

Much controversy has come from Microsoft’s decision to restrict Windows 11 to machines that support TPM 2.0, with the company itself even seeming uncertain about the move.
The upgrade or installation of Windows 11 also fails on other unsupported hardware such as certain older CPUs.
We have already shown you how to check if your PC has a TPM chip. Today, we’ll be teaching you how to install Windows 11 without TPM 2.0 chip or how to install it if your PC has only TPM 1.2 or an unsupported CPU. If you are unsure about the Windows 11 processor requirements, please check the official lists of Intel and AMD CPUs that will work with Windows 11 at the end of this article.
What is a TPM 2.0 Chip?
TPM stands for Trusted Platform Module, which may not mean much to you alone. Essentially, TPM is a security module typically soldered onto the motherboard in the form of a chip. It acts as a cryptographic processor and offers a hardware-based approach to generating hashes and storing cryptographic keys, biometric data, user data, and more.
Rooting the cryptography in hardware makes it all but impossible for attackers to tamper with and access this data, protecting against malware, ransomware, and sophisticated nation-state attacks. While older PCs might use a TPM 1.2 chip, most PCs using TPM usually run with a newer TPM 2.0 chip. There are no other public versions in between.
Is it safe to install Windows 11 without TPM 2.0 Chip?
Despite what Microsoft’s Windows 11 compatibility tool may tell you, installing Windows 11 without TPM is quite simple. All it requires is putting a few registry entries or using a script based tool to activate a Windows 11 TPM 2.0 bypass.
Before you do so, however, you should consider that TPM 2.0 is used to power many of Windows 11’s security features. This includes measured boot, Windows Hello, SecureBIO, WD System Guard, and Device Health Attestation. When you run Windows 11 without a TPM chip, you won’t have access to these features and may be putting your data more at risk as a result.
If possible, then, we recommend that you install a discrete TPM 2.0 module or wait and upgrade your hardware. It’s likely Windows 11 will only rely on TPM more in the future and we can’t guarantee that Microsoft won’t disable this bypass at a later point.
The Windows 11 TPM 2.0 bypass
If you really can’t do the above or just want to take the new OS for a test drive, however, this is how you install Windows 11 on unsupported hardware. You can either tweak the installation routine yourself (methods 1 & 3), use a wrapper-tool for Microsoft´s Media Creation Tool to get an ISO/USB without the Windows 11 TPM-check (method 2) or apply a Windows 11 TPM 2.0 bypass for upgrading a running Windows 10 system to Windows 11 (method 4).
How to install Windows 11 without TPM 2.0 / TPM 1.2
As mentioned, installing Windows 11 without TPM requires a few registry entries. The easiest way to bypass the Windows 11 TPM check this is to try to install Windows 11 via an ISO or the Insider program, then follow the steps below if you get a “This PC can’t run Windows 11” message.
If you see the message “This PC does not meet the system requirement”, minimize the installer, go to registry, edit the entries, then go back to the installer, Press back button once, and continue. If you prefer to do this the easy way you can avoid the standard setup/installation provided by Microsoft and use one of the methods shown after this one.
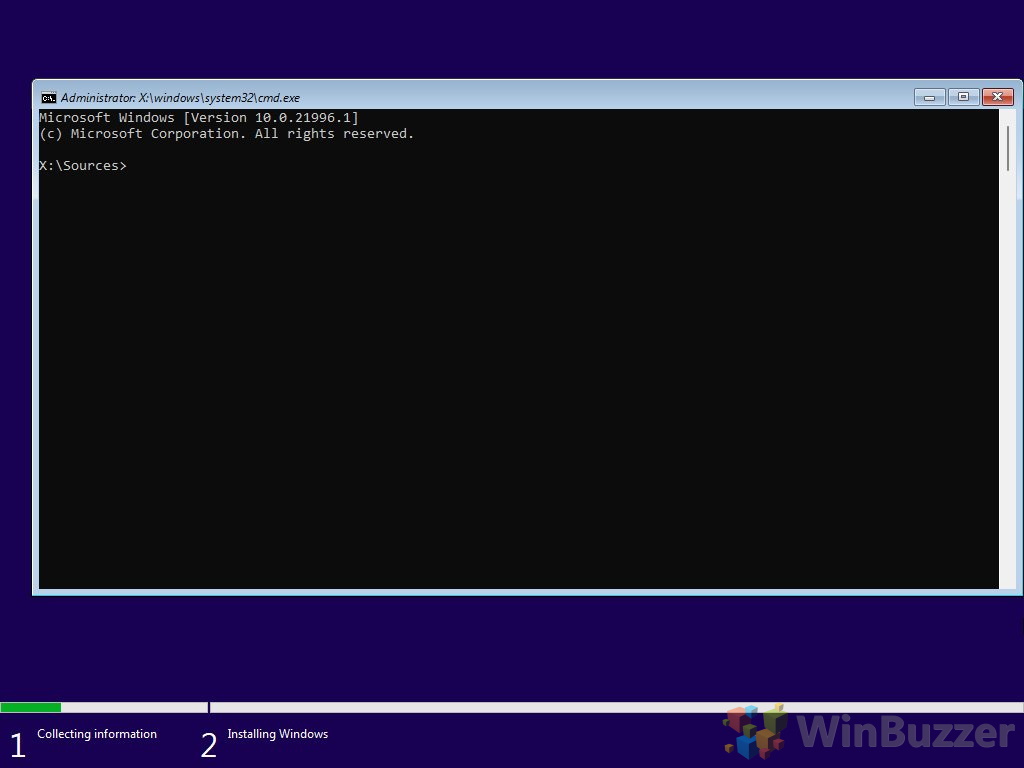
- Press Shift + F10 to open Command Prompt and run the “regedit” command

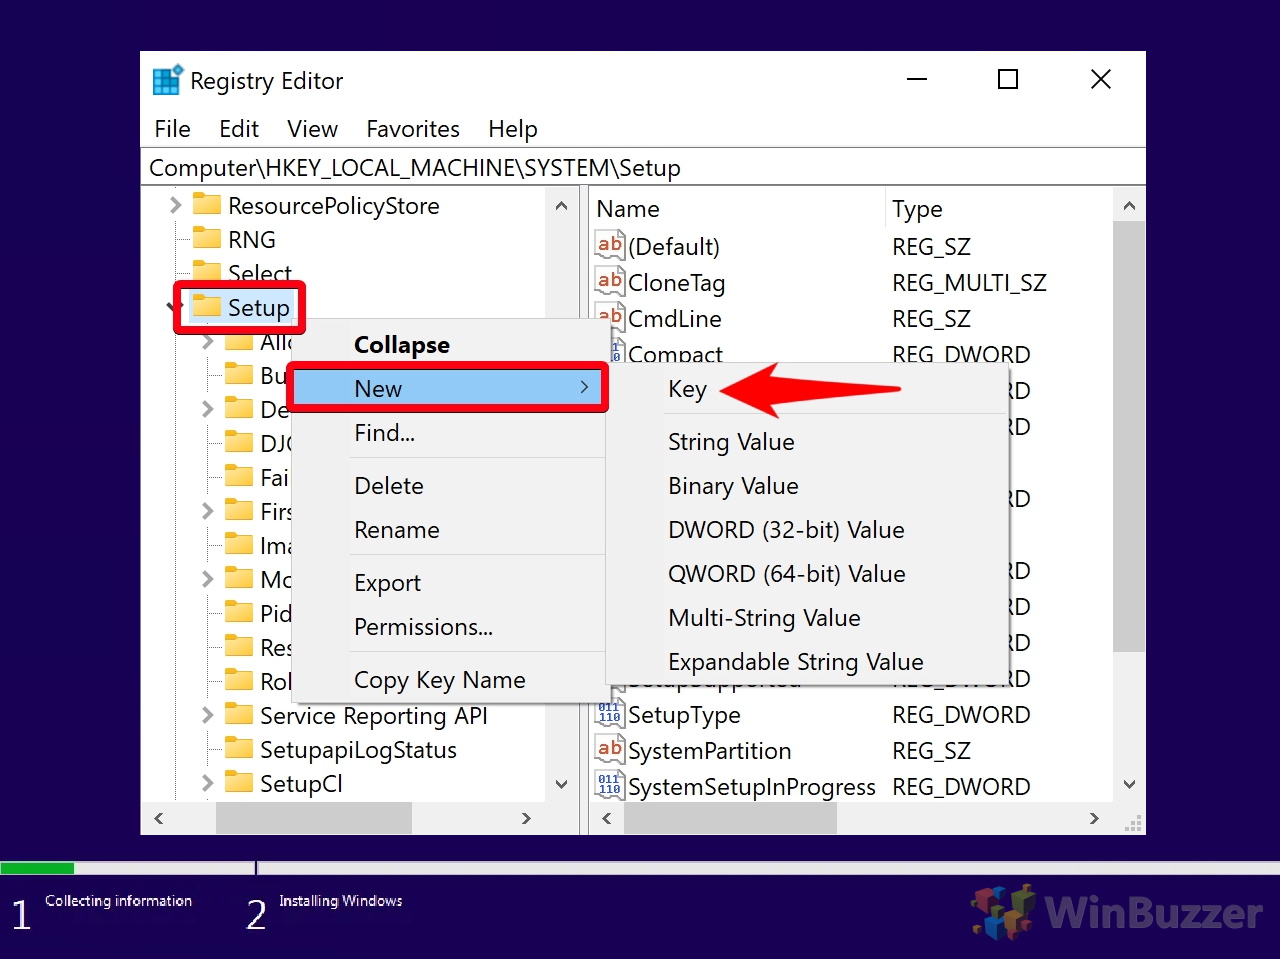
- Add a new key in the “Setup” key
In the Registry Editor, navigate to
Computer\HKEY_LOCAL_MACHINE\SYSTEM\Setup. Right-click on the “Setup” folder in your sidebar and select “New > Key”.
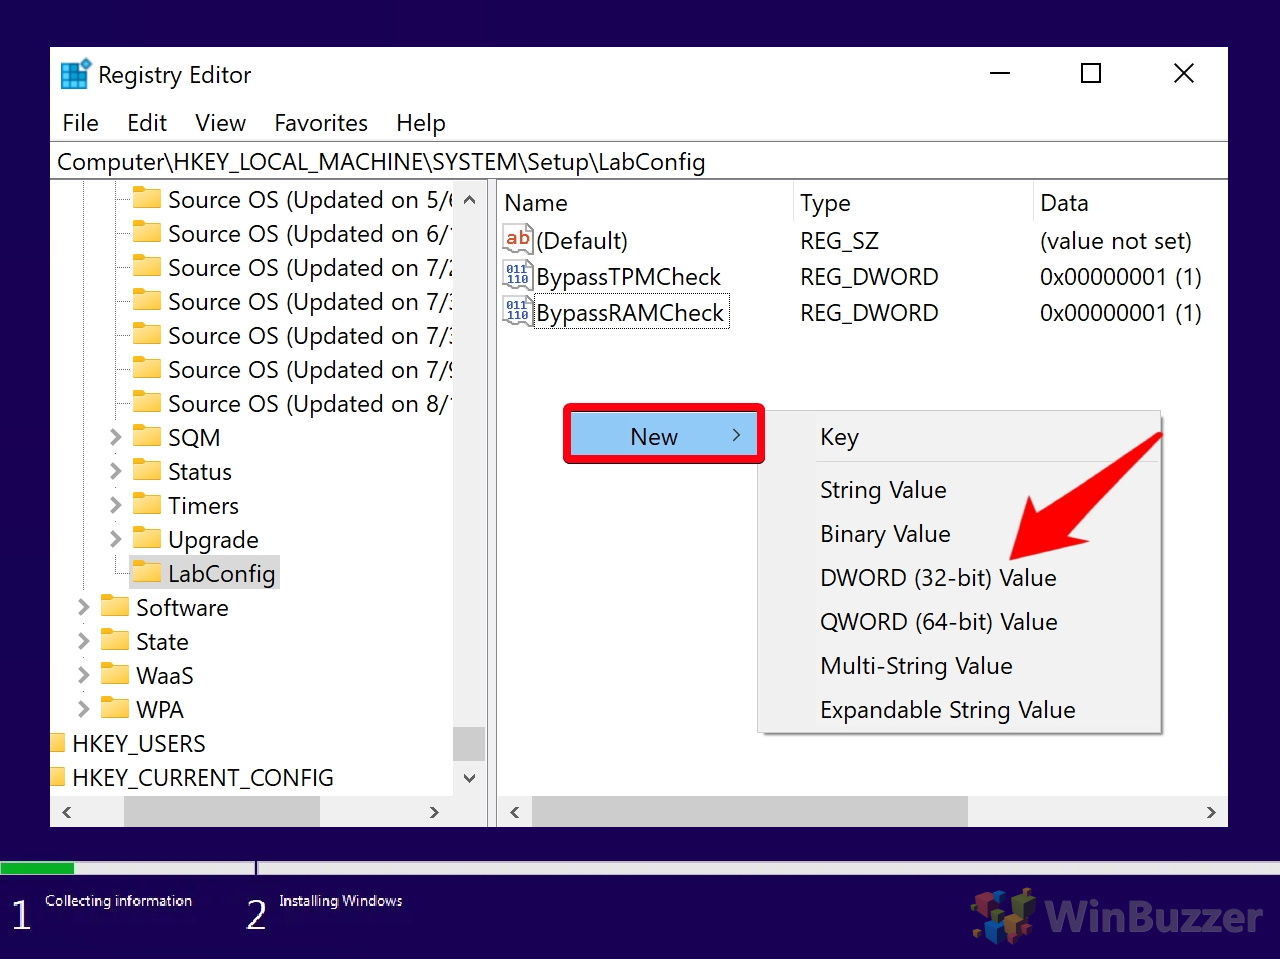
- Name the key “LabConfig” and add a new DWORD
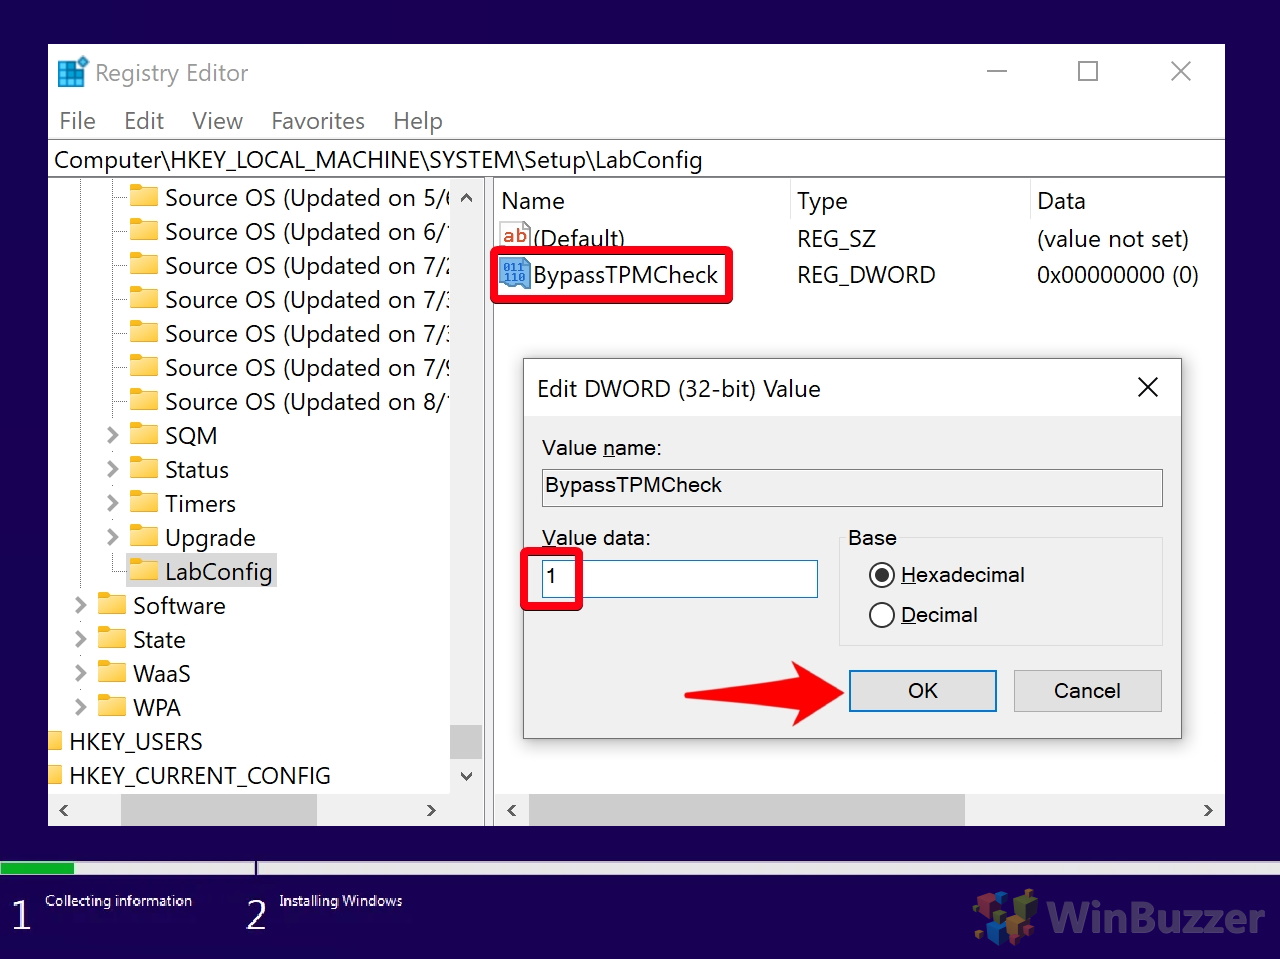
After you name your folder, you can create the DWORD by right-clicking in any blank space in the main pane and selecting “DWORD (32-bit) Value”.

- Name the value “BypassTPMCheck” and set the value data to 1.
It’s important the capitalization and spelling are exactly the same. You can modify the value data by double-clicking your new DWORD and changing the “Value data” text box. Press “OK” when you’re done to save the changes.

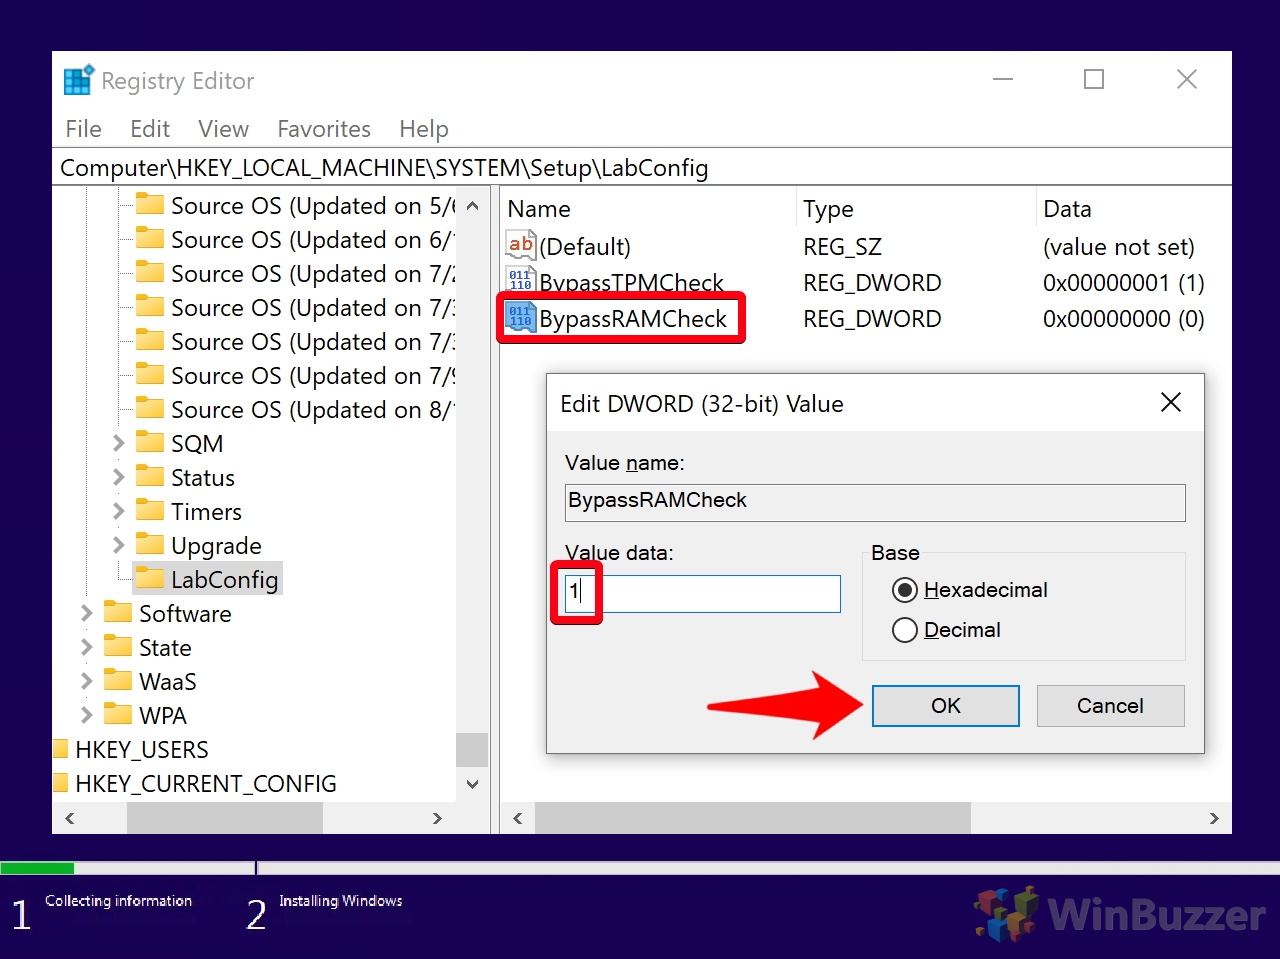
- Create another DWORD called “BypassRAMCheck”
Again, make sure the capitalization and spelling is exactly the same as above.

- Change the value data to 1
Remember, you can access the value data field by double-clicking on the “BypassRAMCheck” key. Press “OK” to apply it.

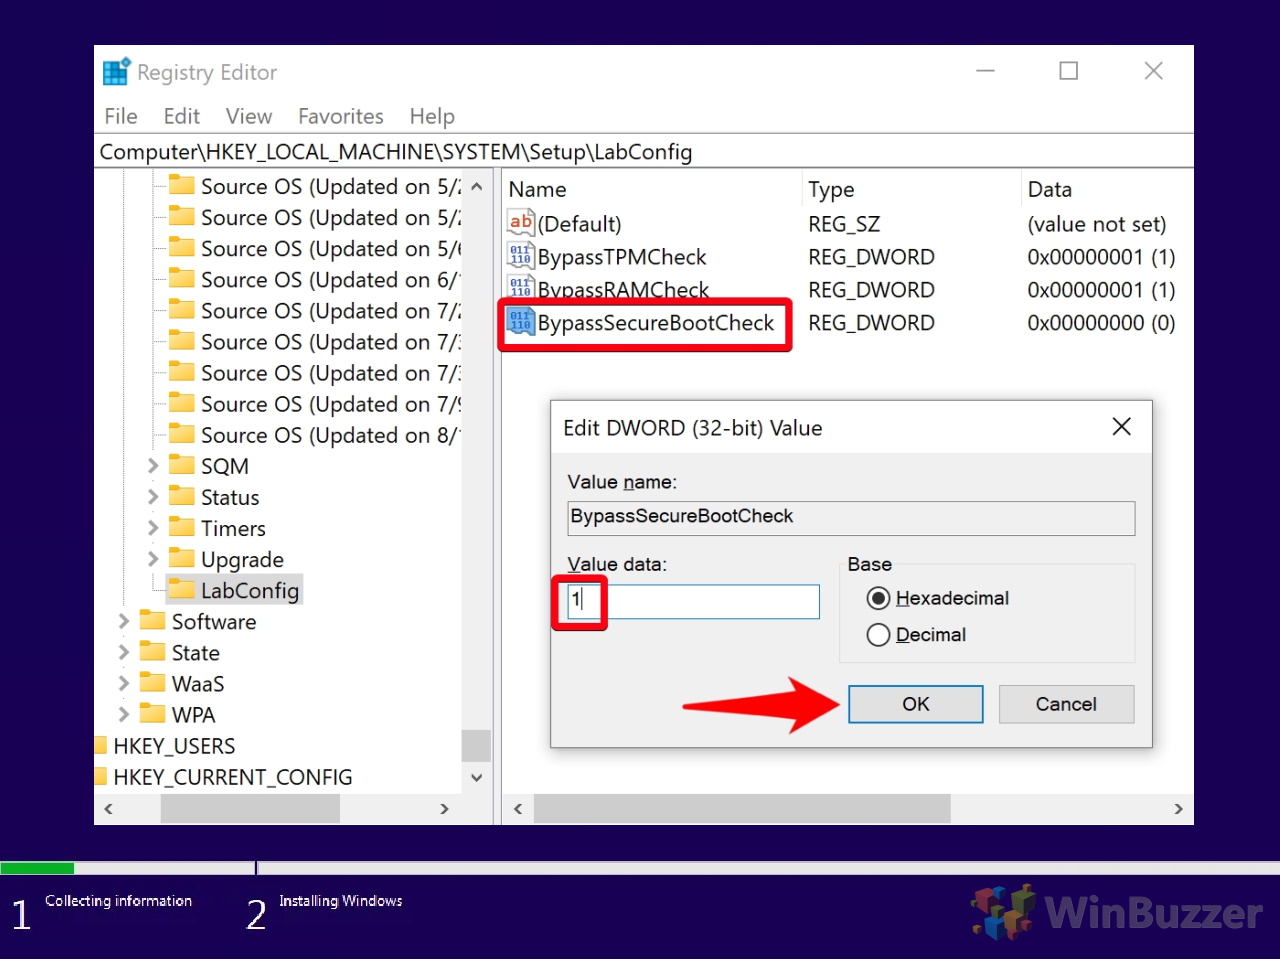
- Create a new DWORD called “BypassSecureBootCheck”

- Change the value data of SecureBootCheck to 1 and press “OK”

- Close the Registry Editor and press the back button on your Windows 11 setup
You’ll find the back button in the top-left corner.

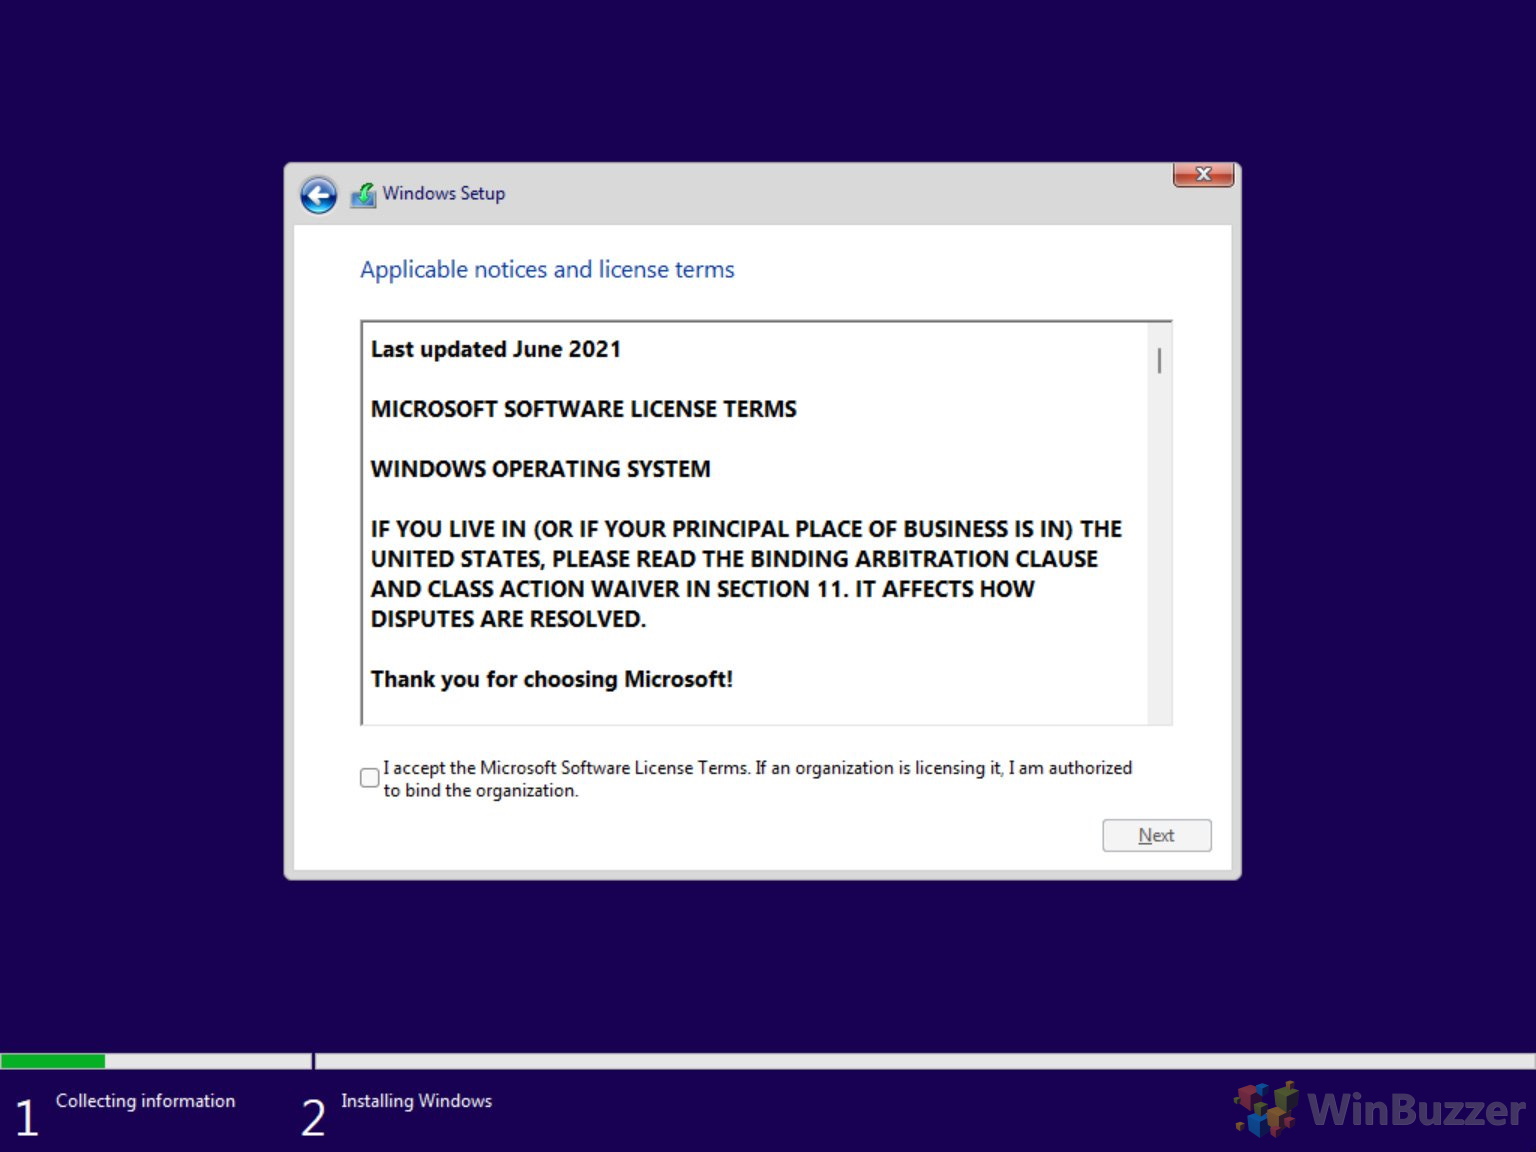
- Install Windows 11 on your unsupported hardware
You can now go through the setup process as normal. Your installer should no longer tell you your PC is incompatible.


How to auto-create a Windows 11-ISO without TPM-check for installation
You can use Microsoft´s Media Creation Tool with the script-based tool Universal MediaCreationTool wrapper (Universal MCT wrapper) to automatically download Windows 11 from Microsoft´s servers and create ISO-files where the TPM check has been removed. If you want to use this ISO to upgrade Windows 10 to Windows 11 dynamically from a running system, you will additionally need to activate the TPM bypass shown in method 4 below.
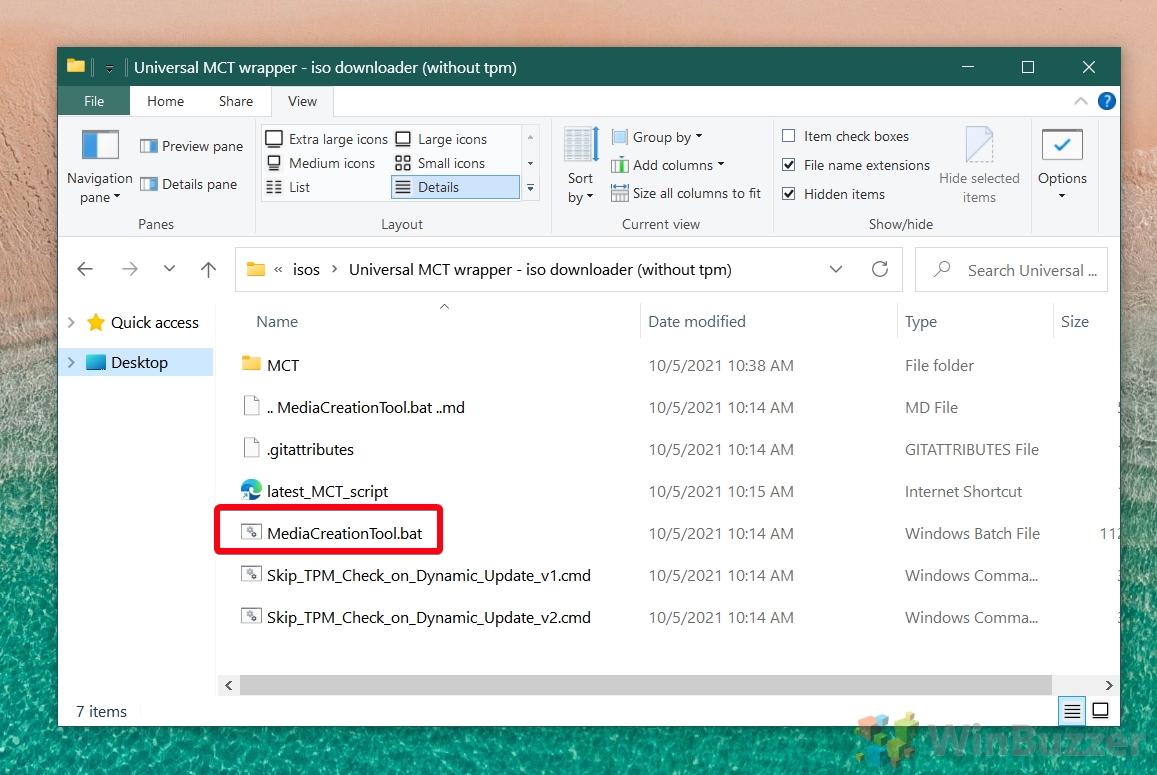
- Download and unzip Universal MCT wrapper
Download Universal MCT wrapper from GitHub, unpack the ZIP-file and run “MediaCreationTool.bat”. If you want to learn more about the project, you find everything here.

- Click on “11” to select “Windows 11”

- Choose “Create ISO” or “Create USB” based on your preference.
“Create USB” will automatically create a bootable USB-stick which can be used for a fresh installation of “Windows 11”.

- Wait until the Media Creation Tool has finished downloading Windows 11
After the download of Windows 11 has been finished, the Media Creation Tool will close automatically and Universal MCT wrapper will create an ISO/USB which allows installing Windows 11 without TPM.
- Wait for Universal MCT wrapper to finish

- Use ISO/USB to install Windows 11 without TPM
The ISO to install Windows 11 without TPM can be found in the main folder of Universal MCT wrapper.

- Install Windows 11 without Trusted Platform Module
You use the ISO/USB to either install Windows 11 without TPM-check on a PC or as a virtual machine with VMware, Virtualbox, or Hyper-V.


How to upgrade to Windows 11 with unsupported CPU / without TPM 1.2
If your PC fails to upgrade to Windows 11 because of an unsupported CPU and/or that your device only has TPM 1.2 instead of TPM 2.0, you can fix that quickly. Just apply the following registry-tweak to add a bypass for unsupported CPU and TPM 1.2.
- Open Regedit

- Navigate to folder and check for existing DWORD
Use the address bar to navigate to “HKEY_LOCAL_MACHINE\SYSTEM\Setup\MoSetup” and check if the DWORD “AllowUpgradesWithUnsupportedTPMOrCPU” is located there. If it is missing, right-click in the right pane, select “New > DWORD (32-bit) Value”, and name the new DWORD “AllowUpgradesWithUnsupportedTPMOrCPU”.

- Edit DWORD “AllowUpgradesWithUnsupportedTPMOrCPU”
Double click on “AllowUpgradesWithUnsupportedTPMOrCPU”, type “1” in “Value data” and save with “OK”.


How to upgrade to Windows 11 without any TPM (TPM 2.0 / TPM 1.2)
If you want to directly upgrade Windows 10 to Windows 11 without a TPM 2.0 chip, you can use the wrapper tool from the previous step to activate a bypass with a simple click. This method is also needed if you run the Windows 11 upgrade from a previously created ISO created with method 2.
- Run the Windows 11 TPM 2.0 bypass
Double-click on “Skip_TPM_Check_on_Dynamic_Update_v2.cmd” as admin to remove the TPM-check for updates. If this does not work, you can try alternatively “Skip_TPM_Check_on_Dynamic_Update_v1.cmd”.

- Wait for confirmation
If you see a PowerShell window popping up with a green bar stating “Skip TPM Check on Dynamic Update [Installed]…” the TPM 2.0 bypass has been activated and you should be able to upgrade from Windows 10 to Windows 11 without TPM 2.0. Running the respective CMD-script again will re-activate the TPM-check.
![Skip TPM Check on Dynamic Update [Installed]](data:image/svg+xml;nitro-empty-id=MTQyMzo0NDk=-1;base64,PHN2ZyB2aWV3Qm94PSIwIDAgMTMyMyA5MzMiIHdpZHRoPSIxMzIzIiBoZWlnaHQ9IjkzMyIgeG1sbnM9Imh0dHA6Ly93d3cudzMub3JnLzIwMDAvc3ZnIj48L3N2Zz4=)

![Skip TPM Check on Dynamic Update [Installed]](https://winbuzzer.com/wp-content/uploads/2021/10/Skip-TPM-Check-on-Dynamic-Update-Installed.jpg)
Windows 11 supported Intel processors
Windows 11 supports intel processors from Intel’s 8th generation or newer which means CPUs from mid-2017 onwards. Here we provide a selection of the most popular consumer-level CPUs. Microsoft has a full list of all supported Intel processors for Windows 11, including chips from the Atom, Celeron, Pentium, Xeon and Core series.
Intel 8th generation (Coffee Lake; Whiskey Lake; Amber Lake)
Desktop
- Core i3-8100
- Core i5-8400
- Core i5-8600
- Core i5-8600K
- Core i7-8700
- Core i7-8700K
- Core i7-8086K
Mobile
- Core m3-8100Y
- Core i5-8200Y
- Core i3-8130U
- Core i3-8145U
- Core i3-8100H
- Core i5-8250U
- Core i5-8250U
- Core i5-8400H
- Core i7-8650U
- Core i7-8665U
- Core i7-8750H
Intel 9th generation (Coffee Lake Refresh)
- Core i3-9100
- Core i5-9400
- Core i5-9600
- Core i5-9600K
- Core i7-9700
- Core i7-9700K
- Core i9-9900
- Core i9-9900K
Intel 10th generation (Comet Lake; Ice Lake; Amber Lake)
Desktop
- Core i3-10100
- Core i5-10400
- Core i5-10600
- Core i5-10600K
- Core i7-10700
- Core i7-10700K
- Core i9-10900
- Core i9-10900K
Mobile
- Core i3-10100Y
- Core i3-10100U
- Core i5-10210U
- Core i5-10200H
- Core i5-10400H
- Core i7-10510U
- Core i7-10710U
- Core i7-10750H
- Core i7-10850H
- Core i9-10980HK
Intel 11th generation (Tiger Lake)
Desktop
- Core i3-11100
- Core i5-11400
- Core i5-11600
- Core i5-11600K
- Core i7-11700
- Core i7-11700K
- Core i9-11900
- Core i9-11900K
Mobile
- Core i3-1115G4
- Core i5-1135G7
- Core i5-11300H
- Core i7-1165G7
- Core i7-1185G7
- Core i7-11375H
Windows 11 supported AMD processors
For AMD, Windows 11 CPU compatibility goes back to processors released in 2018 or later. This includes 2nd generation Ryzen (Zen+) chips and above. Microsoft also has a full AMD list, including chips from AMDs Athlon, EPYC, Ryzen and Ryzen Threadripper series. Below is a list of the more common consumer-level CPUs. Unfortunately CPU like the 3300X, 3700, 4600HS and 5900H are missing, even though all are all very recent.
AMD Ryzen 2000 series (Zen+; Zen)
Desktop
- Ryzen 3 2300X
- Ryzen 5 2600
- Ryzen 7 2700
- Ryzen 7 2700X
- Ryzen Threadripper 2920X
- Ryzen Threadripper 2950X
- Ryzen Threadripper 2970WX
- Ryzen Threadripper 2990X
AMD Ryzen 3000 series (Zen 2; Zen+)
Desktop
- Ryzen 3 3100
- Ryzen 5 3600
- Ryzen 7 3700X
- Ryzen 9 3900
- Ryzen 9 3900X
- Ryzen 9 3950X
- Ryzen Threadripper 3960X
- Ryzen Threadripper 3970X
- Ryzen Threadripper 3990X
- Ryzen Threadripper 3995WX
- Ryzen 3 3200G**
- Ryzen 5 3400G**
- Ryzen 3 3300U
- Ryzen 5 3500U
- Ryzen 5 3550H
- Ryzen 7 3700U
- Ryzen 7 3750H
AMD Ryzen 4000 series (Zen 2)
Desktop
- Ryzen 3 4300G
- Ryzen 5 4600G
- Ryzen 7 4700G
Mobile
- Ryzen 3 4300U
- Ryzen 5 4500U
- Ryzen 5 4600H
- Ryzen 7 4700U
- Ryzen 7 4800HS
- Ryzen 7 4800H
- Ryzen 9 4900HS
- Ryzen 9 4900H
AMD Ryzen 5000 series (Zen 3)
Desktop
- Ryzen 5 5600X
- Ryzen 7 5800X
- Ryzen 9 5900X
- Ryzen 9 5950X
Mobile
- Ryzen 3 5400U
- Ryzen 5 5600U
- Ryzen 5 5600HS
- Ryzen 5 5600H
- Ryzen 7 5800U
- Ryzen 7 5800HS
- Ryzen 7 5800H
- Ryzen 9 5900HS
- Ryzen 9 5900HX
- Ryzen 9 5980HS
- Ryzen 9 5980HX
That’s it for this Windows 11 tutorial. Now that you have it installed, you may want to check out all the major features coming to the OS, including focus sessions and the new snipping tool.
If you decide it’s not for you, you may instead want to check out our tutorial on how to roll back a Windows update. Technically, it’s for Windows 10, but as you’ll notice not much has changed between versions, so the process is more or less the same.
Last Updated on February 16, 2022 12:13 pm CET by Markus Kasanmascheff


