

The Windows key on your keyboard can be a useful shortcut for accessing various features and functions of Windows 11 / Windows10. However, it can also be a source of annoyance or frustration for some users, especially when gaming or working on important tasks. In this guide, we will show you how to disable the Windows key and provide some hints what you can do if the Windows key is not working
Why You Might Want to Disable the Windows Key
The Windows key can accidentally interrupt your game or application. If you press the Windows key by mistake while playing a game or using a full-screen application, it will minimize your window and bring up the Start menu. This can disrupt your immersion, performance, or productivity. Some games may also not resume properly after being minimized. To avoid this, you can disable the Windows key temporarily using a software tool like SharpKeys to remap it or by editing the registry. Alternatively, you can physically remove the Windows key from your keyboard or cover it with tape.
The Windows key also can get stuck due to software or hardware issues. Sometimes, the Windows key may not register properly when you press it or release it. This can cause unwanted actions like opening multiple windows, launching Cortana, switching desktops, etc. This can happen due to a faulty keyboard driver, a virus infection, a sticky key feature, or physical jamming of the key. To fix this, you can try updating your keyboard driver, scanning your system for malware, disabling sticky keys, or cleaning your keyboard with compressed air.
The Windows key may not work at all due to software or hardware issues. Sometimes, the Windows key may stop functioning altogether and prevent you from accessing shortcuts like Win + R (Run), Win + E (Explorer), Win + L (Lock), etc. This can happen due to a corrupted system file, a disabled group policy setting, an incompatible keyboard layout, or damaged keyboard circuitry. To fix this, you can try running a system file checker scan, enabling the WinKey feature in the group policy editor, switching to another keyboard layout, or replacing your keyboard.
⚠️ Please note: The process described below is the same in Windows 11 as it is in Windows 10. However, bear in mind that we’ll be using screenshots from Windows 11, so your UI may look a little different. We’ll point out any changes you need to be aware of as they come up.
How to Disable Windows-Key Triggered Hotkeys with Gpedit
If you are using the Pro, Enterprise, or Education edition of Windows 11/Windows 10, you can disable hotkeys triggered by the Windows key via Group Policy. On the Home edition, you will have to use the other methods shown below. Alternatively, you might want to consider installing a group policy editor so you can also use this option there.
- Open the Group Policy Editor (gpedit)

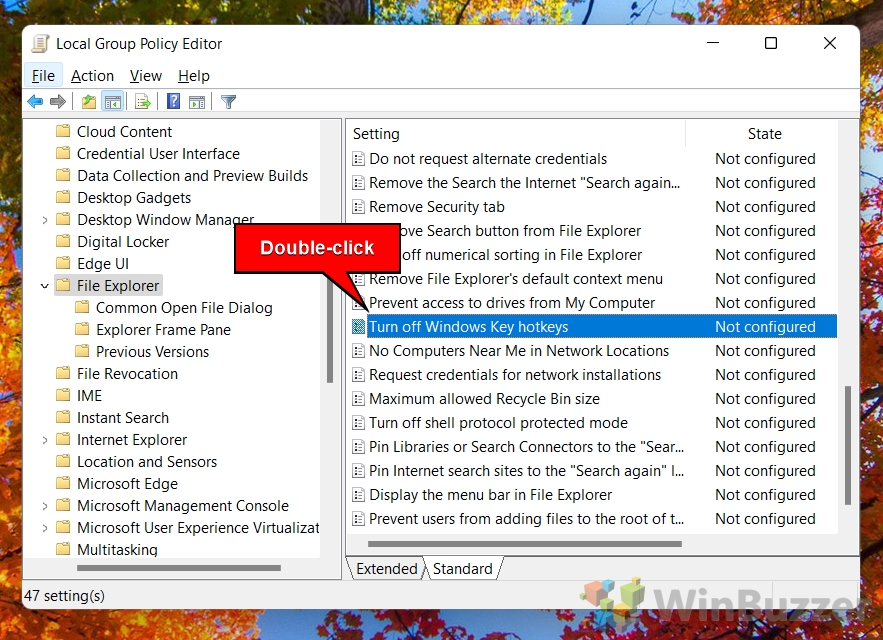
- Find and open the “Turn off Windows Key hotkeys” group policy
In the left pane, navigate to “User Configuration > Administrative Templates > Windows Components > File Explorer”. In the right pane, look for the setting named “Turn off Windows Key hotkeys” and double-click on it.
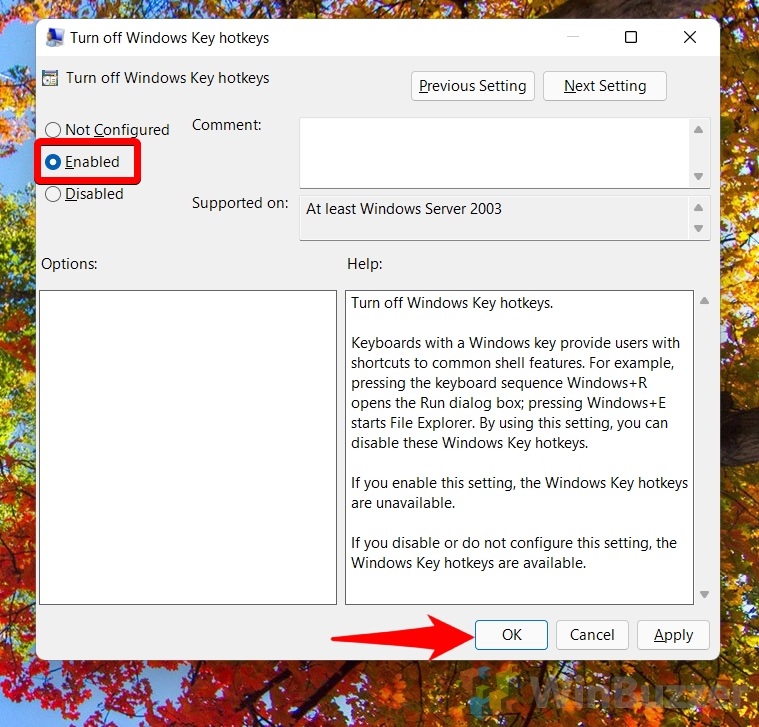
- Enable the group policy and save with “OK”
How to Disable the Windows Key Completely with Regedit
Using a registry edit, you can turn off the Windows key completely, so it won´t interfere with your games or other applications when you accidentally hit it.
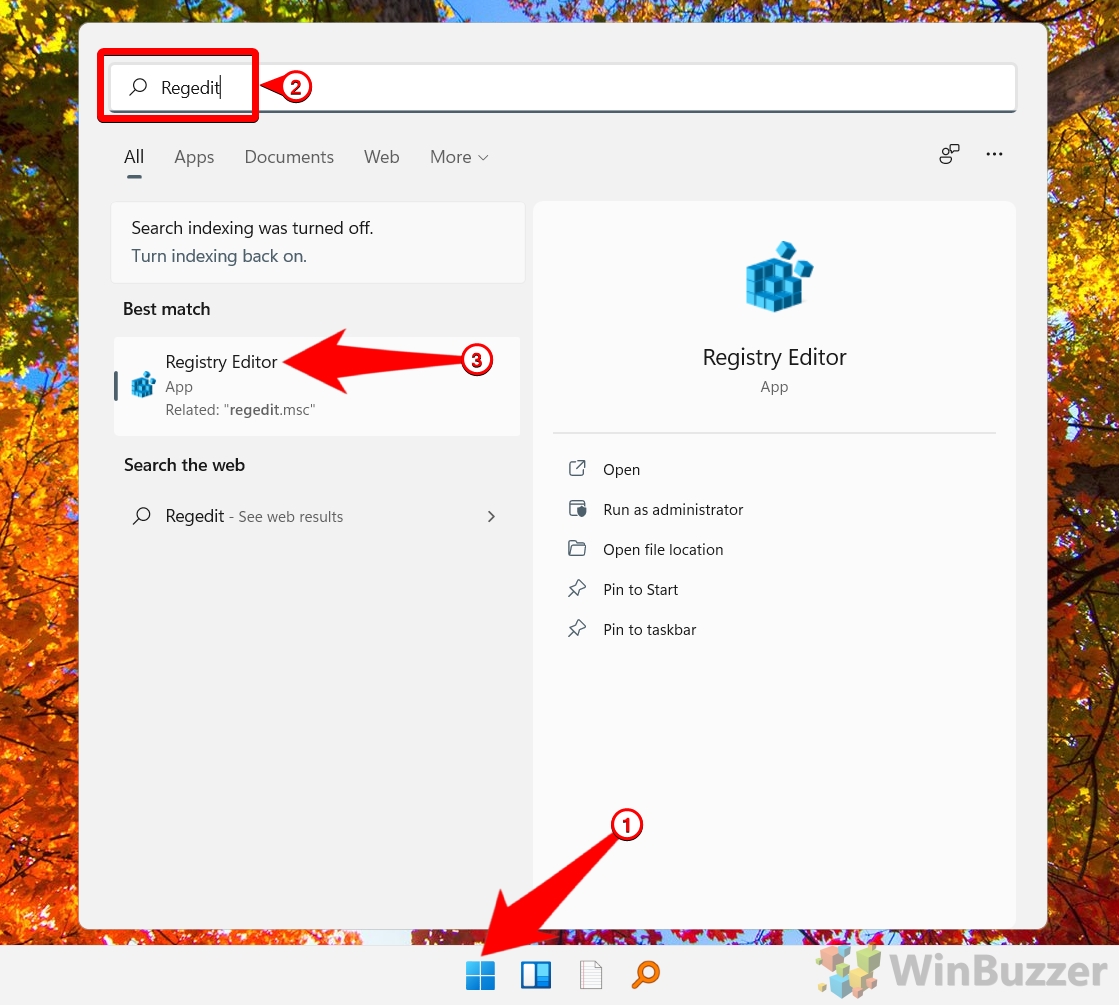
- Open the Registry Editor (regedit)
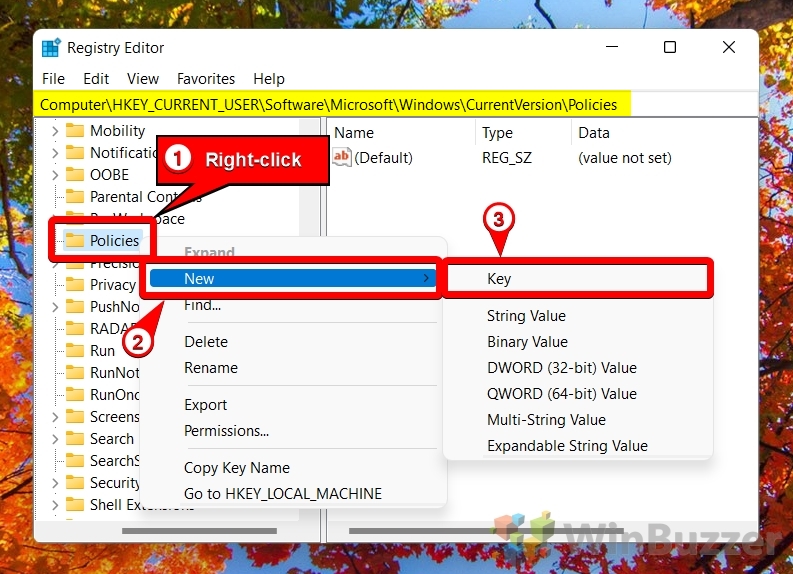
- Create a new KEY
Navigate to:
Computer\HKEY_C'URRENT_USER\Software\Microsoft\Windows\CurrentVersion\Policies
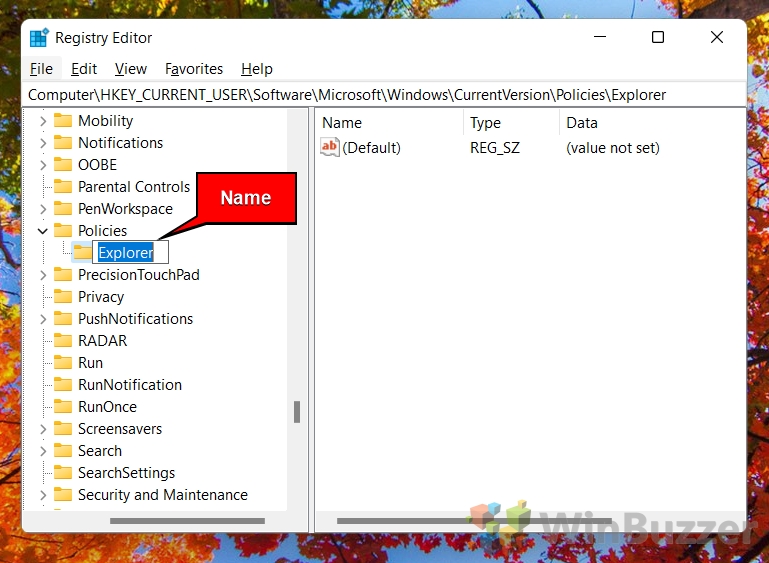
Right-click on “Policies” and select “New – Key”.
- Name the Key “Explorer”
- Create a DWORD
Right-click on the right side and select “New – DWORD (32-bit) Value”.
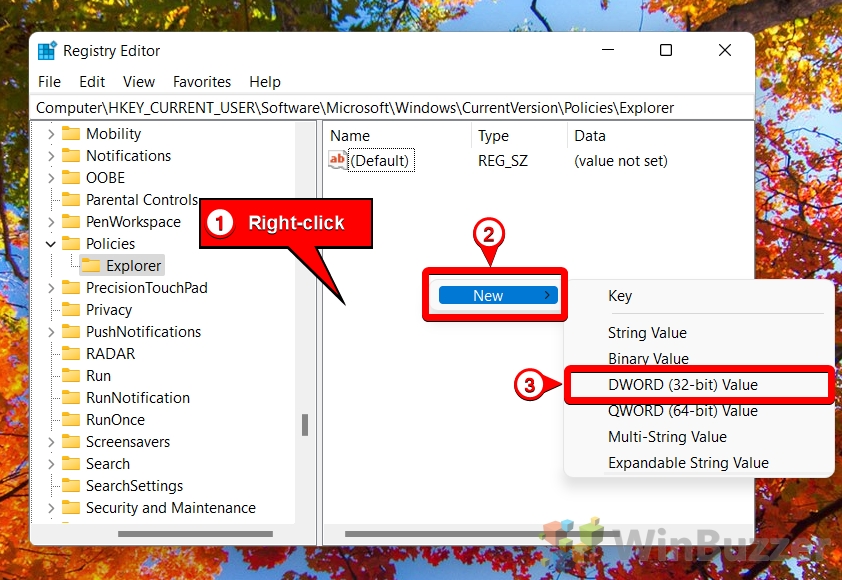
- Name the DWORD “NoWinKeys”

- Activate the DWORD “NoWinKeys”
Double-click on “NoWinKeys”, put “1” in “Value data” and save with “OK”.

How to Disable Individual Windows-Key Triggered Hotkeys with Regedit
With Regedit you can also just disable some hotkeys triggered by the Windows key.
Note: This method only works for some Explorer-related hotkeys such as Win+E (open File Explorer), Win+M (minimize all windows), Win+Z (open Game Bar), etc. It does not work for other system-wide hotkeys such as Win+L (lock screen), Win+R (run command), etc.
- Open the Registry Editor (Regedit)

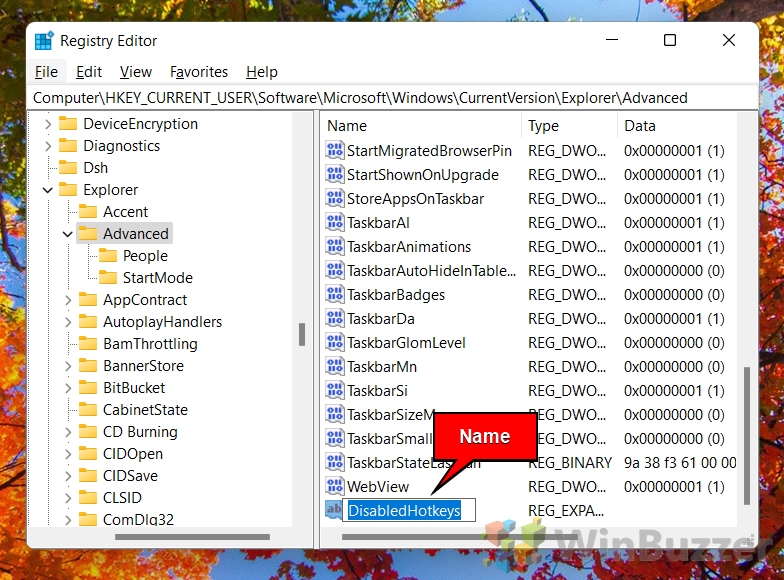
- Navigate to the following key using the left pane and create an “Expandable String Value”
Navigate to
HKEY_CURRENT_USER\Software\Microsoft\Windows\CurrentVersion\Explorer\Advanced
Right-click on “Advanced” and select “New – Expandable String Value” from the context menu.

- Name it “DisabledHotkeys”
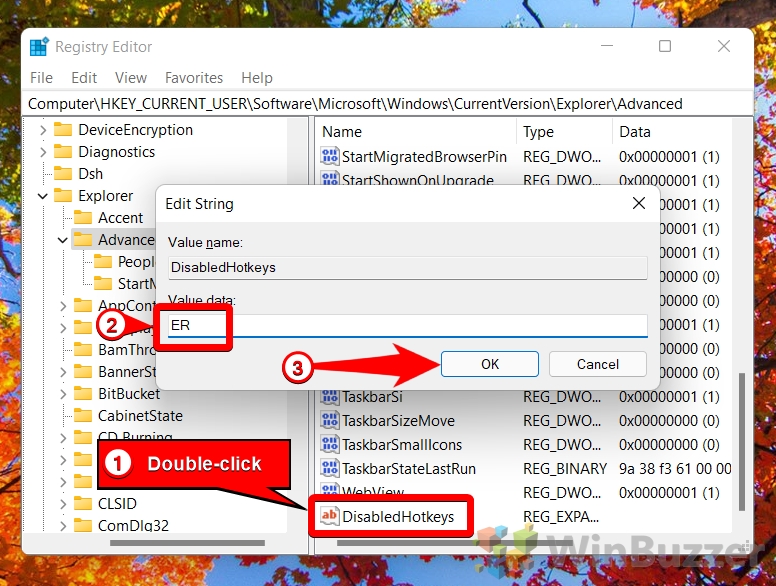
- Define hotkey combinations to deactivate
Double-click on “DisabledHotkeys” and enter all characters of hotkeys that you want to disable, separated by commas. For example, if you want to disable Win+E, Win+M and Win+Z, enter E,M,Z in the “Value data” field.
FAQ – Frequently Asked Questions About the Windows Key
How do I re-enable the Windows key if I change my mind?
To re-enable the Windows key, reverse the changes: if you used the registry, delete the modifications or set the DWORD value to “0“; if you used Group Policy, set the policy to “Not Configured.”
Why might the Windows key not work, and how can I troubleshoot it?
The Windows key may not work due to software issues, hardware problems, or settings like “Sticky Keys“. Troubleshooting steps include checking keyboard settings, updating drivers, or ensuring it’s not disabled through the methods in the tutorial.
Can I disable the Windows key in specific applications only, like games?
Disabling the Windows key for specific applications isn’t directly covered in the tutorial. Some games and applications have built-in settings to disable the Windows key during use, or you can use third-party software to achieve this.
What is the Windows lock key on the keyboard, and how does it work?
Some keyboards come with a Windows lock key that, when pressed, disables the Windows key function to prevent accidental interruptions during gaming or other full-screen activities.
Can I temporarily disable my keyboard, including the Windows key?
Temporarily disabling your entire keyboard, including the Windows key, requires third-party software. The tutorial focuses specifically on disabling the Windows key. We have a separate guide about how to unlock a keyboard that won´t type, if you are struggling with a keyboard that is not working. There we also explain how to lock a keyboard.
What should I do if disabling the Windows key doesn’t work?
If disabling the Windows key doesn’t work, ensure you’ve followed the steps correctly, restart your computer, and verify the changes. If it still doesn’t work, try a different method or check for software conflicts.
How do I lock or unlock the Windows key using software?
Software tools like SharpKeys allow you to remap or disable the Windows key. To lock or unlock, use the software to toggle the key’s function on or off.
How do I disable the Windows key for all users on a computer?
To disable the Windows key for all users using the Registry Editor, you can create or modify the relevant entry under the HKEY_LOCAL_MACHINE branch, which applies changes system-wide.
Can I disable the Windows key without admin rights?
Disabling the Windows key without admin rights is challenging since registry edits and Group Policy changes typically require administrator privileges. Consider using a software tool that doesn’t require admin rights or consulting your system administrator.
Is there a keyboard shortcut to quickly disable or enable the Windows key?
There is no built-in keyboard shortcut in Windows to disable or enable the Windows key. You would need to use one of the methods described in the tutorial or a third-party tool with this functionality.
Can disabling the Windows key affect system performance or other keyboard shortcuts?
Disabling the Windows key should not affect system performance or other keyboard shortcuts, except for those that specifically use the Windows key as part of the shortcut.
Is it possible to disable only the right or left Windows key?
Some third-party keyboard customization software may offer the ability to disable just one, such as SharpKeys and AutoHotkey.
What are the risks of editing the registry to disable the Windows key?
Editing the registry can be risky if not done carefully. Incorrect changes can lead to system instability or malfunctions. Always back up the registry before making changes.
Can I use Group Policy to disable specific Windows key shortcuts instead of all of them?
The Group Policy method shown in the tutorial disables all Windows key hotkeys. To disable specific shortcuts, you might need to use the registry method or third-party software.
After disabling the Windows key, how can I access Windows shortcuts like Win + E or Win + R?
After disabling the Windows key, you’ll need to use alternative methods to perform these actions, such as accessing them through the Start menu or creating custom shortcuts that don’t involve the Windows key.
Related: How to Enable or Disable the Touchpad on Windows 11
The touchpad, also known as a trackpad, is a pivotal element in laptop design, offering a touch-sensitive interface to control the cursor with finger swipes and gestures. Users often find the need to disable the touchpad, especially when it hinders their workflow, such as accidental cursor movements while typing. In our other guide we show you how to enable or disable the touchpad on Windows 11 using various methods.

Related: How to Remap Keys on Windows 11
Most of us are used to the classic qwerty or azerty layout on our keyboards, but that doesn’t mean they’re perfect. Default keyboard layouts are meant to apply to a broad range of people, not cater to individual needs. As a result, you may be wondering how to remap keys in Windows 11, which we show you in detail in our other guide.
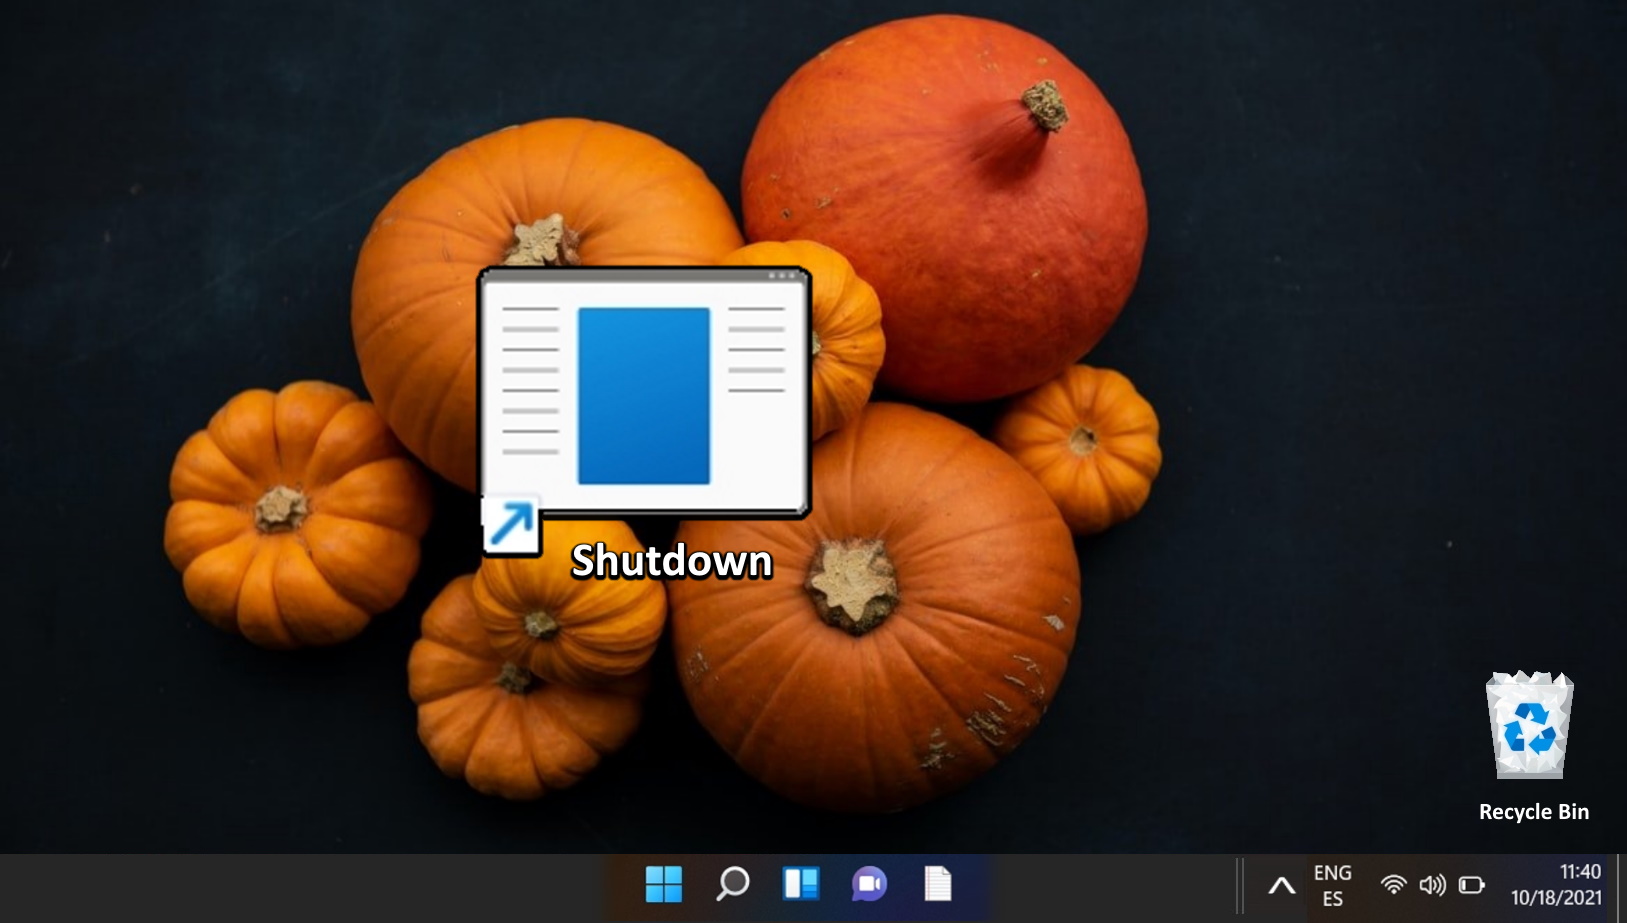
Related: How to Create a Windows 11 Shutdown Shortcut (or Sleep, Hibernate, Lock)
It typically takes just a few clicks to activate sleep mode in Windows 11, but why wait? In our other tutorial we show you how to create a Windows 11 shutdown shortcut that can do it in a double-click instead, which you can use from the desktop or pinned to the taskbar.
Related: How to Turn on or off Sticky Keys in Windows
Maybe you’re repeatedly running in a game or just trying to get your Shift key to work. You hear a bleep and the dreaded “Do you want to turn on Sticky keys?” dialog interrupts what you’re doing. If you run into this issue frequently, it may be time to turn off Sticky Keys in Windows 11/Windows 10.

Last Updated on April 21, 2024 11:14 am CEST by Markus Kasanmascheff


