Microsoft provides all kinds of customization options via Windows Settings, but more advanced changes to your system can be made in the Local Group Policy Editor, also known as gpedit. The only problem is that gpedit isn’t the most intuitive app in the world. Mistakes are made and sometimes you need to reset a group policy in Windows 11 or Windows 10.
Generally, there are two methods to reset Windows group policies. One involves manually changing each via the usual editor, and the other lets you reset every group policy in one go via the command line.
It’s usually best to start with the first – disabling the most recent or potentially problematic policies. If that has no effect, you can clear them all with a command or switch each off in the policy editor. We’re going to show you how to do both in this tutorial.
⚠️ Please note: The process described below is the same in Windows 11 as it is in Windows 10. However, bear in mind that we’ll be using screenshots from Windows 10, so your UI may look a little different. We’ll point out any changes you need to be aware of as they come up.
How to Reset Group Policy Settings Using the Local Group Policy Editor
Windows Group Policies have three states: Enabled, Disabled, and Not configured. It’s the “Not configured” option that follows your system’s default state, and as a result, this is the best pick if you want to get your PC back to normal functioning.
If you have a lot of group policies enabled or disabled, we do recommend using the command below instead. Manually changing many of them will be time-consuming.
- Open the Local Group Policy Editor
Press the “Start” or “Search” button and type “gpedit.msc“. Click the top result to launch the Group Policy Editor. This is your gateway to modifying group policy settings.

- Sort by Enabled Group Policies
Navigate to"Computer Configuration > Administrative Templates > All Settings"and click on the “State” column to sort the policies. This will help you quickly identify and access any policies you have previously modified to an “Enabled” state. After clicking, you’ll see that each local group policy with the “Enabled” state will appear at the top of your list. Double-click one of them to open its settings.

- Change Enabled Policy to ‘Not Configured’
In the policy settings window, select the “Not Configured” option, then click “Apply” and “OK“. This resets the selected group policy to its default state, effectively undoing any customizations you’ve made.

- Reset a Disabled Local Group Policy Setting
If you’ve disabled certain policies and wish to reset them, sort the policies by the “State” column again to find the disabled ones. Double-click a policy to open it.

- Revert the Policy to ‘Not Configured’
Within the policy settings, choose the “Not Configured” option and confirm the changes by clicking “Apply” and “OK“. Repeat this process for any other policies you wish to reset, ensuring your system reverts to its default configuration.

How to Reset All Group Policy Settings via Command Line (CMD)
- Open Command Prompt as Administrator
Press the “Start” button, type “Command Prompt“, and select “Run as administrator” to open an elevated Command Prompt window. This step is crucial for executing the commands with the necessary permissions.

- Enter the Reset Group Policy Command
Type the commandRD /S /Q "%WinDir%\System32\GroupPolicyUsers" && RD /S /Q "%WinDir%\System32\GroupPolicy"and press Enter. This command removes all policy settings, effectively resetting them to their default states.

- Update Your Local Group Policy Settings
To ensure the changes take effect immediately, typegpupdate /forceand press Enter. This command updates your group policy settings, applying the reset across your system. You should see a confirmation message indicating the update was successful.

FAQ – Frequently Asked Questions About Group Policy (Gpedit)
What should I do if resetting group policy settings does not resolve my issue?
If resetting the group policy settings doesn’t solve your problem, it’s possible the issue is not related to group policies. Consider other troubleshooting steps such as checking for conflicting software, scanning your system for malware, ensuring your system has the latest Windows updates installed, and performing a system restore to revert your system to a previous, stable state. These steps can help isolate the problem further and possibly uncover a resolution.
Can resetting group policy settings impact system performance?
Resetting group policy settings to their default states generally improves system performance, especially if the reset resolves misconfigurations or conflicting policies that may have been causing issues. However, resetting does not inherently speed up your computer; performance improvements would specifically result from eliminating problematic configurations. After a reset, monitoring system performance can help assess the impact and guide any further optimization steps.
How long does it take for group policy changes to take effect?
Group policy changes made through the Local Group Policy Editor typically take effect immediately after applying the changes or issuing the gpupdate /force command. Nonetheless, policies that influence user sign-in processes or require system services to restart, such as those related to startup scripts or security settings, may necessitate a system reboot to effect changes. If changes don’t seem to apply, verify by rebooting your computer and rechecking the policy settings.
How can I back up my group policy settings before resetting them?
To back up your group policy settings, especially if you’ve tailored many configurations, you can use PowerShell scripts or the Group Policy Management Console (GPMC) where available. For individual settings, note them down or take screenshots. For broader backups, GPMC allows for backing up entire Group Policy Objects (GPOs), which is useful for administrators managing multiple policies. These backups can be restored if needed, ensuring a safety net before making significant alterations or resets.
Are there any risks involved in using the command line method to reset group policies?
Using the command line to reset group policies carries minimal risk when commands are entered correctly and with understanding their function. Nevertheless, incorrect commands or typos can lead to unintended changes or deletion of critical system directories. It’s essential to double-check commands before executing them and to use administrative credentials judiciously. For those unsure, practicing on a non-critical system or virtual machine can help build confidence.
Can resetting group policy settings correct problems with Windows Updates?
Yes, resetting group policy settings can often resolve issues related to Windows Updates, particularly if prior configurations inadvertently interfered with the update process. After resetting, recheck for updates through the Windows Update settings page. If issues persist, consider troubleshooting with the Windows Update Troubleshooter and ensuring that your device’s date and time are correctly set, as these can also affect update availability and installation.
What happens to custom policy settings when I reset group policies?
When you reset group policies, all custom settings are removed, and policies revert to their default state, typically “Not Configured“. This action means that any specific restrictions, configurations, or customizations previously in place will be lost. To restore your desired settings, you will need to manually configure each policy again, using references or notes you have kept. It’s advisable to document custom settings before resetting to facilitate easier reconfiguration.
Can I reset group policy settings for a specific user profile only?
Yes, it’s possible to reset group policy settings specifically for a single user profile by focusing on the “User Configuration” policies within the Local Group Policy Editor. This section allows you to adjust policies applied at the user level. Remember that changes made here won’t affect “Computer Configuration” policies, which apply system-wide. For targeted resets, navigate to the specific “User Configuration” policy, revert it to “Not Configured“, and apply the change.
Can resetting group policy settings affect installed software or applications?
While resetting group policy settings mainly affects how Windows operates and user configurations, it can indirectly influence software or applications, especially those reliant on specific policies for functionality or access permissions. For instance, resetting policies related to software restriction or execution might allow previously blocked applications to run or vice versa. It’s crucial to review and potentially reconfigure policies that directly manage software behavior post-reset.
Will resetting group policy settings remove installed Windows features or programs?
Resetting group policy settings to their default configurations does not uninstall or directly modify installed software, Windows features, or programs. Instead, it affects the policies regulating system and user behavior, including access controls, user interfaces, and operational settings. To manage program features or Windows components, you would need to use the appropriate Windows settings or control panels directly.
How can I disable or enable specific Windows features using group policy settings?
To disable or enable specific Windows features through group policy settings, navigate to the “Computer Configuration > Administrative Templates > Windows Components” section within the Local Group Policy Editor. This area contains policies for managing various components and features of the Windows operating system. By enabling or disabling these policies, you can control the availability and behavior of features such as Windows Defender, Windows Update, and much more. Always review the policy description to understand its impact before applying changes.
Is it possible to restrict access to Control Panel and PC settings using group policy?
Yes, you can restrict access to the Control Panel and PC settings by navigating to “User Configuration > Administrative Templates > Control Panel” in the Local Group Policy Editor. Here, enabling the “Prohibit access to Control Panel and PC settings” policy prevents users from accessing these settings. This can be useful in managed environments where limiting user configurations is necessary to maintain system integrity or compliance with organizational policies.
How do I manage user rights and permissions through group policy settings?
To manage user rights and permissions, access the “Computer Configuration > Windows Settings > Security Settings > Local Policies > User Rights Assignment” section in the Local Group Policy Editor. This area allows administrators to define which users or groups have permissions to perform specific tasks on the system, such as logging on as a service, backing up files and directories, or shutting down the system. Each policy lists the rights it governs, enabling granular control over user activities and system access.
Can group policy settings manage network and internet settings?
Group policy settings provide a robust framework for managing network configurations and internet settings. By navigating to “Computer Configuration > Administrative Templates > Network” within the Local Group Policy Editor, you can access policies that control network connections, bandwidth management, Wi-Fi settings, and more. These policies enable administrators to enforce consistent network behavior across all system users, enhancing security and optimizing network resource usage.
How can I ensure my group policy settings are consistently enforced on all user accounts?
To enforce group policy settings consistently across all user accounts, configure the desired policies under the “Computer Configuration” section for system-wide application and use the “User Configuration” section for policies that should apply to individual user accounts. Utilizing the “gpupdate /force” command helps apply and refresh policy settings immediately. In environments with multiple users or computers, consider using Active Directory Group Policy Objects (GPOs) for centralized management and consistent enforcement of policies across the network.
Related: How to Download and Use the Group Policy Editor (gpedit.msc) in Windows 11 Home or Windows 10 Home
If you’ve been following a tutorial only to receive the message “gpedit.msc not found”, it’s because there is no group policy editor on your Windows version. Microsoft instead reserved it for “Pro” variants of its OS. In our other guide, we show you how to install and open gpedit.msc (or something like it) on Windows 11 Home, Windows 10 Home, by making use of third-party tool PolicyPlus.

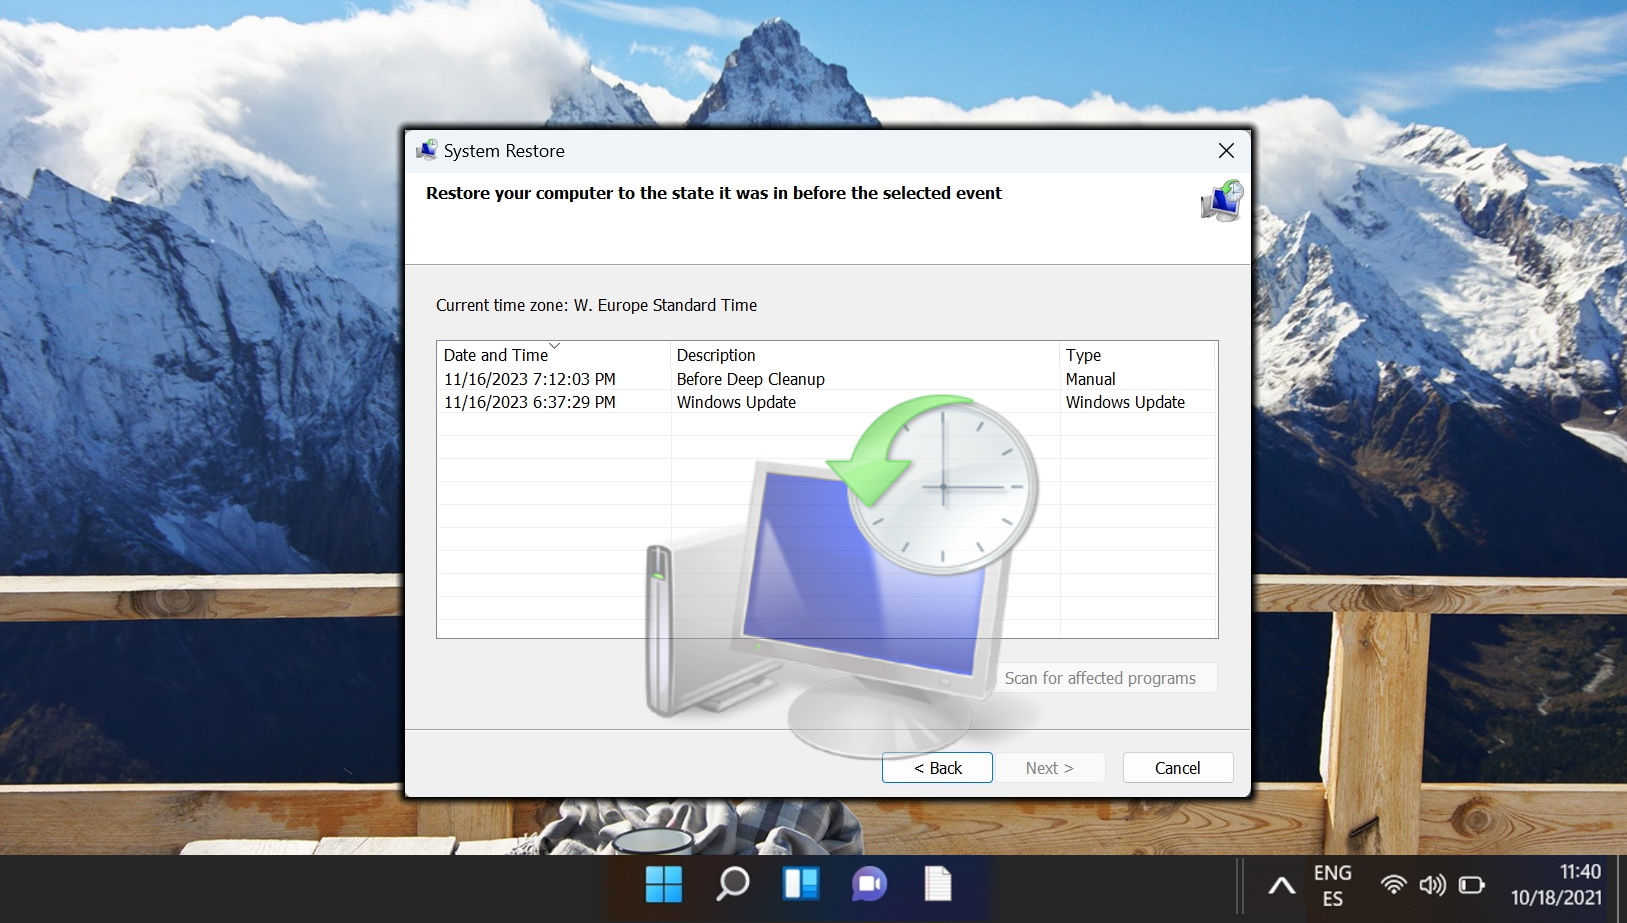
Related: How to Use System Restore in Windows 11
System Restore isn’t automatically active in Windows 11. Users need to take the initiative to enable this feature, setting the stage for their system’s safety net. In our other guide, we show you how to create system restore points in Windows 11 manually or automatically and how to return to a previously created restore point.
Related: How to Reset Windows 11 or Windows 10 (Normal or Factory Reset)
If you have a persistent issue with your PC that you have been unable to fix, the best option is to usually to reset your operating system. This will give you the option to keep your files (refresh), remove everything, or perform a factory reset. In our other guide, we show you how to factory reset Windows 11 and Windows 10 using both Advanced Startup Options and the OS’s in-built Settings apps.