

The Processor or CPU (Central Processing Unit) serves as the brain of your computer, orchestrating every task from basic calculations to complex computing processes. With the evolution of technology, understanding the capabilities and specifications of your CPU is more relevant than ever, whether for upgrading, troubleshooting, or optimizing performance.
This tutorial is your comprehensive guide to uncovering the details of the CPU that powers your Windows 11 PC. We’ll explore various user-friendly methods to access this information, from quick checks in the Task Manager and Settings to more in-depth analyses using the Control Panel, System Information, DirectX Diagnostic Tool, Device Manager, Command Prompt, and PowerShell. Each method is designed to cater to different user preferences and requirements, ensuring that you have the knowledge and tools to identify your processor type, its capabilities, and much more.
Whether you’re a tech enthusiast keen on maximizing your system’s performance or a casual user looking to familiarize yourself with your PC’s hardware, this tutorial will provide you with clear, step-by-step instructions to navigate the intricacies of Windows 11 and reveal the essential details about your CPU.
How to Check What Processor / CPU is in Your PC in Task Manager
The Task Manager in Windows 11 is not just for monitoring applications and system performance; it also serves as a quick gateway to view essential CPU information. This method is particularly convenient if you are looking for an immediate glance at your processor’s capabilities without delving into deeper system settings.
- Click on the “Windows” icon, type in “Task Manager,” and select “Task Manager”
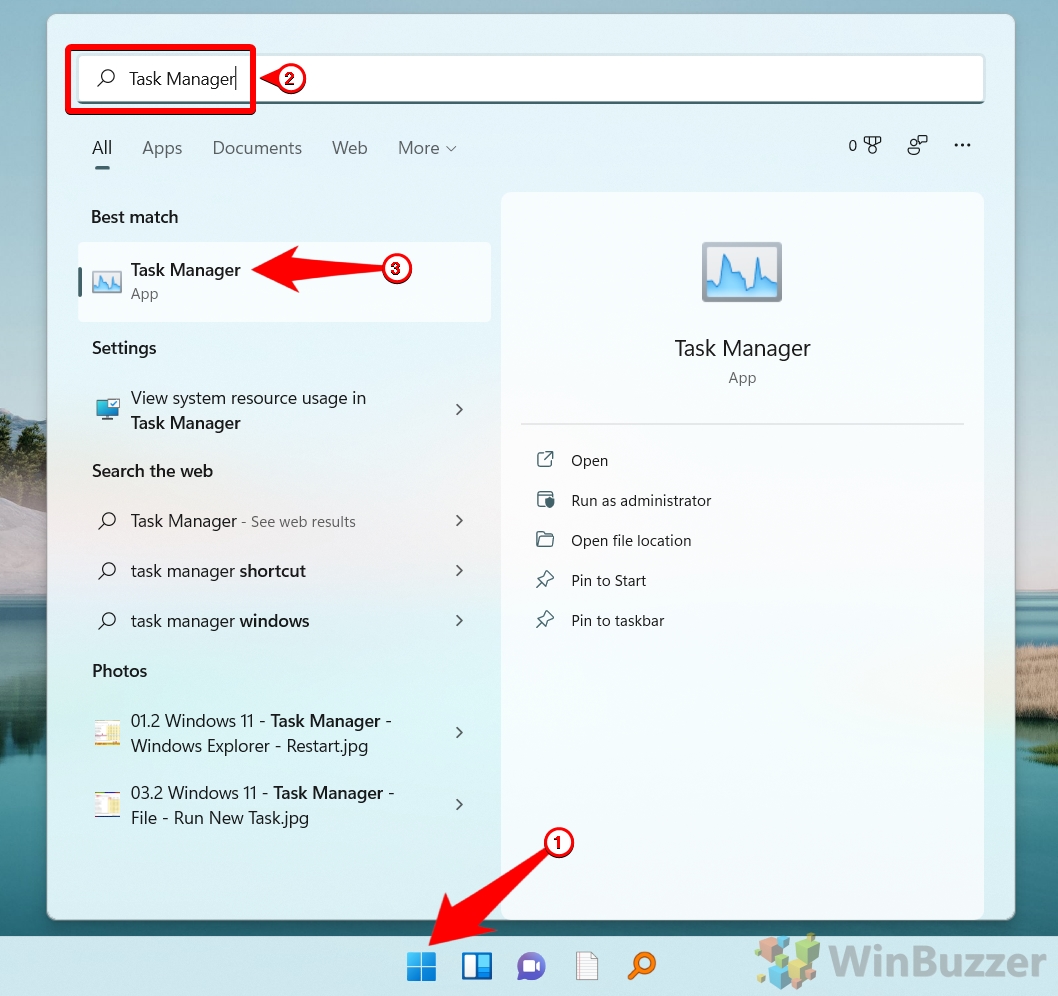
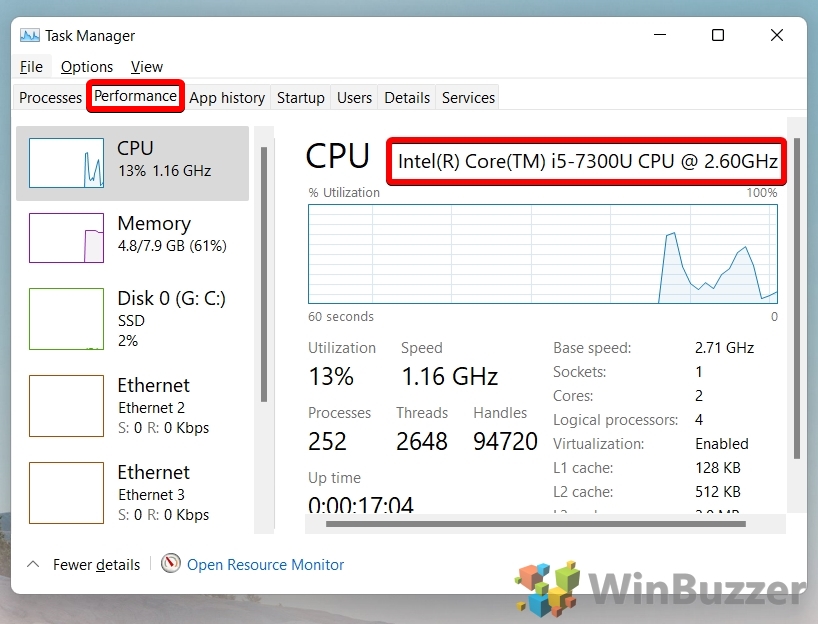
- Click on the “Performance” tab, and the name of the Processor will be visible, as shown in the picture
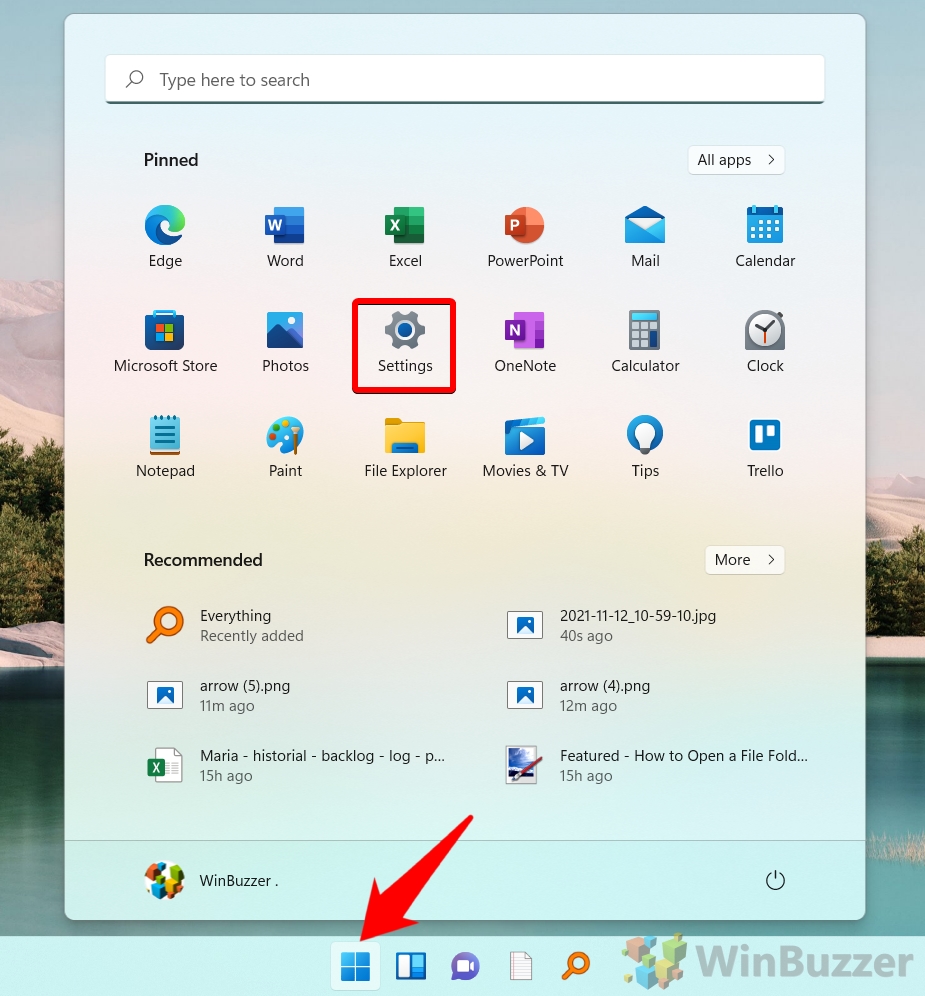
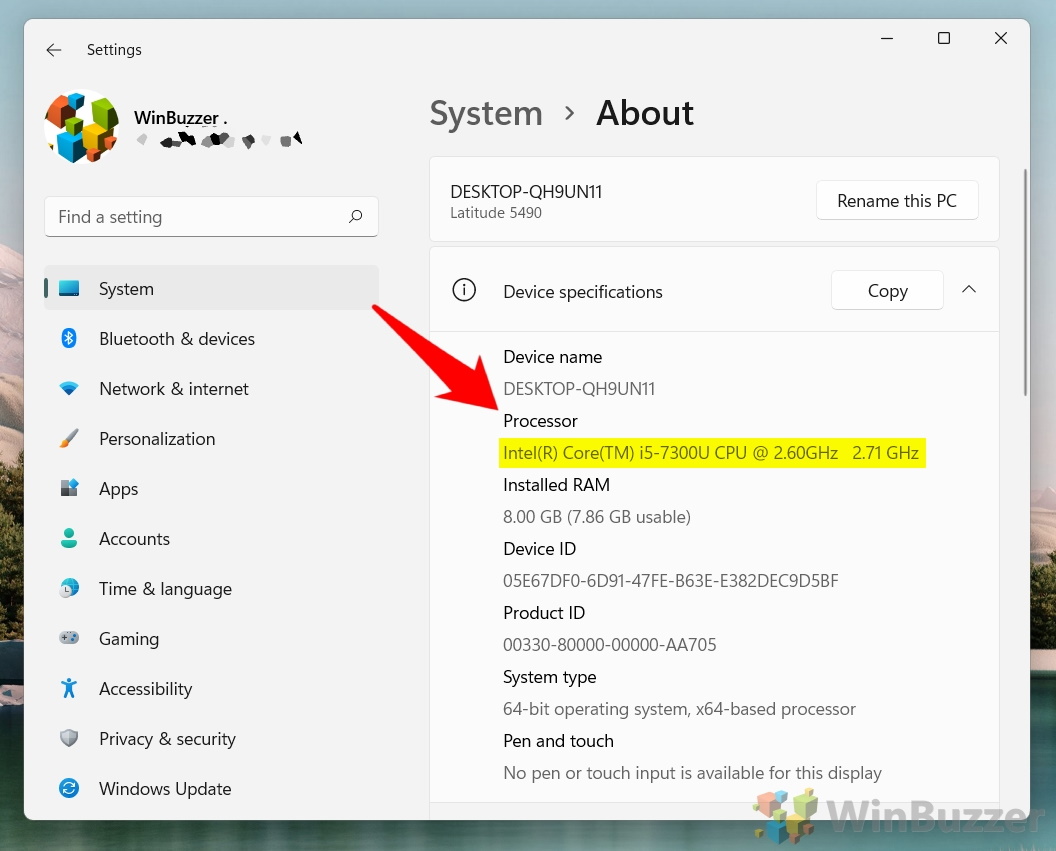
How to Identify What Processor / CPU is in Your PC in Settings
Windows 11’s Settings app provides a streamlined approach to accessing system information, including CPU details. This method is tailored for users who prefer a straightforward and intuitive interface to understand their system’s core specifications.
- Click on the “Windows” icon, and select “Settings” from the pinned applications in the start menu
- Select “System” from the sidebar, and click on “About” to check out the device details
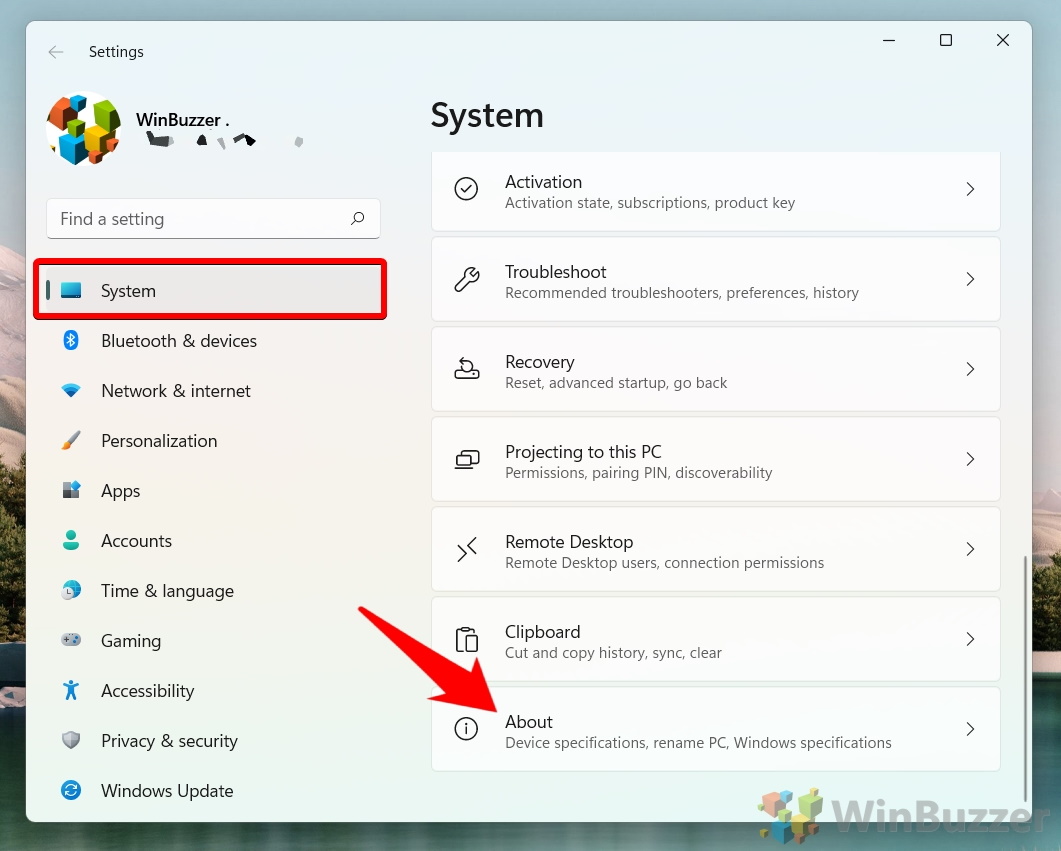
- Under “Device Specifications,” you will be able to see the details regarding the Processor as shown in the picture
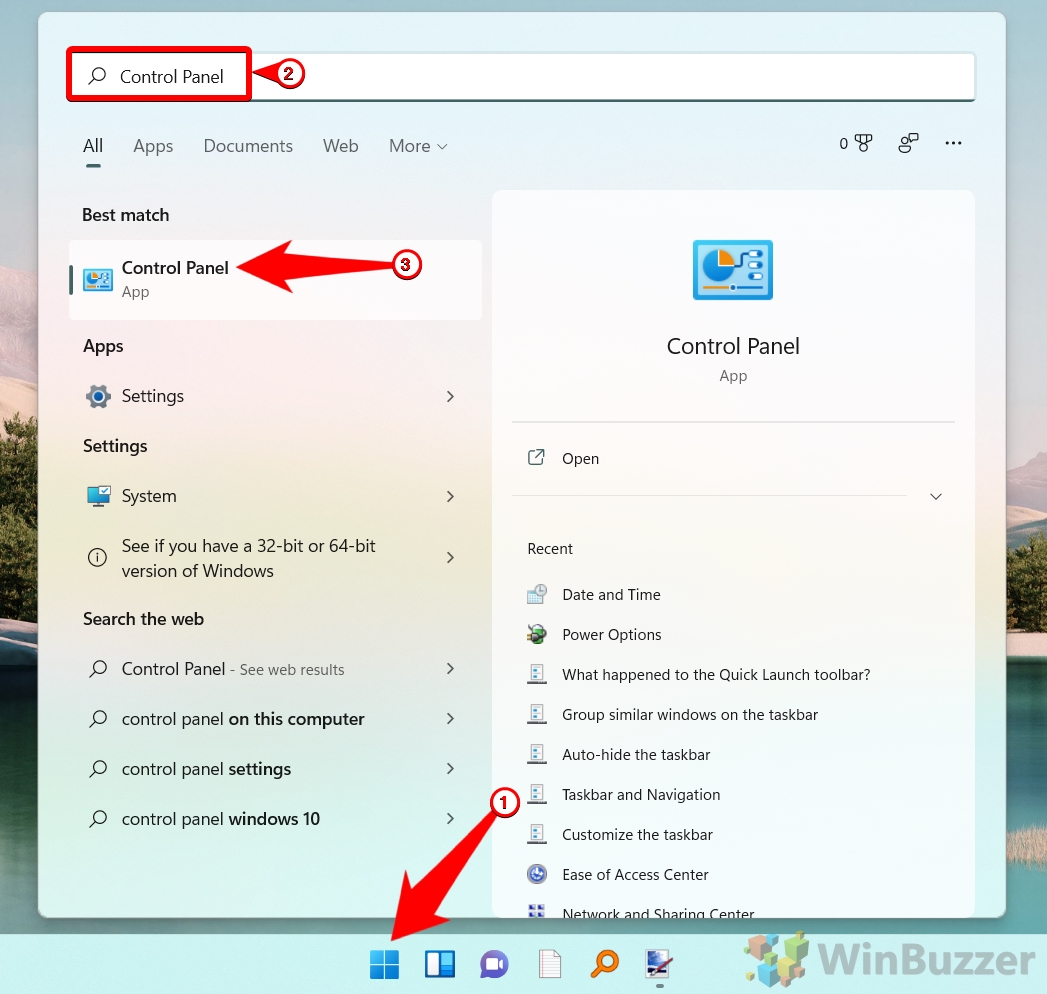
How to Check What Processor / CPU is in Your the PC using Control Panel
The classic Control Panel remains a comprehensive resource for detailed system information, including processor specifics. This method caters to users who appreciate the classic Windows experience and desire a thorough overview of their system’s configuration.
- Click on the “Windows” icon, type in “Control Panel,” and select “Control Panel” from the result
- Type in “System” and click on “System,” as shown in the picture
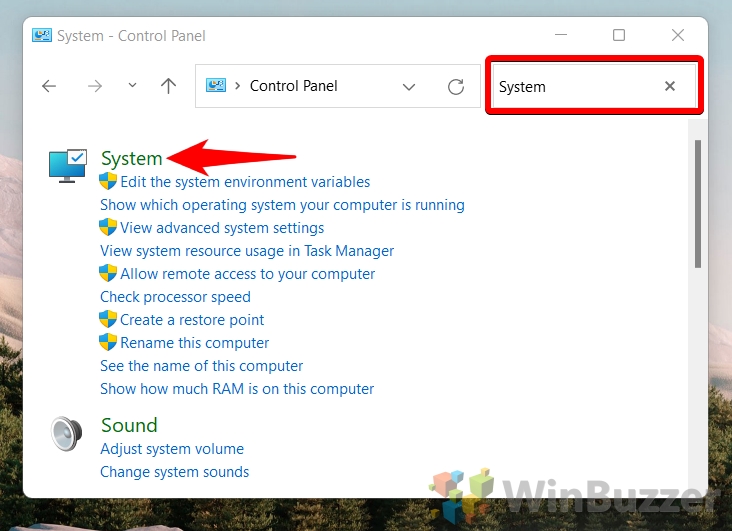
- In the “About” section, the details of the Processor specification will be visible under the “Processor”

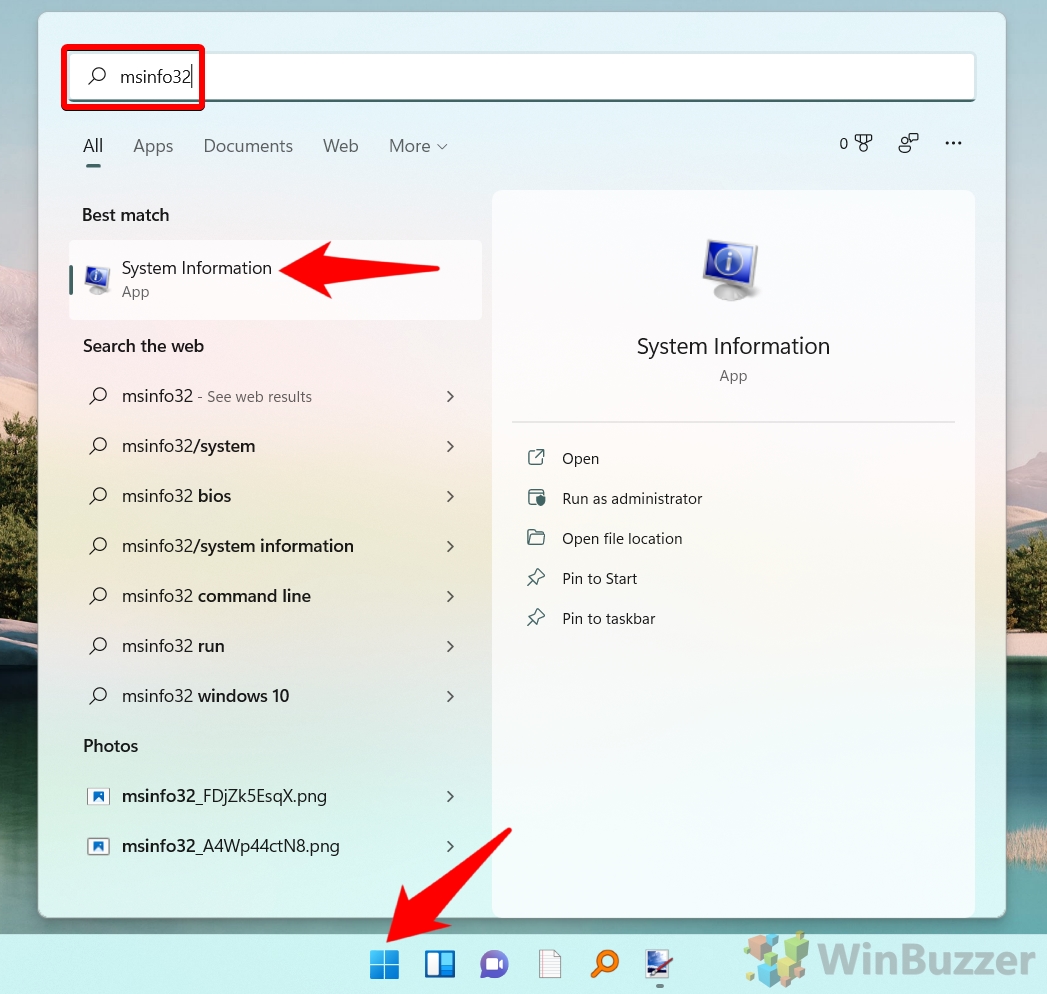
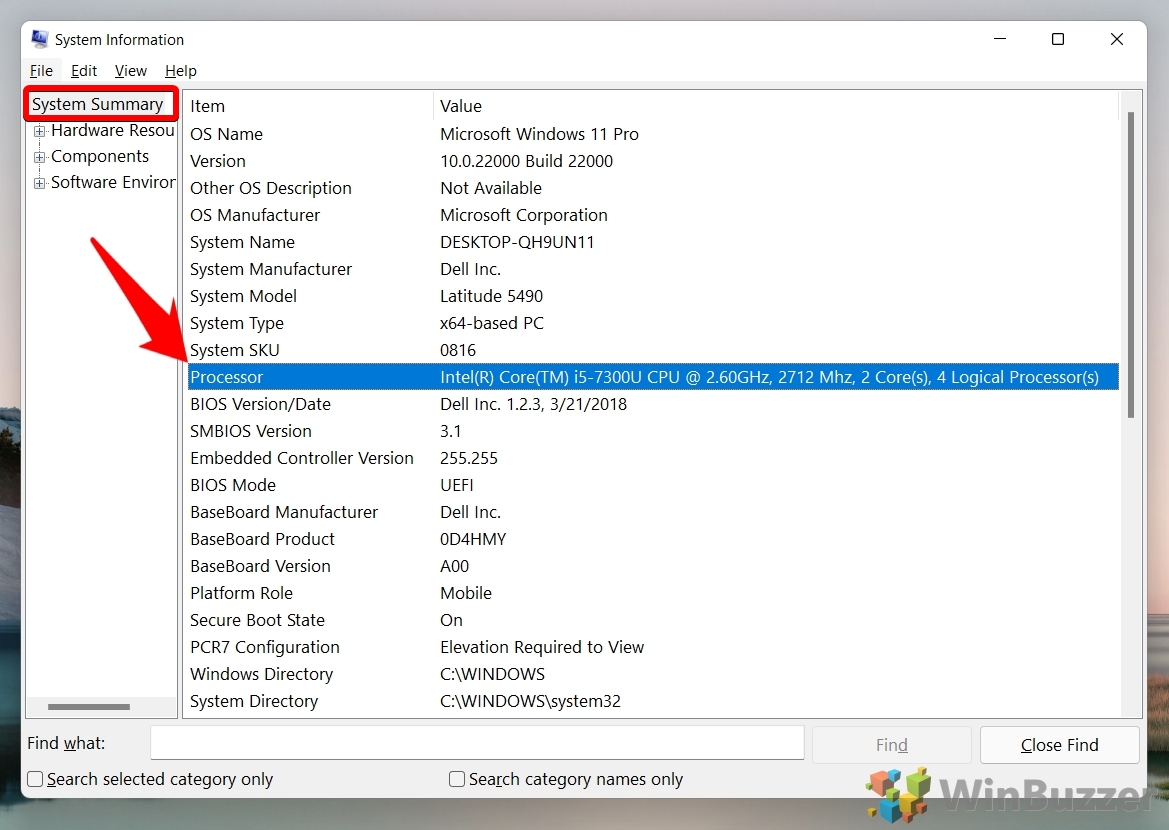
How to Check What Processor / CPU is in Your PC in System Information (msinfo32)
The System Information tool offers a deep dive into the hardware and software aspects of your PC, presenting extensive details about the CPU. This approach is ideal for users who require a complete snapshot of their system’s internals for diagnostic or informational purposes.
- Click on the “Windows” icon, type in “msinfo32”, and select “System Information” from the result
- Select “System Summary” from the sidebar, and check out the details of the Processor next to the item “Processor”
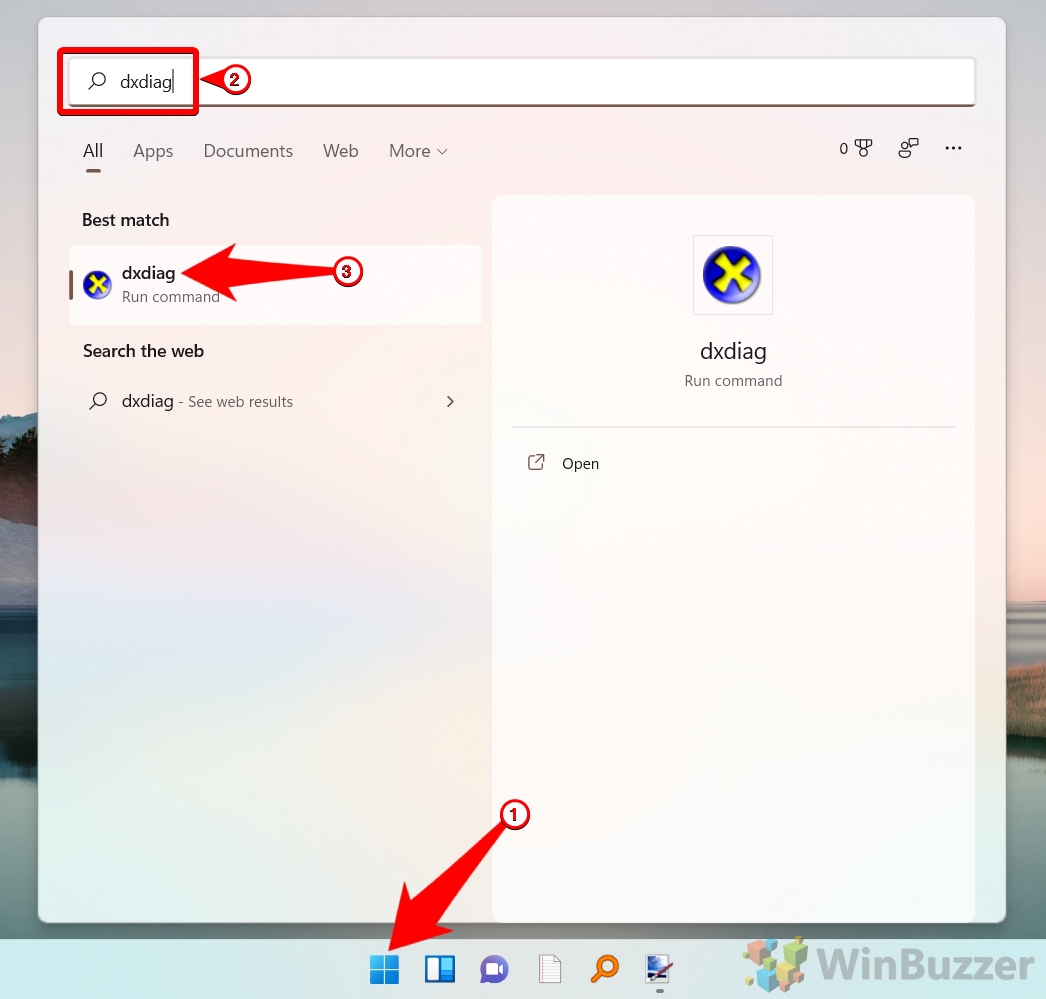
How to Check What Processor / CPU is in Your the PC using the DirectX Diagnostic Tool (dxdiag)
Primarily aimed at diagnosing and providing information related to graphics and sound, the DirectX Diagnostic Tool also includes valuable CPU data. This method is particularly appealing to multimedia enthusiasts and gamers who wish to assess their system’s overall performance capabilities.
- Click on the “Windows” icon, type in “dxdiag,” and select “dxdiag” from the result
- On the “DirectX Diagnostic Tool” dialogue box, click on “Yes”
If you just want to check what CPU is inside your PC and/or the CPU clock speed, you can also click “No” here.
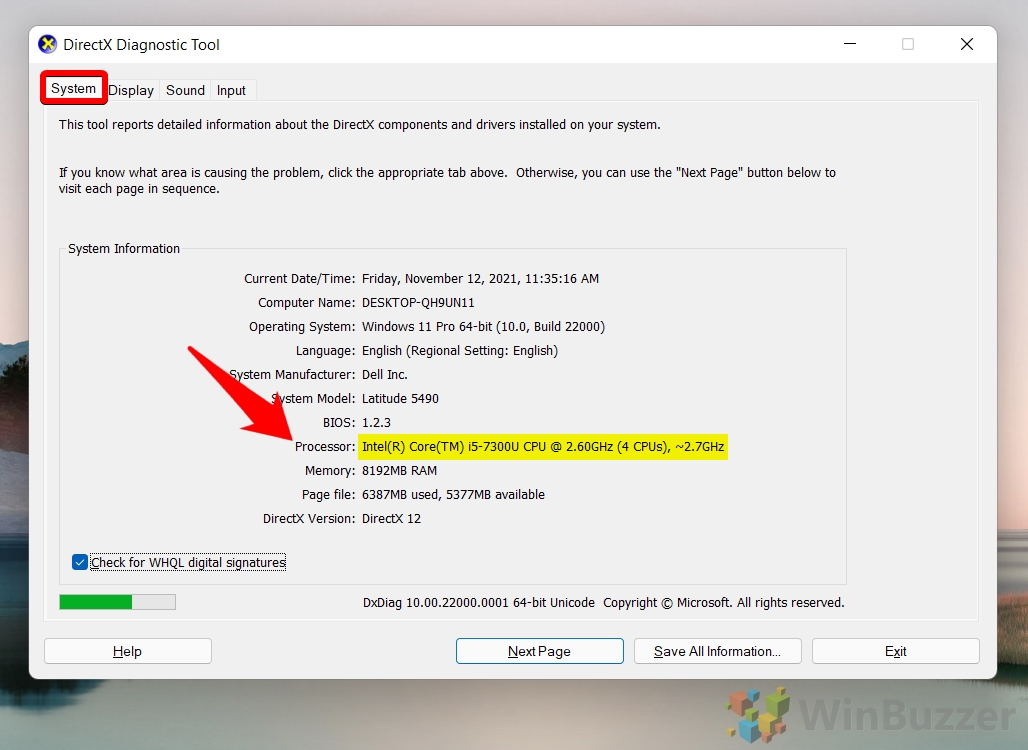
- In the “DirectX Diagnostic Tool,” under the “System” tab, the processor details will be visible next to the “Processor”
The DirectX Diagnostic Tool (dxdiag) will show the number of cores in your CPU as CPUs in parenthesis.
How to Check What Processor / CPU is in Your the PC with Device Manager
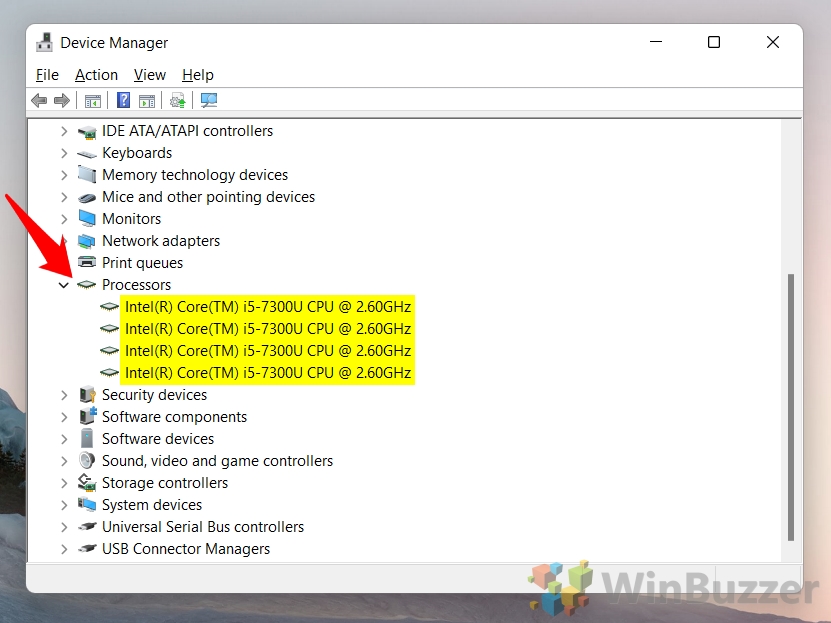
Through the Device Manager, users can explore the hardware components of their PC, including a detailed view of the CPU structure. This method is beneficial for those interested in the technical aspects of their processor, such as core count and architecture.
- Click on the “Windows” icon, type in “Device Manager,” and select “Device Manager” from the result
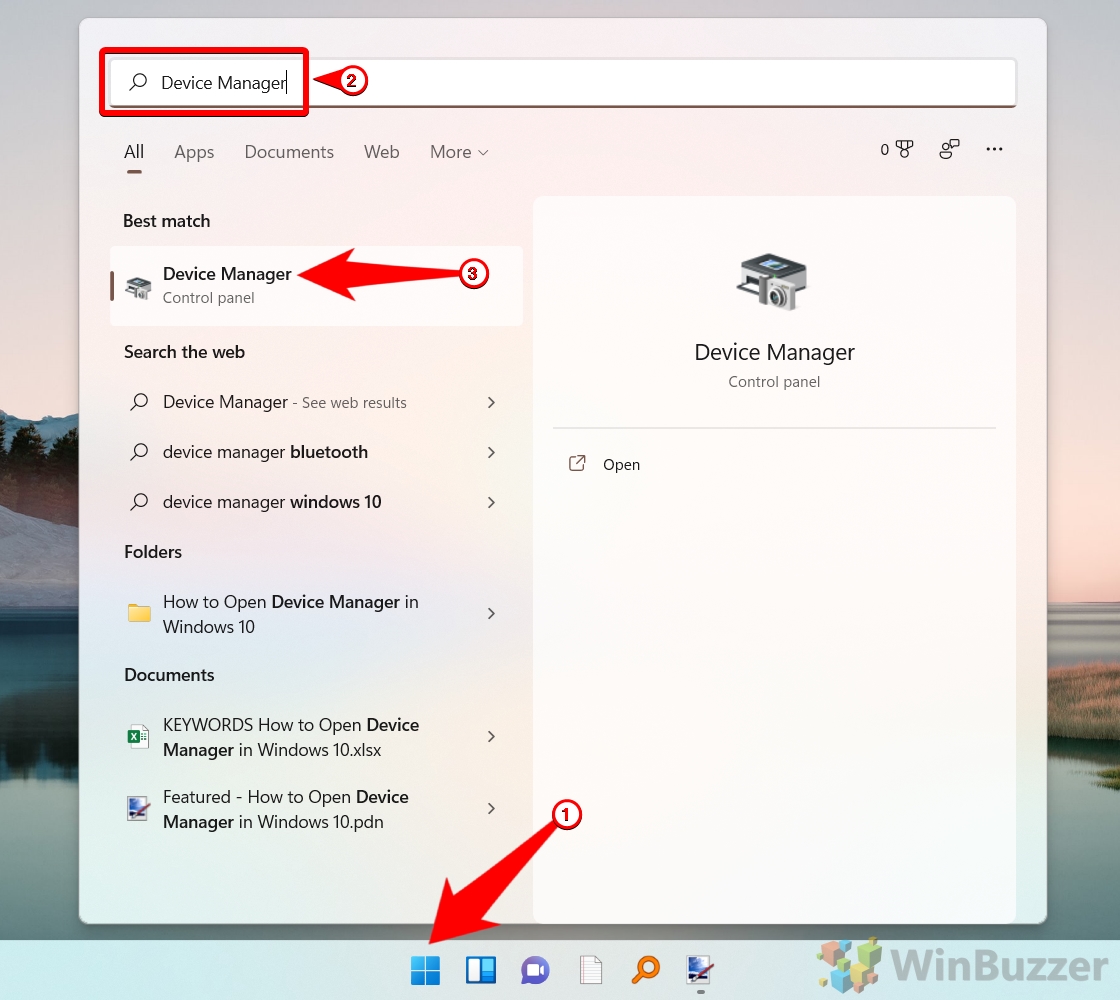
- Click on the “Dropdown” before the “Processors” to see all the details of the Processor
Device Manager will show every CPU core as a single entry so you will know how many cores your CPU has.
How to Check What Processor / CPU is in Your PC with Command Prompt
The Command Prompt in Windows 11 offers a direct and powerful way to query system information, including detailed CPU specifications. This method is favored by advanced users and professionals who are comfortable with command-line interfaces and seek precise information.
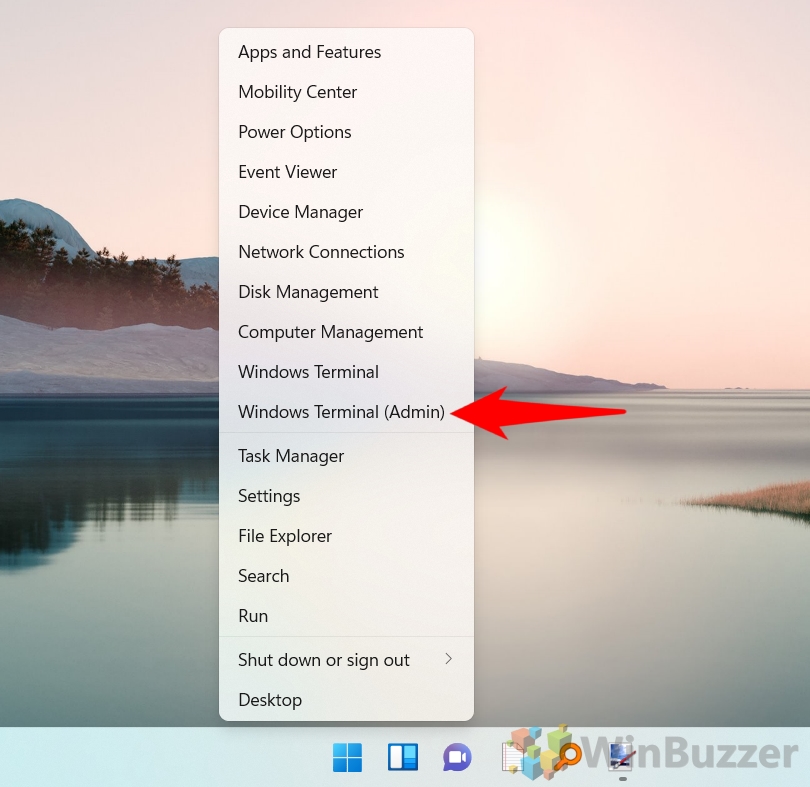
- Right-click on the “Windows” icon and select “Windows Terminal (Admin)” from the context menu
- Click on the “Dropdown” icon and select “Command Prompt” from the options

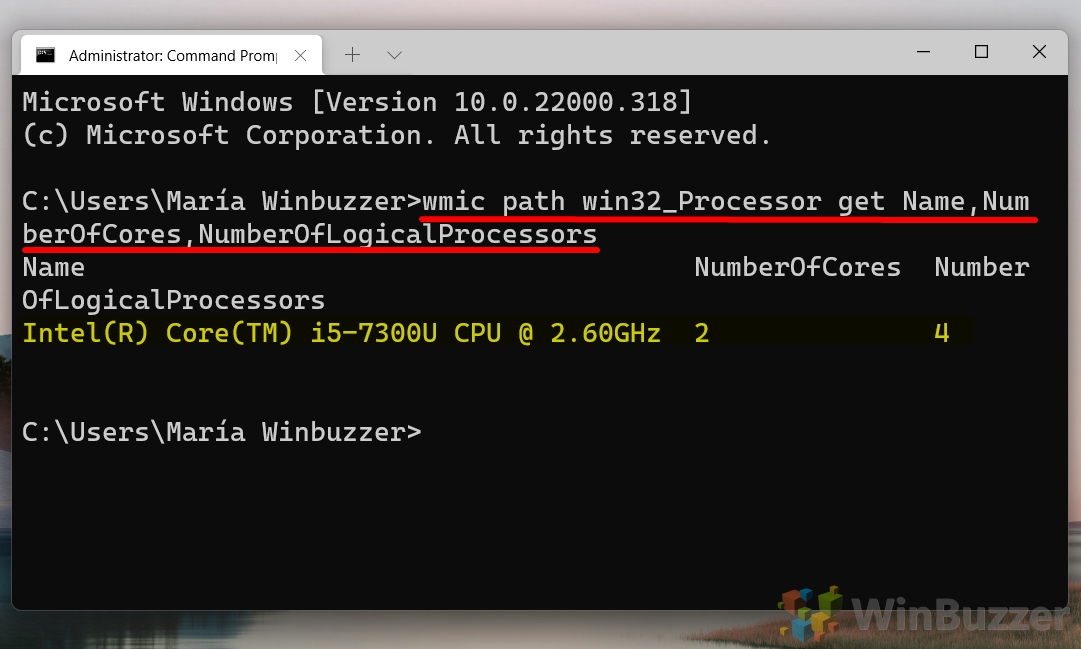
- Type in the following command and press “Enter” to see the processor details
wmic path win32_Processor get Name,NumberOfCores,NumberOfLogicalProcessor
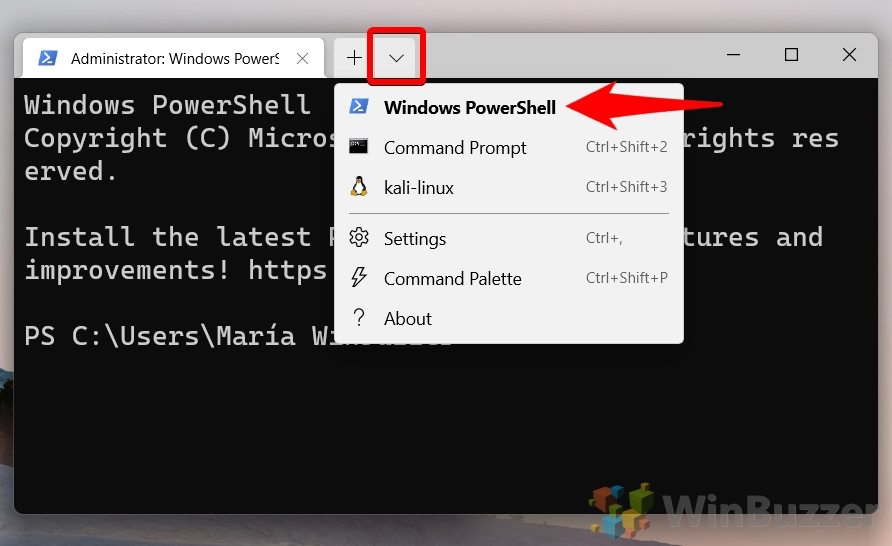
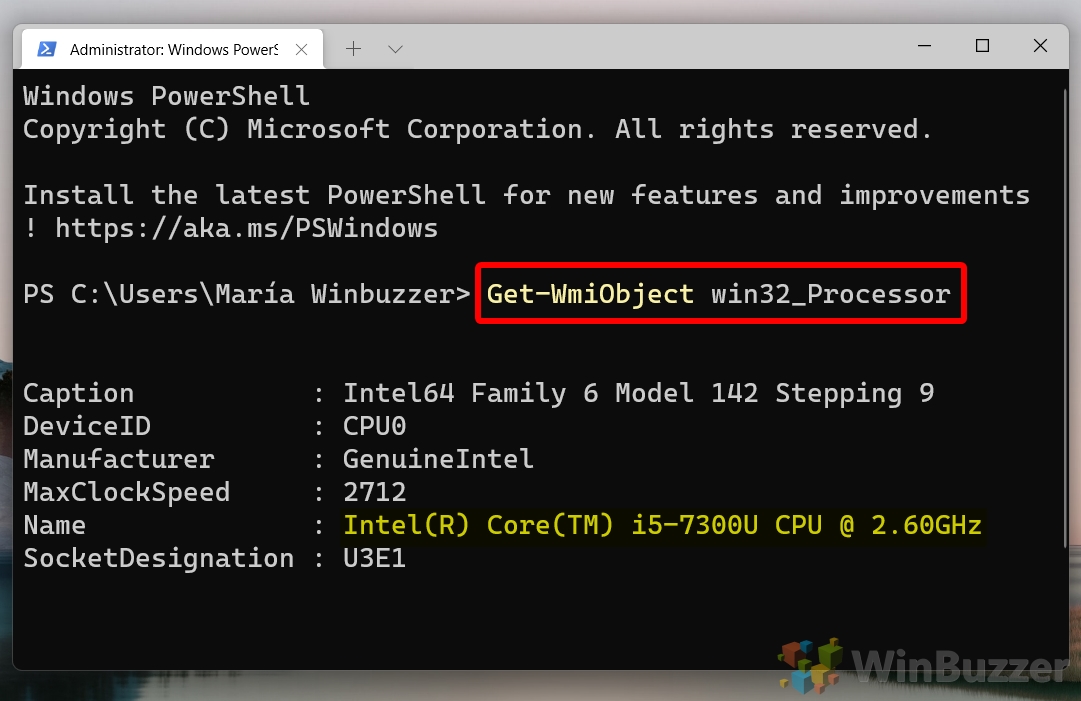
How to Check What Processor / CPU is in Your the PC using PowerShell
PowerShell extends beyond traditional command-line tasks, providing a robust platform for comprehensive system management and information retrieval, including CPU details. This method is suited for IT professionals and advanced users who require extensive data for scripting, automation, or complex system analysis.
- Right-click on the “Windows” icon and select “Windows Terminal (Admin)” from the context menu

- Click on the “Dropdown”, and select “Windows PowerShell” from the options
- Type in the following command and press “Enter” to see the processor details
Get-WmiObject win32_Processor
FAQ – Frequently Asked Questions About CPU Information in Windows 11
Can I find out the CPU’s temperature through the methods described in the tutorial?
The tutorial does not cover methods for checking the CPU’s temperature directly within Windows 11’s built-in tools. To monitor CPU temperature, you would typically need to use third-party software such as HWMonitor or Core Temp. These applications provide real-time temperature readings for your CPU and other components, which is crucial for monitoring your system’s health and performance during intensive tasks or troubleshooting overheating issues.
How can I check if my CPU supports virtualization technology?
While the tutorial doesn’t address this, checking for virtualization support usually involves accessing the BIOS/UEFI settings of your computer. Upon entering the BIOS/UEFI, look for settings labeled as “VT-x,” “AMD-V,” “SVM,” or “Virtualization Technology”, which indicate support for virtualization. Additionally, tools like Intel’s Processor Identification Utility or AMD’s Ryzen Master (for AMD processors) can provide this information within Windows. Virtualization technology is essential for running virtual machines and certain security features like Windows Sandbox.
Is there a way to determine my CPU’s power consumption or TDP (Thermal Design Power) using these methods?
The tutorial’s methods do not detail how to find the CPU’s TDP or power consumption directly. TDP is a specification provided by the CPU manufacturer that indicates the maximum amount of heat a CPU or GPU is expected to generate under normal operation. To find this information, you would typically refer to the manufacturer’s website or datasheet for your specific CPU model. Understanding TDP is important for ensuring your cooling solution is adequate and for assessing overall system power requirements.
Can I use these methods to find out the warranty status of my CPU?
The tutorial does not provide a way to check the warranty status of your CPU through Windows 11 tools. To check the warranty, you would need the CPU’s serial number and then visit the manufacturer’s website, where most provide a warranty status check tool. This process involves entering the serial number or other identifying information to retrieve warranty details, including start and end dates, and any remaining coverage.
How can I identify if my CPU is compatible with a specific motherboard or chipset?
CPU-motherboard compatibility is not covered in the tutorial and typically involves more than just software checks. To determine compatibility, you need to know the CPU’s socket type and the chipset it supports, then compare these with the motherboard’s specifications. Manufacturer websites and documentation are the best sources for this information. Tools like PCPartPicker can also help by checking compatibility for you when planning a build or upgrade.
Is it possible to find out the CPU’s release date or generation through these methods?
The methods described do not provide the CPU’s release date or generation. However, once you have the CPU model from the methods described (e.g., using System Information or Command Prompt), you can search this model number online on the manufacturer’s website or trusted tech review sites to find detailed information, including the release date, generation, and technological features. This information is useful for understanding the CPU’s age, performance expectations, and compatibility with other hardware.
Can any of these methods show the CPU’s bus speed or frequency?
The tutorial does not explicitly cover finding the CPU’s bus speed or frequency. However, the Task Manager’s “Performance” tab can provide a real-time view of the CPU’s current operating frequency. For detailed information about the base and boost frequencies, bus speed, and other related specifications, you would need to consult the CPU’s datasheet or specifications on the manufacturer’s website. Understanding these frequencies can be important for overclocking and troubleshooting performance issues.
How can I see my CPU’s architecture (e.g., x64 or x86) using these methods?
The System Information tool (msinfo32), as mentioned in the tutorial, can provide this information. Under “System Type,” you will find whether your system is based on x64 (64-bit) or x86 (32-bit) architecture. This is crucial for determining the type of software your system can run, as 64-bit systems can handle more memory and more complex applications than 32-bit systems.
Can I use PowerShell to find out the number of threads my CPU supports?
While the tutorial does not detail this, you can use PowerShell to find out the number of threads. The command Get-WmiObject win32_Processor | Select-Object NumberOfLogicalProcessors will show the number of logical processors (threads) your CPU supports. This is particularly useful for understanding multitasking capabilities and performance in threaded applications.
Is there a method to check the CPU’s cache size using these methods?
Once you have identified your CPU model using the methods described, you can look up the cache size specifications online on the manufacturer’s website or technical review sites. The CPU cache is a small amount of very fast memory used to store frequently accessed data, and its size can significantly impact performance, especially in data-intensive tasks.
Can DirectX Diagnostic Tool show the CPU’s integrated graphics capabilities?
The DirectX Diagnostic Tool, as mentioned in the tutorial, primarily focuses on graphics and sound hardware information. While it shows the processor model, it does not detail the integrated graphics capabilities. For specifics about the integrated GPU, such as its model, performance characteristics, and supported features, you would need to refer to the CPU’s specifications on the manufacturer’s website or use a dedicated tool like GPU-Z.
How can I verify if my CPU is operating at its maximum speed?
The Task Manager’s “Performance” tab, as described in the tutorial, shows the current operating speed of your CPU. Comparing this with the base and boost speeds listed in your CPU’s specifications can indicate whether it’s operating at maximum capacity. Factors like thermal throttling, power settings, and workload can affect the actual operating speed.
Is it possible to identify the CPU’s manufacturer and model using Command Prompt?
Yes, as outlined in the tutorial, the Command Prompt can be used to identify the CPU’s manufacturer and model. The command wmic path win32_Processor get Name will provide this information. Knowing the manufacturer and model is essential for troubleshooting, upgrades, and when seeking support or drivers.
Can Device Manager show if my CPU is single, dual, or multi-core?
As mentioned in the tutorial, Device Manager displays each core of your CPU as a separate entry under “Processors” This can help you determine the core count of your CPU, which is important for understanding its multitasking and parallel processing capabilities.
How can I find out if my CPU supports hyper-threading or Simultaneous Multithreading (SMT)?
The tutorial indirectly covers this when discussing cores and logical processors. By comparing the number of logical processors to the number of cores in the Task Manager or System Information, you can infer hyper-threading/SMT support. If the number of logical processors is twice the number of cores, your CPU likely supports hyper-threading (Intel) or SMT (AMD), enhancing parallel processing capabilities.
Related: How to Monitor and Check CPU Temperature
Whether you’ve just installed a new CPU cooler or you’re simply curious, it’ a good idea to keep an eye on your CPU temp (Core temp). Though processors in many modern laptops have good specs, that matters little if they run into thermal throttling. In our other guide, we show you how to perform a CPU temperature check in Windows and evaluate three pieces of software that are up to the job.

Related: How to Check Which Graphics Card You Have
Regardless of if you’re planning an upgrade or checking if your PC makes a game’s system requirements, it’s useful to know how to check a graphics card on Windows. Though users often turn to third-party tools to so, there are also plenty of ways to perform a graphics card check via Windows tools, as we show in our other tutorial.

Related: How to Check RAM Type, Speed and Size on Windows
Whether you’re planning an upgrade, tuning CPU timings, or just curious, it’s handy to know information about your RAM. However, with old methods not being as user-friendly, many are left wondering how to check RAM speed on Windows and find information like its size and type. In our other guide, we show you how to check RAM speed, type, and size using several built-in Windows tools. You can then decide what method works best for you if you want to check hardware information in the future.

Related: How to Check Your Motherboard Model Information on Windows
Have you ever asked how to check the motherboard model in Windows? How to find the motherboard serial number? Our tutorial will show you 3 simple methods for checking your motherboard model and related information on Windows.
Related: How to Check PC Specs with Windows System Information, PowerShell, and More
If your computer at least boots, there are several ways to find your system spec in Windows, from the system information tool to PowerShell, Command Prompt, and third-party tools. As not every method shows the same types and details of system specs, it´s good to always have some alternatives at hand.
Related: How to Check Your Windows Version, Edition and Build Number
Understanding the version of your Windows operating system is crucial for a variety of reasons, such as installing new programs, troubleshooting, and ensuring you have the latest security updates. In our other guide, we show you how to find your Windows version, edition and exact build number with various internal tools.
Last Updated on April 21, 2024 7:25 pm CEST by Markus Kasanmascheff


