Regardless of if you’re planning an upgrade or checking if your PC makes a game’s system requirements, it’s useful to know how to check a graphics card on Windows 10. Though users often turn to third-party tools to so, there are also plenty of ways to perform a graphics card check via your default OS tools.
While those with a PC GPU can often just open it up and look inside, many face confusion when wondering how to check a laptop graphics card. This can be especially difficult as some laptops have two graphics cards – the one integrated with the CPU and a dedicated one.
Graphics card check on Windows 10: Discrete GPU or integrated
As a result, we’re going to show you how to check what graphics card you have, but also how to determine which is your integrated graphics card. As a dedicated GPU is much faster for 3D rendering or gaming, this can be an important piece of information to get the most out of your device. Let’s get started:
How to Check Graphics Card on Windows 10 via Display Setttings
Windows display settings is one of fastest ways to answer the age old question of “what is my graphics card?”
- Open display settings
Right-click any empty space on your desktop and choose “Display settings”.

- Open Advanced Display Settings
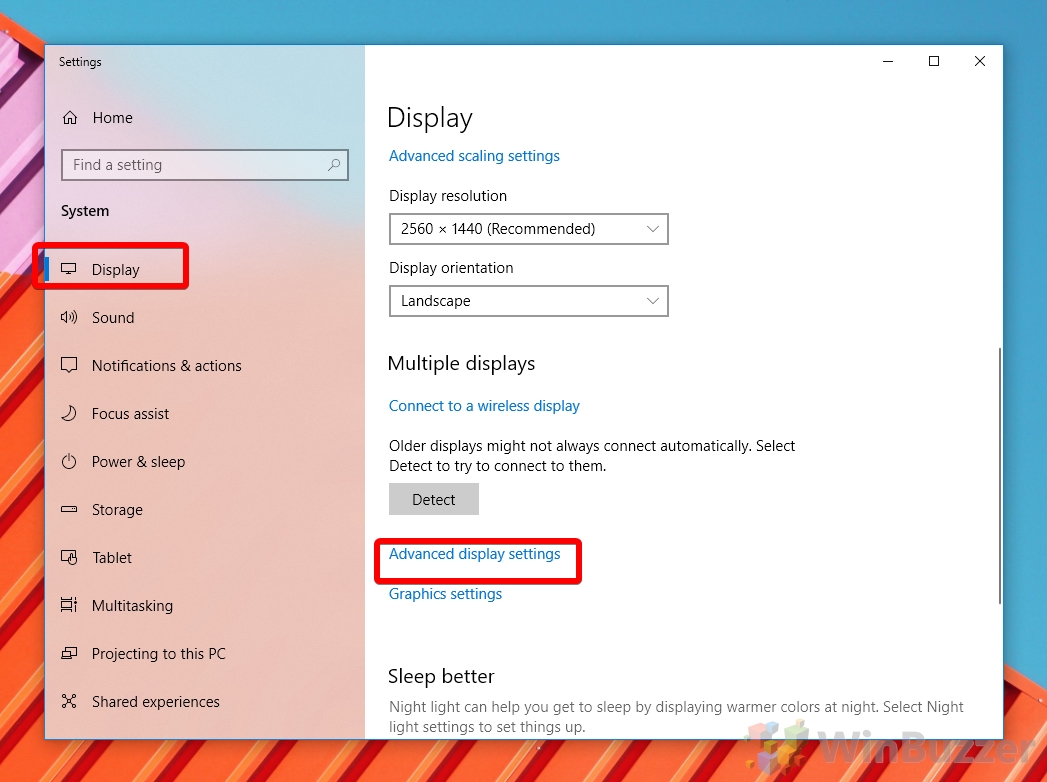
Click “Display” on the left sidebar, then “Advanced display settings”.

- Check your Windows 10 graphics card model
Under “Display information”, you’ll see the text “Display 1: Connected to [Your Graphics Card]”. Be aware that if you’re using a laptop this will probably be your integrated graphics card. You can check the other steps to find your dedicated one.

How to Find Your Graphics Card on Windows 10 via Device Manager
So long as you have drivers for your GPU, Windows 10’s device manager can be a very quick way to find all of your graphics cards.
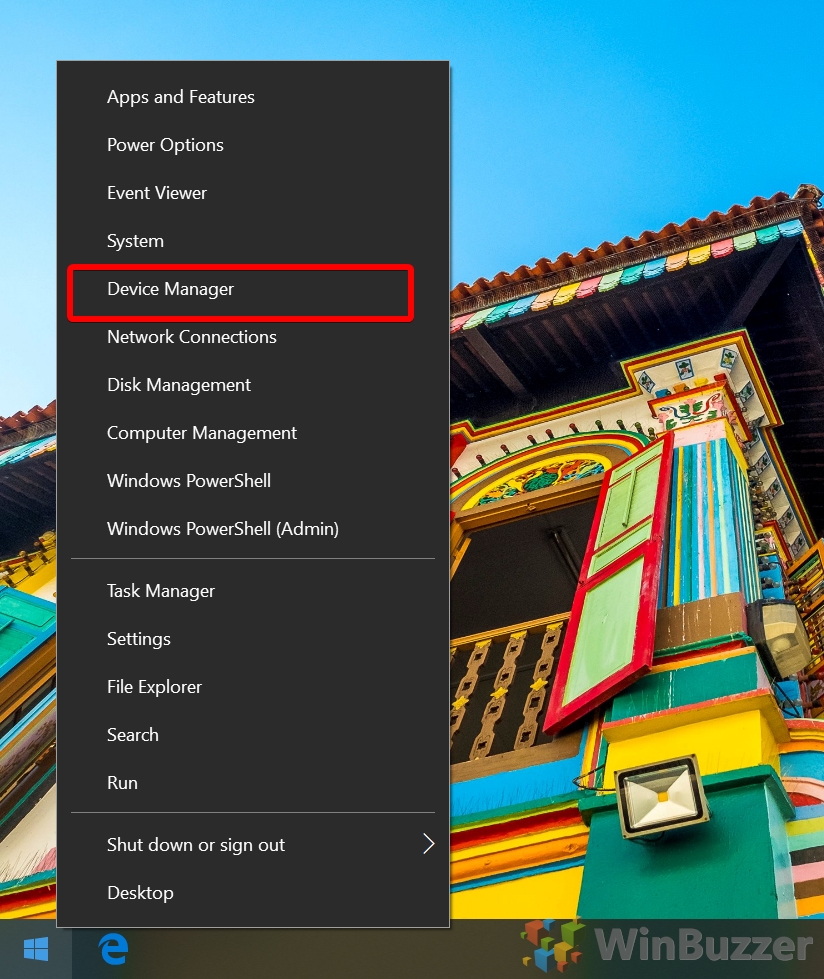
- Open Device Manager
- Check the graphics card in Windows 10 Device Manager
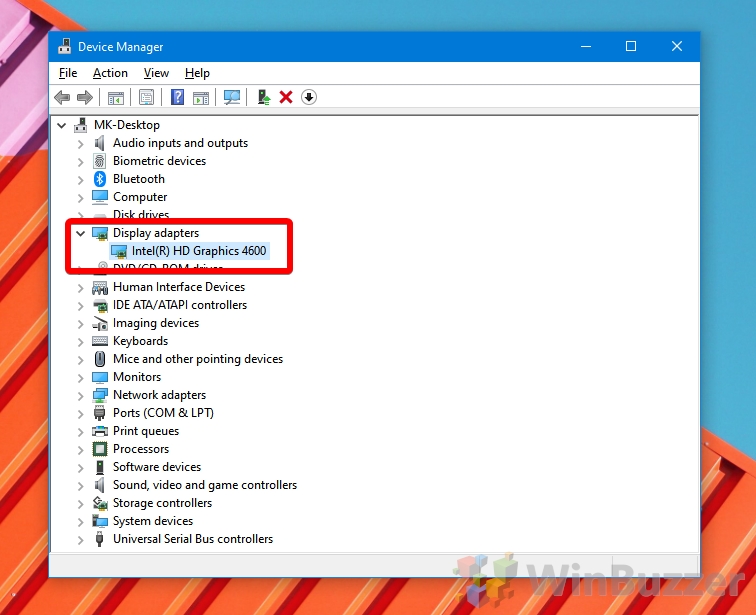
Scroll down the device list until you see “Display adapters”. Click the arrow next to it to expand the heading. The name of your dedicated and integrated graphics cards will be shown below. Your integrated graphics card will likely have “Intel” or “Vega” in the name, while a dedicated card will say “Nvidia” or “AMD Radeon”.

How to Check Graphics Card on Windows 10 via System Information
If you’d like a little more information without much complexity, Windows 10’s system information tool is for you.
- Open System Information
Press the “Windows” key and search for “System Information”, clicking the top result.

- Find the graphics card under the “Display” menu
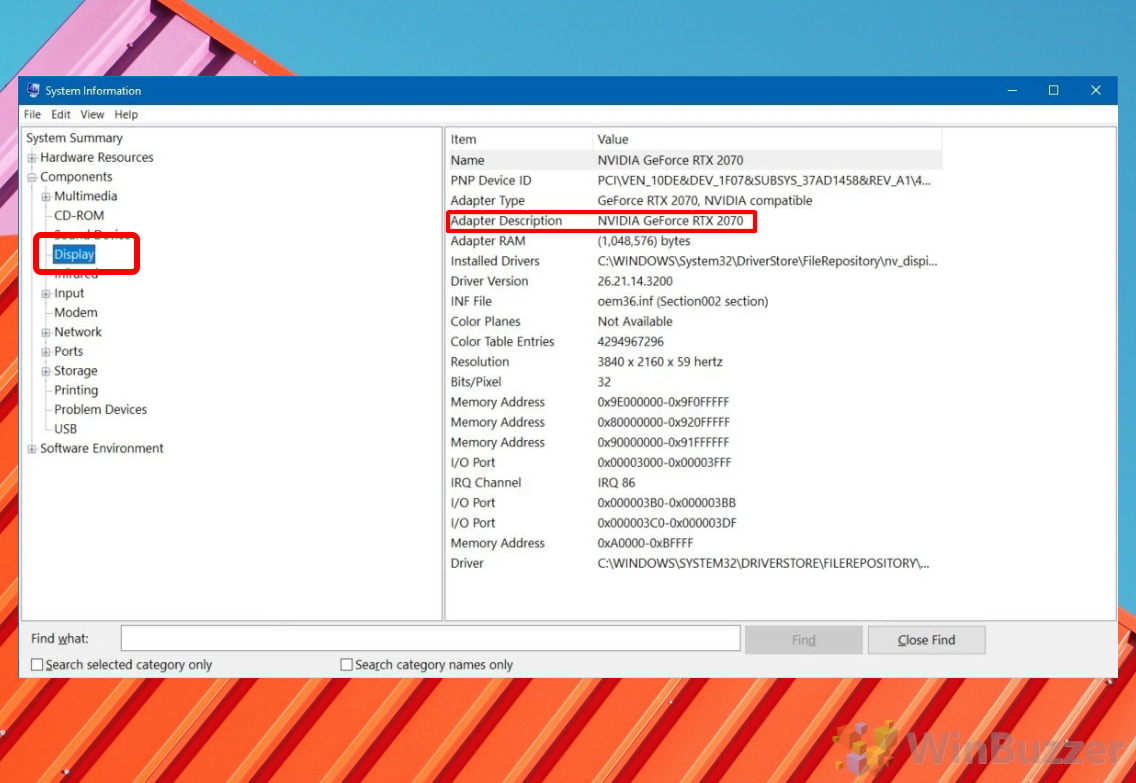
In the left sidebar, maximize the “Components” list and click on “Display”. You’ll see your graphics card information in the main pane, with the “Name” and adaptor description returning the name of the device. In this case, our PC graphics card is an Nvidia RTX 2070.

How to Check Laptop Graphics Card or PC GPU via Dxdiag
Dxdiag is a tried and tested way to perform a graphics card check, returning your GPU and its video memory.
- Open dxdiag
Press “Windows” and type “dxdiag”, clicking the top result. Click “Yes” to any prompts about unsigned drivers.

- Check display information
Click the “Display” tab and then the “Device” column for various details about your GPU such as the manufacturer and video memory, which is used to store textures and other information.

How to Check What Graphics Card You Have with Command Prompt
If you just need the name and not any other graphics card information, this can be achieved very quickly with Command Prompt.
- Open Command Prompt
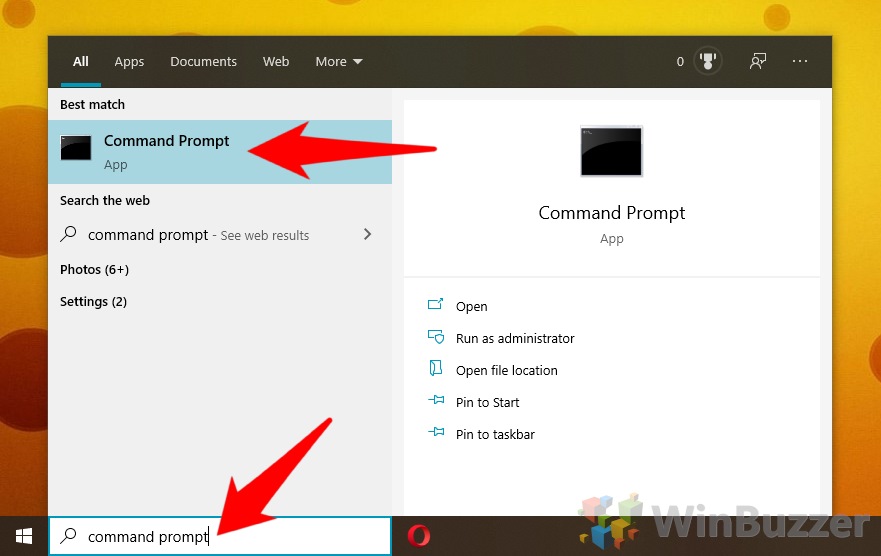
Press “Windows” and type “Command Prompt”, clicking the top result.

- Enter the check video card command
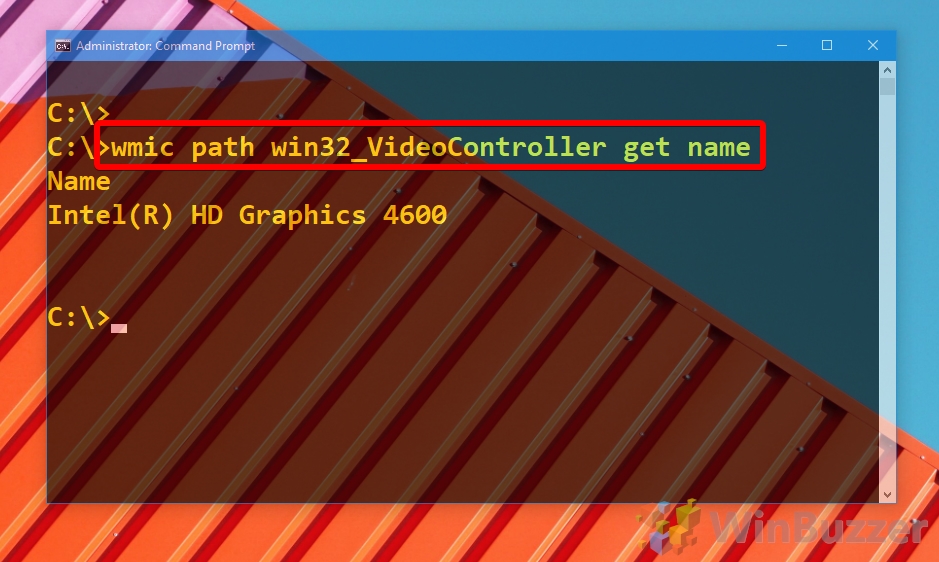
To return just the name of your graphics card, type:
wmic path win32_VideoController get name
Or, if you’d like a more detailed reading, enter:
wmic path win32_VideoController get name, videoarchitecture, deviceID, adapterram
Your VRAM will be returned in bytes.

How to Check What Graphics Card You Have with PowerShell
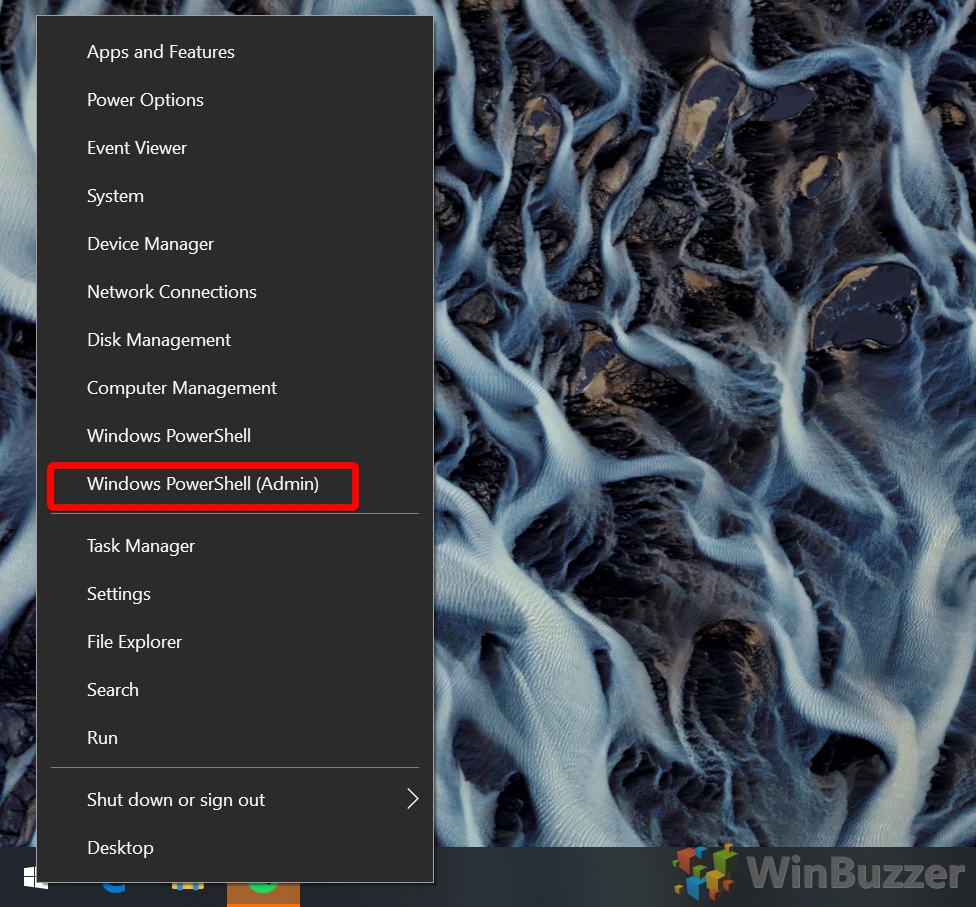
It’s possible to perform a similar command with PowerShell, if you’re more comfortable there.
How to Check Laptop Graphics Card or PC Graphics Card via Task Manager
While this won’t work for those who haven’t updated for a while, you can find your graphics card on Windows 10 in Task Manager in the OS’ latest versions.
- Open Task Manager
Press “Windows” and type “Task Manager”, clicking the top result.

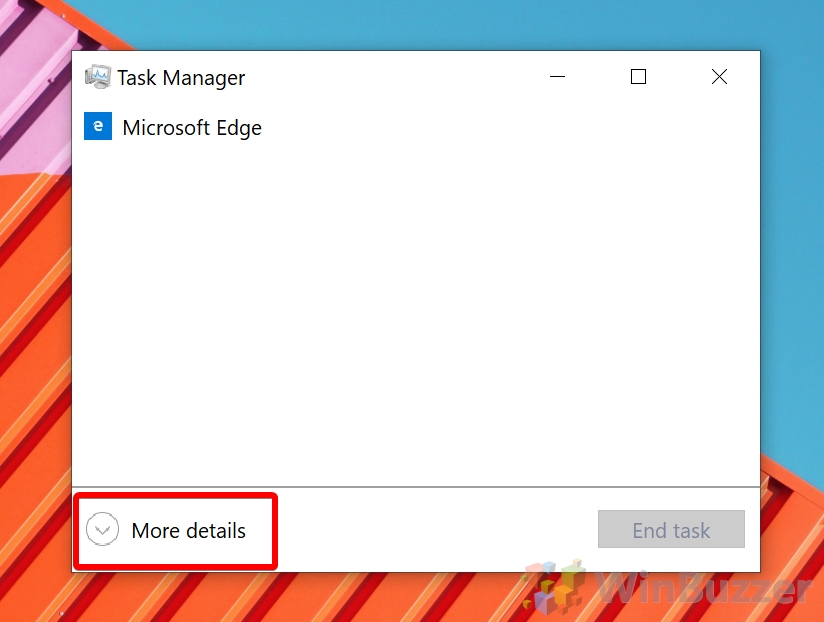
- Click “More details”
- Check your graphics card information
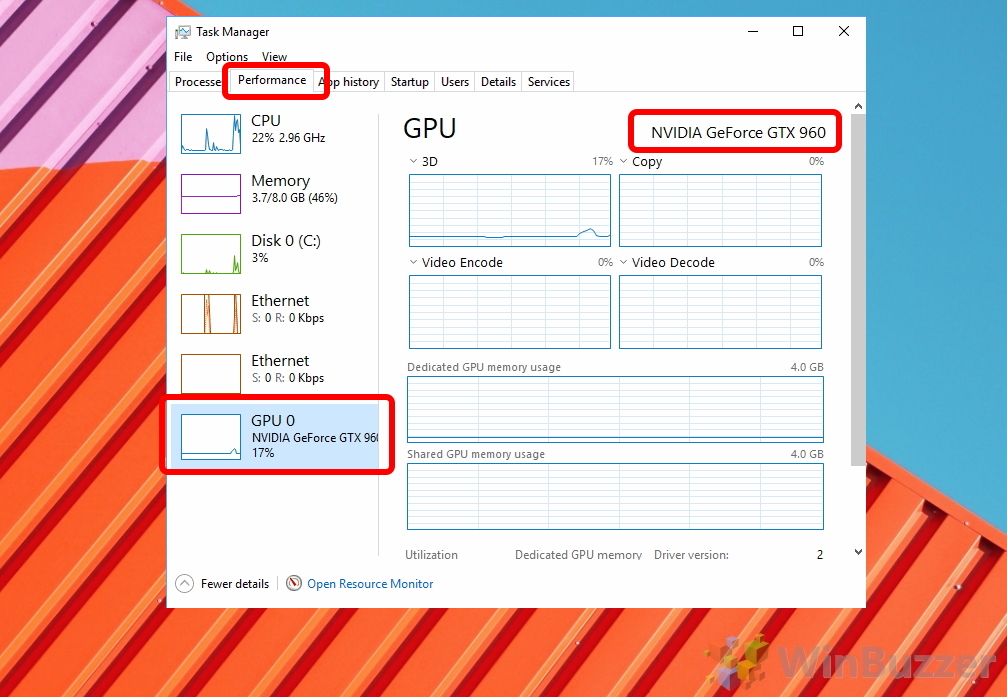
Click on the “Performance” tab and then “GPU” in the left sidebar. Your graphics card name will show in the top-right of Task Manager, as well as its utilization and dedicated memory usage.

How to Check What Graphics Card You Have with CPU-Z
Though it’s not strictly necessary, third-party tools like CPU-Z are often installed on systems already and can provide more information.
- Check your GPU info with CPU-Z
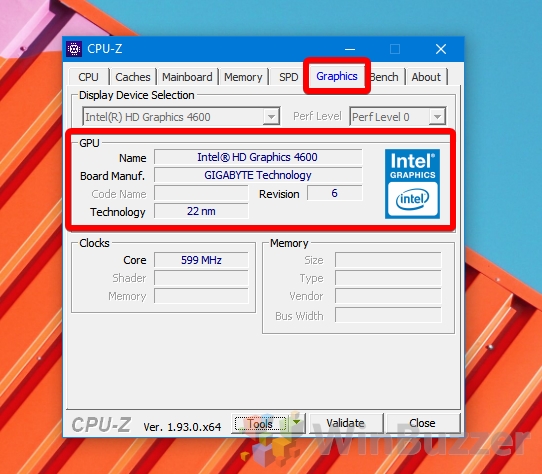
Press the “Start” button and type “CPU-Z”, clicking the top result. Once it opens, click the “Graphics” tab and check the “GPU” section for your GPU name, clocks, memory, and technology. If you have more than one GPU, you can select it from the “Display Device Selection” dropdown at the top, with Intel and Vega graphics cards being integrated graphics.

How to Find Out Detailed Graphics Card Information with HWiNFO
HWiNFO is hardware information tool that provides a lot information than most tools. You can download it here.
- Perform a graphics card check with HWiNFO
Now that you know your graphics card, you may want to check our tutorial on how to check your RAM and how to stress test a CPU.
Open HWiNFO via your Start Menu and check the “GPU” section in the top right for your graphics card information. You can switch the “GPU #0” heading if you have more than one card.

Extra: How to Check What Processor / CPU Is in Your PC
The Processor, commonly known as the CPU (Central Processing Unit) in any computing system, is the main chip designed to accept and execute instructions and produce a result for a specific purpose. If you want to know what Processor you have in your PC, check out our other guide.
Extra: How to Check RAM Type, Speed and Size on Windows
Whether you’re planning an upgrade, tuning CPU timings, or just curious, it’s handy to know information about your RAM. However, with old methods not being as user-friendly, many are left wondering how to check RAM speed on Windows and find information like its size and type. In our other guide, we show you how to check RAM speed, type, and size using several built-in Windows tools. You can then decide what method works best for you if you want to check hardware information in the future.
Extra: How to Check Your Motherboard Model Information on Windows
Have you ever asked how to check the motherboard model in Windows? How to find the motherboard serial number? Our tutorial will show you 3 simple methods for checking your motherboard model and related information on Windows.
Extra: How to Check PC Specs with Windows System Information, PowerShell, and More
If your computer at least boots, there are several ways to find your system spec in Windows, from the system information tool to PowerShell, Command Prompt, and third-party tools. As not every method shows the same types and details of system specs, it´s good to always have some alternatives at hand.
Extra: How to Check Your Windows Version, Edition and Build Number
Understanding the version of your Windows operating system is crucial for a variety of reasons, such as installing new programs, troubleshooting, and ensuring you have the latest security updates. In our other guide, we show you how to find your Windows version, edition and exact build number with various internal tools.
Last Updated on December 12, 2023 6:02 pm CET by Markus Kasanmascheff
