Fonts are the “letters” used by word processing and other software such as Microsoft Word, OpenOffice, or Google Docs. Several font families and thousands of typefaces are accessible commercially and for free. You can save them to your word processor or art application, install them, and use them as you choose.
When you open Microsoft Word and start a new blank document, the default font is automatically set to Calibri. This is only helpful if you like Calibri and wish to utilize it frequently. Luckily, you can change the default font in Microsoft Word to your favorite one quite easily.
What is the default font in Word?
The most frequent default fonts in Word are Calibri and Times New Roman. Before you choose another font when you start a new document on your computer, the default font usually will be one of these two, depending on your version of Word. The default font size in Microsoft Word is being set to 11 or 12 points but you can also change this easily.
The instructions may alter depending on the version of Microsoft Office you are using. Microsoft Word 2010 and the following editions are nearly identical. Previous versions, such as the 2007 edition, differ quite substantially. For this guide, we have show you how to change the default font in Microsoft Word 2010 and the subsequent versions.
How To Change the Default Font in Microsoft Word
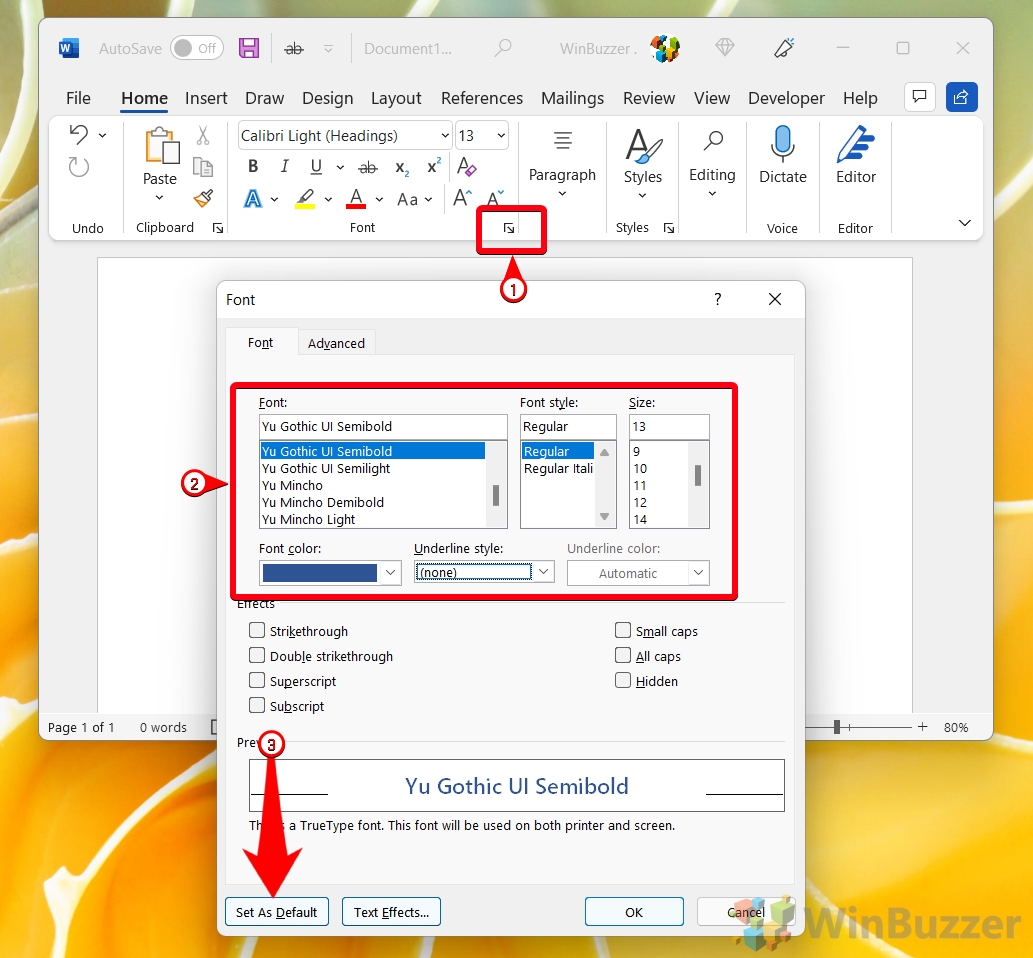
- Click at the bottom right corner of the “Font” panel, select any font you like, and click on “Set As Default”
You can choose the font size from the list of possible measures for that font in the right column.

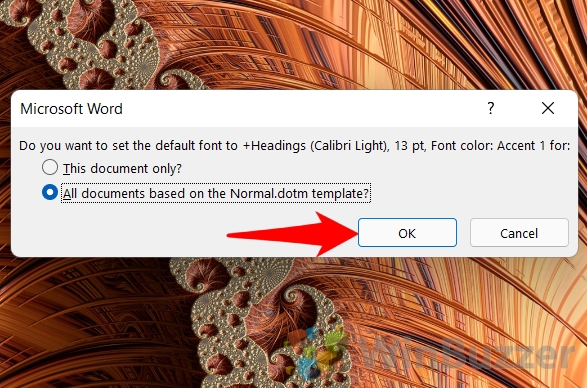
- Select “All documents based on the Normal.dotm template” by clicking the radio option, and then click on “OK”

How to Use Word Templates and Change the Template File “Normal.dotm”
The Microsoft Word Normal.dotm template is the default template that dictates the basic structure of any new document you create, such as margins, font style, and size. There might be times when you need to alter this template to suit your specific needs, or reset it if it becomes corrupted. In our other guide, we show you how to use templates in Microsoft Word, using the default Word template file “Normal.dotm”, individual templates created by yourself, or from the Free Microsoft Office Templates Catalog.
FAQ – Frequently Asked Questions About the Default Font in Microsoft Word
Can I set a custom font that I’ve downloaded as the default font in Word?
Yes, you can set a custom font as the default in Word, provided you’ve first installed the font on your operating system. After installation, open Word, navigate to the Font settings, select your custom font from the dropdown list, and then click “Set As Default“. Ensure the font is fully compatible with Word to avoid any display issues.
Will changing the default font in Word affect other Microsoft Office applications?
No, changing the default font in Word is specific to Word itself and does not automatically alter the default font settings in other Microsoft Office applications like Excel or PowerPoint. Each application maintains its own default settings, which must be changed individually if desired.
Can I have different default fonts for different types of documents?
Yes, to use different default fonts for various document types, you can create and save multiple templates, each with its own set of default fonts and styles. When starting a new document, choose the template that matches the type of document you’re creating. This way, each template maintains its specific default font settings.
How do I change the default font color in Word?
To change the default font color, open the Font settings dialog in Word, select the desired color from the color palette, and then click “Set As Default“. This will apply your chosen font color to all new documents based on the Normal.dotm template. Remember, this does not affect existing documents.
Is it possible to set a default font style (e.g., bold, italic) in Word?
Absolutely, within the Font settings dialog, you can select a font style such as bold or italic and then set it as the default for all new documents. This is particularly useful if you consistently require certain text sections, like headings, to be in a specific font style for emphasis or branding purposes.
What happens to the default font setting if I upgrade my Word version?
When you upgrade Word, there’s a chance that default settings, including the default font, might revert to the new version’s defaults. It’s a good practice to check your preferred settings after an upgrade and reapply them if necessary. Note that custom templates should be unaffected, but it’s wise to back them up before upgrading.
How do I revert to the original default font if I change my mind?
To revert to Word’s original default font, open the Font settings dialog, select the font (typically Calibri or Times New Roman, depending on your Word version) and font size (usually 11 or 12 points) that was originally set as the default, and then click “Set As Default.” This will reset the default font for all new documents.
If I share a document, will the recipient see the default font I set?
When you share a Word document, the recipient will see the document with the fonts you used, assuming those fonts are installed on their system. If the recipient doesn’t have the specific font, Word will substitute a similar font. To avoid font substitution, consider embedding fonts in the document, though be mindful of file size and licensing restrictions.
How do I ensure the font I set as default is available on other computers?
To ensure your default font is seen correctly on other computers, use a widely available font or embed the custom font within the Word document. Embedding ensures the font displays correctly on other systems but increases the file size and may have licensing implications. Check the font’s license to ensure embedding is permitted.
How can I change the default font for only specific sections of a document, like headings or footers?
To change fonts for specific sections such as headings or footers, modify these sections in a new document, selecting your desired fonts. Then, save these changes either in a specific template or by modifying the Normal.dotm template. This ensures your chosen fonts are applied automatically to similar sections in future documents.
Can the default line spacing be adjusted along with the default font?
Yes, you can adjust the default line spacing in Word by going to the Paragraph settings. Here, you can set your preferred line spacing options and then save these settings as the default for new documents based on the Normal.dotm template. This allows you to control the overall readability and appearance of your documents.
How do I back up my default font and other settings in Word?
To back up your Word settings, locate the Normal.dotm template file in your Word user templates folder and copy it to a secure backup location. This file contains your custom settings, including the default font. Regularly updating this backup ensures you can restore your preferred settings if needed.
Why can’t I find some fonts in Word’s font list to set as default?
If a font is not appearing in Word’s list, it might not be correctly installed, or it may not be compatible with Word. Ensure the font is installed in the correct folder on your operating system and is a TrueType or OpenType font, as these are most compatible with Word. Some fonts may also be restricted by licensing or security settings.
Does changing the default font affect existing documents?
Changing the default font in Word applies to new documents created after the change. It does not retroactively alter the font in existing documents. To change the font in an existing document, you must open the document and manually change the font.
Can I set a default font for tables separately in Word?
While Word doesn’t allow for a global default font specifically for tables, you can create custom table styles that include your preferred font settings. Apply these styles to tables as you create them to ensure consistency across your documents. This method offers a practical workaround for managing table aesthetics.
Related: How to Enable Autosave in Word to Never Lose Your Edits
Whether it’s due to an unstable power supply, a computer hiccup, or just human error, losing unsaved work is a problem that can strike at any time, leaving a trail of lost time and effort. This is where Microsoft Word’s Autosave feature becomes a true lifesaver. In our other guide, we show you how to enable Autosave in Word and explain the difference between using Autosave and Autorecover.
Related: How to do a Hanging Indent in Microsoft Word
A hanging indent, sometimes called a second line indent, is the practice of offsetting the second and subsequent lines of a paragraph. This indentation is typically five spaces, which translates to half an inch. The hanging indent is required for formatting in various style guides, including APA, Chicago, and MLA. In our other tutorial, we show you how to do a hanging indent in Word so you can get your work up to scratch.
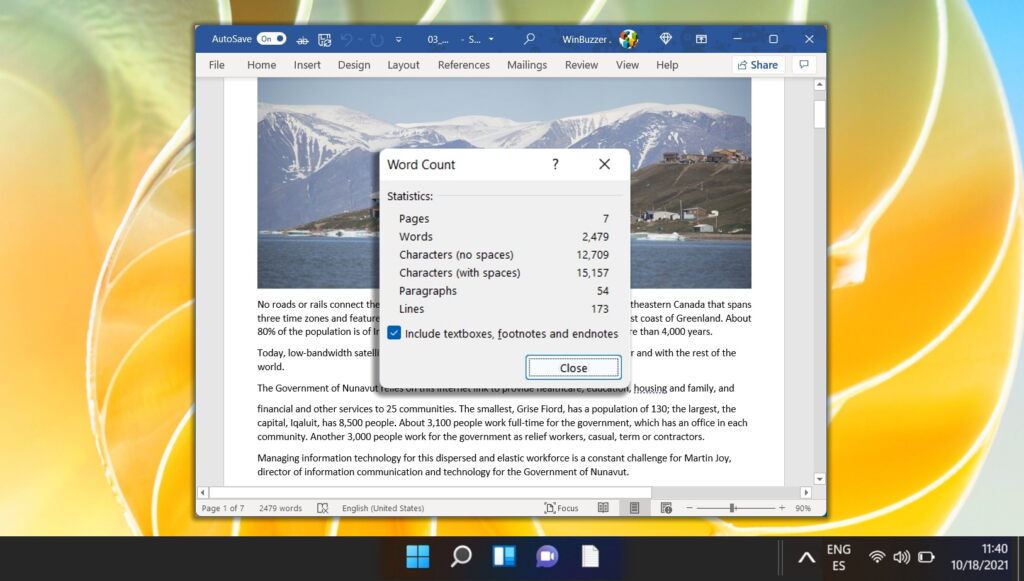
 Related: How to Check the Word Count in Microsoft Word and Word Online
Knowing the word count is important for almost every form of writing, whether it’s a novel, advertisement, or homework assignment. In our tutorial we show you how to check the Word count and character count in Microsoft Word using its built-in tools.
Last Updated on April 21, 2024 7:10 pm CEST by Markus Kasanmascheff

