

Creating a hanging indent in Microsoft Word is essential for formatting documents according to various style guides such as APA, MLA, and Chicago. This tutorial will guide you through the steps to create a hanging indent in Word, ensuring your documents meet academic or professional standards.
What is a hanging indent?
A hanging indent is where the first line of a paragraph is not indented, but subsequent lines are. This style is commonly used in bibliographies and reference lists, making it easier for readers to distinguish between entries.
How to Add a Hanging Indent in Word via Paragraph Formatting
This method is ideal for applying a hanging indent to individual paragraphs or a small section of your document. It utilizes Word’s built-in paragraph formatting options.
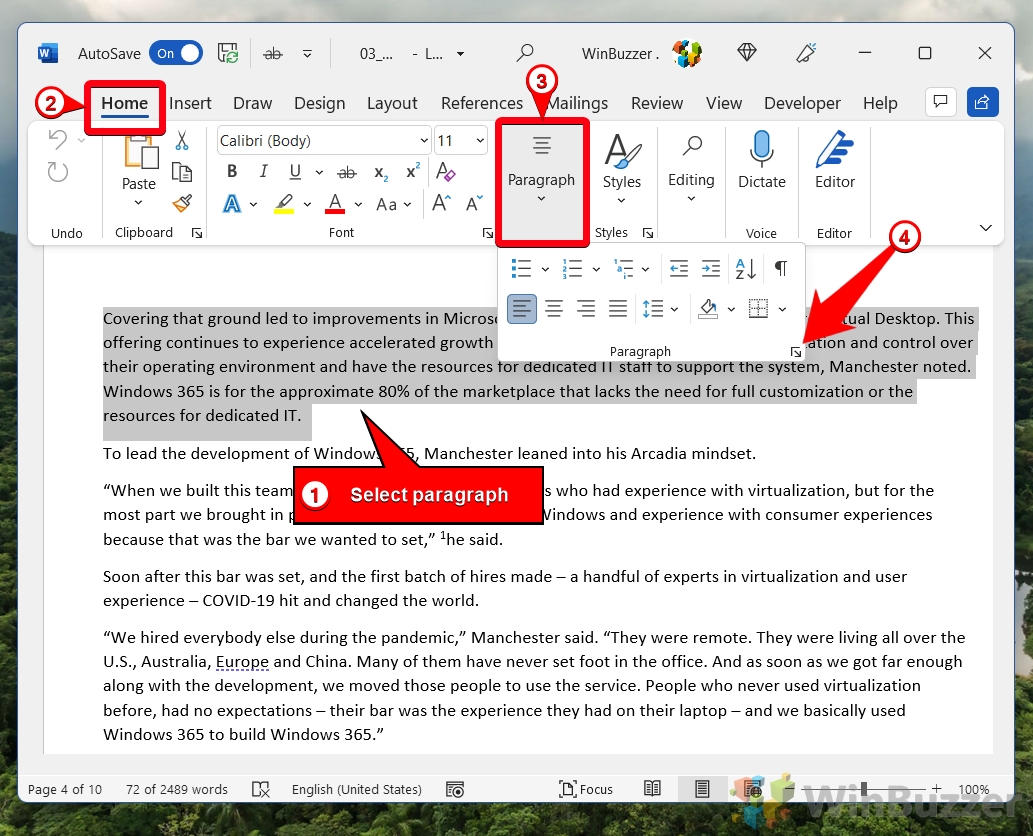
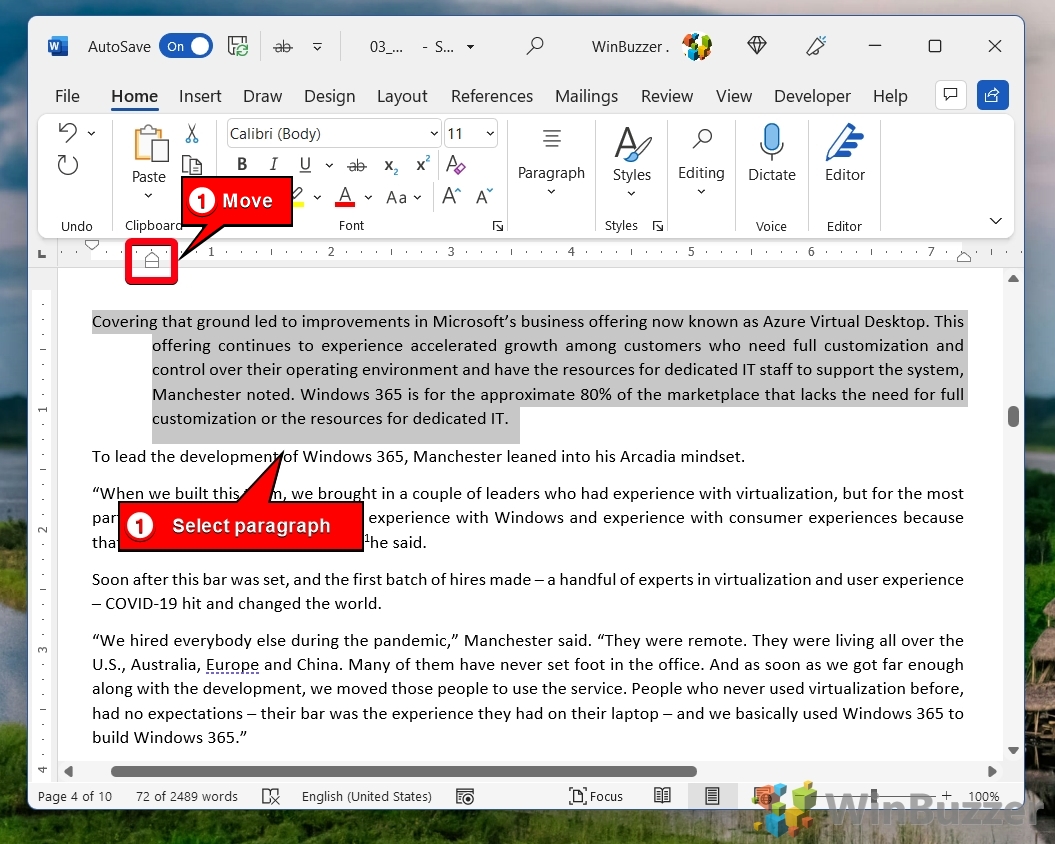
- Select Paragraph and Open Paragraph Dialog
To begin, highlight the paragraph you wish to format. Then, navigate to the “Home” tab and locate the paragraph section. Click the small paragraph flyout icon in the bottom right of the paragraph section to open the paragraph dialog box.
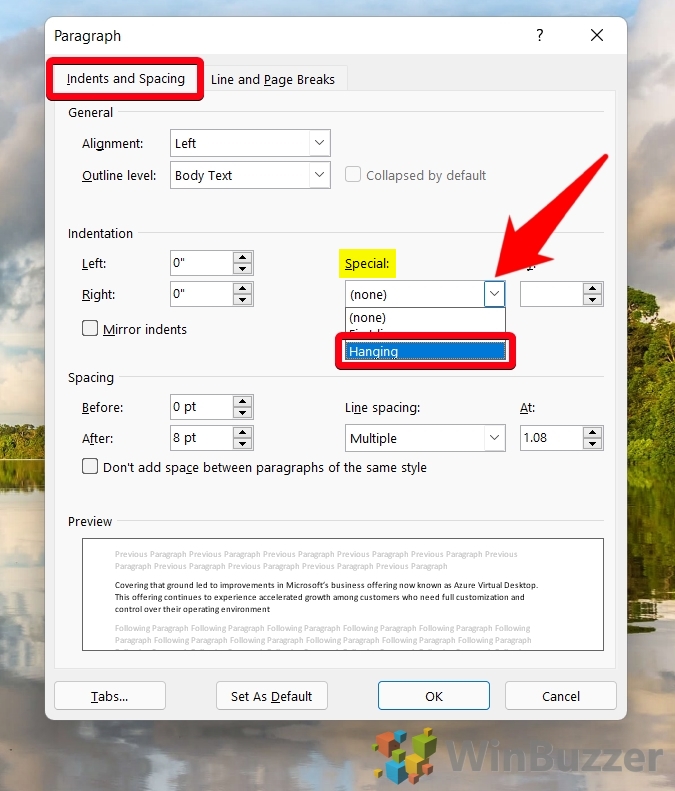
- Set Indentation to Hanging
In the paragraph dialog box, switch to the “Indents and Spacing” tab. Select “Hanging” from the “Special” dropdown menu. Word will automatically set the indentation to 0.5 inches (1.27cm).
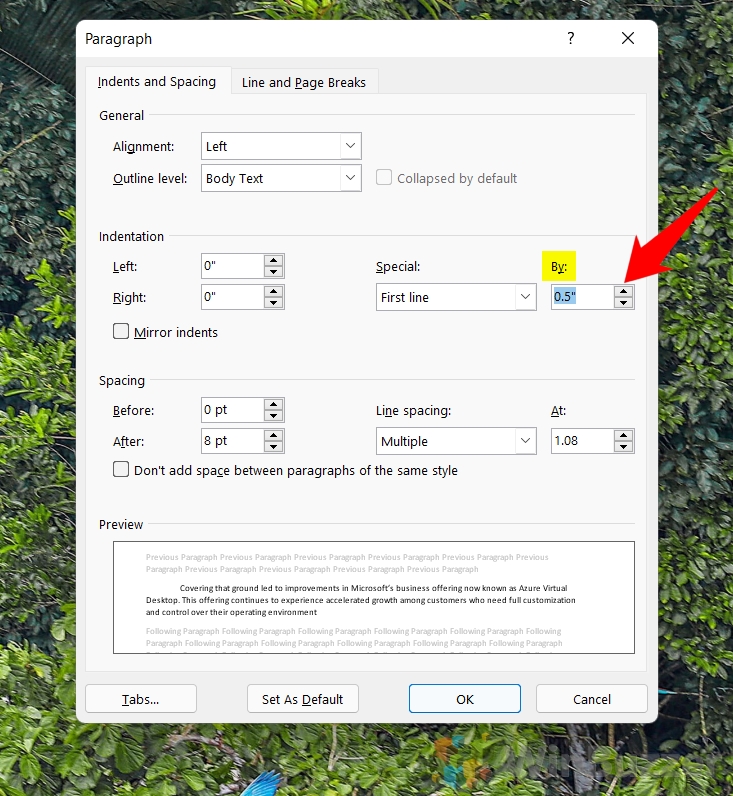
- Adjust Hanging Indent Size (Optional)
You can customize the indent size by modifying the value in the “By:” field.
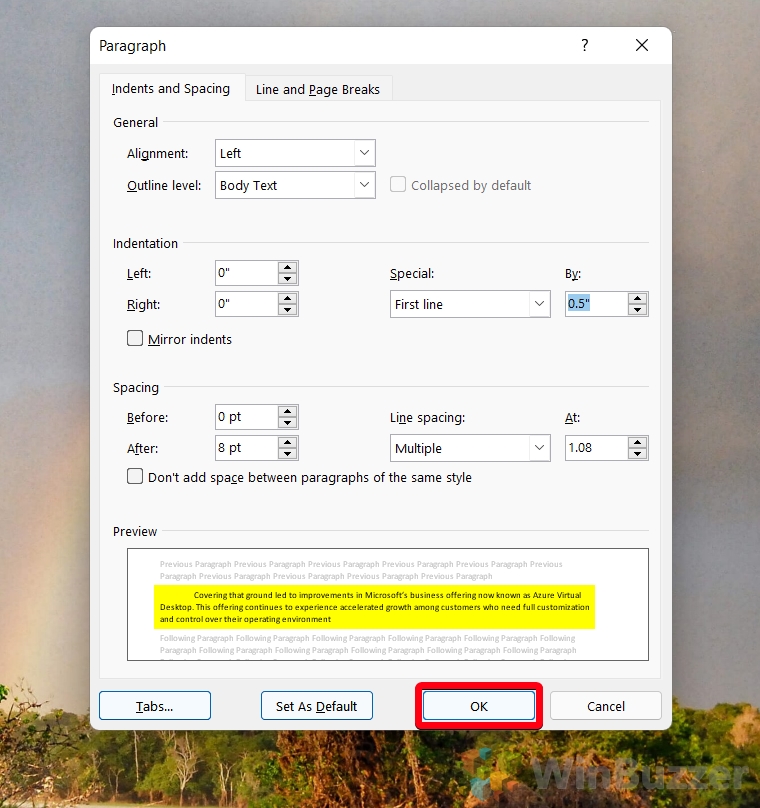
- Confirm and Apply Settings
Preview your changes in the dialog box to ensure they meet your requirements. Click “OK” to apply the hanging indent.
- Review in Document
Check how the hanging indent appears in your document. Formatting can sometimes look different in the preview.
- Enable Ruler for Adjustments (Optional)
For further adjustments, enable the ruler by going to the “View” tab and selecting “Show > Ruler“.

- Adjust Indent Using Ruler
With the ruler enabled, select your paragraph again. Drag the second marker on the ruler to adjust the size of your hanging indent.
How to Create a Hanging Indent in Word for References, Works Cited, or a Bibliography List
As we mentioned earlier, you’ll be using hanging indents most often when citing sources. Here’s how to do a hanging indent in Word in a way that applies it to your entire citation list. Applying a hanging indent to the entire list of references or a bibliography ensures consistency and readability.
- Select References and Access Paragraph Settings
Highlight all the references. Right-click on the selection and choose “Paragraph…” to open the paragraph settings.

- Apply Hanging Indent
In the “Indents and Spacing” tab, set “Special” to “Hanging“. This will apply a 0.5-inch hanging indent to your selection. You can manually change the “By:” field if necessary. Press “OK” to apply the changes.

- Review Applied Indentation
Review your document to ensure the hanging indent has been correctly applied to each citation.

How to Indent the Second Line in Word via a Style
Creating a dedicated style for hanging indents can streamline the formatting process for frequent users. If you often write academically, it’s worth setting up a formatting style in Word with the hanging indent applied to it. Once it’s set up, you can insert a hanging indent in Word in a single click.
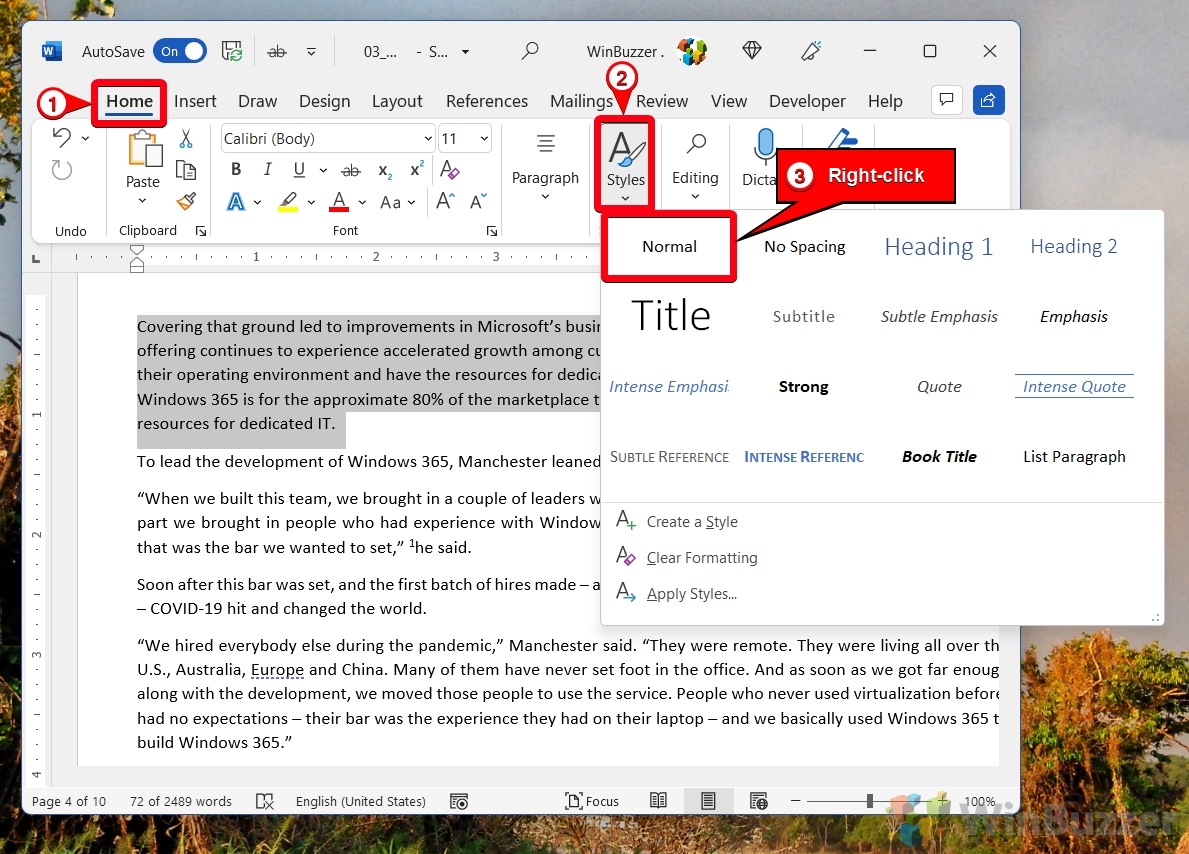
- Access Styles in Home Tab
Open the “Home” tab and right-click on any style in the Styles section.
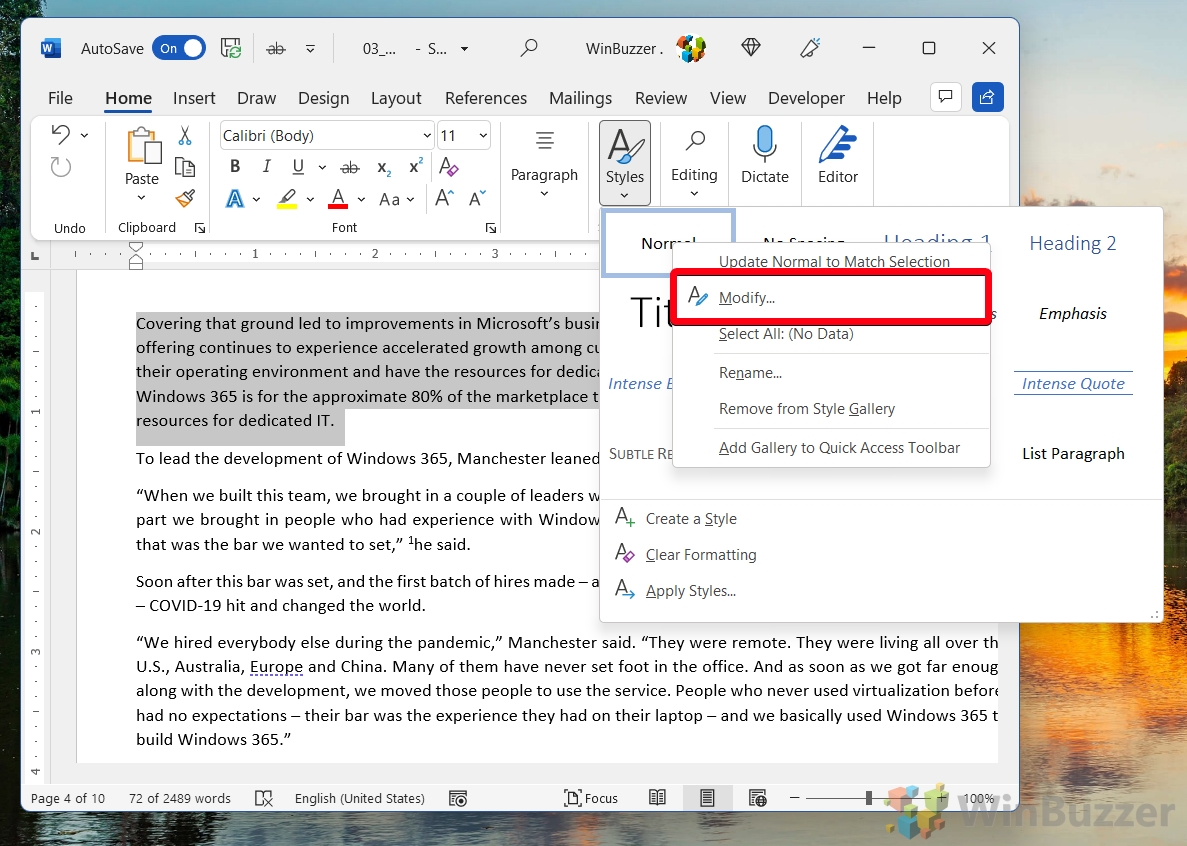
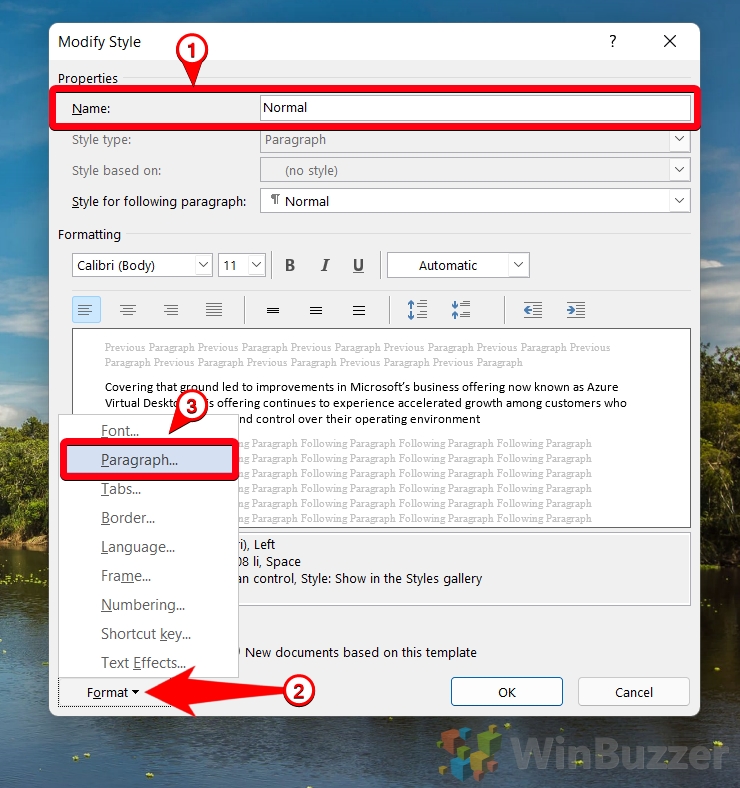
- Modify Style
From the context menu, select “Modify…” to open the style modification options.
- Create Hanging Indent Style
Rename the style to “Hanging Indent“. Click on “Format > Paragraph” to access the paragraph settings.
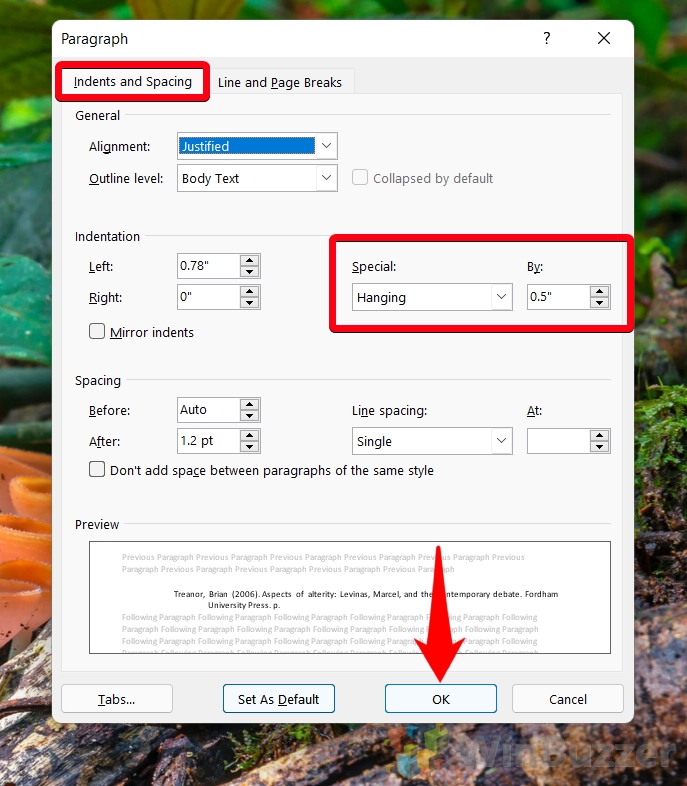
- Set Style to Hanging
Select “Hanging” from the “Special” dropdown under the “Indents and Spacing” tab.
Word will automatically set the indent to 0.5 inches (1.27cm). Confirm your settings by clicking “OK“.
- Apply Style to Paragraph
Select the paragraph you wish to format and click on the “Hanging Indent” style in the ribbon.

FAQ – Frequently Asked Questions About using Hanging Indents
How do you indent the second line of a reference in Word on a Mac?
To indent the second line of a reference on a Mac, first select the text you wish to format. Then click on “Format” in the menu bar, followed by “Paragraph.” In the dialog that opens, click the “Indents and Spacing” tab. From the “Special” dropdown menu, choose “Hanging.” Set the indent size, which is typically 0.5 inches for most referencing styles. Click “OK” to apply the changes to your selected text.
What is the standard size for a hanging indent?
The standard size for a hanging indent is 0.5 inches or roughly 1.27 centimeters. This measurement is commonly adhered to in academic writing and professional documents because it offers a clear visual distinction for each new entry or paragraph, promoting ease of reading. However, always check specific guidelines (like APA, MLA, or Chicago) as requirements might slightly vary.
How do you apply a hanging indent of 0.5 inches in Microsoft Word?
To apply a hanging indent of 0.5 inches in Microsoft Word, highlight the paragraph or text you want to format. Right-click on the highlighted area and select “Paragraph.” Under the “Indents and Spacing” tab, look for the “Special” dropdown menu and choose “Hanging.” By default, Microsoft Word sets the indent size to 0.5 inches, but if it’s different, manually enter 0.5 inches in the “By:” field next to the “Special” menu. Confirm your settings by clicking “OK.”
How do you indent both left and right in Word?
To indent text from both the left and right margins in Word, highlight the text you wish to format and right-click to select “Paragraph.” In the “Indents and Spacing” tab, under the “Indentation” section, you will find options for setting the “Left” and “Right” indents. Enter your desired measurements here (for example, 0.5 inches) and click “OK.” This will indent your selected text away from both margins by the amount specified.
How many spaces is a standard indent?
A standard indent is commonly recognized as five spaces, which translates to about 0.5 inches or 1.27 centimeters when using a word processor like Microsoft Word. This convention comes from the typical setting of manual typewriters used in the past. However, when formatting documents in Word, it’s more precise to set indents in inches or centimeters rather than spaces, ensuring consistency across the document.
How do I indent every paragraph in Word?
To indent every paragraph in a Word document, select all the text (you can do this quickly by pressing Ctrl+A on a Windows or Command+A on a Mac). Then right-click on the selection, and choose “Paragraph” from the contextual menu. In the “Indents and Spacing” tab, you can select “First line” under the “Special” dropdown to indent the first line of each paragraph, or choose “Hanging” to apply a hanging indent. Specify the size of the indent (e.g., 0.5 inches) and click “OK.” These settings will apply to all selected text.
Does Harvard referencing use hanging indents?
Yes, Harvard referencing style often recommends using hanging indents for the reference list at the end of academic papers, articles, or books. A hanging indent helps to visually separate each citation entry, making it easier for readers to navigate the references. Typically, a 0.5-inch indent is used. Always ensure to follow any specific instructions provided by your institution or publication for formatting references.
How does one set up a hanging indent for a works cited page?
To set up a hanging indent for a works cited page in Microsoft Word, highlight the entries you want to format. Right-click on the highlighted text and select “Paragraph.” Go to the “Indents and Spacing” tab and choose “Hanging” from the “Special” dropdown menu under the “Indentation” section. The default size of 0.5 inches is typically appropriate, but you can adjust it if your style guide requires it. Click “OK” to apply the hanging indent to your works cited page.
What is the quickest way to apply a hanging indent to multiple references?
The quickest way to apply a hanging indent to multiple references in Microsoft Word is to first select all the references you wish to format by clicking and dragging or using Ctrl+A (Windows) or Command+A (Mac) if you want to select all text. Then, on the ruler at the top of the page (make sure it’s visible by checking “View” > “Show” > “Ruler“), drag the lower triangle marker (which represents the hanging indent marker) to the right until it aligns with the 0.5-inch mark on the ruler. This action applies a hanging indent to the selected text instantly.
Why don’t we generally indent the first line of a paragraph in bibliographies or reference lists?
In bibliographies or reference lists, the first line of each entry is not indented to apply a hanging indent formatting style that enhances readability and organization. The uniform starting edge makes it easier for readers to spot where each new entry begins, while the indented subsequent lines help to visually separate individual entries from each other, facilitating quick reference and scanning of the document.
How do you indent a quotation in Word following Harvard style?
In Harvard style, quotations longer than a certain threshold (typically 40 words) should be formatted as a block quote. To indent a block quotation in Word, first select the quote text, then right-click and choose “Paragraph.” In the dialog that opens, under “Indentation,” set the “Left” indent to 0.5 inches or as advised by your style guide. Block quotes are usually separated from the main text by a line space above and below and do not require quotation marks.
What are the rules for using indentation in academic writing?
In academic writing, different types of indentation are applied to serve specific purposes. The first line indent is used to signify the start of a new paragraph, making text easier to read. Hanging indents are often used in references and bibliographies to visually delineate each entry, enhancing navigability. Always adhere to the specific guidelines provided by your style guide (APA, MLA, Harvard, etc.) as practices can vary slightly.
How do you automatically indent all paragraphs in a document?
To automatically indent all paragraphs in a Microsoft Word document, select the text you want to format (Ctrl+A for all text), then right-click and choose “Paragraph.” In the “Indents and Spacing” tab, choose “First line” from the “Special” dropdown menu for a standard first-line indent, or select “Hanging” to apply a hanging indent. Enter the size of the indent (usually 0.5 inches) and click “OK.” This operation will apply your chosen indent style to all selected paragraphs.
Why might paragraphs not be indenting correctly in Word?
If paragraphs are not indenting correctly in Word, it could be due to conflicting formatting applied to the text, overrides from pasted content, or incorrect settings in the Paragraph dialog box. To resolve this, select the problematic paragraph(s), clear all formatting (under the “Home” tab, click the eraser icon “Clear All Formatting“), and reapply your desired indent settings through the “Paragraph” dialog. Ensuring that no style overrides or direct formatting issues are influencing your document will help achieve the desired formatting.
Is there a shortcut for quickly creating a hanging indent in Word?
Although there’s no single keyboard shortcut for creating a hanging indent in Word, you can quickly set one by using the ruler. First, ensure the ruler is visible by checking “View” > “Ruler“. Then, select the text you wish to format, and on the ruler, drag the lower triangle (the Left Indent marker) to your desired indent value, typically 0.5 inches. This action will not move the upper triangle (First Line Indent marker), thus creating a hanging indent. For those frequently working with hanging indents, setting up a specific style in the “Styles” pane for quick application can also save time.
Extra: How to Use Word Templates and Change the Template File “Normal.dotm”
The Microsoft Word Normal.dotm template is the default template that dictates the basic structure of any new document you create, such as margins, font style, and size. There might be times when you need to alter this template to suit your specific needs, or reset it if it becomes corrupted. In our other guide, we show you how to use templates in Microsoft Word, using the default Word template file “Normal.dotm”, individual templates created by yourself, or from the Free Microsoft Office Templates Catalog.
Extra: How to Change the Default Font in Word
When you open Microsoft Word and start a new blank document, the default font is automatically set to Calibri. This is only helpful if you like Calibri and wish to utilize it frequently. Luckily, you can change the default font in Microsoft Word to your favorite one quite easily. In our other guide, we show you a simple way to change the default font and default font siize in Microsoft Word by setting a different font for the “normal.dotm” template.

Extra: How to Insert a Footnote or Endnote in Microsoft Word
The ability to insert footnotes and endnotes in Microsoft Word documents is indispensable. These elements serve not only to cite sources and provide additional context but also to enhance the readability and credibility of your document. Whether you’re drafting a scholarly article, a detailed report, or any comprehensive document, understanding the nuances of footnotes and endnotes is crucial. In our other guide, we show you how to add a footnote or endnote in Word using the software’s built-in tools, whilst also explaining the difference between the two.

Extra: How to Add Page Numbers in Word and Modify Them If Needed
Page numbers in Word are a valuable tool to help you order pages after printing or quickly reference information for other readers. Though inserting page numbers in Word in the base form is quite easy, it gets more complex once you start to modify them to suit your exact needs. In our other guide, we show you how to insert page numbers in Word, including how to skip the first page number and access the various styling options.
Extra: How to Double Space in Word
With your footnotes and endnotes out of the way, you might want to get the rest of your paper up to standard. Many style guides ask you to double or 1.5 space your piece to allow for easier written comments. A “Double spaced” document is a text with approximately twice the amount of vertical space between lines when compared to a standard document. In other words, there’s a full blank line between each row of text that an editor can write in. In typography, this space between lines is called “leading”. In our other guide, we show you how to do double spacing in Word, while explaining what double spaced means and why it’s important.


