Windows 10 brings plenty of upgrades to the sign-in experience, but it also comes with some annoyances. One of them is its insistence on showing the user who last signed-in. This can be an issue in some environments where security is important, but you can enforce a ‘Do not display last user name’ policy to remedy this.
Enabling the policy will prevent the full name of the last user from displaying on the sign-in screen. Instead, it will just display “Other user” at startup, making it harder for someone to guess the credentials.
If the computer has been signed into and recently locked or restarted, it will instead show the currently active user and a ‘Switch user’ button in the bottom left corner, rather than a username and profile picture. With that explained, let’s jump into how to enable the ‘Do not Display last signed-in user name’ policy in Windows 10:
How to Enable ‘Do Not Display Last Signed-In User Name’ via Local Security Policy
As with most methods, there’s a user-friendly and non-user-friendly way of doing things. The most UI-heavy method is the Local Security Policy app, which we’ll cover first.
- Open Local Security Policy
Press “Windows + R”, type “secpol.msc”, and press “OK” to open the Local Security Policy app.
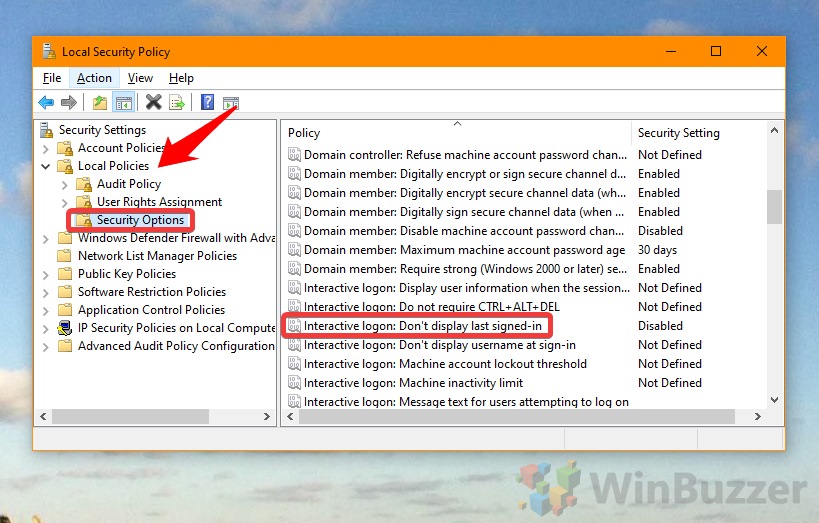
- Navigate to the “Interactive Login: Don’t display last signed-in” policy
In the left sidebar, navigate to “Local Policies > Security Options”. In the main pane, double-click “Interactive logon: Don’t display last signed-in”.
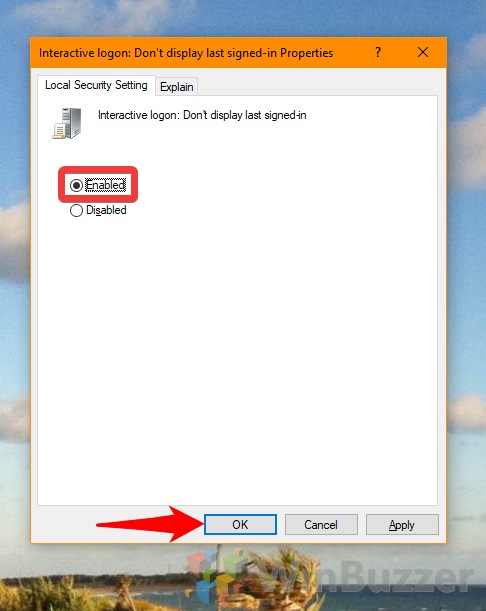
- Switch “Interactive Logon: Do not display last username” to “Enabled”
Press “OK” when you’re finished.
- Read the Explainer
Switch to the “Explain” tab if you’d like more information on the behavior of the sign-in/log-in screen in different scenarios. Enabling the policy disables the username display while disabling it shows the username.


How to Enable ‘Interactive Logon: Do Not Display Last User Name’ via Registry Editor
If you don’t have access the the Local Security Policy editor, which may be the case for Windows 10 Home users, you can edit your registry for the same effect.
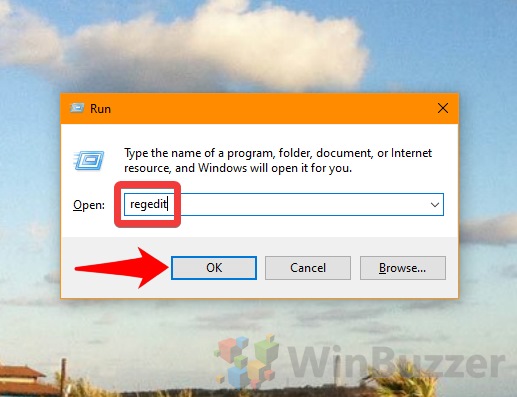
- Open the Registry Editor
Press “Windows + R” and type “regedit”. Click “OK”.
- Navigate to the system policies key and edit the “dontdisplaylastusername” DWORD
In the search bar, paste:HKEY_LOCAL_MACHINE\SOFTWARE\Microsoft\Windows\CurrentVersion\Policies\System.
Double-click the “dontdisplaylastusername” DWORD to edit it, setting it to “0” to turn off the last user name or “1” to keep them on.