
System Restore is a vital feature in Windows 11, often used as a quick fix for various system errors and issues. It allows users to revert their computer's system files, program files, and registry settings to an earlier state, providing a potential solution when troubleshooting problems like BSOD errors, driver crashes, or Wi-Fi issues. However, not all system restores go as planned. Sometimes, a restore might lead to the loss of critical applications or fail to resolve the existing problem. In such cases, undoing a system restore becomes necessary.
Understanding System Restore
Before diving into how to undo a system restore, it's essential to understand what it entails. A system restore in Windows 11 essentially takes your computer back in time to a previous state. This state is determined by a restore point, which is a snapshot of your system's settings and configurations at a particular moment. It's important to note that system restore does not affect personal files but may modify system files to revert to the earlier state.
Why Undo a System Restore?
There are several reasons why you might need to undo a system restore in Windows 11:
- Unresolved Issues: The system restore did not resolve the problem you were facing.
- Loss of Applications: You might lose access to critical applications that were installed after the restore point was created.
- Incorrect Restore Point: Sometimes, the restore point might be set before the actual start of the problem, rendering the restore ineffective.
You can undo a System Restore in Windows 11 on the running system, or if your PC does not boot properly, via “Advanced Startup Options” before boot.
How To Undo a System Restore in Windows 11
This is the standard method of undoing a system restore in Windows 11 when you can access your operating system normally. It's the go-to approach if you've performed a system restore and subsequently encountered issues or didn't achieve the desired outcome. You can do this from within the Windows interface, specifically through the System Properties applet, which is ideal for situations where the system is stable and bootable. We'll guide you through a step-by-step process to safely revert your system to its state before the restore, ensuring minimal disruption to your workflow.
- Open Windows 11 Settings

- Open “System” and click on “About”

- Click on “Advanced system settings”

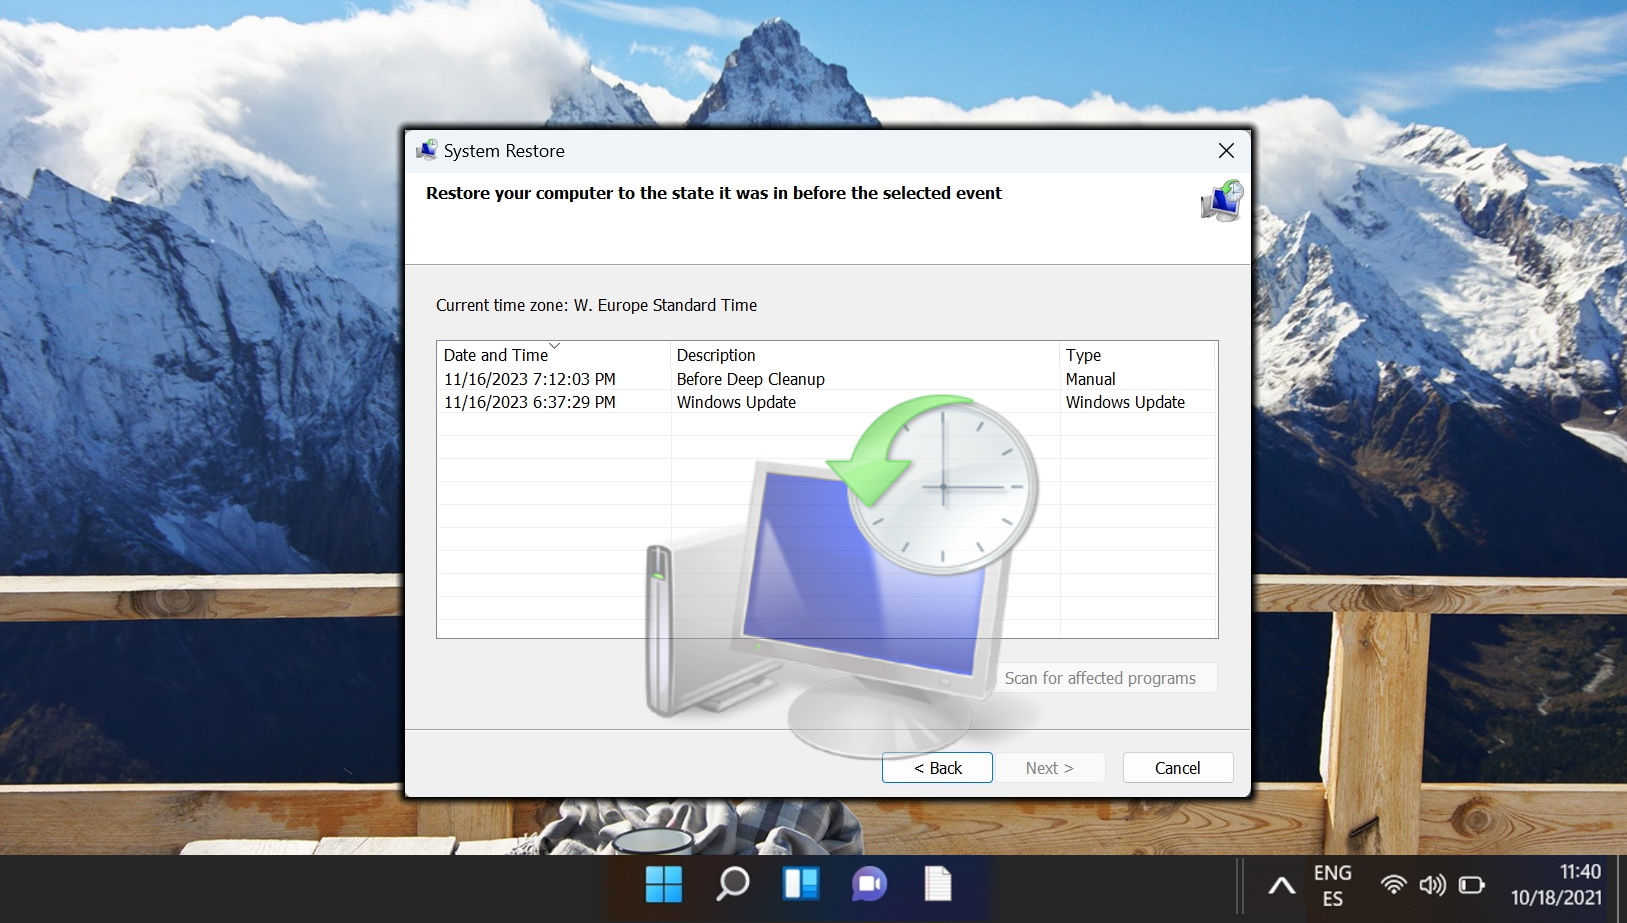
- Open “System Protection” and click “System Restore”

- Select “Undo System Restore” and click on “Scan for affected programs”
This scans your system to identify which programs and drivers will be affected by reverting to the selected restore point.

- Review “Programs and drivers that will be deleted”
You will see a list of updates, programs and drivers that were removed by the initial system restore and will now be restored by undoing it. Conversely, it also shows which programs and drivers that were added back by the system restore will be removed again. This feature is crucial for understanding the impact of undoing a system restore. It informs you about the changes that will occur in your system's software and drivers, helping you make an informed decision about whether to proceed. Knowing which applications and drivers will be affected allows you to plan for any necessary reconfigurations, re-installations, or updates after undoing the system restore.

- Back in the selection screen, click “Next”

- Click “Finish” to confirm

- Click “Yes” to start undoing the system restore

- Click “Close” or “Restart if required

How to Undo a System Restore Before Booting Windows 11
This method is crucial if the system restore has rendered your system unbootable or if you're encountering severe issues preventing normal access to Windows. The process involves using the Windows Recovery Environment (WinRE), a powerful toolset for troubleshooting and repairing various system issues. This method is a bit more technical and requires navigating through the advanced startup options to access system restore settings. It's particularly useful when standard methods within the operating system are not feasible due to booting problems.
- Start the Windows Recovery Environment (WinRE) and select “Troubleshoot”
- Interrupt the Boot Process
Power On and Off: Turn on your PC and as soon as the Windows logo appears (or just after the BIOS/UEFI screen), press and hold the power button until the PC shuts down.
Repeat the Process: Repeat this process 2-3 times. On the third or fourth attempt, Windows should enter the Windows Recovery Environment automatically.
- Boot from a Windows Installation Media
Insert Media: Insert the Windows installation USB or DVD and restart your computer.
Boot from Media: You may need to change your BIOS/UEFI settings to boot from the USB/DVD. This usually involves pressing a key (like F2, F12, Del, etc.) during startup to enter the BIOS/UEFI settings.
Choose Language and Preferences: Once booted from the media, choose your language and other preferences.
Select ‘Repair Your Computer': On the Windows Setup screen, instead of choosing “Install now,” select “Repair your computer” at the bottom left.
Access WinRE: This will take you to the Windows Recovery Environment.

- Interrupt the Boot Process
- Select “Advanced options”

- Select “System Restore”

- Click “Next”

- Select the system restore to undo
Select the entry that shows “Undo” in the “Type” column on the right
Click “Scan for affected programs” which scans your system to identify which programs and drivers will be affected by reverting to the selected restore point.

- Review “Programs and drivers that will be deleted”
You will see a list of programs and drivers that were removed by the initial system restore and will now be restored by undoing it. Conversely, it also shows which programs and drivers that were added back by the system restore will be removed again. This feature is crucial for understanding the impact of undoing a system restore. It informs you about the changes that will occur in your system's software and drivers, helping you make an informed decision about whether to proceed. Knowing which applications and drivers will be affected allows you to plan for any necessary reconfigurations, re-installations, or updates after undoing the system restore.

- Click “Next” to proceed undoing the system restore

- Click “Finish” to confirm

- Click “Yes” to start undoing the system restore

- Click “Restart” to boot again into Windows 11

How to Use System Restore in Windows 11
System Restore isn't automatically active in Windows 11. Users need to take the initiative to enable this feature, setting the stage for their system's safety net. In our other guide, we show you how to create system restore points in Windows 11 manually or automatically and how to return to a previously created restore point.
FAQ – Frequently Asked Questions About System Restore in Windows
How can I protect my personal data before performing or undoing a system restore?
To safeguard your personal data, it's essential to back it up before undertaking system changes. Use external drives, cloud storage, or network-attached storage devices for backup. Windows also offers built-in backup solutions under Settings > Update & Security > Backup. You can choose from options like File History or Backup and Restore (Windows 7) to create copies of your files. Regular backups ensure that, in the unlikely event of data loss during system restoration processes, you have up-to-date copies of your important files.
What should I do if the “Undo System Restore” option is greyed out or unavailable?
If the “Undo System Restore” option is unavailable, first ensure you're logged in as an administrator, as this function requires administrative privileges. If the issue persists, it might indicate that there's no previous restore point to revert to. In such cases, explore alternative troubleshooting steps like running system file checks (using the sfc /scannow command in Command Prompt), performing a disk cleanup, or seeking assistance from Microsoft Support or a professional technician for more complex system issues.
Can I create a system restore point manually before undoing a system restore?
Absolutely. Creating a manual system restore point before undoing a previous restore is a prudent measure. To do this, type “Create a restore point” in the Windows search bar and open the System Properties dialog. Under the System Protection tab, select your system drive, click “Create” and follow the prompts. Label your restore point with a clear, descriptive name to easily identify it later. This newly created restore point can serve as a fallback in case the undo process leads to unexpected issues.
How do I manage the disk space allocated for system restore points?
Managing disk space for system restore involves adjusting how much of your drive's space is reserved for storing restore points. In the System Protection tab of the System Properties dialog, select your main system drive and click on “Configure“. Here, you can use the slider to increase or decrease the percentage of disk space allocated to system restore points. Be mindful that allocating more space allows for more restore points, offering a broader safety net for system recovery, but also reduces the usable space for other data on your drive.
What are the implications of undoing a system restore on network settings?
Undoing a system restore can revert network settings and configurations to their state at the time of the restore point, potentially disrupting connections established after that point. This includes Wi-Fi profiles, VPN configurations, and other network-related settings. After undoing a system restore, you may need to reconnect to networks, re-enter security keys, or reconfigure VPN and other network settings to restore your connectivity according to your current needs.
Can antivirus software interfere with the process of undoing a system restore?
Antivirus software can sometimes interfere with system restore processes by mistakenly identifying these actions as malicious. If you encounter issues, temporarily disable your antivirus software before starting the undo process. Ensure to re-enable it immediately after to keep your system protected. If your antivirus offers a ‘passive' or ‘gaming' mode, activating it during the restore can also minimize interference without fully disabling protection.
Is it possible to undo a system restore from Safe Mode?
Yes, undoing a system restore from Safe Mode is possible and can be a useful approach when dealing with system instability or when normal boot is problematic. To enter Safe Mode, restart your computer and press the F8 key (or Shift + F8 on some systems) during boot-up. Select “Safe Mode” from the Advanced Boot Options menu. Once in Safe Mode, follow the same steps to access System Restore and proceed with undoing the restore as you would in a normal system state.
How do I know which drivers will be affected before undoing a system restore?
The “Scan for affected programs” option during the system restore process provides a detailed list of applications and drivers that will be affected by undoing the restore. This list includes both the programs/drivers that will be restored to their previous state and those that will be removed. Reviewing this list helps you understand the changes that will be made, allowing you to prepare for necessary re-installations or updates to drivers and software post-undo process.
What happens if my computer loses power during the undo process?
A power loss during the undo process can lead to system instability or corruption. If this occurs, try booting into Safe Mode to assess and repair potential damage. Running system diagnostics and repair tools like “Startup Repair” from the Advanced Boot Options or the Windows Recovery Environment (WinRE) can help address boot issues. If problems persist, you might need to perform a more comprehensive system repair or recovery from a recent backup.
Can undoing a system restore fix issues caused by a recent Windows update?
Undoing a system restore can revert your system to a state before a problematic Windows update was installed if the restore point was created prior to the update. However, for issues specifically related to Windows updates, using the built-in update rollback features or the “Recovery” options in Settings > Update & Security might provide a more targeted solution, allowing you to remove recent updates while keeping other system changes intact.
How often should I create system restore points?
It's advisable to create system restore points at key moments, such as before installing new software, applying significant updates, or making major system changes. While Windows creates restore points automatically before certain events, manually creating them ensures you have a recent fallback option. Regular, proactive management of restore points—weekly or bi-weekly, depending on your usage and changes made to the system—can help maintain a robust safety net for system recovery.
What to do if undoing a system restore does not resolve my original issue?
If undoing a system restore doesn't address your issue, consider alternative troubleshooting steps such as running built-in Windows diagnostics, performing a clean boot to diagnose software conflicts, or using the “Reset this PC” feature, which allows you to reinstall Windows while keeping or removing personal files. Consulting online forums, Microsoft support, or a professional technician can also provide tailored advice for more complex issues.
Can I undo a system restore initiated by Windows Update?
System restores initiated by Windows Update, typically created automatically before an update is applied, can usually be undone like any manual restore point. However, it's important to consider the implications of reverting such changes, as it may lead to the loss of important security patches or feature updates. Always weigh the need to undo the restore against the potential benefits of the updates that were applied.
Are there any alternatives to system restore for troubleshooting system issues?
Besides system restore, Windows offers several tools for troubleshooting and resolving system issues. The “Fresh Start” and “Reset this PC“ features provide more comprehensive recovery options, allowing you to reinstall Windows while keeping or removing personal files. The “Startup Repair” tool can fix boot-related problems, and the “Command Prompt” in the Windows Recovery Environment allows for advanced troubleshooting. Third-party software and bootable recovery media can also offer additional repair and recovery capabilities.
How can I disable system restore if I prefer not to use this feature?
To disable system restore, navigate to the System Properties dialog, under the System Protection tab. Select your system drive, click “Configure,” and then choose “Disable system protection”. Be mindful that this action deletes existing restore points and prevents the creation of new ones, removing a layer of safety for your system. Consider maintaining regular backups or exploring alternative recovery solutions if you choose to disable this feature.
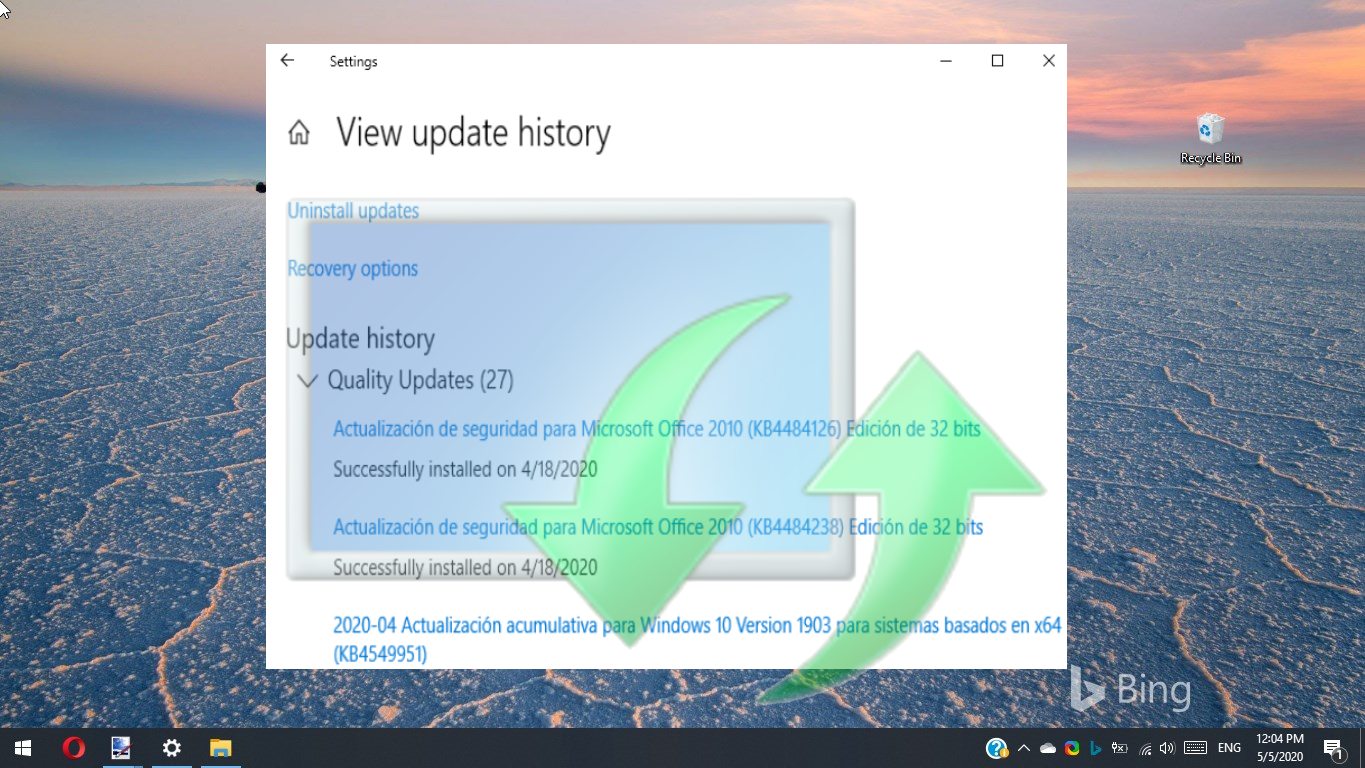
Extra: How to Uninstall or Roll Back Any Windows Update
When it comes to feature updates, Microsoft makes this clear and easy. A simple button press in update settings is all you need to remove it. However, you may be wondering how to restore your previous version of Windows when it's cumulative, a change to drivers, or a security patch. In our other guide we show you how to roll back or undo Windows updates via its hidden list of updates, including changes to drivers and security.
Last Updated on April 19, 2024 9:52 am CEST by Markus Kasanmascheff


