

As an admin, it’s important to have the tools to control the apps and files users can run. The truth is that in a day-to-day work environment there are many applications and file types that employees don’t need, but present a significant risk. One example of this is scripts. As a result, today we’ll be showing you how to use AppLocker to block script files from running in Windows 10 or Windows 11.
AppLocker is a built-in tool for Windows 11 or Windows 10 in the Enterprise and Education editions that lets IT professionals define the apps and file types users can or cannot run. It provides a simple interface to block an application from running based on a series of rules.
How to use AppLocker to block a script
To block a script file with Windows AppLocker, you must define a new rule to deny it for a user or group. You can, for example, block scripts for all general users, but allow them for admins.
How to Configure AppLocker to Allow or Block Script Files from Running
Before we start adding rules, we need to make sure the application identify service is enabled and set to start automatically. Without this service, AppLocker will be unable to enforce any script rules you define and, therefore, be essentially useless. Here’s how you can enable it and then block scripts using AppLocker in Windows 11 or Windows 10.
- Open Command Prompt as Administrator
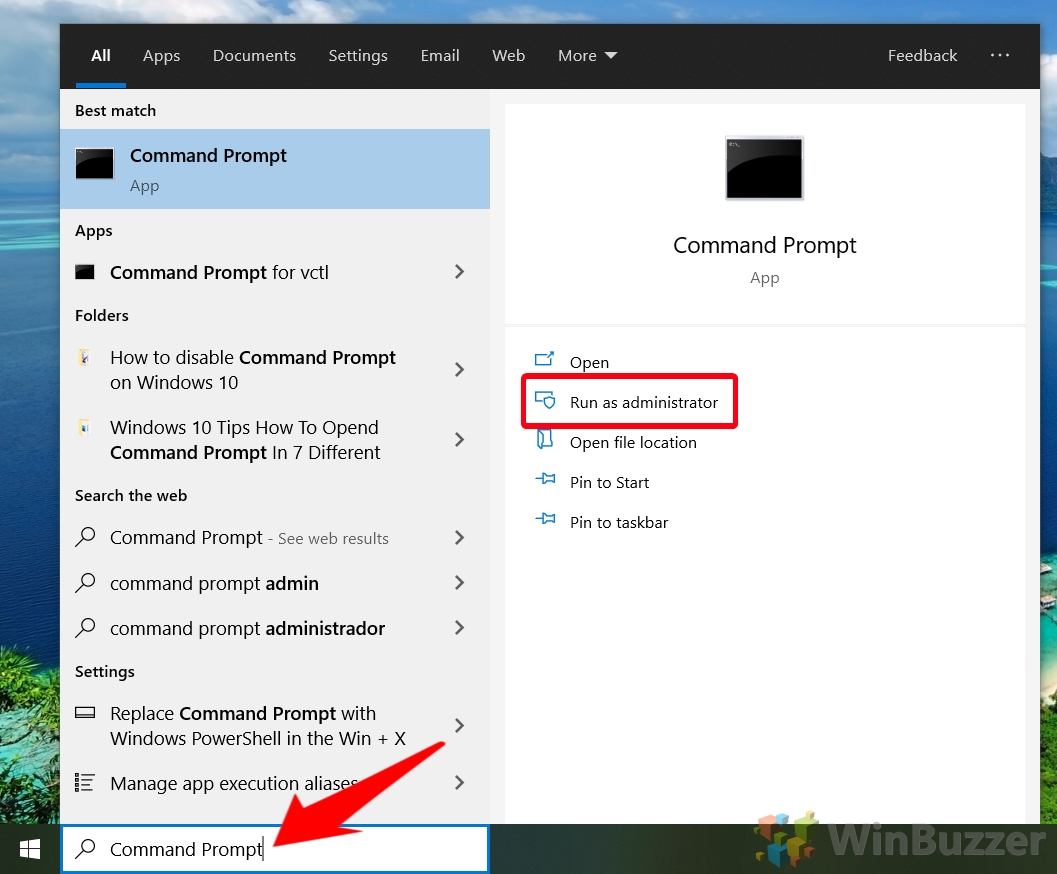
Press the “Start” button, type “Command Prompt”, and select “Run as administrator” from the right-hand side. This step is essential for executing commands that require administrative privileges.
- Activate the Application Identity Service
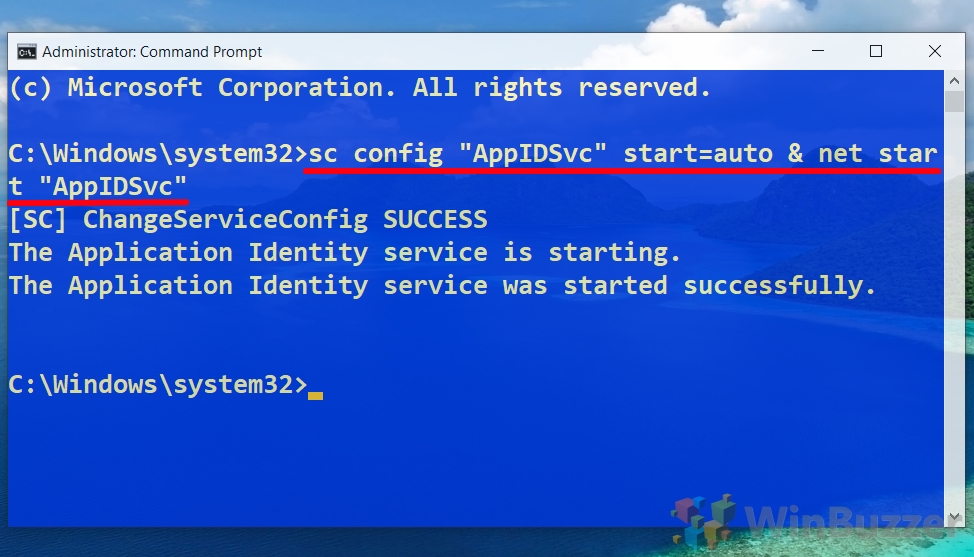
With the Command Prompt open, enable the Application Identity service by typing the command:sc config "AppIDSvc" start=auto & net start "AppIDSvc". This ensures the service starts automatically and is currently running, which is necessary for AppLocker to function.
- Access the Local Security Policy App
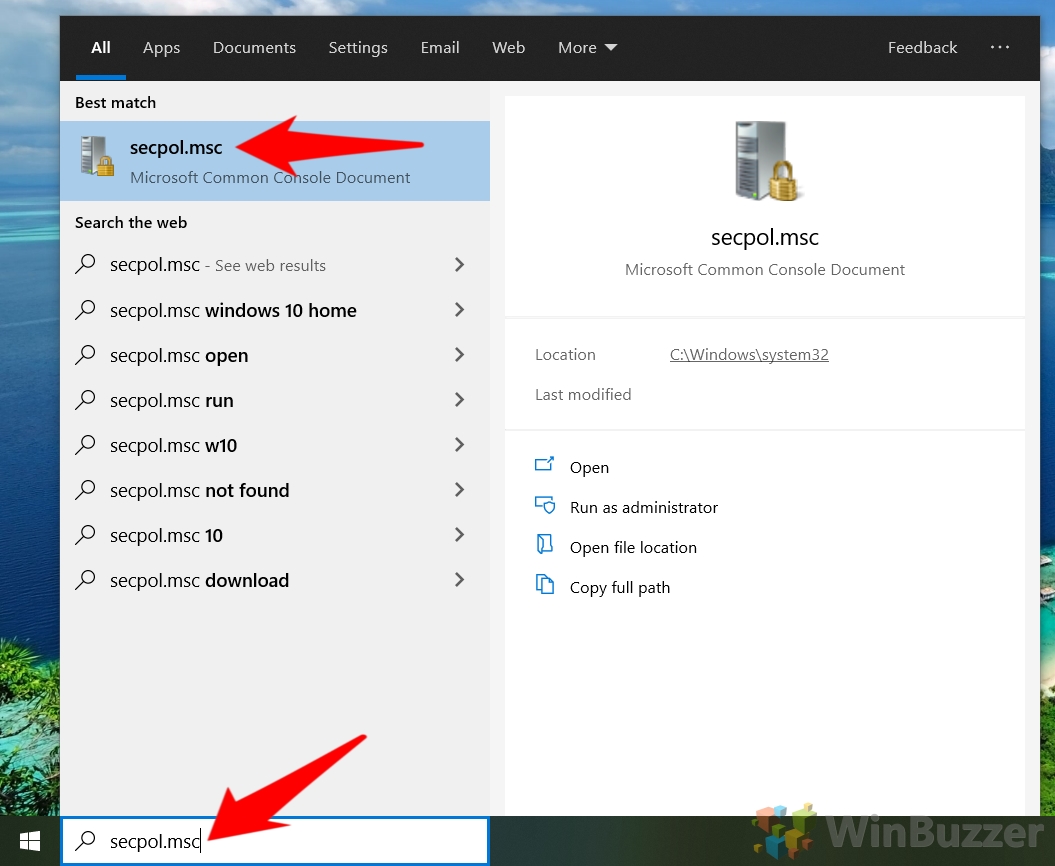
Press Start and type “secpol.msc”. Click on the top result to launch the Local Security Policy editor.
- Navigate to AppLocker Rule Enforcement Settings
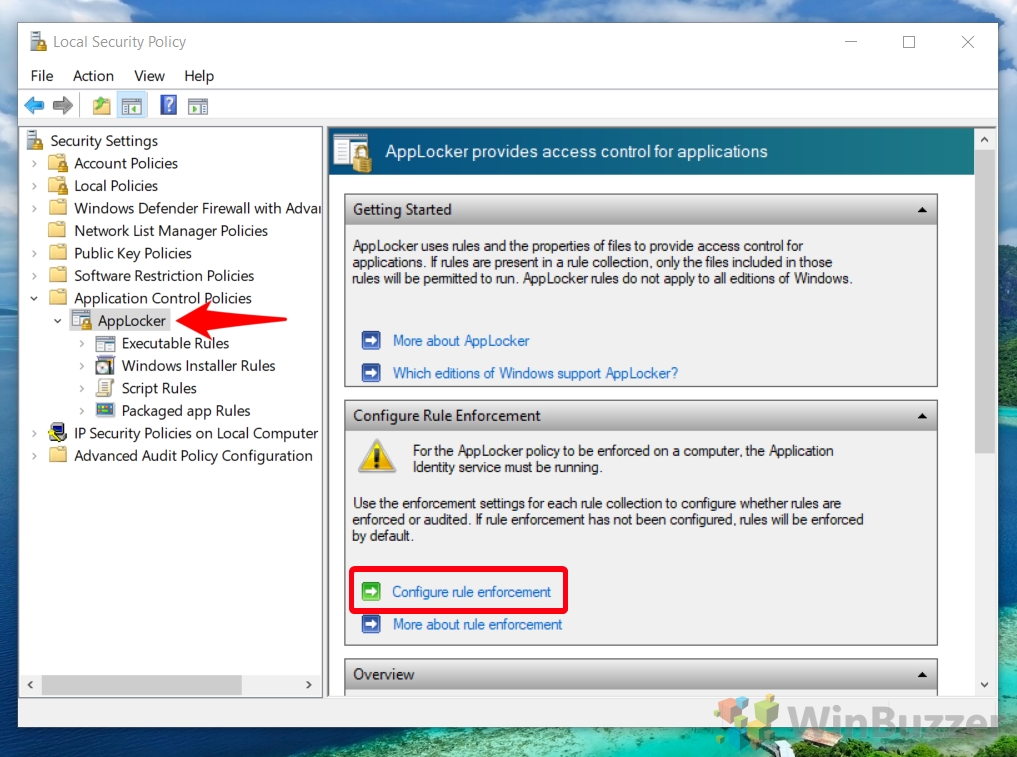
In the Local Security Policy app, expand the “Application Control Policies” folder, click on “AppLocker”, and then select “Configure rule enforcement”. This action opens the settings where you can specify which rules AppLocker should enforce.
- Enable AppLocker Script Rules
In the AppLocker Properties window, check the box next to “Script rules > Configured” and click “OK”. This step allows you to create and enforce rules specifically for script files.

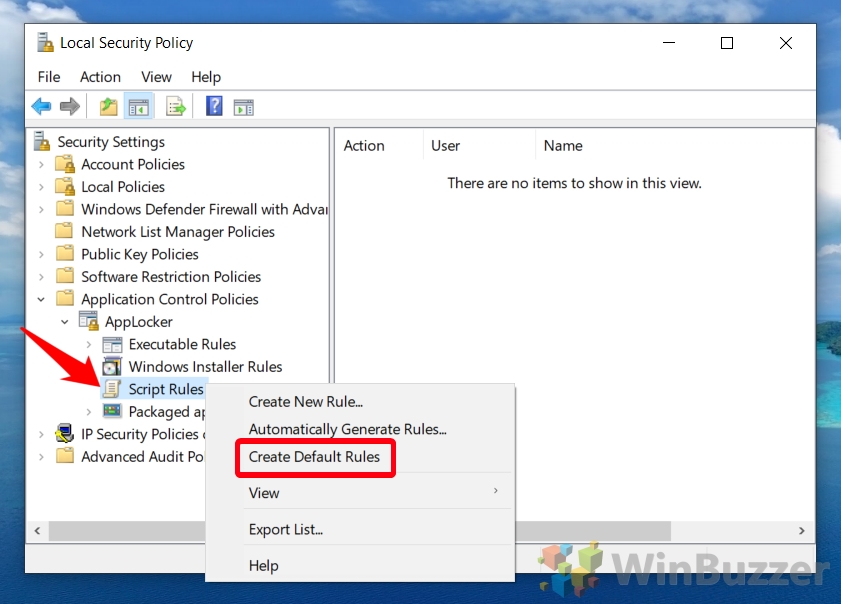
- Create Default AppLocker Script Rules
Back in the main AppLocker interface, expand “AppLocker” in the sidebar, right-click “Script Rules”, and choose “Create Default Rules”. This action generates a set of default rules that typically allow scripts to run from safe locations like the Windows and Program Files folders.
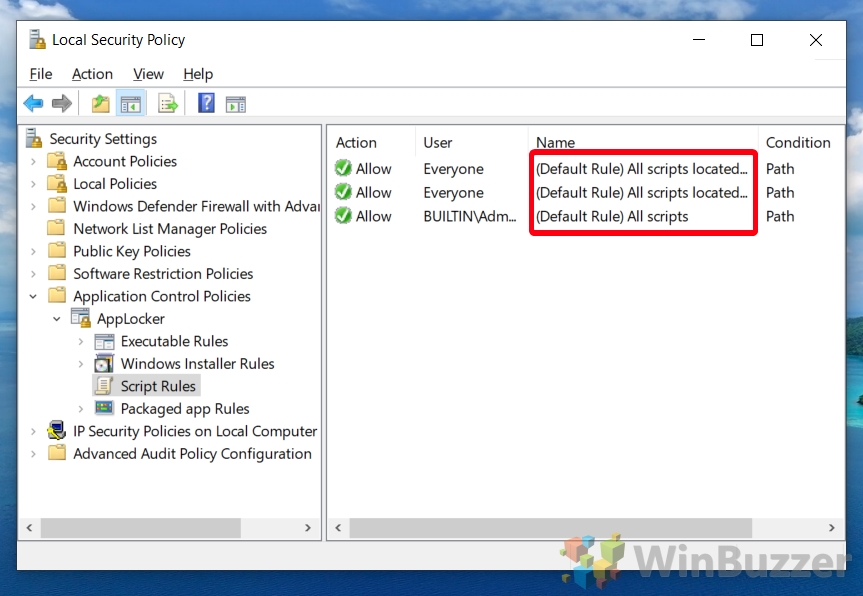
- Verify Default Rules
Ensure that the default rules are now listed in the main pane. You should see three allow rules that permit scripts to run from the Windows folder, the Program Files folder, and for admin users. These rules are a good starting point for securing script execution.
- Initiate New Script Rule Creation
To tailor AppLocker’s script management to your needs, right-click “Script Rules” again and select “Create New Rule…”. This step begins the process of defining a custom rule for blocking or allowing scripts.

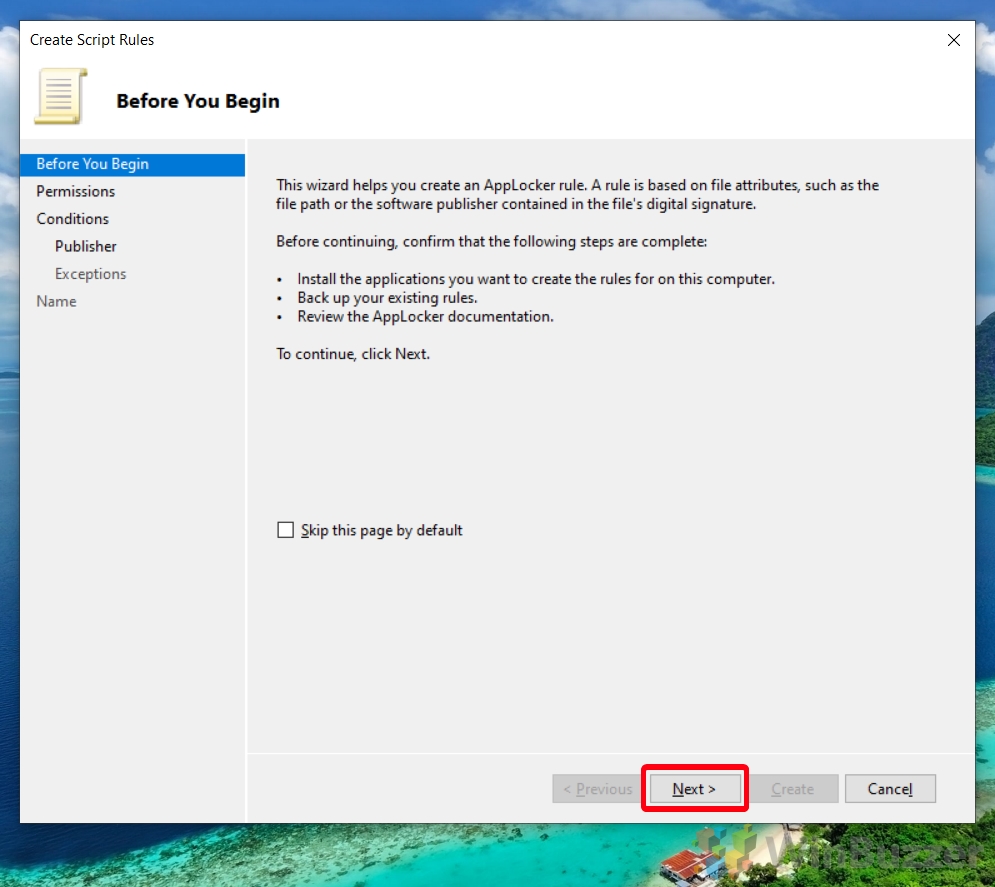
- Proceed with Rule Creation Wizard
On the “Before You Begin” screen of the New Rule Wizard, click “Next” to move forward. This screen provides an overview of the rule creation process.
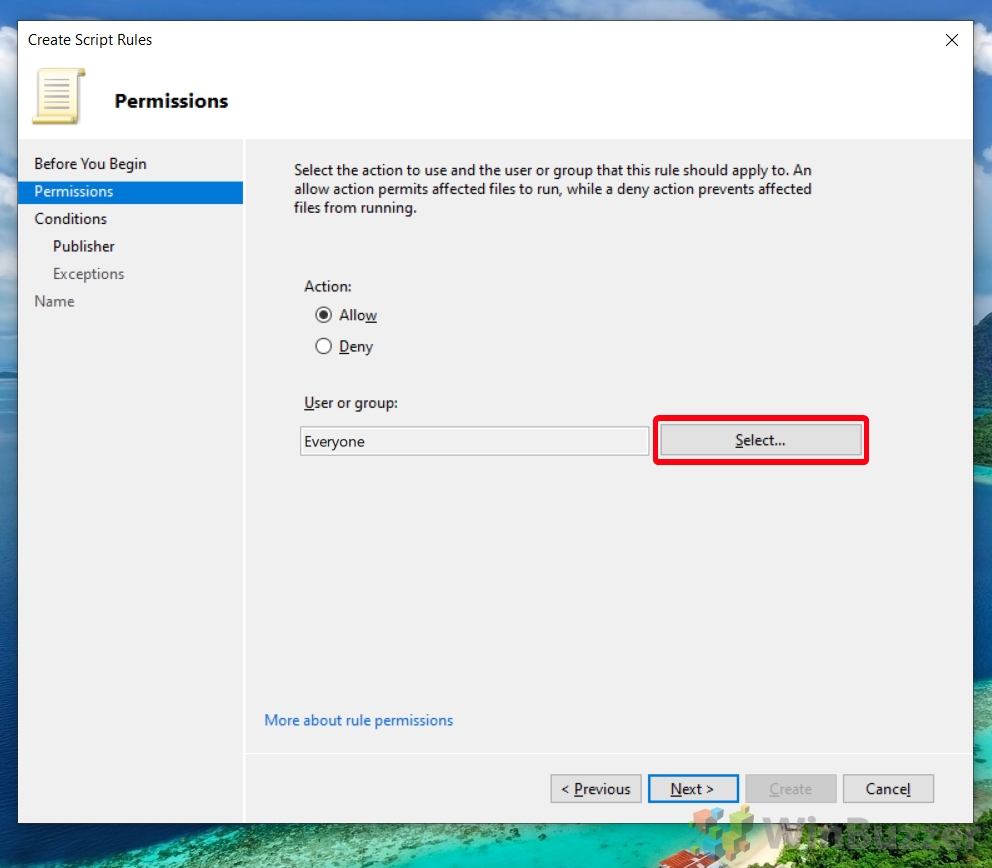
- Specify Rule Scope
Choose whether to apply the new rule to all users or a specific user or group by clicking “Select…”. If you’re targeting a specific demographic within your organization, this step allows you to narrow down the rule’s application.
- Advanced User or Group Selection
Click “Advanced…” in the “Select User or Group” window for more refined control over who the rule applies to. This option is useful for administrators managing rules for large organizations.

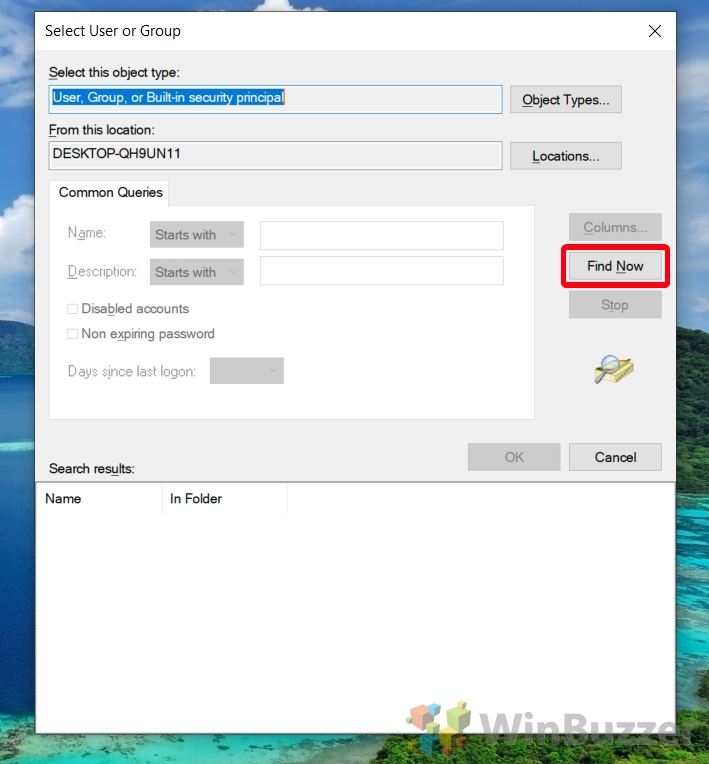
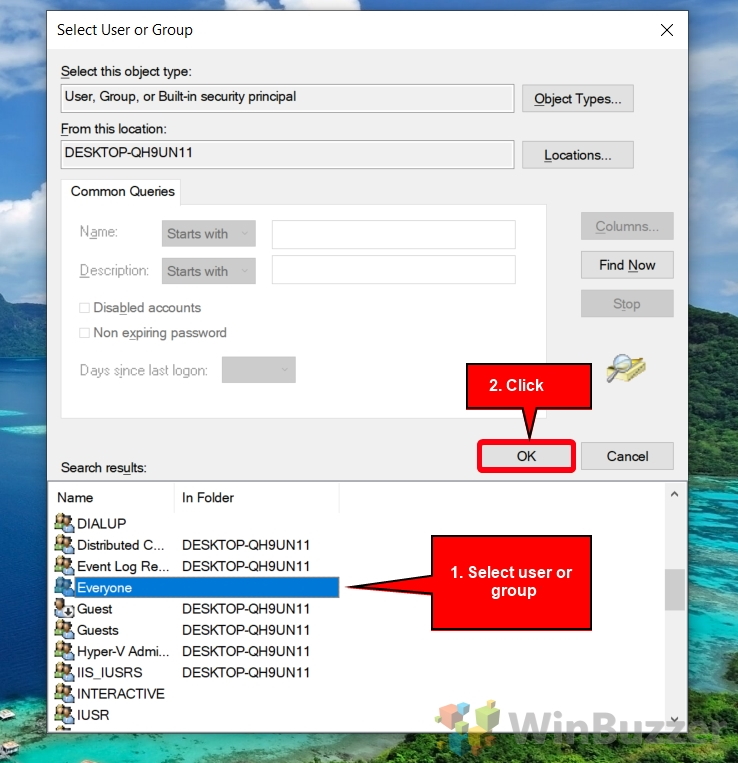
- Find and Select User or Group
Press “Find Now” to generate a list of users and groups. From this list, select the user or group you wish to apply the rule to and press “OK”.
- Select User or Group
After selecting the appropriate user or group, click “OK” to confirm.
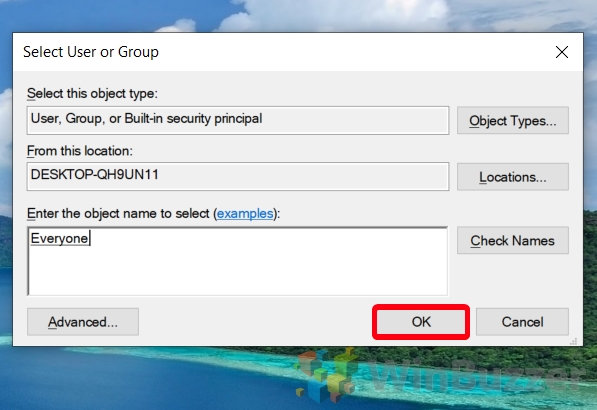
- Return to Wizard
Click “OK” to apply your choice and return to the rule creation wizard.
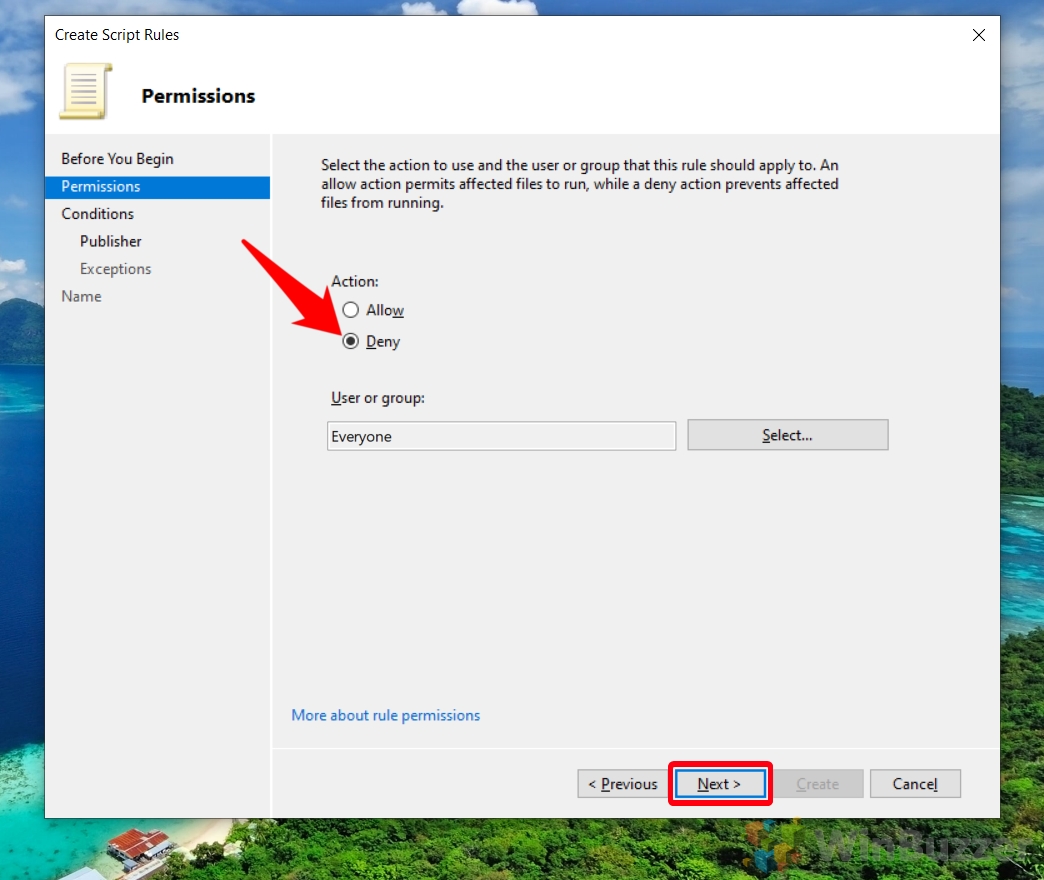
- Choose Rule Action
Under the “Action:” heading, select either “Allow” or “Deny” depending on whether you want to permit or block script execution for the chosen user or group. Then, press “Next”.
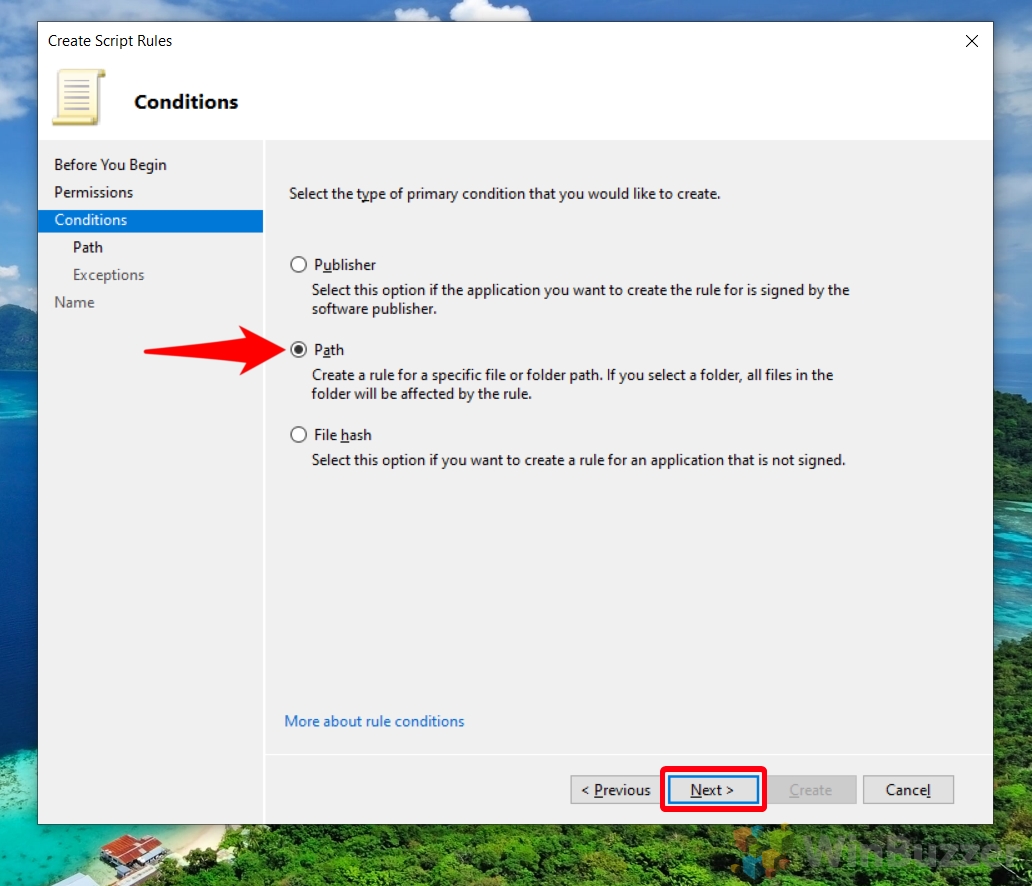
- Select Rule Condition
Choose “Path” as the condition for your rule and click “Next”. This condition allows you to specify a particular script or folder to block or allow.
- Specify Script or Folder
To block a specific script, click “Browse Files…” and navigate to the script you want to restrict. Alternatively, to block all scripts in a folder, click “Browse Folders…” and select the desired folder.

- Choose the Script Type
For “Browse Files…“, Choose .ps1, .bat, .cmd, .vbs, or .js from the file type dropdown.

- Or: Choose a Script Folder
For “Browse Folders…“, select the desired folder to apply the rule for all scripts in that folder.

- Advance Through Rule Wizard
Click “Next” in the wizard to proceed. This action takes you closer to finalizing your new rule.

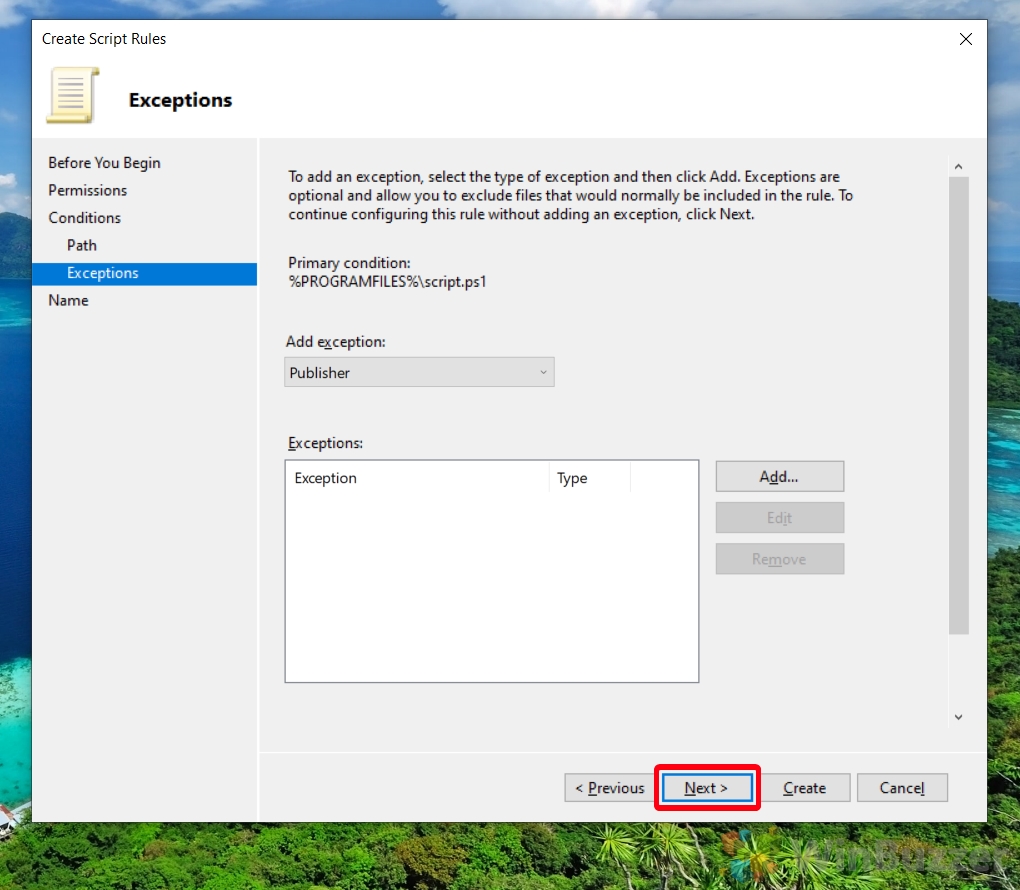
- Add Rule Exceptions (Optional)
If necessary, add an exception to your rule or simply click “Next” on the exceptions screen. Exceptions allow you to refine the rule further by specifying scenarios where the rule does not apply.
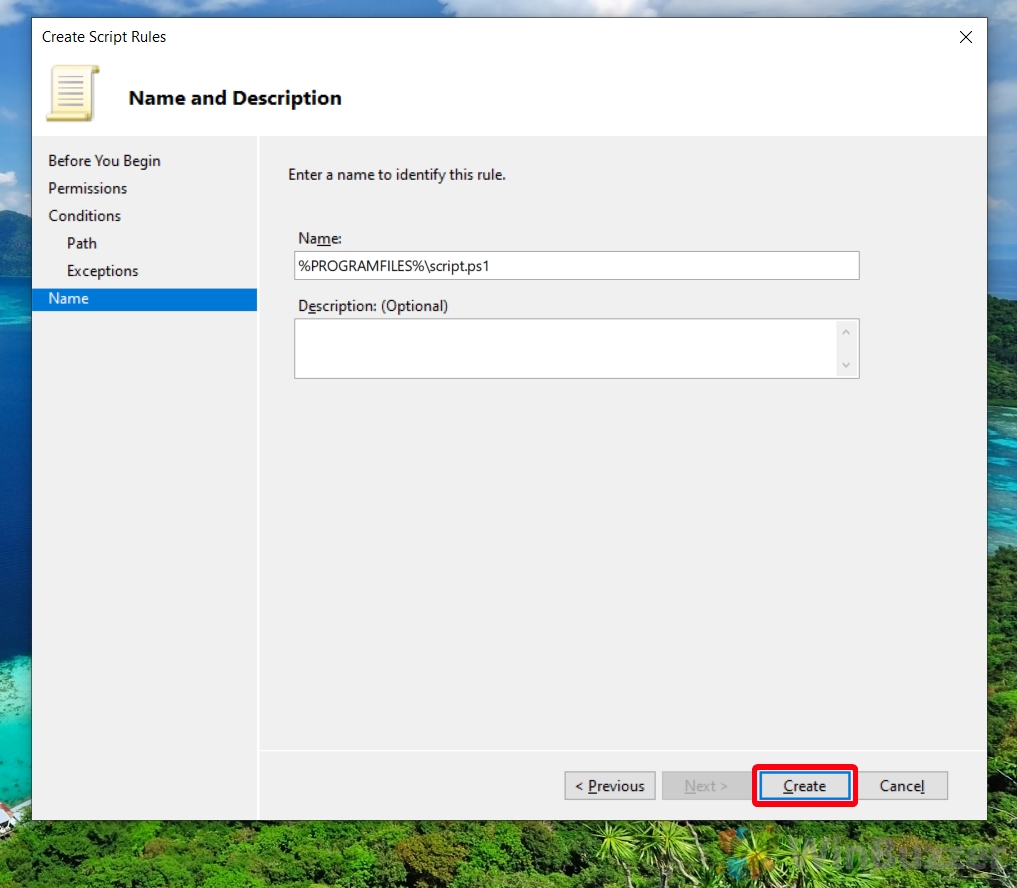
- Name and Describe Your Rule
Enter an identifying name and description for your new rule, then press “Create”. This information helps you and others understand the rule’s purpose at a glance.
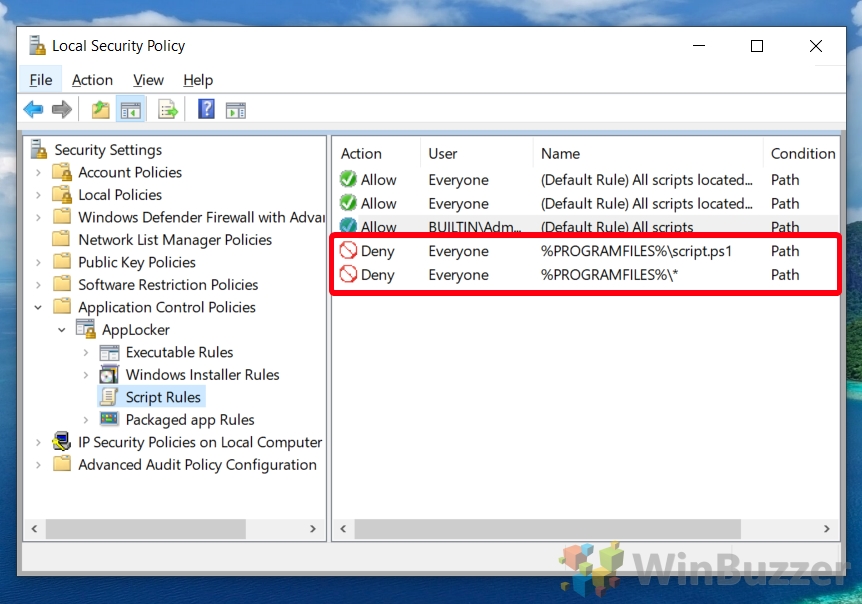
- Review and Test New Rules
Finally, view and test your new rules in the “Script” rules folder. You can create additional rules as needed to ensure your organization’s security requirements are met. Once satisfied, close the Local Security Policy window.
FAQ – Frequently Asked Questions About AppLocker
How do I update existing AppLocker rules if my security requirements change?
To update an existing AppLocker rule, open the Local Security Policy application by searching for “secpol.msc” in Start. In the “Application Control Policies” > “AppLocker” section, locate the rule you wish to modify. Right-click on the rule and choose “Properties” from the context menu. Here, you can edit details such as the rule’s conditions or its action (allow or deny). It’s important to review and test updated rules to ensure they don’t inadvertently block critical applications or scripts.
Is there a way to log attempts to run scripts that AppLocker blocks or allows?
Yes, AppLocker can log both blocked and allowed script execution attempts. To enable logging, in the Local Security Policy app, navigate to “Application Control Policies” > “AppLocker“, and then select “Configure Rule Enforcement“. Here, tick the “Configured” boxes under both “Audit only” and “Enforce rules“, according to your needs. Blocked and allowed attempts will be logged in the Event Viewer under Applications and Services Logs > Microsoft > Windows > AppLocker.
Can AppLocker manage scripts executed from network drives?
Yes, AppLocker has the capability to manage script execution from network drives. You will need to create path-based rules that specify the network paths from which scripts should be allowed or denied. When crafting these rules, use UNC paths (e.g., \\Server\SharedFolder\Script.ps1) to accurately point to the scripts on the network drives. Ensure these paths are accessible and correctly typed to avoid unintended script blockage.
How do I ensure AppLocker does not block critical system scripts necessary for Windows to operate?
When setting up AppLocker, it automatically suggests creating default rules that prevent the blocking of critical system scripts and applications. You should accept these default rules during setup. Additionally, regularly review custom rules and exceptions to ensure vital system scripts, such as those in the Windows directory, are not inadvertently blocked. Monitoring AppLocker logs can also help identify if critical scripts are being blocked so you can adjust rules accordingly.
What types of scripts can AppLocker control beyond PowerShell and batch files?
AppLocker can manage a variety of script types including PowerShell (.ps1), batch files (.bat, .cmd), Visual Basic Scripts (.vbs), and JavaScript (.js). This enables comprehensive control over script execution across your Windows environment. When creating rules, you can specify the script type to ensure targeted management of script execution policies.
Can AppLocker’s script rules distinguish between different PowerShell versions or configurations?
No, AppLocker does not provide the functionality to distinguish between different versions or configurations of PowerShell directly. AppLocker rules focus on the script files themselves, applying based on the file path, file hash, or publisher, rather than the specifics of the PowerShell version. For version-specific control, you might opt to use PowerShell’s own Execution Policies or implement additional security measures like Windows Defender Application Control.
How do I automate the deployment of AppLocker rules across multiple computers in a domain?
Deploying AppLocker rules across multiple computers in a domain can be efficiently managed using Group Policy Objects (GPOs). First, create or modify AppLocker rules on a reference computer. Then, within the Group Policy Management Console (GPMC), locate the GPO tied to the organizational units (OUs) you wish to apply these rules to. Under “Computer Configuration > Policies > Windows Settings > Security Settings > Application Control Policies > AppLocker“, right-click and choose “Import Policy” to import the rules from the reference computer. Finally, apply the GPO, ensuring it propagates across the targeted domain computers.
If a script is allowed by AppLocker but blocked by antivirus software, will it execute?
No, if a script is blocked by antivirus software, it will not execute regardless of AppLocker’s configuration. Antivirus software functions at a different layer of security and has its own criteria for blocking executables and scripts, often based on signatures, behaviors, or reputation, which can override AppLocker’s allowances. It’s vital to align both AppLocker and antivirus policies to ensure consistent security enforcement.
Can AppLocker block or allow scripts based on their content rather than location or user?
AppLocker’s primary means of identifying scripts for blocking or allowing is through path, publisher, or file hash, rather than analyzing the content of the scripts. To manage scripts based on content, other security solutions such as Endpoint Detection and Response (EDR) systems or more advanced antivirus solutions with scripting analysis capabilities might be required. Such solutions can inspect the script content dynamically for malicious behavior or compliance with security policies.
Are there command-line tools or PowerShell cmdlets to manage AppLocker rules?
Yes, management of AppLocker can also be done through PowerShell cmdlets, offering a way to script and automate many tasks related to AppLocker. The cmdlets include functionalities to create new AppLocker rules, delete existing ones, and retrieve information about AppLocker policies applied. For example, “Get-AppLockerPolicy“, “Set-AppLockerPolicy“, and “New-AppLockerPolicy” are some of the cmdlets available. This provides a powerful way to manage policies programmatically, especially for bulk operations or across multiple systems.
How can I prevent users from bypassing AppLocker rules by renaming script files?
Incorporating hash-based rules in combination with path-based rules can strengthen your policy against renaming bypass attempts. Hash-based rules validate the integrity of the script file itself regardless of its name or location, preventing execution if it matches a known blocked hash. Constantly monitor and update your rule sets to include hashes of unauthorized scripts. Additionally, limiting user permissions to rename, execute, or write to certain directories can further mitigate this risk.
Can AppLocker control execution of scripts run from removable media, like USB drives?
Yes, AppLocker can effectively control and restrict the execution of scripts from removable media such as USB drives. By creating path-based rules that specifically address the locations within removable media or by denying execution of scripts from removable drives altogether, administrators can mitigate risks associated with portable storage devices. Regularly monitor and adjust these rules based on organizational security policies and the evolving threat landscape.
What is the performance impact of enabling AppLocker on a system?
The performance impact of AppLocker is generally minimal, as it is designed to integrate seamlessly with Windows operating systems without significantly affecting system resources. However, the complexity and number of rules, as well as the volume and types of applications and scripts being executed, can influence performance. Administrators should balance security needs with performance considerations, possibly using test environments to benchmark the impact of AppLocker policies on system performance before wider deployment.
Can AppLocker rules be exported and imported between different systems or domains?
Yes, AppLocker provides functionality to export and import policies, facilitating easy rule transfer and deployment across different systems or domains. This is particularly useful for replicating security policies in large organizations or quickly applying a tested set of rules to new systems. Rules can be exported to and imported from XML files through the Local Security Policy editor or via PowerShell cmdlets, offering flexibility in maintaining and deploying AppLocker policies.
How can I recover from an incorrect AppLocker rule that prevents access to vital applications or scripts?
In scenarios where an incorrect AppLocker rule blocks access to essential applications or scripts, booting the affected system into Safe Mode can provide an opportunity to bypass standard AppLocker enforcement, allowing administrators to modify or remove the problematic rule. Access the Local Security Policy application or use PowerShell cmdlets in Safe Mode to adjust the AppLocker configuration. For environments managed through Group Policy, updating the policy from a domain controller to remove or adjust the problematic rule and forcing a policy update on the affected system can also resolve the issue.
Related: How to Enable PowerShell Scripts via PowerShell Execution Policy
PowerShell is a powerful tool that many, including myself, don’t use to its full potential. That’s why most of us rely on PowerShell scripts crafted by others, but this can have its own hurdles. Often, you’ll see errors like “PowerShell: running scripts is disabled on this system”. To Enable PowerShell scripts in Windows, you must first set the execution policy. In our other guide, we show you how to enable PowerShell scripts in Windows by setting your execution policy via the command-line.
Related: How to Enable or Disable the Microsoft Store
Microsoft’s app store has been struggling in recent years, but it’s still a useful tool from which you can install apps and games or download music and TV shows. For various, reasons, though, you may want to disable the Microsoft Store, preventing children from downloading non-approved apps or removing bloat from your system. In our other guide, we show you how to unblock or disable the Microsoft Store for all users on your PC to suit your preferences.

Related: How to Enable or Disable Settings and Control Panel
Microsoft has been slowly copying options from the legacy Control Panel in Windows to its new Settings app. These days, almost everything you need can be found there, though there are a few select items that can only be adjusted via the old interface. As a result, admins who are trying to restrict the ability of their users to cause problems with their operating system have to disable both. As such, Microsoft bundles the toggle for both together, letting users disable or enable settings and the control panel in Windows in one fell swoop.

Related: How to Disable Windows Search
Windows Search is a powerful tool, designed to enhance user productivity by providing quick and easy access to files, applications, and settings. By indexing the contents of your PC, Windows Search allows for rapid retrieval of information, making it a valuable feature for many users. However, this convenience comes at a cost. The continuous indexing process can consume significant system resources, leading to decreased performance, especially on lower-end hardware. In our other guide, we show you how to disable Windows Search to optimize power consumption and resource utilization.


