

A mouse is essential for quickly navigating your operating system, which is why it can be so frustrating when it’s not behaving as intended. If you have recently purchased a new mouse or reset your operating system, you may notice that your mouse cursor is too high or too low, hampering your productivity. In such cases, it’s necessary to know how to change mouse sensitivity in Windows 10 – and we’ll be showing you how to do so today.
Change DPI to adjust Windows 10 mouse sensitivity if you can
You should be aware, however, that it’s always preferable to change the DPI on your mouse before you change mouse speed in Windows 10 settings. For reasons we won’t get into here, your cursor will be more accurate if you leave the Windows sensitivity at 6 or 11 and adjust the DPI in your mouse software or via its physical buttons to reach the desired behavior.
How to check mouse DPI
You can do a mouse DPI test with this web-based dpi checker here. With this tool you can measure the real DPI of your mouse, and calculate the sensor accuracy. It can also be used to find out what your DPI actually is if you don’t have a setting for it in your mouse driver.
Many mice, especially cheaper ones, unfortunately, don’t come with DPI control. If you’re in a more restricted enterprise environment, your IT admin may also prevent you from installing third-party software such as mouse drivers. If this is the case, changing Windows 10 mouse sensitivity via its built-in tools is your only choice. Here’s how you can do so:
Windows 10’s new settings UI allows you to adjust most of the things you need these days, and that extends to mouse pointers. Its clear and touch-friendly nature makes it a good choice for a simple task like this.
- Open Settings
Start button, then click the settings cog, above the power button. Alternatively, press
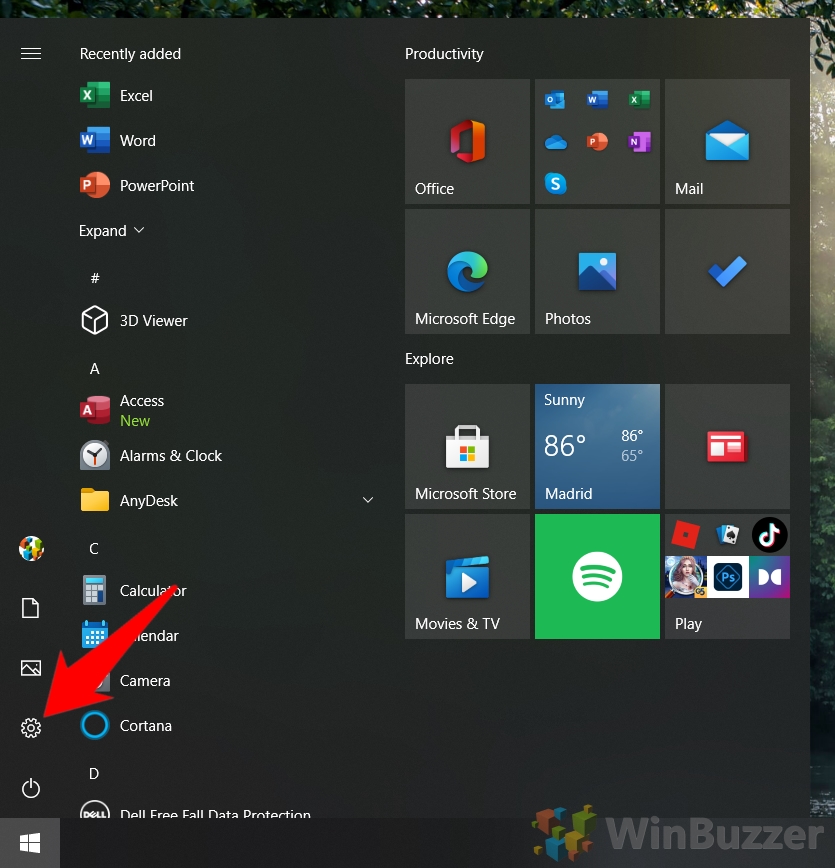
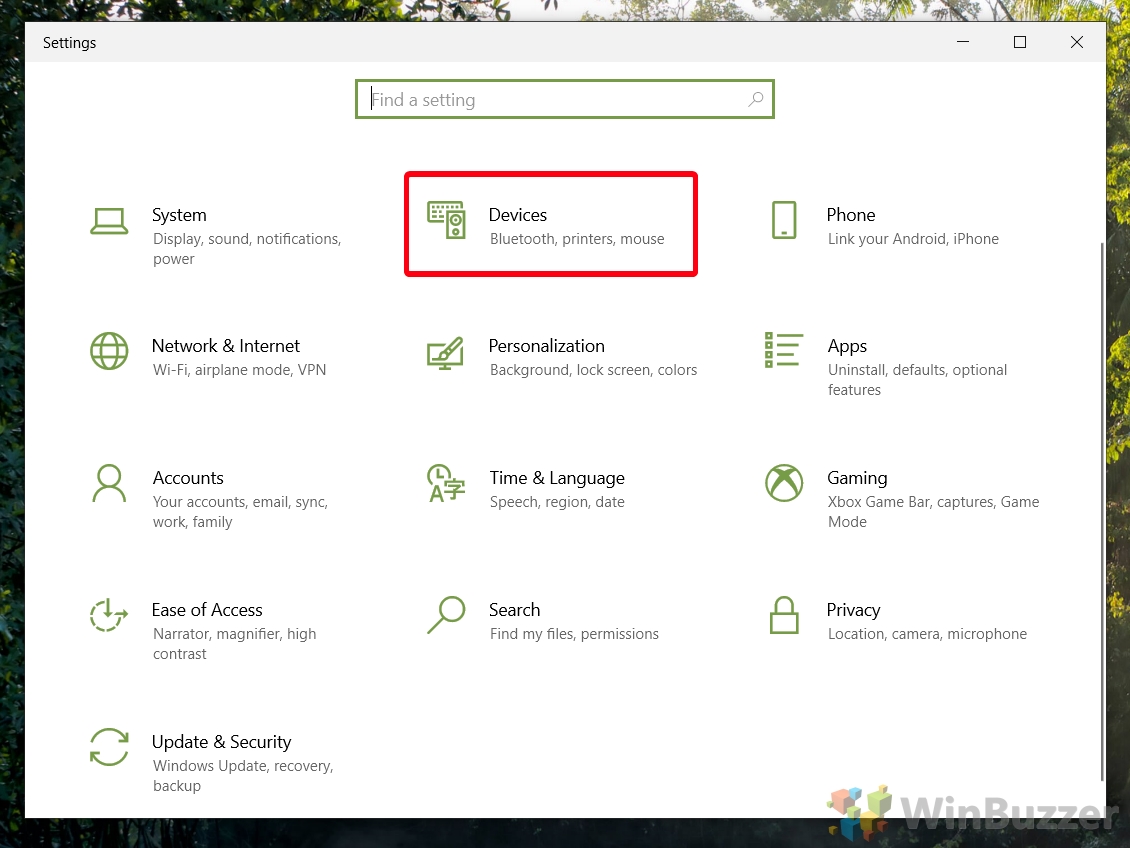
- Click on “Devices”
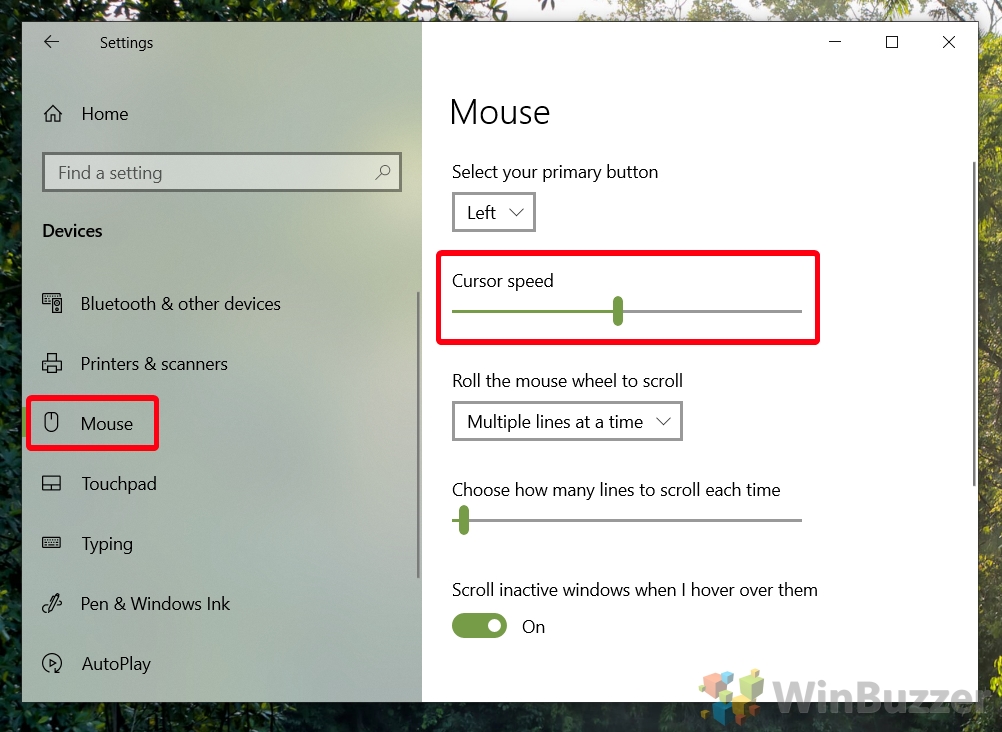
- Choose “Mouse” in the sidebar and change change your mouse speed
In the main pane, you’ll see a slider with “Cursor speed” above it. Dragging this to the left will slow your cursor down, and dragging it to the right will speed it up. The changes will take effect immediately.
How to Change Mouse Speed in Windows 10 via the Control Panel
If you prefer function over form, the legacy Control Panel is also a good choice. It allows you to quickly decrease or increase mouse sensitivity in Windows 10 in a compact, straightforward UI. Here’s how to use it:
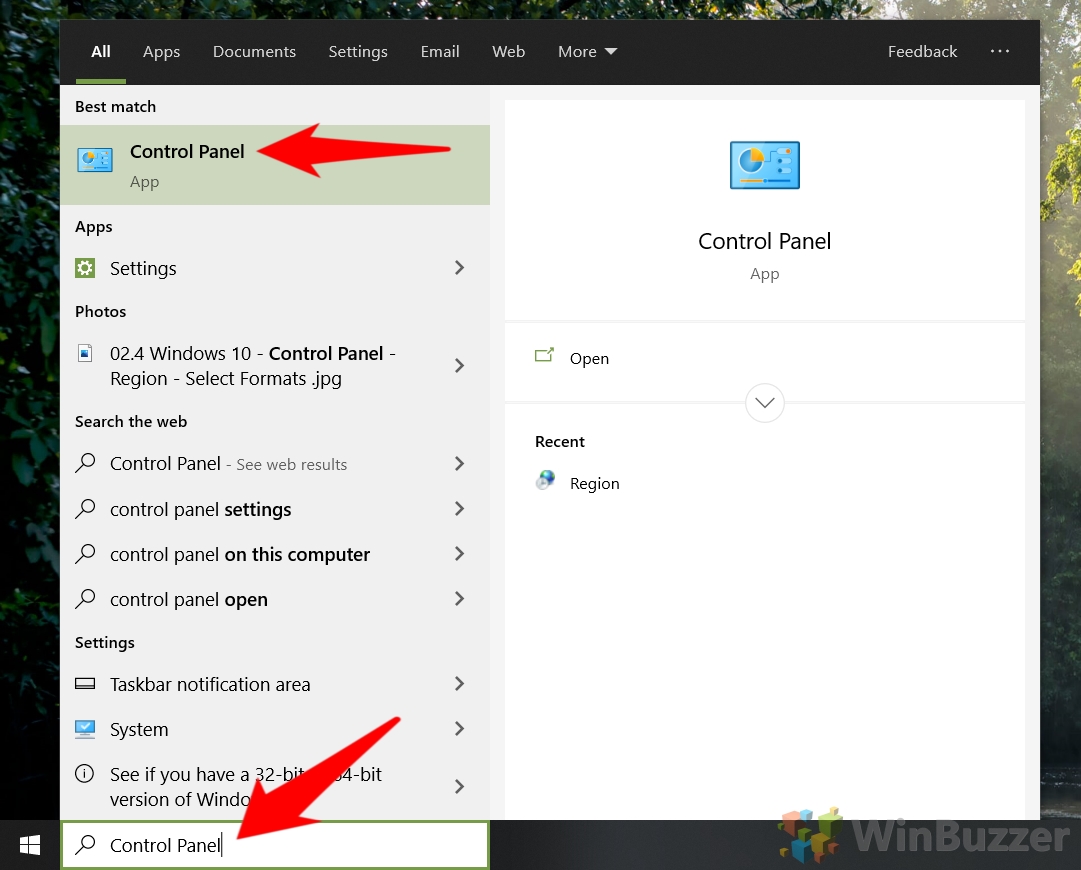
- Open Control Panel
Press Start and type “Control Panel”, then click the top result.
- Click “Hardware and Sound”
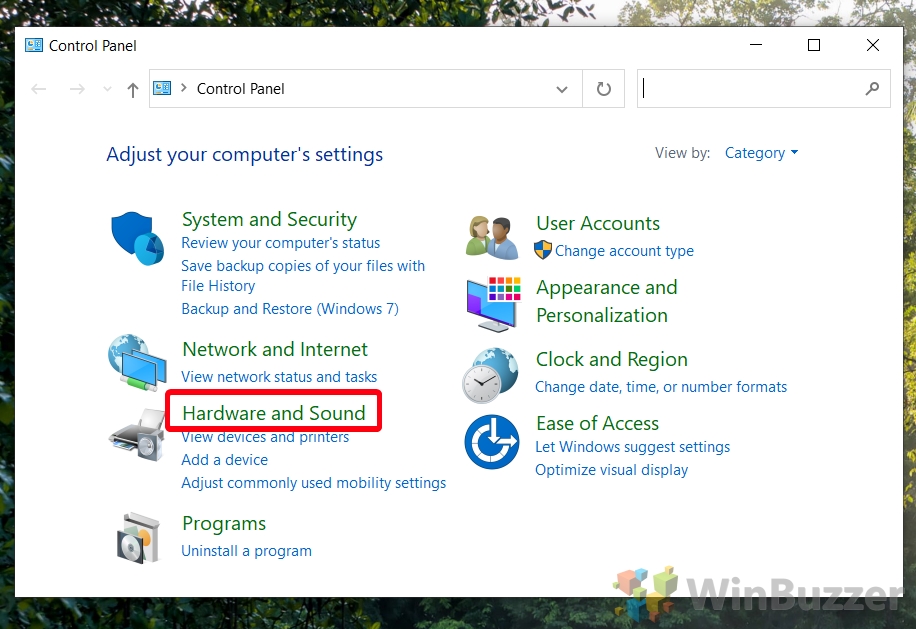
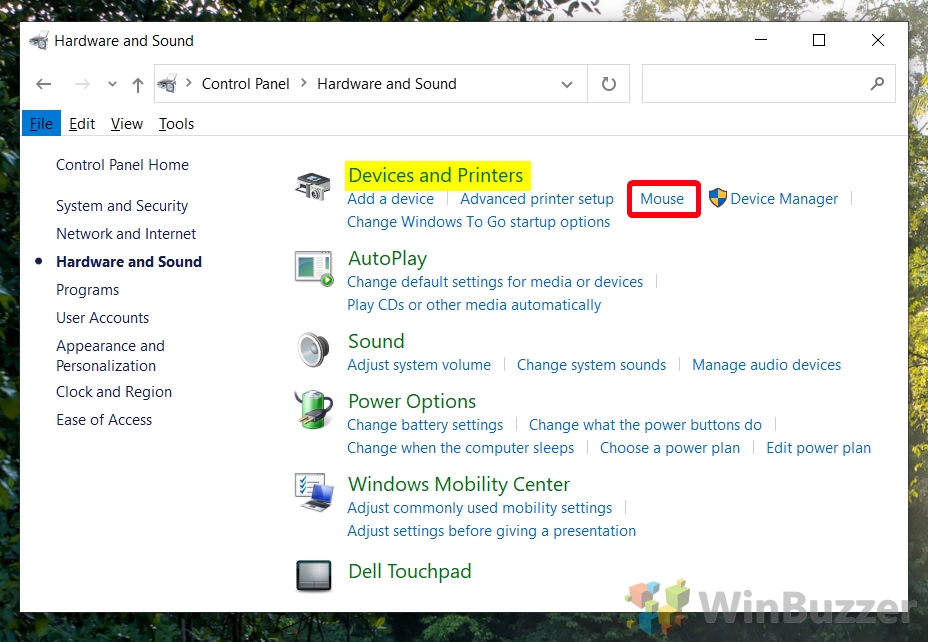
- Look for the “Devices and Printers” section and press “Mouse”
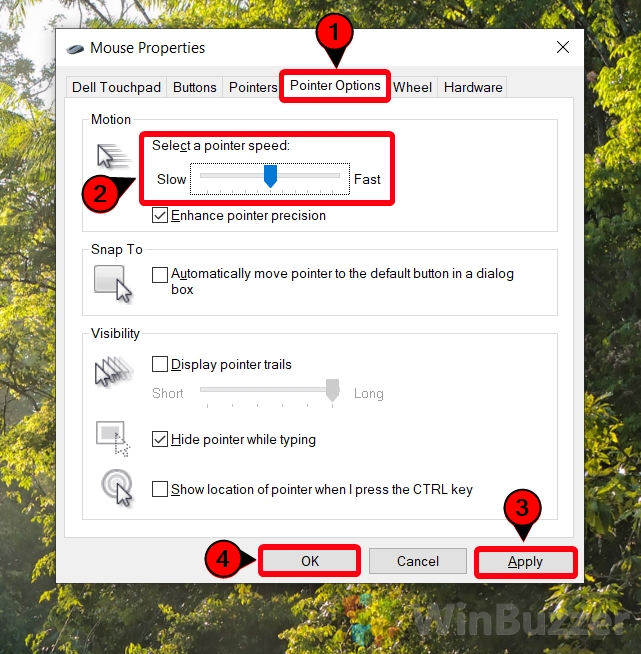
- Open the “Pointer Options” tab and adjust the mouse pointer speed slider
The further to the right, the faster your cursor will get. Once you’re at a speed you’re happy with, you can click “Apply” followed by “OK”.
How to Change Windows 10 Mouse Sensitivity via the Registry Editor
and have a quick read of our
- Open Registry Editor
Press Start and then type “regedit”. Click the top result.

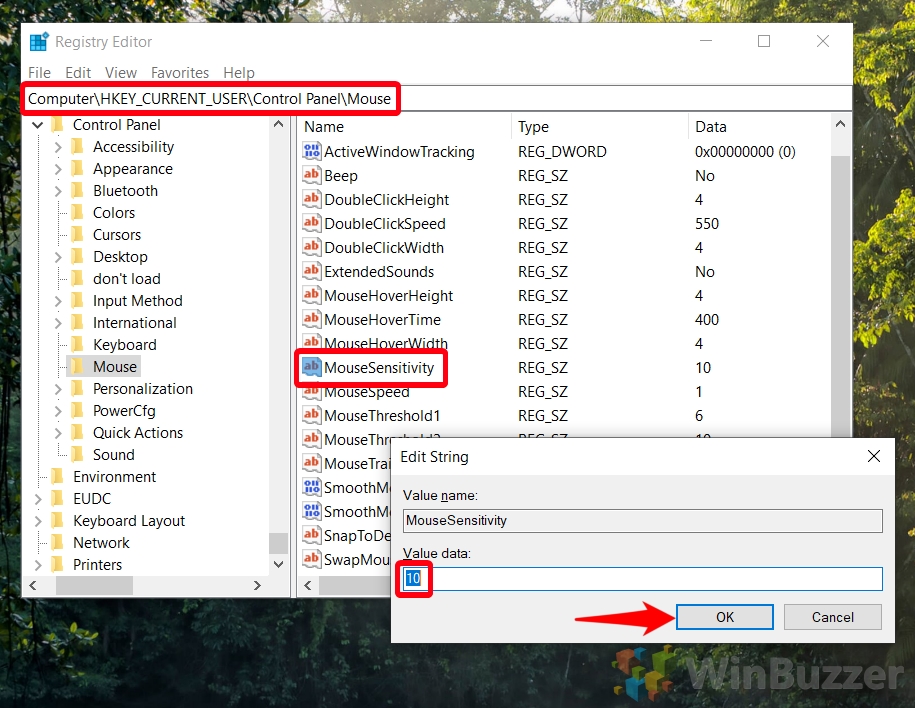
- Navigate to the Mouse key and Adjust your “Mouse Sensitivity” value data
In your Registry Editor top bar, paste
Computer\HKEY_CURRENT_USER\Control Panel\Mouse.Scroll down the main pane until you find the “MouseSensitivity” entry and double-click it. In the “Value data” field, enter a number, with 1 representing the lowest speed, and 20 the highest. Press “OK” when you’re done and test the changes.
If you need to change Windows 10 mouse sensitivity again at any point, you can come back here and adjust the value.
Extra: How to Change Your Mouse Cursor Size or Use a Custom Cursor in Windows 11 / Windows 10
The Windows 11 / Windows 10 cursor is more or less iconic at this point, but it’s not without its flaws. Quite often, it can be too small on high-resolution displays or fit poorly with your system theme. In such instances, you can change your cursor to a custom one or change your cursor size in Windows 11 / Windows 10 settings.

Extra: How to Reverse Scrolling Direction for Mouse or Touchpad in Windows 11 / Windows 10
Your touchpad or mouse scroll direction is something that quickly becomes muscle memory. As a result, using Windows with mouse settings, you’re not used to can seriously hamper your productivity and cause frustration. In such cases, it’s necessary to know how to reverse the scrolling direction in Windows 11 / Windows 10.

Last Updated on June 17, 2023 11:54 pm CEST by Markus Kasanmascheff


