

Need to reduce picture size in Windows 10, but don’t have the time to edit every one? Microsoft’s PowerToys image resizer makes a batch photo resize possible in just two clicks. We’re going to show you how to resize photos with the tool today.
What is PowerToys Image Resizer?
PowerToys is a tool with origins as far back as Windows 95. Published officially by Microsoft, it’s designed to help more advanced users get more out of their PC. In December 2019, Microsoft released a new version of the tool for Windows 10. It currently allows users to easily pick colors, define “zones” for their windows to snap to, quickly rename multiple files, and, crucially, bulk resize images.
Though there are certainly other apps to resize photos, PowerToys image resizer has the advantage of being open-source, well-integrated with Windows, and highly configurable.
Another quick option is using a web based Image Resizer tool like this one offered by SmallSEOTools which can be used directly with any web browser.
Here, we’ll walk you through everything you need to know about it, from installation to how to make pictures smaller with it and configure PowerToys’ many options. Let’s start:
How to Install PowerToys and Enable Image Resizer
Before you can bulk resize images in Windows 10, you need to download and install PowerToys. Unfortunately despite being created by Microsoft, PowerToys isn’t included in the operating system or (at the time of writing) the Microsoft Store. As a result, you’ll have to download the image resizer from its GitHub page.
- Open the GitHub page and download the PowerToys setup
On the releases section of the GitHub, click the PowerToysSetup.exe under the latest version of the tool. Save it somewhere you’ll remember or open it immediately from your browser.
The tool will walk you through a regular setup that will only take a minute or two.

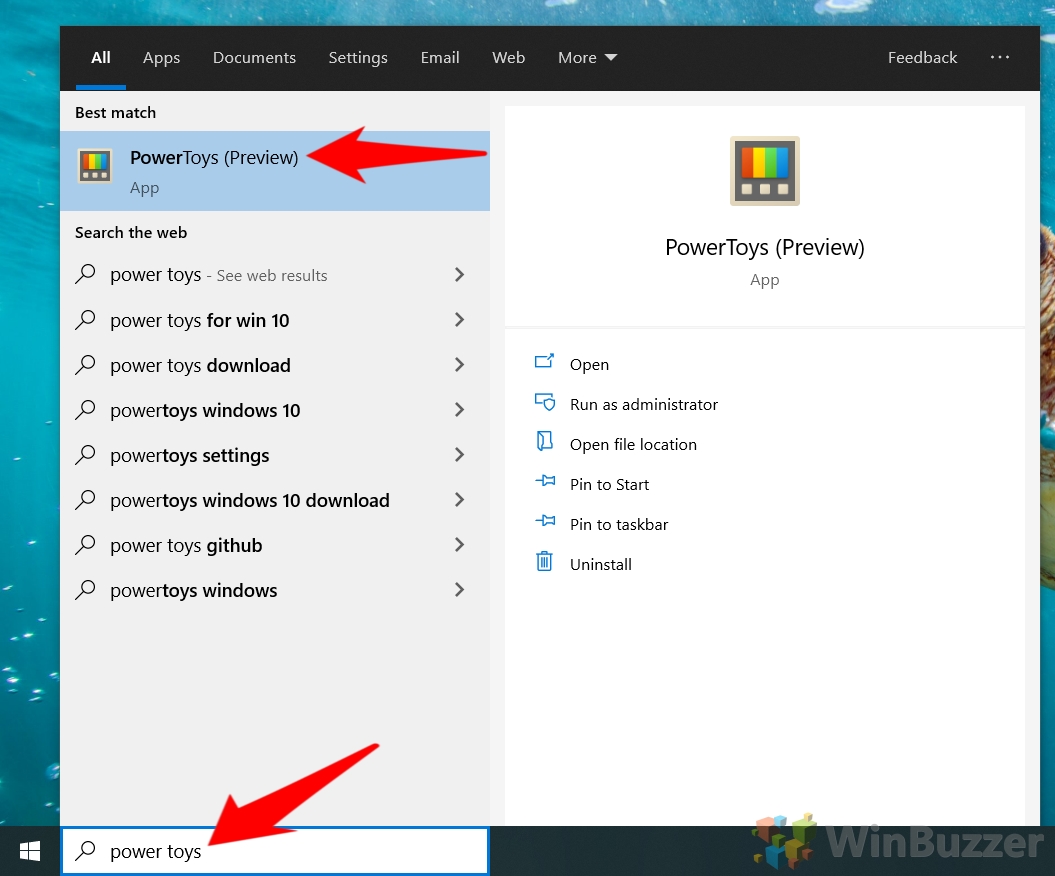
- Open PowerToys
Once it’s installed, you can open PowerToys by pressing the Start button and typing “PowerToys”, then clicking on the top result.
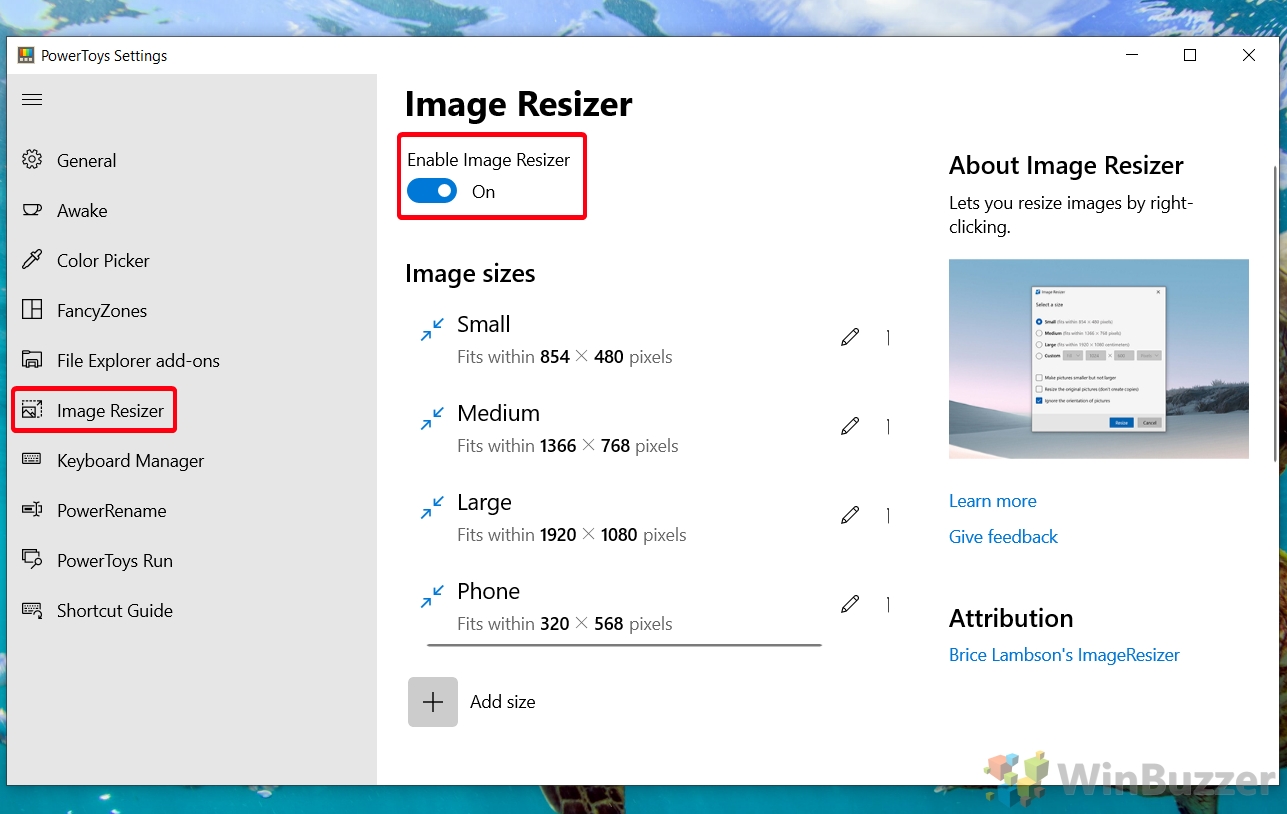
- Enable PowerToys image resizer
You’ll find the bulk image resizer tool by clicking on “Image Resizer” in the PowerToys sidebar, then toggling “Enable Image Resizer” to “On”.
How to Bulk Resize Photos in File Explorer or Desktop
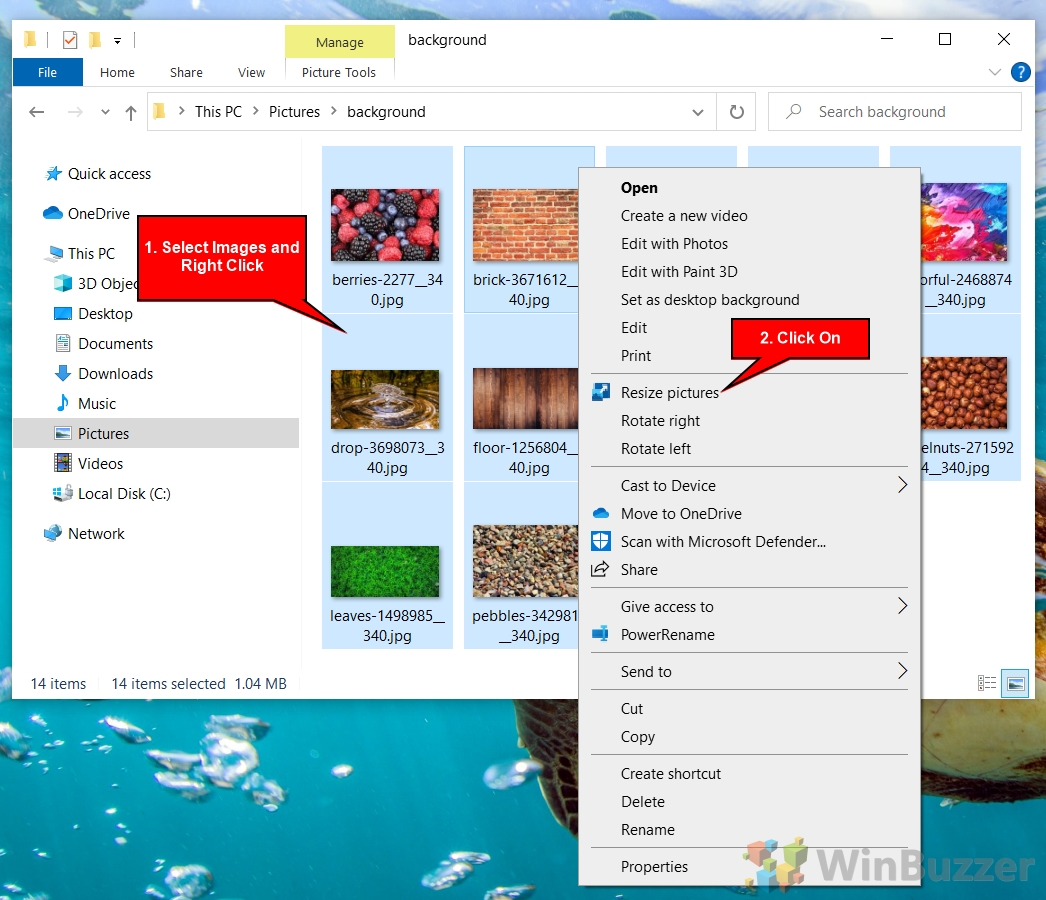
To use the photo resizer, all you need to do is open File Explorer and use it’s context menu:
- Select a group of images, right-click them, and choose “Resize pictures”
Remember, you can select multiple images with Ctrl + Click or Shift + Click.
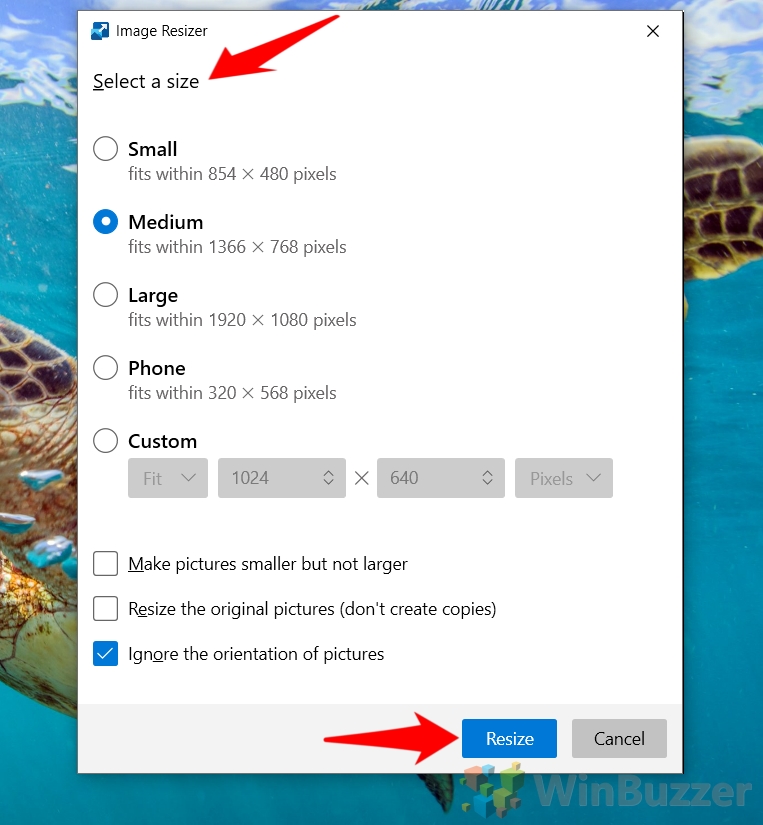
- Select a size in the PowerToys image resizer window
You can reduce picture size or increase picture size depending on what you’re looking for by selecting one of the options in PowerToys. Just bear in mind that blowing your image up too much may cause a significant quality loss.
Once you’ve made your selection, tick any additional options you’d like and then press “Resize”.
How to Configure PowerToys Image Resizer Settings
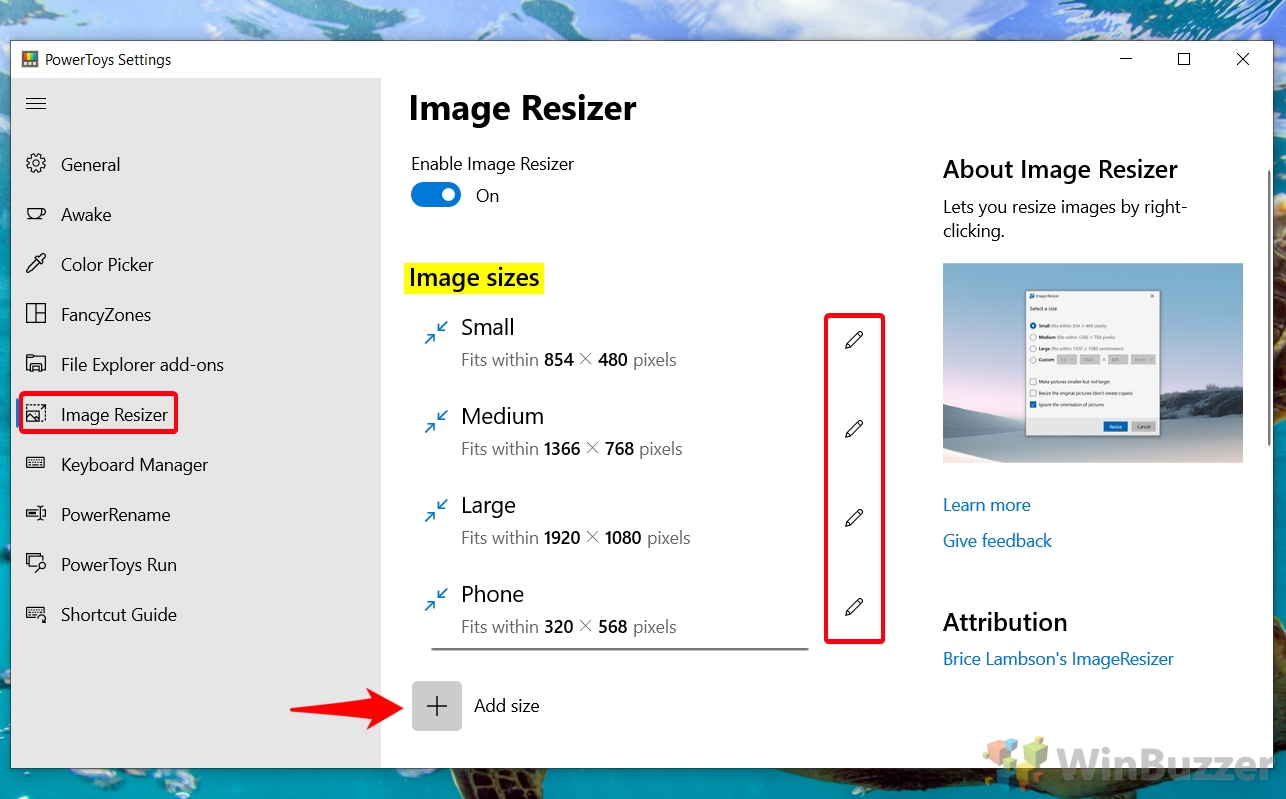
If you’re unhappy with the default image sizes the tool offers or their resulting quality, you can make some tweaks in the Image Resizer settings.
- Open the Image Resizer tab and edit or add sizes
You can change the size of the existing bulk resize options by pressing the pencil next to them, or click “Add size” at the bottom to provide an additional choice.
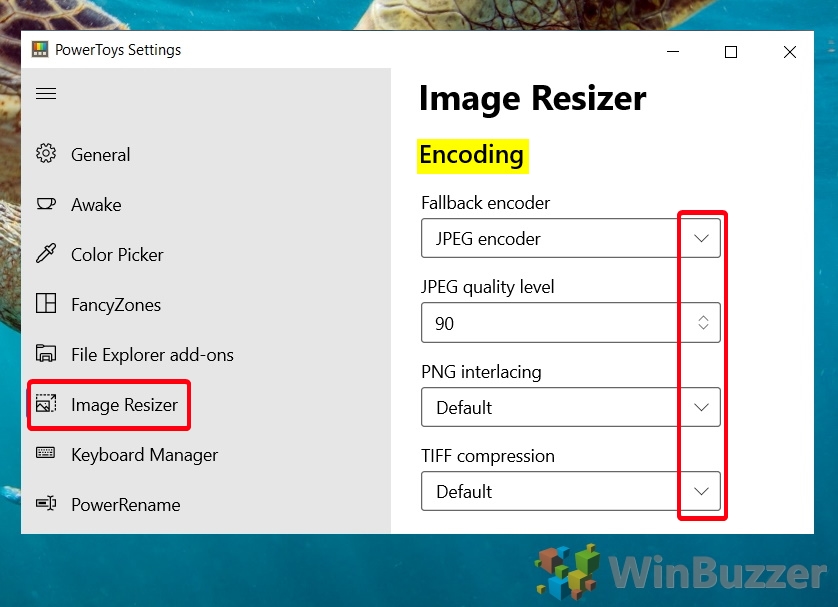
- Scroll down to Encoding section and adjust your picture quality
By default, PowerToys Resize outputs JPEG images at a quality level of 90. If you’re using it as a photo resizer, you may want the best quality possible. However, you should know that increasing this will increase the file size, too. This could undo some of the space savings you experience when you reduce photo size. Generally, 90 and 100 are difficult to distinguish from each other.
You can also choose whether you want to interlace your PNGs and which TIFF compression you’d like to use.
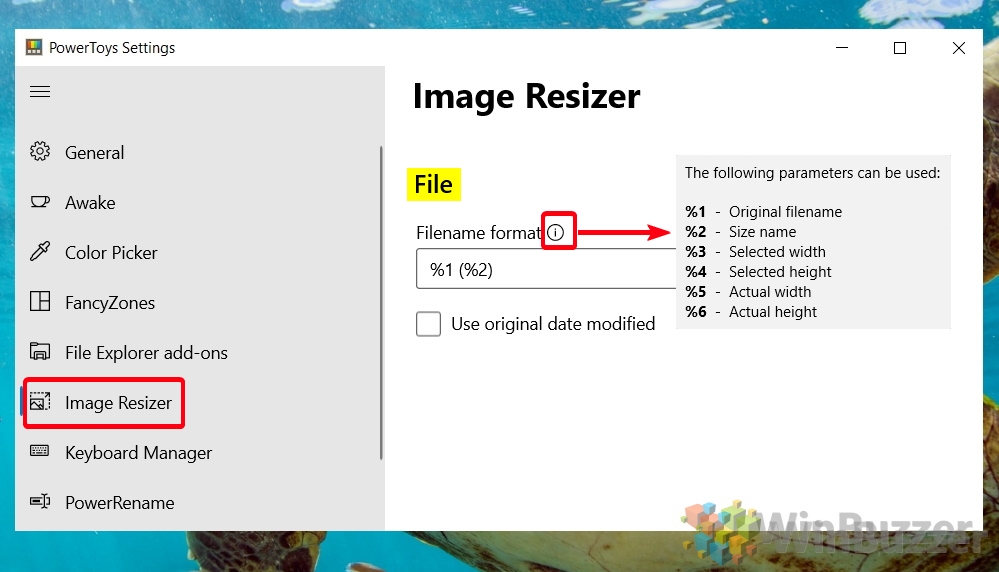
- Modify your filename format
When you’re performing a bulk image resize its important to have a good naming scheme, particularly if you’re outputting multiple sizes for the same images. By default, PowerToys lists the original filename, followed by the size name. However, if you need more detail than that, you can choose to add the selected width, selected height, actual width, and/or actual height.
Pressing the info button will show you the symbols and numbers you need to add to your “Filename format” box to get the parameters you want.
How to Edit SVG Files and Convert HEIC Files
Two image formats you’ll notice aren’t present in PowerToys are the SVG and HEIC formats. You can follow our existing tutorials to find out how to view and edit SVG files and how to convert HEIC files to JPEG for use with PowerToys.
Last Updated on February 14, 2022 7:43 pm CET by Markus Kasanmascheff


