
Though ZIP files have been around for decades, Windows 10 doesn't make it immediately clear what they are, how to unzip a file, or how to zip a file yourself. While most of us understand that a zip file allows us to pack multiple files into a single one, it can be useful to understand the details before we proceed with this tutorial.
What are ZIP files?
ZIP is a file format of the archive type. It lets users add one or more files to a single package, which is then compressed. This compression process can take some time, but significantly reduces the size of the files without them losing any of their quality.
ZIP has been in Windows since 1998 and most commonly uses a compression algorithm called DEFLATE. Different types of files inside the package can be compressed using different methods, but, regardless, files inside of the ZIP file cannot be used unless they are decompressed and extracted.
The format is most commonly used to send files over the internet, particularly when a host has file size limits in place. However, it may also be used to reduce the size of local files that are currently unused and therefore free up space.
Compress files in Windows 10 (Zip / Unzip)
Today, we're going to focus primarily on how to zip and unzip a file. For a full tutorial on compression in general, you can check our dedicated guide instead. Either way, bear in mind that compressing or zipping an encrypted file will cause it to be unencrypted once extracted. Be cautious with the data you compress.
How to Zip a Single File or Folder in Windows using ‘Send To'
Over the years, Microsoft has made it easier and easier to zip files. The easiest is through File Explorer's Send To menu, which is perfect for quickly compressing a single file or folder.
- create a zip file in File Explorer
Right-click the file or folder you'd like to zip, then move your cursor down the menu and click “Send to > Compressed (zipped) folder”.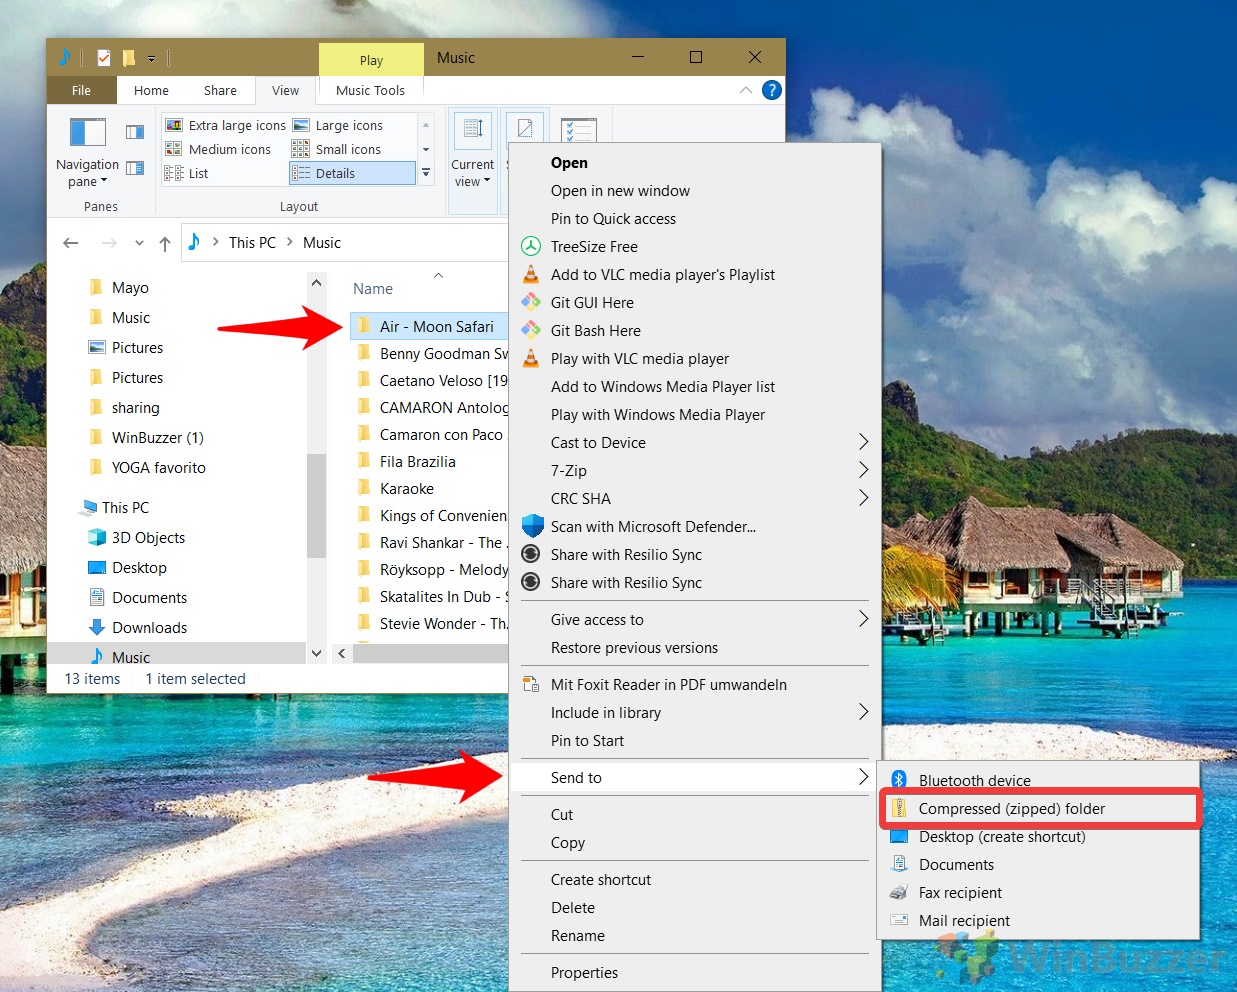
- Name your zipped file or folder
Windows will automatically create a zip file and place your cursor in its name box. Type an appropriate name or keep the pre-populated one and press Enter.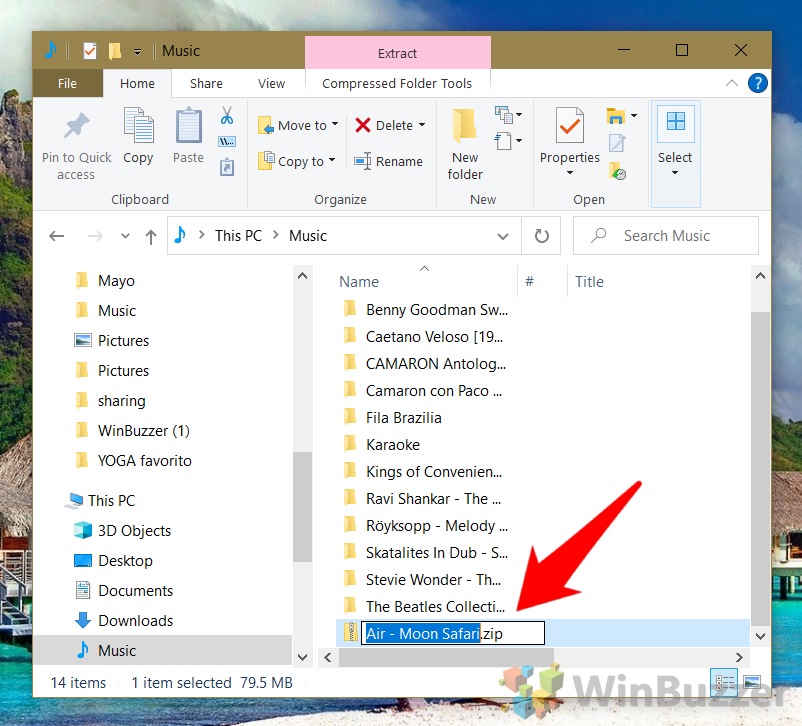
How to Zip Multiple Files and Folders with ‘Send To'
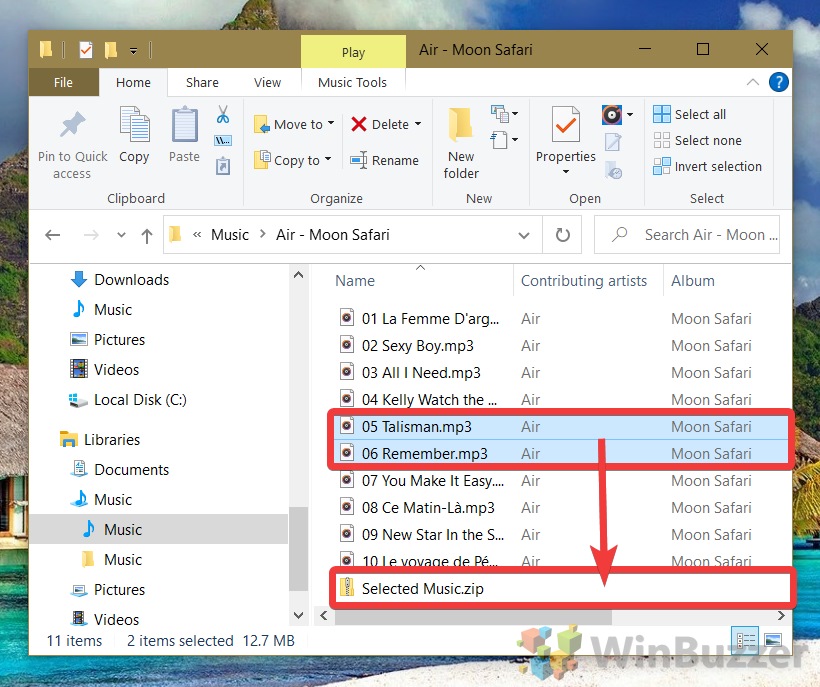
The above method can also be used to create a zip file out of more than one file or folder. All you need to do is select more than one in your File Explorer window.
- How to create a zip file out of multiple files or folders
You can then right-click any of the files or folders and choose “Send to > Compressed (zipped) folder”.
To select multiple files, click on your first file, then Ctrl + click to select the others you'd like to compress. If you a long list of files that all need to be compressed, you can select the file at the top and then Shift + click the one at the bottom to select all of them.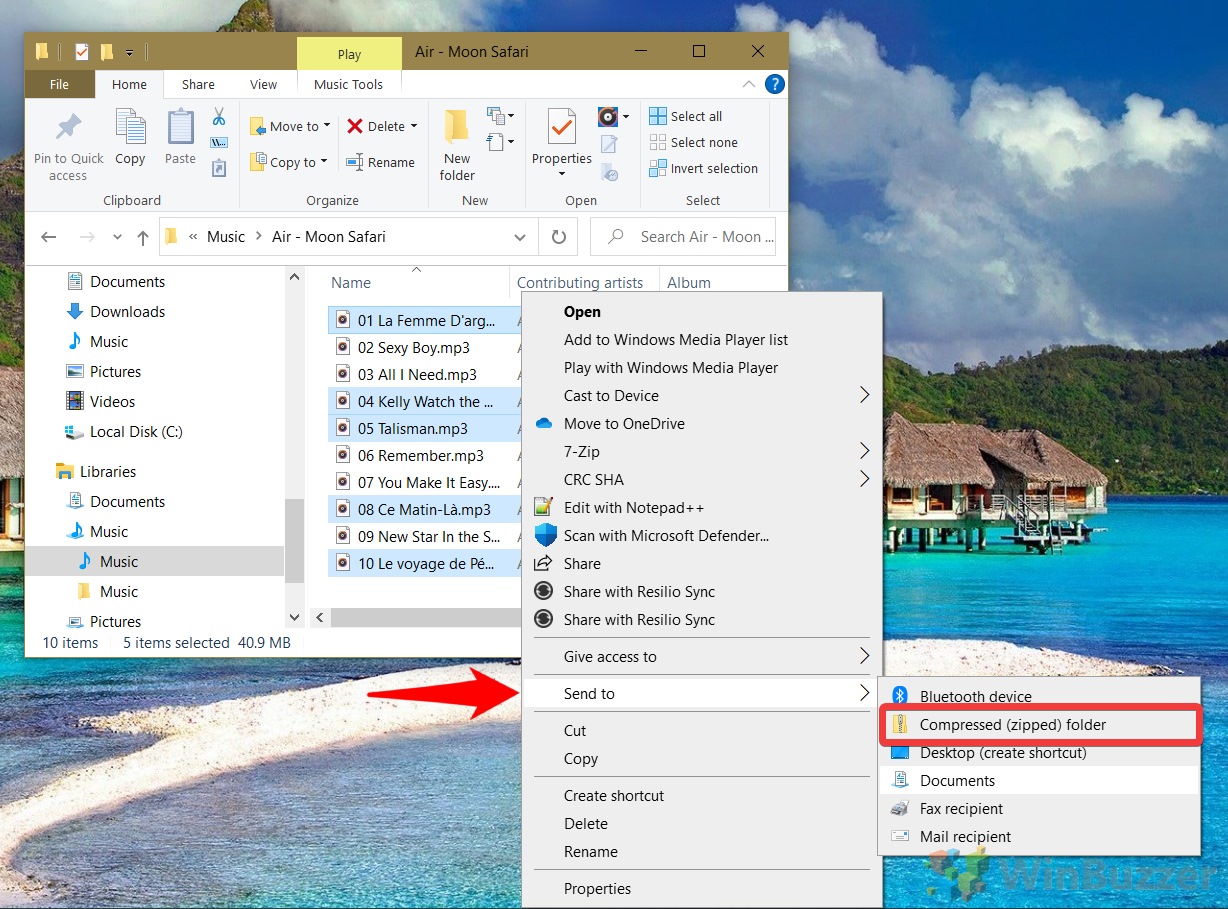
- Name your zip file
Windows 10 will show you a zip file and ask you to choose an appropriate name. Do so, then press Enter.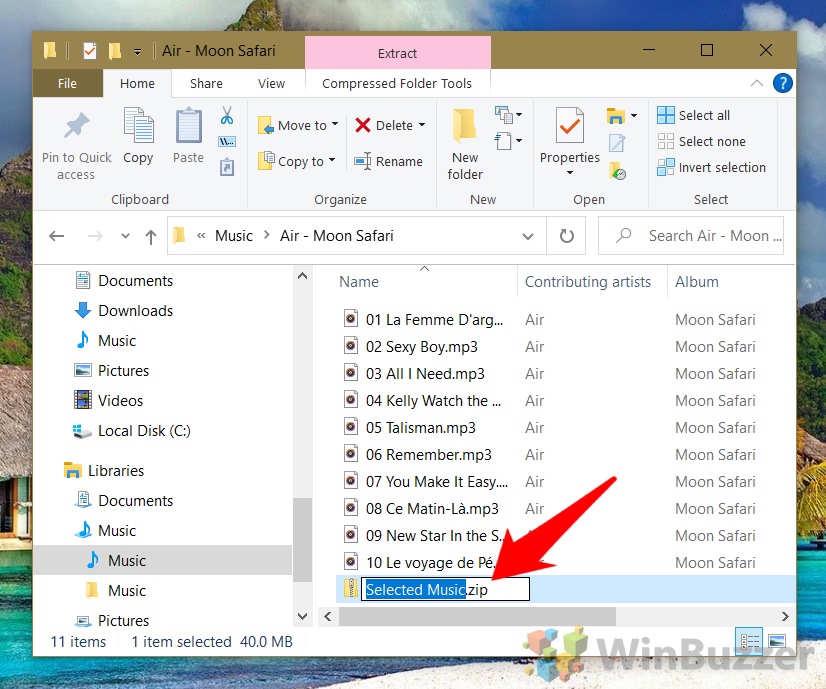
How to Add Folders or Files to an Existing ZIP File
So, you finished creating your zip file, only to realize you missed a file or folder. Not to worry – Windows 10 makes this easy to solve, too.
- Drag your files or folders to your existing zip folder
- Wait for the ‘+ Copy' tooltip and release your mouse button

How to Make a ZIP File Out of Multiple Files or Folders with File Explorer’s Ribbon Bar
If you don't like fiddling around with the right-click menu, File Explorer also provides options via its ever-useful ribbon bar.
- Select your files or folders and press ‘Zip'
You can select multiple files with Ctrl + click or Shift + click. The former will let you select each individually, while the latter will select everything between two selected files.
Once everything you want to click is highlighted in blue, select the “Share” button at the top of the ribbon, then click “Zip”.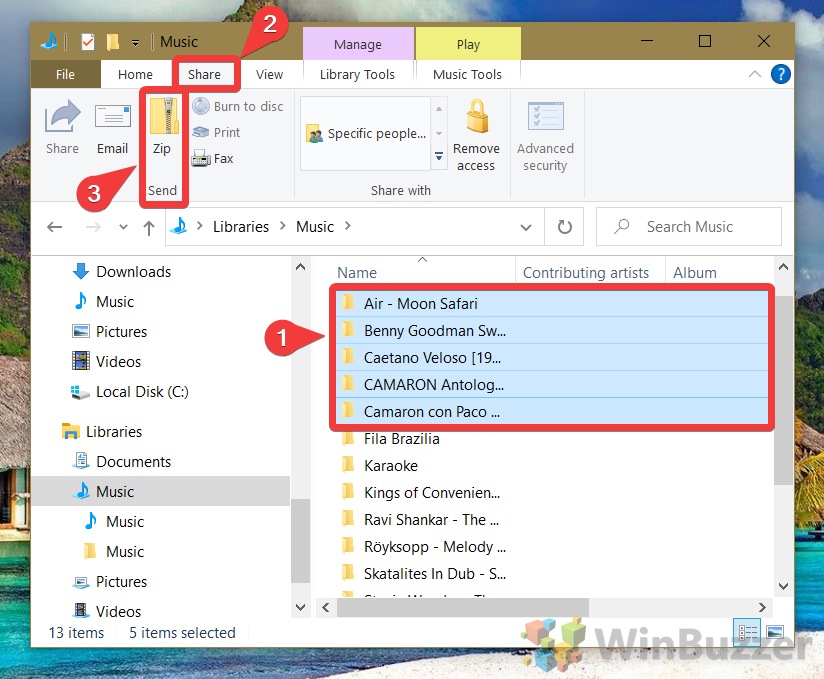
- Name your newly zipped files or folders
You can keep the default name or type one of your own. Once you're done, click away or press “Enter”.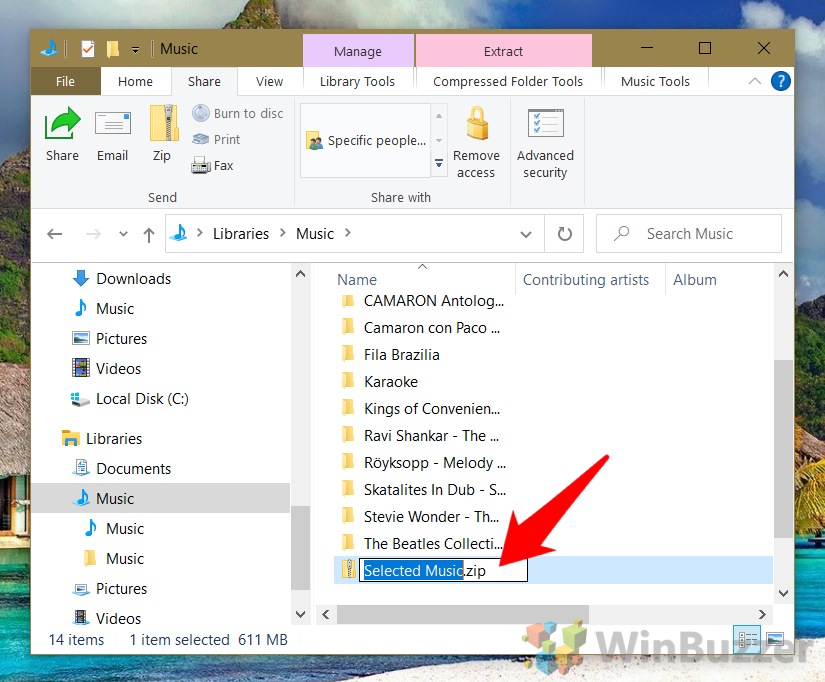
How to Zip or Unzip via the Command Line in Windows
In case you prefer the command line, we'll quickly show you how to unzip files or zip them again with PowerShell. This is generally a bit more fiddly, but it can be powerful if you're trying to automate.
- Open PowerShell as an Admin
Press Start + X to open the secret Start menu, then click “Windows PowerShell (Admin)”.
- Enter the zip command in Windows PowerShell
To zip files or folders, run the following command, replacing thetext (including the greater and lesser than symbols) with the location of your file or folder and where you want to save it: Compress-Archive -LiteralPath-DestinationPath For example, for a single file, you could type:
Compress-Archive -Path C:\Users\winbu\Music\Benny Goodman Swings Again\airmail.mp3 -DestinationPath C:\Users\winbu\Music\favorite music.zip
If you wanted to compress the entire folder, you could instead type:Compress-Archive -Path C:\Users\winbu\Music\Benny Goodman Swings Again\ -DestinationPath C:\Users\winbu\Music\favorite music.zip
Alternatively, to compress all the files in a folder but not the folder itself, you can use a wildcard (*) to exclude the parent folder. This method won't include the subdirectories and files of the root folder:Compress-Archive -Path C:\Users\winbu\Music\Benny Goodman Swings Again\* -DestinationPath C:\Users\winbu\Music\favorite music.zip
If you want to compress only a folder's root files and subdirectories, you can use the *.* wildcard:Compress-Archive -Path C:\Users\winbu\Music\Benny Goodman Swings Again\*.* -DestinationPath C:\Users\winbu\Music\favorite music.zip
Finally, if you have a folder with files or various formats, but only want to zip one type, you can do so with the *.filetype wildcard. In our example, we may want to zip mp3 files, but not their .jpg album art:Compress-Archive -Path C:\Users\winbu\Music\Benny Goodman Swings Again\*.mp3 -DestinationPath C:\Users\winbu\Music\favorite music.zip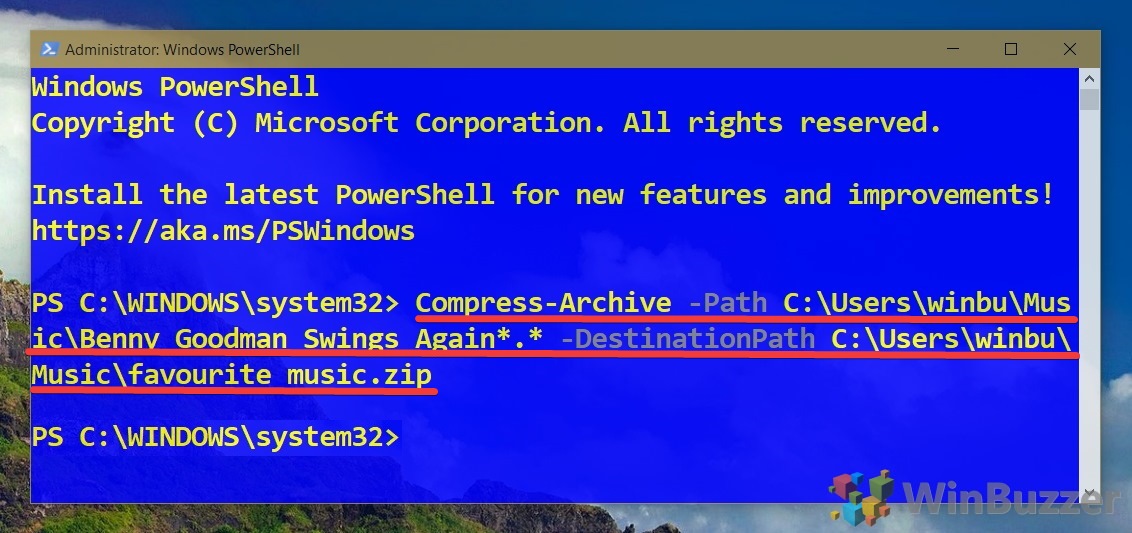
- Enter the unzip command in Windows PowerShell
If you're wondering how to unzip files with PowerShell, try the following command:Expand-Archive -LiteralPath
-DestinationPath Naturally, replace
with the path to your zip, and with where you want it to be unzipped to. If you don't specify a destination path, it will unzip to the same folder the zip is stored in. 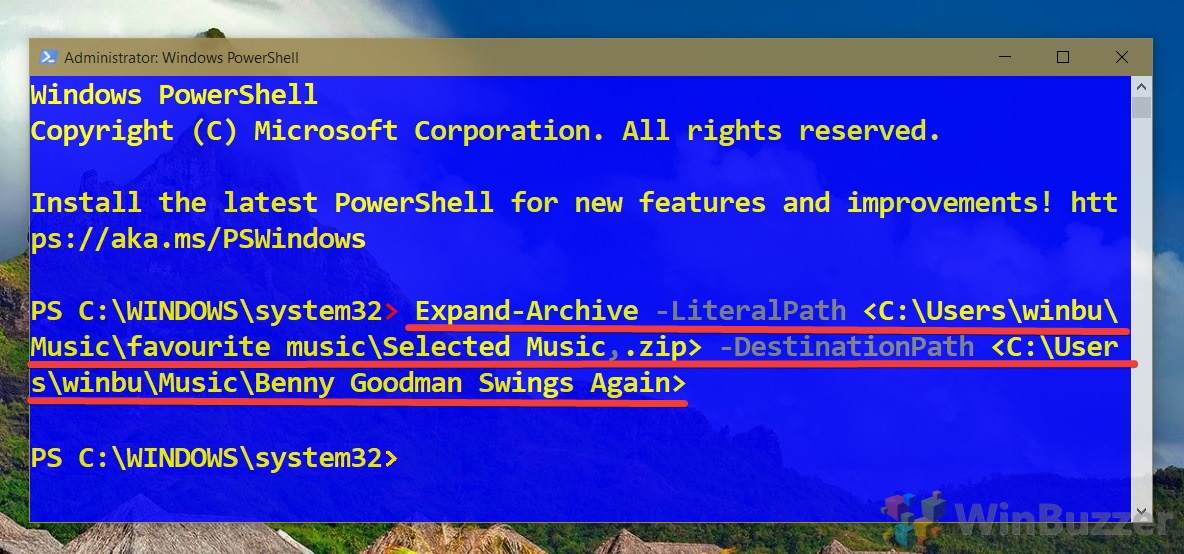
How to Extract All Files and Folders from a Zip File
If you received a ZIP file or are wondering how to unzip a file you previously compressed, File Explorer should be your go-to. We can use that handy right-click menu again to reverse the process.
- Right-click the ZIP file and select ‘Extract All…'
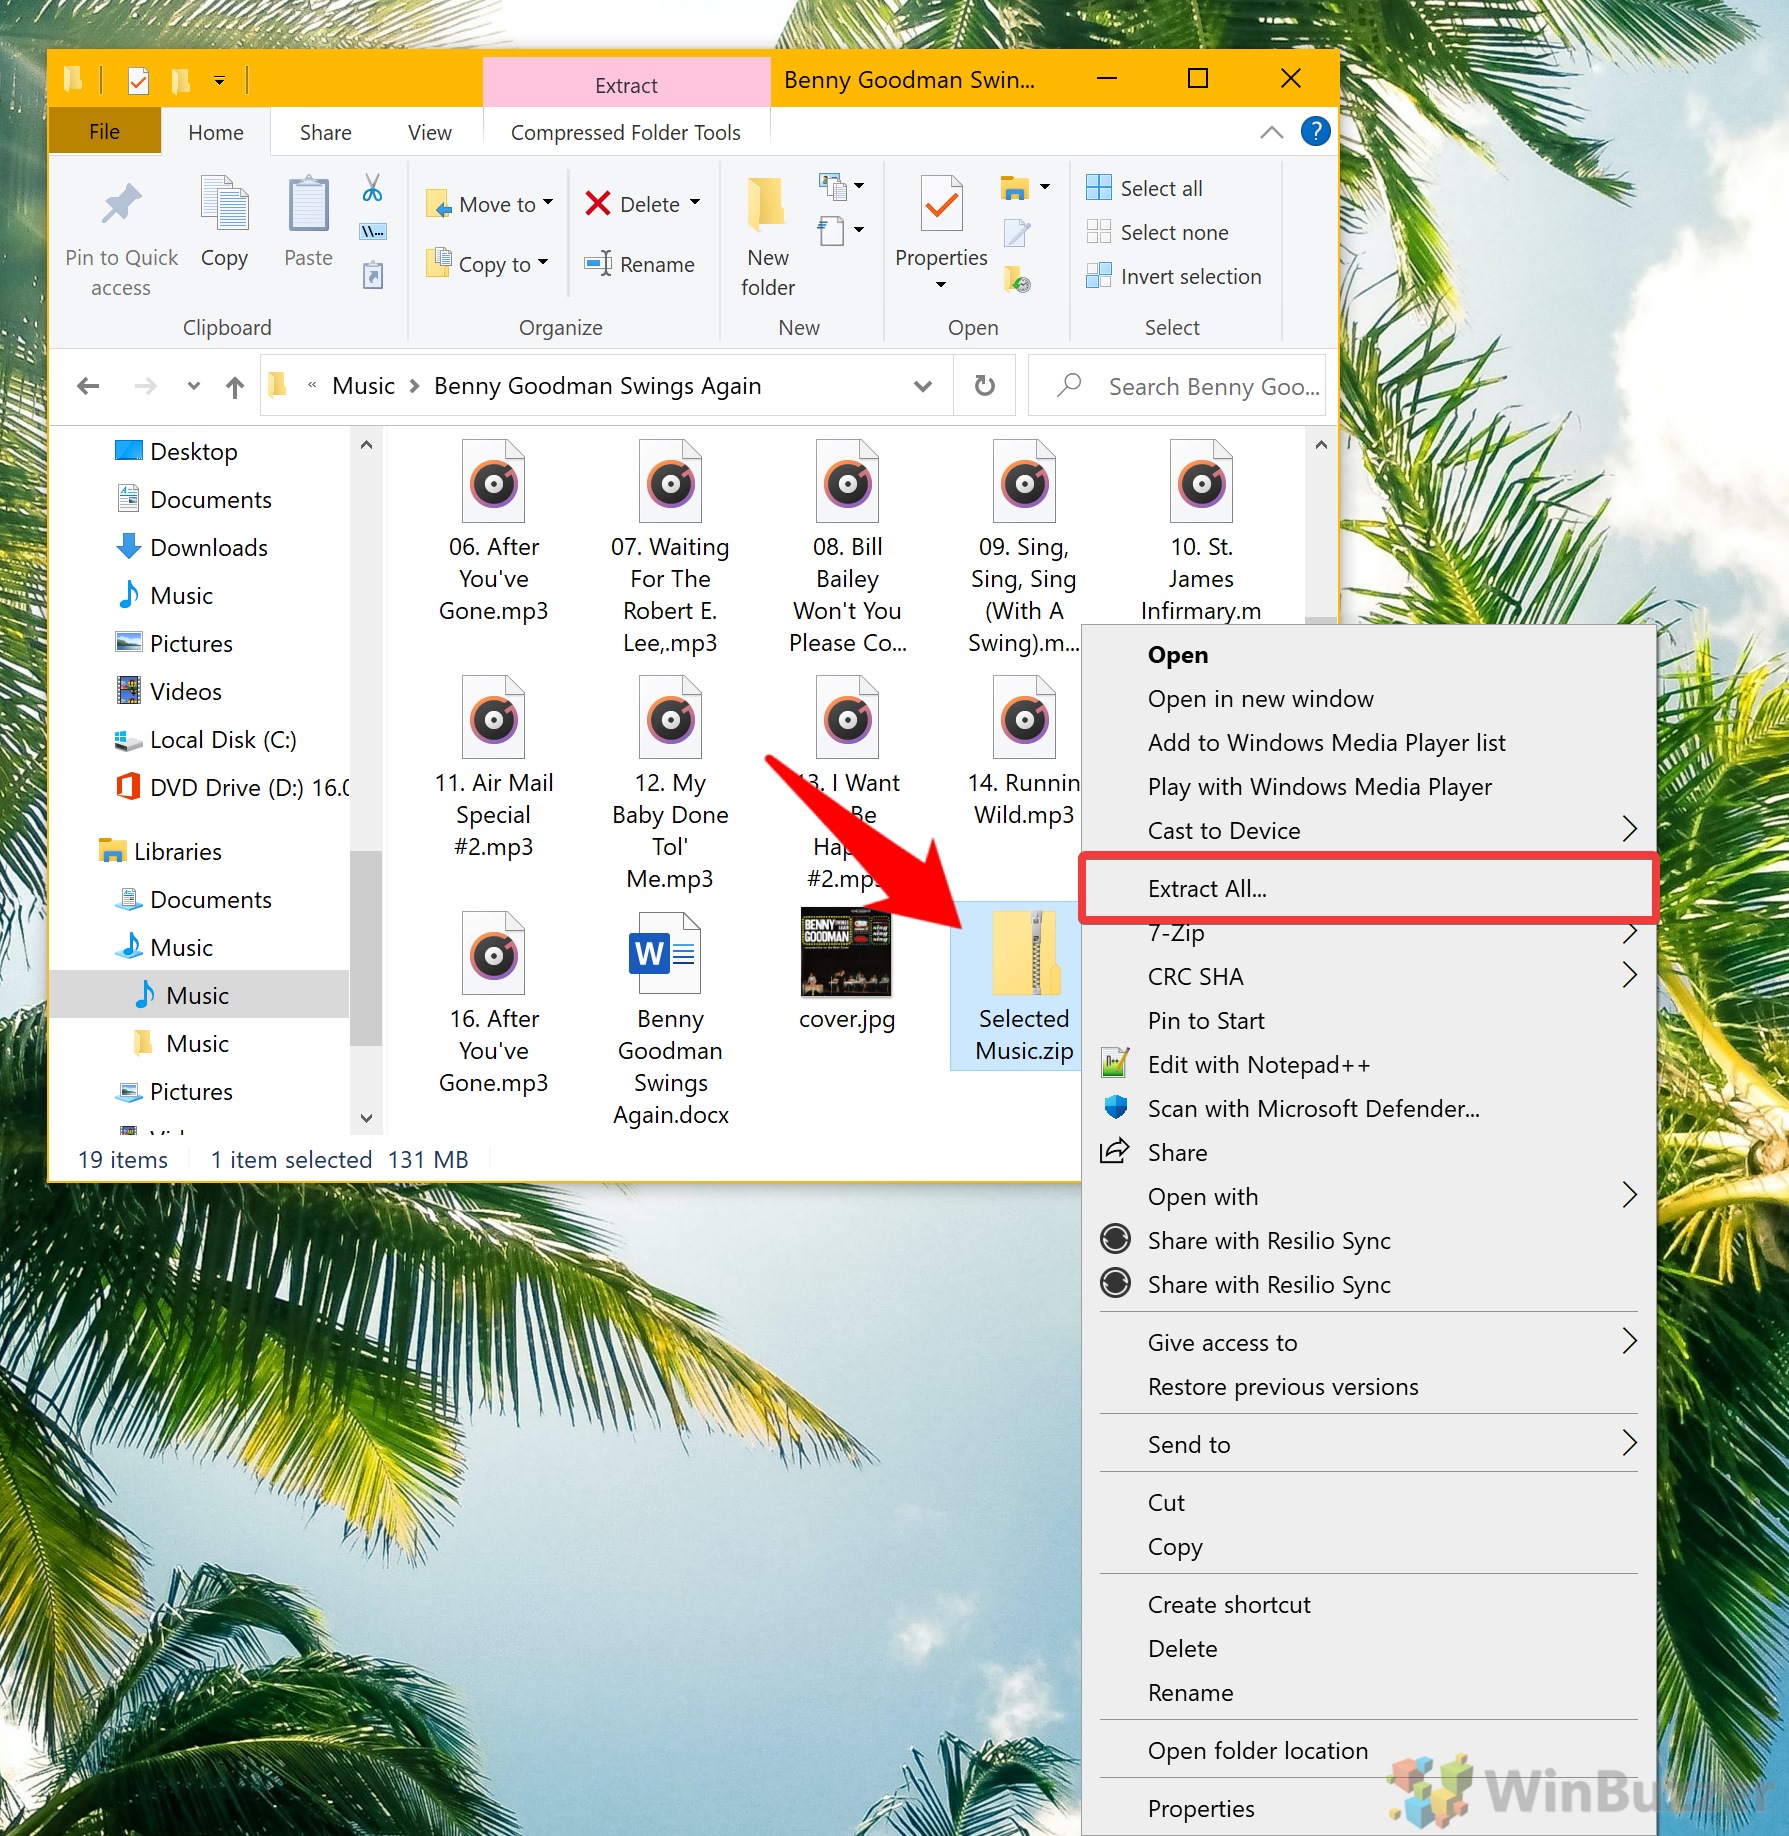
- Choose where to extract the zip to
Windows will surface a window called “Extract Compressed (Zipped) Folders”. Under the “Select a Destination and Extract Files” heading, choose “Browse…”. Navigate to the location you'd like to extract to in the File Explorer menu, click “Open”, and then back in the main extraction window press “Extract”.
Depending on the size of the archive, the extraction process may take some time.
How to Extract a Single File from a Zip File
Sometimes you don't want to wait for an entire archive to extract when you only require a single file. In such cases, it is possible to unzip a single file. First, double-click the .zip file to open it, then follow the step below.
- Drag the file out of the .zip archive
It's really that simple. Just make sure you're dragging the file to either your desktop or another File Explorer window with your destination folder.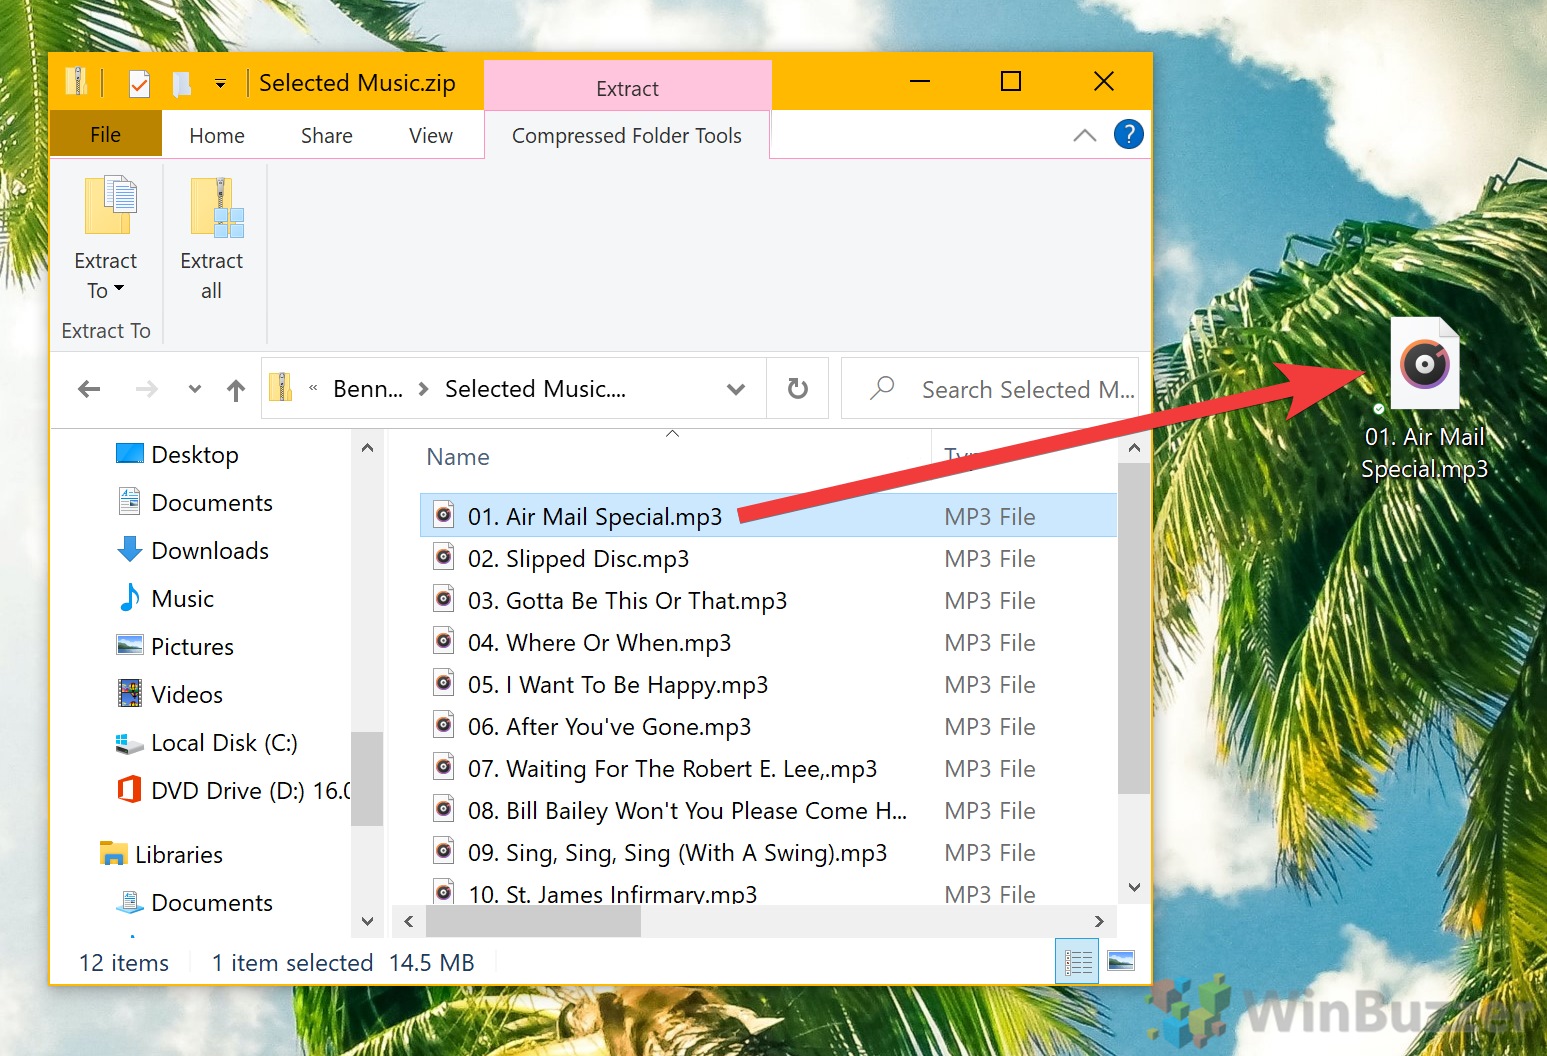
That closes out this guide, which should have taught you everything you need to know about zip files in Windows 10. However, if you have a penchant for learning, you can also try our batch renaming and folder options guides.


