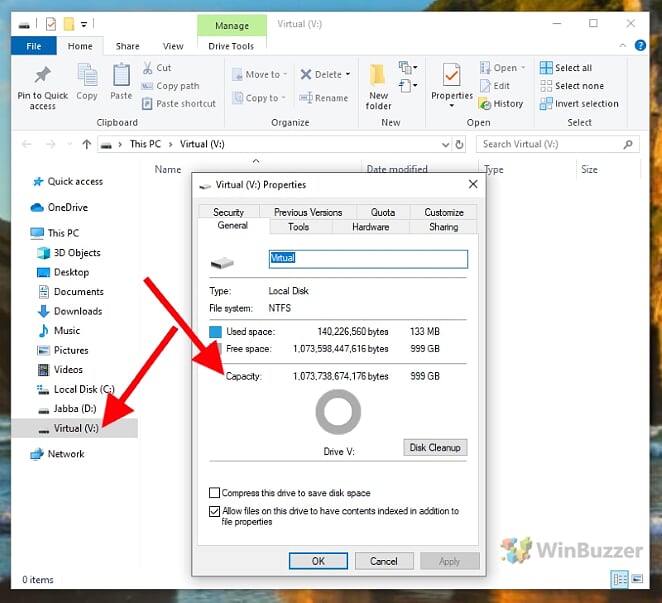
Creating virtual drives on Windows 11 or Windows 10 can be a beneficial way to manage your computer's storage and processing capabilities. This tutorial will guide you through the process, covering various methods and applications for these tasks.
The Benefits of Virtual Drives on Windows 11 and Windows 10
The multiple uses of a virtual hard disk can extend your disk management capabilities on Windows and have various benefits. Creating a virtual drive in Windows is certainly useful for numerous situations. For example, loading a DVD image in ISO format, partitioning ramdisk for apps that hog system performance, or creating a secure drive that is secured by a password.
Supported Types of Virtual Drives on Windows 11 and Windows 10
Windows allows several types of virtual drives, each serving different purposes and offering unique capabilities:
-
Virtual Hard Disk (VHD and VHDX):
VHD (Virtual Hard Disk): This is an older virtual disk format used in Windows. It's a file format representing a virtual hard disk drive (HDD). VHDs can store what is found on a physical HDD, such as disk partitions and a file system, which in turn can contain files and folders. It's commonly used in virtual machine environments but can also be used as standalone storage.
VHDX (Hyper-V Virtual Hard Disk): An enhancement of the traditional VHD format, VHDX was introduced in Windows Server 2012. It supports larger disk sizes (up to 64 TB), provides protection against power failures, and offers improved performance. VHDX is particularly useful in Hyper-V virtualization environments for storing virtual machine files, and for scenarios that require large-capacity virtual drives.
-
Virtual Optical Drives (Based on Image Files):
These are virtual drives that emulate physical optical disc drives, such as CD, DVD, or Blu-ray drives. Users can mount disc images (commonly in ISO format) to these virtual drives. This makes the system treat the image file as though it were a physical disc. This is particularly useful for software installation or accessing media files without needing the physical disc. Virtual optical drives allow for the mounting of various disc images, aiding in tasks like software testing or running older software that requires disc access.
-
RAM Drives:
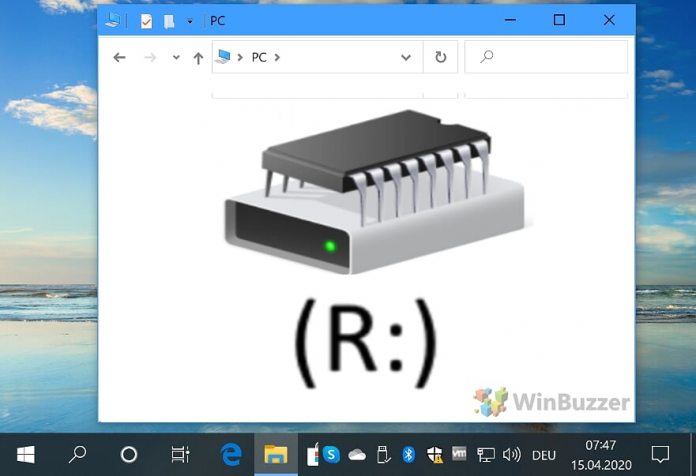
A RAM drive (or RAM disk) uses a portion of the computer's RAM as a fast storage medium. Unlike traditional storage devices that rely on spinning disks or flash memory, RAM drives use volatile memory. This results in extremely fast data access times, surpassing even the fastest SSDs. RAM drives are ideal for temporary storage of information that requires quick access, such as caching files or temporary processing data. However, it's important to note that the data in a RAM drive is lost when the computer is turned off or rebooted, due to the volatile nature of RAM.
⚠️ Please note: The process described below is the same in Windows 11 as it is in Windows 10. However, bear in mind that we'll be using screenshots from Windows 10, so your UI may look a little different. We'll point out any changes you need to be aware of as they come up.
How to Create a Virtual Drive as a Virtual Disk With Disk Management
Creating a virtual drive using Windows' built-in Disk Management tool is a straightforward process. This method walks you through creating a virtual hard disk (VHD), perfect for additional storage or testing purposes.
- Open Disk Management
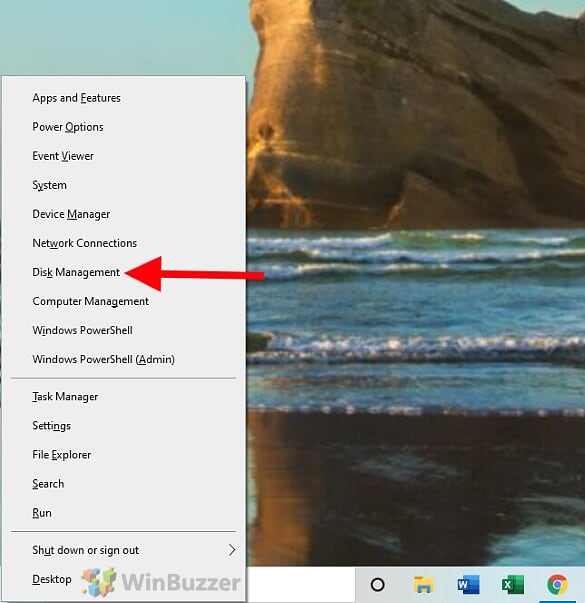
Right-click the Start menu and select “Disk Management” from the context menu to open the utility.

- Start Creating the Virtual Hard Disk (VHD)
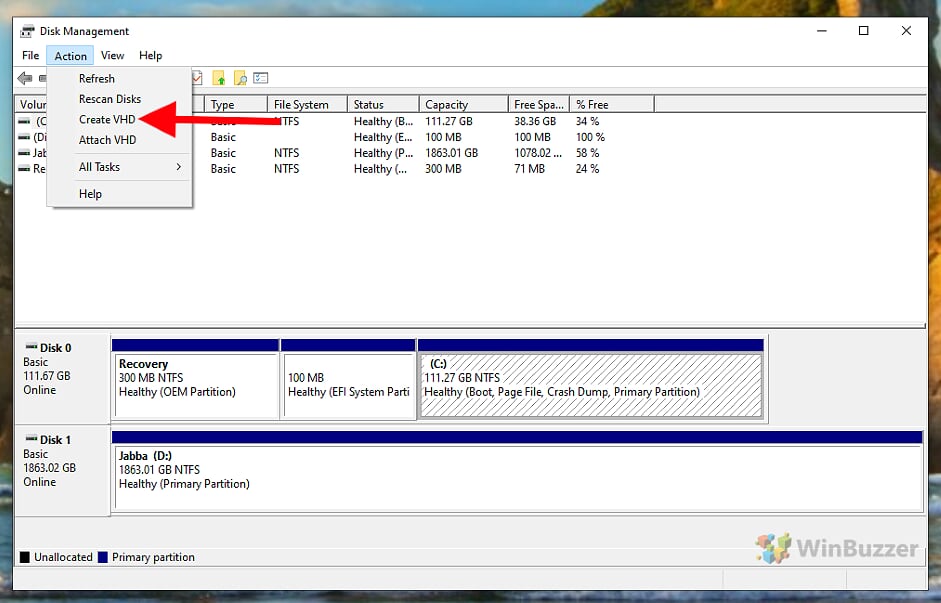
In Disk Management, go to the “Action” menu and choose “Create VHD”.

- Set the VHD Location
Click “Browse” to specify where you want to save the VHD file.

- Choose Path and Filename
Choose a desired folder and enter a filename. This file will store all data for the virtual hard disk.
- Choose Size, Format, and Type of the Virtual Hard Disk (VHD)
Size: Here, you specify the maximum size of the virtual hard disk. This size represents the maximum amount of data the virtual disk can hold. It's important to note that the actual size of the VHD file on your physical drive might start smaller, especially if you choose a dynamically expanding disk.
Format (VHD or VHDX): You can choose between two file formats:
VHD: This is the older format, compatible with various versions of Windows. It's generally sufficient for most purposes but has a size limit of up to 2TB.
VHDX: This is a newer format that supports larger disk sizes (up to 64TB) and has improved resilience to power failure events.
Fixed Size (Fixed Hard Disk): Selecting this option means the virtual hard disk file will be created on your physical drive with the full size you specified. For example, if you specify a 100GB VHD, it will occupy 100GB on your physical drive from the start, regardless of how much data is actually stored on it.
Dynamically Expanding (Dynamic Hard Disk): With this option, the virtual disk file starts small and grows as data is added to it, up to the maximum size specified. This can save space on your physical drive if the virtual drive is not fully utilized.

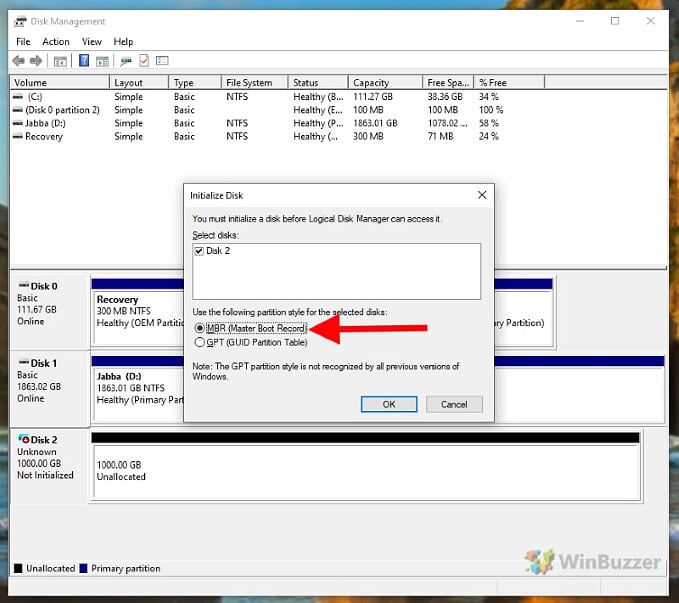
- Initialize the Virtual Hard Disk
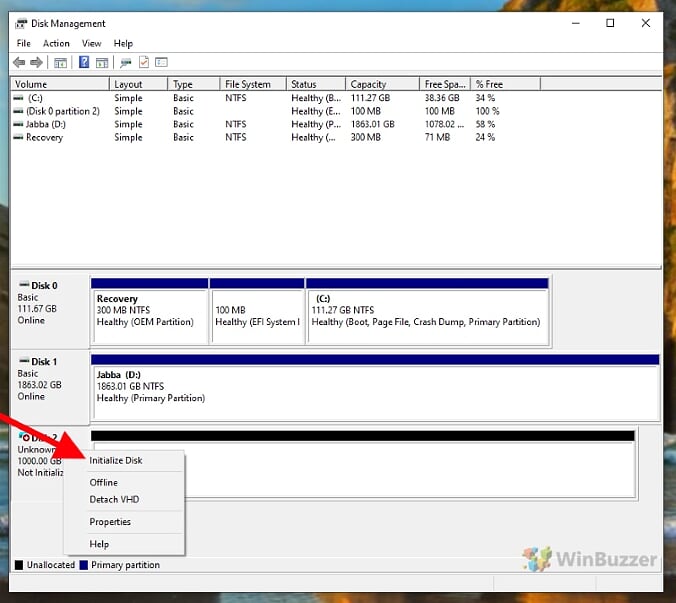
Once created, the VHD appears in the disk list. Right-click on the disk label and select “Initialize Disk”.
- Select VHD Partition Style
Choose between MBR (Master Boot Record) or GPT (GUID Partition Table) partition styles; GPT is recommended for modern systems.
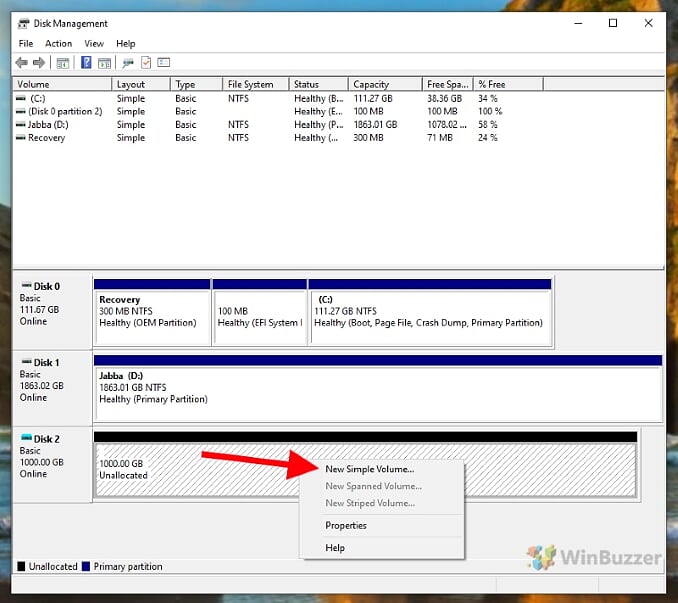
- Create a New Volume
Right-click in the unallocated space of your VHD and select “New Simple Volume”. This starts the New Simple Volume Wizard.
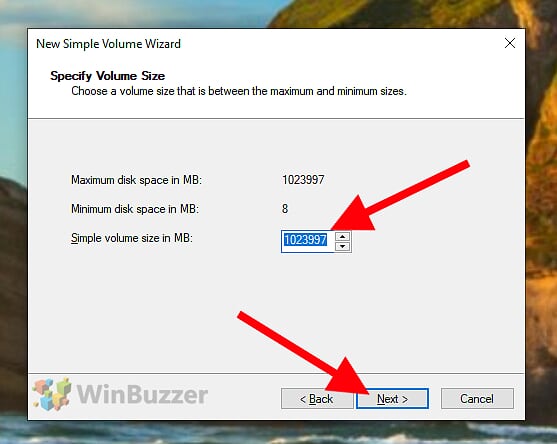
- Specify Volume Size
Accept the default setting for Volume Size to use the whole space that you defined previously. Optionally you can create various virtual volumes/partitions and with that different virtual disks by choosing a fraction and repeating the following steps.

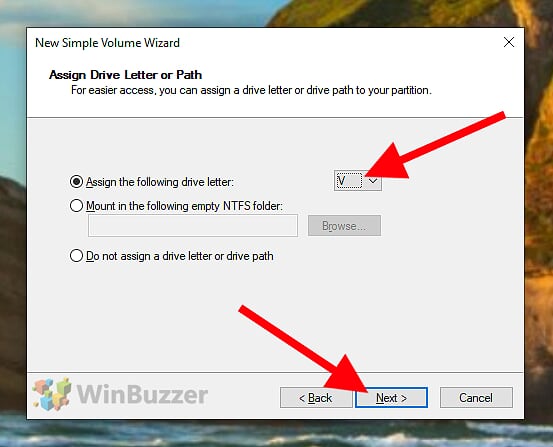
- Assign a Drive Letter
Give your virtual hard disk an available drive letter, such as “V” for “virtual”. This will make it visible and available inside of Windows as a drive.

- Select a Filesystem and Format the Virtual Drive
The “Format Partition” step in the “New Simple Volume Wizard” in presents several options that are crucial for preparing your new virtual hard disk (or any kind of new volume) for use. Here's a breakdown of these options:
File System: This dropdown menu lets you select the file system for your new volume. Common choices include:
NTFS (New Technology File System): The default and recommended file system for Windows. It includes features like security permissions, encryption, disk quotas, and more.
FAT32 (File Allocation Table 32): An older file system with broader compatibility, including with older and non-Windows operating systems, but with limitations like a maximum file size of 4GB.
exFAT (Extended File Allocation Table): Suitable for flash drives and external hard drives, especially when used between different operating systems like Windows and macOS.
Allocation Unit Size: Also known as cluster size, it defines the smallest amount of disk space that can be used to hold a file. The default size is usually optimal for most users, but it can be changed to suit specific needs. Larger allocation units can reduce the overhead of managing files but can also result in more wasted space for small files.
Volume Label: This is essentially the name of the drive. You can enter any descriptive name to help identify the drive in File Explorer.
Perform a Quick Format: When this option is checked, the format process is faster but less thorough. A quick format simply removes the files from the volume and checks for bad sectors, which is usually sufficient for a new drive. An unchecked (full format) option will thoroughly scan the drive for bad sectors and completely erase all data, which can be time-consuming, especially for large drives.
Enable File and Folder Compression: This option allows files and folders to be automatically compressed to save disk space. However, this might reduce the performance slightly, especially on older systems or with large files.

- Use the Virtual Drive like a normal Disk
The newly created virtual hard disk will now appear in File Explorer, ready to be used just like any other hard drive.
How to Create a Virtual DVD Drive in Windows
Windows 11 and Windows 10 offer various ways to create and use virtual optical drives:
-
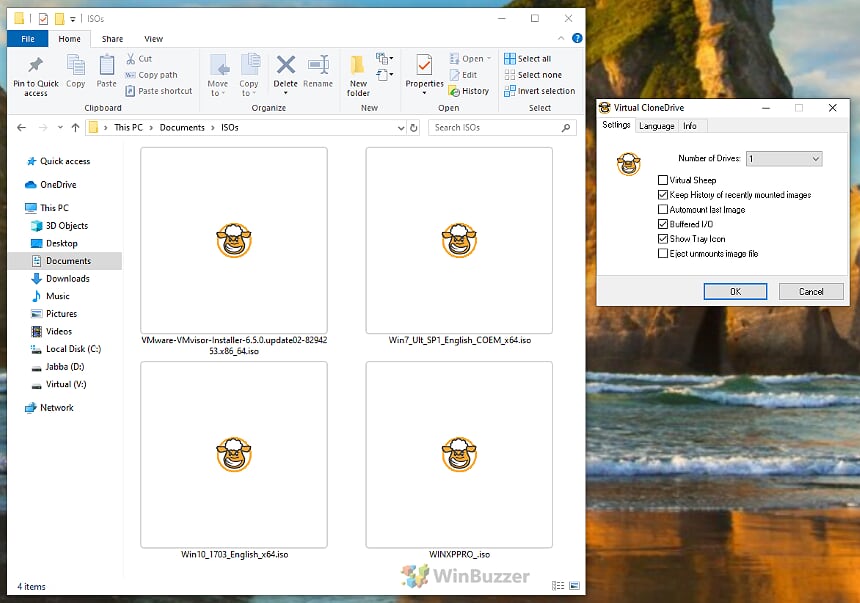
ISO Files: Windows natively supports mounting ISO files without the need for third-party software. Starting with Windows 8 and continuing in Windows 10 and 11, you can simply double-click an ISO file to mount it as a virtual drive. This feature allows you to access the contents of the ISO as if it were a physical disc inserted in a DVD drive.
-
Third-party Software: Programs like “Daemon Tools” and “Virtual CloneDrive” offer additional features for mounting disk images that are not necessary for basic ISO file mounting in modern versions of Windows. They are more relevant if you need to mount other types of image files (like BIN, CUE, NRG) or require advanced features not provided by Windows.

How to Create a Virtual Drive as a RAM Disk on Windows
With a RAM disk, you use part of your super-fast RAM for a virtual drive. In this separate tutorial we show you how you can create even use permanent RAM Disk.

FAQ – Frequently Asked Questions about Virtual Drives
How can I resize an existing virtual hard disk in Windows 10?
To resize a VHD, you must first detach it from Disk Management, then use the PowerShell command Resize-VHD specifying the new size, and finally, reattach it. Example: Resize-VHD -Path "C:\path\to\your.vhd" -SizeBytes 50GB.
Can I store a virtual hard disk on an external drive?
Yes. In Disk Management, when creating a VHD, navigate to your external drive as the storage location.
Is it possible to boot from a virtual hard disk in Windows 10?
Yes. Use bcdboot V:\Windows in the command prompt (where “V” is the mounted VHD) to add the VHD to the boot menu.
How do I transfer a virtual hard disk to another computer?
Copy the VHD file and attach it via Disk Management on the new computer.
Can virtual drives improve system performance?
RAM disks can for specific tasks.
What are the security implications of using a virtual drive?
Encrypt VHDs for security. Remember, RAM disks are volatile and lose data on reboot.
How do I backup a virtual hard disk?
Copy the VHD file to another location while it's detached or the system is off.
Can I run a different OS in a virtual hard disk?
Install an OS in a VHD via normal installation processes, ensuring the VHD is attached during installation.
How do I share a virtual hard disk over a network?
Share the VHD file over the network and ensure the recipient attaches it via their Disk Management.
What file systems are supported in virtual hard disks?
VHDs support NTFS, FAT32, and exFAT. Choose based on compatibility with your system.
How do I recover data from a corrupted virtual hard disk?
Use VHD recovery tools like ‘VHD Recovery Tool' or similar services.
Can I convert a physical disk to a virtual disk?
Use the ‘Disk2VHD‘ tool. Example: Disk2VHD.exe [options] .
What are the limitations of a RAM disk?
Data is volatile and lost on reboot. It consumes system RAM.
How do I mount an ISO file to a virtual DVD drive using PowerShell?
Use the PowerShell command: Mount-DiskImage -ImagePath "C:\path\to\your.iso".
Is it possible to automate the creation of virtual drives?
Yes, using PowerShell or batch scripts. For VHD: New-VHD -Path "C:\path\to\new.vhd" -SizeBytes 10GB -Dynamic to create a new VHD.
Last Updated on April 22, 2024 2:36 pm CEST by Markus Kasanmascheff
