
The Windows 10 lock screen may seem like a small aspect of your experience, but the truth is that most of us look at it multiple times a day. Anything that you see that regularly is worth making your own.
Thankfully, Microsoft provides several options to customize your lock screen, though you still don't get quite as much freedom as we'd like. You can, for example, change your Windows 10 lock screen wallpaper, whether it shows tips and tricks, the notifications you get from apps, and whether you can use Cortana from it.
In this guide, we'll be showing you how to do all of the above. By the end, you'll have a nice custom lock screen in Windows 10 that you can call your own.
How to Change Lock Screen Wallpaper in Windows 10
Changing your lock screen in Windows 10 is simple enough that you may not even need our help. However, it is buried under a few settings menus, so we'll show you how either way.
- Open Settings
Press Start and then click the cog above the power button to open the Settings app.
- Click ‘Personalization'

- Press ‘Lock screen' in the sidebar
Then, in the main pane, look for the drop-down underneath “Background”. Click the dropdown beneath to find more options.

- Option 1: Click ‘Windows spotlight'
Windows spotlight is a feature that automatically downloads beautiful images from Bing to use as your windows background. In certain regions, you may also notice that it displays advertisements.
- Option 2: Picture
As you might expect, the picture option lets you set a custom Windows 10 lock screen wallpaper. This has to be an image you've downloaded from the internet rather than a URL.
You can set it by pressing “Browse”, finding it in File Explorer, and pressing “Open”.
- Option 3: Slideshow
If you're indecisive like me, you might want to click the “Slideshow” option. Rather than a single image, this lets you cycle your lock screen background between a group of them. This is great for family photos, for example.
- Removing the pictures folder from your slideshow
By default, Windows 10 will use the pictures folder for your slideshow. In my experience, my pictures folder clogs up will all kinds of images that aren't suitable for a background. If you want to remove it, first click “Pictures” under the “Choose albums for your slideshow” heading.
- Click ‘Remove'

- Add a folder or folders to your slideshow
You can now add any folder you like to act as the image source for your slideshow. You can even add multiple folders if you have images in separate locations.
To do this, just press the “Add a folder” button.
- Navigate to your folder and press ‘Choose this folder'
Repeat this process for any other folders you'd like to include.
- Click ‘Advanced slideshow settings'

- Change your slideshow settings
I would recommend leaving “Only use pictures that fit my screen” ticked, as otherwise, you may get square images with black bars around them. The others are down to personal preference.
- Turn lock screen tips on or off
If you'd like, you can get fun facts, tips, and other tidbits on your lock screen. Some people will enjoy these, but others will just find them distracting.
You can toggle them on or off by flipping the toggle underneath “Get fun facts, tips, and more from Windows and Cortana on your lock screen”.
How to Add or Change Windows 10 Lock Screen Apps
One lesser-known customization feature for the Windows 10 lock screen is the ability to designate an app to receive detailed notifications. You can add an additional 8 that will display a quick status.
- Open Settings
Press Start and press the settings cog above the power button.
- Click ‘Personalization'

- Add app notifications to your Windows 10 lock screen
In the settings sidebar, click “Lock screen”. Then, in the main pane, click the plus underneath “Choose one app to show detailed status on the lock screen”.
- Choose the app you want detailed notifications for
In the pop-up list, select the lock screen app you want detailed notifications for. The best choice is usually the one you use the most, such as mail or calendar.
- Add quick status apps to the lock screen
Underneath that, you can select or change the lock screen apps that you want a quick status for. Press the “+” button on any of the eight squares to do so. A quick status shows the number of unseen updates for any supported app.
- Choose the quick status app you want from the list
In the pop-up list, click the app that you want to have quick status on the lock screen.
How to Remove a Lock Screen Wallpaper from the Sign-in screen
If you want your lock screen background image to be different from your sign-in screen, you can also do so. With the guide below, this should take less than a minute.
- Open Settings
Press the Start button and then the settings cog above the power button.
- Press ‘Personalization'

- Remove your lock screen wallpaper from the sign-in screen
Click “Lock screen” in the sidebar to access lock screen settings. Scroll down to the very bottom. You'll see a heading that says, “Show lock screen background picture on the sign-in screen”. Press the toggle below it to enable or disable the option.
How to Allow Cortana Above the Lock Screen
Though it isn't widely used, you can also make it so Cortana will work even when your computer is locked. This allows you to shout random questions or actions across the room for her to perform.
Just be aware that you may not have this option if you don't have a microphone attached to your PC or have a later Windows version. Here's how to turn it on if you do:
- Open Settings
Press Start, then click the settings cog above the power button.
- Click ‘Personalization'

- Press ‘Lock screen' in the sidebar, then ‘Cortana lock screen settings'

- Turn Cortana for the lock screen on or off
At the top of the many, you'll see a section that says, “Use Cortana even when my device is locked”. Toggle the switch to “On” and optionally tick “Let Cortana access my calendar, email, messages, and Power BI data when my device is locked.”.
How to Customize the Lock Screen Timeout in Windows 10
If you'd like to use your computer lock screen as decoration, you can modify your settings so that it never times out and turns off. You can also change this setting if you want it to turn off earlier to conserve battery.
- Open settings
Press Start, then click the settings cog above the power button.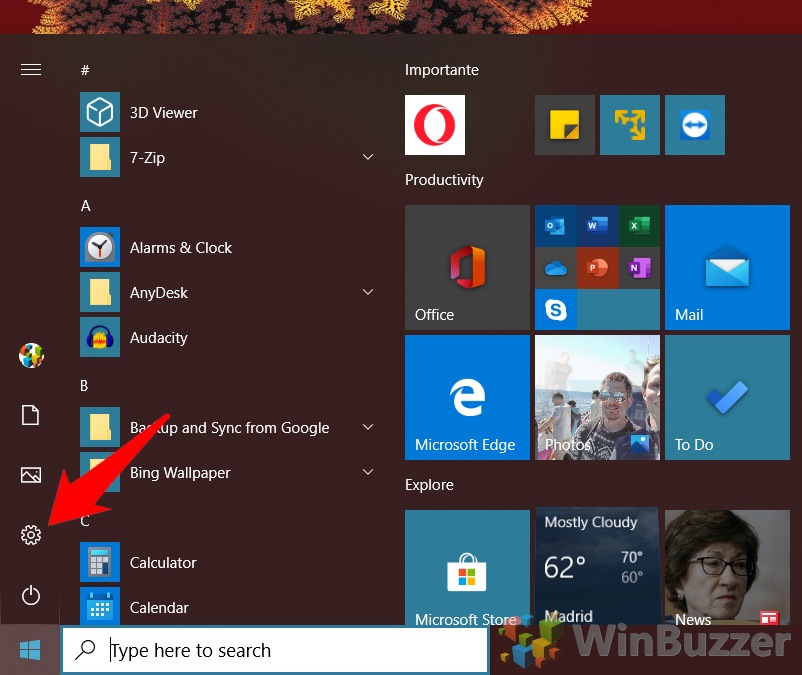
- Press ‘Personalization'

- Open screen timeout settings
Press “Lock screen” in the sidebar to access lock screen settings, then press “Screen timeout settings” towards the bottom of the main pane.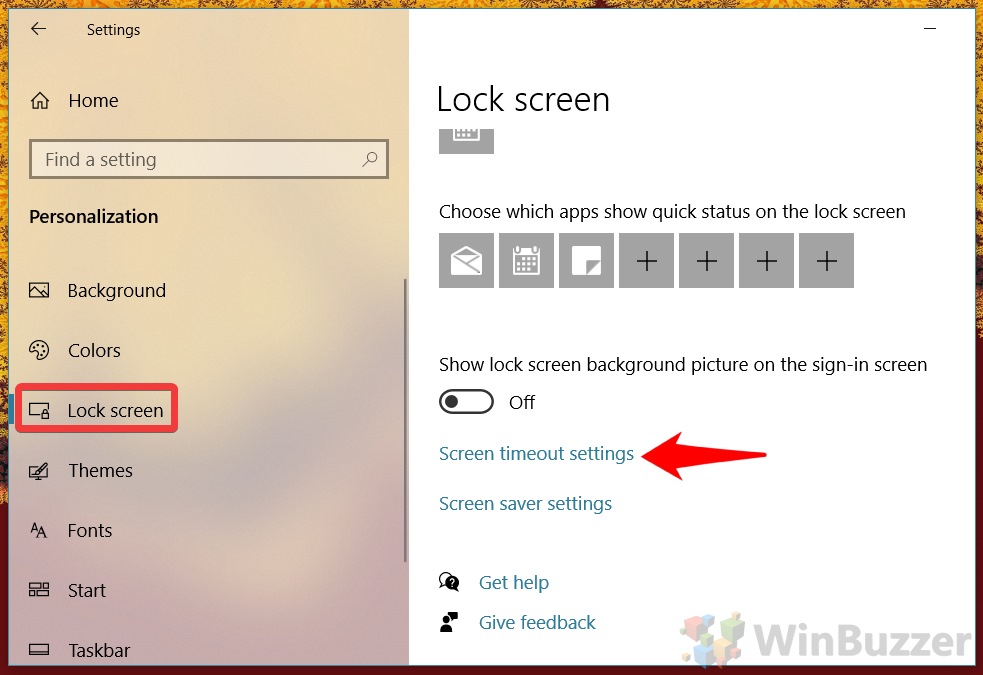
- Change your screen timeout settings
Clicking the link in the previous section will take you to the Screen section of the Power & sleep settings. Look for the sections that say, “On battery power, turn off after” and “When plugged in,” turn off after”, and adjust the dropdowns to suit your preferences.
There you have it. With this guide concluded you should have a good idea of how to customize your lock screen in Windows 10. If you have any other tips and tricks, let us know below.
In the meantime, you may want to disable the lock screen entirely, disable just the login screen, or fix issues with Windows Spotlight.


