

The search indexing service in Windows 10 and Windows 11 tracks important drives and folders for changes by creating an up to date database of filenames, filetypes and even content keywords of specific files.
This speeds up Windows 11 and Windows 10 search dramatically as your PC does not have to scan your whole system or parts on request. The downside of this Windows index is that its results might be outdated, either showing files that have been removed already or not listing existing files you might be searching for.
Mostly you might simply have to wait until those changes get reflected in the Windows search index. In rare occasions, you might need to rebuild the Windows search index manually, to fix bugs or a corrupted search database.
Should You Delete the Windows Search Index or Reset Windows Search?
When you reset and rebuild the Windows search index, you delete all of its contents and tell Windows 10 and Windows 11 to start indexing again. There are different ways to do this.
You can use the Windows “Search and indexing” troubleshooter as shown in our other tutorial to fix Windows search. Here we show you how to delete and rebuild the Windows search index either via indexing options or just a few CMD commands.
At the end we also show you how to completely reset Windows search using a registry hack. Apart from triggering a rebuild of the search index this will also reset search indexing options to factory defaults.
⚠️ Please note: The process described below is the same in Windows 11 as it is in Windows 10. However, bear in mind that we’ll be using screenshots from Windows 10, so your UI may look a little different. We’ll point out any changes you need to be aware of as they come up.
How to Rebuild the Windows Search Index with Search Indexing Options
If you choose to rebuild the search index it will delete the whole search database and trigger the Windows indexing service to re-index all predetermined drives locations and filetypes specified in search indexing options. If this does not fix your problem you might want to completely reset the Windows search index to factory defaults as shown at the end ot this article.
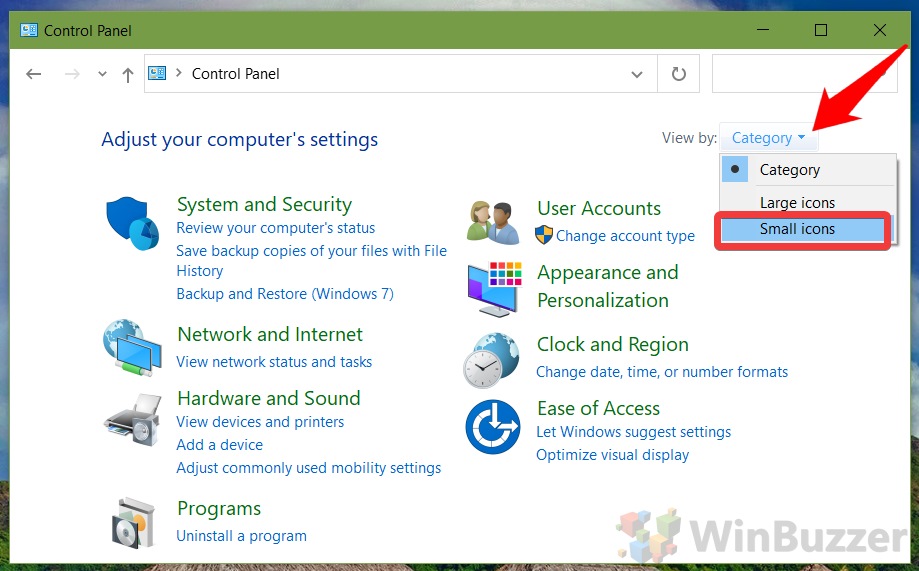
- Open Control Panel

- Switch to Small icons view
Adjust the view settings to easily locate “Indexing Options“.
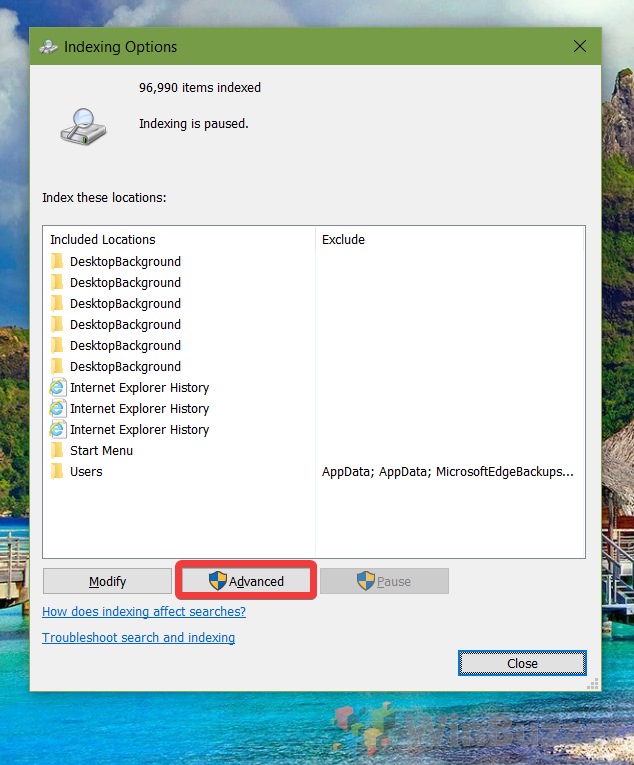
- Open “Indexing Options”
This allows you to manage and customize how Windows indexes files.

- Open “Advanced” in Windows Indexing Options
Access advanced settings for more detailed customization.
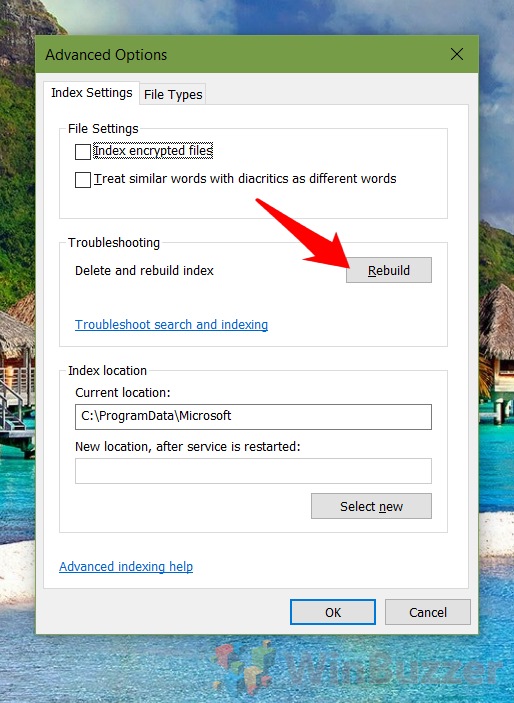
- Click “Rebuild” in “Troubleshooting
Start the process to rebuild the search index, which may temporarily affect search results until reindexing is complete.
- Confirm rebuilding the Windows search index
As Windows reminds you, it might take a long time until file indexing is complete and during that time you might experience missing or incomplete search results. How long a rebuild of the search index takes, depends both on your systems performance, your search indexing options and how many files you have stored on your system.

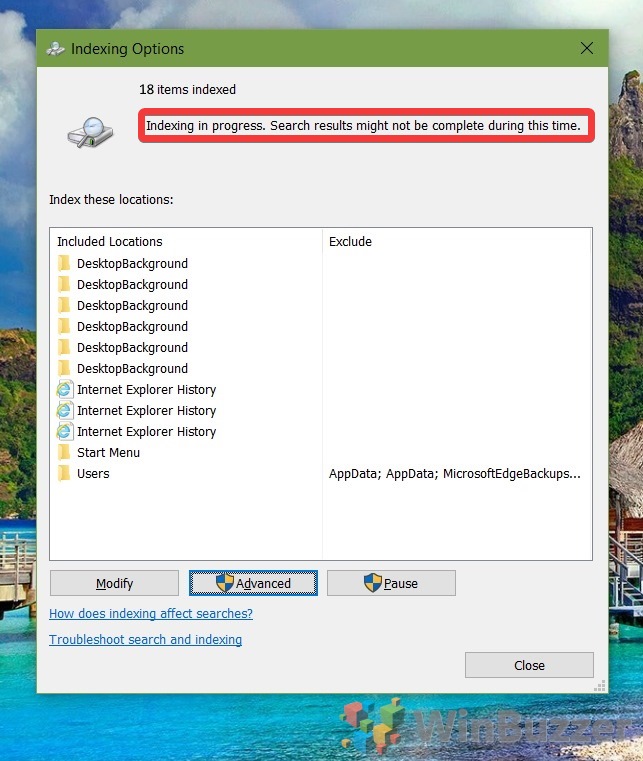
- Check the indexing status in “Indexing Options”
In Windows search indexing options you can check how many items have been indexed during the rebuild and if indexing ist still ongoing.
How to Rebuild the Windows Search Index with Command Prompt
Rebuilding the Windows 10 search index using command prompt does the same job as triggering an index rebuild in search indexing options as shown above. If this does not fix your problem you might want to completely reset the Windows 10 search index to factory defaults as shown at the end.
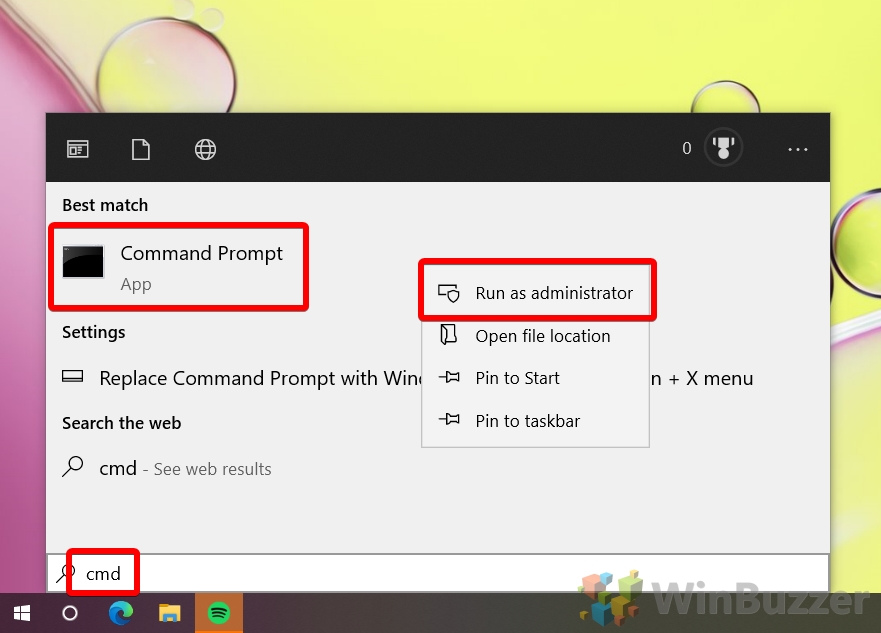
- Open Command Prompt with admin rights
Ensure you have administrative privileges to perform system commands.
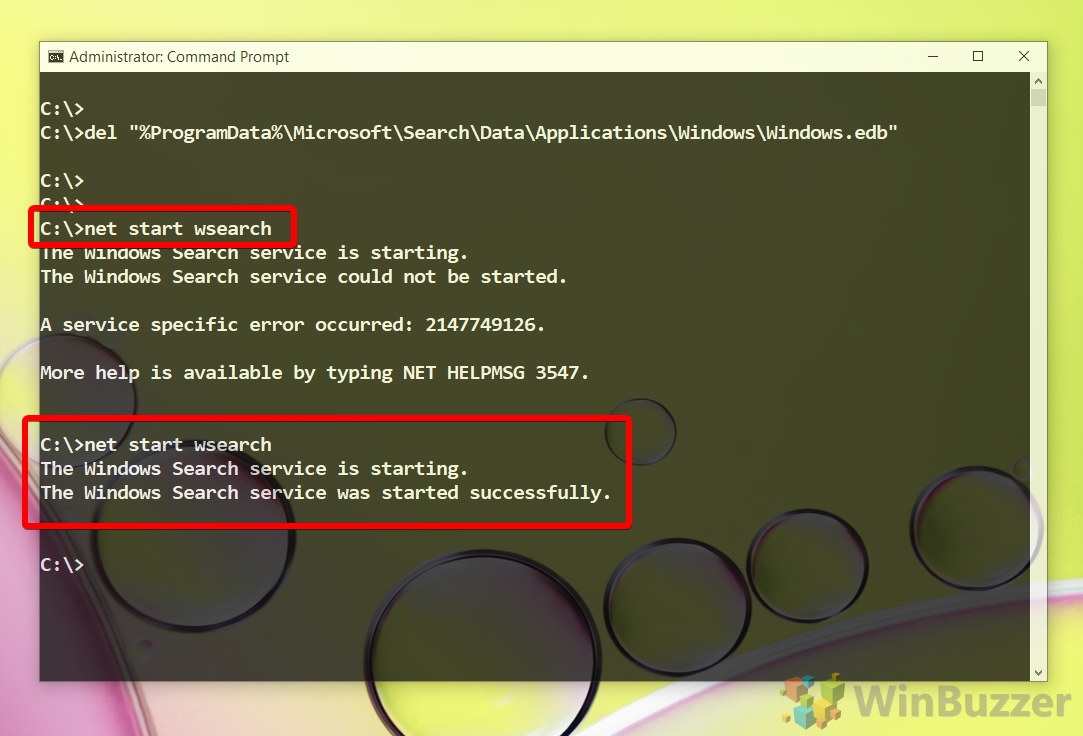
- Stop the Windows file indexing service
Use the commandnet stop wsearchto halt the indexing service.

- Delete the Windows search index database files
This involves removing the existing index files to allow for a fresh start. Type the following command and press Enter:
del "%ProgramData%\Microsoft\Search\Data\Applications\Windows\Windows.edb"

- Restart the Windows search indexing service
Execute
net start wsearchto reactivate the indexing service and commence the reindexing process.
If you see the error message that “The Windows Search service could not be started”, just run the command again. It often takes two or three attempts to be successful.
How to Reset and Rebuild the Windows Search Index using Regedit
This advanced method involves using the Registry Editor to reset the search indexing options and initiate a new index build.
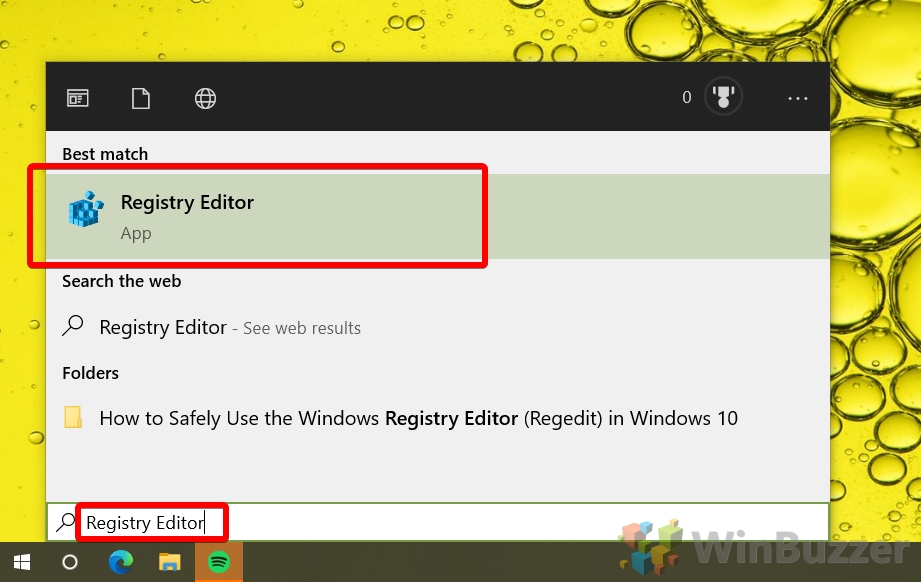
- Open the “Registry Editor”
Utilize the Windows search function to locate and open the Registry Editor.
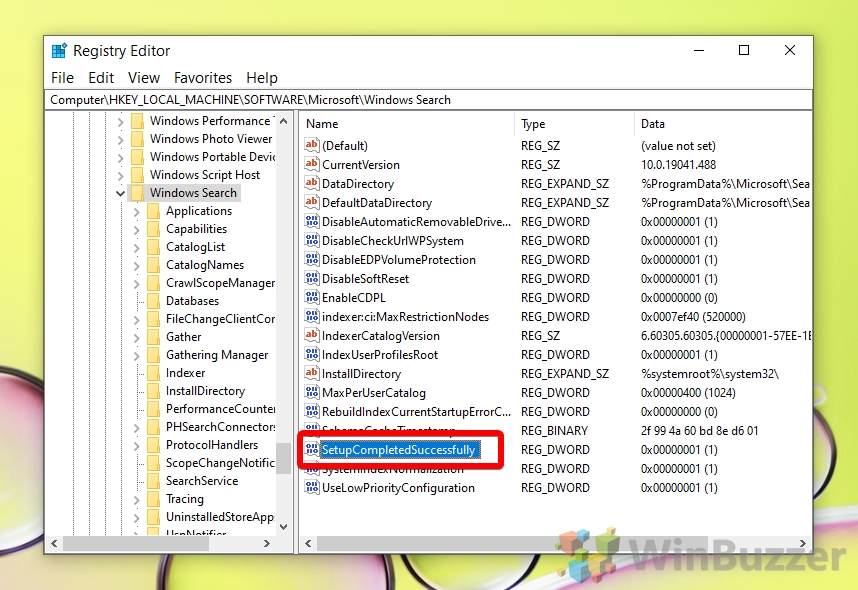
- Navigate to the Windows Search configuration settings
Proceed toComputer\HKEY_LOCAL_MACHINE\SOFTWARE\Microsoft\Windows Search.
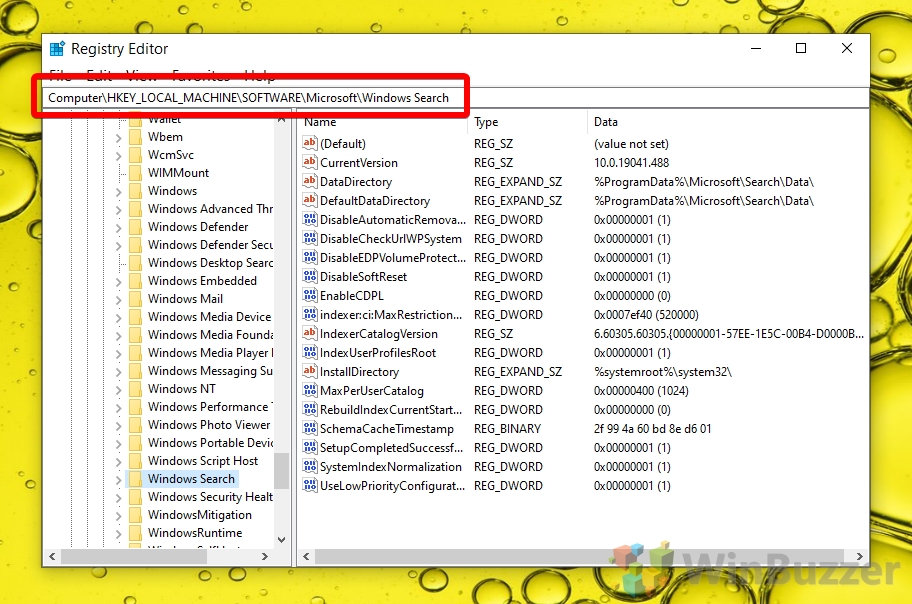
- Check if the DWORD “SetupCompletedSuccessfully” is present
If you see the DWORD “SetupCompletedSuccessfully” just open it with a double-click and skip the following two steps.
- Create new DWORD if “SetupCompletedSuccessfully”is missing
Right click on an empty spot on the right side and select “New – DWORD (32-bit) Value”.
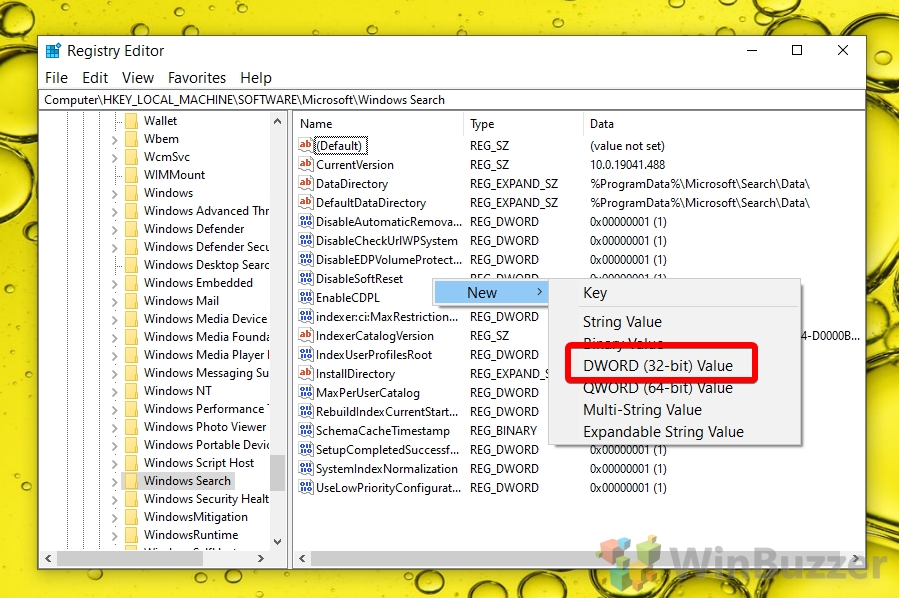
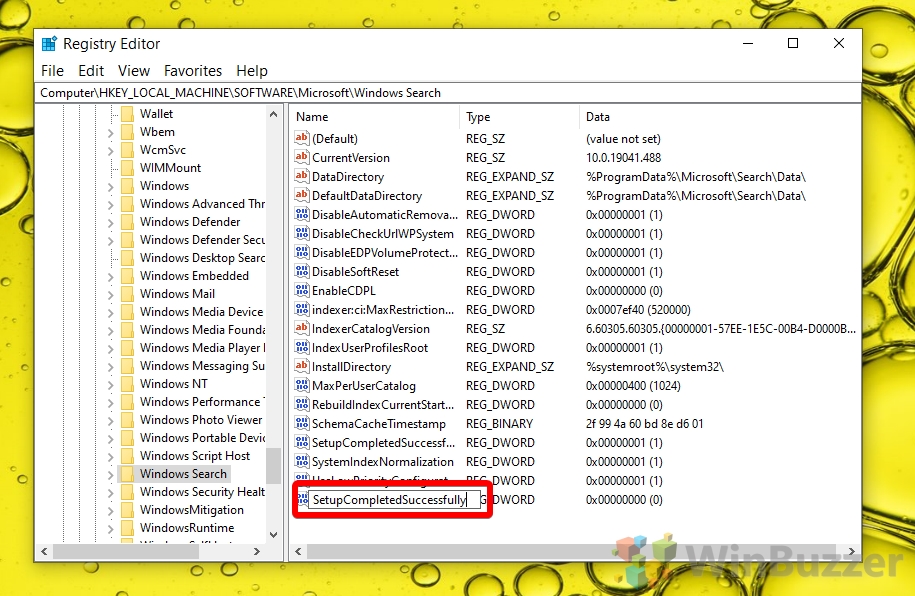
- Name the new DWORD “SetupCompletedSuccessfully”
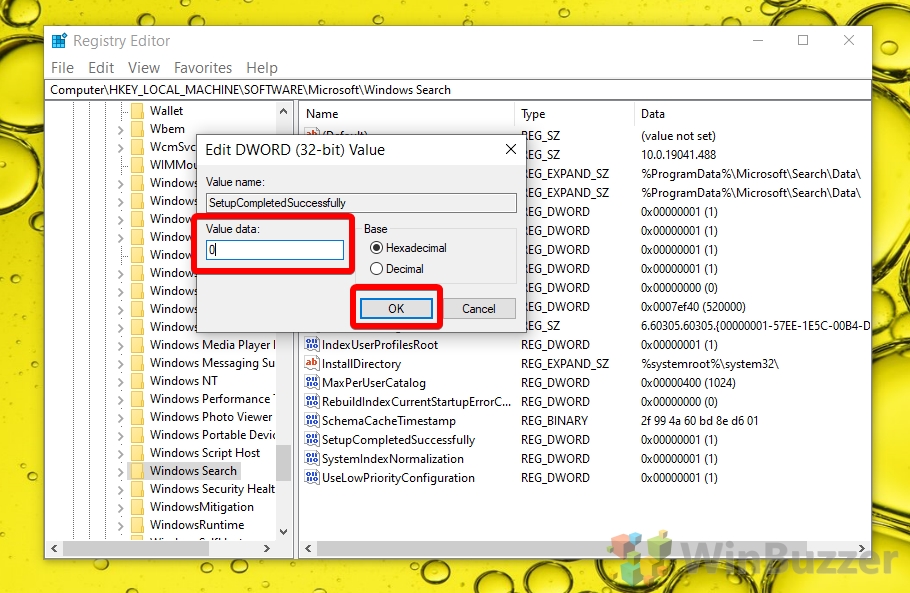
- Set DWORD “SetupCompletedSuccessfully” to “0”
After opening the DWORD “SetupCompletedSuccessfully” set “Value data” to “0” and save via “OK”. You will have to restart your PC to trigger the rebuild of the Windows search index.
FAQ – Frequently Asked Questions About Windows Search and Search Indexing
Can I prioritize certain folders or file types for faster indexing?
Windows Search does not provide a direct feature to prioritize specific folders or file types during the indexing process. However, you can indirectly influence priority by ensuring that the folders or file types you access most frequently are included in the indexing options. To do this, go to Control Panel > Indexing Options, and use the “Modify” button to ensure your preferred locations are checked. Remember, the more items you add to the index, the longer the indexing process might take, so try to keep the indexed locations to those you use most.
How can I check which version of Windows Search I am using?
To check your Windows Search version, you can use the Task Manager and the File Explorer. First, open Task Manager by pressing Ctrl+Shift+Esc, go to the “Details” tab, and look for “SearchUI.exe” (for Windows 10) or “SearchApp.exe” (for Windows 11). Right-click on it and select “Open file location“. In the File Explorer window that opens, right-click on the executable file, select “Properties“, and then switch to the “Details” tab. Here, you’ll find the “Product version“, which corresponds to your Windows Search version. This method gives you a detailed view of the specific build and version of the Windows Search feature you’re using.
Is it possible to index encrypted files for search in Windows?
Yes, Windows Search can index encrypted files, allowing you to search their contents just like any other file. To enable this feature, you need to adjust your Indexing Options. Go to Control Panel > Indexing Options, click on “Advanced“, and in the Advanced Options window, under the “File Settings” section, check the option “Index encrypted files”. This setting allows the content of encrypted files to be indexed and searchable, provided you have the necessary permissions to access these files. Keep in mind that indexing encrypted files might pose a security risk if the index itself is not properly secured.
What should I do if Windows Search stops working after an update?
If Windows Search stops functioning correctly following a system update, start by running the built-in Windows Search Troubleshooter. Access it by going to Settings > Update & Security > Troubleshoot > Additional troubleshooters > Search and Indexing. Follow the prompts to let Windows diagnose and fix common search-related issues. If the troubleshooter doesn’t resolve the problem, consider using System Restore to revert your computer to a state before the update was installed, which can often resolve update-related issues. Always ensure your data is backed up before using System Restore.
How do I back up my current indexing options before making changes?
Windows does not provide a built-in feature specifically for backing up Indexing Options. However, you can manually document your current settings by taking screenshots of the Indexing Options window, including the list of included locations and file types. Alternatively, for a more technical approach, you can export the related registry settings, although this should be done with caution and is recommended for advanced users. The key registry paths related to indexing settings are located under HKEY_LOCAL_MACHINE\SOFTWARE\Microsoft\Windows Search for system-wide settings and HKEY_CURRENT_USER\Software\Microsoft\Windows Search for user-specific settings.
Can changing the location of the index improve performance?
Moving the search index to a faster drive, such as an SSD, can potentially improve indexing and search performance due to faster read/write speeds. To move the index location, go to Control Panel > Indexing Options, click on “Advanced“, and under the “Index location” section, you can change the location where the index is stored. However, this should be done with caution, as moving the index can cause temporary search disruptions and requires reindexing. It’s also important to ensure the new location has sufficient space to accommodate the index, which can grow significantly depending on the number and type of files indexed.
Why does the indexing process take longer on battery power?
When running on battery power, Windows optimizes system performance to extend battery life, which includes reducing the resources allocated to background processes like indexing. This power-saving measure means that indexing may take longer or may even be paused to conserve energy. You can adjust these settings by changing your power plan to “High performance” or modifying the specific power plan settings related to indexing while on battery power, but be aware that this can significantly reduce battery life.
How can I exclude specific file types from being indexed?
To exclude specific file types from being indexed, access the Indexing Options through the Control Panel, click on “Advanced“, and then select the “File Types” tab. Here, you’ll see a list of file extensions currently included in the index. Uncheck the box next to any file type you wish to exclude from indexing. If a file type is not listed, you can add it manually and then uncheck it to exclude it. This customization allows you to streamline the indexing process by ensuring only relevant file types are indexed, potentially improving indexing efficiency and search performance.
What are the implications of disabling Windows Search entirely?
Disabling Windows Search can free up system resources, potentially improving overall system performance, especially on older or resource-constrained systems. However, this comes at the cost of significantly slower file searches, as Windows will need to manually scan through files and folders without the aid of the index. Additionally, some Windows features and applications that rely on indexed content, such as the Start Menu search, Cortana, and certain file search functionalities within applications, may not function as intended or could experience degraded performance.
Can I index external drives or removable media?
Yes, external drives and removable media can be indexed by Windows Search, but they need to be connected to your computer. To include an external drive in the index, go to Control Panel > Indexing Options, click on “Modify“, and then check the boxes next to the external drives or folders you wish to include. Note that these locations will only be indexed while the drive is connected, and the index will need to be updated each time the drive is reconnected, which can affect search performance and indexing speed.
How does Windows Search handle duplicate files?
Windows Search indexes and displays duplicate files if they are located in indexed locations. In search results, duplicates are typically shown with their full file paths to help distinguish between them. However, Windows Search does not inherently prioritize or filter out duplicates; it treats them as individual files. This can be useful for locating all instances of a file but may require manual review to identify and manage duplicates effectively.
Is there a way to manually trigger an index update for a specific folder?
Directly triggering an index update for a specific folder is not a feature explicitly provided by Windows Search. However, any changes made to files or folders within indexed locations, such as adding, deleting, or modifying files, are automatically detected by Windows Search and prompt an update to the index for those specific locations. If you need to ensure a folder is fully up-to-date in the index, you might consider making a minor change to a file within the folder to trigger an indexing update.
What happens to the index when I move or rename indexed files or folders?
When you move or rename files or folders within indexed locations, Windows Search automatically updates the index to reflect these changes. This ensures that search results remain accurate and up-to-date with the current file system structure. However, there might be a slight delay before the index is updated, especially if there are many changes or if the system is under heavy load.
How can I reduce the size of the search index database to free up disk space?
To reduce the size of the search index database and potentially free up disk space, you can limit the number of locations and file types included in the index. In the Indexing Options, use the “Modify” button to deselect folders or drives that you do not frequently search, and under “Advanced“, adjust the file types to include only those you commonly need. This can significantly reduce the size of the index database, as fewer files and file types will be indexed.
Can I use Windows Search to find content within files, like PDFs or Word documents?
Windows Search can find content within files, including PDFs and Word documents, provided these file types are included in the index and their content is accessible. For content search to work with specific file types, Windows Search needs an appropriate filter (IFilter) installed that can read the content of these files. Most common document types are supported by default, but for some file types, especially third-party formats, you might need to install additional software or filters that enable content indexing for those file types.
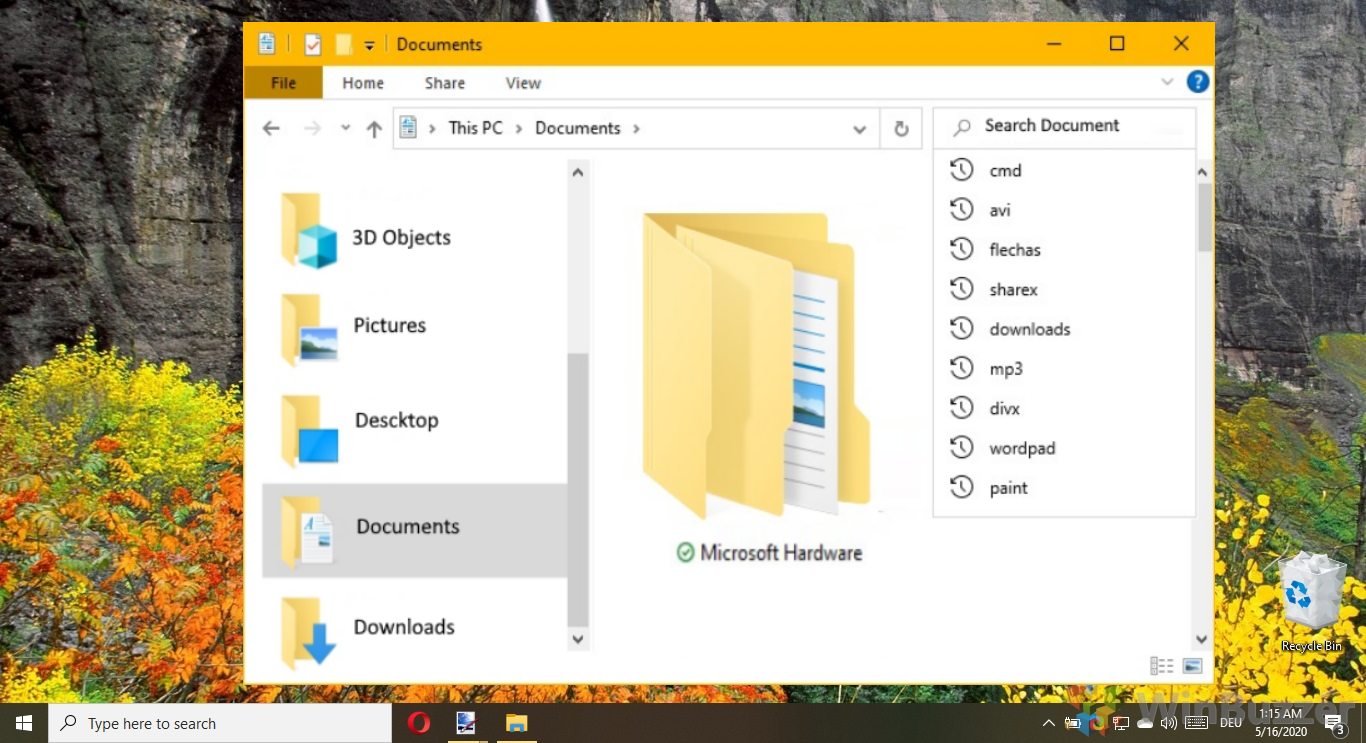
Related: How to Clear File Explorer Search History or Disable It Permanently
Each time you search for a file or string inside a file, Windows 10 catalogs it for future use. If a family member or any other person on your PC clicks the search box, it will try to be helpful by showing a list of recent searches. If you’re planning an engagement or surprise holiday, that’s the last thing you want. The suggestions are rarely useful, so you may also want to clear them to reduce UI clutter. In our other guide, we show you how to clear File Explorer history and disable it via a registry key so you never have to worry about it again.
Related: How to Disable Windows Search and What to Use Instead
Windows Search is a powerful tool integrated into Windows 11 and Windows 10, designed to enhance user productivity by providing quick and easy access to files, applications, and settings. In our other guide, we show you how to disable Windows Search to optimize power consumption and resource utilization and what you can use instead.
Last Updated on April 22, 2024 1:29 pm CEST by Markus Kasanmascheff


