

The Windows 11 and Windows 10 features “Prefetch” and “SuperFetch” provide startup acceleration for frequently used applications.
What is Prefetch and Superfetch in Windows?
Even when you’re not using them, Superfetch loads frequently used programs into memory to speed up startup.
Prefetch is a similar feature which was introduced already with Windows XP that gathers data about programs to also help them start faster.
To achieve this, the prefetch algorithm tries to anticipate when data most probably won´t be available in cache to directly load it from the respective drive. This data in the form of prefetch files is located in the prefetch folder C:\Windows\Prefetch. You can consider the prefetch files as a specific type of cache files.
Contrary to many blog posts, disabling Prefetch and SuperFetch for SSD drives is actually unnecessary. It is true that Prefetch and SuperFetch won´t provide a huge advantage for starting applications from SSD drives, as they are fast anyway. In this respect one could actually switch off the service.
But Windows 11 and Windows 10 already do this automatically for Superfetch if an SSD is installed as system drive. This means you don’t have to worry about the lifetime of older SSD drives because of ongoing SuperFetch-requests.
On older Windows 10 PCs with normal hard disks it may make sense to deactivate SuperFetch in some rare cases. This is because the service causes increased system load and significantly more hard disk requests.
Without SuperFetch, some slower computers even work better, though the startup of certain applications may take a little longer. However, this is more an exception than the rule.
Prefetch actually should be always stay enabled, even on slower HDDs. Whether you perform better with or without SuperFetch, you have to find out for yourself. Below, you find the necessary steps to disable Prefetch and Superfetch.
⚠️ Please note: The process described below is the same in Windows 11 as it is in Windows 10. However, bear in mind that we’ll be using screenshots from Windows 11, so your UI may look a little different. We’ll point out any changes you need to be aware of as they come up.
How to Disable Prefetch on Windows 11 / Windows 10
- Open the “Registry Editor” using Windows 10 search

-
Open the following location:
HKEY_LOCAL_MACHINE\SYSTEM\CurrentControlSet\Control\Session Manager\Memory Management\PrefetchParameters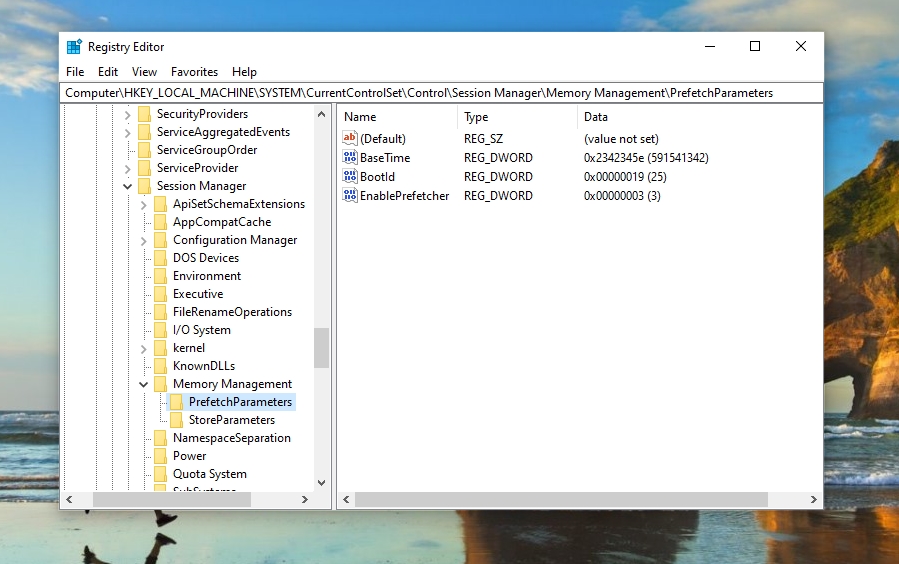
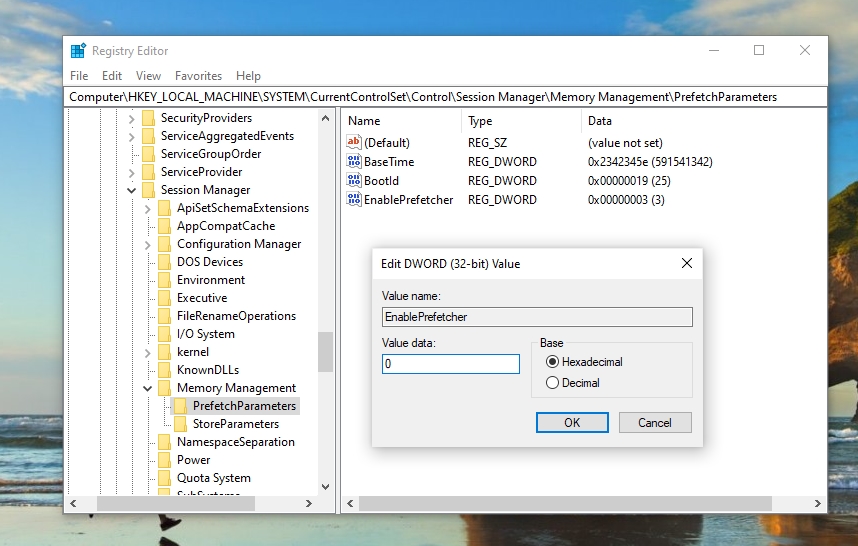
- Set the prefetch mode
Double-click on “EnablePrefetcher” to open this key. In “Value data” put “0” to turn Prefetch off. Here are the other available settings from 1-3:
1 = Application launch prefetching enabled: This mode is specifically focused on speeding up the launch of applications. When enabled, Windows monitors and records which files are used during the initial phase of application startup.
The next time you start the same application, Windows uses this recorded data to pre-load these files into memory, which can reduce the application’s startup time.2 = Boot prefetching enabled: This mode is designed to optimize the system boot process. In this mode, Windows tracks and records the files used during the system boot process. On subsequent system starts, Windows pre-loads these files into memory ahead of time, aiming to reduce the overall boot time.
3 = Applaunch and Boot enabled: This is a combination of both application launch prefetching and boot prefetching, and it’s typically set as the default and optimal setting in Windows. With this mode, Windows optimizes both the application startup times and the system boot process. It provides a balanced performance enhancement by ensuring that both applications and the system itself benefit from prefetching.
How to Disable Superfetch on Windows 11 / Windows 10
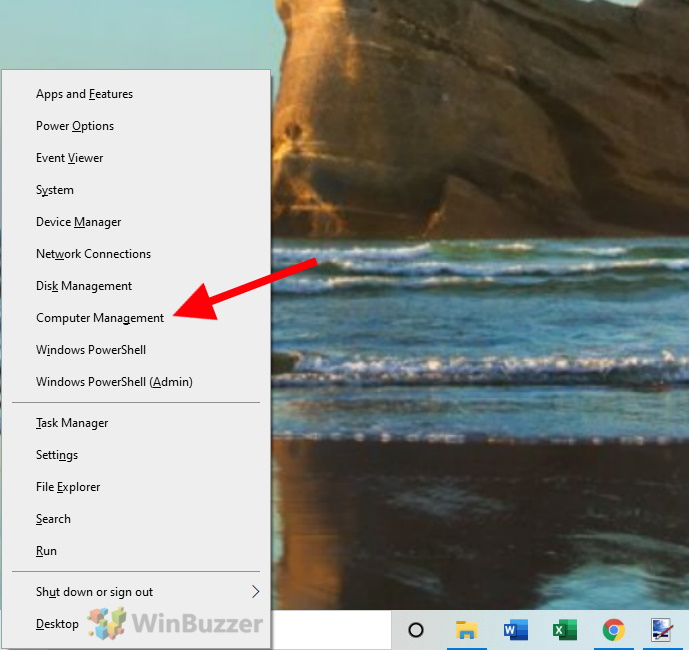
- Open “Computer Management”
First, right click on the start icon in the taskbar to open the context menu. There you click on the entry “Computer Management”, which opens the system program of the same name.
- On the left side open “Services and Applications” and there “Services”

- Select “SysMain” in the services list and click on “Stop the service”.
This will deactivate Superfetch. Afterwards you can evaluate if your system works any better. To re-enable Super Fetch simply click on “Start the service” in the same view where you deactivated it previously.

FAQ – Frequently Asked Questions about Prefetch and Superfetch in Windows
What is Prefetch in Windows?
Prefetch is a feature that gathers data about frequently used programs to help them start faster by pre-loading required data from the drive.
What is Superfetch in Windows?
Superfetch loads frequently used programs into memory even when not in use, to speed up their startup.
How can I disable Prefetch in Windows 10?
Disable Prefetch by editing the “EnablePrefetcher” key in the Registry Editor at “HKEY_LOCAL_MACHINE\SYSTEM\CurrentControlSet\Control\Session Manager\Memory Management\PrefetchParameters” and setting its value to 0.
How do I disable Superfetch (SysMain) in Windows 10?
Disable Superfetch by stopping the “SysMain” service in “Computer Management” under “Services and Applications” > “Services”.
Where is the Prefetch folder located in Windows 10?
The Prefetch folder is located at `C:\Windows\Prefetch`.
Is it OK to delete prefetch files in Windows 10?
Yes, it’s okay to delete prefetch files, but it’s not necessary as Windows manages these files automatically. Deleting them might temporarily slow down application start times until they are regenerated.
Should Prefetch be always enabled?
Yes, Prefetch should generally be enabled, even on slower HDDs, as it helps in faster startup of applications.
Does disabling Prefetch and Superfetch improve performance on SSDs?
Disabling these features on SSDs is unnecessary as Windows 10 and 11 automatically manage Superfetch for SSDs. Prefetch and Superfetch don’t provide a significant advantage on SSDs due to their fast nature.
Can disabling Superfetch improve performance on older PCs?
On older PCs with HDDs, disabling Superfetch might improve performance as it reduces system load and hard disk requests, though it may increase application startup times.
Does cleaning the Prefetch folder speed up the computer?
Cleaning the Prefetch folder does not significantly speed up the computer and is generally not recommended as Windows manages this folder automatically.
Is Superfetch necessary for gaming?
Superfetch is not specifically necessary for gaming, especially on systems with SSDs, as it primarily speeds up application startup rather than in-game performance.
What happens if I delete Prefetch files?
If you delete Prefetch files, Windows will recreate them over time as you use applications. There might be a temporary slowdown in application startup times.
Is it safe to disable SysMain (Superfetch)?
It is safe to disable SysMain (Superfetch), especially to test if it improves system performance on older PCs with HDDs.
Why is Superfetch using high disk usage?
Superfetch might show high disk usage as it actively loads frequently used applications into memory, which can be noticeable on HDDs.
How to re-enable Superfetch in Windows 10?
Re-enable Superfetch by starting the “SysMain” service in “Computer Management” under “Services and Applications” > “Services”.
Related: How to Set CPU Affinity via Windows Task Manager, System Properties, PowerShell, and CMD
For the most part, Windows 11 and Windows 10 manage system resources very well, but there are certain instances where users are left wondering why their Windows performance is bad. This issue comes up, especially when the computer has a weak processor and an app is particularly intensive. Thankfully, a feature that lets you set CPU affinity so you can claw back some resources from other apps. In our other guide, we show you how to set CPU affinity in Windows to claw back some performance, as well as how to change your CPU scheduling.
Last Updated on April 23, 2024 1:07 pm CEST by Markus Kasanmascheff


