Throwing a lot of work into a shared Excel sheet can be rewarding, which is why it’s even more soul-crushing to wake up one day to find it destroyed. Unfortunately, whether by accident or malice, formula and numerical cells often end up edited beyond repair and headers somehow come back in Comic Sans. We’re going to show you how to lock cells in Excel so that you can stop a single keypress from ruining your day.
Locking Cells in Excel – Why You Should Do It
We joke about clumsy colleagues breaking spreadsheets, but there are several reasons locking an Excel spreadsheet is a good idea. Often, you’ll be sharing your spreadsheet not for collaboration, but to provide other departments or shareholders with the statistics they need. In such a case, the need for those numbers to stay accurate and accountable is important. Locking them means that if anybody has any last-minute additions or corrections, they go through the proper channels to add them.
Even if you aren’t sharing a spreadsheet, learning how to lock specific cells in Excel can save you a lot of trouble. No matter how proficient you are with the software, it’s easy enough for you or a pet to lean on a key and break your formulas.
How Locking Cells in Excel Works Technically
It may surprise you to hear that cells in Excel are usually locked by default. The reason that you can still edit them is that you must protect a spreadsheet or worksheet with a password before the behavior kicks in. Once this occurs, users cannot edit, format, or otherwise change cells you keep locked.
You should know, however, that Excel’s worksheet protection isn’t designed to stop a determined attack. Though Excel versions 2010 and higher use enhanced data encryption mechanisms, a criminal can still bypass them without knowing the password and change payment information or add a malicious link. Even if they can’t, passwords are easy to share intentionally or phish. As a result, you should only lock cells in Excel to prevent accidental changes, not to prevent a determined attack.
How to Lock All Cells in Excel
Locking all cells in an Excel spreadsheet is essential when you want to prevent any alterations to your data or formulas. This method is particularly useful for spreadsheets that are intended for viewing only, ensuring that your information remains intact and unmodified.
- Select All Cells
Begin by opening your spreadsheet and pressing “Ctrl + A” to select all cells within it.

- Access Format Cells
Right-click on any of the selected cells and choose “Format Cells…” from the context menu.

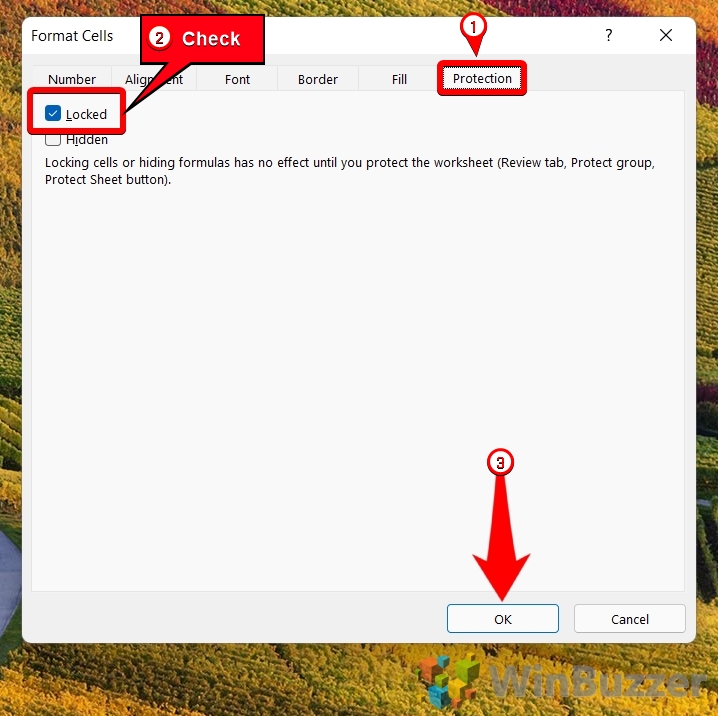
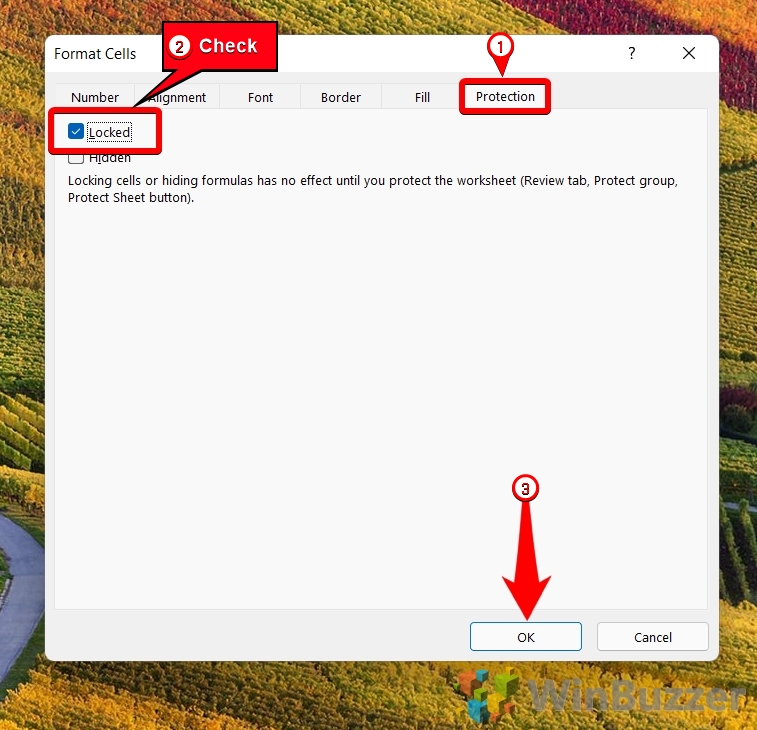
- Enable Locking
In the “Protection” tab, ensure “Locked” is checked, then click “OK“.

- Protect Sheet
Right-click the sheet name at the bottom of your Excel window and select “Protect Sheet…“.

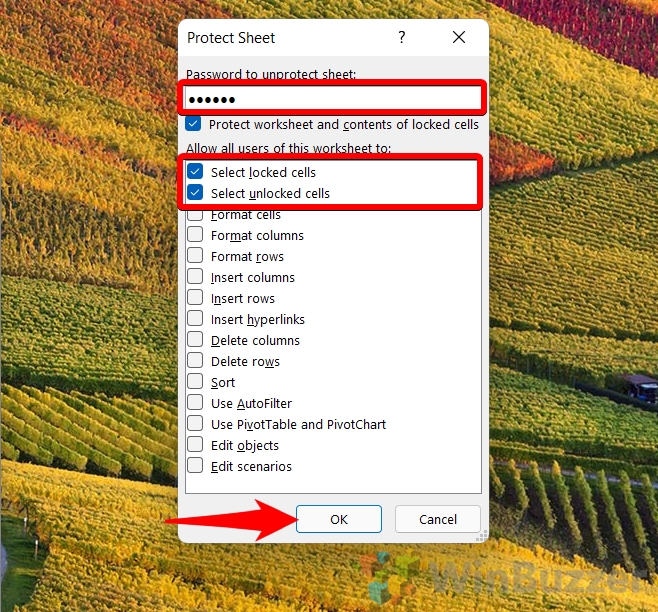
- Set Permissions and Password
Specify a secure password and adjust permissions for users without the password. After making your selections, click “OK“.

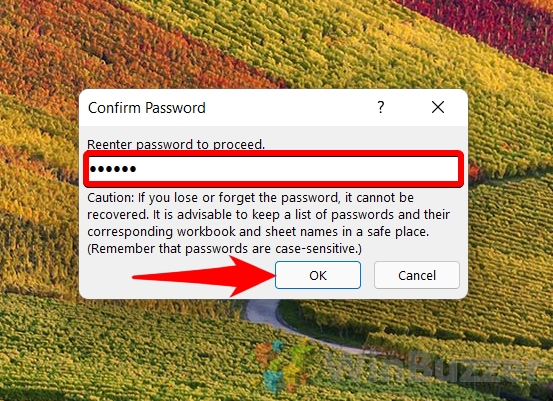
- Confirm Password
Re-enter your password for confirmation and press “OK” to finalize the protection.


How to Lock Specific Cells in Excel
When you need to lock only certain cells within a spreadsheet, allowing edits to the rest, this method provides the necessary flexibility. It’s especially useful in collaborative environments where specific data points must remain constant.
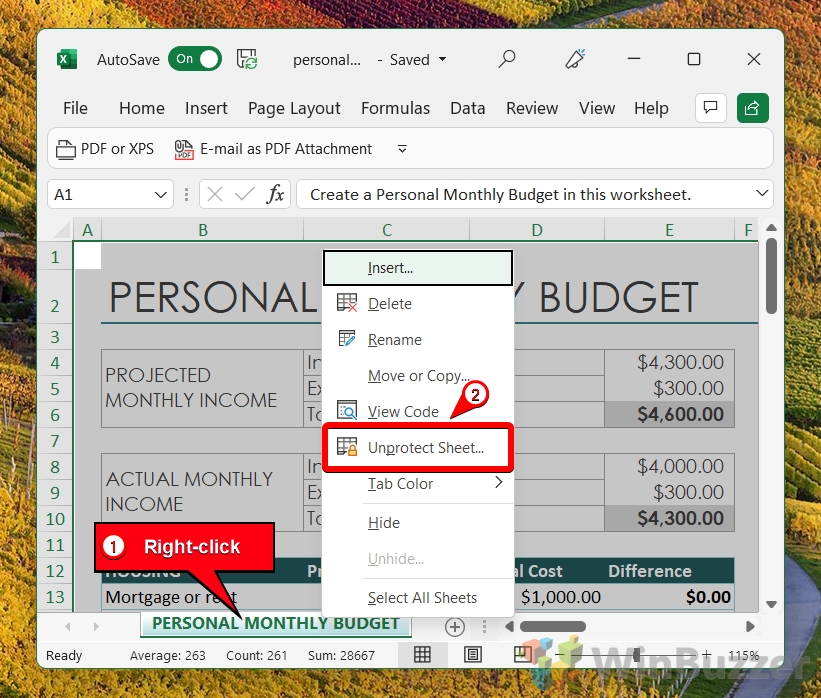
- Remove Existing Protection
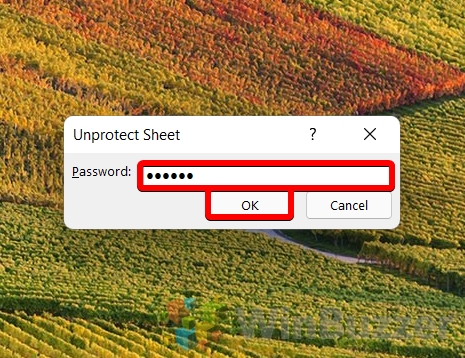
Ensure no previous protections are active by right-clicking the sheet name and selecting “Unprotect Sheet…“.

- Input Excel Password
If prompted, enter the existing password to remove protection.

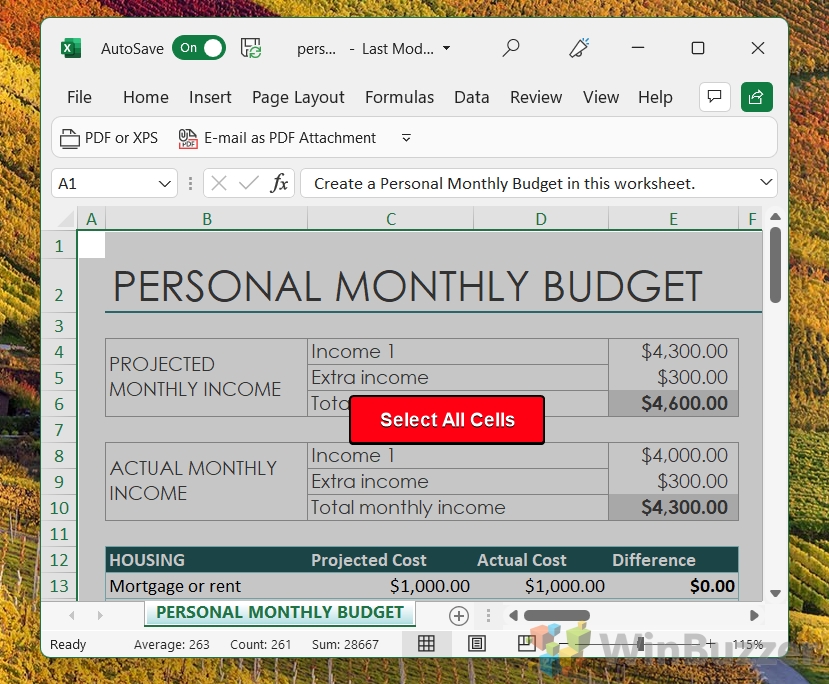
- Select All Cells Again
Press “Ctrl + A” to select all cells in the sheet.

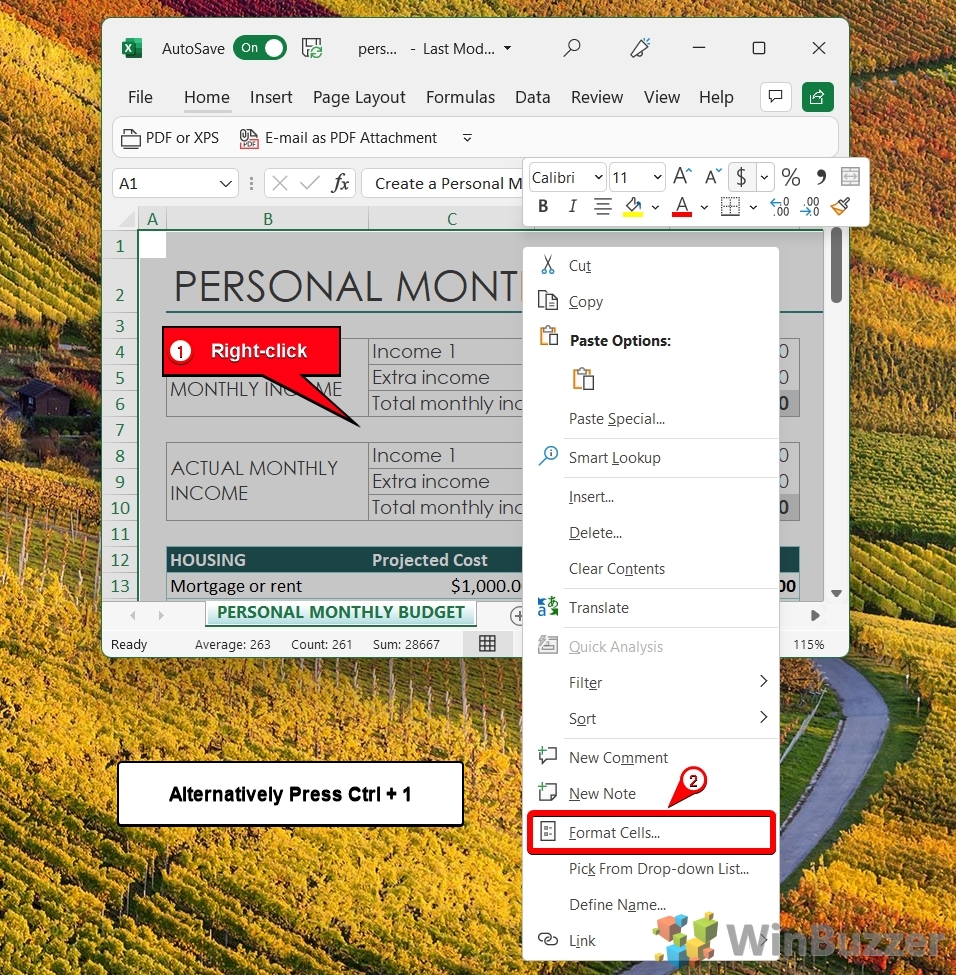
- Access Format Cells
Right-click any cell and choose “Format Cells…” from the context menu.

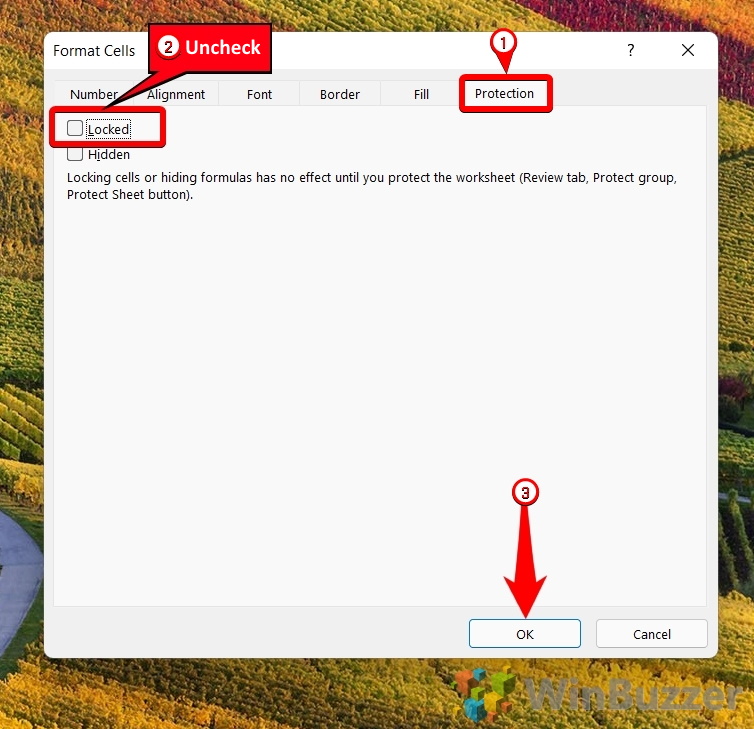
- Disable Locking
In the “Protection” tab, uncheck “Locked” and press “OK” to apply.

- Select Cells to Lock
Select the cell(s) you wish to lock. You can select multiple cells by holding “Ctrl” and clicking on each cell.
How to lock columns in Excel
To select a column to lock, press its letter at the top of your sheet to select it and continue to the next step.
How to lock a row in Excel
If you want to lock an entire row in Excel, simply click its number in the border of your sheet and proceed to the next step.

- Enable Locking for Selected Cells
Right-click on the selected cell(s), choose “Format Cells…“, go to the “Protection” tab, check “Locked“, and click “OK“.

- Re-protect Sheet
Right-click the sheet name, select “Protect Sheet…“, and proceed to set a new password and permissions as desired.

- Confirm New Password
Enter and re-confirm your new password to protect the selected cells.


How to Lock Formulas in Excel
Locking formulas in Excel is crucial for spreadsheets that are used repeatedly, such as budget templates. This ensures that while the data may change, the formulas calculating the data remain secure and unaltered.
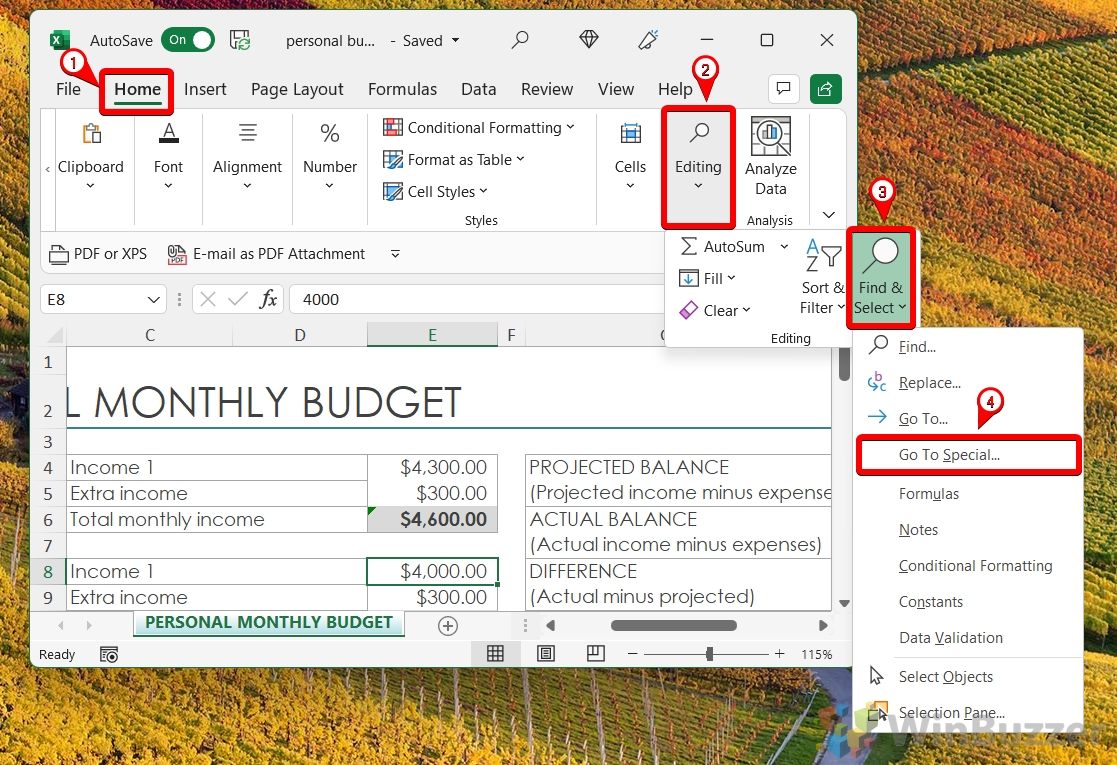
- Find Formulas
Go to the “Home” tab, click “Editing > Find & Select > Go To Special…“, and select “Formulas“.

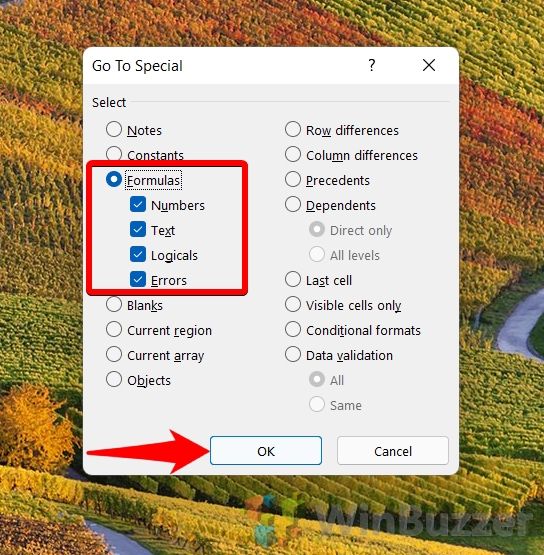
- Select Formula Types
Choose the types of formulas you wish to lock and click “OK“.

- Open Format Cells
With the formulas selected, press “Ctrl + 1” to open the “Format Cells” dialog.

- Lock Formulas
Check “Locked” under the “Protection” tab and click “OK“.

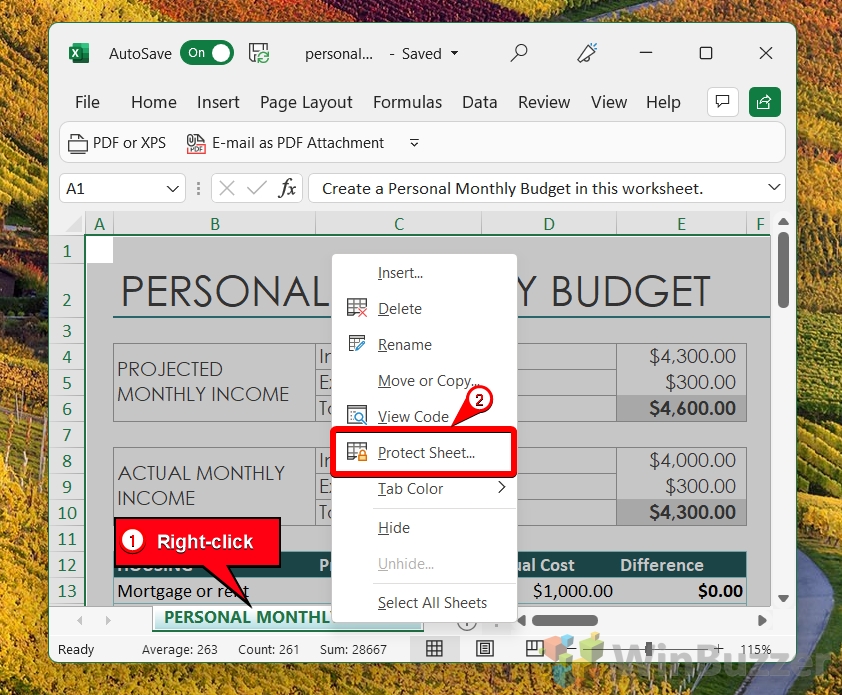
- Protect Sheet with Formulas
Right-click the sheet name, select “Protect Sheet…“, and set your password and permissions.

- Finalize Protection
Enter and confirm your password to secure the formulas. Bear in mind users will have these permissions regardless of whether they have a password. Press “OK” to apply the password and permissions.


FAQ – Frequently Asked Questions About Locking Cells in Excel
Can you lock cells without setting a password?
Yes, you can effectively prevent editing by locking cells without setting a password for sheet protection. This means that while the cells are locked to prevent alterations, the sheet or workbook itself does not require a password to open or view. However, to activate the lock on the cells, you must still go through the process of protecting the sheet, but simply skip the step where you would typically enter a password. This makes the data viewable but not editable, providing a basic form of protection.
Is it possible to lock cells in Excel Online or mobile versions?
While Excel Online and the mobile versions offer a slightly different user experience than the desktop version, they do support basic cell locking functionality. The process may vary slightly due to the different interfaces. For example, in Excel Online, you can find the sheet protection options under the ‘Review’ tab, similar to the desktop version. These versions are streamlined for ease of use on-the-go, so some advanced protection features might not be as readily accessible or available.
Can cell locking be applied to multiple sheets at once?
Yes, cell locking can be applied to multiple sheets within the same workbook simultaneously, which is particularly useful when working with large datasets or multiple related sheets that need similar protection. To do this, hold down the Ctrl key (Cmd key on Mac) and click on each sheet tab you wish to protect at the bottom of the Excel window. This will group the sheets, and any changes including protection settings will apply to all selected sheets. Remember to ungroup the sheets afterward by right-clicking a sheet tab and selecting ‘Ungroup Sheets’ to prevent accidentally making identical changes to all sheets.
What happens if you forget the password to an Excel file or sheet?
If you forget the password to a protected Excel sheet or file, recovering or resetting the password can be challenging, as Excel offers strong encryption for security purposes. Microsoft does not provide a way to recover lost passwords to avoid any security loopholes. However, there are third-party password recovery tools available, though their effectiveness is not guaranteed, and some may pose security risks. Always ensure important passwords are stored securely to avoid being locked out.
How does one prevent other users from adding or deleting rows/columns?
When you protect a sheet in Excel, you have the option to customize what actions other users can perform. By default, most actions, such as adding or deleting rows/columns, are blocked once the sheet is protected. During the protection process, Excel will present a list of actions that you can allow, such as formatting cells or sorting data. To prevent users from adding or deleting rows and columns, make sure not to enable these options when protecting the sheet.
Are there any known issues or limitations with Excel’s cell locking feature?
The cell locking feature in Excel works effectively when combined with sheet protection to prevent unauthorized editing. However, it’s important to note that locking cells does not encrypt or hide data, meaning the cell contents are still visible and accessible for viewing. Another limitation is that the protection applies to the cell content and optionally cell formatting but does not extend to other elements like charts or images unless specifically configured. Additionally, Excel’s protection is not designed to be a robust security measure against determined hacking attempts; it’s aimed more at preventing accidental modifications.
What’s the difference between locking cells and hiding formulas?
Locking cells in Excel prevents users from editing the content of the cells, while hiding formulas is a specific feature that prevents the formulas from being displayed in the formula bar when a cell is selected. Both features require that the sheet be protected to be effective. To hide formulas, you must select the cells containing the formulas, access the ‘Format Cells‘ dialogue, go to the ‘Protection‘ tab, and check ‘Hidden‘ before protecting the sheet. This way, even if the cell is selected, the formula itself won’t be visible in the formula bar, adding an extra layer of protection for your formulas.
Can you still filter and sort data in locked cells?
Yes, Excel allows for the filtering and sorting of data in locked cells when the sheet is protected, provided that these specific permissions are granted during the protection process. When protecting your sheet, Excel offers a list of actions that you can allow, including “Sort” and “AutoFilter”. By checking these options, you enable users to sort and filter data even in a protected state, enhancing data usability while maintaining the integrity of the cell contents.
Can macros be used to automate the process of locking cells or protecting sheets?
Yes, VBA (Visual Basic for Applications) macros can significantly streamline and automate the process of locking cells or protecting sheets, making it particularly useful in managing larger workbooks or applying consistent protection to multiple documents. You can write a macro that specifies exactly which cells or sheets to lock or unlock, and even apply or change passwords. This approach can save a considerable amount of time and ensure consistency across large projects. However, writing macros requires a basic understanding of VBA, and it’s important to use macros securely to avoid introducing vulnerabilities into your spreadsheets.
Should the ‘Locked’ option be unchecked for cells you don’t want to lock before protecting the sheet?
Yes, before protecting a sheet, you must ensure the cells you wish to remain editable are marked as ‘Unlocked’. In Excel, all cells are ‘Locked’ by default, but this setting only takes effect once the sheet is protected. To allow editing for specific cells, select them, open the ‘Format Cells’ dialog from the right-click menu, switch to the ‘Protection’ tab, and uncheck ‘Locked’. After doing this, you can proceed to protect the sheet, and only the cells marked as ‘Locked’ will be protected against editing.
How do you change the password for a protected sheet?
To change the password for a protected Excel sheet, you first need to unprotect the sheet by entering the current password. Once the sheet is unprotected, you can re-protect it by choosing to “Protect Sheet” again and entering a new password of your choice. This method ensures that you can update your password as needed for security reasons or to accommodate changes in access permissions.
Can hidden rows or columns be locked for extra security?
Yes, hiding and then locking rows or columns can add an additional layer of security to your Excel data. When rows or columns are hidden, the information is not readily visible to users who might access the document. By subsequently protecting (locking) the sheet, you prevent unauthorized users from unhiding these rows or columns without the correct password. This method is particularly useful for concealing sensitive information that should not be easily accessible.
Is there a way to see which cells or ranges are locked without unprotecting the sheet?
Without an explicit indication from Excel, it can be challenging to identify which cells or ranges are locked without unprotecting the sheet. A method to visualize this while designing your workbook is to apply a conditional formatting rule or a distinctive cell style to locked cells during the setup phase. However, this requires manual setup and is not automated by Excel’s protection features. Once the sheet is protected, these visual clues can help you remember which areas are locked without needing to unprotect the sheet.
How can I restrict users from changing cell formatting in protected cells?
When you protect a sheet in Excel, you’re given a list of permissions that you can grant or withhold from users, including whether they can format cells. If you want to restrict users from changing cell formatting, ensure you do not check the options under ‘Allow all users of this worksheet to:’ that relate to formatting (such as “Format cells“, “Format columns“, and “Format rows“) when you are setting up sheet protection. This limitation ensures that while users may be able to interact with the cells to a certain extent if permitted (such as entering data), they cannot alter the visual formatting of protected cells.
Can I lock cell comments so they can’t be edited or deleted?
Comments attached to cells (referred to as “Notes” in the latest versions of Excel) are inherently protected when the cells themselves are locked, and the sheet is protected. This means that if a cell with a comment is locked and the sheet protection is enabled, users will not be able to edit or delete the comment. This level of protection ensures that the commentary or additional instructions provided in the cell comments remain intact and unaltered by unauthorized users.
Related: How to Password Protect Excel Files
One of the features that Excel offers is password protection, which can help users to protect their sensitive or confidential information from unauthorized access or modification. However, not all password protection options in Excel are equally secure, and some of them can be easily bypassed or cracked by hackers or malicious software. In our other guide, we explain the different types of password protection in Excel, how they work, and how secure they are.
Related: How to Enable Macros in Excel for Single or All Workbooks
Enabling macros in Excel can significantly streamline your workflow, especially if you find yourself repeatedly performing the same tasks. A macro in Excel is a sequence of commands or actions recorded to automate repetitive tasks. If you want to use macros in your own workbooks or have downloaded an Excel file with macros, our other guide shows you how to enable macros in Excel for single workbooks or in general.

Related: How to Password Protect a Folder in Windows 11 and Windows 10
Protecting your sensitive data in Windows 11 and Windows 10 is crucial, especially if you’re sharing your PC with others or simply want to keep certain information confidential. While Windows 11 and Windows 10 don’t come with a dedicated feature for password-protecting individual folders, there are effective ways to secure your data. In our other guide, We show you how to password-protect a folder in Windows using different methods with built-in and third-party tools.