It’s not uncommon to experience a crackling sound from speakers or headphones when listening to music or playing games in Windows 11 or Windows 10. The first assumption is often that there’s an issue with the hardware itself, but that doesn’t always hold true. Today we’re going to show you how to fix crackling speakers in Windows 11 and Windows 10, starting with some basic hardware troubleshooting.
Troubleshooting Audio Hardware
Before we start on the software side of things, it’s a good idea to do some basic hardware troubleshooting. This should not take long and could save you a lot of time down the line.
First, if you have wired headphones or speakers, you should check their connection. Ensure the cable is plugged in firmly on both ends. If possible, switch the cable out for another and see if the issue persists.
If the speaker crackling is still there, try unplugging other devices from your PC one by one and testing each time to ensure nothing is interfering with your sound. If you’re using wireless headphones, make sure the connection from your PC to your cans is uninterrupted – particularly by metal objects, such as pans and utensils in a kitchen.
If after this your Windows 10 or Windows 11 audio is still crackling, try plugging a different pair of headphones or speakers into the same port and with a different cable and see if it persists. If it does, the problem is most likely motherboard interference or software, rather than the speakers themselves. To make sure, you can plug your original device into a different jack or USB port and see if the popping is still there. If you don’t have an additional port but have a USB-3.5mm audio adapter handy, you can try that.
If after all that you’re still getting crackling or popping, it’s worth taking a look at the software side of things. At this point, it’s probably either software or some kind of issue with your PC’s internals. Fixing it with software is going to be free, but a hardware fix could be costly, so it’s worth checking the software side of things before taking it to a repair shop.
Here are some of the most common ways you can fix Windows 10 or Windows 11 audio crackling via software:
⚠️ Please note: In this tutorial, we use screenshots of Windows 10 to demonstrate the process. Please be aware that though the same general method applies for Windows 11, there may be some minor changes to the process and UI elements in Windows 11. These will be noted in the relevant steps in the guide.
How to Check Your DPC Latency in Windows 10 or Windows 11
Popping and cracking sounds from speakers or headphones can be caused by something called DPC latency. What it stands for doesn’t matter as much as what it measures – the time it takes your drivers to do something.
If a driver on your system is taking too long to perform its task, it may stop your audio driver from processing signals as fast as it should be. This delay in response is often what leads to that popping or crackling sound from your speakers. The delay in processing leads to gaps in your audio.
Identifying high DPC latency can help in pinpointing the root cause of audio issues. To test for DPC latency, we are showing you how to use a free tool called LatencyMon.
- Install and Run LatencyMon
Let LatencyMon run for a while in the background and continue using your PC as you were when you last experienced the crackling. After a while, check back on the tool and its highest reported execution and resolution times.
If you get the message “Your system appears to be having trouble handling real-time audio and other tasks”, there’s a good chance you’ve found your problem. You should try updating your drivers, removing the associated device from your system, or making other adjustments that LatencyMon recommends. We have a guide for driver updates below.

How to Change Your Audio Format
Sometimes, setting the audio quality too high or too low can strain the system, leading to crackling sounds. Adjusting the audio format may resolve this issue.
- Access Sound Settings
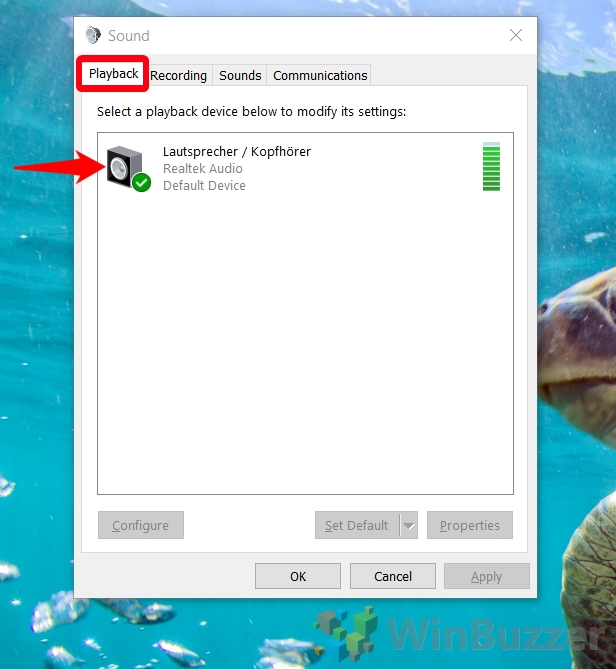
Right-click the speaker icon in your taskbar and select “Sounds” (or “Sound settings” in Windows 11), then navigate to “More sound settings” to open the legacy sound UI.

- Select Your Speaker
In the “Playback” tab, double-click your speaker to open its properties.

- Adjust the Default Audio Format
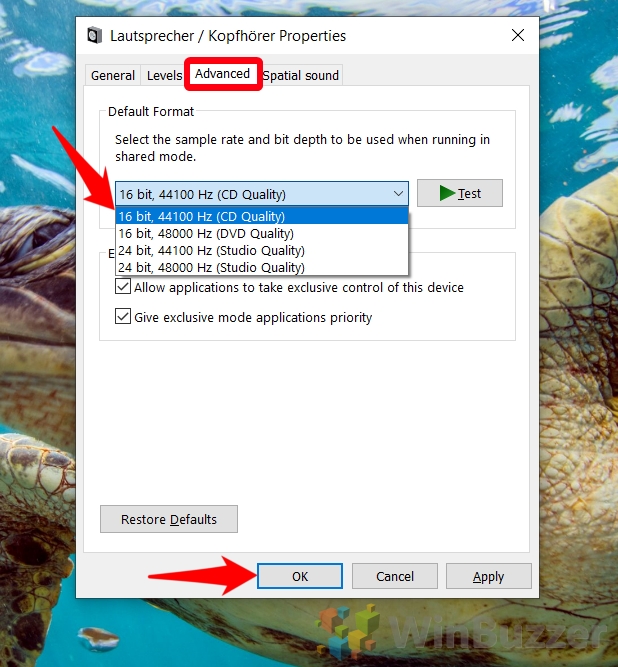
Go to the “Advanced” tab and change the default format. Start with 16 bit 44100Hz CD quality and adjust upwards until crackling reoccurs, then dial it back slightly. Conversely, if you’re getting cracking at 16-bit CD quality, you can try upping it to 24-bit 44100 or something similar.

How to Disable Exclusive Mode in Windows 10 to Fix Crackling Sound
Exclusive mode in Windows 10 and Windows 11 can sometimes cause compatibility issues with sound drivers, leading to crackling sounds. Disabling this feature can be a temporary solution.
- Open Sound Settings
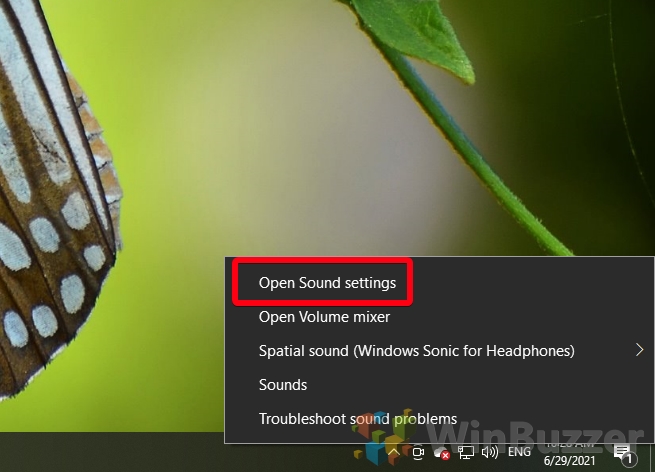
Right-click the audio icon in your taskbar and select “Open Sound settings” (or directly “Sound settings” in Windows 11), then proceed to “More sound settings“. After double-clicking your speakers, this will take you to the legacy sound UI in step 4.
- Navigate to Device Properties
Click on “Device properties” within the Sound settings window to access more options.

- Click “Additional device properties”

- Disable Exclusive Control
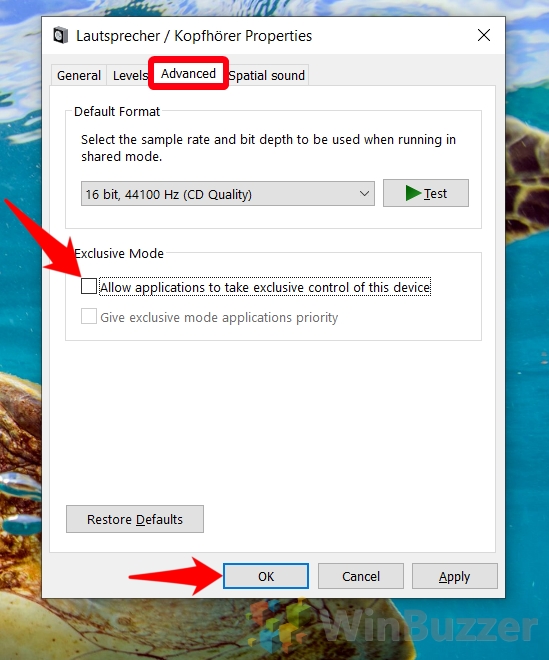
In the “Additional device properties“, go to the “Advanced” tab and uncheck “Allow applications to take exclusive control of this device“. Apply the changes and test your audio to see if the problem has been fixed.

How to Update Your Audio Drivers from Your Manufacturer’s Website
OSometimes audio issues can be fixed by simply updating your sound drivers. The best method to do this is by searching your laptop/motherboard name and downloading the Realtek Audio drivers from their official site for the best compatibility.
- Download Latest Sound Driver
Visit your device manufacturer’s website, locate the support page, and download the most recent sound driver, typically a Realtek driver.

- Install the Driver
Run the downloaded installer and restart your PC. This update could resolve the crackling issue.

How to Troubleshoot Sound Issues in Settings
If none of that works, you can try the Windows 10 or Windows 11 audio troubleshooter, which will try some of the most common solutions for you.
- Access Sound Troubleshooter
Right-click the audio icon and select “Open Sound settings” (or “Sound settings” in Windows 11). Use the troubleshoot option available under the audio settings.

- Click “Troubleshoot” underneath the audio slider or run the troubleshooter from your taskbar
If you’re on Windows 11 your UI will look slightly different. The troubleshoot option will still be underneath the volume slider but in the “Advanced” section. You can press “Output” to troubleshoot your speaker popping. Alternatively, just right-click the audio icon on your taskbar and choose “Troubleshoot sound problems“.

FAQ – Frequently Asked Questions About Fixing Audio Issues on Windows 11 or Windows 10
Can RAM cause audio issues?
Yes, faulty or insufficient RAM can lead to various system performance issues, including audio glitches and crackling sounds, as it affects the overall performance and processing capabilities of the computer. If audio files or streaming software do not have enough RAM for proper execution, this can result in audio distortions. Performing a RAM test using tools like MemTest86 can help diagnose memory issues. If problems are found, consider upgrading your RAM or replacing faulty modules.
Why does my audio crackle at low volume?
Crackling sounds at low volume levels might be caused by incorrect audio enhancements settings, conflicts within the audio drivers, or hardware issues with speakers or headphones. To troubleshoot, try disabling all audio enhancements in the Sound settings panel and testing with different audio sources and formats. If the issue persists, check for loose connections or damage to the speakers or headphones themselves. Adjusting the audio bitrate and sample rate through the sound control panel might also alleviate the problem.
Why is my left headphone crackling?
Crackling in one headphone, especially the left one, could be due to a variety of reasons such as a damaged cable near the jack, debris inside the headphone port, or even an imbalance in audio settings. Start by cleaning the headphone jack with a dry, lint-free cloth. If possible, bend the cable near the jack and along its length to see if the crackling stops at any point, which would indicate a break in the wire. Also, check the balance settings in your device’s audio settings to ensure equal distribution to both sides.
What causes bad audio quality?
Poor audio quality can stem from several factors including outdated or corrupt audio drivers, incorrect configuration of audio settings, low-quality audio files, or hardware issues related to the speakers, headphones, or sound card. Upgrading to the latest audio drivers and ensuring audio settings are correctly configured for your hardware can significantly improve audio quality. For hardware issues, consider professional repair or replacement as necessary, and for low-quality audio files, obtaining higher bitrate versions can make a noticeable difference.
Can Windows Update cause sound issues?
Yes, Windows Updates can unintentionally introduce sound issues by updating audio drivers to versions that might not be fully compatible with your hardware or by altering system settings that impact sound. To troubleshoot, try rolling back the audio driver to a previous version through Device Manager, or visit the manufacturer’s website to download and install the most compatible driver for your specific hardware model. Checking for additional Windows Updates that might contain fixes or using the System Restore function to return to a point before the issue began can also be effective strategies.
How do I remove static from audio in Audacity?
To remove static from audio in Audacity, first record a few seconds of silence to capture the static noise profile. Then select this portion of silence, go to Effect > Noise Reduction, and click “Get Noise Profile.” Next, select the entire track or the area from which you want to remove static, revisit Effect > Noise Reduction, and apply the effect with your chosen settings. Adjusting the noise reduction settings may require some experimentation to find the right balance between removing static and maintaining audio quality.
What are the common audio-visual issues?
Common audio-visual issues include unsynchronized audio and video, video stuttering, audio distortion or crackling, and poor video quality. These issues can be caused by a variety of factors such as outdated drivers, insufficient system resources, incorrect settings, or hardware problems. Resolving these issues typically involves updating drivers, ensuring hardware compatibility, adjusting playback settings for better performance, and checking the integrity of the media files themselves. Using dedicated software for video playback and editing can also help improve synchronization and quality.
Why do my headphones have static noise every few seconds?
Intermittent static noise in headphones can be due to wireless interference (for Bluetooth headphones), a loose or damaged connection (for wired headphones), or electrical interference from other devices. To resolve, try moving away from sources of wireless interference such as Wi-Fi routers, microwaves, or other Bluetooth devices. For wired headphones, inspect the cable for damage and ensure a firm connection to the audio source. If using a computer, changing the USB port or audio jack can determine if the issue is related to the port itself.
How do I stop my sound from crackling in Windows 11?
To address sound crackling in Windows 11, start by troubleshooting hardware connections and checking for any visible damage to cables and ports. Use the built-in audio troubleshooter in Windows 11 by navigating to Settings > System > Sound > Troubleshoot. Adjusting the default audio format and disabling exclusive mode might also help, as these can reduce pressure on the audio processing system and resolve compatibility issues. If the problem persists, consider updating your audio drivers through Device Manager or directly from the manufacturer’s website.
How do I update audio drivers to fix crackling issues?
To update audio drivers, first identify your sound card or audio interface manufacturer and model. Visit the manufacturer’s official website to find the latest compatible drivers for your specific device and operating system version. Download and install these drivers following the onscreen instructions. Alternatively, use Device Manager by right-clicking on the start menu, selecting Device Manager, expanding the “Sound, video and game controllers” section, right-clicking your audio device, and choosing “Update driver“.
Does utilizing an external DAC or sound card improve audio quality?
An external Digital-to-Analog Converter (DAC) or sound card can significantly enhance audio quality by providing higher quality components for sound processing, compared to the often limited onboard sound hardware in computers. These devices can offer a cleaner power supply, better shielding from interference, and higher quality audio conversion, leading to clearer, more detailed sound. They are particularly beneficial for audiophiles, professionals, or anyone seeking the best possible audio experience.
Can CPU performance affect audio output?
High CPU usage can indeed affect audio output, as it might not leave enough processing power for handling audio tasks, leading to crackling, popping, or interruptions in sound. Monitoring CPU usage and closing unnecessary applications can help. In cases of consistently high CPU load impacting audio, upgrading your system’s CPU or optimizing your system for better performance might be necessary.
What’s the importance of disabling exclusive mode for resolving audio issues?
Disabling exclusive mode in your audio device settings can resolve conflicts that arise when multiple applications try to access the audio driver simultaneously. Exclusive mode allows a single application to take full control of the audio device, potentially blocking other applications from using it properly. This can lead to issues like audio crackling, no sound output, or application crashes. Disabling it ensures all apps can share audio hardware resources more harmonously.
How does changing the audio format affect crackling sounds?
Changing the audio format to a more compatible or less demanding bitrate and sample rate can alleviate strain on your system’s audio processing, thus reducing or eliminating crackling sounds. Some formats may be more suitable for your hardware capabilities, and finding the right setting involves testing various combinations in the Sound control panel under the Playback devices’ Advanced settings. Start with a lower setting and gradually increase until you find the optimal balance between quality and performance without inducing crackling.
Is there a way to repair physical damage causing audio issues without professional help?
Minor physical damage, like loose headphone jacks or connectors, can sometimes be temporarily fixed with DIY approaches, such as cleaning the contacts with electronic contact cleaner or gently readjusting the connections. However, significant damage, especially internal to devices or cables, typically requires professional repair or replacement. DIY repairs should be approached with caution, as they can further damage the hardware if not done correctly.
Extra: How to Use DISM and SFC to Repair Windows 11 or Windows 10
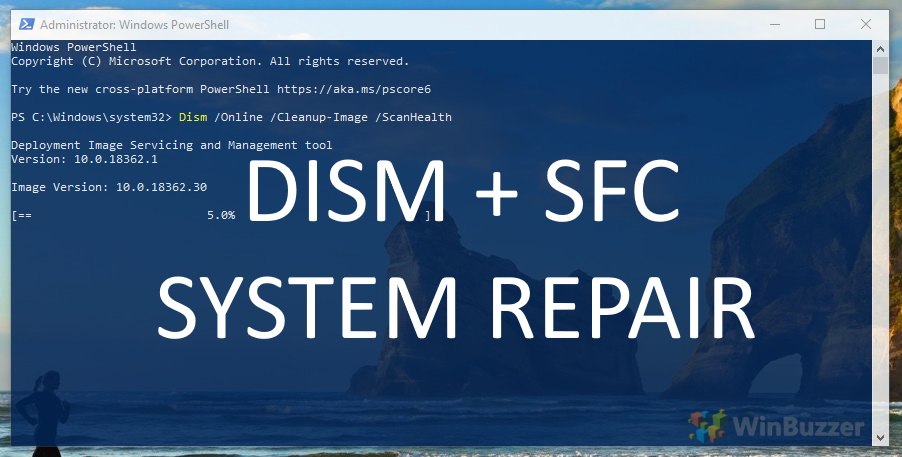
The SFC tool is a native Windows utility that scans for and repairs corrupted or missing system files. It’s a straightforward process that can quickly resolve many common issues with Windows 11 and Windows 10. DISM checks and repairs the Windows component store, a repository for system files. In our other guide, we show you how to use the SFC and DISM repair tools in Windows 11 and Windows 10.
Extra: How to Reset Windows 11 or Windows 10 (Normal or Factory Reset)
If you have a persistent issue with your PC that you have been unable to fix, the best option is to usually to reset your operating system. This will give you the option to keep your files (refresh), remove everything, or perform a factory reset. In our other guide, we show you how to factory reset Windows 11 and Windows 10 using both Advanced Startup Options and the OS’s in-built Settings apps.
Markus is the founder of WinBuzzer and has been playing with Windows and technology for more than 25 years. He is holding a Master´s degree in International Economics and previously worked as Lead Windows Expert for Softonic.com.
