Every Windows computer relies heavily on its Random Access Memory (RAM) for everyday operations. RAM is a critical component that temporarily holds data for quick access, playing a pivotal role in determining system speed and efficiency. However, like any hardware, RAM can develop problems over time, which can lead to various system issues, including crashes, performance degradation, and unexpected behaviors.
The Role of Windows Memory Diagnostic
To tackle potential RAM issues, Windows includes a built-in tool known as Windows Memory Diagnostic. This utility is specifically designed to test the RAM for errors and can be a first line of defense in troubleshooting memory-related problems. It’s an accessible and user-friendly tool, enabling users to perform comprehensive checks without needing specialized hardware knowledge.
When to Use Windows Memory Diagnostic
It’s advisable to run Windows Memory Diagnostic if you’re experiencing system instability, frequent crashes, or if your computer is acting unusually slow. These symptoms can often point to memory issues. Additionally, running this diagnostic is a smart move after installing new memory modules or when setting up a new computer, ensuring that the RAM is functioning correctly from the start.
This guide aims to guide users through the process of using Windows Memory Diagnostic, from initiating the test to interpreting the results. Understanding how to effectively use this tool can save time and potentially prevent more serious computer issues down the line.
Ensuring Effective Memory Testing
It’s important to prepare your system before running the test, which includes saving all work and closing programs, as the diagnostic process will restart your computer. The tutorial will detail these preparatory steps, ensuring a smooth and uninterrupted testing process.
⚠️ Please note: The process described below is the same in Windows 11 as it is in Windows 10. We’ll be using screenshots from Windows 10, so your UI may look a little different.
How to Do a Memory Check on Windows 10 and Windows 11
This method guides you through using the Windows Memory Diagnostic tool to check for memory problems in Windows 10 and Windows 11. It’s useful when experiencing system instability, crashes, or performance issues, which might be related to memory faults.
- Open “Windows Memory Diagnostics”
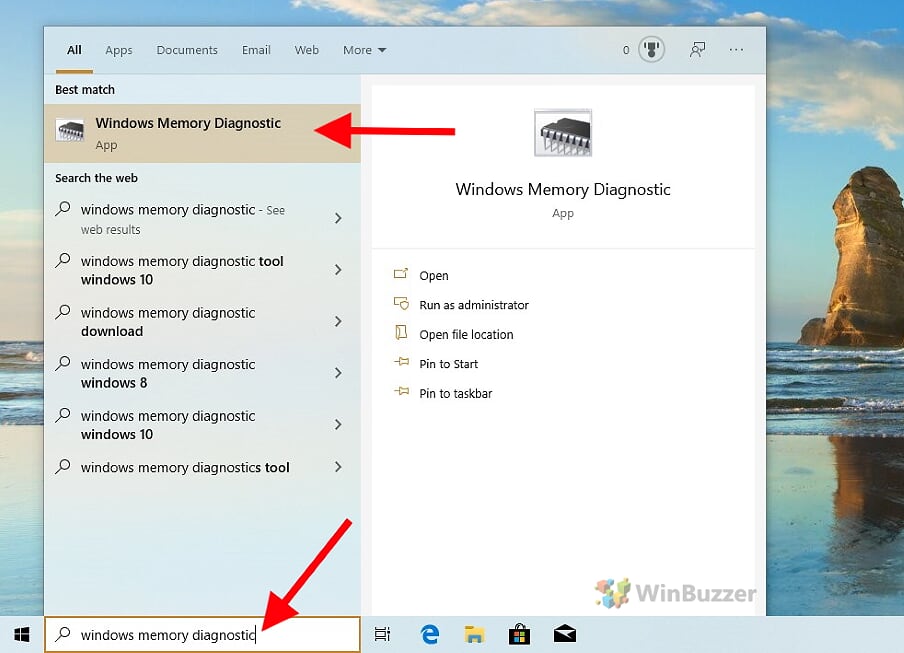
In the search field located in the task bar, enter “mdsched” or search for “Windows Memory Diagnostics” to open the tool.

- Initiate the test environment
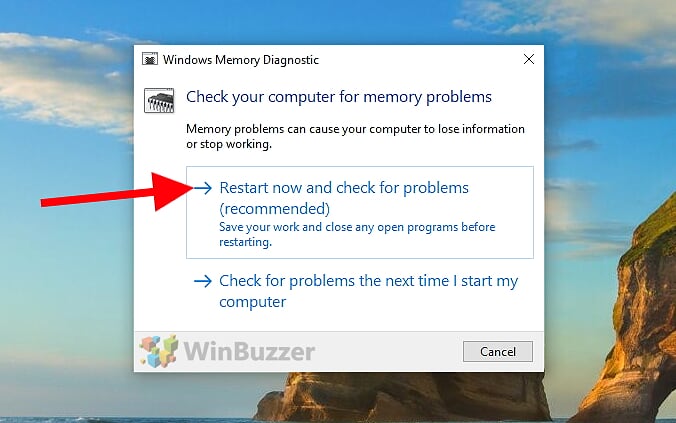
Windows Memory Diagnostics requires a restart to do a memory test. Click to restart immediately or choose to schedule the test after the next reboot.

- Run the RAM test in default mode and select options
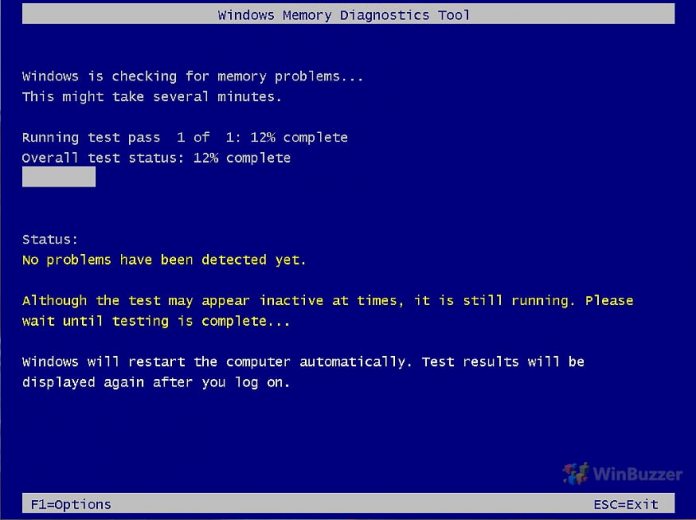
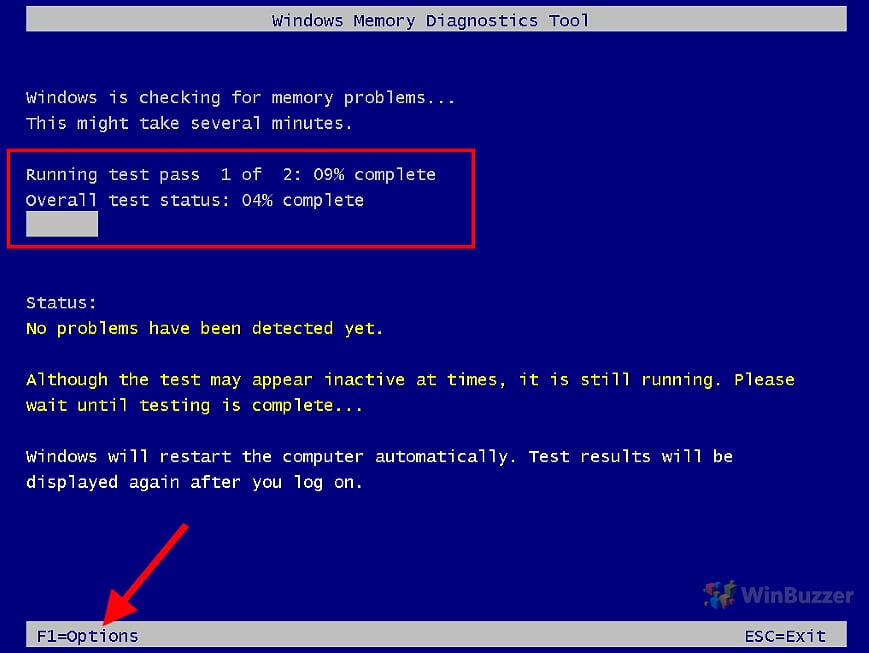
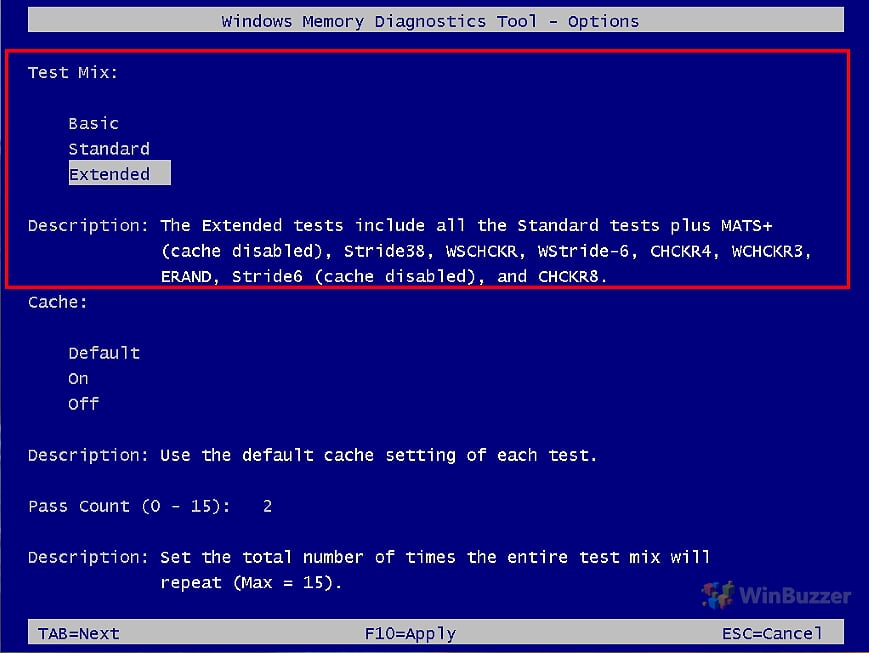
Upon reboot, the tool starts automatically in Standard mode, performing various memory tests. A progress bar and counter will display the test progress. Press F1 to access the Options menu.

- Select the memory test mode
You can choose between Basic, Standard, and Extended test modes for different levels of thoroughness. For routine checks, the Standard mode is often sufficient. However, for in-depth troubleshooting, the Extended mode is more appropriate. The duration of each test mode can vary based on the system’s RAM size and speed.
Basic Mode
Purpose: Designed for a quick check of your RAM.
Tests Included:
MATS+ (Microsoft’s Algorithm Test Suite Plus)
INVC (Inverse Checkerboard)
SCHCKR (Stride6 test with cache enabled)Duration: This mode is the fastest among the three and takes significantly less time to complete.
Use Case: Ideal for a quick system check when you suspect minor memory issues or for routine maintenance checks.
Standard Mode
Purpose: Provides a more comprehensive check than the Basic mode.
Tests Included:
All tests from the Basic mode (MATS+, INVC, SCHCKR)
LRAND (Pseudo-random pattern test)
Stride6 (Stride test with cache enabled)
CHCKR3 (Checkerboard test)
WMATS+ (Windows Memory Algorithm Test Suite Plus)
WINVC (Windows Inverse Checkerboard)Duration: Takes longer than the Basic mode but is generally faster than the Extended mode.
Use Case: Suitable for regular health checks of your system’s memory and when you need a balance between thoroughness and test duration.
Extended Mode
Purpose: The most thorough and comprehensive test mode, designed to detect even the most elusive memory problems.
Tests Included:
All tests from the Standard mode
Additional tests like MATS+ (with cache disabled), Stride38, WSCHCKR, WStride-6, CHCKR4, WCHCKR3, ERAND, Stride6 (with cache disabled), CHCKR8Duration: This is the most time-consuming mode due to its extensive range of tests.
Use Case: Recommended when you encounter persistent system stability issues, frequent crashes, or when Standard mode tests indicate potential memory problems. It’s also useful when you’re troubleshooting new hardware or after making significant hardware changes.

- Enable or disable RAM cache during the test
Choose “Active” or “Inactive” to determine if the cache should be used during the tests. Disabling the cache allows the tool to access RAM data directly for a more thorough test.

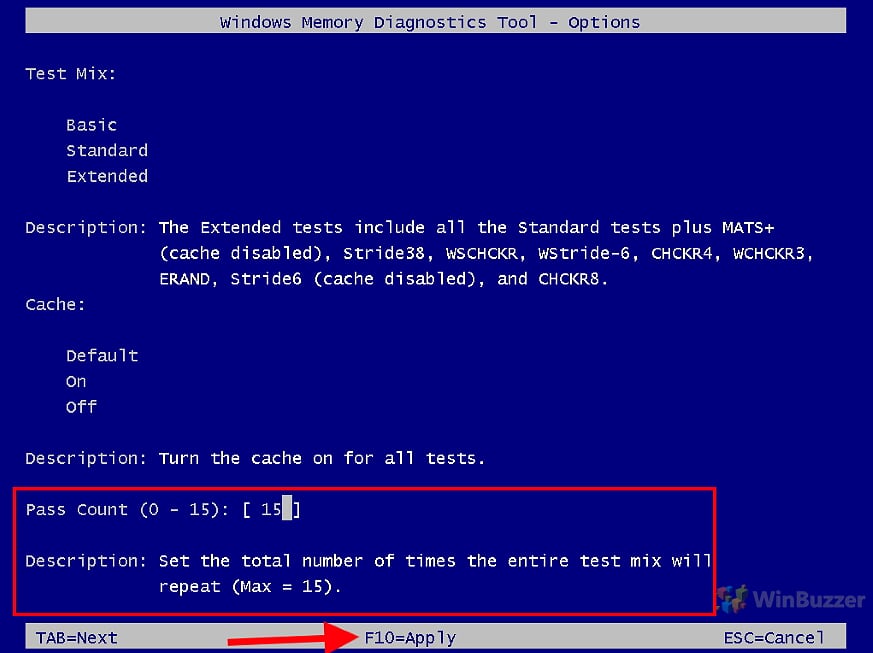
- Choose the number of passes
The “pass count” setting in memory diagnostic tools like the Windows Memory Diagnostic tool refers to the number of times the entire set of memory tests is repeated. Each pass checks the computer’s RAM for errors or issues. By repeating the tests multiple times, the tool can more reliably detect intermittent or elusive memory problems.
For regular maintenance or when no specific issues are suspected, a lower number of passes (1-2) is usually sufficient. If you’re troubleshooting specific memory-related issues like frequent crashes or blue screens, setting a higher number of passes (5 or more) can be more effective in detecting problems. With the “F10 key” you apply the settings and restart the Windows 10 RAM test.

How to Check Windows Memory Diagnostic Results
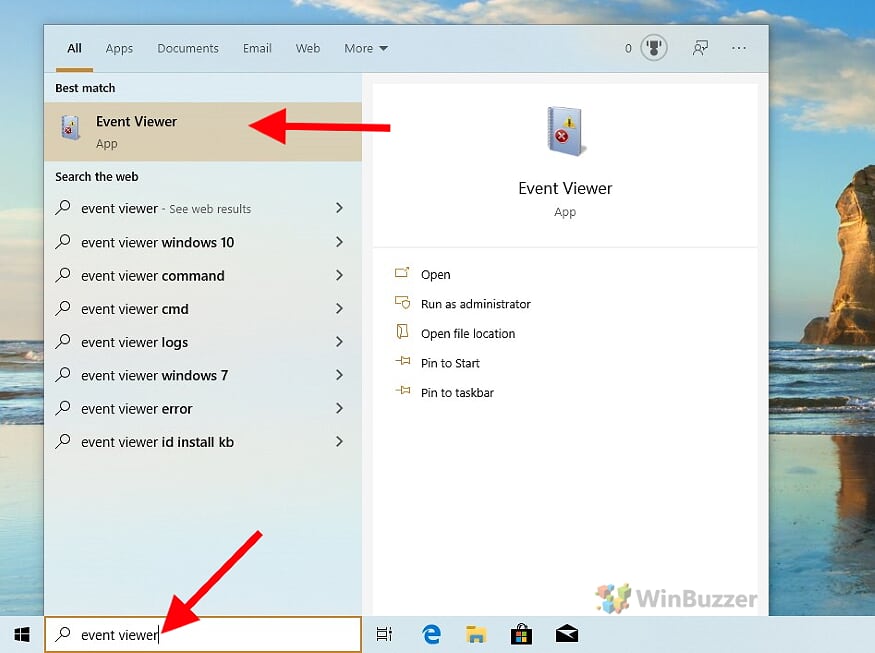
As soon as you have logged into Windows 10 after the subsequent boot process, you can call up the test results via the “Event Viewer“.
- Open the “Event Viewer”

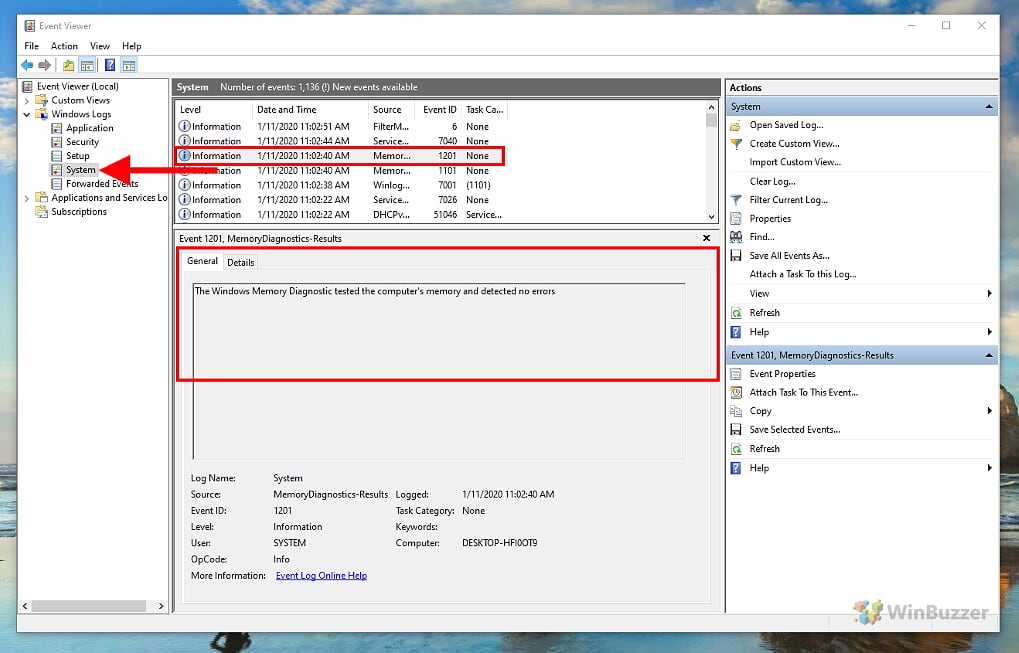
- Check the RAM test results
In Event Viewer, navigate to “Windows Logs” and then “System”. Look for an event entry with “MemoryDiagnostics-Results” as the source.
Double-click the MemoryDiagnostics-Results source to view the message. A result without errors indicates that your RAM is likely not the cause of any issues. Errors suggest potential RAM issues.

Extra: How to Check RAM Type, Speed and Size on Windows
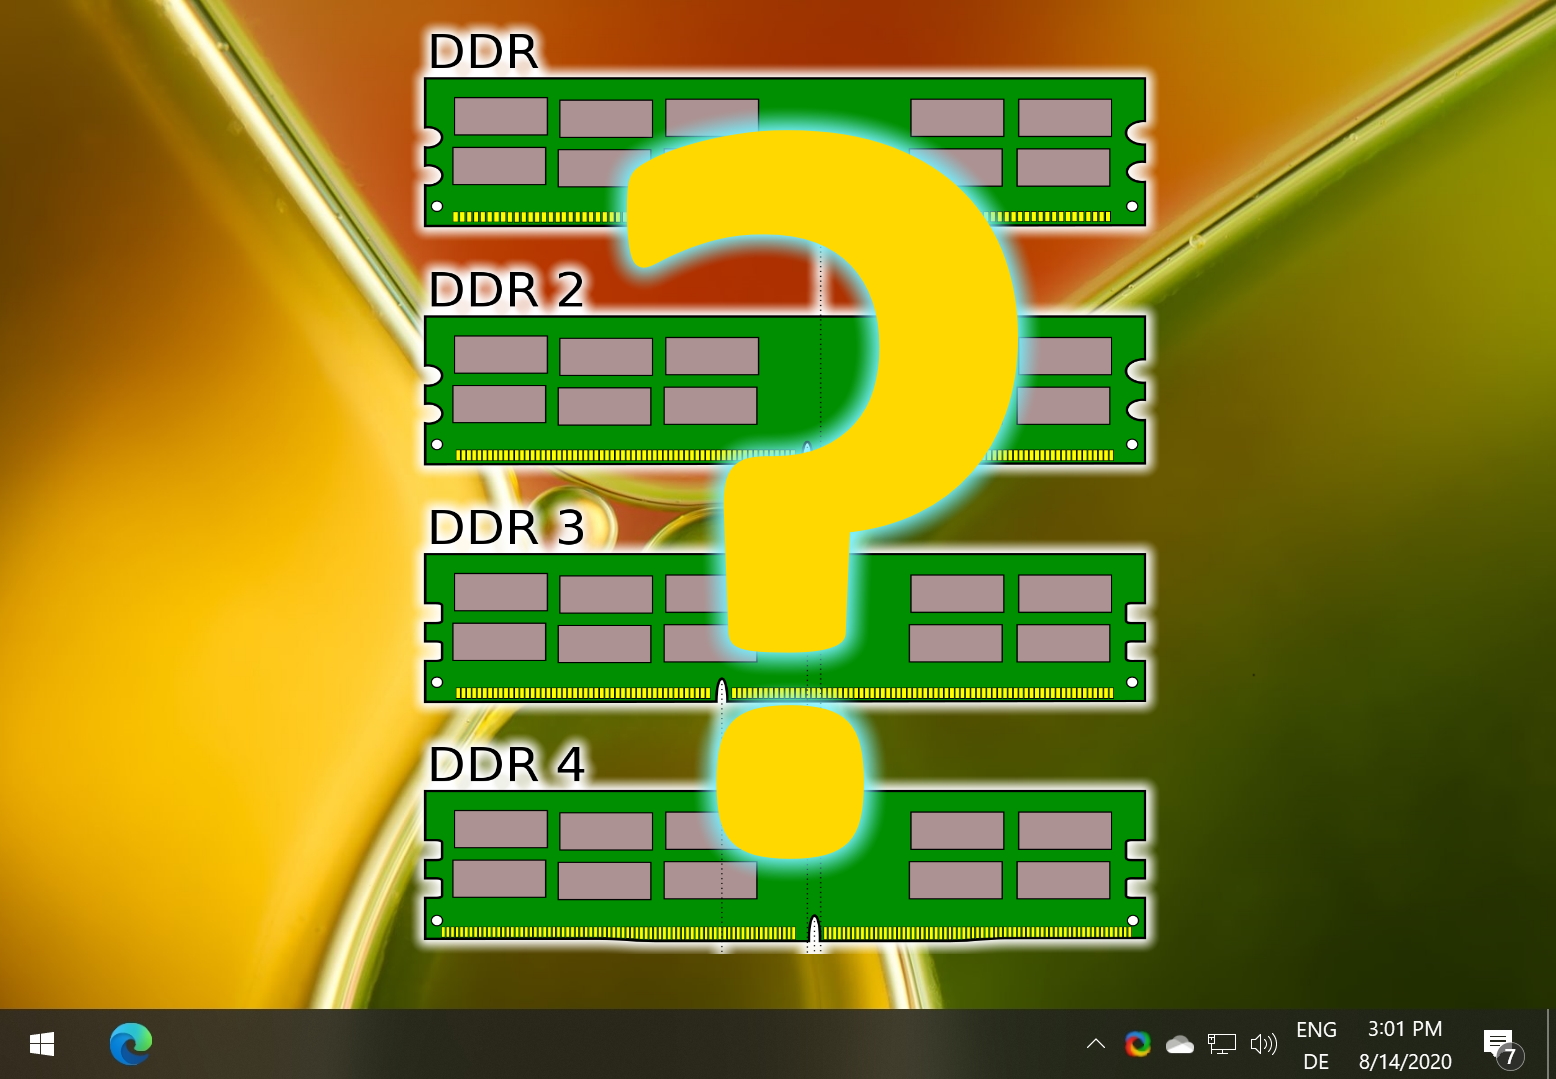
Whether you’re planning an upgrade, tuning CPU timings, or just curious, it’s handy to know information about your RAM. However, with old methods not being as user-friendly, many are left wondering how to check RAM speed on Windows and find information like its size and type. In our other guide, we show you how to check RAM speed, type, and size using several built-in Windows tools. You can then decide what method works best for you if you want to check hardware information in the future.
FAQ on RAM, Memory Issues and Windows Memory Diagnostic
How can I tell if my motherboard is bad or if it’s a RAM issue?
If you experience system instability, check RAM first using Windows Memory Diagnostic. If RAM is fine but issues persist, it could be a motherboard problem. Consider professional diagnostics for the motherboard.
What are the symptoms of bad RAM?
Symptoms include frequent crashes, blue screens, corrupted data, and random reboots. Running Windows Memory Diagnostic can confirm RAM issues.
How do I check for bad RAM?
Use Windows Memory Diagnostic. Type “mdsched” in the search bar, restart your computer, and the tool will run automatically to check for RAM issues.
How to test RAM performance?
While Windows Memory Diagnostic checks for errors, it doesn’t measure performance. For performance testing, use third-party software like MemTest86.
How do I see all my memory usage on Windows 10 and 11?
Open Task Manager and go to the “Performance” tab to see detailed memory usage, including used and available memory.
How do I check program memory usage on Windows 10 and 11?
In Task Manager, under the “Processes” tab, you can see the memory usage of each running program.
How to check RAM using cmd in Windows 11 and Windows 10?
Command Prompt doesn’t directly show RAM health, but you can check RAM type, speed and size with a simple command. For health, use Windows Memory Diagnostic.
How do I check my computer’s total memory on Windows 11 and Windows 10?
Right-click on “Start“, select “System“, and under “Device specifications“, you can see the installed RAM.
How do I find out how much storage I have on my laptop with Windows 11 and Windows 10?
Go to “Settings” > “System” > “Storage” to view the total storage and how much is available.
How to check CPU and memory in cmd on Windows 10 and 11?
Use “tasklist” in Command Prompt to view CPU and memory usage by each process. For detailed system info, use “systeminfo“.
How do I check my RAM amount on Windows 11 and Windows 10?
Open Task Manager, click on the “Performance” tab, and select “Memory” to view total RAM and its usage.
How do I know what type of RAM I have on Windows 11 and Windows 10?
In Task Manager under the “Performance” tab, click on “Memory“. It shows the type (e.g., DDR4) and other details of your RAM. You can also use command prompt and PowerShell for this.
How do I know if my RAM is DDR4 or DDR5?
Check the RAM specifications in Task Manager under the “Performance” tab or physically inspect the RAM stick for labels.
Do you need to test RAM after installing new modules on Windows 11 and Windows 10?
Yes, it’s recommended to run Windows Memory Diagnostic after installing new RAM to ensure it’s functioning properly.
How do I find out what model of RAM I have in Windows 11 and Windows 10?
Use Task Manager or third-party software like CPU-Z to find detailed information about your RAM model and specifications.
