

Screen recording on Chromebook devices has become an indispensable tool for educators, students, professionals, and casual users alike, offering a seamless way to capture and share content directly as it appears. Whether it’s for instructional videos, presentations, or simply recording memorable moments, ChromeOS provides versatile built-in features and third-party applications to accommodate your screen recording needs.
This comprehensive guide is designed to walk you through the various methods of screen recording on your Chromebook, covering everything from using quick keyboard shortcuts to leveraging advanced features in third-party software. We’ll explore the built-in Screen Capture tool that allows for intuitive recording of your entire screen, specific windows, or selected areas, ensuring you have the flexibility to capture exactly what you need.
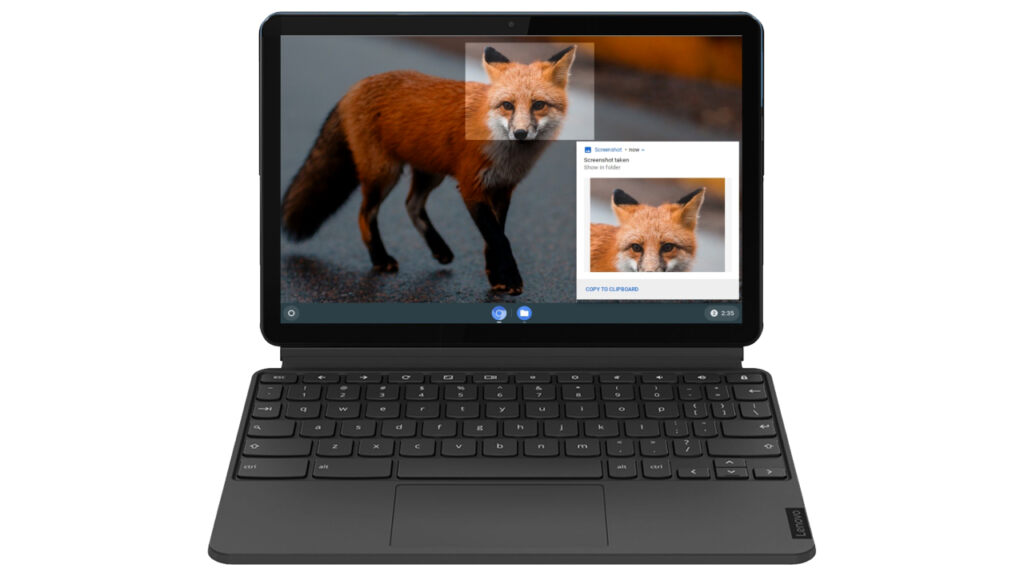
Understanding the distinction between screen recordings and screenshots is crucial; while screenshots capture a static image of your Chromebook screen, screen recordings create dynamic video content, often with the option to include audio. This adds a layer of depth to your content, making it more engaging and informative.
We’ll also delve into the different screen recording options available on Chromebooks, highlighting the ease of access through the Quick Settings panel and the various recording modes you can choose from. Whether you’re aiming for a full-screen video, focusing on a single window, or targeting a specific screen segment, this guide will provide you with the knowledge to make the most out of your Chromebook’s screen recording capabilities.
How To Screen Record on Chromebooks / ChromeOS
The Chromebook screen recorder tool, introduced in ChromeOS 89, is now available in the quick settings panel. It’s surprisingly strong while being simple to use.
- Click on the clock at the bottom right corner, and then click on the “Screen Capture” icon

- Select the video icon from the Screen Capture toolbar

- You can record the entire screen, a portion, or a single window, choose one to proceed

- Click on the gear icon to capture audio with the onboard microphone

- Partial: Drag to pick the area to record, then press the “Record” button to start the screen recording

- Full Screen: click on the full-screen icon and then click anywhere on the screen to start the screen recording

- Window: click on the window icon and select the window you want to screen record

- When you are done screen recording on your Chromebook, click on the red “Stop” button on the shelf at the bottom left

- A notification will pop up that states, “Screen Recording Taken” click on it to go to the video file in your “Downloads” folder

- The “Download” folder will open, and you may choose a video file to watch, share, save to Google Drive, or delete

How to Take a Screenshot on Chromebooks / ChromeOS / CloudReady
The screenshot function of Chromebooks used to be limited and only accessible using a weird keyboard shortcut. That changed a year ago when Google released a dedicated tool to capture screenshots and videos of what is visible on your Chromebook.
Our tutorial shows you two methods for starting the screen capture tool on ChromeOS, how to utilize it, and where to find your captured images and videos on your device.
FAQ – Frequently Asked Questions About Screen Recording on Chromebooks
How can I improve the quality of my screen recordings on a Chromebook?
To enhance the quality of your screen recordings, make sure your Chromebook is optimized for performance. Close unnecessary applications and browser tabs to free up system resources. Ensure your Chromebook’s software is up to date for the best compatibility and performance with the screen recording feature. Consider recording in well-lit environments if capturing via a webcam, and use an external microphone for clearer audio. The final quality also depends on your Chromebook’s hardware capabilities, such as processor speed and RAM.
Can I record only the audio without the screen on a Chromebook?
While ChromeOS does not offer a native feature specifically for audio-only recordings, you can utilize online audio recording services or download audio recording apps from the Chrome Web Store or the Google Play Store if your Chromebook supports Android apps. When using these tools, ensure you grant the necessary permissions for microphone access. For higher-quality recordings, consider using an external microphone and recording in a quiet environment to minimize background noise.
How do I share a screen recording from my Chromebook directly with others?
After completing a screen recording, locate the file in your Downloads folder. Right-click on the file to access sharing options, where you can choose to share via email, social media, or through cloud storage services like Google Drive. For larger files, consider using Google Drive or another cloud service to generate a shareable link, which can then be sent to others without the need for large email attachments. Ensure you understand the privacy settings of your chosen sharing method to control who can view your recording.
Is it possible to add background music to a screen recording on a Chromebook?
To add background music to your screen recording, you’ll need to use video editing software. Chromebooks can run web-based editors or Android apps available through the Chrome Web Store or the Google Play Store. Import your screen recording and music file into the editor, then overlay the music track onto your video timeline. Adjust the music volume and position to fit your video content. Export the edited video to save the new version with background music.
How do I ensure my screen recordings are saved in Google Drive automatically?
ChromeOS does not automatically save screen recordings to Google Drive, but you can manually set up a workflow for this. After recording, move your video file from the Downloads folder to a specific Google Drive folder by dragging and dropping the file within the Files app. For an automated solution, consider using a third-party app or extension that syncs your Downloads folder with Google Drive, but be mindful of privacy and security settings when using third-party solutions.
Can I use an external microphone for better audio quality in screen recordings?
Yes, connecting an external microphone to your Chromebook can significantly improve audio quality in screen recordings. Plug in your external microphone or connect it via Bluetooth, then go to your Chromebook’s sound settings to ensure the external device is selected as the input source. Test the microphone before recording to adjust levels and minimize background noise. This setup is particularly beneficial for narrations, tutorials, or any recording where clear audio is crucial.
What should I do if my screen recording files are too large to share?
If your screen recording file is too large, use a video compression tool to reduce its size. Several web-based services and Android apps can compress video files without significant quality loss. When compressing, choose a lower resolution or bitrate to reduce file size. Alternatively, split the video into smaller segments if the content allows. Remember to preview the compressed video to ensure the quality remains acceptable for your needs before sharing.
How can I record gameplay or streaming videos on my Chromebook?
To record gameplay or streaming videos, use the Chromebook’s native screen recording tool. Ensure you have the game or video ready to play in full-screen mode for a more immersive recording experience. Be mindful of the legal and ethical considerations when recording streamed content, especially copyrighted material. Always seek permission if you plan to share or publish your recordings, and check the terms of service for the content you’re recording.
Are there any privacy concerns with screen recording on a Chromebook?
When screen recording, it’s important to be aware of privacy considerations, especially if capturing content that includes personal information, private conversations, or third-party applications. Always obtain consent if you’re recording in a setting that involves others or their content. Review the recorded content before sharing to ensure no sensitive information is inadvertently exposed. Be mindful of the legal implications in your jurisdiction, as privacy laws vary widely.
Can I set a timer for the screen recording to stop automatically on a Chromebook?
ChromeOS’s native screen recording feature does not currently support automatic stop timers. However, you can manually monitor the recording duration and stop it at the desired time. For more advanced features, including timers, consider using third-party screen recording software available through the Chrome Web Store, the Google Play Store or web-based tools, keeping in mind that these may have different features and limitations.
How can I annotate or highlight items during a live screen recording?
For live annotations during a screen recording, you’ll need to use third-party software that offers on-screen drawing or highlighting capabilities. Look for apps in the Chrome Web Store or the Google Play Store that enable real-time annotations. Some apps may allow you to draw directly on the screen using a stylus or mouse, which can be particularly useful for tutorials, presentations, or emphasizing specific points in your recording.
Can I record a screen in the background while using another app on a Chromebook?
Yes, once you start a screen recording on your Chromebook, the recording will continue even if you navigate away from the initial screen or use other applications. This allows you to capture a broader range of activities, from multitasking between apps to demonstrating workflows. Just be mindful of any sensitive information that may be displayed while recording.
How do I fix audio sync issues in my screen recordings on a Chromebook?
Audio sync issues in screen recordings can be caused by system lag or performance issues. To mitigate this, close unnecessary apps and tabs to free up resources. Restart your Chromebook to clear any temporary glitches. If the issue persists, use video editing software to manually align the audio and video tracks. This may involve slight adjustments to the audio track’s timing to sync correctly with the video.
What are the legal implications of screen recording on a Chromebook?
Screen recording can have legal implications, especially concerning copyright and privacy. Always ensure you have the right to record and share the content, particularly if it includes copyrighted material or personal information of others. In educational and professional settings, adhere to institutional policies and guidelines. When in doubt, seek permission from content creators or consult legal advice to avoid potential infringement issues.
Can I customize the file format of screen recordings on a Chromebook?
Chromebook screen recordings are typically saved in a web-friendly format like MP4, which is widely supported across devices and platforms. If you need a different format, use video conversion tools available online or through the Chrome Web Store or the Google Play Store. When converting, choose the format that best suits your needs, considering compatibility, quality, and file size. Some formats may be better for editing, while others are optimized for streaming or storage efficiency.
Related: How to Zoom In and Out on a Chromebook
Zooming in and out on a Chromebook is a valuable skill for enhancing your user experience, whether for work, education, or leisure. There are multiple ways you can zoom in and out on a Chromebook. These include keyboard shortcuts, touchpad gestures, and specific tools designed to magnify small screen sections. Our other guide covers these methods comprehensively, ensuring you can adjust your Chromebook’s display to your personal requirements.

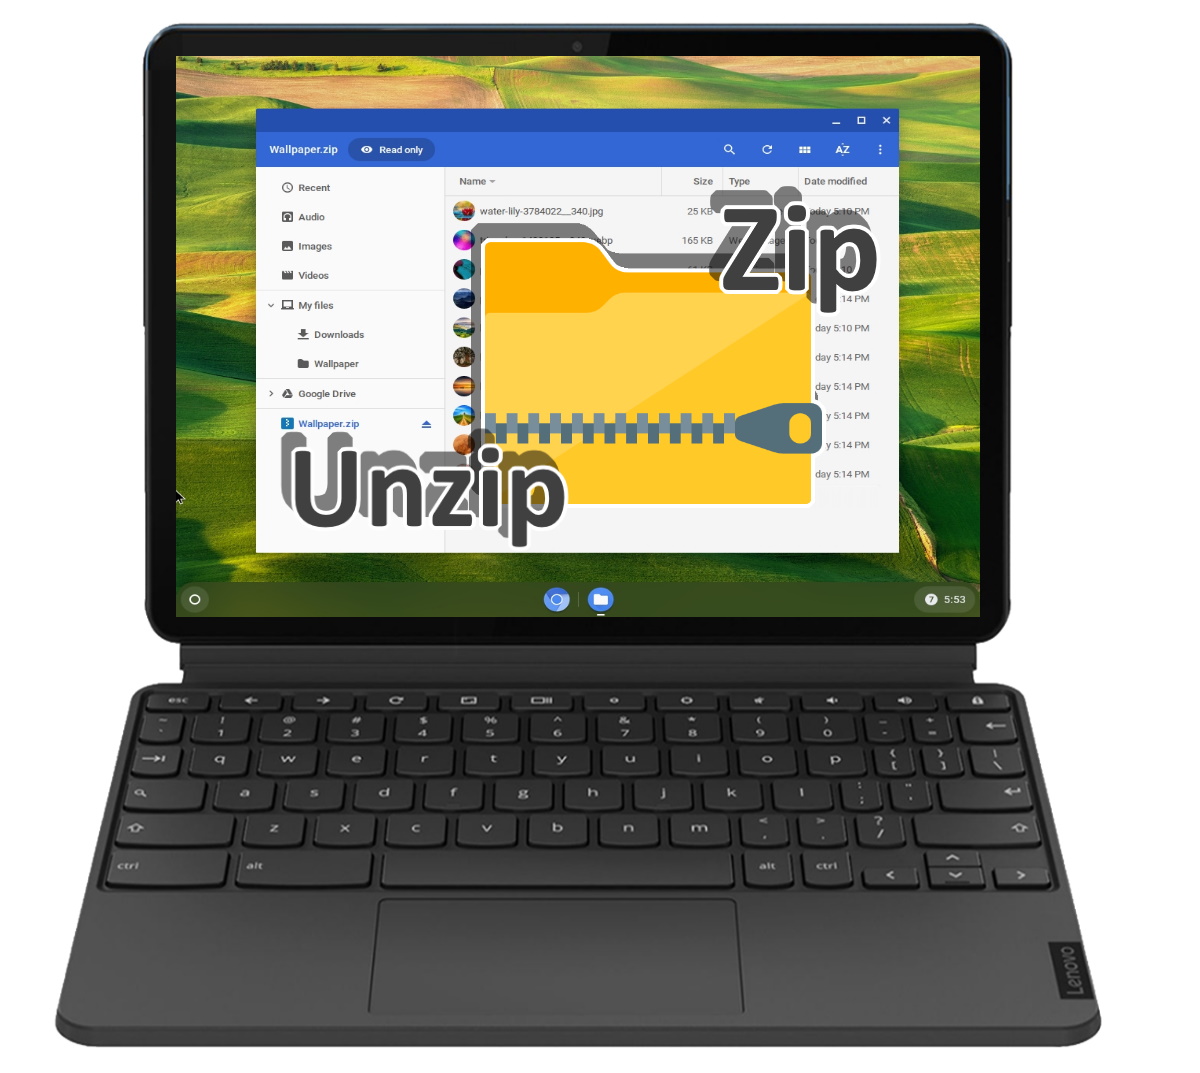
Related: How to Zip and Unzip Files on a Chromebook
The ability to compress and decompress files is essential, especially when dealing with large amounts of data or when sending files over the internet. For Chromebook users, this task is made simple with the built-in tools of Chrome OS. In our other guide, we show you how to unzip files on Chromebooks or how to create new ZIP archives using the built-in compression feature of ChromeOS.
Related: How To “Split Screen” on a Chromebook/on ChromeOS
The split screen feature on Chromebooks/ChromeOS is a useful function that allows users to view and work on two windows simultaneously. This can enhance productivity and multitasking, especially for tasks that require switching between different tabs or applications. There are different ways to use the split screen feature on Chromebooks, which we are all showing in detail in our other guide.
Last Updated on April 21, 2024 7:12 pm CEST by Markus Kasanmascheff


