

PDF is a versatile format that can hold most common file types in a form that’s viewable by just about anyone. One use case is to create a PDF from images so that they’re accessible in a single, universal document.
Previously, you might have needed a separate software to combine images into a PDF, but Windows these days allows you print to images to PDF directly from File Explorer. This greatly speeds up the process and still produces great results.
In this guide we show you how to create a PDF from multiple images using this method, and we’ll also show you how to enable the Microsoft Print to PDF option if you don’t have it already.
⚠️ Please note: The process described below is the same in Windows 11 as it is in Windows 10. However, bear in mind that we’ll be using screenshots from Windows 10, so your UI may look a little different. We’ll point out any changes you need to be aware of as they come up.
How to Create a PDF from Multiple Images in File Explorer
Combining a JPG to a PDF only takes a minute or so. Indeed, you can perform this process with most popular image formats, such as PNG and GIF. Just be aware that GIFs will no longer animate.
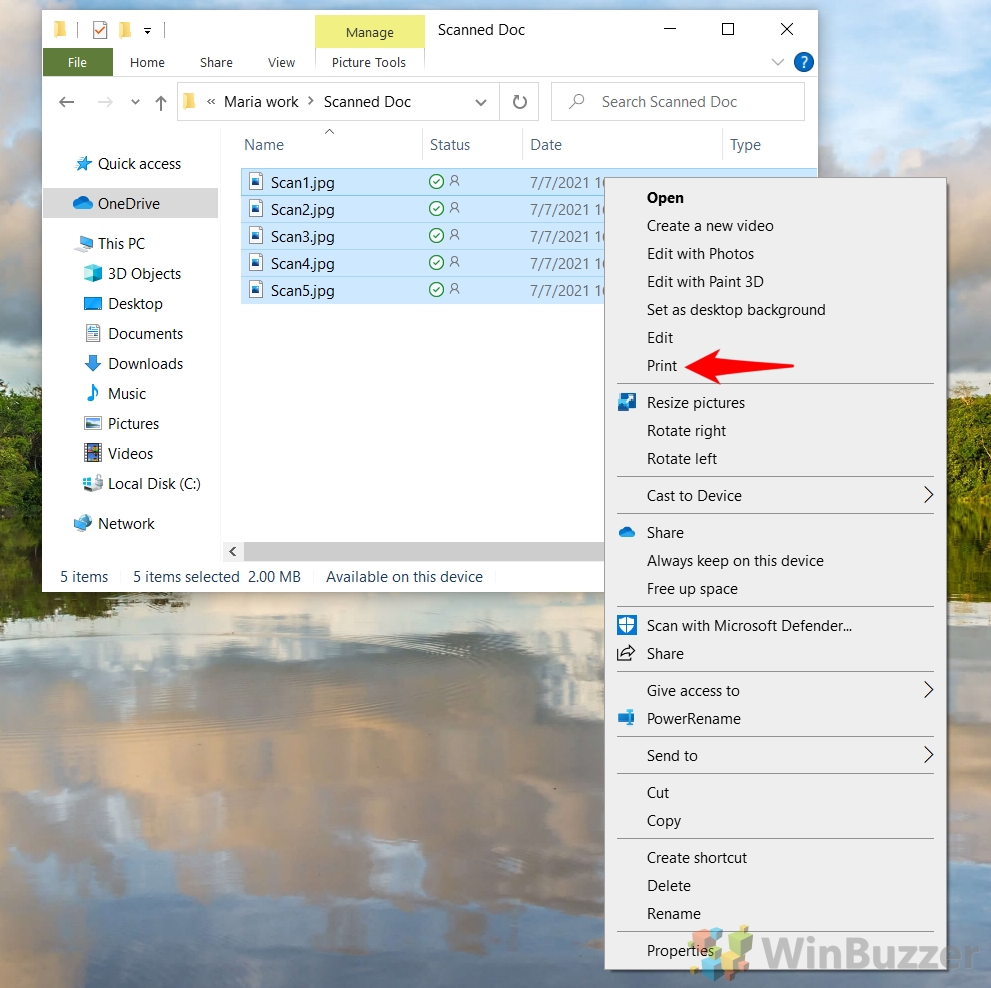
- Select and Print Images
Select the images you wish to include in your PDF. Click on the first image, hold down the “Shift” key, and click on the last image to select multiple files. Then, right-click on one of the selected images and choose “Print”. This will open the Print Pictures window, where you can adjust settings for your PDF.
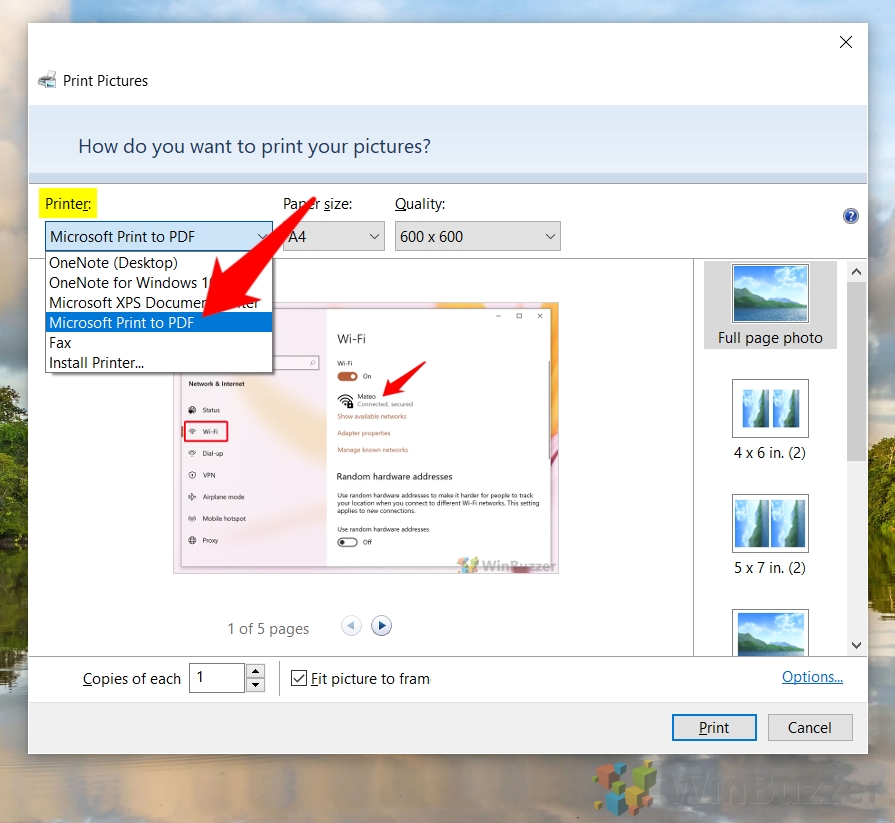
- Choose Microsoft Print to PDF
In the Printer dropdown menu, ensure “Microsoft Print to PDF” is selected. If this option is not available, you will need to activate it by following the steps in the section below on activating the Microsoft Print to PDF option.
- Preview and Adjust Settings
Preview your images using the arrows at the bottom of the window. Each image will be placed on its own page by default. Click “Options…” if you need to adjust the page orientation or other settings.
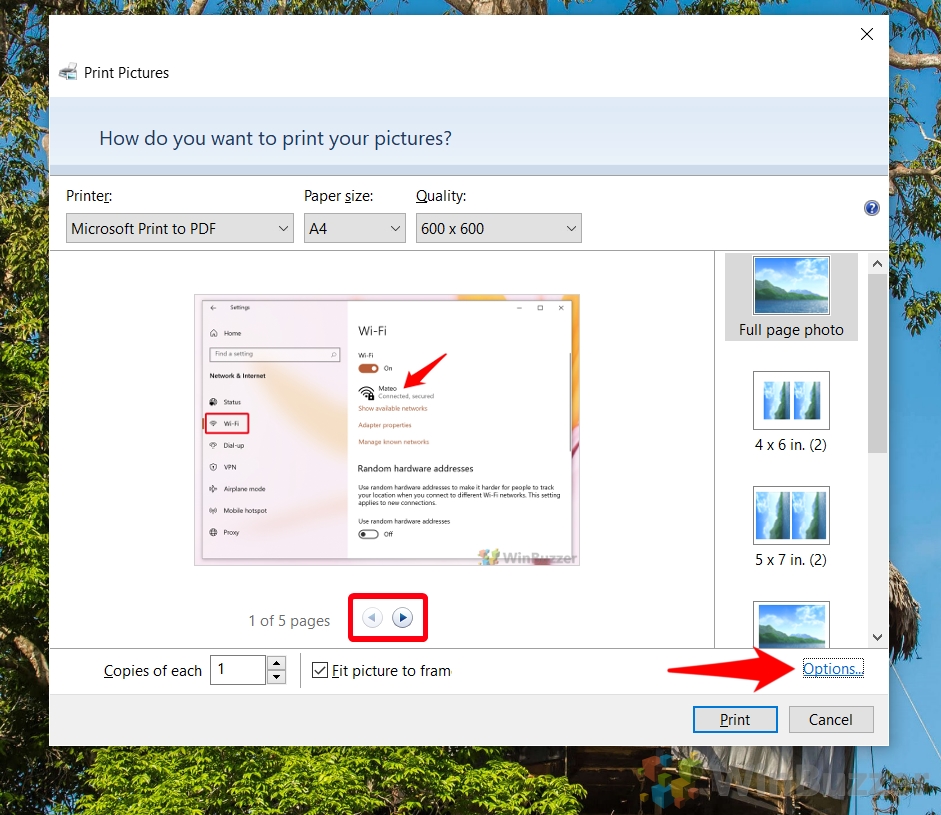
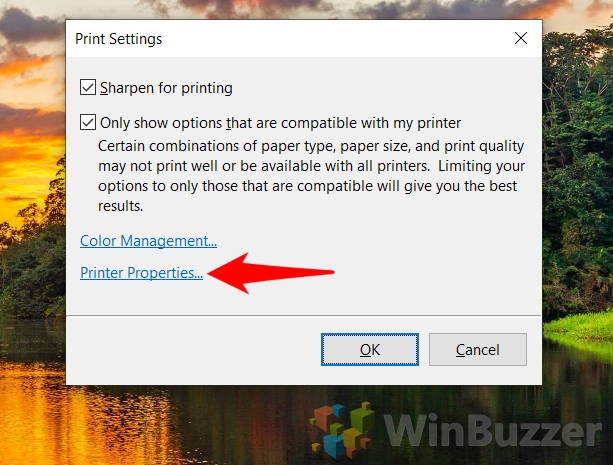
- Access Printer Properties
Click “Printer Properties…” to open a dialog where you can further customize your PDF, such as changing the orientation to landscape or portrait.
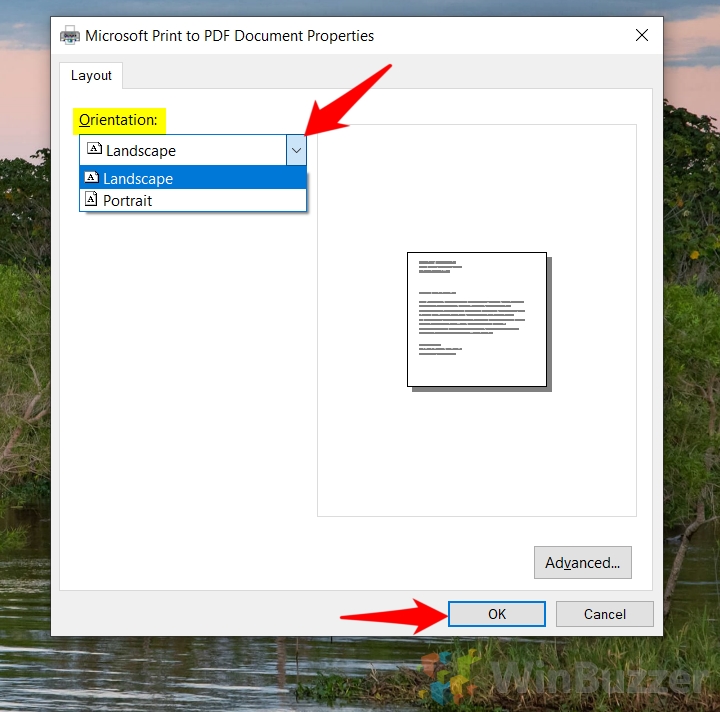
- Adjust Orientation
For images better suited to a landscape format, select “Landscape” from the dropdown menu under the “Orientation” heading. Click “OK” once you’re satisfied with your selection.
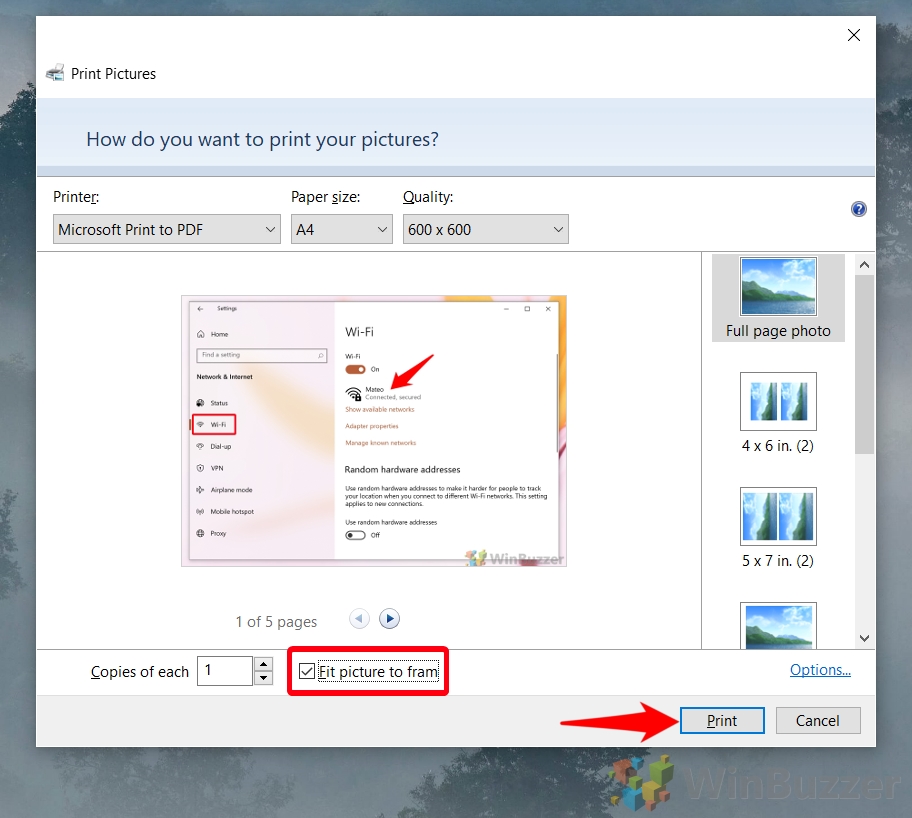
- Fit Picture to Frame
If your images are being cut off, check the “Fit picture to frame” option. This ensures that your images fit within the page, though it may result in white borders if the aspect ratio doesn’t match. After customizing your settings for paper size, quality, and the number of photos per page, click “Print”.
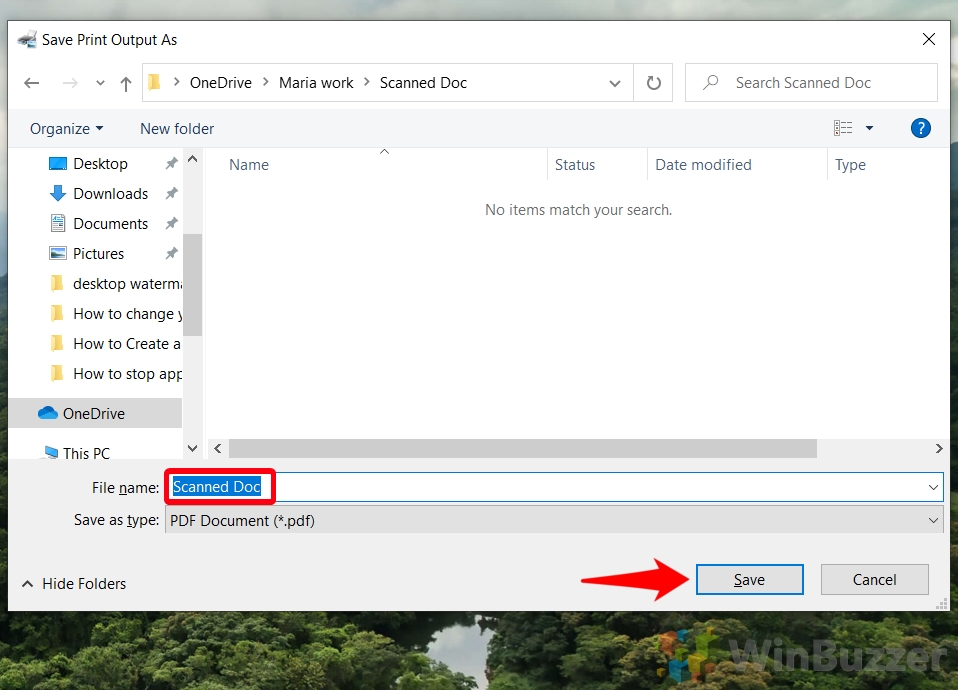
- Save Your PDF
Windows will prompt you to choose a save location and file name for your document. Navigate to a folder of your choice, enter a name for the PDF, and click “Save”.
- Open and Your PDF
Double-click the PDF file to open it and review your images.
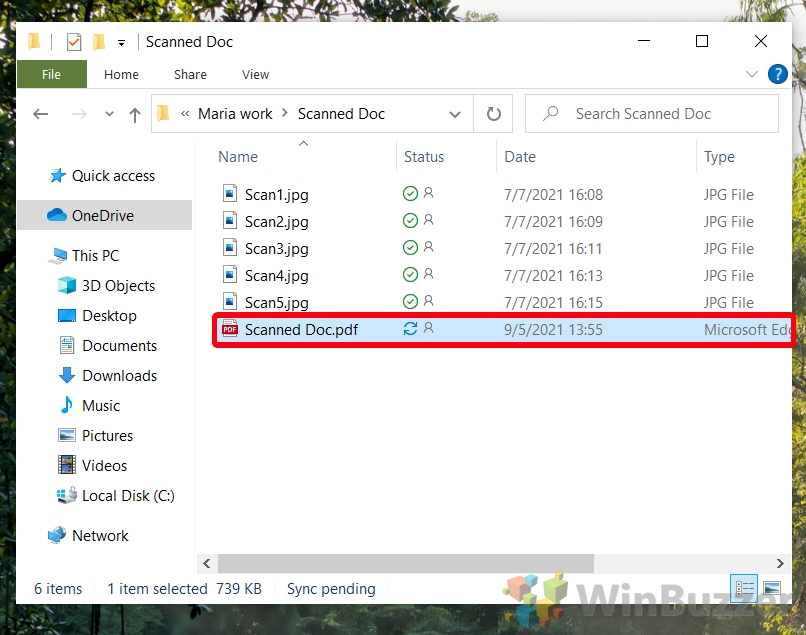
- Check the Result
Ensure there are no color or display issues and that all images are correctly aligned and visible.
How to Activate the Microsoft Print to PDF Option in Windows 11 / 10
If the Microsoft Print to PDF option is not showing, you can enable it manually to start creating PDFs from your images. Follow these steps to activate it.
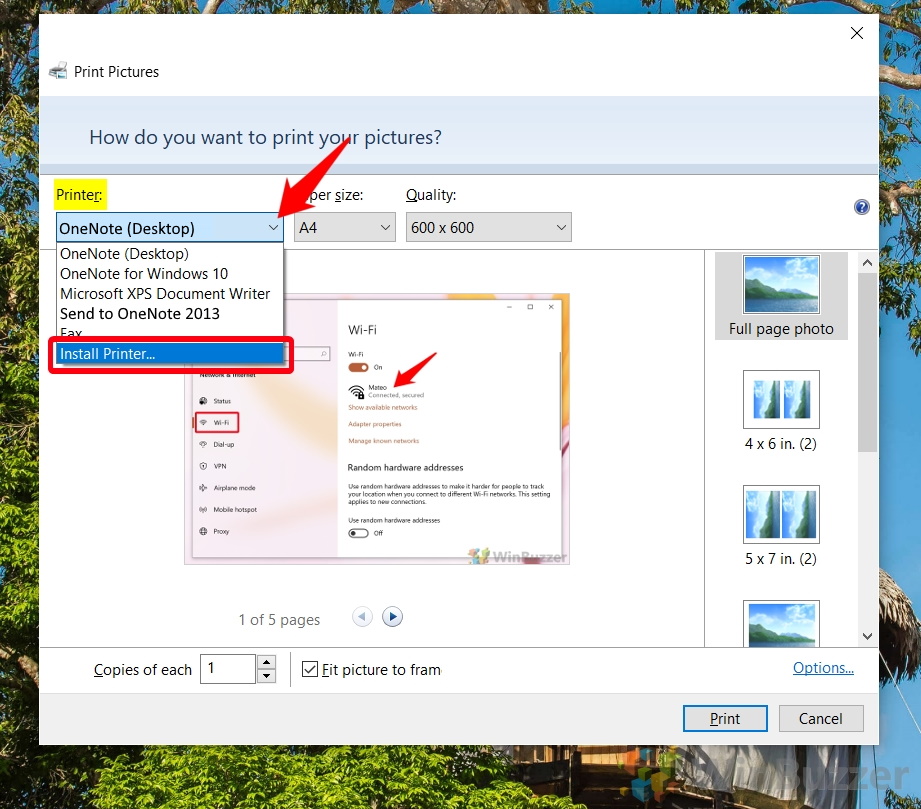
- Install Printer
In the Print Pictures window, select “Install Printer…” from the “Printer:” dropdown menu.
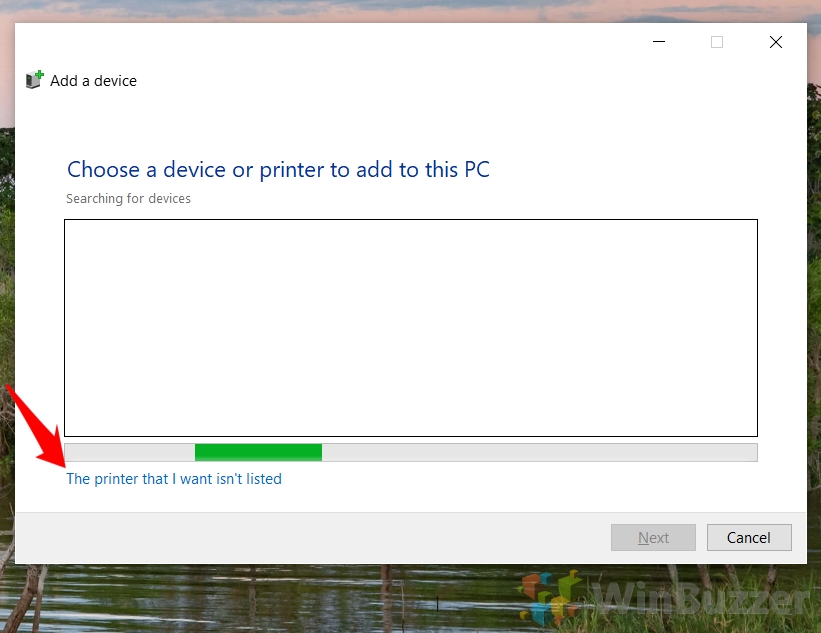
- Printer Not Listed
Click on “The printer that I want isn’t listed” to manually add the Microsoft Print to PDF printer.
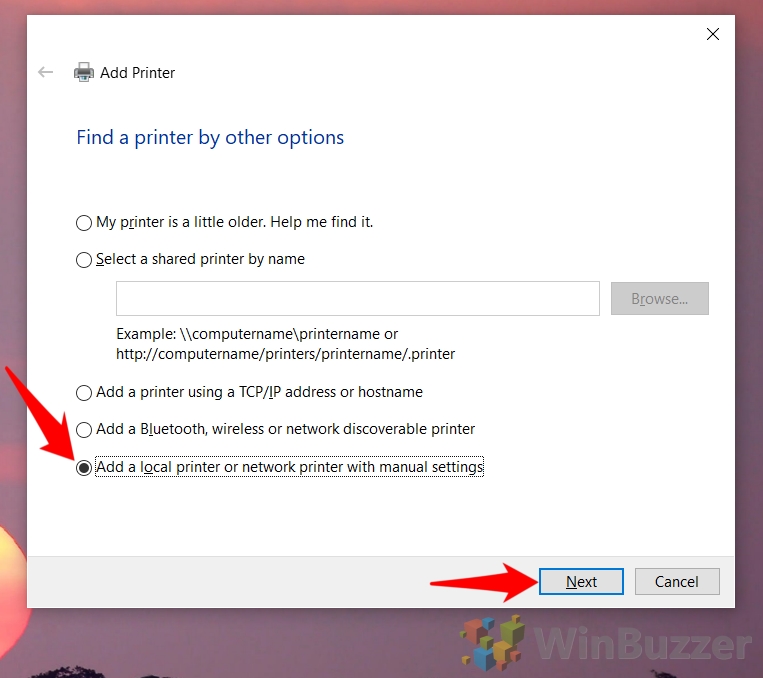
- Add a Local Printer
Select “Add a local printer or network printer with manual settings” and click “Next“.
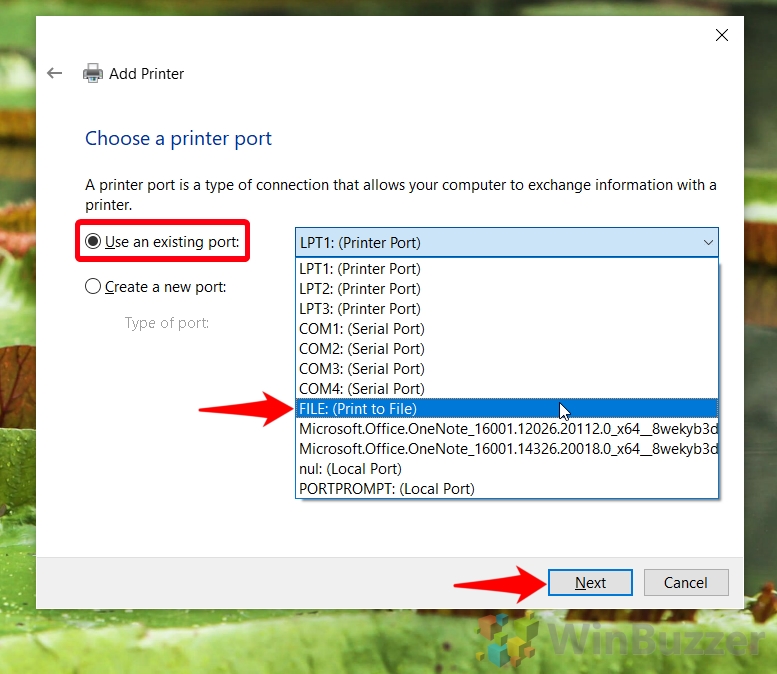
- Use an Existing Port
Choose “Use an existing port” and select “FILE: (Print to File)” from the dropdown menu. Click “Next” to proceed.
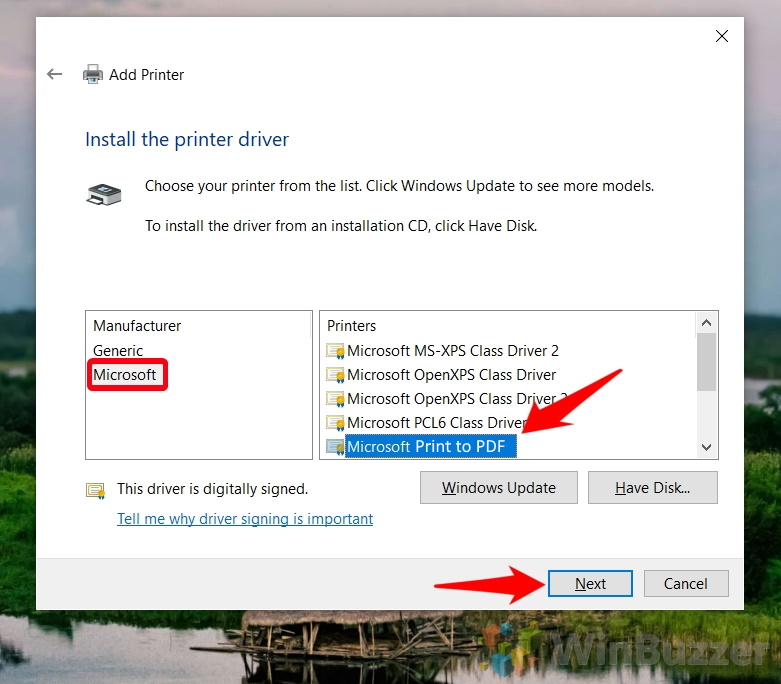
- Select Microsoft Print to PDF
In the left-hand column, select “Microsoft“, then choose “Microsoft Print to PDF” on the right. Click “Next” to continue.
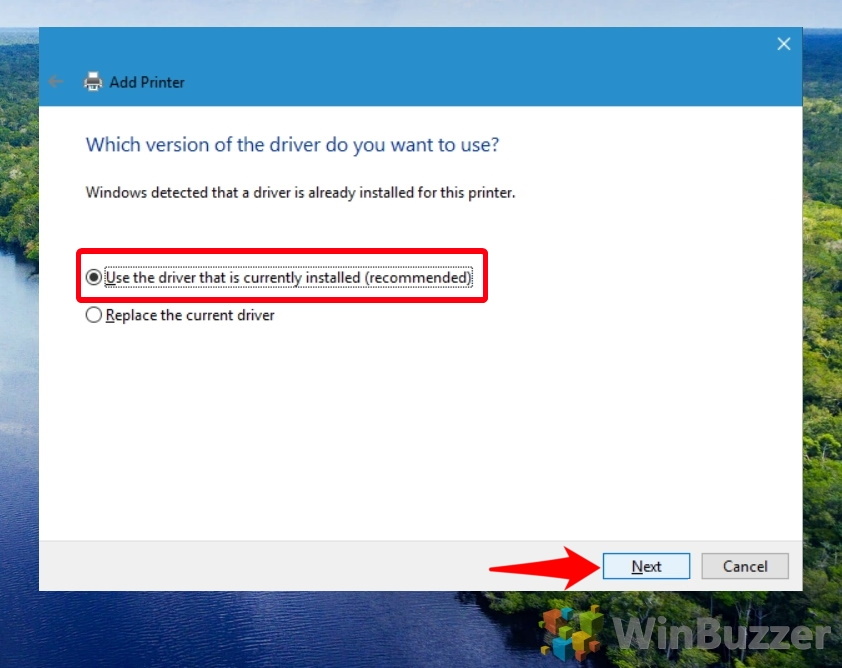
- Use the Current Driver
Tick the option “Use the driver that is currently installed (recommended)” and click “Next“.
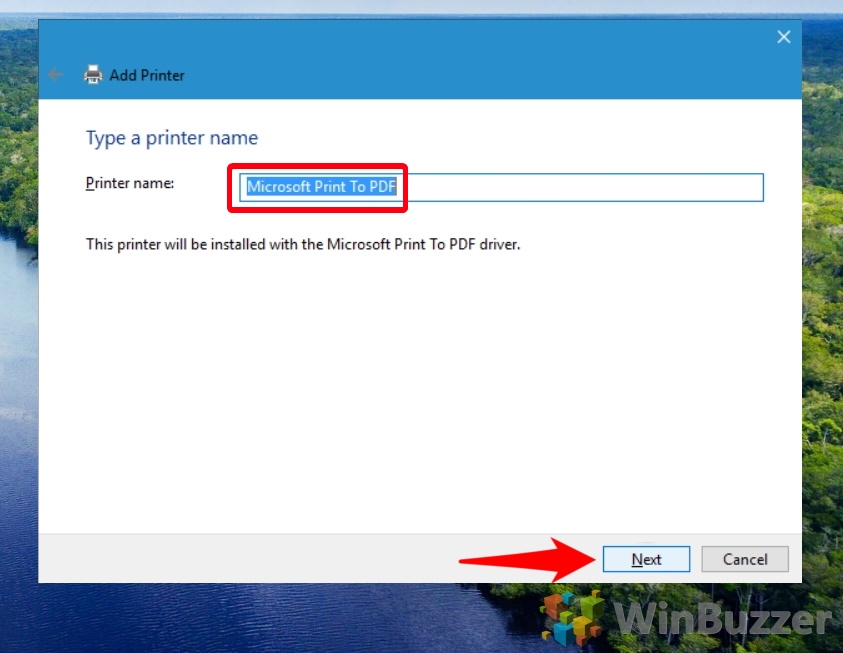
- Name Your Printer
Enter “Microsoft Print to PDF” as the printer name and click “Next“.
- Set as Default Printer
Check “Set as the default printer” if you wish, and press “Finish“. The Microsoft Print to PDF option should now be available for creating PDFs from images.

How to Convert a JPG to PDF
Quite often, it’s necessary to turn downloaded or created images into an easily browsable document. For this purpose, there’s no better file format than the humble PDF. In our other guide, we show you how to convert a JPG to a PDF using a variety of methods.

FAQ – Frequently Asked Questions About Images in PDF Files
Is it possible to include both landscape and portrait images in one PDF?
Absolutely. When creating a PDF from images, each image’s orientation is preserved as it was originally. If your document includes a mix of landscape and portrait images and you want them to display properly, make sure to review each image’s orientation before creating your PDF. Customizing settings for each orientation might be necessary, especially if a uniform appearance is desired across all pages. Sometimes, editing the images to have a uniform orientation before combining them into a PDF can simplify the process.
Can I add a watermark to the images in the PDF?
Directly adding watermarks to your images within the PDF using the outlined method isn’t possible. However, you can easily add watermarks to your images beforehand by using image editing software. Programs like Adobe Photoshop or free tools like GIMP offer functionalities to insert watermarks. Once you apply the watermark, follow the tutorial steps to create your PDF. For a consistent look, ensure the watermark is applied uniformly across the images.
How can I merge PDFs created from images with other PDF documents?
To combine your newly created PDF with other PDF documents into a single file, you will need to utilize PDF editing software. Adobe Acrobat is a popular choice for such tasks, offering a straightforward interface to merge files. Alternatively, there are free online tools and software like PDFsam that also allow you to merge multiple PDF files. Simply upload or open the PDFs you wish to combine, arrange them in your desired order, and execute the merge operation.
Why are some of my images rotated incorrectly in the PDF, and how can I fix it?
Incorrectly oriented images in your PDF are usually a result of their metadata, which might suggest a different orientation than desired. To fix this, use image editing software to rotate your images to the correct orientation before creating your PDF. Additionally, check if your photo viewer software automatically adjusts orientation for viewing and disable this feature if editing images, as it can give a misleading preview of the image’s actual orientation.
Can I create a PDF from images with transparent backgrounds? Will it remain transparent?
Yes, when you create a PDF using images with transparent backgrounds, the transparency should be retained in the final document. This feature is useful for maintaining design integrity or for specific presentation purposes. However, keep in mind that how the transparency is rendered can depend on the PDF viewer used to open the document. Some viewers may display the transparency differently, so it’s wise to check your PDF in multiple viewers to ensure consistency.
How do I ensure that images are not stretched or distorted in the PDF?
To avoid stretching or distorting images, first, ensure that the “Fit picture to frame” option is checked in the printing options, which adapts the image to the page size while maintaining its aspect ratio. However, if your images have varying aspect ratios, consider manually adjusting them using image editing software to fit the desired page size or orientation for the PDF, keeping a consistent aspect throughout.
Can I specify the DPI (dots per inch) for the images in the PDF?
The “Microsoft Print to PDF” feature in Windows 10 does not offer explicit control over the DPI setting for images within the PDF. For high-quality images in your PDF, ensure that the original images are of high resolution and DPI before converting them into a PDF. If specific DPI settings are crucial for your project, consider using professional PDF creation or image editing software where you can adjust these settings before incorporating the images into a PDF.
Is it possible to batch convert multiple folders of images into separate PDFs simultaneously?
Batch converting multiple folders of images into separate PDFs simultaneously requires additional tools beyond the basic functionality provided by Windows 10. Various third-party software options offer batching capabilities, which can automate the process of converting images from different folders into individual PDFs. Look for software with batch processing features and specify your folders and conversion settings according to the instructions provided by the software.
What can I do if the PDF file size is too large for email attachments?
If your PDF file is too large, consider using online PDF compression tools or dedicated PDF editing software to reduce the file size. These tools typically offer options to compress images and remove unnecessary data without significantly affecting quality. Additionally, ensure to optimize the image files before creating the PDF by resizing or using lower resolution images if high quality is not critical for the intended use.
Can I add clickable links to my PDF?
Adding clickable links directly through the “Print to PDF” feature isn’t possible. However, after creating your PDF, you can use PDF editing software like Adobe Acrobat or free online editors to add hyperlinks. This is useful for directing viewers to websites, email addresses, or other PDF pages. Simply open the PDF in your chosen editor, select the tool to add links, and apply them to the desired text or image areas in your document.
How can I split a PDF created from images back into individual images?
To extract or split images from a PDF back into individual image files, use PDF extraction or conversion tools. Many online tools and software like Adobe Acrobat offer the functionality to select and save images from a PDF document separately. The process typically involves opening the PDF in the software, selecting the extraction option, and choosing the images or pages to convert back into image format.
Can I automate the process for creating PDFs from images frequently?
For frequent and automated PDF creation from images, scripting solutions or third-party software with batch processing can be a tremendous help. Tools like PowerShell for Windows or Python scripts can automate repetitive tasks, including PDF creation. Third-party software often has a GUI and command-line interface to set up automated processes, allowing for scheduled or triggered PDF creation based on your needs.
How do I reduce the margins in my PDF to make images larger?
Reducing the margins to make images larger within the PDF can sometimes be managed through the “Printer Properties” settings, where you can select borderless printing options or adjust margin sizes if available. For greater control over the layout, including zero or minimal margins, use image editing software to resize or adjust your images to the exact dimensions needed for the PDF, or use advanced PDF editing software to set page margins after the PDF has been created.
Is there a way to create a table of contents for the PDF with image labels or names?
Creating a table of contents for a PDF, especially for one made from images, requires manual input using PDF editing software after the PDF has been created. This can be a helpful navigation tool in large documents. Software like Adobe Acrobat allows you to manually create bookmarks or a table of contents that references specific pages or sections within the PDF. These references can be labeled according to the content or images on those pages for easy navigation.
How can I enhance the color or contrast of images directly in the PDF after creating it?
While the “Microsoft Print to PDF” feature does not support direct image enhancement, you can adjust the color, brightness, or contrast of images before creating the PDF using photo editing software. If you need to make these adjustments after the PDF has been created, use PDF editing software that offers image editing capabilities. Tools within these applications can help enhance or adjust image properties directly in the PDF, though editing prior to PDF conversion is recommended for best results.
Related: How to Convert a Word Document to PDF (Docx to PDF)
The Microsoft Word document format, Docx, is an excellent format with a lot of flexibility and software support. However, there may be instances where the recipient of your document doesn’t have word processing software or when your document must look the same no matter the device it’s viewed on. In such cases, PDF can be the better choice. In our other guide, we show you how to make a Word document a PDF through saving and exporting from Word, or converting docx to PDF via a third-party tool.

Related: How to Convert Excel Files to PDF (.XLSX to PDF)
Excel is an incredible tool for data processing, but its file format isn’t quite as universal as the humble PDF. The PDF is harder to edit, compatible with a wider range of devices, and requires little to no additional software. This, combined with its static nature, makes it an ideal format for published reports. In our other guide, we show you how to save an Excel File as a PDF from Excel or a third-party software, with some additional tips on speeding up the process.

Related: How to Enable or Disable the Integrated PDF reader in Edge, Firefox, and Chrome
All of the major browsers, including Chrome, Edge, and Firefox, integrate a PDF viewer. This is, to give an example, so you can just click the link in Chrome to open it in another tab. Doing so means you don’t have to wait for another app to open or leave your browser window, which aids productivity. In our other guide, we show you how to Enable or Disable the Chrome, Firefox, or Microsoft Edge PDF viewers in just a few short steps.


