

A few years ago, Nvidia made a move that was bound to frustrate a lot of gamers. It made its GeForce Experience app, which is the easiest way to update and download Nvidia drivers, require an account. Those who just want to maintain their PC now needlessly needed to be part of Nvidia's family.
Thankfully, though Nvidia strongly pushes GeForce Experience on its GPU owners, it's possible to update them without it. The process is a bit more involved, but GTX drivers can be found on its official website for installation. Doing so will still net you the use Nvidia Control Panel, but won't come with extra fluff like desktop overlays, settings optimizers, and game recording.
Today we're going to show you how to download Nvidia Drivers without Geforce experience, as well as how to install them and check your GPU. If you want to know how to update Nvidia drivers without Geforce Experience, the manual installation of a new driver will exactly do that and replace your existing outdated Nvidia GPU driver. Let's get started:
How to Manually Update and Download Nvidia Drivers
One downside to manual drivers updates is that you need to know your hardware quite well. Though many will remember their GPU make, it can be difficult to remember the exact model. If you want to avoid the underside of your desk or have a laptop, you can check your Nvidia GPU via Task Manager. You can then proceed to check your architecture and download and install the Nvidia display driver.
Checking Your Nvidia GPU
Identify your Nvidia GPU model using the Task Manager to ensure you download the correct drivers.
- Open Task Manager
Press “Ctrl + Shift + Esc” to launch Task Manager. Navigate to the “Performance” tab to find your GPU's details, crucial for downloading the right drivers. - View GPU Details
Look under the “Performance” tab for the GPU section to note down your Nvidia GPU model, such as GTX 690.

Accessing System Information
Knowing whether your system is 32-bit or 64-bit is vital before downloading the appropriate driver. You can do that via “System Information”.
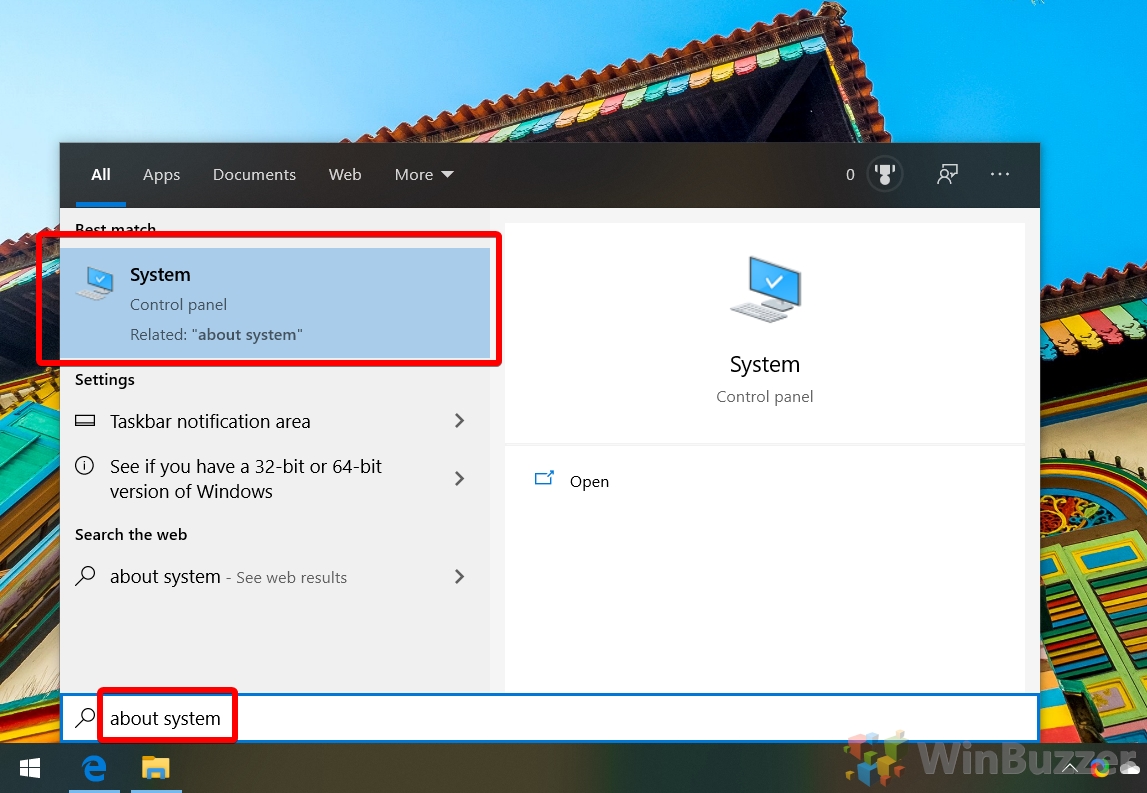
- Open System Information
Press the “Start” button and type “about system“, then click the top result to open the “About” section of your system settings.
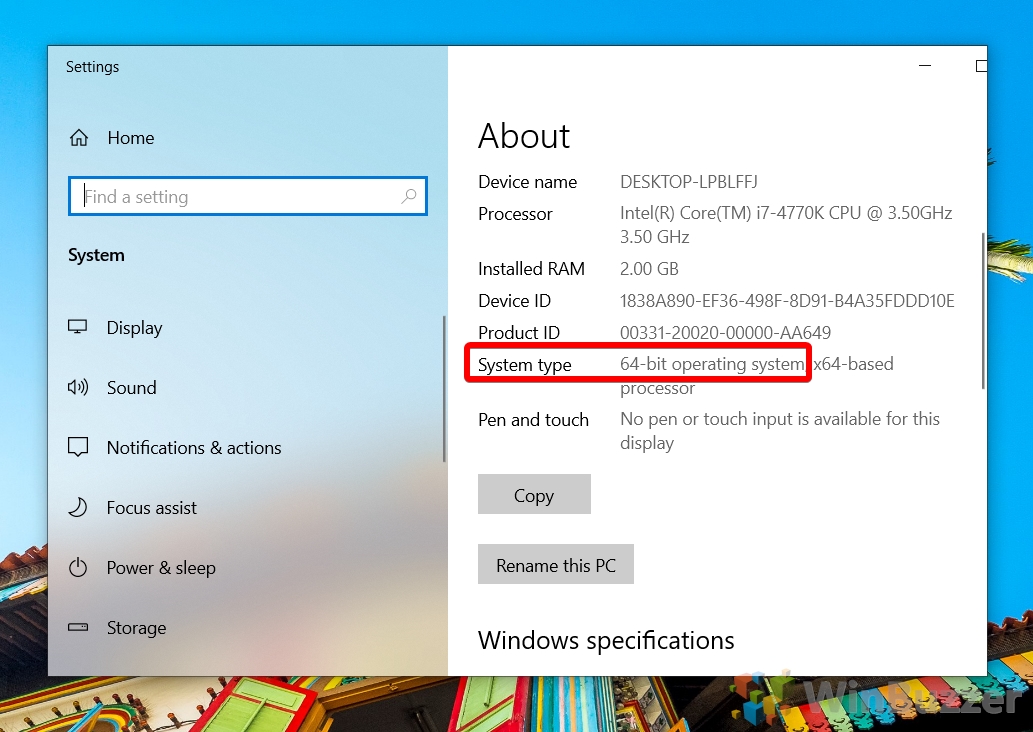
- Identify System Type
Find the “System type” heading in the “About” section to determine if your operating system is 64-bit or 32-bit.
Downloading Nvidia Drivers
With your GPU model and system architecture identified, proceed to download the Nvidia drivers.
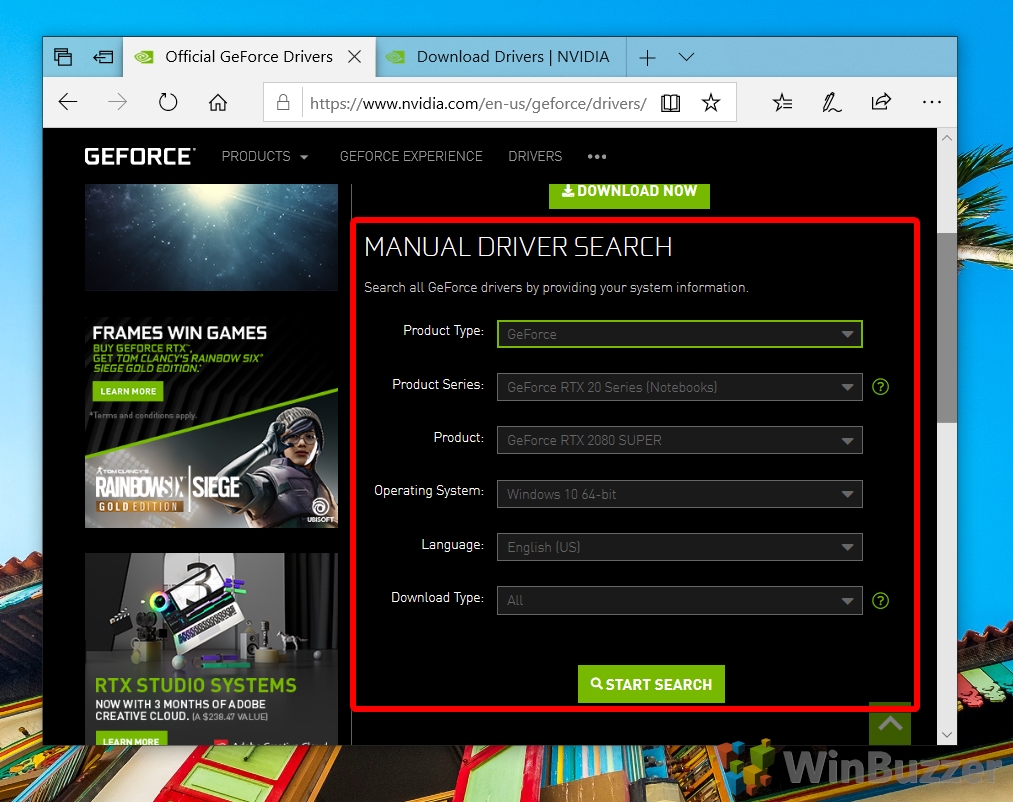
- Navigate to the GeForce Drivers Page
Visit the GeForce drivers page on Nvidia's website to manually search for drivers specific to your GPU model and operating system.
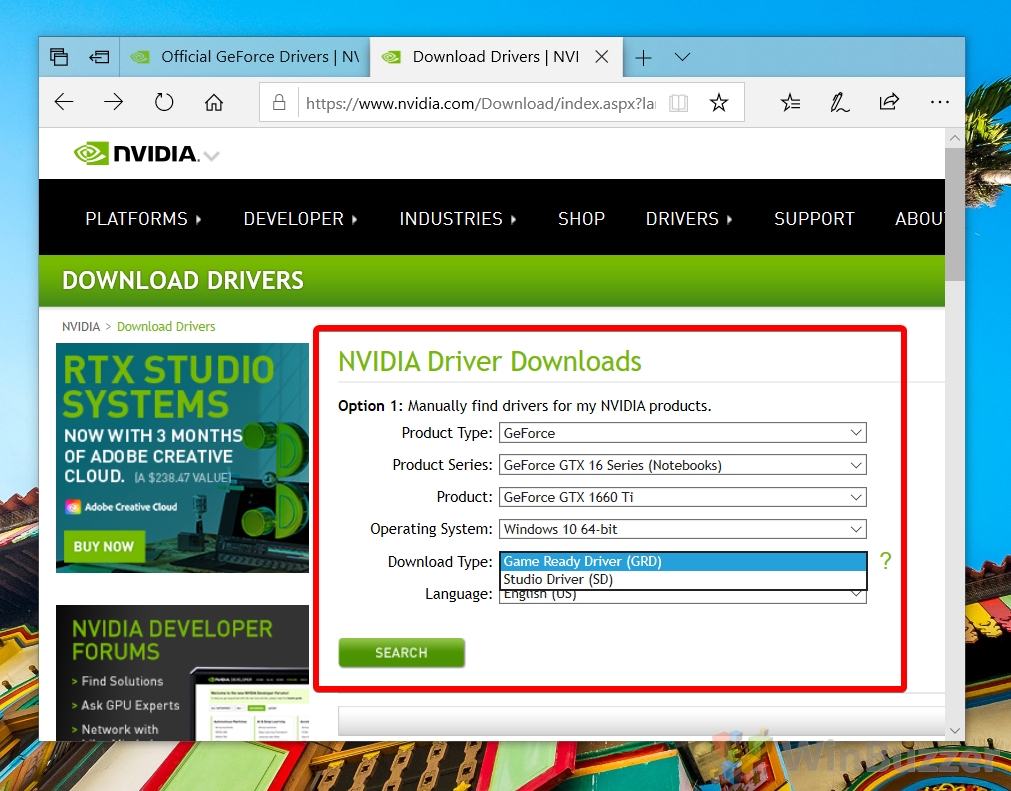
- Choose Driver Type
If you prefer to get away from modern Nvidia entirely, you can head to the legacy download Nvidia drivers page, making sure to enter the correct details and selecting “Game Ready Driver” or “Studio Driver” depending on whether you use the card for gaming or 3D rendering.
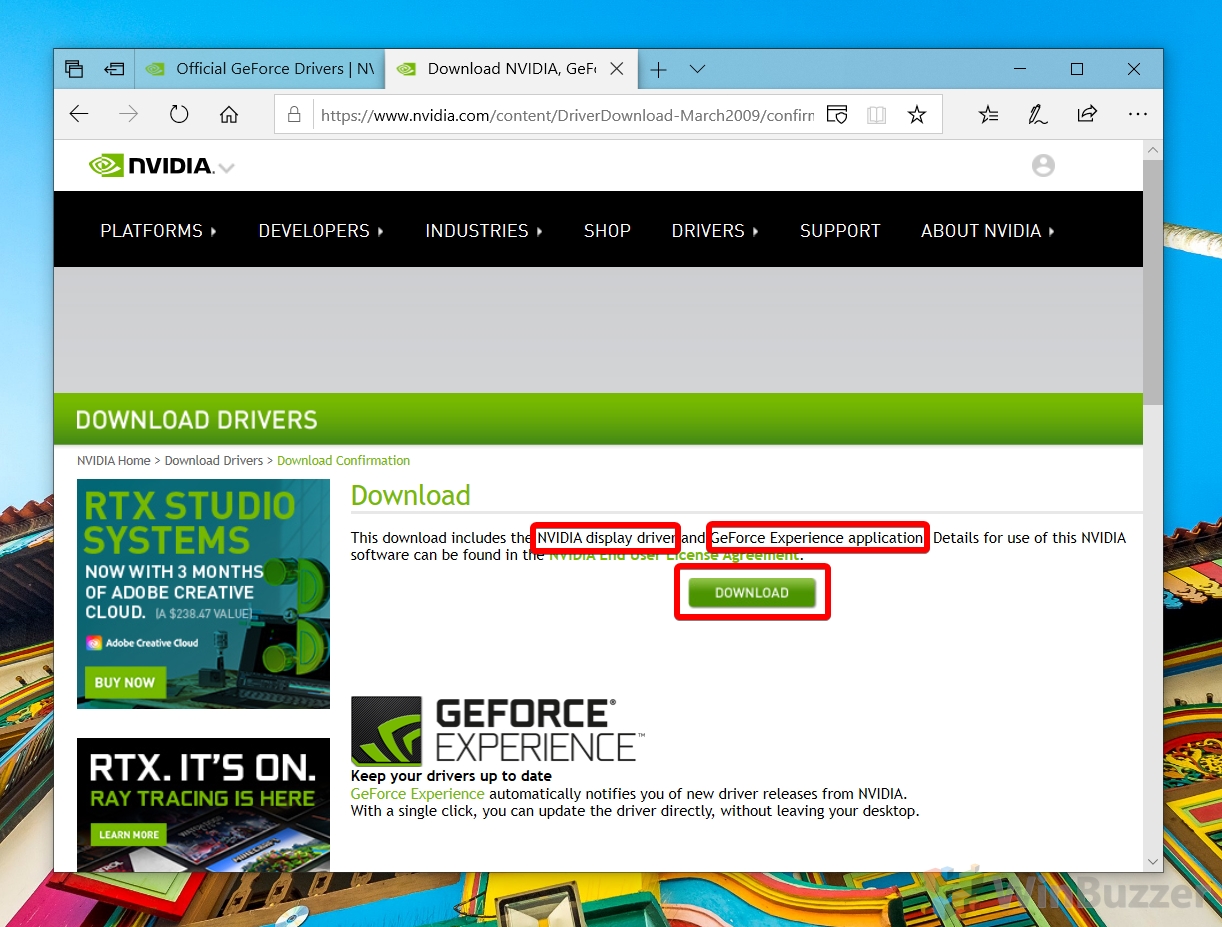
- Download the Driver
Click “Download” after selecting your driver. You'll be informed that the download includes the Nvidia display driver and possibly the GeForce Experience application.
Installing Nvidia Drivers
Follow these steps to install the Nvidia drivers and update your GPU.
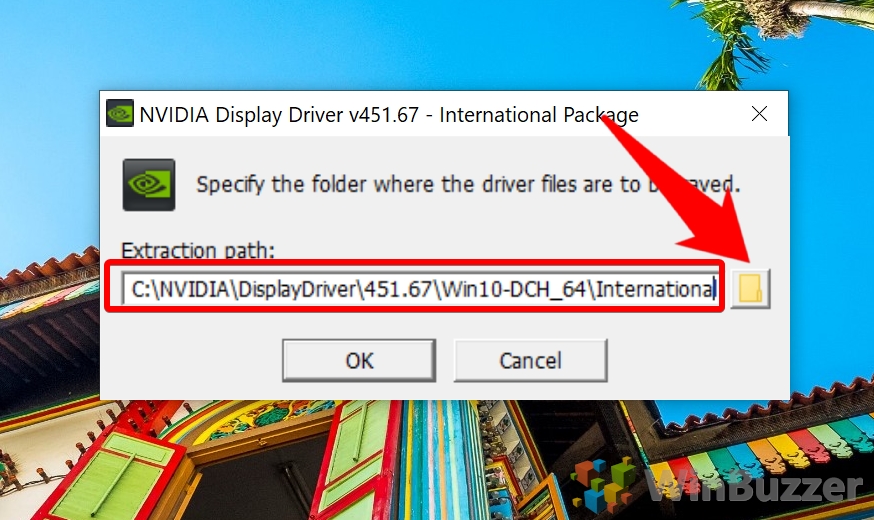
- Extract the Nvidia Display Driver
Run the downloaded file and choose a location to extract the installer files. Click “OK” to proceed.
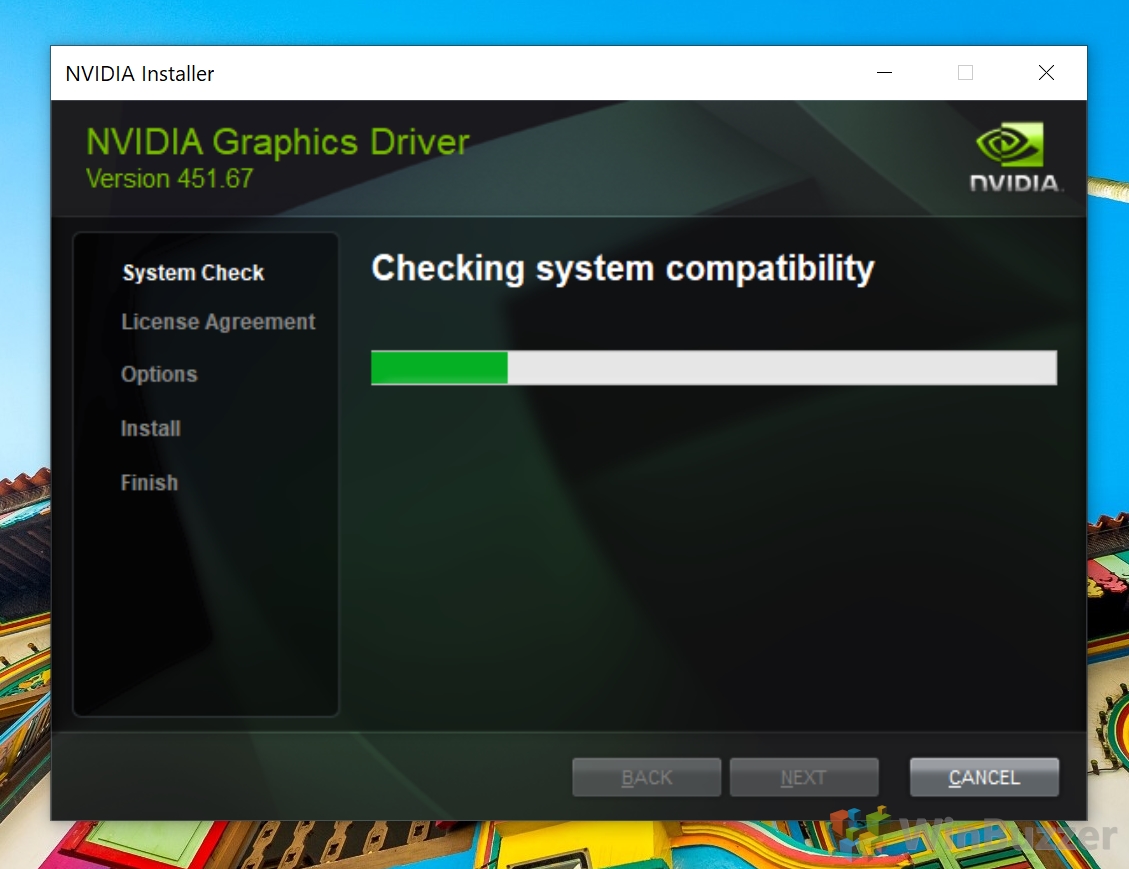
- System Compatibility Check
The installer will verify if the downloaded driver matches your system. If an error occurs, recheck your GPU model and system type.
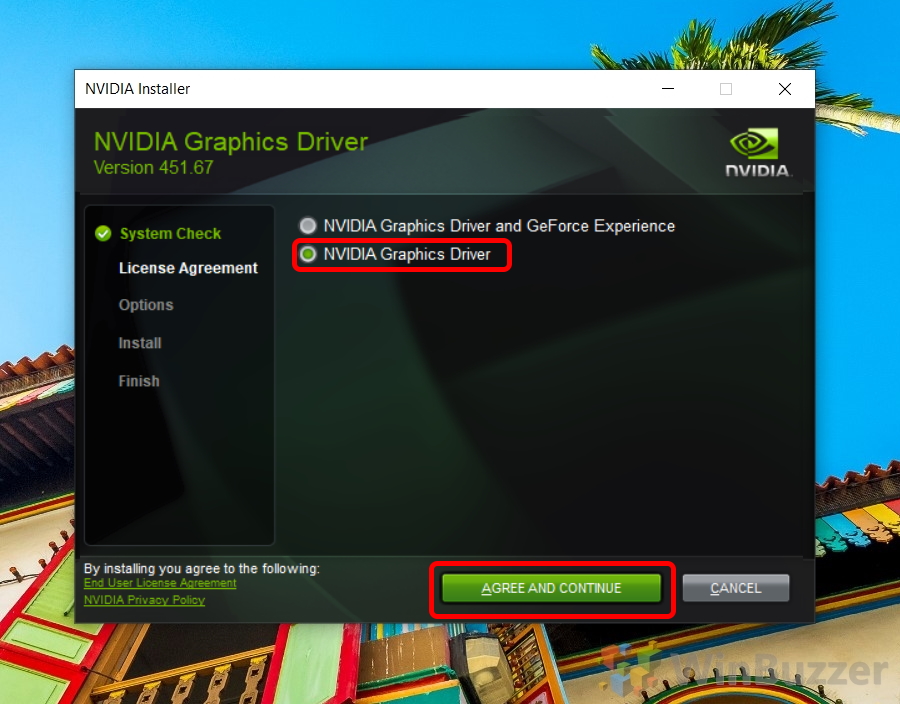
- Select Nvidia Graphics Driver Installation
Opt for just the Nvidia Graphics Driver installation without the GeForce Experience software. Select “Nvidia Graphics Driver” and agree to the terms.
Related: How to Check Which Graphics Card You Have
Regardless of if you're planning an upgrade or checking if your PC makes a game's system requirements, it's useful to know how to check a graphics card on Windows. Though users often turn to third-party tools to so, there are also plenty of ways to perform a graphics card check via Windows tools, as we show in our other tutorial.
Related: How to Restart, Reset or Update the Graphics Driver in Windows 11 or Windows 10
Restarting a graphics driver in Windows involves sending a special signal to the graphics hardware, which causes it to stop processing any commands and release any resources it is currently using. Then, Windows unloads the driver software from memory and reloads it again. You can also uninstall a graphics driver in Windows 11/Windows 10 to reset it to its original version. In our other guide, we show you how to restart the graphics driver in Windows without rebooting and how to reset or upgrade the graphics driver if it does not work properly.
Related: How to Turn Windows 11 Hardware Accelerated GPU Scheduling On or Off
Hardware-accelerated GPU scheduling is a Windows 11 and 10 feature that first appeared in 2020. You may be wondering what it does, whether you should turn GPU scheduling or off, and how to disable or enable hardware-accelerated GPU scheduling on your PC. We'll be covering all this today, starting with a short explanation of how it works. In our other guide, we show you how to turn Windows 11 hardware-accelerated GPU scheduling on or off using Settings and the Registry Editor.

FAQ – Frequently Asked Questions About Nvidia Drivers
Can I manually select which components of the Nvidia driver to install?
Yes, during the Nvidia driver installation process, users are given a choice to opt for a custom installation, where you can select specific components of the driver package to install. This is particularly useful if you wish to install only the essential Nvidia Graphics Driver and exclude the GeForce Experience software or other components. Choose “Nvidia Graphics Driver” during installation for a minimal setup, as demonstrated in the tutorial.
Is updating Nvidia drivers without GeForce Experience recommended for all users?
Updating Nvidia drivers manually without GeForce Experience is especially beneficial for users who prefer a streamlined, more control-oriented process without additional software. It's also a viable option for systems where GeForce Experience might not be available or for users who value simplicity and direct management over their driver installations. This method ensures that you're in direct control of the driver versions installed and the timing of updates.
What's the difference between Game Ready Driver and Studio Driver?
Nvidia offers two main types of drivers: Game Ready Drivers, optimized for gaming performance and compatibility with the latest gaming titles, and Studio Drivers, tailored for creative applications requiring maximum stability and performance in tasks such as video editing, 3D rendering, and graphic design. The Game Ready Driver is updated frequently to introduce optimizations for new games, while the Studio Driver follows a less frequent update cycle with a focus on extensive testing for creative applications.
Will updating Nvidia drivers improve gaming performance?
Updating to the latest Nvidia drivers can significantly enhance gaming performance by providing new optimizations, bug fixes, and compatibility for recent game releases. These driver updates often include specific performance enhancements for new games, ensuring optimal gameplay experiences and improved frame rates. Regular driver updates are crucial for maintaining the best gaming performance and resolving any existing issues with games.
How often should I update my Nvidia drivers?
Nvidia recommends updating your drivers with each new release, particularly for users actively engaged in gaming or professional applications relying on graphics performance. These updates not only enhance performance and compatibility but also address security vulnerabilities and bugs. Staying updated ensures you're getting the most out of your hardware, although for stable systems not facing any issues, some users may choose to update less frequently.
Can I install Nvidia drivers on a system with integrated graphics?
Yes, systems with both integrated graphics and an Nvidia GPU can have Nvidia drivers installed specifically for the Nvidia hardware. This setup allows you to benefit from the power of your Nvidia GPU for demanding applications while using the integrated graphics for less intensive tasks, potentially saving on power consumption. You may need to configure your system settings to ensure applications use the Nvidia GPU when necessary.
What should I do if the Nvidia driver installation fails?
If the installation of an Nvidia driver fails, first verify that you've chosen the correct driver version for your specific GPU model and operating system. If the installation continues to fail, perform a clean driver installation, which removes previous versions before installing the new one. Consult Nvidia's support documentation for detailed troubleshooting steps, and consider using the Display Driver Uninstaller (DDU) tool in Safe Mode to remove existing drivers thoroughly before attempting the installation again.
How can I uninstall an old Nvidia driver before installing a new one?
To ensure a smooth update process, uninstalling the old Nvidia driver is recommended. You can do this through the Windows “Add or Remove Programs” feature by selecting the Nvidia graphics driver from the list and choosing to uninstall. For a more thorough removal, tools like Display Driver Uninstaller (DDU) can be used in Safe Mode to completely eliminate all traces of previous drivers before installing a new version.
Is it necessary to restart my computer after installing Nvidia drivers?
Yes, restarting your computer after installing a new Nvidia driver is necessary to ensure that all components of the installation are correctly applied and functioning. A restart finalizes the installation process and ensures that your system recognizes the updated drivers, potentially resolving any display issues and initializing the new driver features.
What do I do if my GPU isn't listed in the Task Manager?
If your Nvidia GPU doesn't appear under the “Performance” tab in Task Manager, try updating Windows and checking again. If the issue persists, the GPU may not be correctly recognized by your system, possibly due to outdated or missing drivers. In this case, accessing the Device Manager and looking under “Display adapters” to update or reinstall the GPU drivers directly might resolve the issue.
Can I revert to an older Nvidia driver if I face issues with the new one?
Yes, if a new Nvidia driver introduces issues or conflicts, you can revert to a previously stable version by downloading it from the Nvidia driver archive on their official website. To ensure a clean rollback, use the Display Driver Uninstaller (DDU) tool in Safe Mode to remove the current driver before installing the older version. This approach can resolve compatibility issues or restore stability to your system.
How do I update drivers for an Nvidia laptop GPU?
Updating drivers for an Nvidia laptop GPU follows the same process as for desktop GPUs. Ensure that you select the correct product series and operating system on the Nvidia Driver Downloads page to get the appropriate driver for your laptop GPU. It's important to download drivers specifically designed for laptops (if available) to ensure compatibility and optimal performance.
If my system crashes after a driver update, what should be my next steps?
In case of a system crash following a driver update, boot your computer into Safe Mode to uninstall the problematic Nvidia driver. This can be done via the Windows “Add or Remove Programs” feature or, for a thorough removal, using Display Driver Uninstaller (DDU). After uninstalling, either attempt to reinstall the previous stable driver or consult Nvidia support for guidance on resolving the issue.
How do I perform a clean installation of Nvidia drivers?
For a clean Nvidia driver installation, run the driver installation file and select the “Custom (Advanced)” option, then check the box for “Perform a clean installation.” This process ensures that all previous settings and versions are cleared before installing the new driver, often resolving potential conflicts and providing a fresh start for driver interaction with your system.
Can updating Nvidia drivers fix issues with specific games or applications?
Nvidia frequently releases driver updates tailored to fix issues or optimize performance for new and existing games and applications. Keeping your drivers up to date can resolve compatibility issues, improve performance, and introduce new features that enhance the user experience in specific games or creative applications. It's advisable to check release notes for driver updates to see if they address any particular issues you're facing.


