Windows 10 feature and quality updates are vital for keeping your operating system secure and healthy, but often they just come at a bad time. Thankfully, though Microsoft made it difficult to pause Windows 10 updates when it launched, newer versions make it quite simple and even give you the option to defer or delay Windows 10 updates if you wish.
The difference between pausing and deferring Windows 10 updates
Today we're going to show you how to do that, but first, we should make the difference between the pause of a Windows update and a delay/defer clear. When you pause updates, you stop them from being installed on that specific device for just some day. After that point, you'll need to update to the most recent version of Windows 10 until you can pause again.
Deferring/delaying updates is a bit more extreme, and that's why it's soft limited to Windows 10 Pro and above. You can defer a feature update for up to 365 days, and quality updates by up to 30, as they can contain important security updates.
However, on top of all this, Windows 10 Pro and Enterprise users can choose how often they receive updates. Semi-Annual Channel (Targeted) tries to update your PC at the same time as everyone else, then waits your specified delay time until it installs. The Semi-Annual channel only tries to deliver feature updates to your PC when they've been fully tested, meaning you can delay updates for up to 16 months.
The method we are showing you to defer Windows Feature Updates works also for new Windows Insider builds. You can select the channel you are on accordingly.
How to Pause Windows Updates via Settings
The method to pause Windows updates is the same on Windows 10 Pro and Home and is very simple.
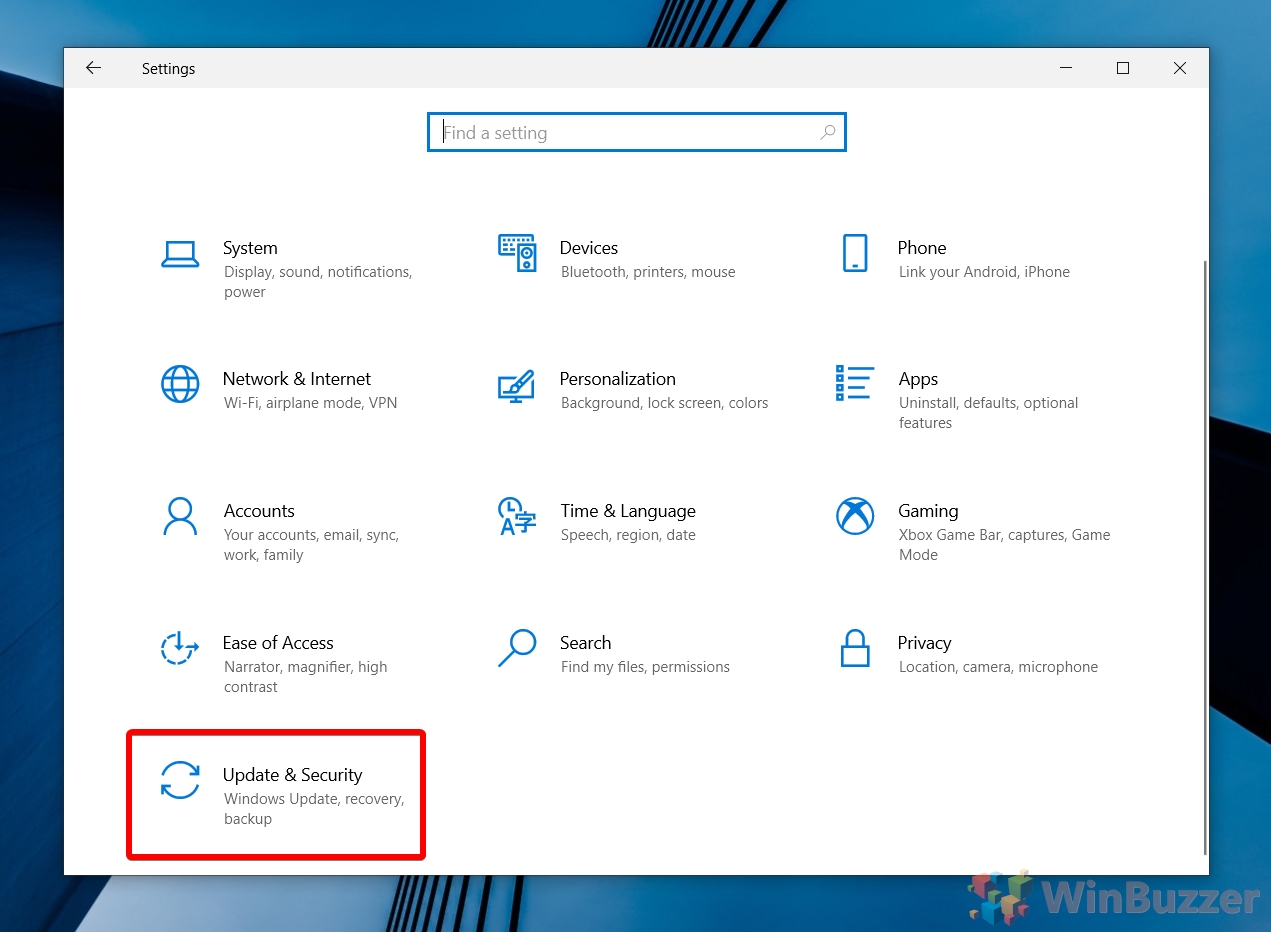
- Open Update & Security settings
Press “Windows + I” to open settings, then click “Update & Security”.
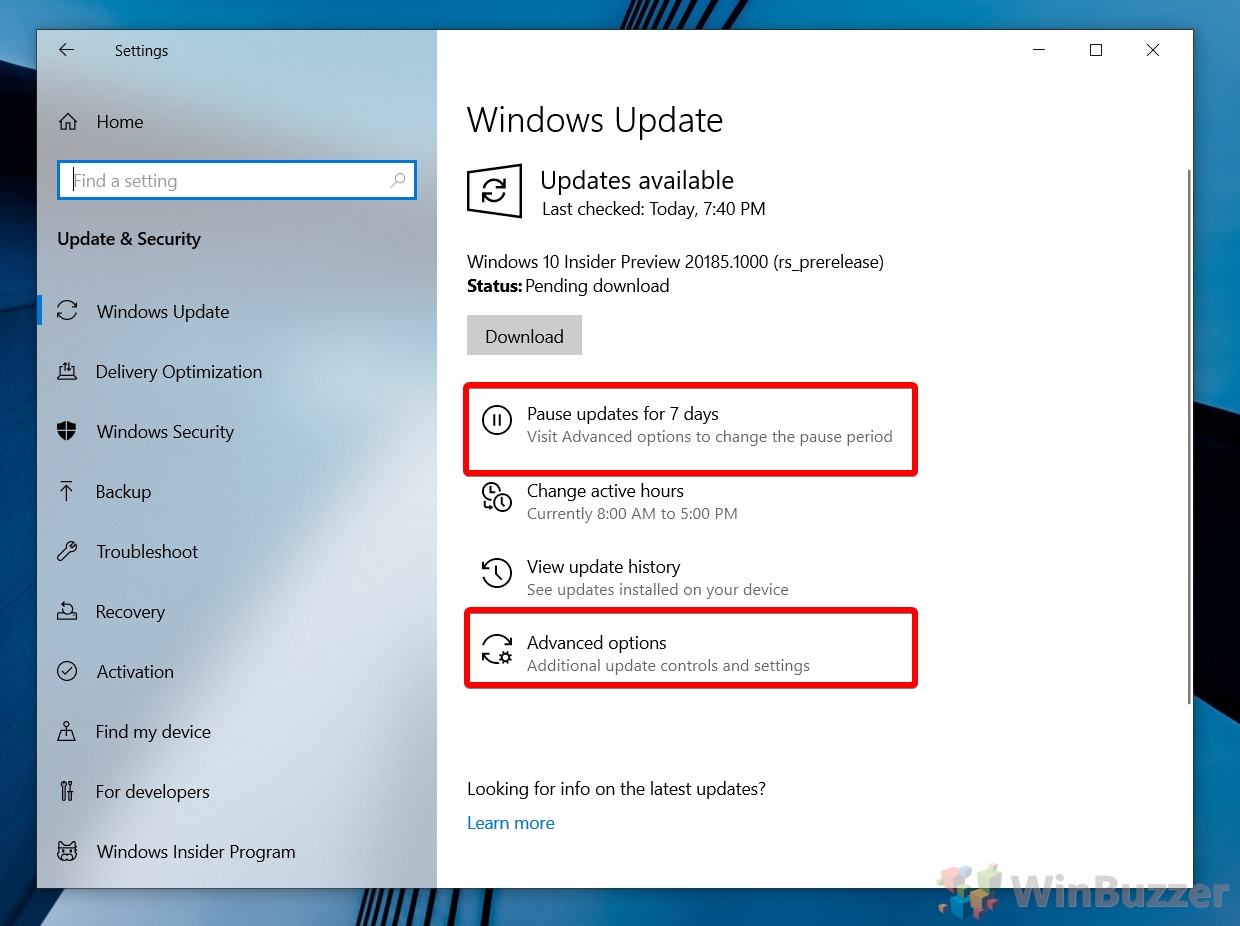
- Pause Windows updates for seven days or open advanced settings
Windows gives you the default option to pause Windows updates for 7 days. This is useful if you've heard of an issue that you expect to be resolved soon, or you're just particularly busy one week. If you're happy with that, click “Pause updates for 7 days”, otherwise choose “Advanced options”.
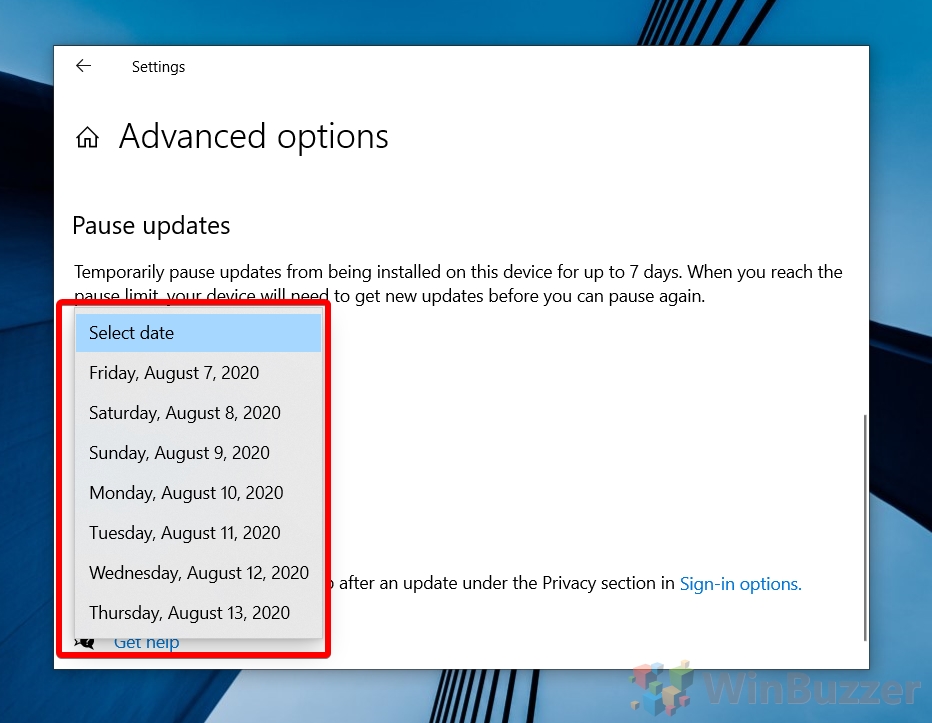
- (optional) select a date to delay your Windows 10 update until
The interface for advanced update options may vary depending on your OS version, but on later ones you'll have the ability to choose a specific date via the “Select date” dropdown. Choose one that's relevant to you, or if you're on an older version of Windows 10, the number of days you'd like to pause it for. If you're on Windows 10 Pro, you may also find the options for differing updates further down this page.
How to Defer or Delay Feature Updates for Semi-Annual Channel via Group Policy Editor
Windows 10 Pro users also have the option to defer Windows 10 feature updates via Group Policy. This applies to the Semi-Annual Channel.
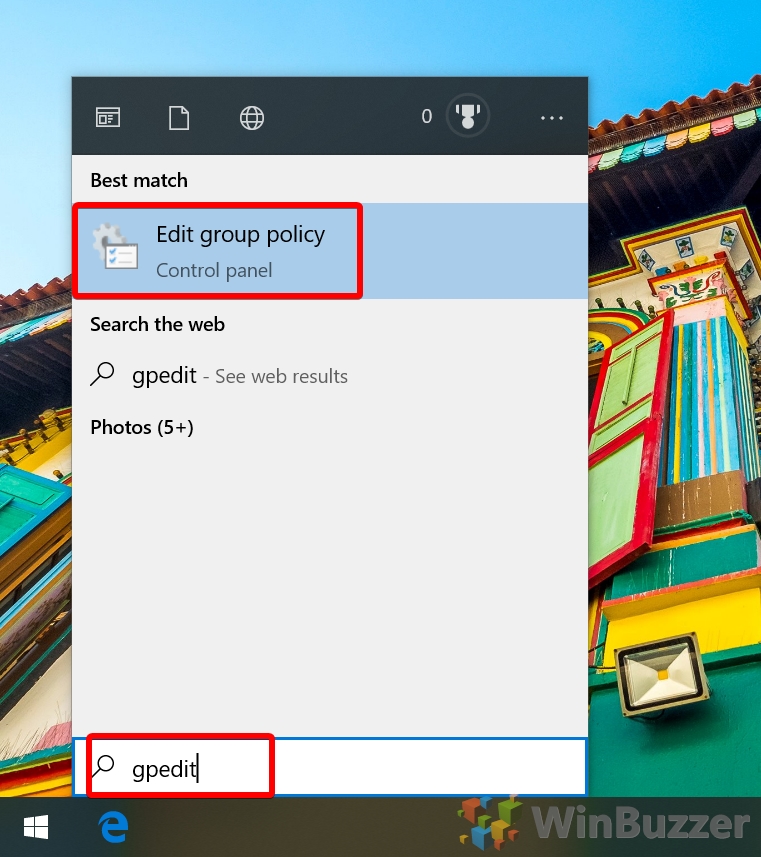
- Open Group Policy Editor
Press “Windows” and type “gpedit”, then click “Edit group policy”.
- Navigate to the Windows Update for Business folder and edit Feature Updates
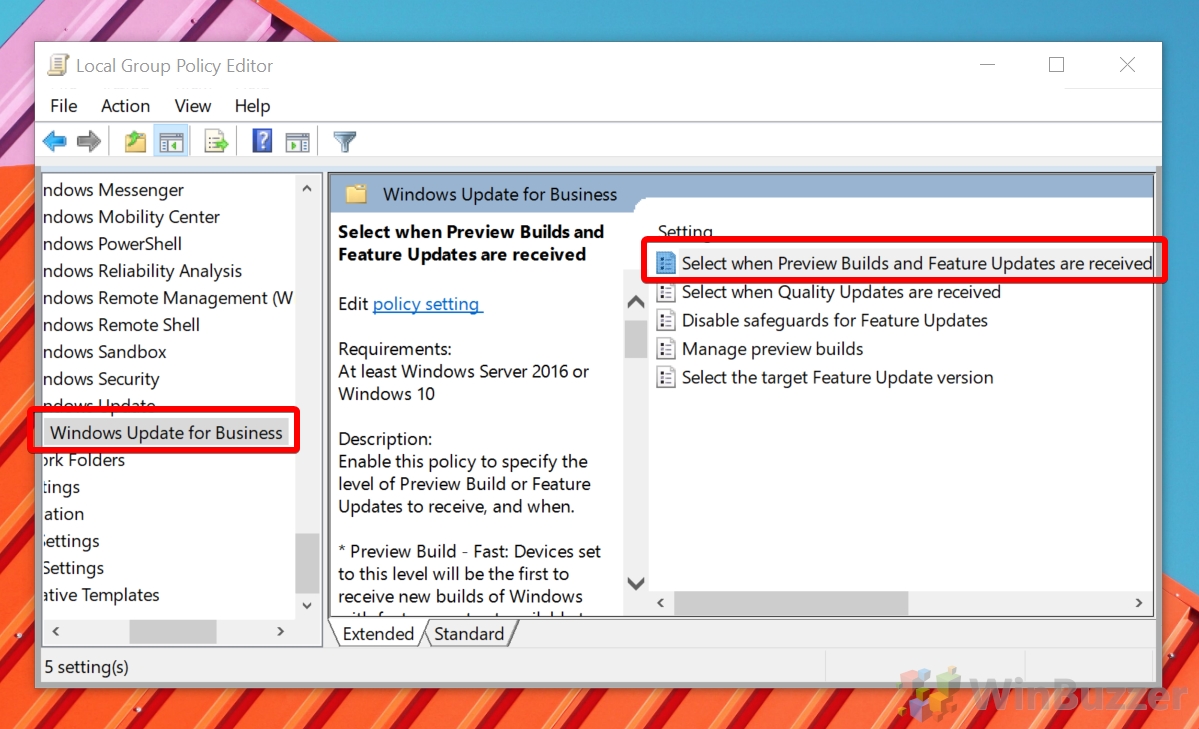
In the left side-bar, go to “Computer Configuration > Administrative Templates > Windows Components > Windows Update > Windows Update for Business“. Double-click “Select when Preview Builds and Feature Updates are received”.
- Change the Windows 10 update channel
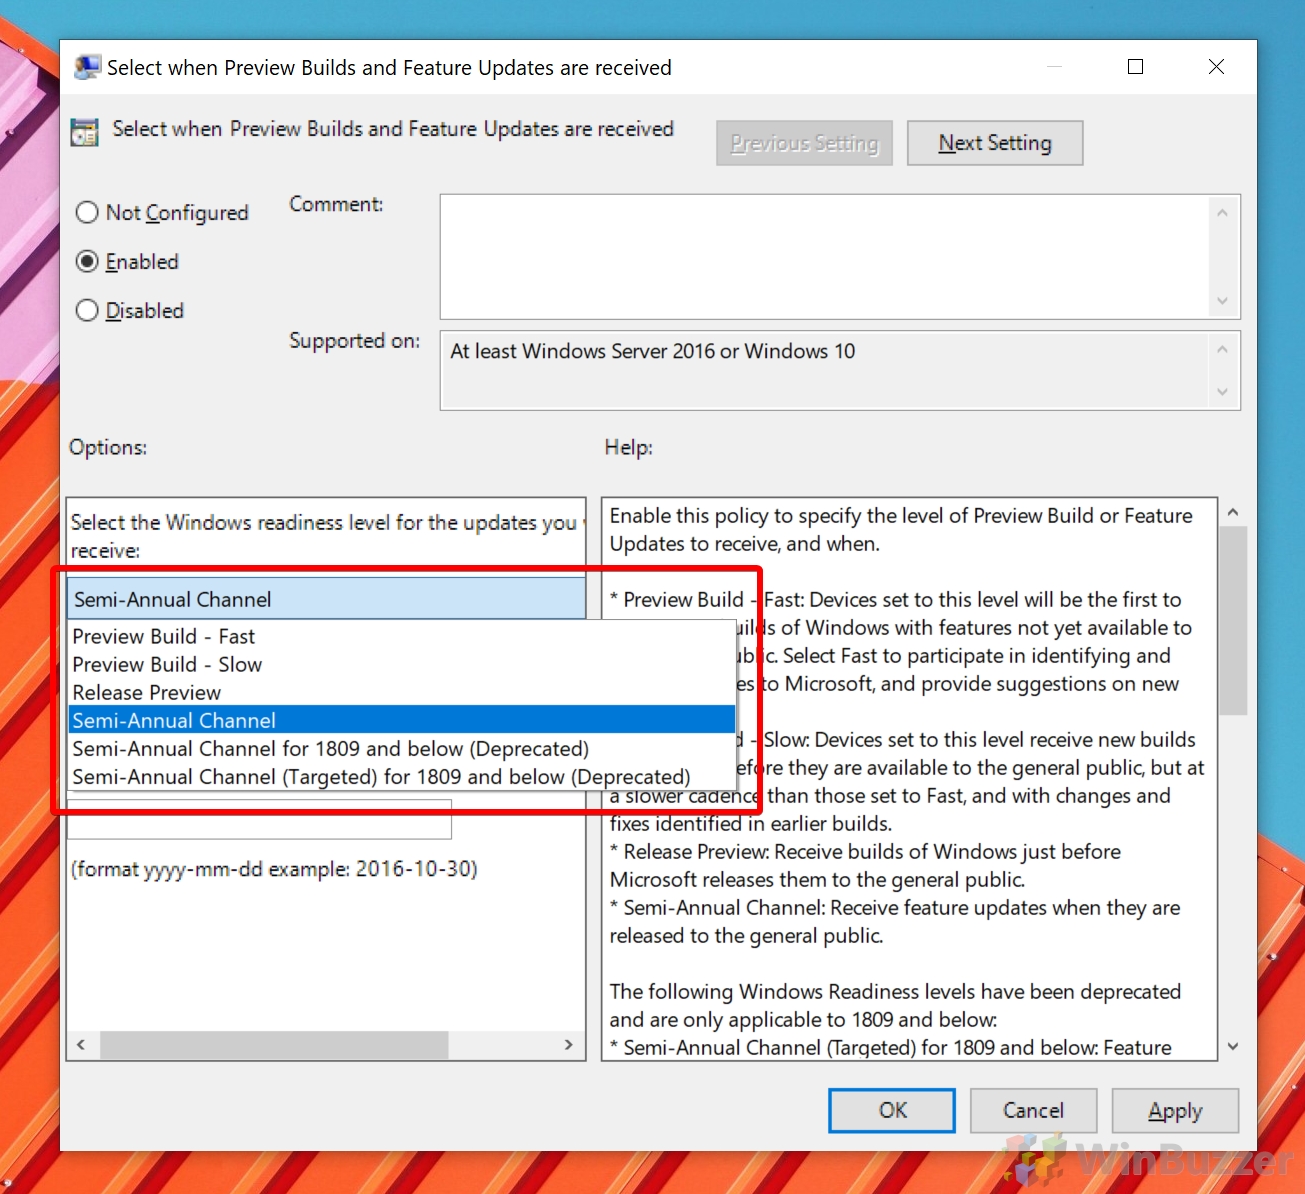
In the policy editor, check the bottom-left pane for the “Semi-Annual Channel” heading and click it to change the channel via dropdown. This should work even if you're a Windows 10 Insider.
- Delay feature updates on Windows 10
In the policy editor, check the bottom-left pane for the “Semi-Annual Channel” heading and change the number underneath “After a Preview Build of Feature Update is released, defer receiving it for this many days” to one that suits you. Press “OK”.
How to Defer or Delay Windows 10 Quality Updates for the Semi-Annual Channel with Group Policy Editor
You can use a similar method to above to delay Windows 10 quality updates, up to a maximum of 30 days.
- Open the Group Policy Editor
Press “Windows” and type “gpedit”, then click “Edit group policy”.
- Navigate to the Windows Update for Business folder and edit Quality Updates
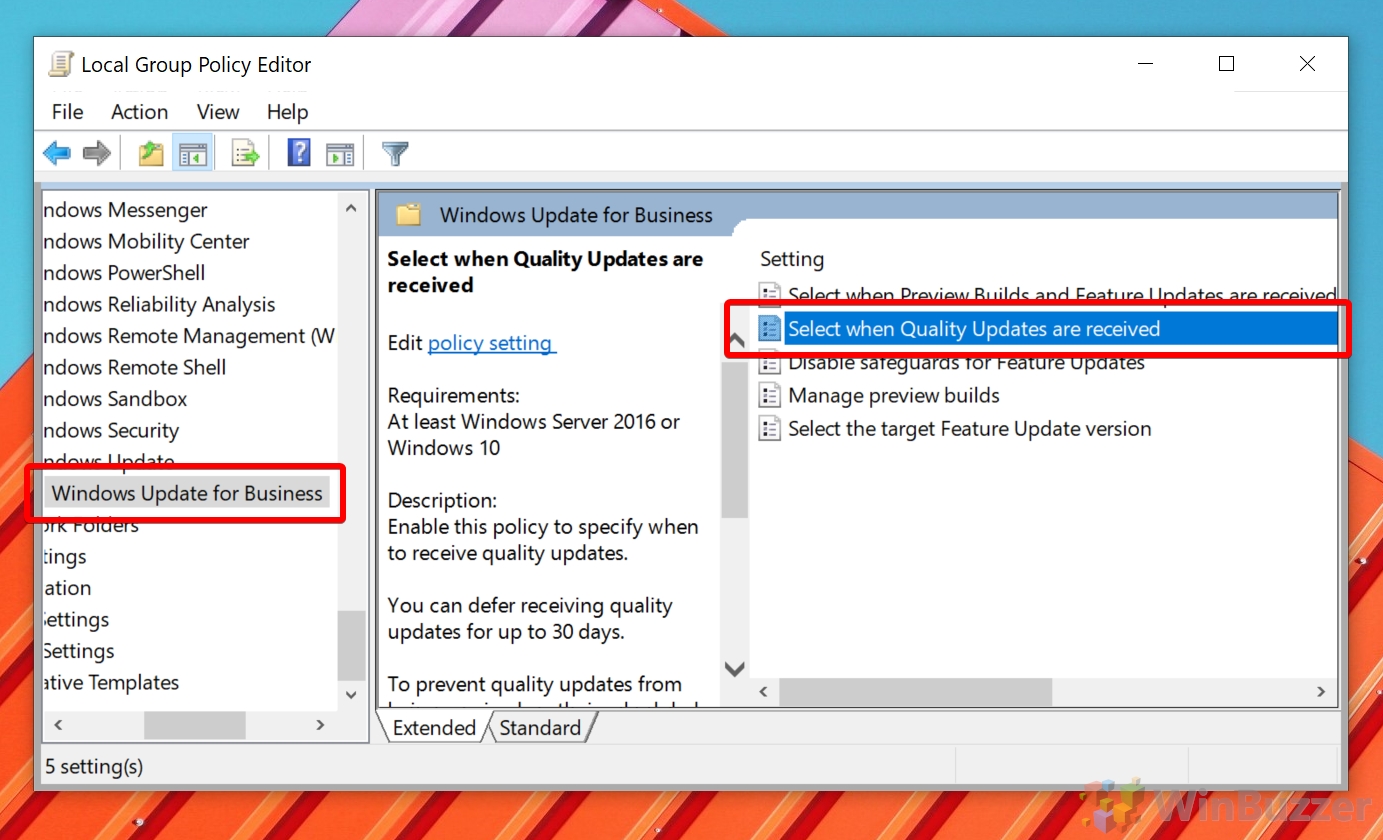
Navigate to “Computer Configuration > Administrative Templates > Windows Components > Windows Update > Windows Update for Business” in the sidebar and double-click “Select when Quality updates are received” to edit the policy.
- Delay quality updates on Windows 10
In the policy edit screen, tick “Enabled” and then change the number of days underneath the “Options” heading in the bottom-left pane. Click “OK” to apply the changes.
How to Defer or Delay Updates in Windows 10 via the Registry Editor
You can defer feature and quality updates for the semi-annual channel quickly with our .reg files, then edit the number of days to suit your preferences.
- Download the registry hack file and extract it
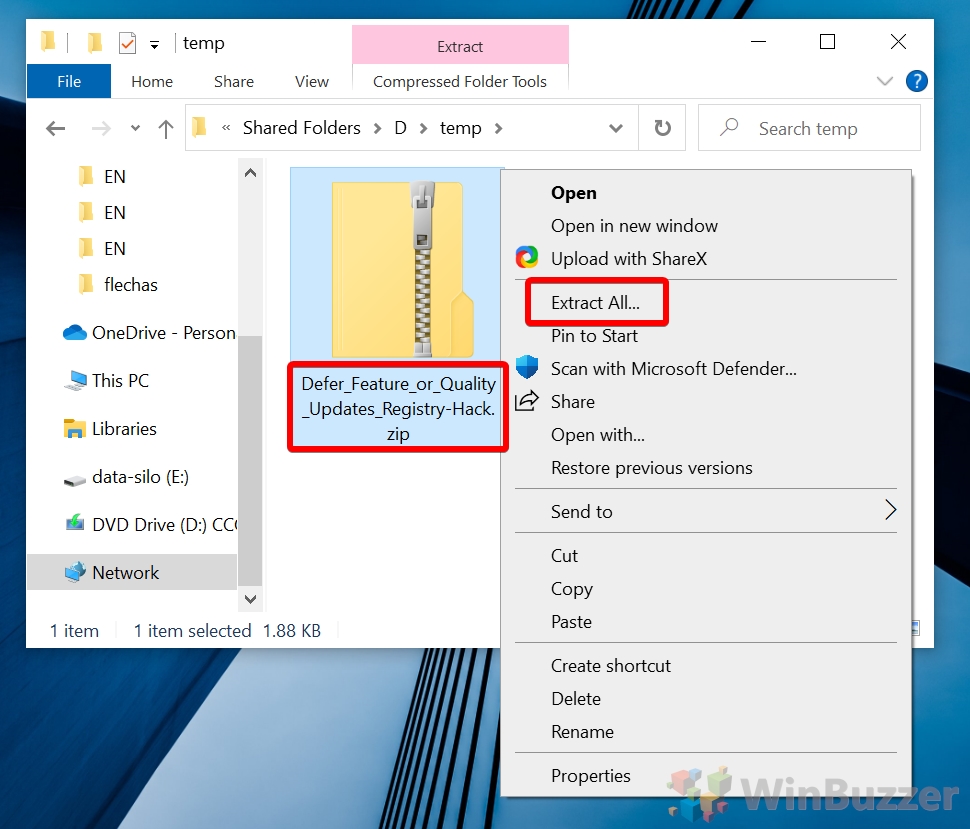
Grab our Defer Feature or Quality Update registry files here, right-click the .zip file, and choose “Extract All…”.
- Choose your registry edit option
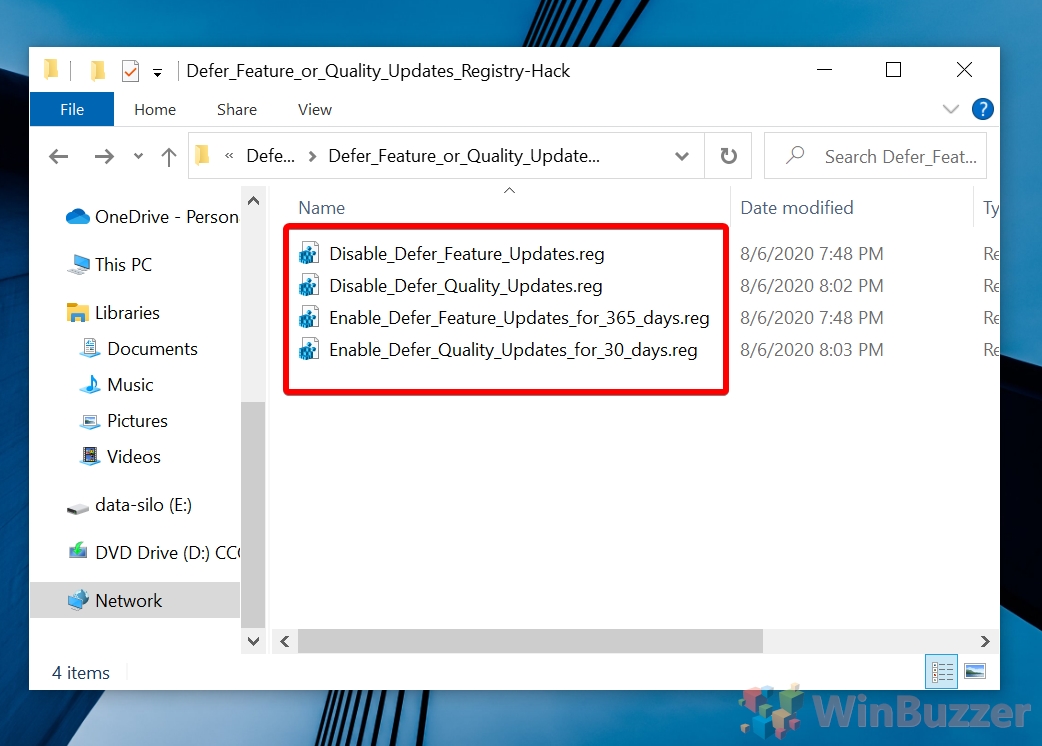
You'll notice the .zip file contains four files:
Disable_Defer_Feature_Updates.reg: Turns off deferred Feature Updates
Disable_Defer_Quality_Updates.reg: Turns off deffered Quality Updates
Enable_Defer_Feature_Updates_for_365_days.reg: Delays Feature Updates for 365 days (editable)
Enable_Defer_Quality_Updates_for_30_days.reg: Delays Quality Updates for 30 days (editable).
Double-click the one you'd like to apply.
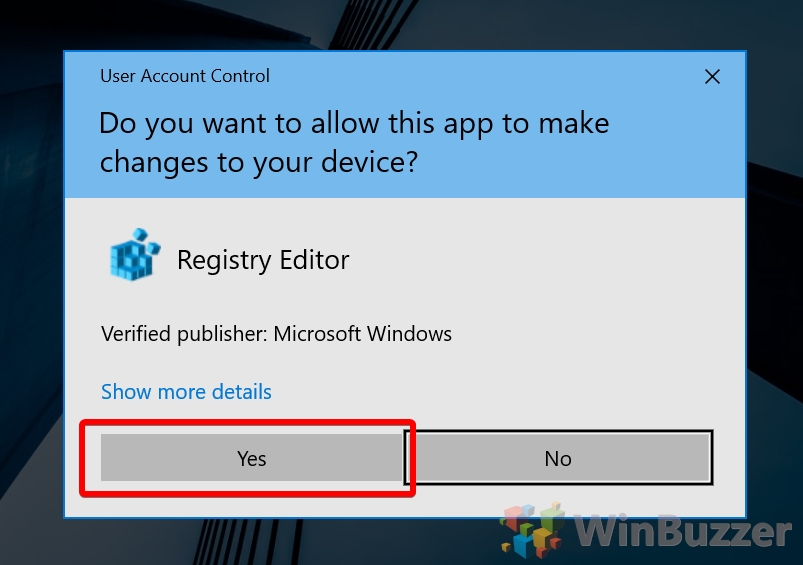
- Accept the UAC prompt
- Click “Yes” on the Registry Editor warning
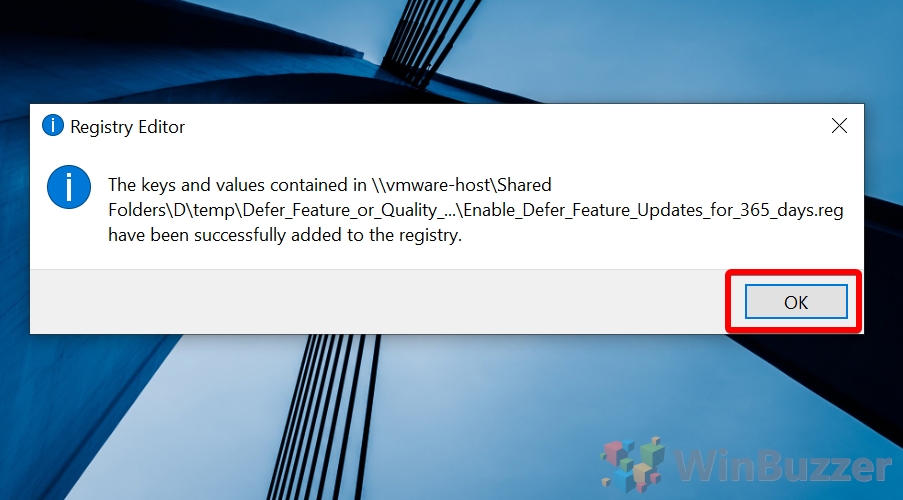
- Press “OK” to the success dialog
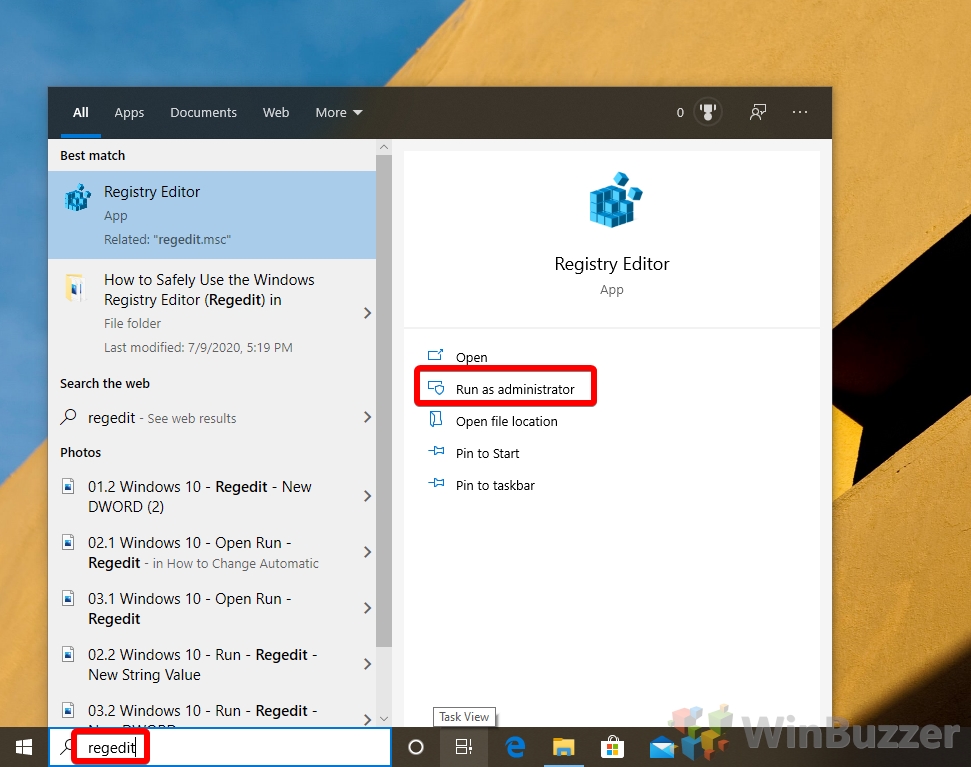
- Open the registry editor
Press “Windows” and type “Regedit”, then click the top result.
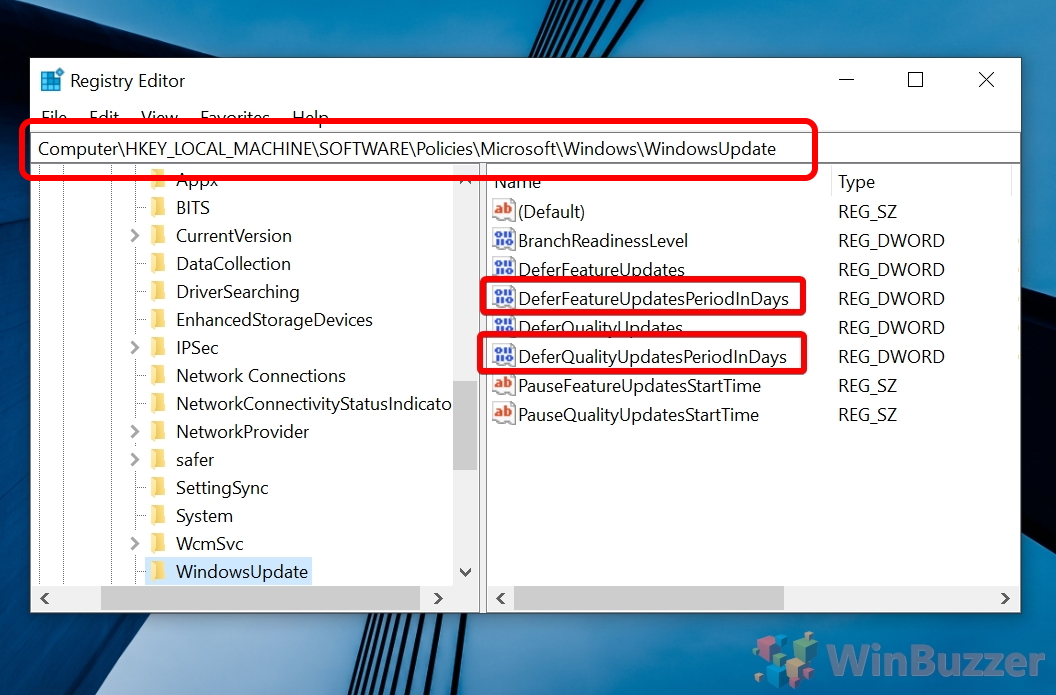
- Navigate to the newly-created registry entry and double-click it
You'll find the new entry(s) underComputer\HKEY_LOCAL_MACHINE\SOFTWARE\Policies\Microsoft\Windows\WindowsUpdate. Double-click “DeferFeatureUpdatesPeriodInDays” or “DeferQualityUpdatesPeriodInDays” depending on which you'd like to modify.
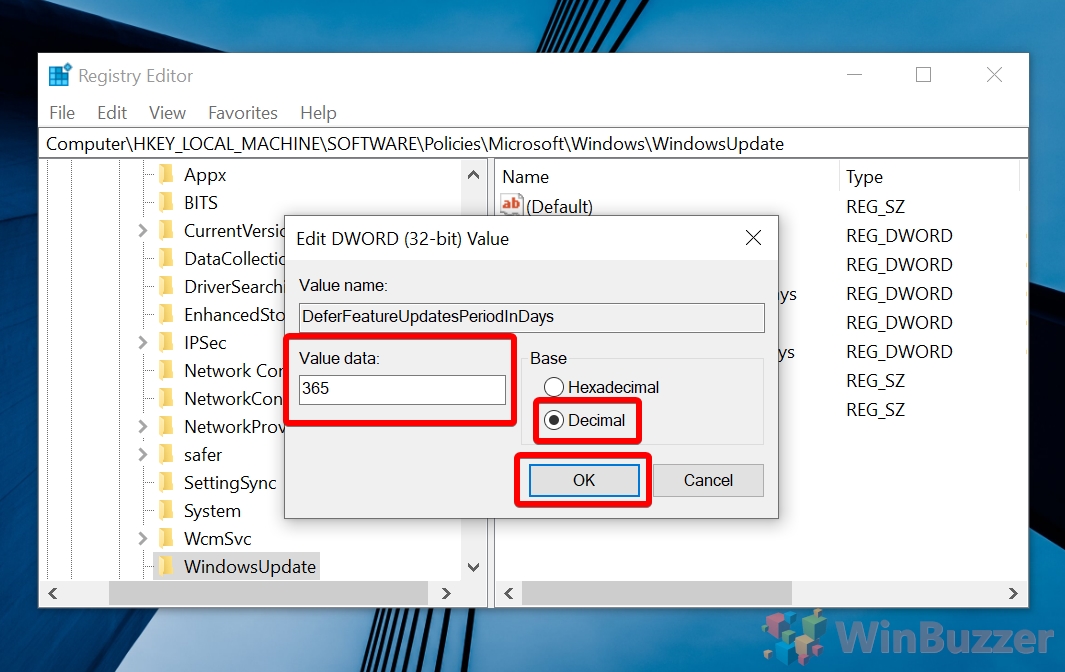
- Change the “Value data” to the number of days
In the “Edit DWORD” screen, change the “Value data” to the number of days you'd like to delay updates by, remembering that the max for feature updates is 365 and the max for quality updates is 35. Set the “Base” type to “Decimal” and press “OK”.
At this point, you can close out of any windows you opened during the tutorial. While you're here you may want to check out our tutorial on How to


