

When editing videos, you might occasionally need to change the color of the background or some object in the frame.
Some people ask freelancers to fully change a color scheme when working on a project but it’s quite expensive.
If you have ever wondered how to change color in Premiere Pro, read this step-by-step tutorial to learn how to do it quickly and efficiently with the help of Mac or Windows video editing software.
Method 1: Through Effects
The first method is simple to apply, as you can quickly change the color of any object in the frame by following 5 steps.
Step 1. Launch Adobe Premiere Pro
First, you need to buy Adobe Premiere Pro and install it on your computer or laptop. If you haven’t done it yet, you can also learn how to get Adobe Premiere for free. Once you have installed the program, open your project.
Step 2. Bring Up the Effects Control Panel

Go to the Effects panel (Shift+7) and search for the phrase “change to color.” When you see the name of the corresponding effect in the search field, drag it to your video. Then, open the Effect Controls panel (Shift+5).
You will see two sub-menus, From and To, with the Color Eyedropper tool and the Color Palette rectangle that displays the color that you have selected.
Step 3. Select the Color You Want to Change
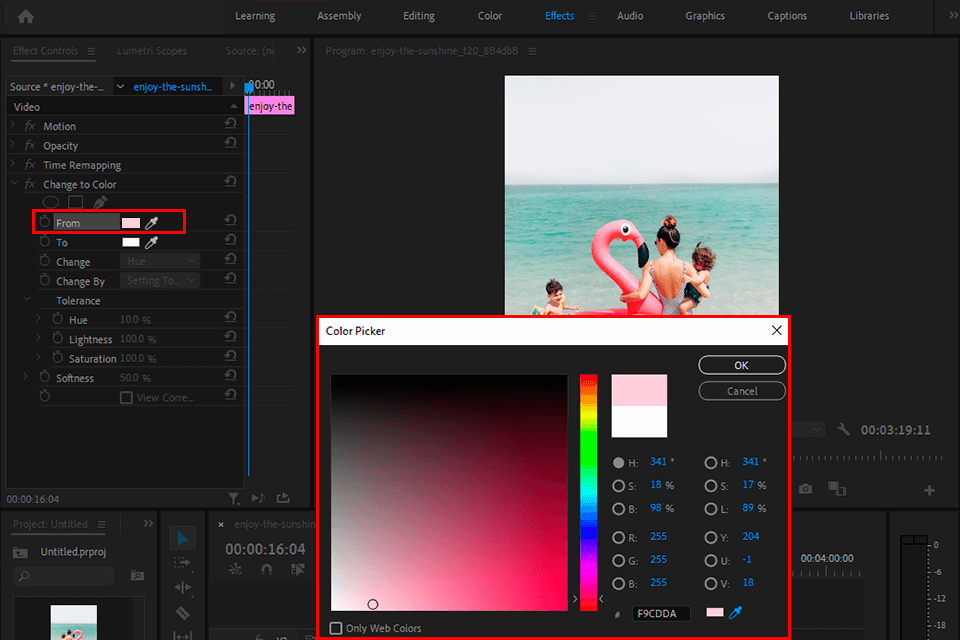
Go to the Change to Color section and click on the From eyedropper option to sample the color that you are going to change. When doing it, hold CTRL (CMD on Mac) to ensure that you will select the best color average. By default, the color will be changed to red.
Then, adjust the Tolerance (Hue) values and change Softness until you are satisfied with the result.
Step 4. Alter the Color

Click on the To option. Then, you will see a rectangular Color Picker window with sliders. By moving them along the Color Spectrum Bar, you can select a new color for your object or background. Then, you just need to click and drag the circle in the color window to select the right shade.
The other way to change colors in Premiere Pro is to use the playhead at the start of the video. You need to click on the stopwatch next to To. It will allow you to create a starting animation keyframe and make it easier to change colors in the frame.
Step 5. Done! Continue Editing
This is one of the simplest ways to change the color of an object or background in Adobe Premiere. If you are a beginner and don’t know how to make your footage look more professional, you can contact video editing services that will help you enhance your clips at a budget price.
Method 2: Through Lumetri Color
The next method is even easier to apply, however, it also allows you to change the color of any object quickly. You need to go to Lumetri Color Panel to perform one-click color adjustments when editing your clip in Adobe Premiere Pro.
Step 1. Activate the Lumetri Color Panel

Open the Color menu in your workspace toolbar. It will allow you to access the Lumetri Color panel.
Step 2. Adjust the Color

Then, you can either use the eyedropper or pre-select colors to decide which color you want to use. For instance, if you want to adjust the sky color and change it to a teal hue, you need to perform several simple steps.
You can change the Hue, Saturation, and Luminance values by moving sliders. To select a color with higher accuracy and make your footage look more natural, use Denoise and Blur tools. After selecting the pixels that you want to edit, you can change their color to any color you like.
Step 5. Done! Continue Editing
By following these 2 steps, you can change colors in Premiere Pro. After doing it, you can further enhance your footage by applying various effects.
Method 3: Through HSL Secondary
If you don’t know how to change color in Premiere to give your videos a professional look, you can use an HSL Secondary menu to tweak it up. Here, you will find more advanced tools that allow you to isolate colors or luma key and perform further adjustments
Step 1. Open the HSL Secondary Section

Go to the HSL Secondary section in the Lumetri Color panel. Click on the header to see all the controls.
Step 2. Alter the Color

Here, you can use three color pickers, which allow you to select colors, add more colors to the spectrum or remove them if you don’t need them.
The HSL secondary allows you to use a selected color picker to outline your objects and select every color within them.
Then, you just need to decide, which color you want to use for your background. You can do it by using sliders or the color spectrum.
Step 3. Done! Continue Editing
Now, the background in your video has acquired a different color. I prefer using this method as it allows me to select any color that I want to use. Thanks to it, it’s easy to change a specific color to another one or fully transform your footage by making it black and white and leaving only one color unchanged.
About the author
 Tata Rossi is a Boston-based photographer, filmmaker, and retoucher who works for FixThePhoto. Besides providing professional photo retouching services, she likes sharing her ideas about photoshoot props and poses with her readers.
She often provides readers with retouching tips and creates step-by-step tutorials for those who want to master Photoshop, Lightroom, and other Adobe software.


