

Navigating through Windows 10 and Windows 11, you might have stumbled upon the “Recent Files” feature, a significant leap from its predecessors, aimed at boosting user productivity. This feature, though hidden within the realms of File Explorer, holds the potential to streamline your workflow. However, its limitation to display only 20 files and the need for enhanced privacy may prompt you to delve deeper into the system’s configurations. The “All Recent Files” list, an unofficial term for this extensive log, mirrors the convenience once offered by the Windows XP Start Menu, showcasing a broader array of files and locations.
To harness this feature’s full capabilities, including viewing a wider range of file types and ensuring privacy through regular clearing of this list, we will explore various methods tailored for both Windows 10 and Windows 11 users.
How to Find the All Recent Files List in Windows 11 and Windows 10
Windows’s recent items folder is easy to find and provides a lot more value. You can access it with a simple Run command.
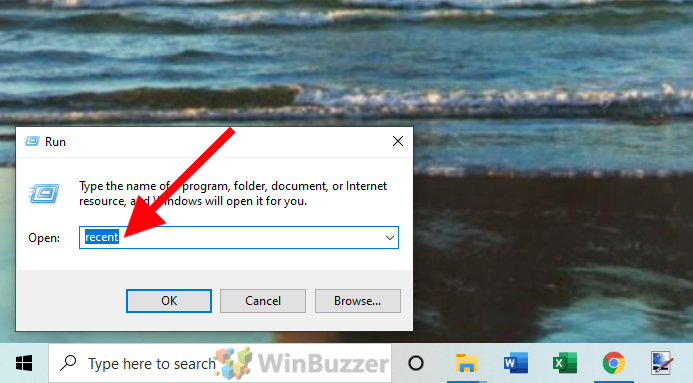
- Open the all recent files folder
The fastest way to access the all recent files folder is pressing “Windows + R” to open the Run dialog and typing “recent”. You can then hit enter.
- View and modify the all recent files list
The above step will open an Explorer window with all your recent files. You can edit the options like any other search, as well as delete the recent files you want.
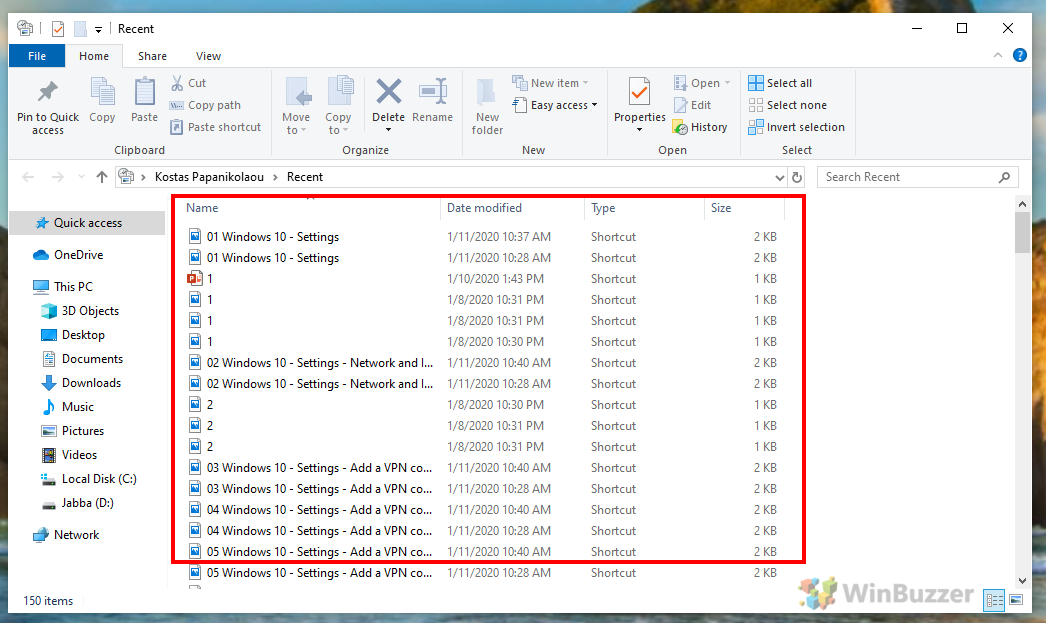
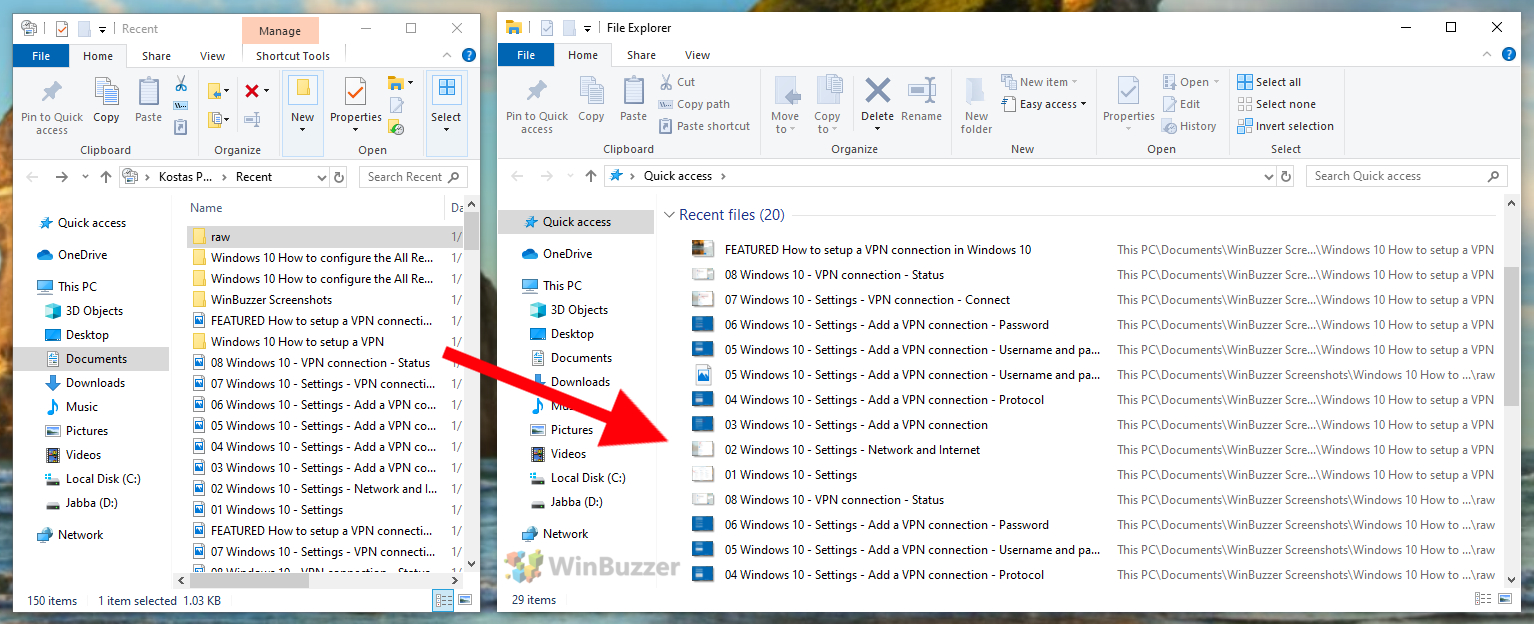
- Compare to the regular Recent files list
You can open regular recent files list to compare it to the one in Windows Explorer’s. You should see more file types and way more files in general.
How to Clear or Disable the All Recent Files List on Windows 10
Now that you know how to access this hidden feature, you may be wondering how to clear the all recent files list. You should know that clearing items from Quick Access doesn’t remove them from here, so somebody can still snoop on your activity if you don’t take action. Luckily, that’s easily remedied by following these steps, and if you reverse them you can fix issues if the Windows 10 recent folders aren’t showing in quick access.
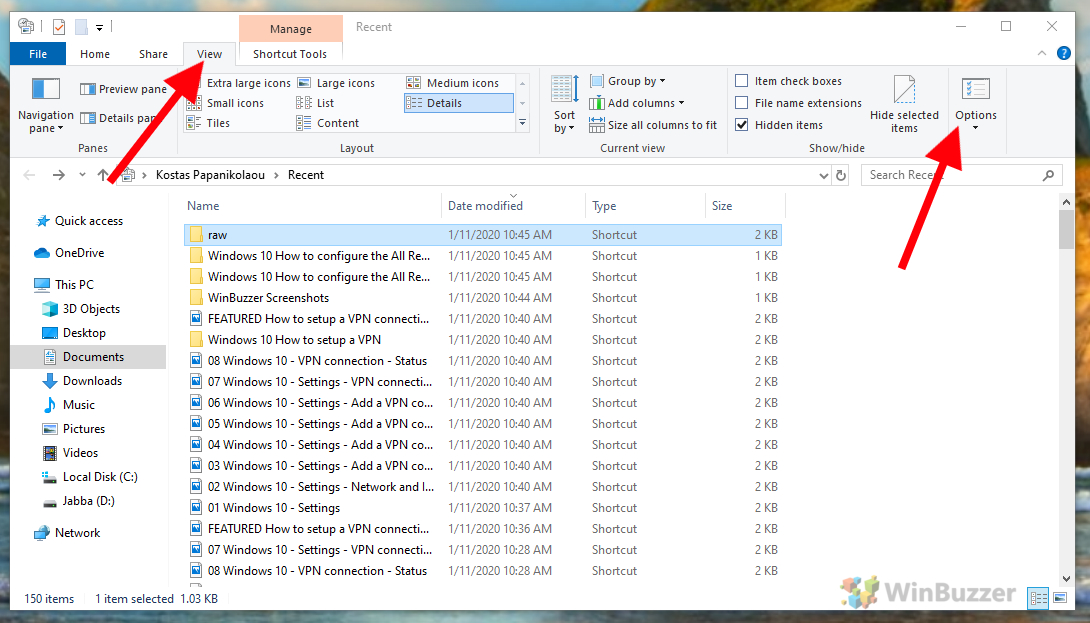
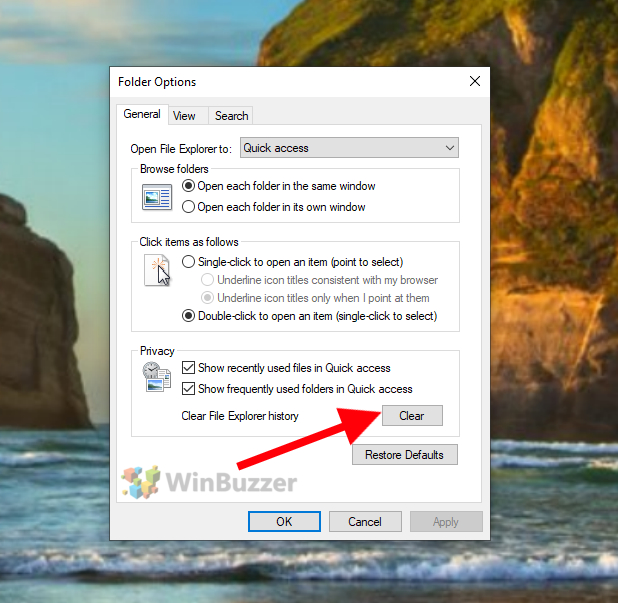
- Open the Options pane in File Explorer
Open File Explorer. Navigate to the “View” tab on the ribbon at the top, where you’ll find various options to customize your viewing preferences. Within this tab, locate and click on the “Options” button. This action will open the Folder Options dialog box, which allows you to adjust the settings for browsing files and folders on your system.
- Clear your File Explorer history
In the Folder Options dialog, switch to the “General” tab if it’s not already selected. Here, you’ll find various settings related to privacy and file browsing. Look for the “Privacy” section, which contains a button labeled “Clear” next to “Clear File Explorer history“. Clicking this button will erase the list of files you’ve recently accessed, as well as the history of locations you’ve visited within File Explorer. This step ensures that your recent activity is no longer visible in the Quick Access section or the All Recent Files list.
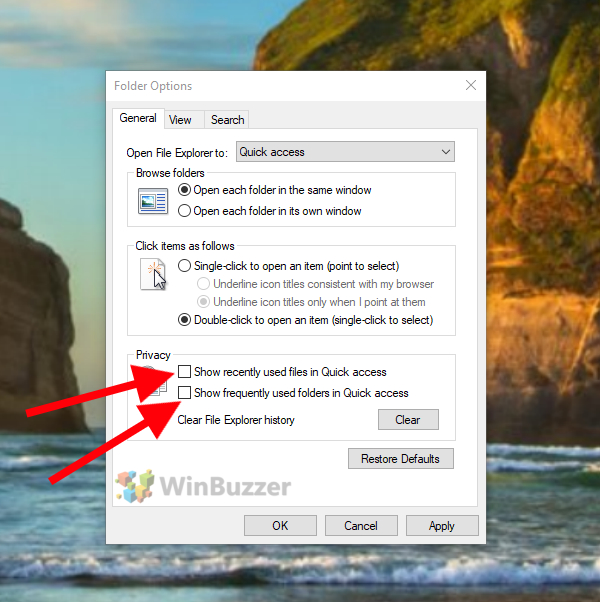
- Disable the Recent Files List
If you prefer to stop Windows from tracking your recent files altogether, you can disable this feature within the same “General” tab of the Folder Options dialog. Under the “Privacy” section, you’ll find a checkbox labeled “Show recently used files in Quick access“. By default, this option is enabled, allowing Windows to display your recent files for quick access. To disable this feature, simply uncheck the box. Next, click “OK” to apply the changes. This action will prevent Windows from populating the Recent Files list in the future, offering an additional layer of privacy.
How to Clear or Disable the All Recent Files List on Windows 11
For Windows 11, the process to disable or manage the Recent Files and Folders differs slightly from Windows 10, particularly due to interface changes and different naming conventions.
-
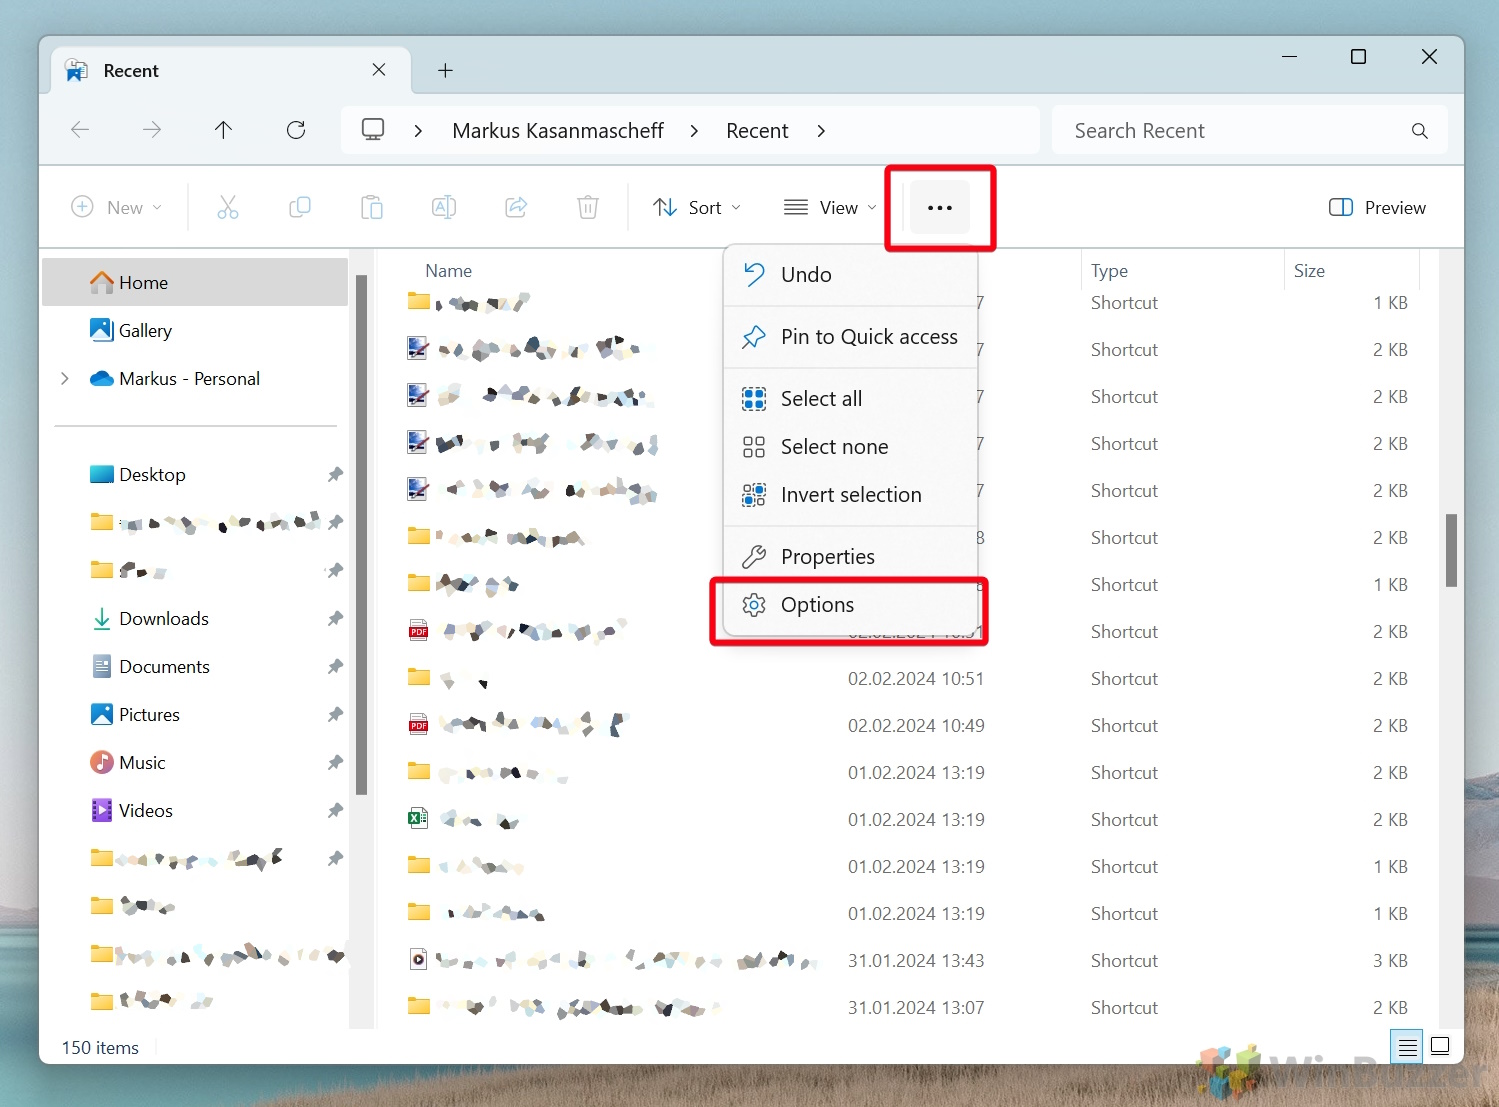
Open File Explorer
In Windows 11, open File Explorer by clicking its icon on the taskbar or pressing “Windows + E“. -
Open File Explorer Options
Locate and click on the “See more” button (represented by three dots) in the command bar at the top. From the dropdown menu, select “Options“. This action opens the Folder Options dialog, where you can adjust settings related to file and folder browsing.
-
Clear File Explorer History
Within the Folder Options dialog, direct your attention to the “General” tab, which might be the default tab displayed. Scroll down to the “Privacy” section. Here, you will find the “Clear” button adjacent to “Clear File Explorer history“. Clicking this button will remove the list of recently accessed files as well as the history of navigated folders in File Explorer. This step is crucial for users looking to maintain privacy by erasing traces of their recent activities.
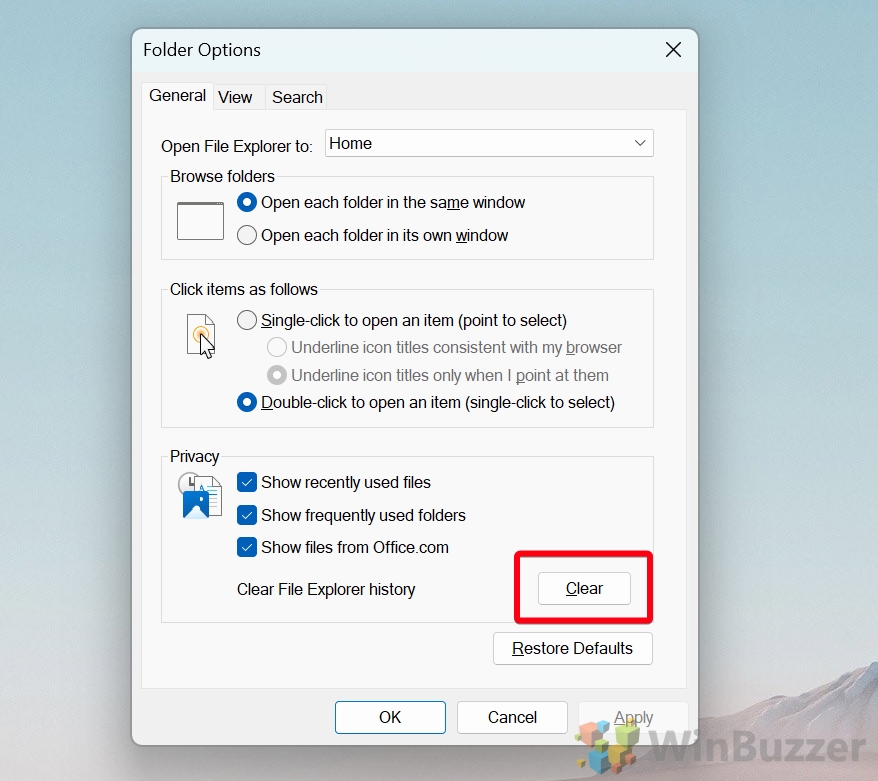
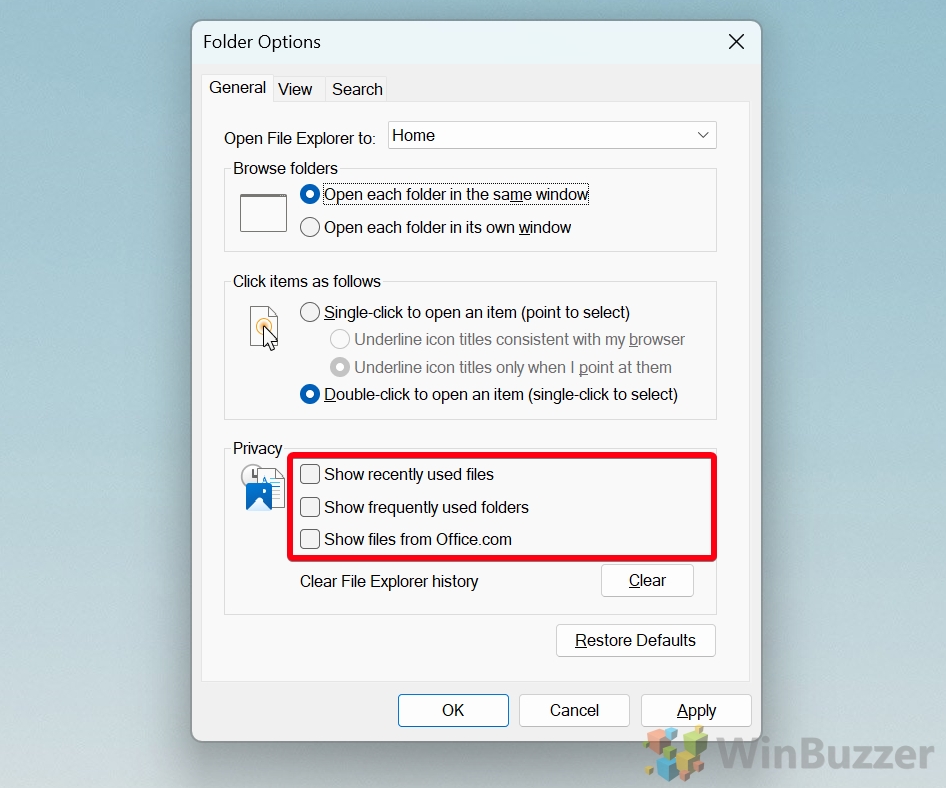
- Modify Privacy Setting to Disable Recent Files and Folders
To prevent Windows 11 from tracking and displaying your recent files and folders, you can disable the following checkboxes:
Uncheck “Show recently used files in Quick access” to stop displaying recent files. Uncheck “Show frequently used folders in Quick access” to hide frequently accessed folders. There’s also the option “Show files from Office.com“, which you can manage based on your preference, to hide those files in the recent files list.
How to Clear the Recent Files Folder on Shutdown
So far, we’ve shown how to view the all recent files list and how to disable it. However, what if you want the convivence of the list without shared users spying on your activities? Users on Windows 10 Pro / Windows 11 Pro or higher can set a group policy to automatically delete the history on shutdown.
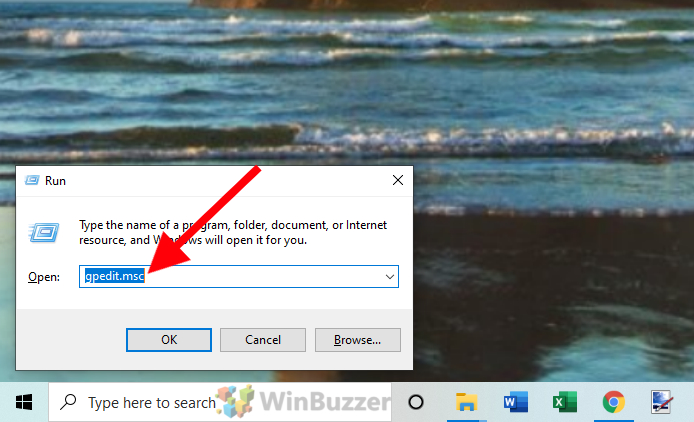
- Open the Group Policy Editor
Press “Windows + R” and type “gpedit.msc” to open the Group Policy Editor.
- Navigate to the Start Menu and Taskbar template
In the Group Policy editor, use the left-hand folder structure to navigate to “User Configuration> Administrative Templates > Start Menu and Taskbar“. Double-click “Clear history of recently opened documents on exit”.
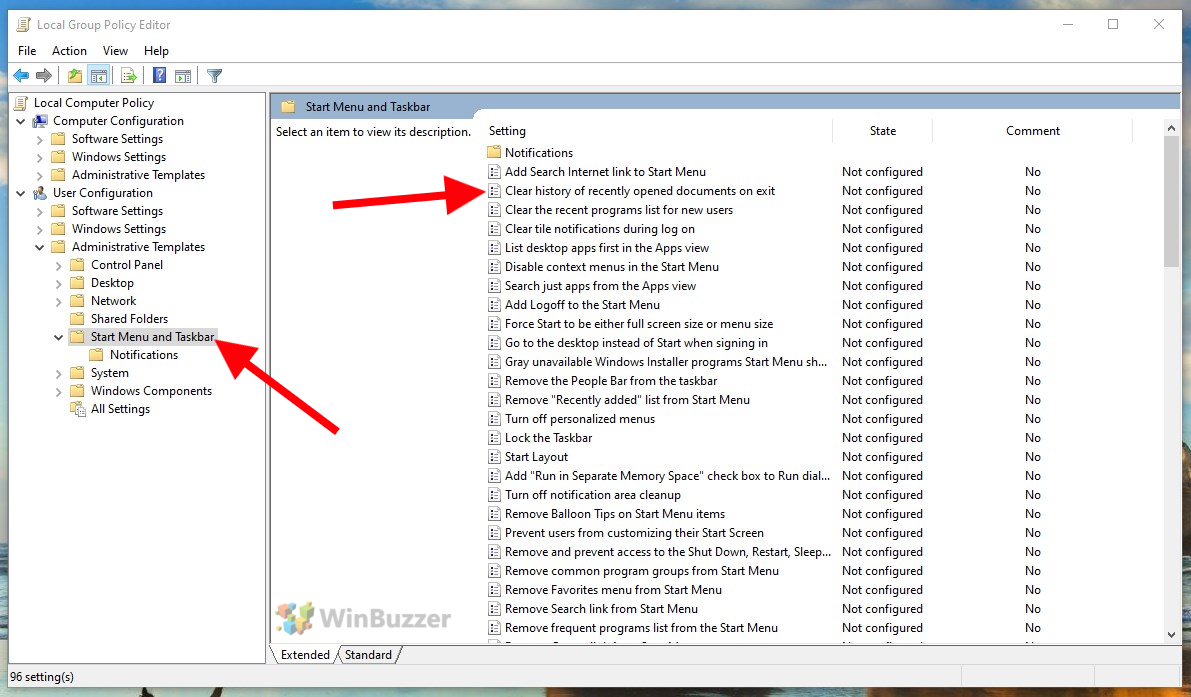
- Enable the group policy
Change the policy setting from ‘Disabled‘ or ‘Not Configured‘ to “Enabled”. Press “OK”. Your all recent files list will now be accessible for the duration of your login. After you shut down your PC they’ll disappear, keeping your Windows recent folders and activities private.

FAQ – Frequently Asked Questions About Recent Files and Folders in Windows
How can I create a shortcut to the ‘All Recent Files’ folder for quicker access?
To create a desktop shortcut for easy access to the ‘All Recent Files’ folder, right-click on an empty space on your desktop, select “New” > “Shortcut”. In the location field that appears, type %AppData%\Microsoft\Windows\Recent and click “Next”. Name the shortcut as you prefer, for example, “Recent Files”, and finish by clicking “Finish”. This shortcut will directly open the ‘All Recent Files’ folder without navigating through the Run dialog.
Is there a way to filter the types of files displayed in the ‘All Recent Files’ list?
While the ‘All Recent Files’ list doesn’t offer a built-in feature for filtering by file type, you can use File Explorer’s search functionality to achieve this. After opening the ‘All Recent Files’ folder, click on the search bar at the top-right corner and type the extension of the files you want to see, such as *.pdf for PDF files. This will display only the files of that type in the current view.
Can I manually add files to the ‘All Recent Files’ list for quick access?
The ‘All Recent Files’ list is populated automatically by Windows based on your file access patterns and cannot be manually modified to include specific files. However, for quick access to important files, consider pinning them to Quick Access, placing shortcuts on your desktop, or adding them to your Start menu.
How do I make the ‘All Recent Files’ list show more than the default number of files?
The ‘All Recent Files’ list in Windows is dynamically managed and doesn’t offer an official setting to increase the maximum number of files shown. However, frequently accessing important files will ensure they remain in the list. For a more permanent solution, consider creating shortcuts or using file management strategies like dedicated folders for important documents.
If I use cloud storage like OneDrive, will my online documents show up in the ‘All Recent Files’ list?
Files accessed through OneDrive or similar cloud services will appear in the ‘All Recent Files’ list provided they are opened or synced through the File Explorer on your PC. Online-only files viewed through a web browser won’t be listed unless they’re downloaded or synchronized with your local OneDrive folder.
What’s the difference between ‘Quick Access’ and the ‘All Recent Files’ list, and why use one over the other?
‘Quick Access‘ is a feature in File Explorer that provides fast access to frequently used folders and recent files, allowing you to pin items for consistent access. The ‘All Recent Files’ list, on the other hand, is a dynamic record of files you’ve recently opened, providing a broader, but temporary, snapshot of your activity. Use ‘Quick Access’ for staple locations and files you frequently visit, and the ‘All Recent Files’ list to review or revisit recent work without permanent pins.
How does clearing the ‘All Recent Files’ list affect my search history in File Explorer?
Clearing the ‘All Recent Files’ list removes the record of recently accessed files from the File Explorer view but does not impact your File Explorer search history. Search entries and suggestions are managed separately and can be cleared through the Search settings in Windows.
Can file access from external devices like USB drives appear in the ‘All Recent Files’ list?
Yes, accessing files from external devices such as USB drives, external hard drives, or SD cards through File Explorer will cause those files to appear in the ‘All Recent Files’ list, provided the device is connected and the file was accessed recently.
Is there a way to automate the clearing of the ‘All Recent Files’ list at every startup instead of shutdown?
To automate clearing the ‘All Recent Files’ list at startup, you can use Task Scheduler to create a task that runs a script or command to clear the list upon login. This involves scripting knowledge to create a batch file or PowerShell script that empties the contents of the Recent Items folder and scheduling it to run at user logon.
How does the ‘Clear history of recently opened documents on exit’ policy affect network shared folders?
Enabling the ‘Clear history of recently opened documents on exit’ policy ensures that any record of documents opened from network shared folders is cleared upon logout or shutdown. This policy is particularly useful in environments where privacy and security are paramount, preventing subsequent users from easily discovering which documents were accessed.
If I disable the Recent Files list, will Windows still keep a record of my file access activity elsewhere?
Disabling the Recent Files list in File Explorer will prevent it from showing your recent files, but Windows and other applications may still maintain logs or histories of your activities. For example, Office applications keep their own recent documents lists, and Windows Event Viewer logs certain system activities. Comprehensive privacy measures may require adjusting settings in multiple locations.
Can I sort the ‘All Recent Files’ list by criteria other than date, such as file type or size?
The ‘All Recent Files’ list can be sorted by various criteria beyond the default date modification. In the folder view, right-click on an empty space, select “Sort by,” and choose from options like Name, Date modified, Type, Size, and more. This allows for a customized view that can help you find files based on specific criteria.
What impact does clearing the ‘All Recent Files’ list have on my system’s Undo history for file operations?
Clearing the ‘All Recent Files’ list has no effect on the Undo feature within File Explorer or other applications. The Undo feature is session-specific and allows you to reverse file operations like deletions, moves, or renames performed during the current session, independent of the ‘All Recent Files’ list.
If I reinstall Windows, will the ‘All Recent Files’ list be preserved through the Windows.old folder?
The Windows.old folder is created when you perform a custom installation of Windows without formatting the drive, preserving files and data from the previous installation. While it includes many system files and settings, it does not specifically preserve the ‘All Recent Files’ list, which is typically regenerated based on your new activity in the fresh installation.
Can the visibility of specific file types in the ‘All Recent Files’ list be restricted for privacy reasons?
Windows does not offer built-in functionality to hide specific file types from the ‘All Recent Files’ list for privacy concerns. For sensitive files, consider using encryption, storing them in a secure location not indexed by Windows Search, or using third-party privacy tools that offer more granular control over which files appear in recent lists.
Last Updated on February 29, 2024 1:33 pm CET by Markus Kasanmascheff


