
This article was contributed by Jeremy Clifford from RouterCtrl.com.
Wi-Fi and Ethernet both give us indispensable internet connections to do a multitude of tasks. Internet users were comfortable with the internet connections via the Ethernet cable until Wi-Fi came into existence a couple of decades ago.
Wi-Fi was pretty slow originally, but the technology has been developing rapidly. It still does, and the introduction of the next-gen Wi-Fi 6 increased the Wi-Fi speed almost to the point of Ethernet connection. However, Wi-Fi still produces some unexpected glitches and signal interruptions due to the inherent radio signal it runs on. That’s why sometimes you come across Wi-Fi not working, but Ethernet is.
With most users connecting via Wi-Fi these days, the slightest signal interruption would have major repercussions for them. It’s not a surprise since most modern devices are mobile and Wi-Fi-enabled. The longer your Wi-Fi has this connection issue, the worse your problem will get.
Nowadays, almost everything you own is connected to the internet; it seems you can’t do anything without an internet connection. Here in this post, we guide you on how to fix the Wi-Fi not working issue with several proven methods. Let’s dive in.
Router Issues
The router is the source of internet connection to your devices via both Ethernet and Wi-Fi. When Wi-Fi is not working, but Ethernet is, the router works, but your device cannot read the internet signal. Therefore, there could be an issue with your router.
The quickest way to check if there’s something wrong with your router is to try connecting other devices to Wi-Fi. If your Wi-Fi still doesn’t work, your router is the source of the problem. Follow these steps to fix the router:
Restart Your Router and Modem
- Switch them off and pull out the plugs.
- After a short while, reconnect them and switch on the modem first, followed by the router.
- Restarting your router and modem allows the system to remove possible bugs. When the bugs are removed, your router should be working well; otherwise, try the next method.

Factory Reset
You can try the factory reset if the soft reset doesn’t work. To reset it to factory settings, you can just press the reset button on the back of your router and hold it. After a few seconds, the lights will start blinking. You can release the button after that. The router will restart and should be good as new once it boots up.
Windows Troubleshooting
You can use the often-overlooked Windows Network Troubleshooter to help you find errors. This built-in function can run on its own once you start the action via the settings. Follow these steps to begin:
- Open Windows Settings
Click the Windows icon to go to Windows Settings, and select Settings. Alternatively, use a shortcut by pressing the Windows and the ‘i’ key simultaneously to view the Settings page.

- Select Update & Security

- Go to “Troubleshoot” and click on “Additional troubleshooters”.

- Select Network Adapter and choose Run the troubleshooter.

- Windows 11 will try to troubleshoot the Network Adapter on its own and looks for errors or bugs.
At the prompt to choose which Network Adapter to diagnose – select “Wi-Fi network”. If there are problems, the troubleshooter will display them and recommend the next thing to do. Stick to the instructions, and see if the proposed solution fixes your Wi-Fi issue.

Flush the DNS Cache
DNS or the Domain Name System is like a phonebook of the internet and translates the domain names (like amazon.com) to IP addresses for web browsers to load internet resources. Unfortunately, DNS stores cache, like other online processes, which could be troublesome. If the DNS cache caused your Wi-Fi to malfunction, here are the steps you could follow to flush the DNS cache:
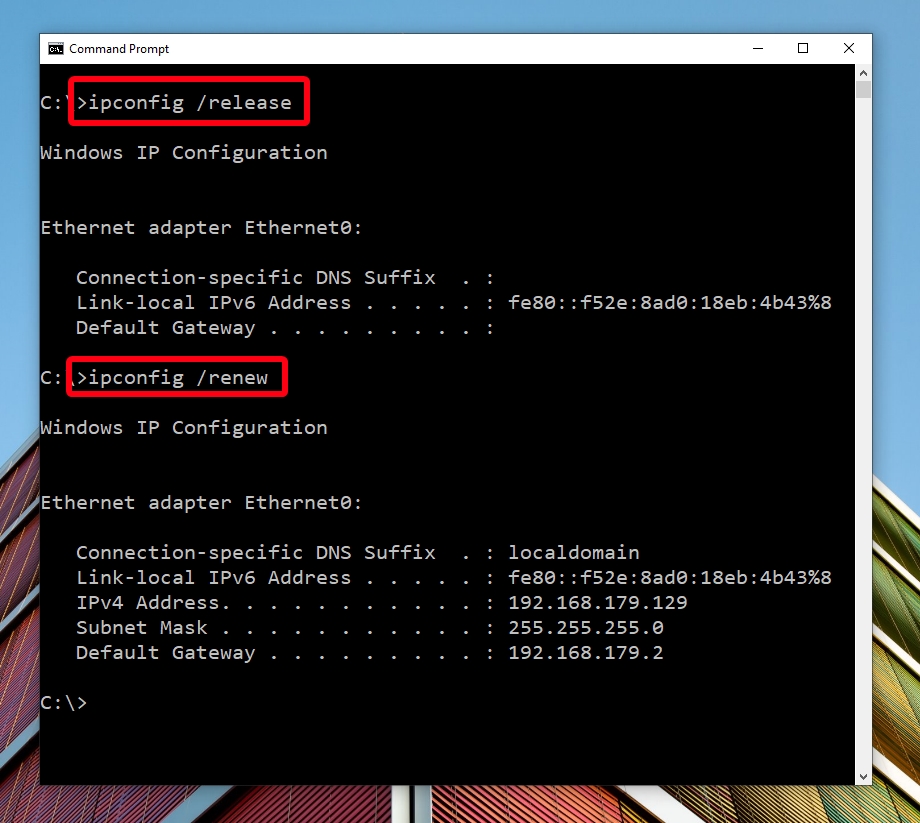
- Open Command Prompt via Search and run it as administrator

- Type the following commands one after another
ipconfig /release
ipconfig /renew
- Run the command to flush the DNS Cache
ipconfig /flushdns

Flushing DNS in Windows 10
Change to a Different Frequency Band
Most modern routers have dual-band capability – they can operate on the 2.4 GHz and 5 GHz Wi-Fi frequencies. At times, your Wi-Fi gets stuck in either band due to several reasons. The 2.4 GHz is used by various devices, including home appliances. For that reason, it can easily stall due to heavily congested traffic, although its reach is excellent.
On the contrary, the 5 GHz frequency gives you more speed and power, but the signal deteriorates quickly with the distance. In addition, it cannot pass through obstructions and walls well. A good practice is to try switching to the other frequency if one doesn’t work.
Switching Between 2.4 and 5 GHz Bands in Windows
Reinstall Drivers
Network drivers can also be the source of the issues with your faulty Wi-Fi. Under normal circumstances, the pre-installed drivers from Windows Update should do the job. However, sometimes the generic drivers cannot meet the system demands. Consequently, you will get an unstable network connection resulting in an unusable Wi-Fi.
Follow these steps if you want to uninstall and reinstall the Wi-Fi network adapter drivers:
- Right-click on the Windows icon at the bottom-left of the screen to go to Device Manager

- Double-click on “Network adapters”, right-click on your Wi-Fi network adapter and select “Uninstall”
Then, restart your computer. It will find default drivers automatically. If that does not fix the issue you can try to update the driver as shown in the next step.

- Right-click on your Wi-Fi network adapter and choose “Update drivers”.

- Choose “Search automatically for drivers”
• Windows will look for the latest driver software available for your device.
• Follow the instructions on-screen until you end the process.
Check Parental Controls
Parental control is a norm in a Wi-Fi home network. Some settings in the parental control app allow you to configure the internet access schedule. Simply remove the restrictions to fix the Wi-Fi access issue.
Contact Your ISP
If none of the methods listed above work, you should contact your Internet Service Provider’s customer service team or technical support as a last resort. It will help if you explain the steps you have already taken so that they can pinpoint where the problem lies. There’s also a possibility that the problem lies at their end.
Conclusion
Having internet via Wi-Fi proves to be a convenient way to get connected. However, considering the internet is transmitted using radio waves, Wi-Fi is understandably more volatile and prone to various interruptions. Therefore, you will occasionally experience issues like Wi-Fi not working, but Ethernet is. Hopefully, one of the fixes explained above solved the problem for you.
About the author
Jeremy Clifford is the person behind RouterCtrl.com. He has experience in networking equipment and administration and my goal is to share everything I know with his readers.


