

Creating a document that is not only informative but also visually appealing can significantly enhance readability and viewer engagement. In Microsoft Word, one simple yet effective way to achieve this is by incorporating vertical and horizontal lines. These lines serve various purposes, from dividing sections to emphasizing key points or simply adding an aesthetic element to your document.
How Adding Lines in Word Can be Useful
Lines in a Word document are versatile elements that can be used for organizational, decorative, or functional purposes. They can guide the reader’s eye, demarcate sections, or simply add a touch of design flair to your content.
Microsoft Word offers several methods to insert both vertical and horizontal lines, catering to different needs and document styles. From automatic formatting options to manual drawing, these methods provide flexibility and creative control over how lines are integrated into your document.
Incorporating lines can significantly improve the structure and aesthetic appeal of your document. Whether it’s through delineating sections with horizontal rules or using vertical lines to create margins or columns, these elements can make your document more organized and visually appealing.
How to Use AutoFormat to Insert a Line in Word
The AutoFormat feature in Word simplifies the process of inserting horizontal lines across your document. By typing specific characters consecutively and hitting Enter, Word automatically converts these characters into a visually appealing, full-width line. This method is ideal for quickly adding thematic breaks or section dividers without navigating through menus.
- Type Symbols and Press Enter
Input three consecutive hyphens, equals, asterisks, underlines, tildes, or hashes. Hit Enter. Word creates a line where your cursor is located. Remove it via the “Borders” section under the “Home” tab.

How to Use the Horizontal Line Tool to Draw a Line in Word
The Horizontal Line Tool in Word provides a straightforward way to insert a decorative or functional line at your cursor’s location. Located within the Borders menu, this tool can be used to effortlessly add a pre-styled horizontal line, enhancing the visual appeal of your document or delineating sections. It’s particularly useful for users looking for a quick and easy method to insert lines without manual adjustments.
-
Open the Border Menu
Navigate to “Home > Paragraph > Border icon > Horizontal line“.

-
Line Placement
The line appears at the cursor’s position.

-
Customize Line
Double-click the line to modify width, thickness, and color. Confirm by clicking OK.

How to Insert a Horizontal or Vertical Line in Word
Utilizing Word’s Border feature allows for the insertion of both horizontal and vertical lines directly into your document. This method offers flexibility in line placement, such as beneath text for a horizontal line or alongside text for a vertical line, making it suitable for creating text boundaries or sidebars. The Border feature is versatile, accommodating various document layouts and styles.
- Insert Horizontal Line
Position the cursor, then choose “Bottom Border” from the border icon in the “Home” tab.

-
Horizontal Line Appears
The line is added at the cursor’s location.

- Insert Vertical Line
Select text, then apply “Left Border” and/or “Right Border” for vertical lines at the document’s edge.
You can add a vertical line in Word at the left or right edge of your document. Bear in mind that this can only be a maximum of 31px from the edge of your page. If you’d like it further away or in the center, use one of the methods below instead.

-
Vertical Line Follows Text
The vertical line aligns with your selected text.

-
Adjust Style
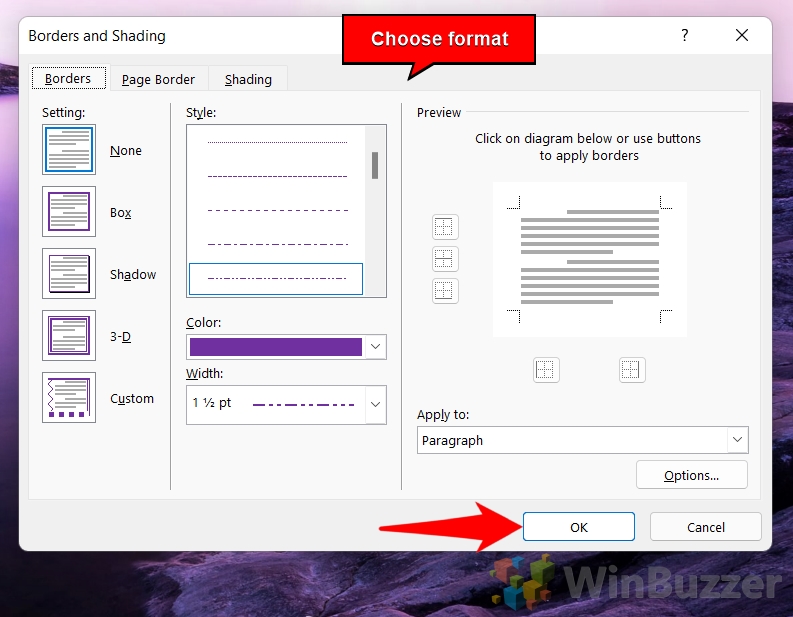
Navigate to “Home > Border icon > Borders and Shading…” for style customization.
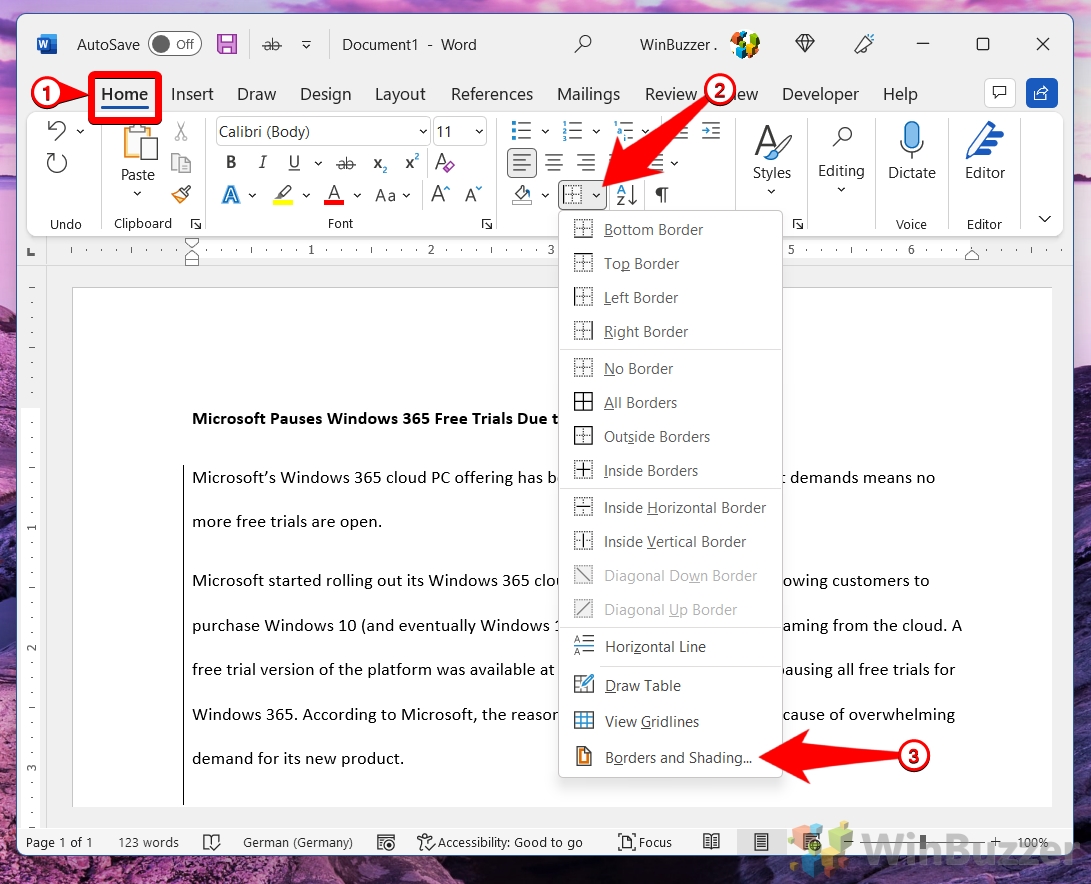
- Customize Vertical Line
Select line type, color, width, and press OK. Use “Options” for spacing adjustments.
-
Preview Style
Check the line’s appearance in your document.

- Remove Line
Choose “No Border” to delete the line.

-
The Line Disappears
Confirm the line’s absence in your document.

How to Draw a Line in Word with the Shapes Tool
The Shapes Tool in Word opens up a realm of creative possibilities, including the ability to draw custom lines anywhere in your document. Beyond mere straight lines, this tool allows for the creation of arrows, curves, and more complex shapes. It’s perfect for users who require full control over line placement, style, and interaction with other document elements.
-
Access Shapes
Go to “Insert > Shapes > Lines > Line“.

-
Draw Line
Click and drag across the document to create a line.

- Format Line
With the line selected, use “Shape Format” for adjustments. Right-click for “Format Shape…“.

-
More Formatting Options
Right-click your line and press “Format Shape…” for more options

- Change the line formatting options to your liking
The line will update instantly on your page as you make the changes.

How to Make a Vertical Line in Word and Separate Text into Columns
Separating text into columns with a vertical line in Word is an effective way to organize content in a visually appealing manner, reminiscent of newspaper layouts. This feature not only divides text into multiple columns but also allows for the insertion of a neat line between them, providing clear separation and improving readability. It’s particularly useful for newsletters, brochures, or any document that benefits from a multi-column format.
-
Create Columns
Highlight text, choose “Layout > Columns > Two“.

- Access More Options
Click “Columns > More Columns…” in the “Layout” tab.

-
Add Line Between
Check “Line between” and press OK.

-
Column Line Appears
A line now separates the columns.

How to Insert a Vertical Line in Word Using a Bar Tab
The Bar Tab feature in Word is a lesser-known but useful tool for adding vertical lines at specific tab positions within your document. Unlike border lines that span the entire margin or are attached to text, Bar Tabs offer precision in vertical line placement, making them ideal for aligning text or creating custom table-like layouts without the actual use of tables.
-
Paragraph Settings
Select a paragraph, click “Paragraph Settings” in the “Home” tab.

-
Open Tabs
Click “Tabs…” in the settings menu.

- Configure Bar Tab
Set tab stop position, select “Bar” under “Alignment“, and press Set > OK.
The Tab stop position determines the position at which Word will place the vertical line on your page. You can set negative values here to place the line outside of your page margins. Check the ruler of your document so you can get an accurate measurement.

-
Vertical Line Added
The line appears at the set position.

-
Remove the Vertical Line
In paragraph settings, use the “Clear” button under “Tabs“.

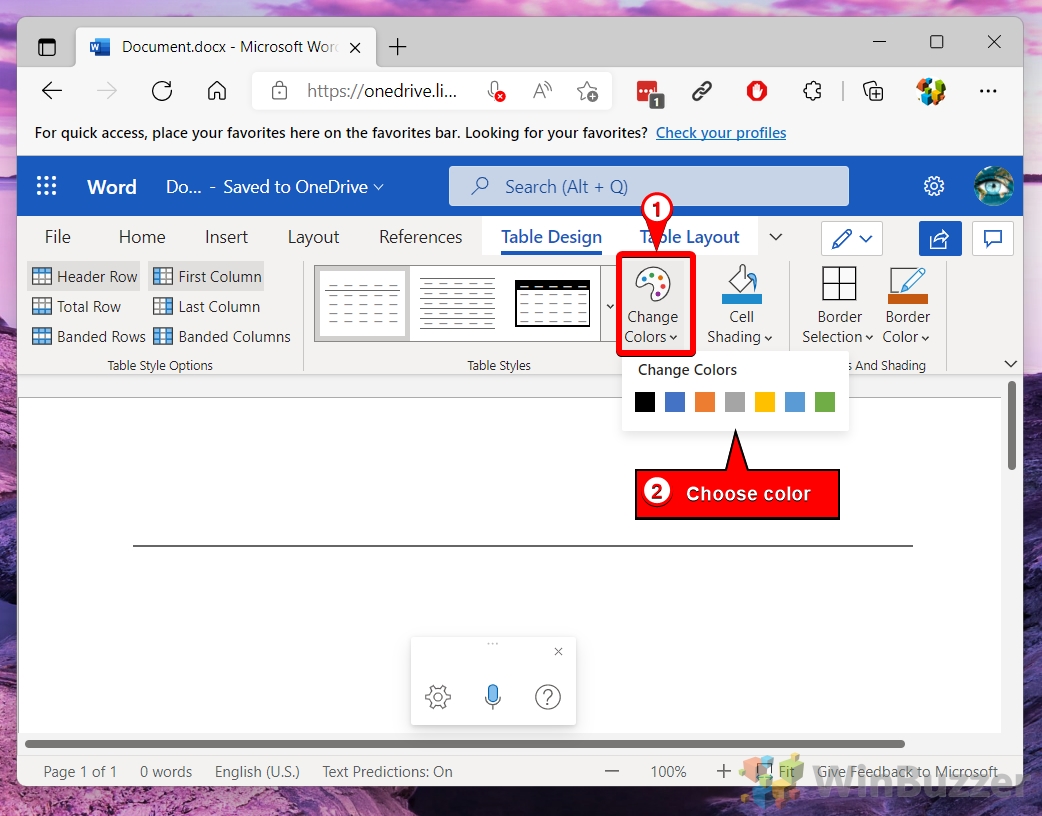
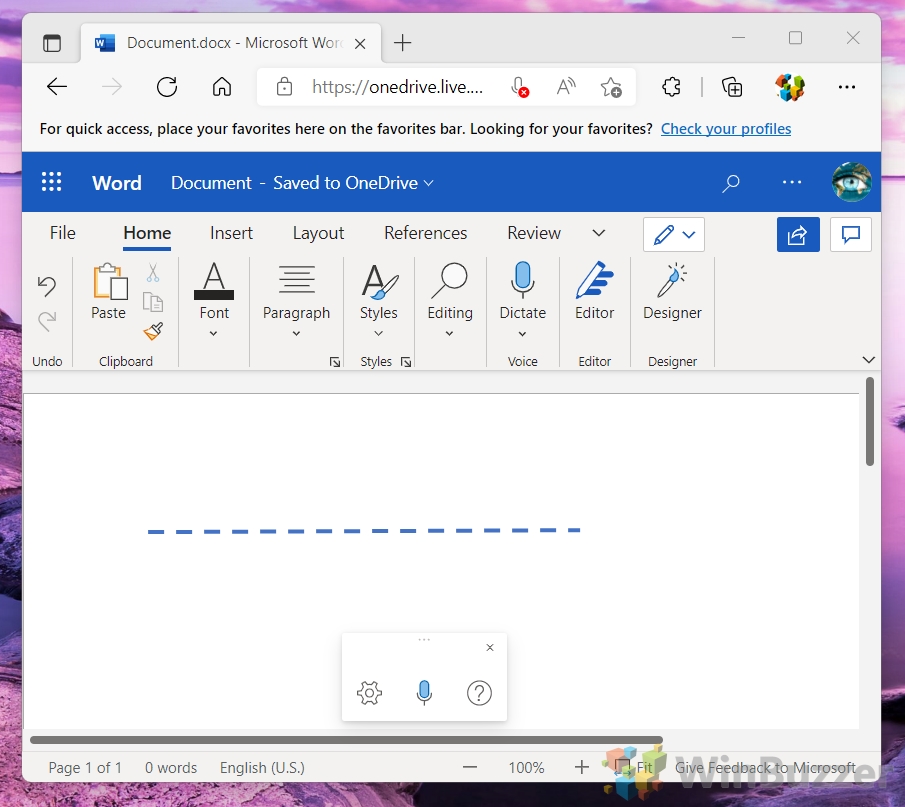
How to Insert a Horizontal Line in Word Online
Although Word Online features a pared-down set of tools compared to the desktop version, it still offers methods for inserting horizontal lines to separate content or decorate your document. Utilizing the Table feature or the Drawing tool, users can create lines to visually break up text or highlight sections, maintaining document clarity and visual interest even in the web-based application.
-
Insert Table
In the “Insert” tab, choose “Table > 1×1 Table“.

-
Table Styles
Use the dropdown in “Table Styles” for border customization.

-
Select List Table
Choose the first option under “List Tables“.

-
Change Colors
Opt for a line color in “Change Colors“.
- OR: Use Drawing
Alternatively, select “Drawing” in the “Insert” tab.

-
Choose the Line Tool
In the drawing panel, pick “Line” from “Shapes“.

-
Draw a Line
Click and drag to create your line.
-
Adjust Line
Modify the line using edge handles.

-
Line Formatting
Use the toolbar to set color, weight, and style.

-
Save and Close
Confirm your changes.
- The Line Appears
Your horizontal line will now appear in your document.
How to Remove a Horizontal Line in Word
Lines in Word that have been added accidentally usually can always be undone with the undo hotkey Ctrl + Z, but that does not always help. In our other guide, we show you how to remove a line in Word when it’s automatically inserted by the border line function, as well as how to stop it from happening again.

FAQ – Frequently Asked Questions About Adding Lines in Word
Can I add page borders in Word Online?
While Word Online has a more streamlined set of features compared to its desktop counterpart, adding traditional page borders directly isn’t one of them. However, you can creatively use table borders or shapes as workarounds. For instance, you could draw a rectangle shape around the entire page and adjust its outline to mimic a page border. For more sophisticated border options, such as art borders or more detailed customizations, the desktop version of Word would be the recommended tool.
How do I convert text from horizontal to vertical orientation in Word?
To change the orientation of text in Word from horizontal to vertical, you can utilize text boxes or table cells. Insert a text box or a table, then select the text or the cell containing the text, and look for the “Text Direction” option under the “Layout” or “Format” tab. Clicking this will rotate the text orientation. It’s worth noting that while Word’s desktop version offers more flexibility with this feature, including multiple rotation angles, Word Online’s capabilities might be limited to simpler rotations within table cells.
Why can’t I move images freely in Word Online?
Image manipulation in Word Online is indeed more restricted compared to the desktop version. This is largely due to the web-based nature of Word Online, which aims to provide a more streamlined and faster experience, sacrificing some advanced features in the process. To move images more freely in your document, you can try inserting them into a table cell or a text box as a workaround, which then allows you some level of maneuverability. For full control over image placement and wrapping styles, switching to the desktop version is advisable.
How do I insert a line that spans the width of the page in Word?
To insert a line that spans the full width of your page in Word, you can use the “Shapes” tool to draw a line from one margin to the other. Ensure you start from the very edge of the left margin and drag your cursor all the way to the right margin. Holding down the “Shift” key while dragging will help keep the line straight. Another method is to use the “Borders” function: place your cursor at the desired position and choose “Bottom Border” from the “Borders” dropdown in the “Home” tab. This will create a line that extends across the width of your page content area.
What are the limitations of Word Online compared to the desktop version?
Word Online is designed to offer core Word functionalities in a more accessible, web-based format. However, this accessibility comes with some limitations. Notably, Word Online offers fewer formatting tools, reduced options for header and footer design, limited font choices, and minimal support for advanced content like macros. Additionally, certain features like section breaks, advanced image formatting, and comprehensive track changes functionality are pared down or absent. For users requiring full-feature access, particularly for complex document editing and design, the desktop version remains the preferred choice.
How can I customize the color and style of lines drawn in Word?
After drawing a line in Word using the “Shapes” tool, select the line to activate the “Shape Format” tab, which provides a plethora of customization options. Here, you can change the line’s color, adjust its width or thickness, and apply various styles such as dashed, dotted, or solid. You can also add effects like shadows or glows for a more distinctive appearance. In Word Online, while the customization options are more limited, you can still adjust basic attributes like line color and weight through the options available in the “Format” pane when a line is selected.
How do I add a horizontal line in Word without using AutoFormat?
To insert a horizontal line without relying on AutoFormat, you have several options. One method is to use the “Shapes” tool to manually draw a straight line where you need it. Simply select the “Line” shape and drag across your document while holding down the “Shift” key to ensure the line is perfectly horizontal. Another approach is to utilize the “Borders” feature: place your cursor where you want the line, then select “Bottom Border” from the “Borders” dropdown in the “Home” tab. This adds a line that acts like a border just beneath your current line of text.
Can I create custom column layouts with vertical lines in Word?
Yes, you can create custom column layouts in Word and add vertical lines between these columns for clear separation. After dividing your text into columns via “Layout > Columns”, use the “Shapes” tool to draw vertical lines between your columns. Simply select the “Line” shape and draw your line where needed between columns. For a more automated approach, when setting up your columns, you can check the “Line between” option to automatically insert a thin vertical line between columns. This method is especially useful for newsletters, pamphlets, or any document layout that benefits from clearly defined column sections.
How do I ensure lines are perfectly horizontal or vertical in Word?
To draw perfectly horizontal or vertical lines in Word, use the “Shapes” tool to select the “Line” shape. As you draw the line by clicking and dragging your mouse, hold down the “Shift” key. This constrains the line’s movement, ensuring it remains perfectly horizontal or vertical regardless of how you move your mouse. This technique is incredibly useful for creating tidy, professional-looking documents where precision matters.
Is it possible to add borders to pictures in Word Online?
Directly adding borders to pictures in Word Online is not as straightforward as in the desktop version due to its simplified feature set. However, a practical workaround involves inserting the picture into a single-cell table and then applying a border to the table cell. This method allows you to adjust the border’s thickness, color, and style, effectively framing your picture. To do this, insert a 1×1 table, place your picture inside, then use the “Table Design” options to customize the cell’s border to your liking.
How do I change the page orientation for a single page in a Word document?
Changing the orientation of a single page within a Word document involves inserting section breaks. Place your cursor at the beginning of the page you wish to change, then navigate to “Layout > Breaks > Next Page” to insert a section break. Next, change the orientation via “Layout > Orientation”. Repeat these steps at the end of the page to revert to the original orientation for subsequent pages. This method is primarily applicable to the desktop version of Word, as Word Online does not currently support changing the orientation of individual pages within a document.
Why don’t my formatting changes show up in Word Online?
If you’re not seeing your formatting changes take effect in Word Online, first ensure you’re in “Editing View” rather than “Reading View”, as some formatting capabilities are limited or unavailable in “Reading View”. Additionally, be aware that Word Online has a more limited set of formatting tools compared to the desktop version, which may affect the availability and appearance of certain formatting options. If a specific formatting feature is not supported in Word Online, consider making those changes in the desktop version of Word.
How do I insert a decorative line or flourish in my Word document?
To insert decorative lines or flourishes in Word, you can utilize the “Shapes” feature to explore various line styles that offer a more decorative appearance. Choose “Insert > Shapes”, then select a line style that fits your design needs. Additionally, you can explore the “Insert > Symbols > More Symbols” option to find decorative line characters or flourishes that can be inserted as text. For more elaborate designs, consider using clip art or custom images that feature decorative lines or flourishes, which can be inserted and resized as needed.
Can I use templates in Word Online for specialized documents?
Word Online provides access to a variety of templates for different types of documents, including resumes, letters, reports, and more. To browse and use these templates, simply click “File > New” from within Word Online, and you’ll be presented with a selection of available templates. While the variety might not be as extensive as in the desktop version, there’s still a good range of options to help kickstart your document creation process.
How do I align lines or shapes with text or other objects in Word?
To align lines, shapes, or other objects in Word, first select the object you wish to align. Then, navigate to the “Format” tab that appears in the Ribbon, where you’ll find alignment options under the “Arrange” group. Here, you can align the selected object with other elements in the document, such as the page margin, other objects, or text. Options include aligning to the left, center, right, top, middle, and bottom. For more precise control, especially when working with multiple objects, consider using the “Align” tool for distributing and aligning objects evenly. Note that alignment options may vary between the desktop version and Word Online, with the desktop version offering more advanced capabilities.
Extra: How to Draw in Microsoft Word (Freehand and Shapes Tool)
The instances where you’d want to draw in Word in a professional environment are slim, but that doesn’t mean you shouldn’t do it. Drawings can add some extra flavor to your documents while remaining suitable for certain audiences. In our other guide, we show you how to draw on a Word document or annotate text using two of the software’s in-built tools.

Extra: How to Add a Page Border in Microsoft Word
Page borders are a useful tool. They make your document stand out without looking tacky, while providing a guide should somebody want to staple or hole punch. In our other guide, we show you how to add a border in Microsoft Word, as well as how to change their style, colour, width, or apply them to specific pages.


