

This guide will show you how to flush DNS in Windows 11 or Windows 10 using four different methods: CMD, PowerShell, Microsoft Edge, and Google Chrome. The primary goal is to resolve issues that result in “Page Not Found” errors, but you can also use it to improve your security or privacy.
What does flushing DNS do?
To understand what flushing the DNS resolver cache is, you first need to understand what DNS does and the purpose of the cache. DNS stands for domain name system, the mechanism by which the internet translates the URL you type into your browser (winbuzzer.com) into an IP address a computer can understand (92.204.43.156).
The DNS cache helps with this domain name resolution process by storing a temporary database of your recent website visits and their associated IP addresses. This way, name resolution can be handled locally on your PC rather than having to send a request to a server and wait for the response.
Flushing the DNS cache removes the database of sites and IP addresses on your PC. This is useful in cases where the website or service has changed its IP address and your cache has not updated, causing your browser to direct you to the wrong place.
It can also help to protect you against a type of attack called DNS spoofing, where an attacker modifies your DNS cache to direct you to malicious sites. Finally, it removes records about the sites you have visited from your PC.
⚠️ Please note: The process described below is the same in Windows 11 as it is in Windows 10. However, bear in mind that we’ll be using screenshots from Windows 11, so your UI may look a little different. We’ll point out any changes you need to be aware of as they come up.
How to Clear DNS Cache in Windows 11 or Windows 10 with Command Prompt
The Command Prompt method for clearing DNS cache is a straightforward and widely used approach suitable for users of all technical levels. By entering a simple command, this method swiftly clears the DNS resolver cache within Windows. This action can resolve various internet connectivity issues, such as inability to load websites or network errors, by ensuring that your system queries fresh DNS information for domains.
-
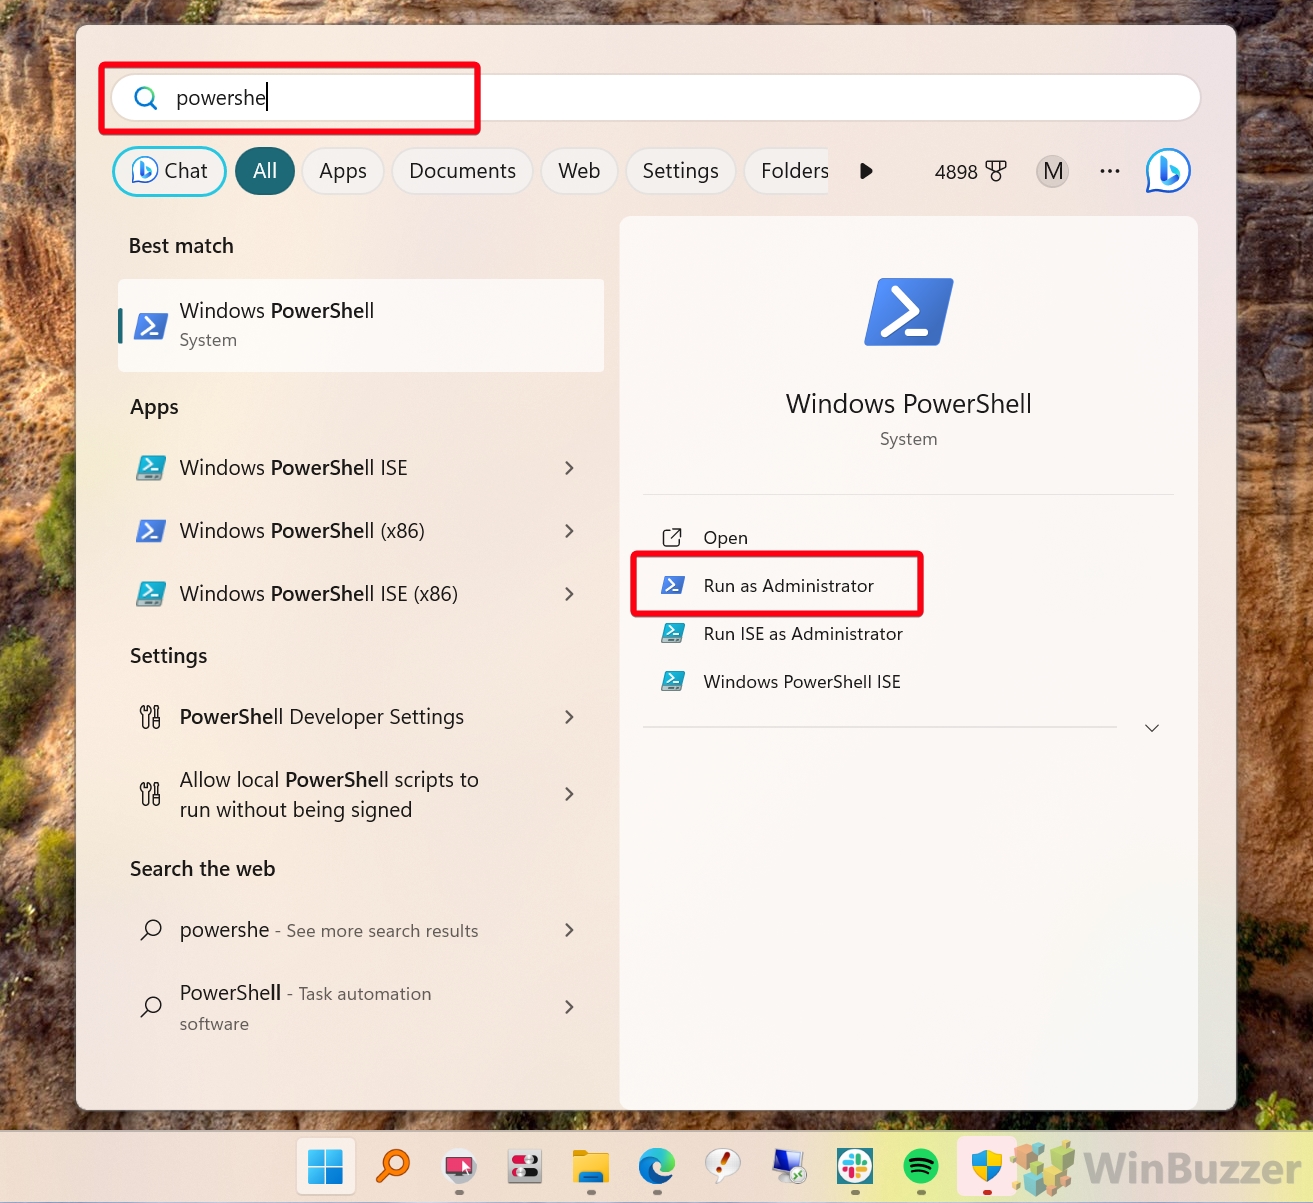
Open Command Prompt as Admin
Press Start, type “Command Prompt”, and select “Run as administrator“.

-
Flush DNS
Enter “ipconfig /flushdns” and press Enter. You’ll see a confirmation message indicating the DNS Resolver Cache was successfully flushed. This action can help resolve connectivity issues.Windows IP Configuration Successfully flushed the DNS Resolver Cache
Try loading your website again to see if flushing the DNS cache solved the issue.

How to Clear DNS Cache in Windows 11 or Windows 10 with PowerShell
Using PowerShell to clear the DNS cache represents a more modern and powerful approach compared to the traditional Command Prompt. This method is particularly suited for users who prefer PowerShell for its advanced scripting capabilities and direct access to a wide range of system functions.
-
Open PowerShell as Admin
Press Start, type “PowerShell”, and select “Run as administrator“.
-
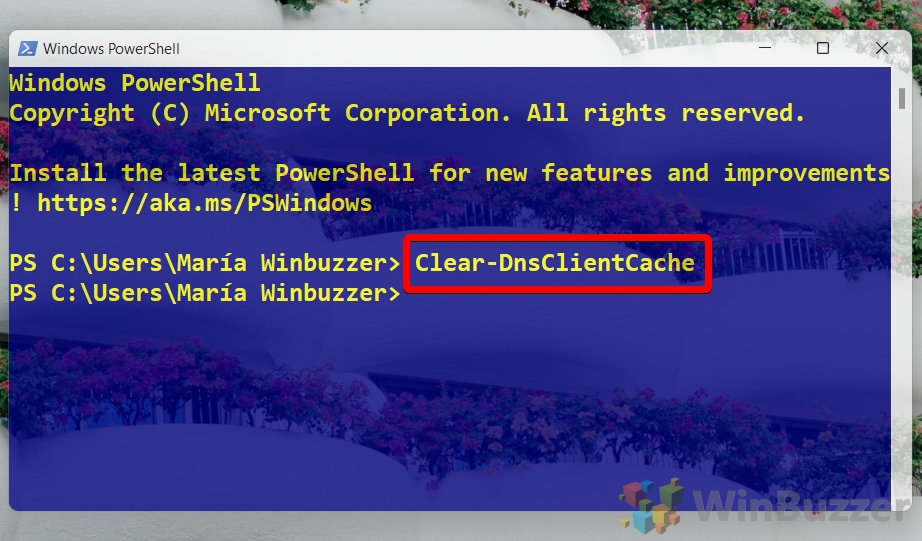
Clear DNS Cache
Type “Clear-DnsClientCache” and press Enter.
Note that this command won’t work unless you have the correct capitalization. It also won’t give an output, so you’ll just have to take its word that it worked.
How to Reset DNS in Windows 11 or Windows 10 with Microsoft Edge
This method involves using the Microsoft Edge browser to reset the DNS cache specifically for web content accessed through Edge. It’s a useful approach for users experiencing issues with website accessibility or performance within the Edge browser itself.
- Access DNS Settings and Clear the Host Cache
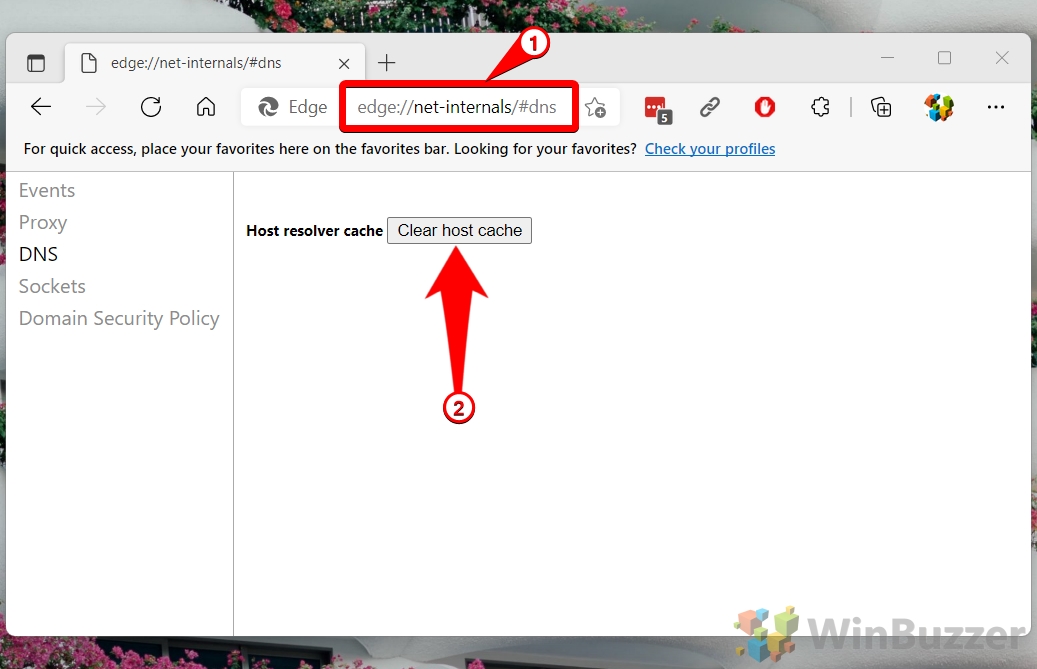
In Edge, navigate to edge://net-internals/#dns in the address bar or by clicking our link.
How to Reset DNS in Windows 11 or Windows 10 with Google Chrome
Similar to the Edge method, resetting the DNS cache via Google Chrome targets DNS-related issues encountered specifically within the Chrome browser. This approach is ideal for users who primarily use Chrome for internet access and are facing problems such as slow website loading times or failed page loads.
- Access DNS Settings
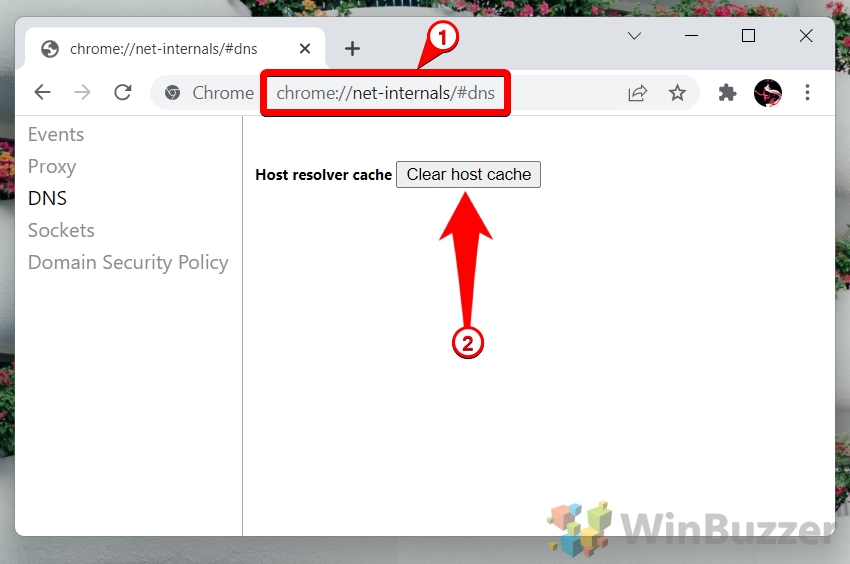
In Chrome, go to chrome://net-internals/#dns in the address bar or via our link.
How to Change Your DNS Server in Windows and Why You’d Want To
When you sign up for an internet service provider (ISP), they assign you to a DNS server of their creation. This function makes it possible for you to access all your favorite sites and services without manually typing their IP address. Unfortunately, however, not all DNS servers are created equal. There are several reasons you may want to change DNS in Windows 10, but it’s necessary to learn what they are and how they work so you can make an informed decision. In our other guide, we show you how to change DNS servers on Windows via the Control Panel, Settings, and Command Prompt.

How to Enable DNS over HTTPS (DoH) on Windows 11
If you’ve been keeping an eye on the recent security landscape, you may have heard of DNS over HTTPS, often shortened to DoH. But what is this new protocol, why do you need it, and how do you enable DNS over HTTPS in Windows 11? In our other guide, we explain and show you how to enable DNS over HTTPS (DoH) in Windows 11, using both IPv4 and IPv6 addresses.
FAQ – Frequently Asked Questions About DNS Flushing in Windows
Is it safe to flush DNS cache?
Flushing the DNS cache is generally safe and can be a standard troubleshooting step for resolving internet connectivity issues. It clears the locally stored IP addresses of websites you’ve visited, forcing your computer to retrieve fresh information the next time you try to access those sites. This process can help resolve issues caused by outdated or corrupted entries without impacting your system’s overall performance or security. However, it’s essential to understand that this action is temporary and the cache will begin to repopulate as you continue to browse the internet.
How often should I flush my DNS?
Regular users typically don’t need to flush their DNS cache frequently. It’s advisable to do so when you encounter specific internet connectivity issues that cannot be resolved through other means, such as restarting your router or checking for ISP-related problems. Network administrators might flush DNS caches more regularly to maintain network hygiene or after making significant changes to DNS records. Ultimately, the frequency depends on the nature of the issues you’re encountering and the environment in which your devices operate.
Does flushing DNS help speed?
Flushing the DNS cache doesn’t directly increase internet speed but can resolve connectivity and slow access issues to certain websites. For example, if a website has changed its IP address and your system is trying to access it using an old, cached address, flushing the DNS can resolve this discrepancy, potentially reducing loading times for that site. However, it’s not a guaranteed way to speed up your overall internet connection, which can be influenced by many other factors, including your ISP, router performance, and network congestion.
What is the difference between DNS flush and clearing cache?
Flushing the DNS cache specifically refers to clearing the locally stored record of domain name and IP address associations maintained by your operating system to speed up the resolution process. In contrast, clearing the cache typically refers to a broader action that removes temporary files, cookies, and other data stored by applications and web browsers. While both actions can improve system performance and resolve certain issues, DNS flushing is specifically targeted at resolving domain resolution problems.
Can flushing DNS cause problems?
Flushing the DNS cache is generally safe and unlikely to cause significant problems. The most notable effect is the momentary delay in accessing websites immediately after the flush, as your system needs to re-query the DNS information for those sites. In rare cases, if incorrect or malicious DNS settings are propagated post-flush, there might be connectivity issues, but these are typically resolved by setting the correct DNS server addresses or relying on automatic DNS settings provided by your ISP.
How do I know if my DNS cache is cleared?
After executing a DNS flush command, the system typically displays a message indicating success. While there’s no straightforward method to visually inspect the emptied cache, a noticeable sign that the flush was effective is the resolution of previously encountered connectivity issues. If a website that was not loading before now loads without issues, it’s a good indication that the flush was successful. For more technical verification, you could use command-line tools to display the DNS cache content before and after the flush, noting the cleared entries.
Do you need admin rights to flush DNS?
Yes, flushing the DNS cache requires administrator privileges on your computer. This requirement ensures that standard users without administrative rights cannot make system-wide changes that affect network connectivity. To perform a DNS flush, you must run the Command Prompt or PowerShell with administrator rights, which can be done by right-clicking the application and selecting “Run as administrator” from the context menu.
What happens if I delete all DNS records?
Deleting all DNS records for a domain can lead to significant issues, including the domain becoming unreachable on the internet. DNS records are crucial for directing traffic to the correct servers, and without them, browsers and other clients cannot resolve the domain name to an IP address. This action should be undertaken with caution and typically only in scenarios where you’re transferring a domain to a new host and need to set up new records, or if you’re decommissioning a domain.
Why is my DNS server not responding, and how can I fix it?
A non-responsive DNS server can be due to various reasons, including network connectivity issues, incorrect DNS settings, or problems with the DNS server itself. To fix it, you can start by restarting your router and computer, which can resolve temporary connectivity issues. If the problem persists, try switching to a public DNS service like Google DNS (8.8.8.8 and 8.8.4.4) or Cloudflare DNS (1.1.1.1). Additionally, ensure your computer’s DNS settings are correctly configured to either obtain an address automatically or are set to a known working DNS server.
How long does it take to flush DNS?
The command to flush DNS executes almost instantaneously, and the process itself completes within a few seconds. However, the immediate after-effect is that your system will re-query DNS information for websites you access, which might slightly delay your first access to those sites post-flush. This delay is usually negligible and improves as your DNS cache begins to repopulate with fresh entries.
Is there a downside to flushing DNS?
The primary downside to flushing DNS is the temporary delay in domain name resolution as your system rebuilds its DNS cache. This can result in a slight initial slowdown when accessing websites immediately after the flush. However, this effect is temporary and typically resolves quickly as new DNS information is cached. It’s also worth noting that if your system was relying on outdated or incorrect DNS information, flushing the DNS can actually resolve these issues, outweighing any temporary downsides.
How do I renew my IP address and why would I need to do it?
Renewing your IP address can resolve network connectivity issues, especially in dynamic IP environments where addresses are assigned temporarily. To renew your IP address in Windows, open Command Prompt with administrator rights and type “ipconfig /release” followed by “ipconfig /renew“. This process releases your current IP address and requests a new one from your DHCP server, which can be helpful if there’s an IP address conflict or if your current IP address is experiencing connectivity issues.
What are DNS records, and why would I need to delete them?
DNS records are entries within the DNS system that facilitate the translation of human-friendly domain names to IP addresses and vice versa, along with other domain-specific settings. You might need to delete or modify DNS records when changing hosting providers, to correct outdated entries, or to implement new configurations for your domain. Care should be taken when deleting DNS records, as incorrect configurations can lead to domain resolution issues, making your website or services inaccessible.
How do I fix DNS problems on Windows 11 or Windows 10?
To troubleshoot DNS problems on Windows, start with a DNS flush as described in the tutorial. If issues persist, ensure your DNS server settings are correct, either by setting them to obtain automatically or by specifying known good DNS servers. Restarting your router and checking for any network outages can also help. If you’re still facing issues, you might want to temporarily disable any VPNs or firewalls to rule out any interference they might be causing.
How can DNS settings affect internet connectivity and security?
DNS settings are crucial for translating domain names into IP addresses, a process integral to accessing websites and services online. Incorrect DNS settings can lead to connectivity issues, preventing access to websites. From a security perspective, using reputable DNS servers can provide additional protections, such as blocking known malicious domains or using DNS over HTTPS (DoH) for encrypted DNS queries, enhancing your privacy and security against eavesdropping and DNS spoofing attacks.
Related: How to Reset your Network
We’ve all run into the dreaded taskbar icon that denotes Windows internet connection issues. There are various reasons this can happen, but if you’re really struggling, the quickest fix is to perform a full Windows network reset. In our other guide, we show you how to do a network reset via the network and internet settings menu or the netsh winsock reset command.

Related: How to Check WiFi Signal Strength in Windows
The gap between wireless networking and wired ethernet connections is closing. These days, with a good router and wireless chip, your internet speed and latency can get very close to your trusty cable. The kicker, however, is that only stands true if you have good WiFi signal strength. In our other guide, we show you how to check WiFi signal strength in Windows using both the OS’ in-built tools and a third-party WiFi analyzer.

Related: How to Forget a WiFi Network and Delete Wireless Network Profiles
After years of hefting a laptop around, you inevitably build up a menagerie of Wi-Fi networks. For the most part, they’ll sit on your PC, hardly used, but at times a change in configuration can make it difficult to connect to a network your computer already remembers. At this point, it can be beneficial to forget a Wi-Fi network and delete its network profile. In our other guide, we show you how to forget a Wi-Fi network in Windows to stop automatic connect and resolve configuration issues.

Related: How to Change WiFi Priority on Windows
Windows allows to define WiFi priority. This will order WiFi networks in a way that your PC will always try to connect to preferred access points first. If you don´t define WiFi network priority, Windows 10 will usually pick the connection with the strongest signal. In our other guide, we show you how to prioritize wifi networks using the networks flyout or via command prompt.

Last Updated on April 22, 2024 11:55 am CEST by Markus Kasanmascheff


