
Windows has always had a bit of an icon problem. While operating systems like Android and Google still have a general “style” for third-party app icons, Windows struggles to remain consistent. Icons can be 3D or 2D and round or square, or simply just bad. To help you make your desktop more cohesive, today we’re going to show you how to change icons on Windows 11 and Windows 10.
How Changing icons in Windows 11 and Windows 10 works
There are several ways to customize an icon in Windows without needing to use any third-party software. You can change an app icon on your Start menu or taskbar by changing its shortcut icon, apply custom folder icons, change icons on your desktop, and more.
We’ll be walking through doing all of these things and more today, starting with where to get icons from in the first place.
How to Download New Icons from IconArchive
While Windows has some icons for you to choose from already, the selection is generally quite limited. As a result, you’ll probably want to download some icons from the web. Our site of choice is IconArchive, which has gathered over 600,000 icons in its 15 years of operation. Some other sites you can try include:
The process to download the icons should be roughly the same whatever you choose:
Search for your application in the search bar and download an icon you like
To download an icon on IconArchive, hover over it and press the “ICO” button in the top-right. The icon file should download straight away with no additional hassle.
![]()
How to Change App Icons using Shortcuts
If you’re wondering how to change the icon of a program when it’s on your Start menu, taskbar, or desktop, the answer is by changing its shortcut properties. All you need to do is restart the app after your changes and it’ll show up on your taskbar with its shiny new coat of paint.
- Access Shortcut Properties
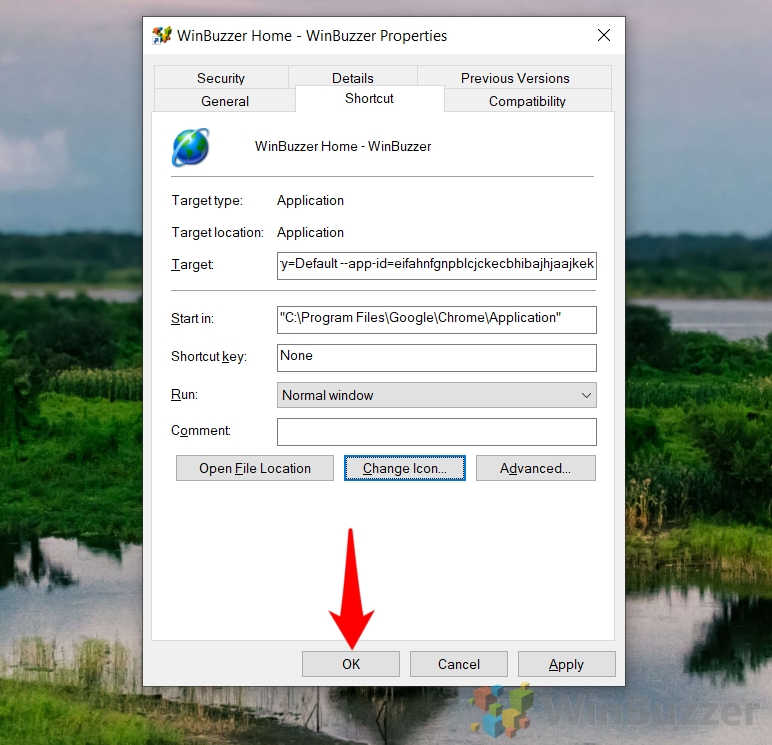
Right-click your app shortcut and choose “Properties“. This shortcut can be the one on your desktop or the one on your start menu, which you’ll find inC:\Users\%UserName%\AppData\Roaming\Microsoft\Windows\Start Menu\Programs. Just bear in mind that when you change an icon on the desktop it won’t affect the Start Menu/Taskbar and vice versa.
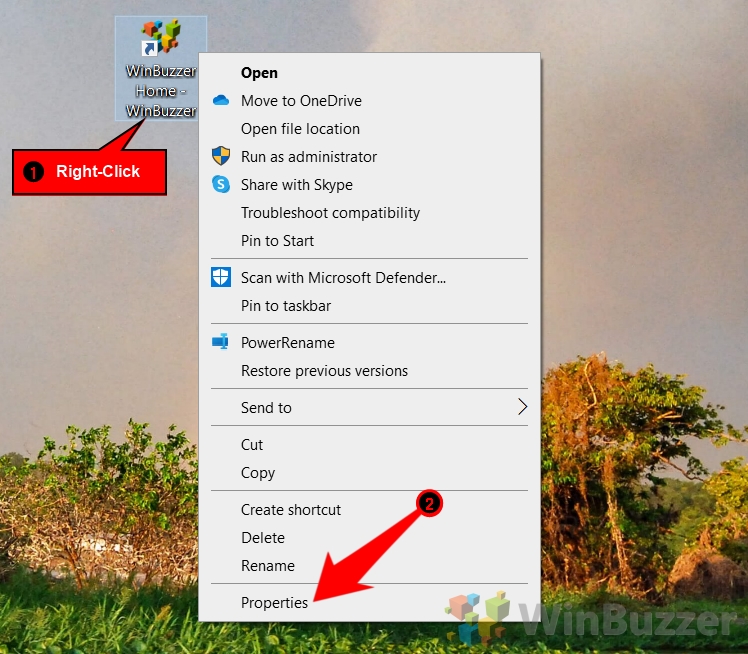
- Navigate to the Shortcut Tab
Open the “Shortcut” tab and press “Change Icon…“.
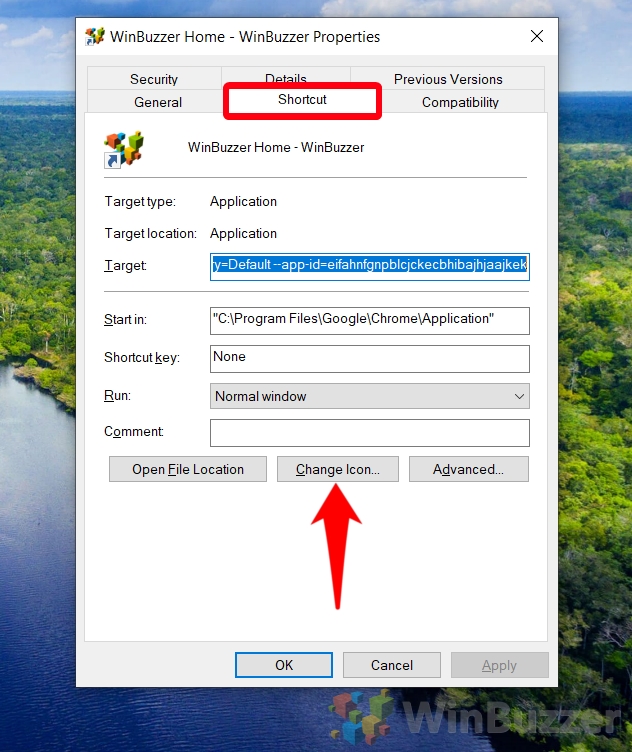
- Choose a New Icon
Click “Browse…” next to “Look for icons in this file“.
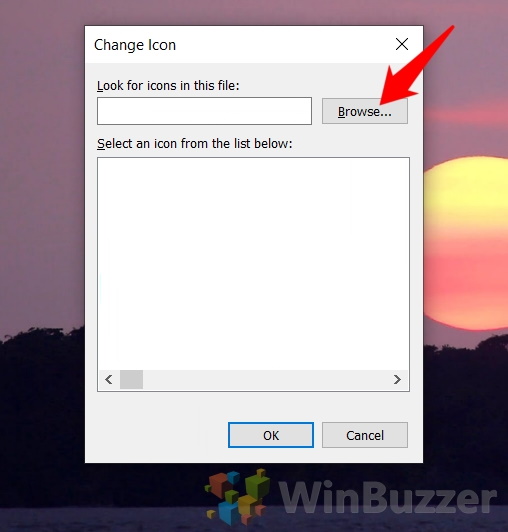
- Navigate to your downloaded icon or open “shell32.dll” in System32
shell32.dll has a number of in-built icons for Windows which may be useful to you for some applications. A lot of them are a bit outdated, but they should do the job.
You can find shell32.dll inC:/Windows/System32.
- Apply the Changes
Select your icon, press “OK“, then “Apply” in the properties menu.
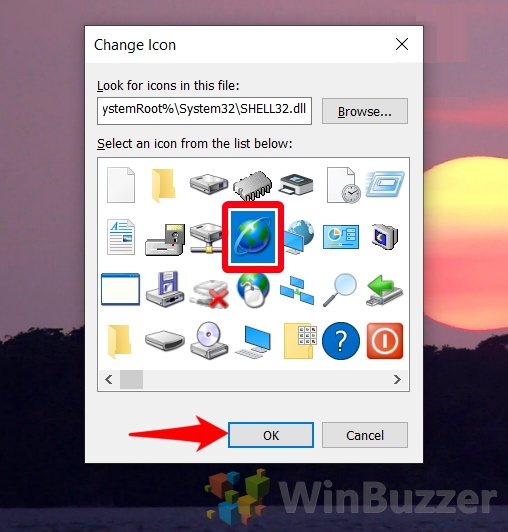
- Press “OK” in the properties menu
The change will immediately apply to your shortcut, but you may have to restart the app before the changes reflect in your taskbar.
How to Change Desktop Folder and System Icons via Icon Settings
You may have noticed that, try as you might, there are some desktop icons that you cannot change by modifying their shortcut. This is because they’re default system icons such as the recycle bin, user folder, network, etc.
You can still change them, however, you just need to follow a slightly different process. Here’s one way to change those desktop icons:
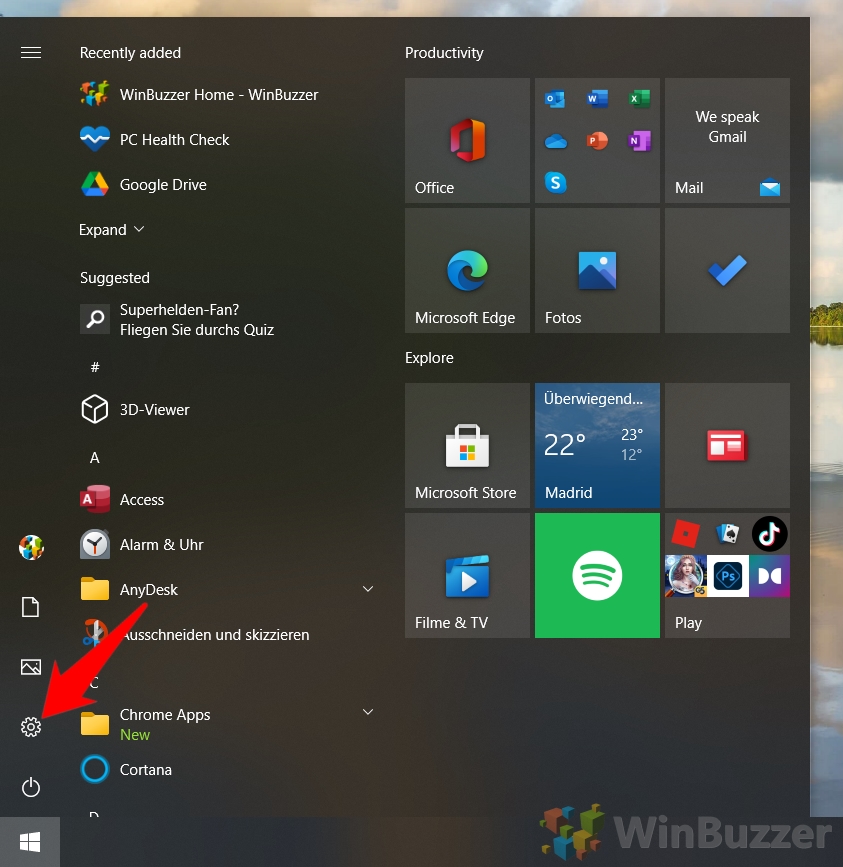
- Open Settings
Hit the hotkey “Windows + I” or click the Start button and access the settings cog.Press the Start button and click the settings cog. On Windows 10, this will be just above the power button. If you’re on Windows 11, it should be in your pinned apps.

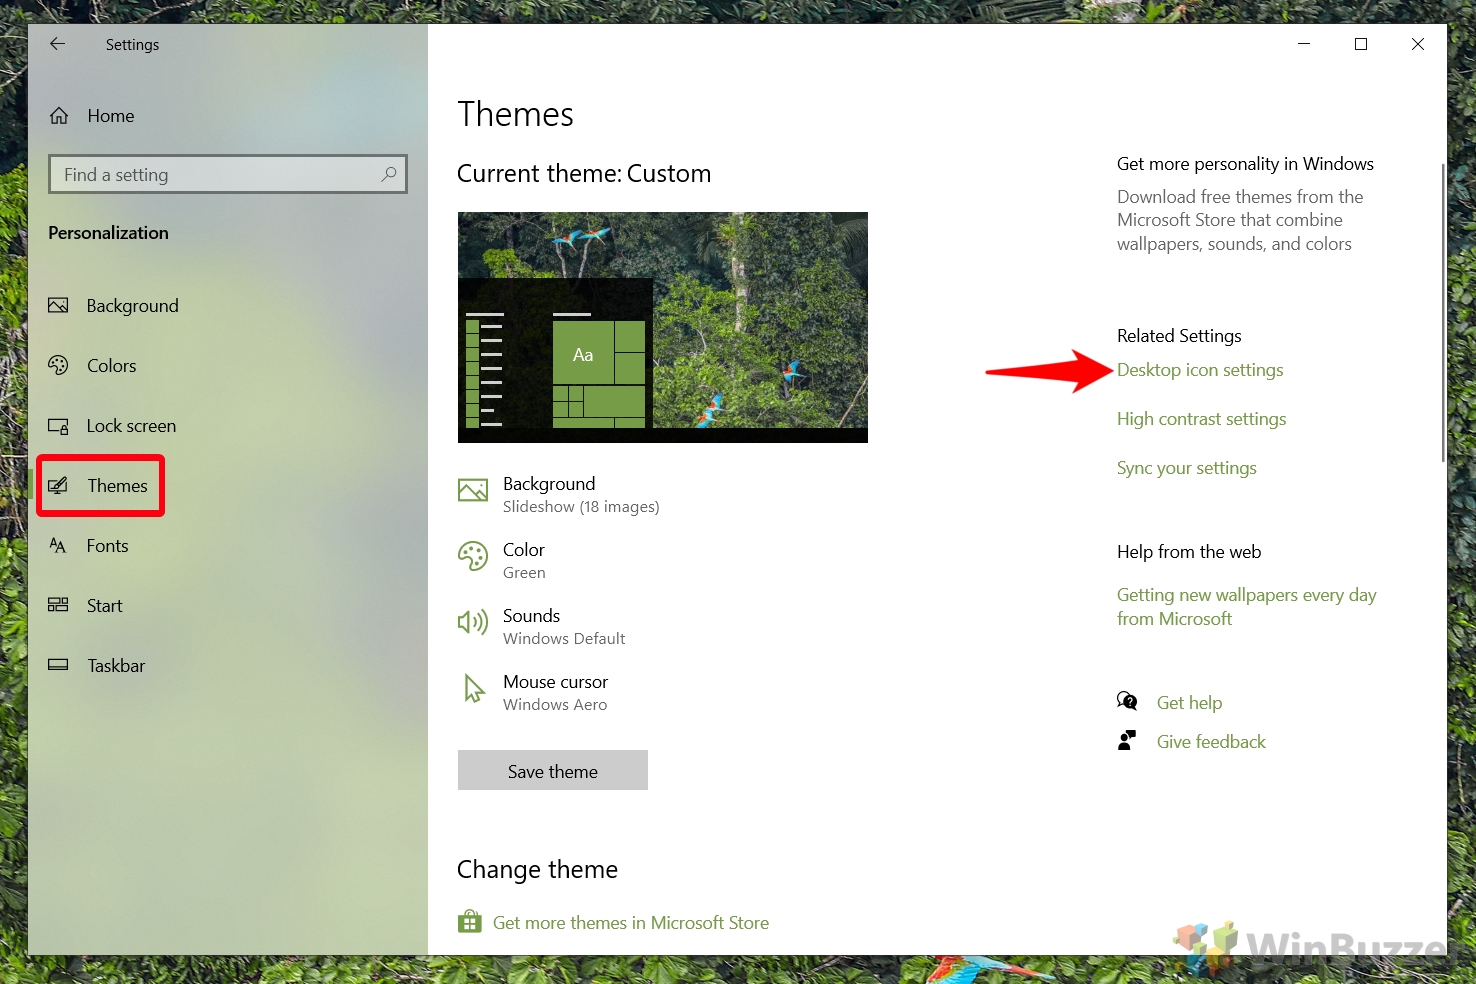
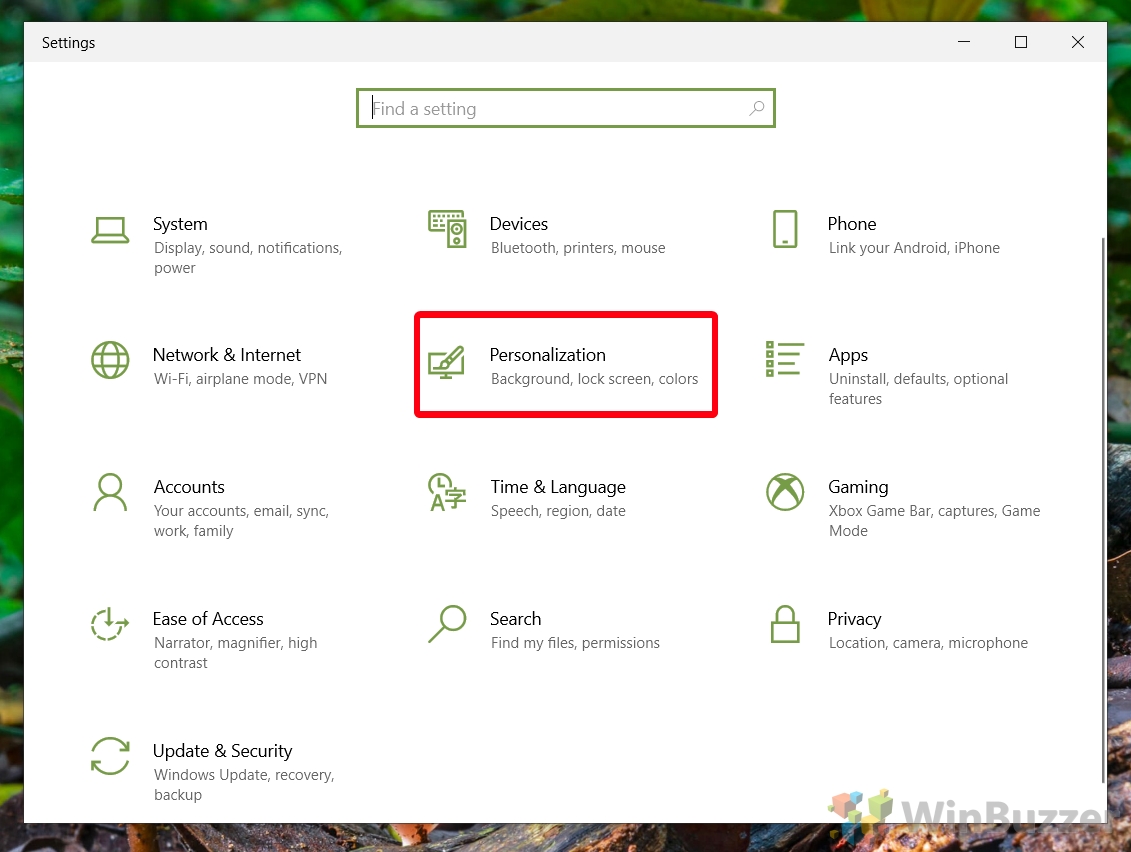
- Open “Personalization” settings
In Windows 10 you can get there by clicking on the personalization heading in the grid. In Windows 11, you’ll have to press “Personalization” on the sidebar instead.

- Open the Themes section and press “Desktop icon settings”
In Windows 10 you can press “Themes” in the right sidebar and then “Desktop icon settings” in the “Related settings” section on the right.
If you’re using Windows 11, instead press the “Themes” button in the main pane and then scroll down until you see the “Desktop icon settings” button and click it.
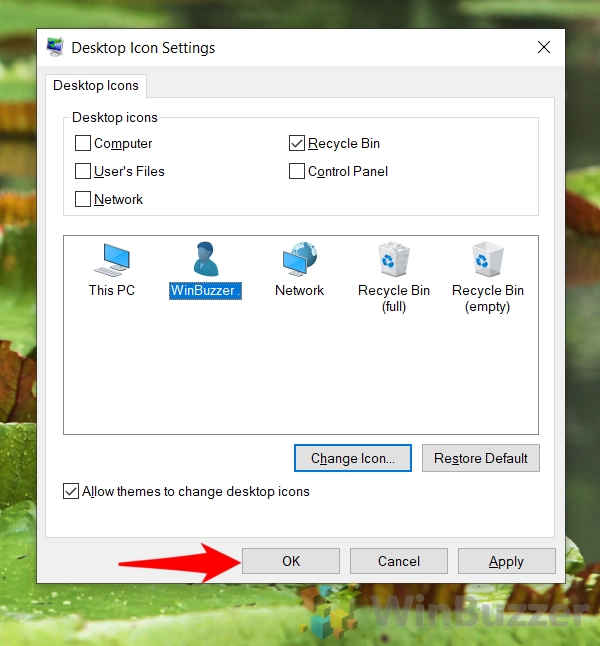
- Select a New Icon
Press “Change Icon…” to browse for a new icon.

- Apply The New Icon
Select and icon from the list or browse to a downloaded one and press “OK“.
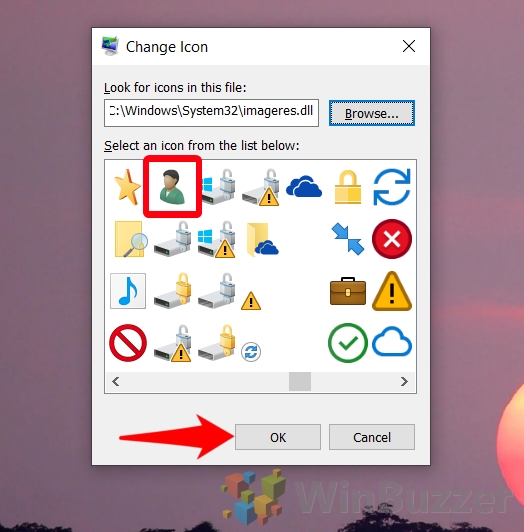
- Press “OK” in the “Desktop Icon Settings” window
You can repeat this process to change any other system icon on the desktop.
How to Restore Desktop System Icons to Defaults in Settings
If you previously changed your system desktop icons but no longer like how they look, there’s a quick way to restore them. Just follow the steps below:
- Access Settings
Press Start, followed by the settings cog. If you’re on Windows 10, the cog will be above the power button. Windows 11 users will find it pinned to their start menu.
- Open personalization settings
Windows 10 users can get to personalization settings by pressing the “Personalization” heading in their settings grid. Windows 11 users will access it via the sidebar.
- Click on “Themes” and then “Desktop icon settings”
For Windows 11 users, both the “Themes” and “Desktop icon settings” sections will be found in the main pane rather than in sidebars like Windows 10.

- Restore Defaults
Select “Restore Default” and confirm by clicking “OK“.

- Click “OK”
Your Windows 10 or Windows 11 desktop icons will instantly return to their defaults.

How to Change the User Icon in Registry Editor
If you’re having trouble changing your user files icon through the settings UI, you can try the Registry Editor instead. This is a bit more complex, but you’ll be fine so long as you read our safe registry editing guide and follow our instructions carefully.
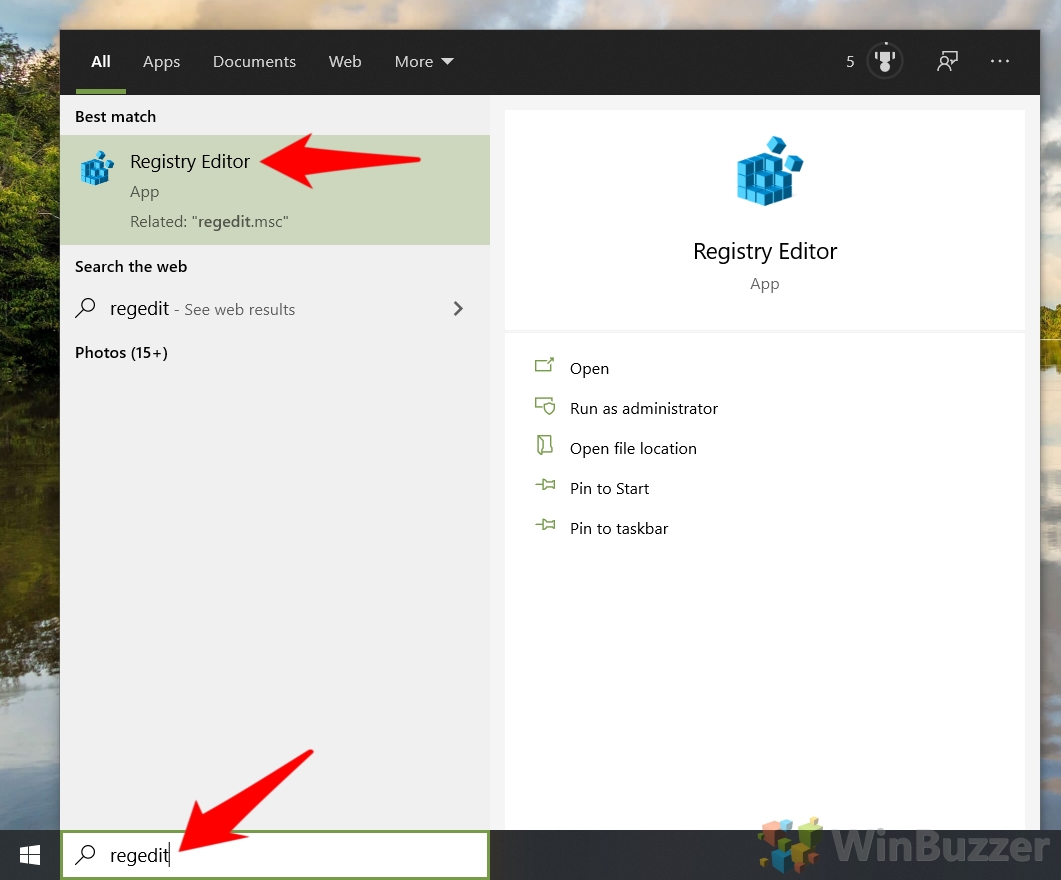
- Open Registry Editor
Press Start and type “Regedit”, then click the top result.

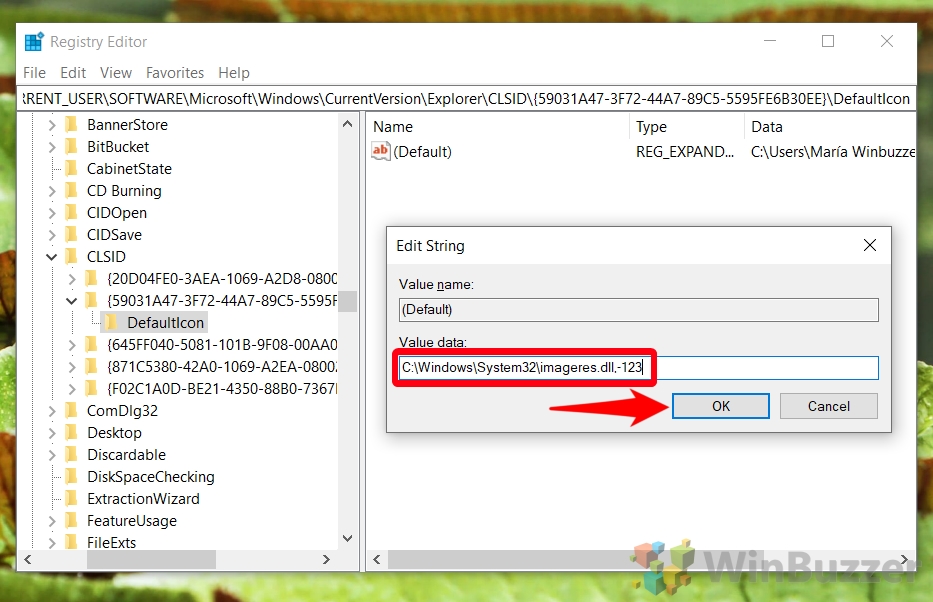
- Go to the DefaultIcon registry key and edit the “Default” string
To change the default icon for the user folder in Windows 10 or Windows 11, paste the following into your RegistryEditor address bar and press Enter:HKEY_CURRENT_USER\Software\Microsoft\Windows\CurrentVersion\Explorer\CLSID\{59031A47-3F72-44A7-89C5-5595FE6B30EE}\DefaultIconDouble-click the “(Default)” string and change the “Value data:” to point to the file path of your new icon. Press “OK” to apply the change. You may have to sign in and out of your account before you see any changes.

- Restore the default user’s files icon
If you don’t like the change, replace the value data in the (Default) string with:C:\Windows\System32\imageres.dll,-123
After you log in and out, the default user files icon will be restored.
How to Change This PC Icons for the Current User in Windows 10
As well as the default desktop icons, Windows has system icons for the “This PC” section of your File Explorer. These can be changed on a per-user or per-system basis using Regedit. Here’s how to do it per user:
- Open Registry Editor
Press Start and type “regedit”, then click the top result.
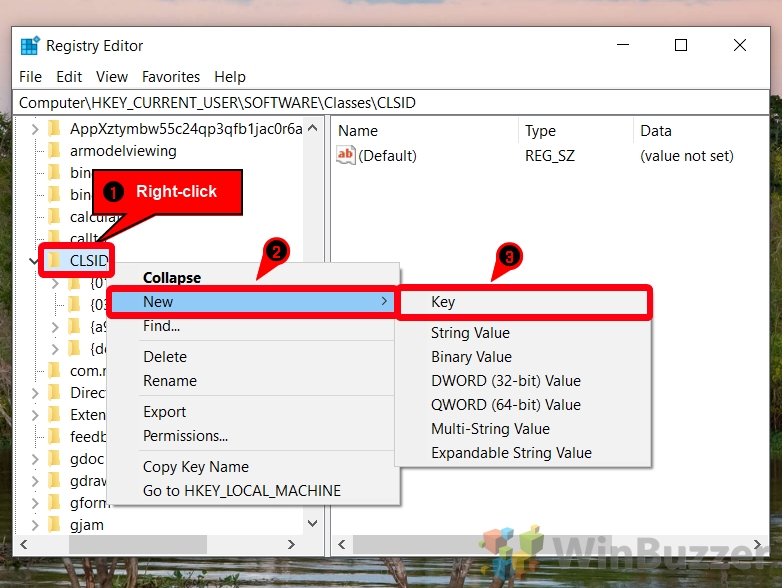
- Navigate to the CLSID key and create a new key
To get to the CLSID key, past the following in your Registry Editor address bar:Computer\HKEY_CURRENT_USER\Software\Classes\CLSID
Once there, right-click the CLSID folder in the sidebar and select “New > Key“.
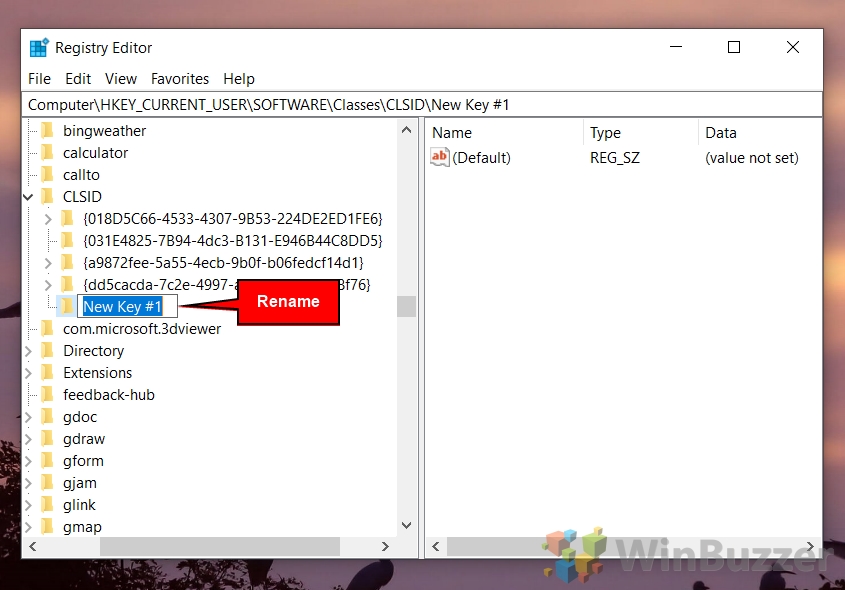
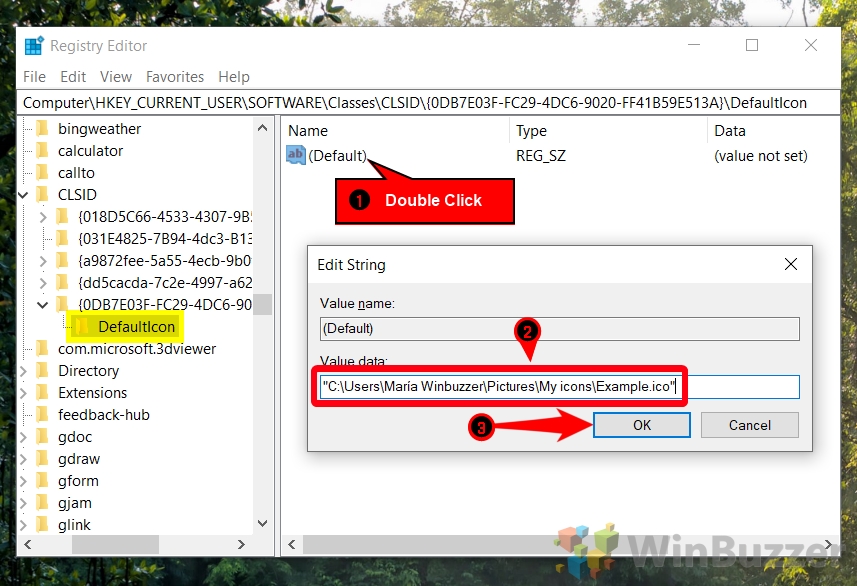
- Rename the key to reference the 3D objects icon
The name you’ll want to paste into the key is:{0DB7E03F-FC29-4DC6-9020-FF41B59E513A}If you already have a key named
{0DB7E03F-FC29-4DC6-9020-FF41B59E513A}, you do not need to create another one.
- Create a new key inside the “{0DB7E03F…}” key
To do so right-click on your newly created key and press “New > Key”.
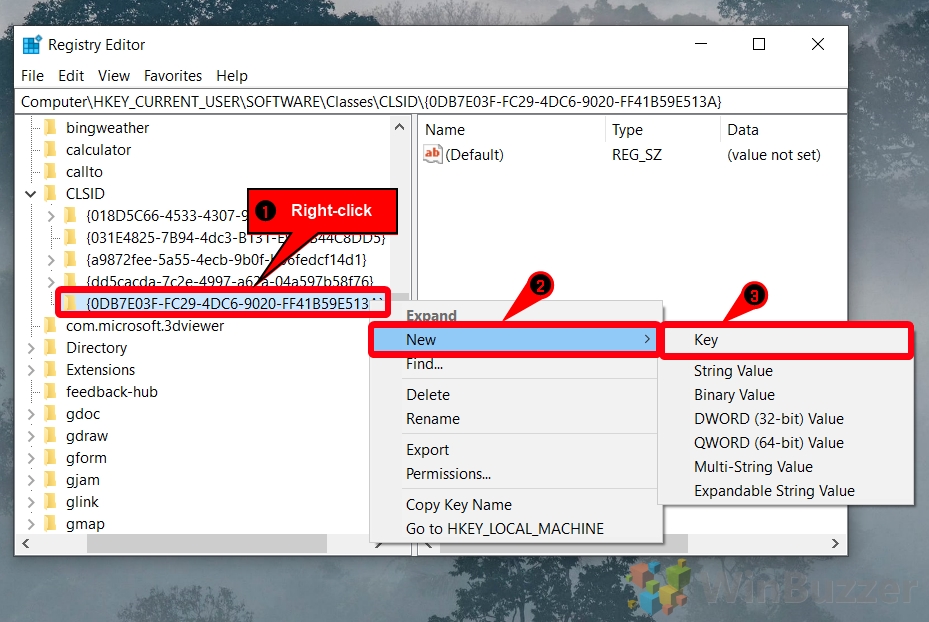
- Name the new key “DefaultIcon”
If you already have a DefaultIcon key, you do not need to create the folder.

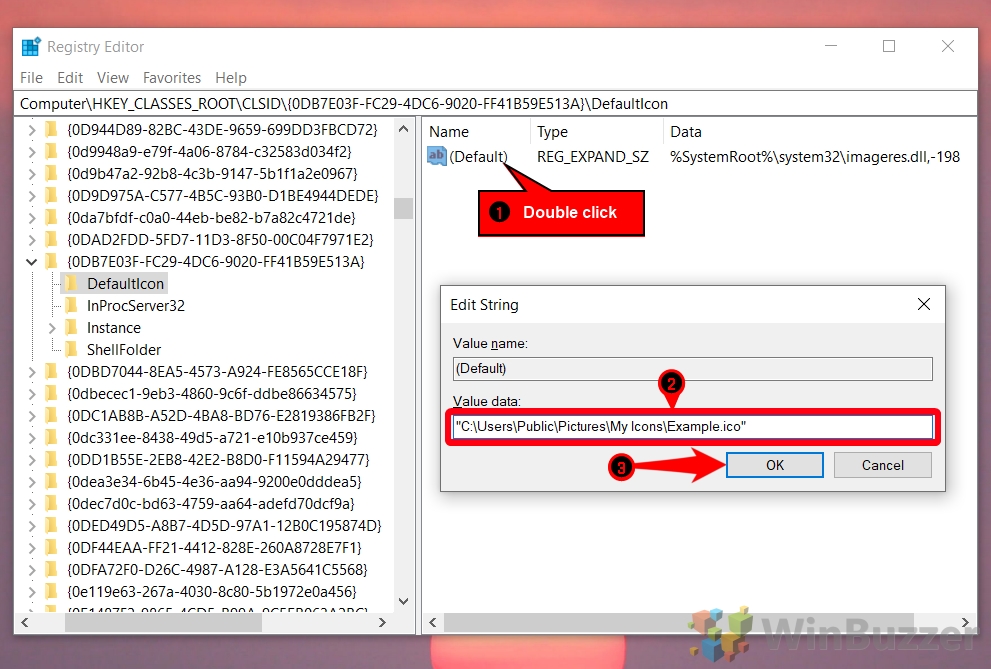
- Double-click the “(Default)” string in the main pane and set the value data to your icon path
Make sure you are inside of the “Default” icon key before you do so. Press “OK” once you have specified the path to your .ico file in quotation marks.
- Repeat the process for the icon of the Desktop folder
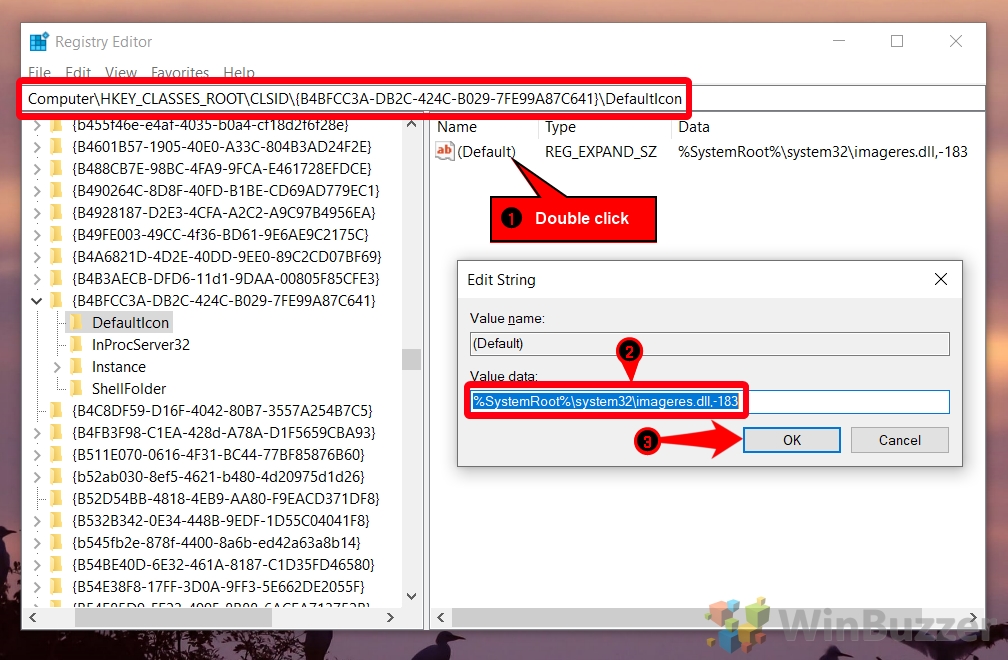
For the Desktop folder, you’ll want to use/search for the key name{B4BFCC3A-DB2C-424C-B029-7FE99A87C641}in your CLSID key instead. You’ll need to create a “DefaultIcon” folder and point the “(Default)” string to your icon file like in the previous steps.

- Repeat the process for the Documents folder
For the documents folder, you should name the key{d3162b92-9365-467a-956b-92703aca08af}.

- Repeat the process for the Downloads folder icon
The key name for the Downloads folder is{088e3905-0323-4b02-9826-5d99428e115f}.

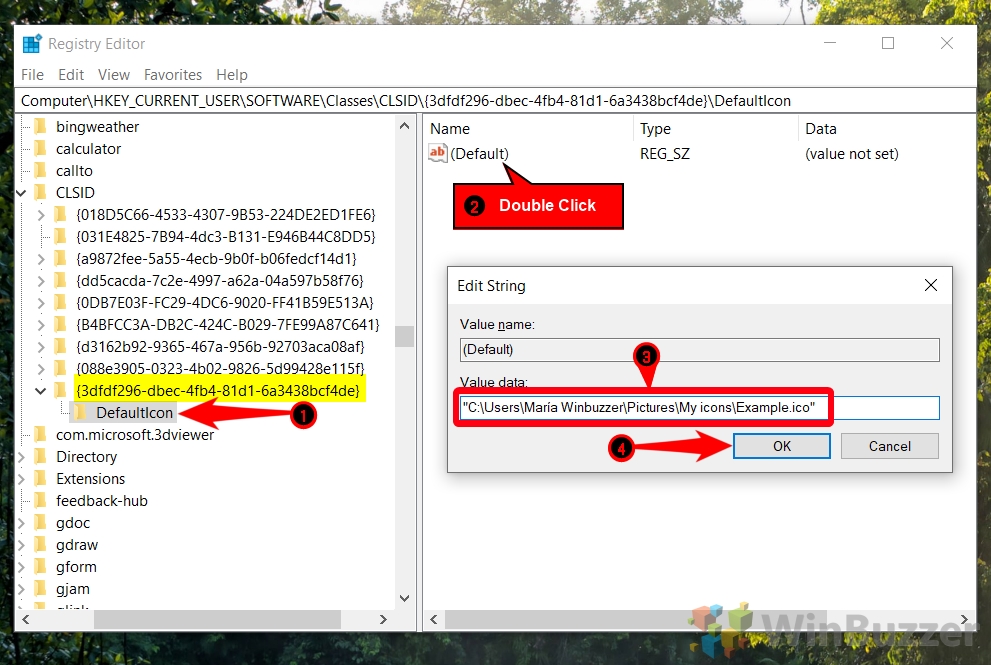
- Repeat the process for the Music Folder icon
The key name for the music folder is{3dfdf296-dbec-4fb4-81d1-6a3438bcf4de}.
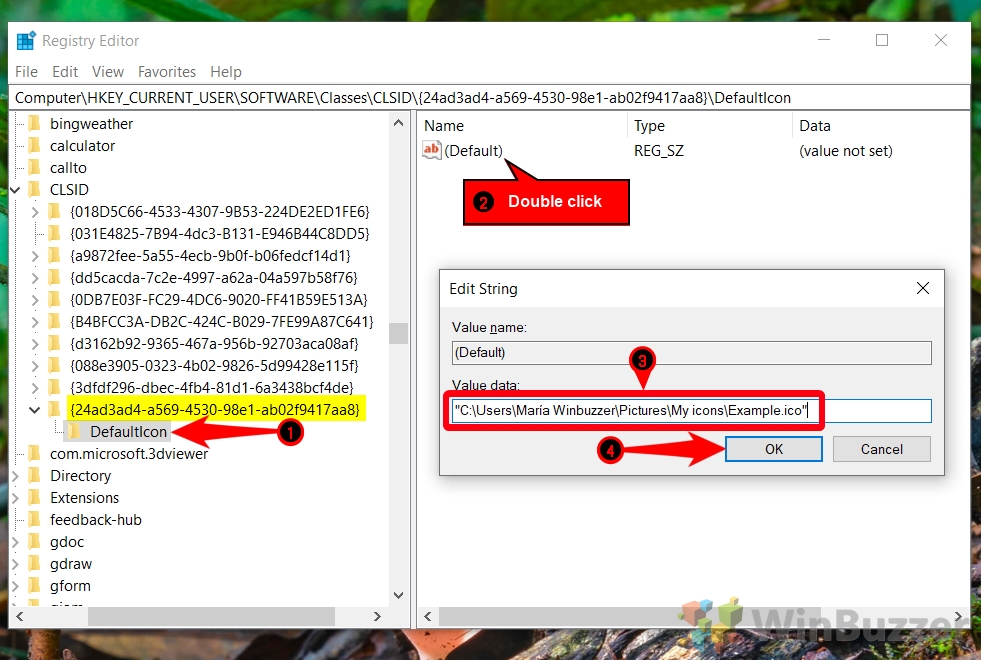
- Repeat the process for the Pictures folder icon
The key name for the Pictures folder is{24ad3ad4-a569-4530-98e1-ab02f9417aa8}.
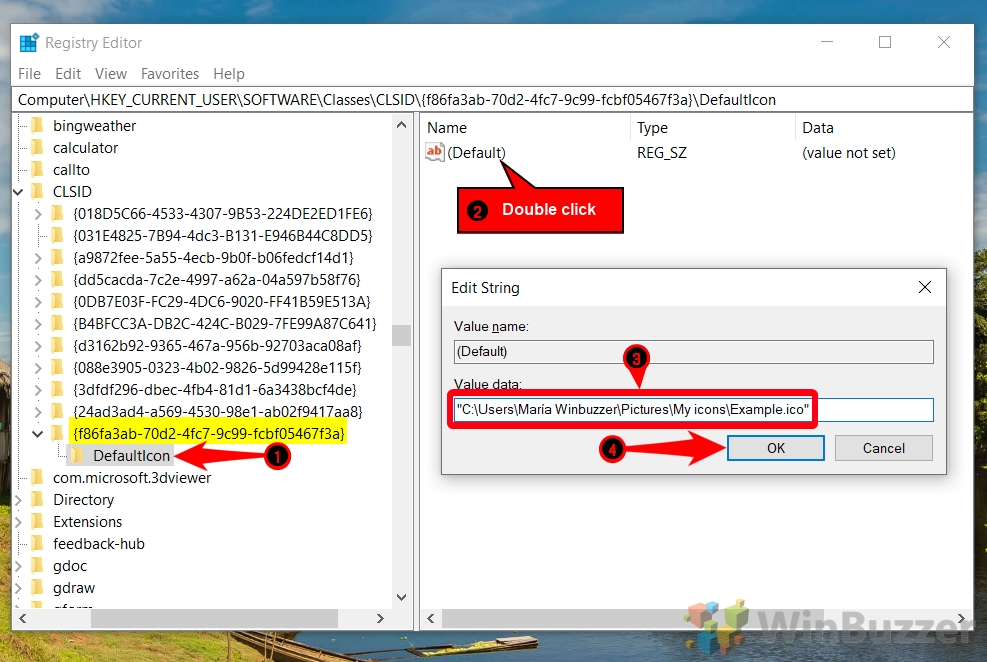
- Repeat the process for the Videos folder icon
The name of the Videos icon key is{f86fa3ab-70d2-4fc7-9c99-fcbf05467f3a}.
You have now changed the icon of every folder in the the “This PC” section. If you’d like to restore them to their defaults, you should use the following file paths in the default string:
Folder
Default Icon 3D Objects %SystemRoot%\system32\imageres.dll,-198 Desktop %SystemRoot%\system32\imageres.dll,-183 Documents %SystemRoot%\system32\imageres.dll,-112 Downloads %SystemRoot%\system32\imageres.dll,-184 Music %SystemRoot%\system32\imageres.dll,-108 Pictures %SystemRoot%\system32\imageres.dll,-113 Videos %SystemRoot%\system32\imageres.dll,-189 Refresh your File Explorer window to apply any changes.
How to This PC Folder Icons for All Users
If you have multiple users on the same PC and wish to add custom folder icons for the This PC section for all of them, there’s no need to repeat the above process multiple times. Instead, you can change the keys in the HKEY_CLASSES_ROOT section of Registry editor. Here’s how:
- Open Registry Editor
Press Start and type “regedit”, then click the top result.

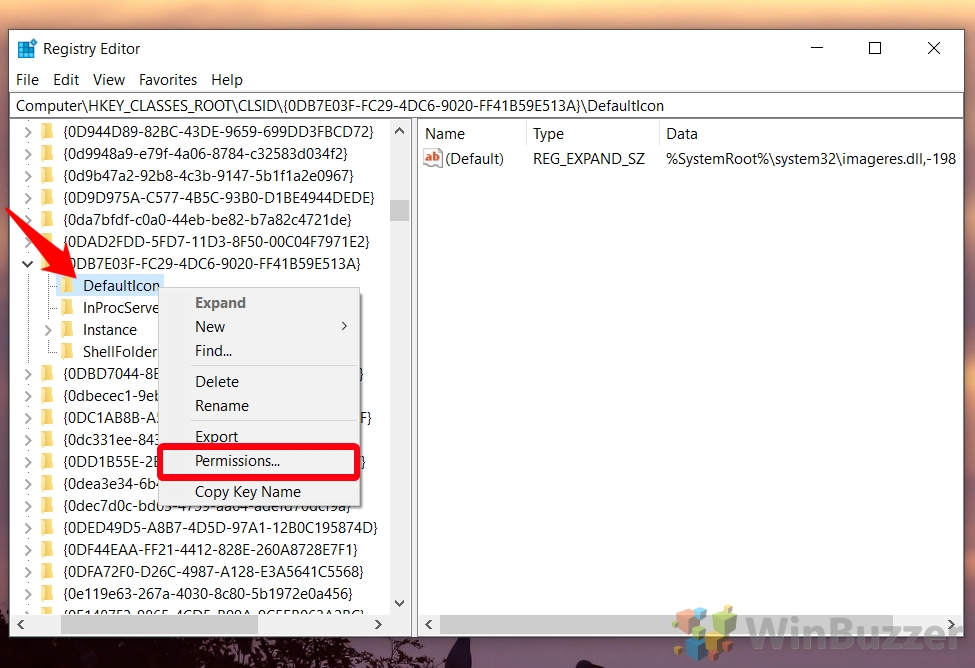
- Navigate to the root 3D objects folder icon key, right-click it, and press “Permissions…”
To get to the 3D objects key, paste the following in your Regedit address bar:Computer\HKEY_CLASSES_ROOT\Software\Classes\CLSID\{0DB7E03F-FC29-4DC6-9020-FF41B59E513A}\DefaultIconYou can right-click the folder in the left sidebar to bring up the permissions menu.
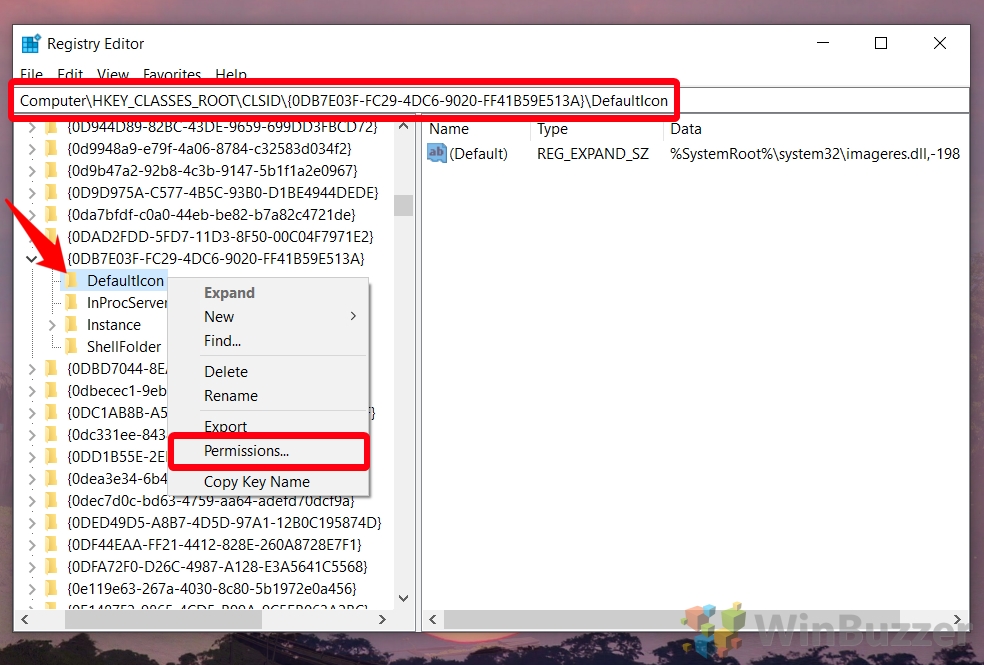
- Open Special Permissinons
Click “Advanced“.
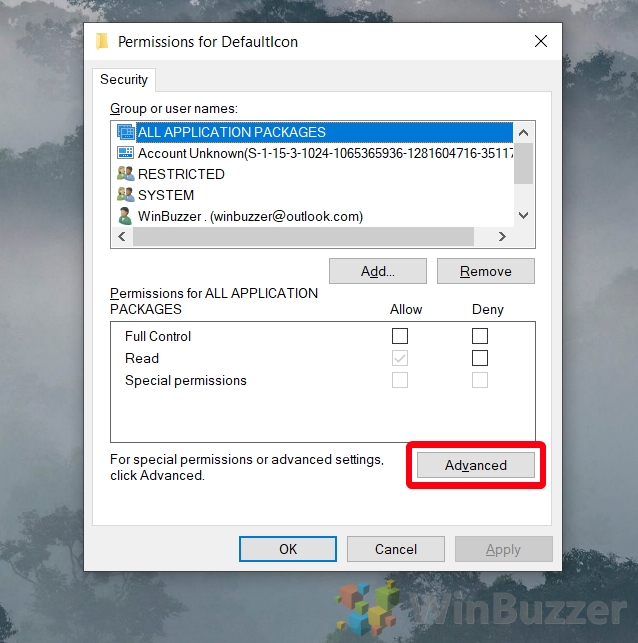
- Press “Change” next to the owner field
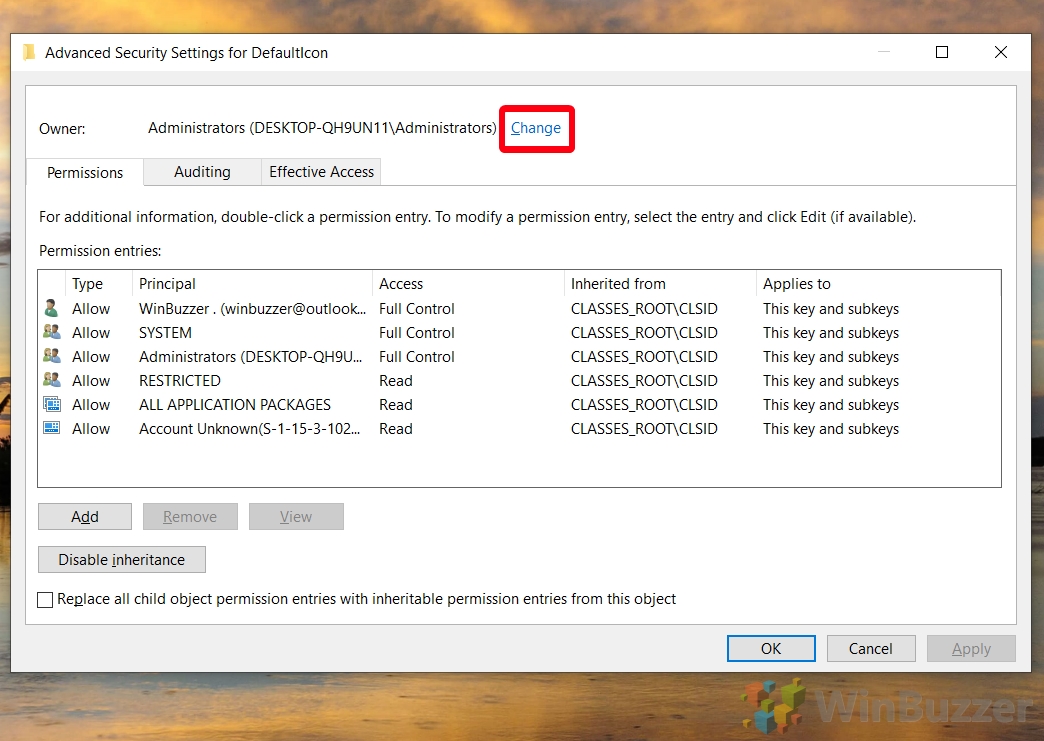
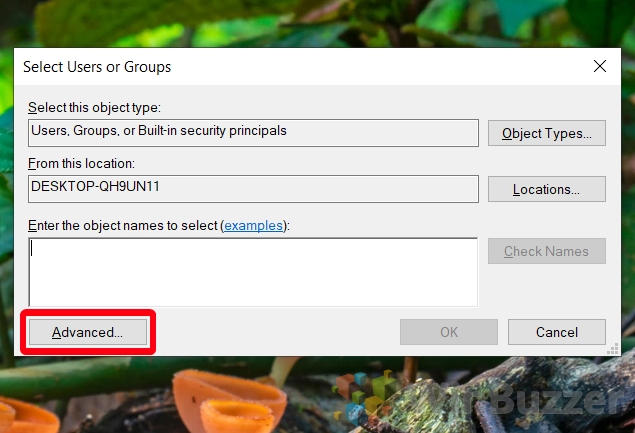
- Click “Advanced…” in the “Select User or Group” menu
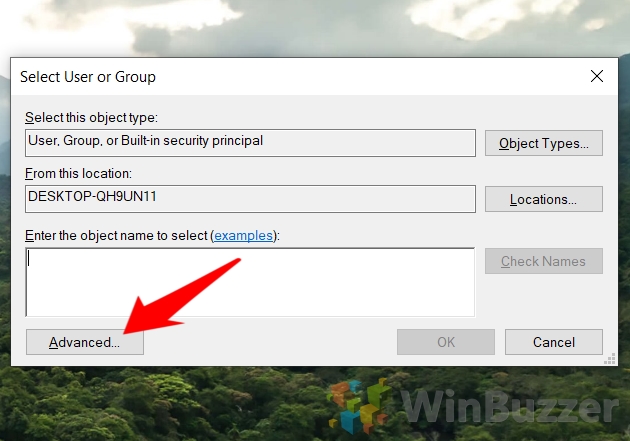
- Press the “Find Now” button, select your admin account, and press “OK”

- Press “OK”
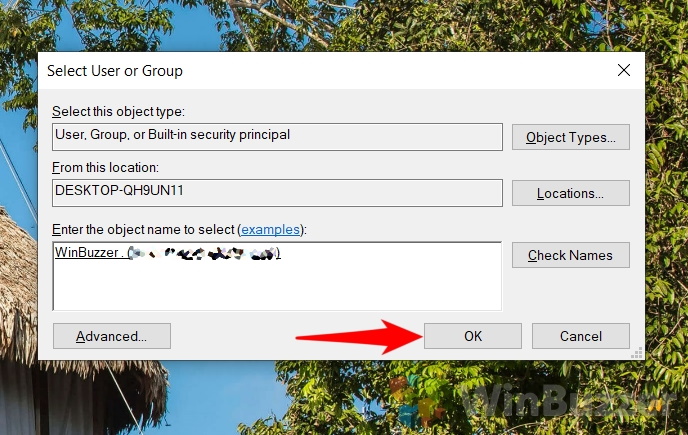
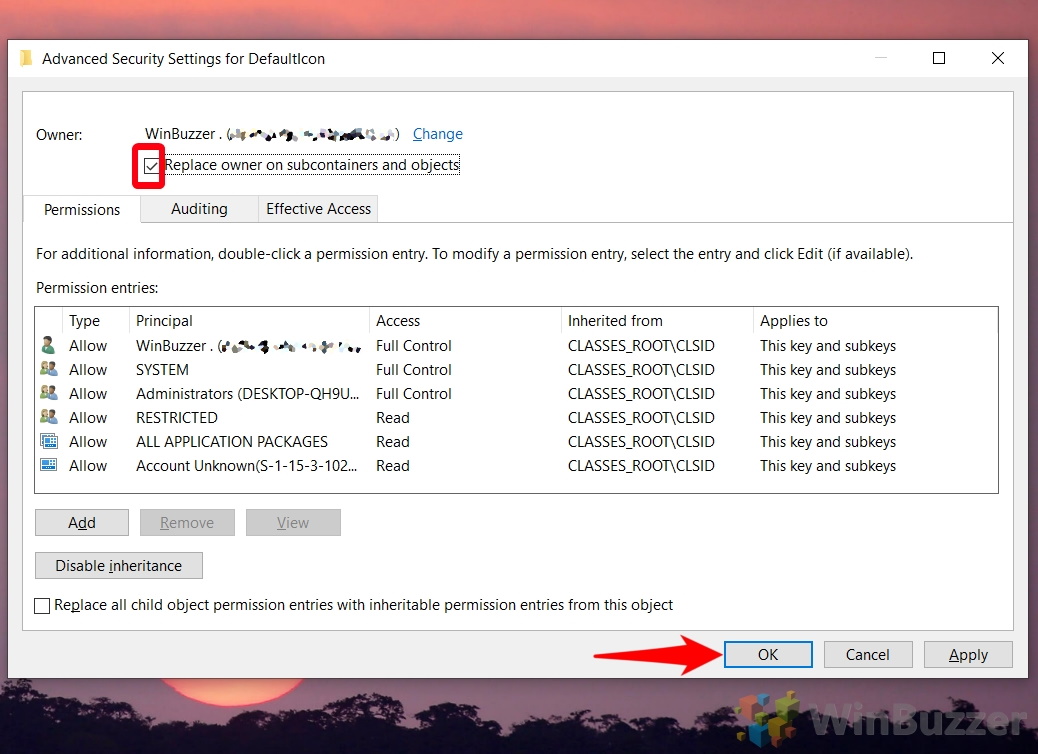
- Tick “Replace owner on subcontainers and objects” and press “OK” again
- Right-click the DefaultIcon folder and press “Permissions…” again
- Press “Add…” in the permissions window

- Click “Advanced…”
- Press “Find Now”, select your user, and press “OK”
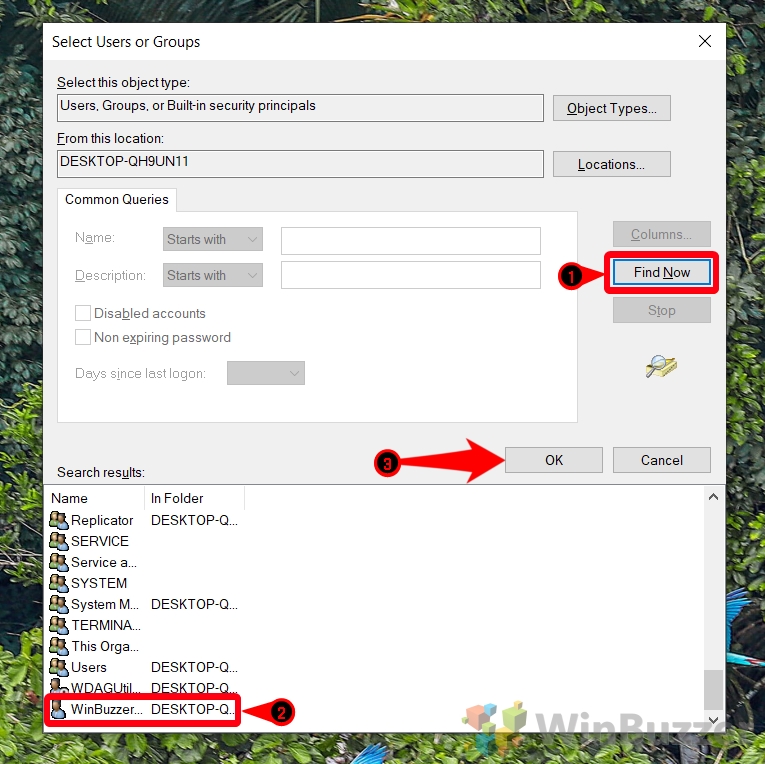
- Press “OK” again

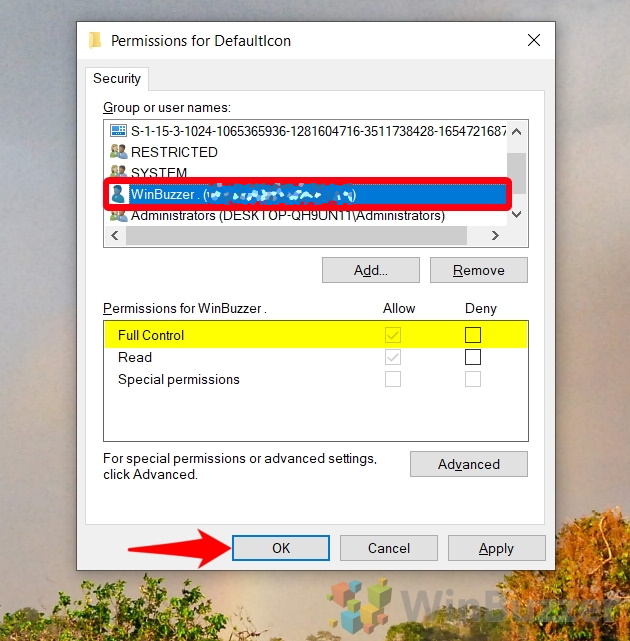
- Select the user from the “Security” list and tick “Allow” next to “Full Control”
Press “OK” to apply the changes.
You’ll have to repeat steps 1 – 14 for each icon you change.
- Double click the “(Default)” string the 3D object’s “DefaultIcon” folder and enter your icon path in the “Value data” field
Press “OK” to apply the changes.
- Repeat the process for the Desktop folder icon
For the Desktop folder, you’ll want to use/search for the key name{B4BFCC3A-DB2C-424C-B029-7FE99A87C641}in your CLSID key instead. Remember that you should be changing the “(Default)” string in the “DefaultIcon” folder, not in the main one. Press “OK” to apply the changes.
- Change the Documents folder icon
To change the Documents folder icon, you should navigate to the{d3162b92-9365-467a-956b-92703aca08af}key and change the value data of the “(Default)” string in its “DefaultIcon” subkey.

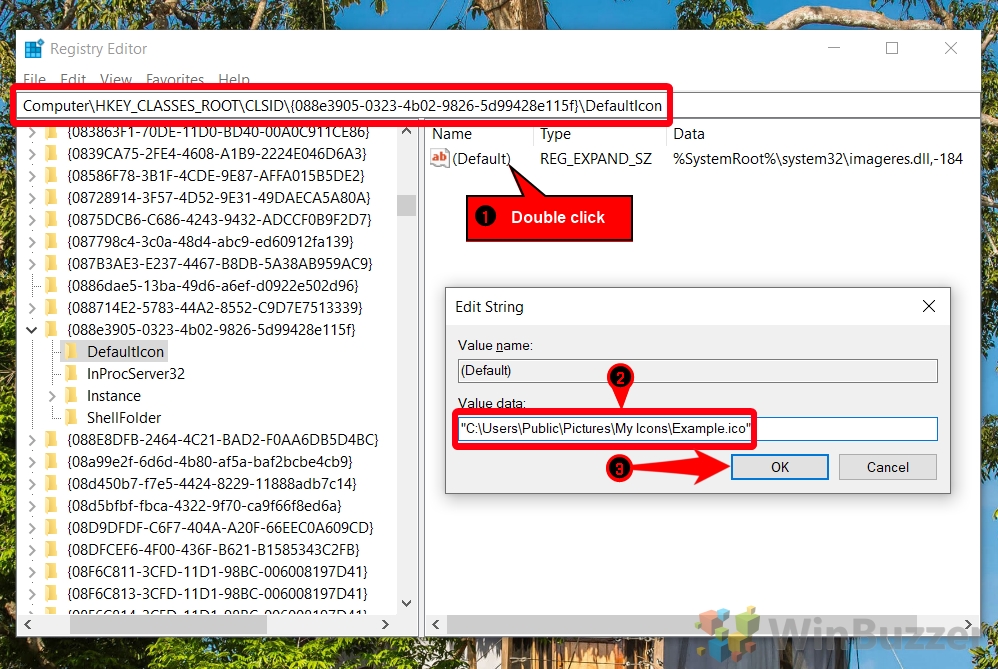
- Change the Downloads folder icon
To change the Downloads folder icon, you should navigate to the{088e3905-0323-4b02-9826-5d99428e115f}key and change the value data of the “(Default)” string in its “DefaultIcon” subkey.
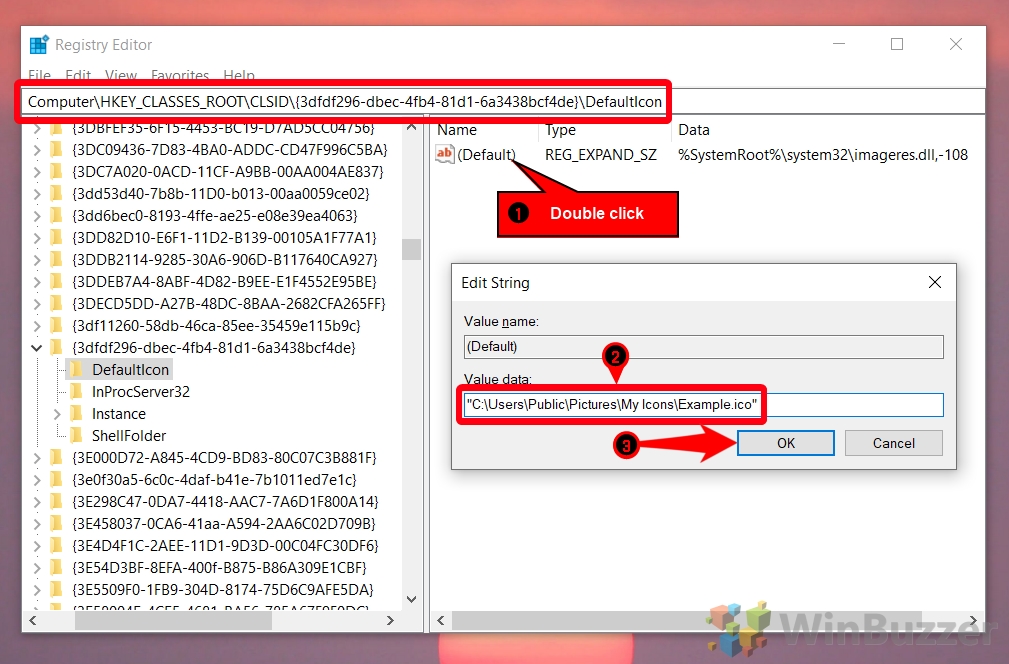
- Change the Music folder icon
To change the Music folder icon, you should navigate to the{3dfdf296-dbec-4fb4-81d1-6a3438bcf4de}key and change the value data of the “(Default)” string in its “DefaultIcon” subkey.
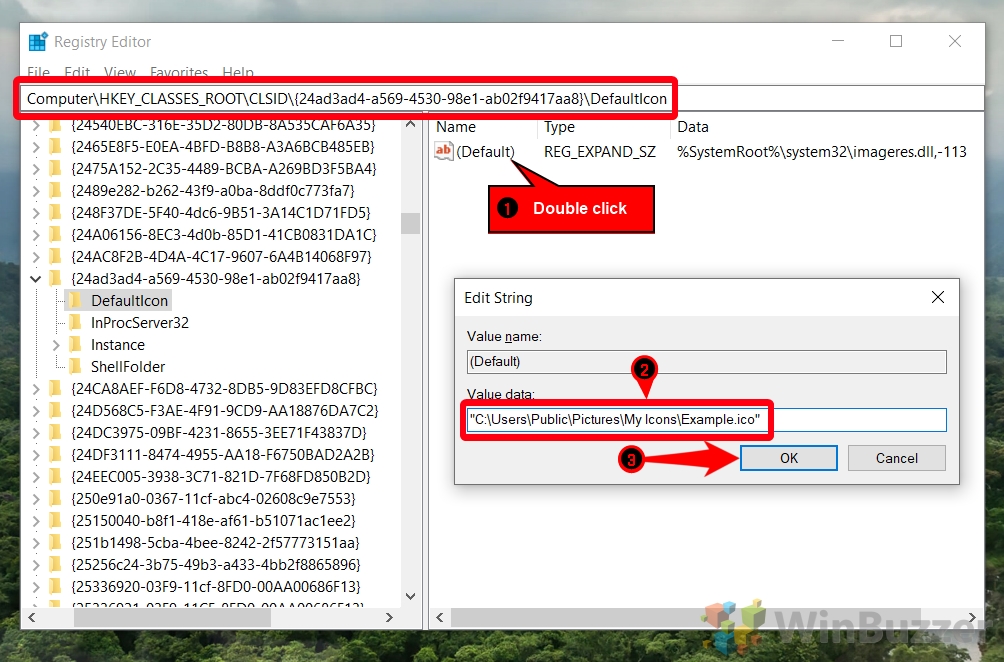
- Change the Pictures folder icon
To change the Pictures folder icon, you should navigate to the{24ad3ad4-a569-4530-98e1-ab02f9417aa8}key and change the value data of the “(Default)” string in its “DefaultIcon” subkey.
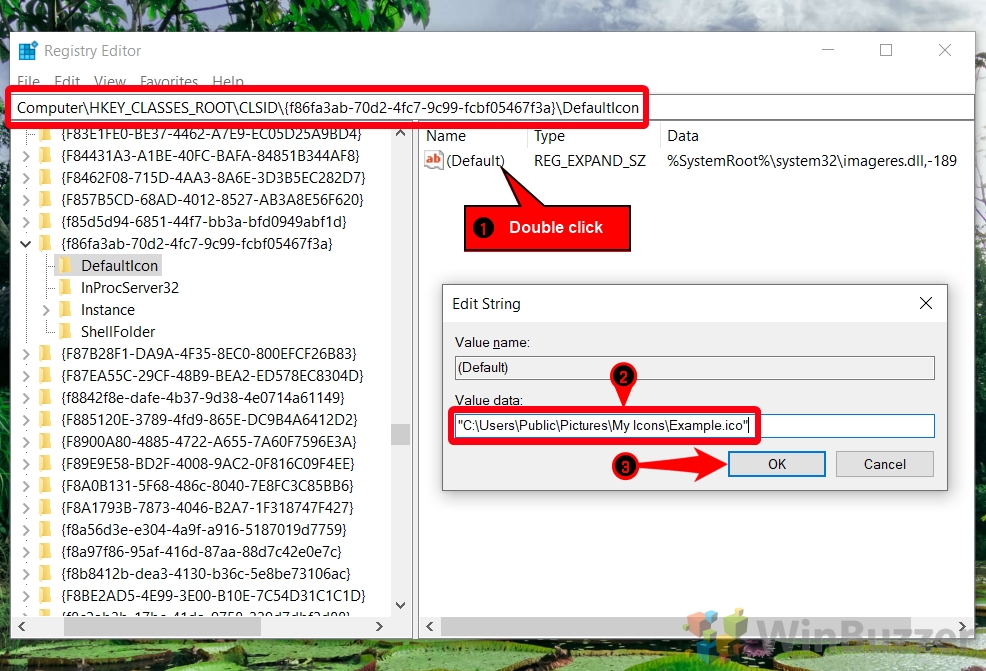
- Change the Videos folder icon
To change the Videos folder icon, you should navigate to the{f86fa3ab-70d2-4fc7-9c99-fcbf05467f3a}key and change the value data of the “(Default)” string in its “DefaultIcon” subkey.
FAQ – Frequently Asked Questions About Customizing Icons in Windows
How do I change the icon of a specific file type in Windows 10 and Windows 11?
To change the icon for a specific file type, you must edit the Windows Registry, which can be risky if not done carefully. First, open the Registry Editor by pressing Win + R, typing regedit, and pressing Enter. Navigate to HKEY_CLASSES_ROOT\.[fileExtension], where [fileExtension] is the extension of the file type you want to change (e.g., .txt for text files). Within this key, find or create a subkey named DefaultIcon. Set the default value of this key to the full path of your new icon file. Remember to back up your registry before making any changes and proceed with caution.
How can I create a custom icon from an image in Windows 10 and Windows 11?
To create a custom icon from an image, you’ll need to convert the image to the ICO format, which supports transparency and multiple sizes. You can use image editing software like Photoshop with an ICO plugin or online conversion tools. When creating your icon, consider including sizes like 16×16, 32×32, 48×48, and 256×256 pixels within the ICO file to ensure it looks good at various scales. Save your ICO file to a location where it won’t be accidentally deleted, as Windows will reference this file for the icon.
Is it possible to change the icons of pinned apps on the taskbar directly in Windows 10 and Windows 11?
Directly changing icons for pinned taskbar apps is not straightforward due to how Windows caches these icons. However, you can work around this by changing the icon of the application’s shortcut first. To do this, locate the shortcut in the Start Menu or on your desktop, right-click it, select “Properties“, and then “Change Icon“. After changing the shortcut’s icon, unpin the original app from the taskbar and repin the modified shortcut. This process forces Windows to refresh the taskbar icon.
How do I change folder icons to custom images in Windows 10 and Windows 11 for a more personalized look?
To change a folder icon to a custom image, right-click on the folder and select “Properties”. Go to the “Customize” tab and click on “Change Icon“. Here, you can browse to the location of your custom ICO file and select it as the new icon. Apply the changes, and your folder will now display the custom icon. This method is great for personalizing project folders or categorizing your files visually.
Can I change the network icon in the system tray for Windows 10 and Windows 11?
Changing the network icon in the system tray is not supported through standard Windows settings and can be challenging due to system restrictions. However, third-party customization software like “Rainmeter” or “Classic Shell” might offer solutions to customize system tray icons, including the network icon. Be cautious when using third-party software, ensuring it’s from a reputable source to avoid security risks.
How do I revert to the default icons for all my customized shortcuts and folders in Windows 10 and Windows 11?
To revert customized shortcuts to their default icons, right-click on the shortcut, select “Properties“, go to the “Shortcut” tab, and click “Change Icon“. Here, you can choose one of the default icons provided by Windows or browse to the original application’s executable file to use its default icon. For folders, the process is similar; access the “Customize” tab in the folder properties and click “Restore Default“. This will revert the folder to its original Windows icon.
What’s the best way to organize and manage a large collection of custom icons on Windows 10 and Windows 11?
Organizing a large collection of custom icons can be made easier by categorizing them into folders based on type, usage, or theme. Consider using descriptive folder names and keeping your icon library in a dedicated location that’s backed up regularly. For more advanced management, icon library software can help catalog your icons, allowing for easier searching, previewing, and applying of icons. Regularly pruning unused icons and duplicates can also keep your collection manageable.
How do I fix broken or incorrect icons that appear after customizing in Windows 10 and Windows 11?
Broken or incorrect icons can often be fixed by rebuilding the icon cache. To do this, open Command Prompt as an administrator and execute the following commands: ie4uinit.exe -show, taskkill /IM explorer.exe /F, and start explorer.exe. This sequence refreshes the icon cache by restarting the Windows Explorer process. If the issue persists, ensure the custom icons are still in their original locations and haven’t been moved or deleted.
Can I assign different icons to individual files within the same file type in Windows 10 and Windows 11?
Windows doesn’t support different icons for individual files of the same type directly. A workaround is to create shortcuts for the files you want to customize and then change the icons of those shortcuts. This method is particularly useful for desktop shortcuts or files you frequently access, allowing for visual differentiation without altering the file type association.
How do I change the drive icons in ‘This PC’ on Windows 10 and Windows 11?
Changing drive icons involves editing the Windows Registry. Open Registry Editor and navigate to HKEY_LOCAL_MACHINE\SOFTWARE\Microsoft\Windows\CurrentVersion\Explorer\DriveIcons. Create a new key named after the drive letter you wish to customize (e.g., D). Inside this key, create another key named DefaultIcon and set its default value to the path of your custom icon file. As with any registry edits, proceed with caution and consider backing up your registry before making changes.
What are the dimensions and format requirements for custom icons in Windows 10 and Windows 11?
Custom icons should be in the ICO format, which supports transparency and multiple sizes within a single file. Commonly included sizes are 16×16, 32×32, 48×48, and 256×256 pixels. Including these sizes ensures that your icon looks sharp and clear in different contexts, such as the taskbar, desktop, or file explorer. Some icon editing tools allow you to create an ICO file containing all these sizes from a single source image.
How do I ensure my custom icons remain after a system update in Windows 10 and Windows 11?
System updates can sometimes revert custom icons to their defaults. To safeguard your customizations, keep a backup of your custom icons and the paths where they’re applied. After an update, you may need to reapply some of your custom icons. Using a consistent folder structure for your icons can simplify this process, making it easier to locate and reapply them as needed.
Can I use SVG files as icons in Windows 10 and Windows 11?
Windows does not directly support SVG files for icons. To use an SVG image as an icon, you’ll need to convert it to the ICO format. Several online tools and image editors can perform this conversion, allowing you to specify the desired sizes for the ICO file. Ensure the SVG is simplified and not overly complex to maintain clarity when scaled down to icon sizes.
How do I change the icon of a pinned website shortcut on my desktop in Windows 10 and Windows 11?
To change the icon of a pinned website shortcut, right-click on the shortcut and select “Properties“. In the “Web Document” tab, you’ll find a “Change Icon” button. Clicking this allows you to browse for and select a new icon. This method is useful for distinguishing between multiple web shortcuts on your desktop or taskbar, making frequently accessed sites more recognizable.
Is there a way to batch change multiple folder icons at once in Windows 10 and Windows 11?
Windows doesn’t provide a built-in feature for batch changing folder icons. However, third-party software exists that can facilitate this process, allowing you to apply a custom icon to multiple folders simultaneously. When choosing third-party software, look for options with positive reviews and from reputable sources to ensure compatibility and security. Always back up important data before using such tools, as bulk changes carry a risk of unintended consequences.
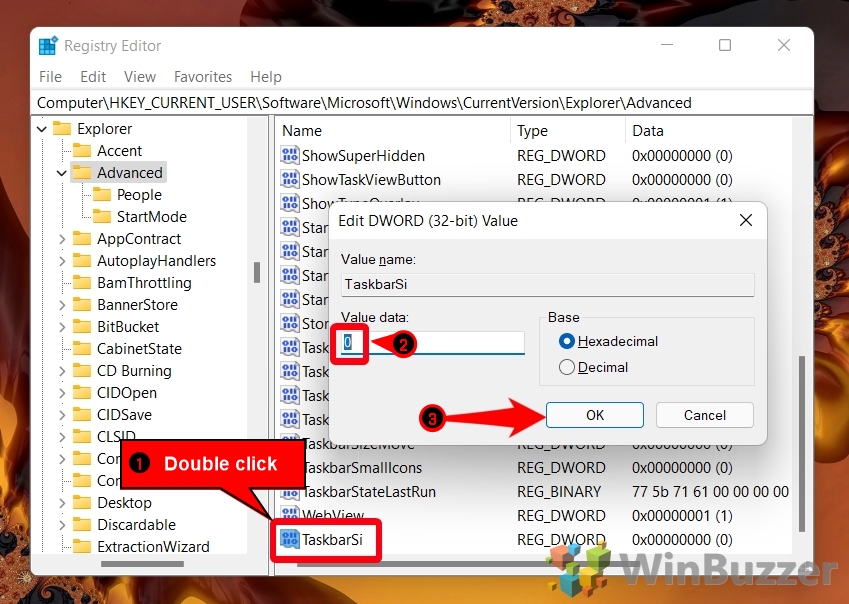
Extra: How to Change Desktop and Taskbar Icon Size
Now that you have learned how to change app icons, folder icons, and more, you’ll probably want to know how to change your desktop and taskbar icon size to show off them off better. You can do so by following our guide here.
Extra: How to Make Your Taskbar Bigger or Smaller
Alternatively, you can show off your customized icons by following our guide on how to make your entire taskbar bigger or smaller.
Ryan has had a passion for gaming and technology since early childhood. Fusing the skills from his Creative Writing and Publishing degree with profound technical knowledge, he enjoys covering news about Microsoft. As an avid writer, he is also working on his debut novel.


