

Excel is an incredible tool for data processing, but its file format isn’t quite as universal as the humble PDF. The PDF is harder to edit, compatible with a wider range of devices, and requires little to no additional software. This, combined with its static nature, makes it an ideal format for published reports. In this guide we are showing you how to convert Excel files to PDF so you can do just that.
How to convert Excel to PDF without losing formatting
Before we start on the various methods to save Excel files as PDFs, it’s important to discuss how you can minimize the chances you’ll get a bad conversion. Converting .xls or .xlsx to PDF can cause problems with pages being cut off or misaligned.
As a result, before you save to PDF, we recommend your margins, orientations, and size, as well as any headers of footers you’d like. You may also want to define your print area in the page layout tab and use page breaks to separate different tables. While you’re in the page layout tab, you should also change the width, height, and scale of your document to be suitable for printing.
How to Save Excel Files as PDF
Converting Excel files to PDF directly from Excel is a straightforward method that preserves the layout and formatting of your documents. This section guides you through the process step by step.
- Access the File Menu
Click on “File” located in the top-left corner of your Excel spreadsheet to open the backstage view.

- Save a Copy as PDF
Select “Save a Copy” in the sidebar, then choose “This PC“. Change the save format to PDF by clicking the dropdown arrow next to “Excel Workbook” and selecting “PDF“. Clicking the “Save” button will then prompt you to save the Excel file as a PDF.

- Optional: Adjust PDF Settings
For more control over the PDF output, click “More options” under the format dropdown. This allows you to modify the PDF settings before saving.

- Specify Save Options
In the File Explorer “Save As” pop-up, press “Options…” to access and adjust your page options, ensuring your document’s layout is preserved in the PDF format.

- Complete the Save Process
After adjusting your settings, click “OK” and then “Save” to convert your Excel file to a PDF. Your document will now be saved in the chosen location as a PDF file.

How to Use Excel to Export as PDF
Exporting your Excel document as a PDF is a slightly different method that some users may find more intuitive. Follow these steps to export your Excel files as PDFs.
- Open File Menu
Begin by opening your Excel document and clicking on “File” in the top left corner to access the backstage view.

- Export to PDF/XPS
Navigate to “Export” in the sidebar and select “Create PDF/XPS Document“. This option is designed specifically for converting documents to PDF.

- Optional: Customize PDF Export Settings
Click the “Options…” button in the File Explorer pop-up to access additional settings. This step allows you to fine-tune how your Excel document is exported to PDF.

- Finalize Export Settings
Adjust your document settings as needed and press “OK“. You can now save your Excel file as a PDF in your preferred location.

How to Add an Export to PDF Button to the Quick Access Toolbar
Enhancing productivity by adding a “Publish to PDF” button to your Quick Access Toolbar allows for quick PDF exports. Here’s how to set it up.
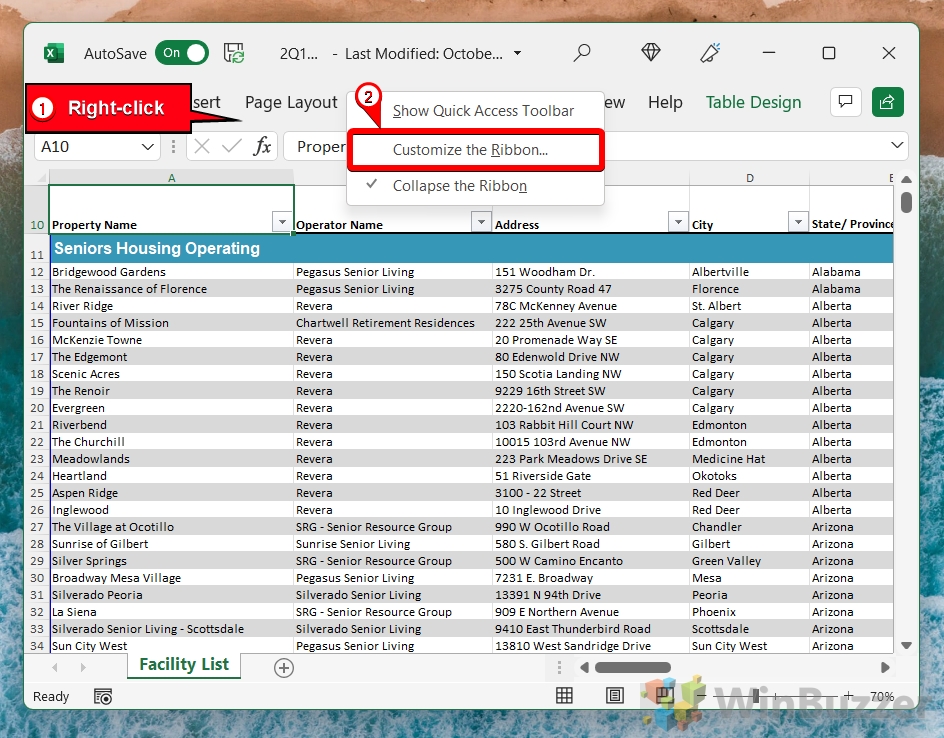
- Customize the Ribbon
Right-click the Excel ribbon and select “Customize the Ribbon…” to open the Excel Options dialog.

- Add Publish as PDF Command
In the “Quick Access Toolbar” section, add the “Publish as PDF” command by selecting it from the “All Commands” list and clicking “Add >>“.

- Use the PDF or XPS Button
Now, you can simply click the “PDF or XPS” button in your Quick Access Toolbar whenever you want to export an Excel document as a PDF.

- Publish Your Document
Choose your save location and click “Publish” in the File Explorer to complete the PDF export process.

How to Add the Email as PDF Attachment Button to the Quick Access Toolbar
If you usually email your PDFs straight away, you can cut out even more busy work by adding the “Email as PDF Attachment” command to your Quick Access Toolbar.
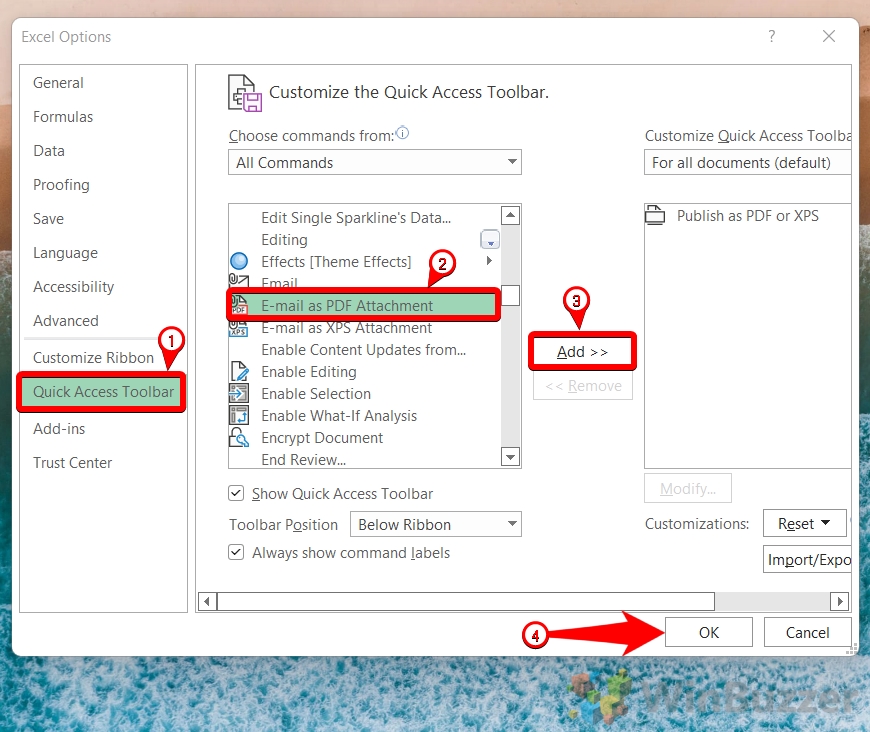
- Right-click your ribbon and choose “Customize the Ribbon…”

- Click “Quick Access Toolbar” in the sidebar and add the “Email as PDF Attachment” command
You can do so by scrolling down the list until you find the command, clicking it, then pressing “Add” between the two columns. Once you’re done, press “OK” to apply the changes.

- Click the “E-mail as PDF Attachment” button in your Quick Access Toolbar

- Email your PDF file to the intended recipient

How Convert an Excel File to a PDF with File Converter
The final method we’ll be showcasing today involves the use of File Converter, a free tool that lets you convert pretty much anything in a couple of clicks. Once you’ve installed it, here’s how to use it to convert XLXS to PDF:
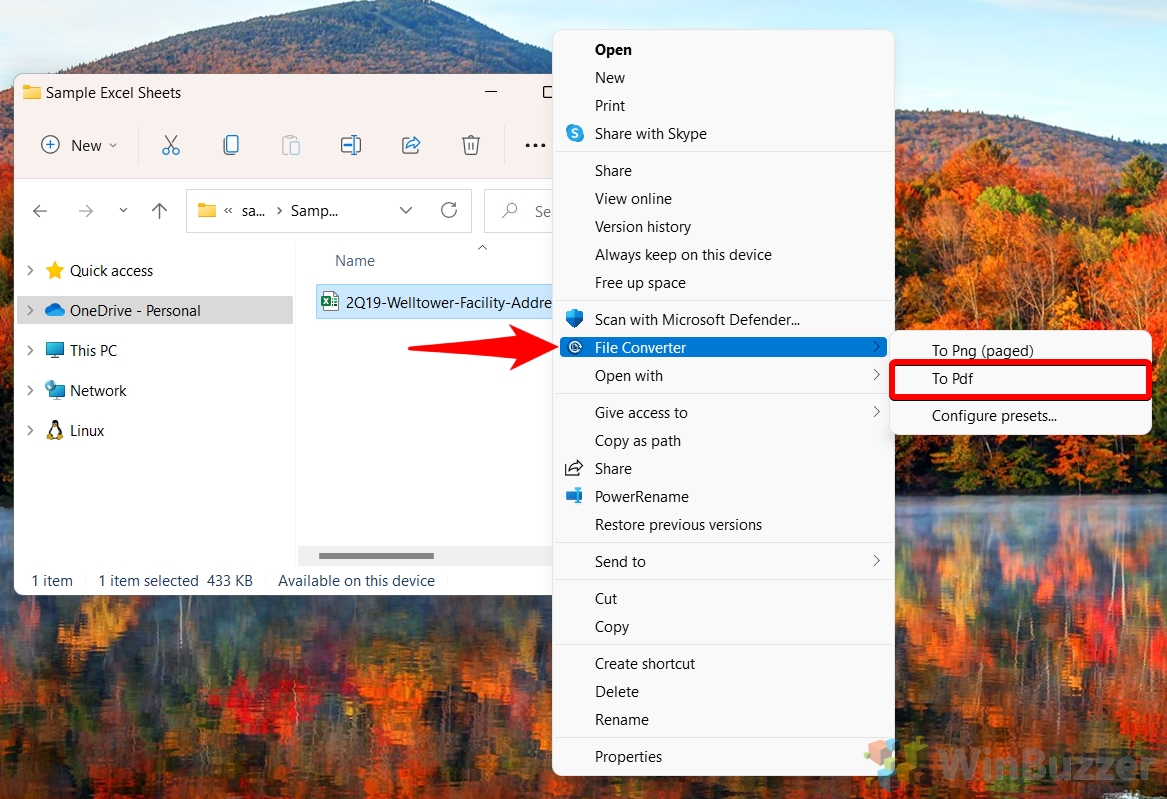
- Right-click the Excel file you want to convert and press “Show more options”

- Choose “File Converter” from the context menu and press “To Pdf”

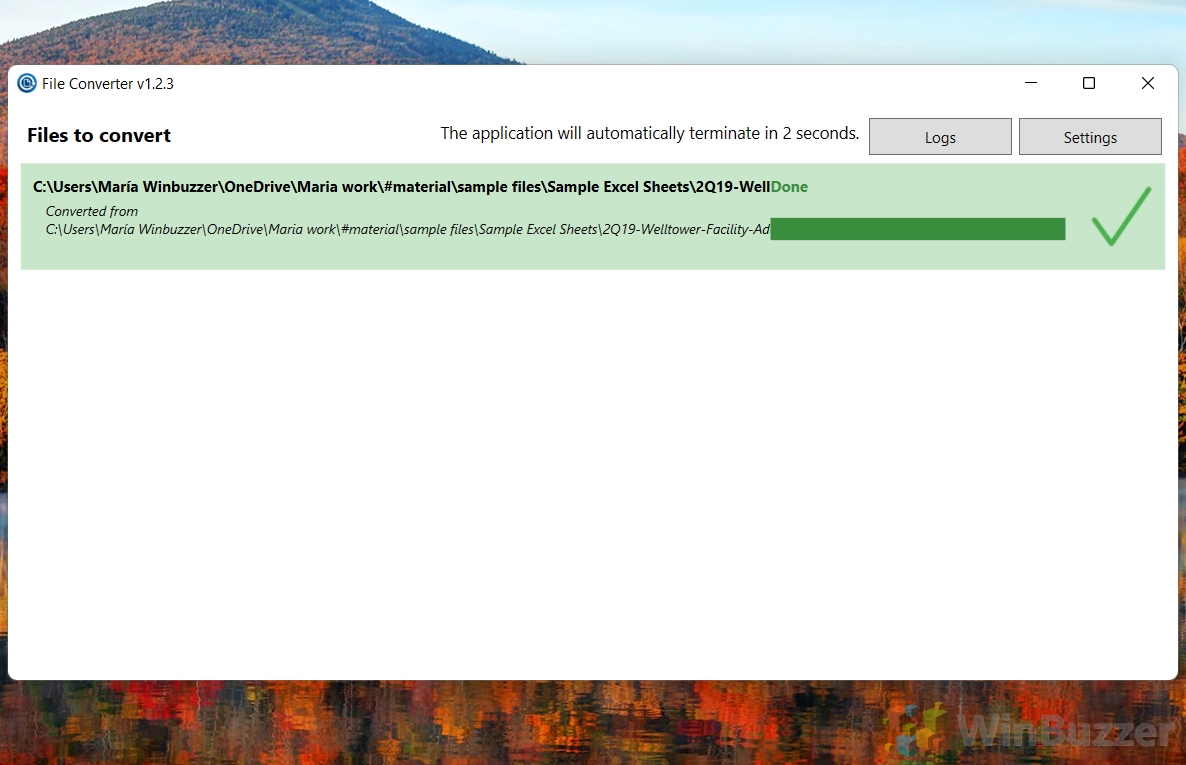
- Wait for the conversion to complete
Once the conversion is complete, your progress bar will reach the end and the entry will light up green.

- View your output PDF
Navigate to the specified output folder of your PDF to view the file in full.


FAQ – Frequently Asked Questions About Excel to PDF Conversion
How can I ensure my PDF maintains the same formatting as my Excel file when converting?
To ensure your PDF maintains the same formatting as your Excel file, meticulously check and adjust the Page Layout settings in Excel prior to conversion. This includes setting the correct print area, page orientation (portrait or landscape), and size. In the PDF saving or exporting process, selecting options like high-quality printing might also help preserve visual fidelity. These preparation steps help in retaining the alignment, fonts, and overall structure of your document in the PDF output.
Can I directly email a converted PDF from Excel?
Yes, to email a converted PDF directly from Excel, you can utilize the feature detailed in section IV of the tutorial. By adding an “Email as PDF Attachment” command to your Quick Access Toolbar, you enable a functionality for quick sharing. This option prepares your Excel file as a PDF and attaches it to a new email in your default email application, streamlining the sharing process significantly. Ensure you have a configured email client to use this feature smoothly.
Can I convert multiple Excel sheets into one PDF?
Yes, converting multiple sheets into a single PDF file can be accomplished by selecting the “Entire Workbook” option in the PDF save or export dialogue. Before initiating the conversion process, make sure that all the sheets you wish to include in the PDF are formatted correctly and have their print areas appropriately set. This ensures that each sheet appears as intended in the consolidated PDF document, allowing for a seamless presentation of diverse data.
Is it possible to convert selected parts of an Excel sheet to PDF, not the whole sheet?
Yes, converting only selected parts of an Excel sheet to PDF is possible by highlighting the area you want to convert and then choosing the ‘Print Selection‘ in the print settings before saving or exporting to PDF. This method is useful for focusing on specific data or sections within a large dataset. Ensure your selection encompasses all relevant data and formatting you wish to include in the PDF to avoid partial or incorrect displays.
How can I adjust the size of the PDF during the Excel to PDF conversion process?
Adjusting the size of the PDF during the conversion process requires you to pre-set the page size and scaling options in Excel’s Page Layout tab. These settings directly influence the resulting PDF’s size and appearance. Select a suitable paper size based on your content’s layout (A4, Letter, etc.), and utilize the ‘Scale to Fit‘ settings to manage how your content fills the page. These careful adjustments ensure the generated PDF matches your presentation and sharing requirements.
Why does my Excel file lose some formatting when converted to PDF?
Formatting loss during Excel to PDF conversion typically occurs due to discrepancies between Excel’s flexible formatting capabilities and the fixed nature of PDFs. To minimize this, ensure that elements like conditional formatting, cell borders, and fonts are correctly applied and that the page layout settings (such as margins, orientation, and scale) are appropriately configured to retain the intended look. Also, verify that the selected area for conversion includes all necessary formatting and content. Using high-quality printing options where available can also aid in preserving visual elements.
Can I automatically convert an Excel file to PDF at scheduled times?
Automating Excel to PDF conversions at scheduled times requires an automation script or software capable of performing batch processing. This can be achieved using Excel macros paired with Windows Task Scheduler for basic needs, or through more sophisticated third-party file conversion software offering scheduled conversion features. It’s important to thoroughly test your automated process with different files to ensure reliability and accuracy in the conversions.
How can I protect the PDF file generated from Excel?
To protect a PDF file generated from Excel, you’ll need to use additional software like Adobe Acrobat or an online PDF editing tool once the conversion is complete. These tools allow you to add password protection, encrypt the PDF, and set permissions controlling whether the PDF can be printed, edited, or copied. Be sure to choose a strong password and correct security settings according to the sensitivity of your document’s content.
What’s the difference between saving and exporting an Excel file to PDF?
The distinction between saving and exporting an Excel file to PDF often lies in the specific options and control over the PDF output you receive. Saving tends to be straightforward and integrated into the standard save function, allowing for quick conversion with basic settings. Exporting, on the other hand, generally provides more detailed options for customization, such as adjusting the quality, including document properties, or ensuring bookmarks and hyperlinks are transferred. Each method serves different needs, with exporting offering a potentially higher level of control over the final PDF’s appearance and structure.
Can embedded Excel objects (like charts or images) be converted to PDF?
Embedded objects within Excel, including charts, images, and shapes, are preserved and appear in the PDF as they do in the original Excel file. For optimal results, ensure the objects are correctly positioned and within the print area boundaries in Excel. Since PDFs maintain the visual appearance of your document, intricate details in charts or clarity in images should remain intact after conversion.
How do I keep my Excel file’s hyperlinks active in the PDF?
To keep hyperlinks active when converting an Excel file to PDF, ensure that the option for generating “Document structure tags for accessibility” is selected if provided in your conversion settings. This ensures hyperlinks are operational in the PDF, facilitating navigation. Be aware, however, that not all conversion methods or settings may support this feature, so it may be beneficial to test or consult your software’s documentation for specific capabilities.
How can I make my Excel sheets fit onto one page in the PDF?
Making an Excel sheet fit onto one page in the PDF involves adjusting the ‘Scale‘ settings under Page Layout in Excel. You can choose to scale your worksheet by percentage or select the option to fit the sheet onto one page. This latter option adjusts the scale automatically to ensure your content fits within the desired page size, preserving the entirety of your document in a single-page PDF. These adjustments are crucial for maintaining readability and ensuring a professional presentation of your data.
What if I need to share an Excel worksheet as a PDF but keep it editable for collaboration?
Sharing an Excel worksheet as a PDF while retaining editability suggests a need for a dynamic sharing approach. Combine PDF sharing for wide accessibility with cloud-based spreadsheet services like Google Sheets or Microsoft OneDrive, where you can upload and share the original Excel file for real-time editing and collaboration. Use the PDF for presentations or static sharing, and direct collaborators to the online version for interactive editing.
How can I ensure that my Excel’s print area settings are preserved in the PDF?
Preserving Excel’s print area settings in the PDF conversion requires setting up the print area properly in Excel first. Select the range of cells you wish to include, go to the Page Layout tab, and set the ‘Print Area.’ Ensure your selection covers all necessary data and that page layout attributes like orientation and scale complement your chosen area. These settings are crucial as they directly influence which parts of your sheet are included and how they are formatted in the produced PDF.
Can I convert Excel workbooks with macros to PDF?
You can convert Excel workbooks with macros to PDF, and the conversion process itself is unaffected by the presence of macros. However, it’s important to note that the macros’ functionality will not carry over to the PDF, as PDFs do not support the dynamic or interactive content typically associated with Excel macros. Hence, the resulting PDF serves as a static representation of the data and formatting present in your Excel workbook at the time of conversion.
Related: How to Convert a Word Document to PDF (Docx to PDF)
The Microsoft Word document format, Docx, is an excellent format with a lot of flexibility and software support. However, there may be instances where the recipient of your document doesn’t have word processing software or when your document must look the same no matter the device it’s viewed on. In such cases, PDF can be the better choice. In our other guide, we show you how to make a Word document a PDF through saving and exporting from Word, or converting docx to PDF via a third-party tool.

Related: How to Freeze a Row or Column in Excel
Excel’s freeze pane feature is an invaluable tool for navigating large datasets without losing sight of your reference points. Whether you’re working with financial reports, data analysis, or any extensive spreadsheet, the ability to lock specific rows or columns in place as you scroll through your data can drastically enhance your productivity and data interpretation accuracy. In our other guide, we show you multiple ways to freeze and lock the rows and columns in an Excel sheet using the ribbon interface.

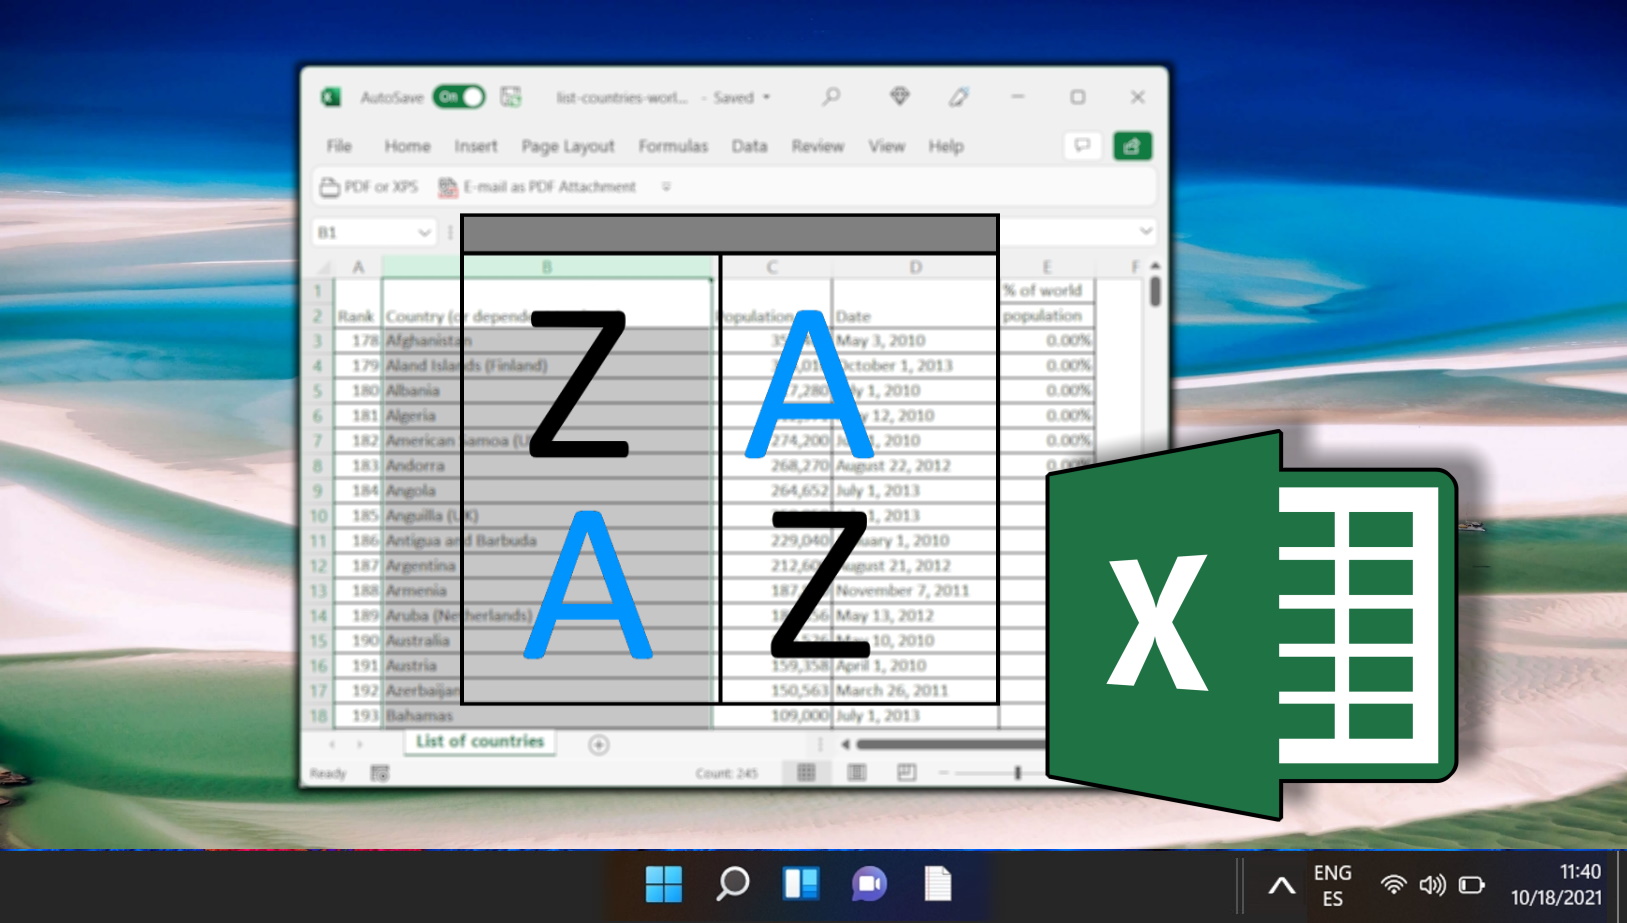
Related: How to Alphabetize Data in Excel Columns or Rows
One of the most common types of sorting in Excel is alphabetical sorting. Whether it’s a list of names, businesses, or mail addresses, sorting helps to organize and keep track of what you’re doing. In our other guide, we are showing you how to alphabetize in Excel for both rows and columns.
Related: How to Autofit Rows and Columns in Excel
By default, Excel cells are not very wide. You can fit a total of eight full characters, which is enough for many numbers, but not much for text. In our other guide, we show you how to autofit in Excel for both columns and rows, using double-click. shortcuts, and the ribbon.


