Creating your own business cards in Microsoft Word is a straightforward process that can save you time and money. Whether you’re using a template or starting from scratch, Word provides all the tools you need to design professional-looking business cards. This tutorial will guide you through both methods, ensuring you end up with a business card that effectively represents your professional identity.
How to Use a Microsoft Word Business Card Template
Business card templates for Word are available right inside the application from Microsoft’s searchable online library. With a quick search, you can access over 30 Microsoft Word business card templates, free of charge. Here’s how:
- Open Word and Access Templates
Navigate to the “More templates” button on the home screen to explore Word’s template options.

- Type “Business Card” in the search box
Filter the templates by typing “Business Card” in the search box.

- Select Your Preferred Template
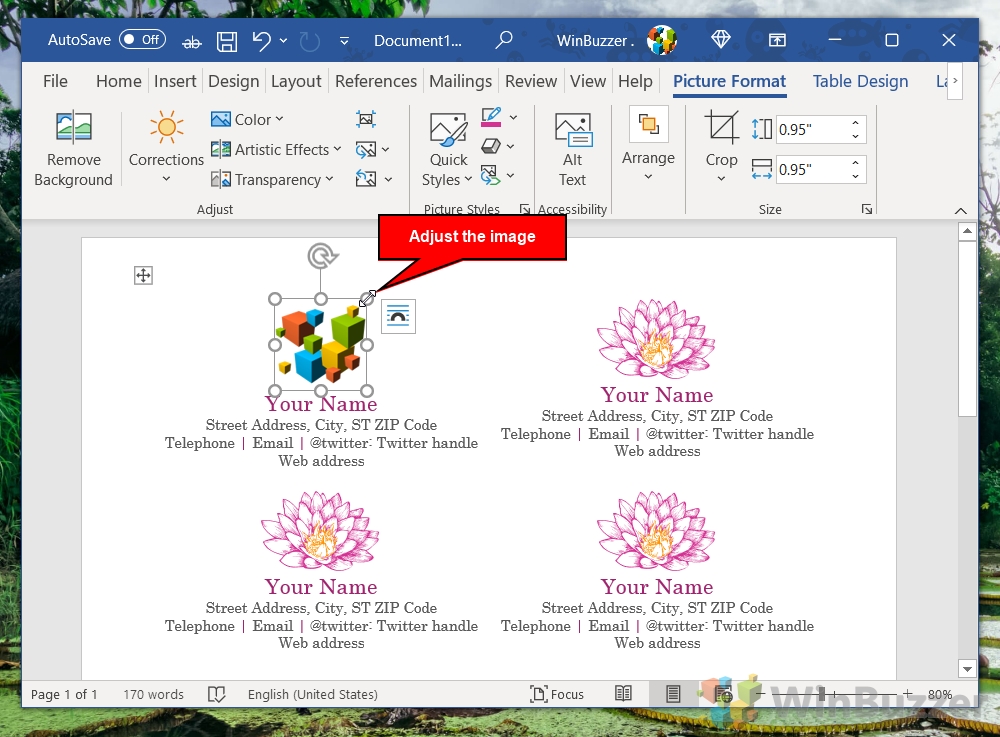
Choose a template that fits your needs, such as the “Flower personal business card” template for its simplicity.

- Create Your Business Card
Click “Create” to open the template for editing.

- Customize the Template
Remove default images by selecting them and pressing “Delete“.

- Insert Your Logo
Go to “Insert > Pictures > This Device…” to add your logo.

- Adjust Image Size
Resize your logo to fit by dragging its bounding box.

- Adjust the image dimensions to fit by dragging its bounding box

- Edit the Text
Replace placeholder text with your information. The text will automatically update as you type.

- Customize Font and Color
Highlight your name or any text, then use the font color icon in the “Home” tab to choose a color.

- Finalize Your Design
Continue customizing the template with your contact information and details.

- Print Your Business Cards
Save your document, print and cut your business cards on card stock for a professional finish.

How to Make Business Cards in Word From Scratch
If you’d rather make a completely custom business card in Word, you can make use of the table function and some creative formatting to do so. One bonus of this method is that you’ll have a well-defined border to cut around after you print them.
- Start with a Blank Document
Create a new, blank document in Word.

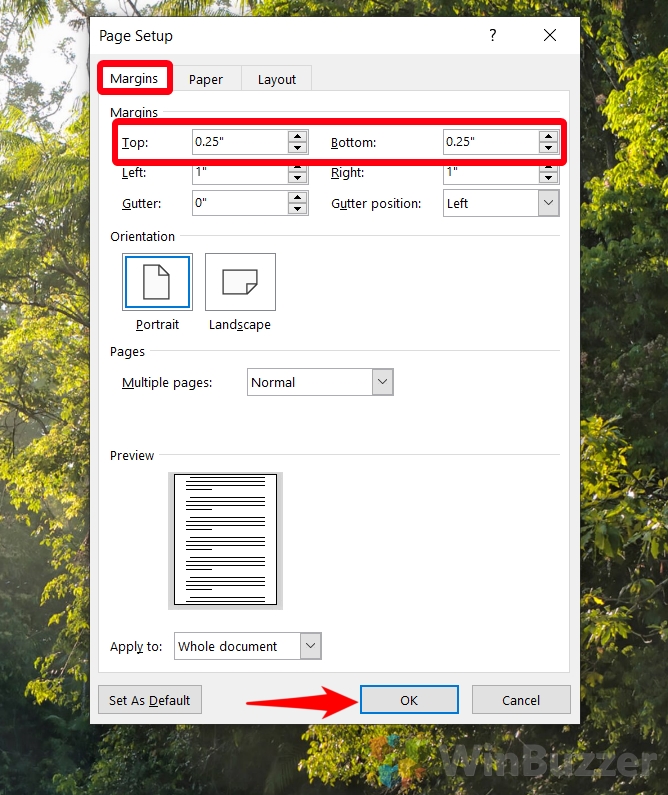
- Open Custom Margins Options
You’ll find the “Margins” button on the far left of your ribbon.

- Set Custom Margins
In the Page Setup window, click the “Margins” tab and adjust your top and bottom margins to 0.25″.

- Insert a Table
Add a 2×5 grid table to your document for standard business card sizes.

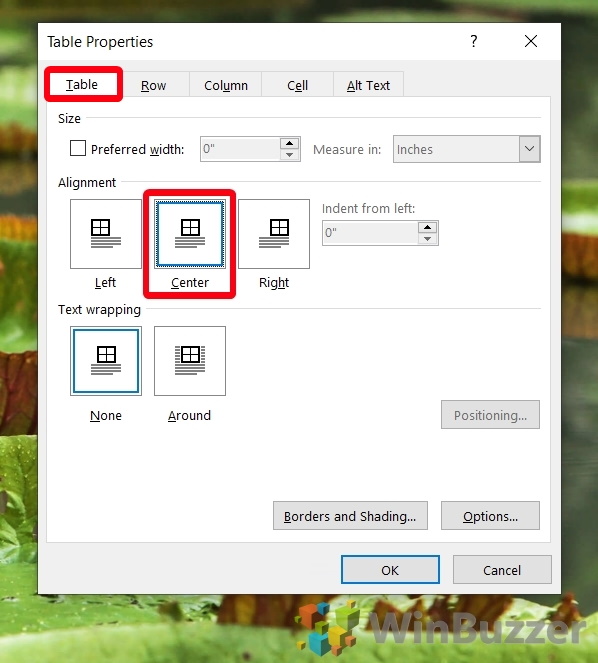
- Adjust Table Properties
Right-click on the table to set specific dimensions for cells and rows.

- Open the “Table” tab and click the “Center” alignment button

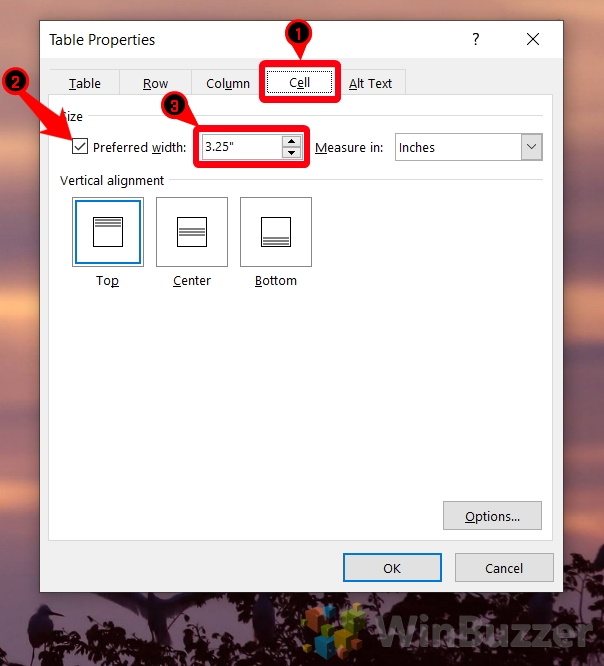
- Open the “Cell” tab and tick “Preferred width”, then set it to 3.25″

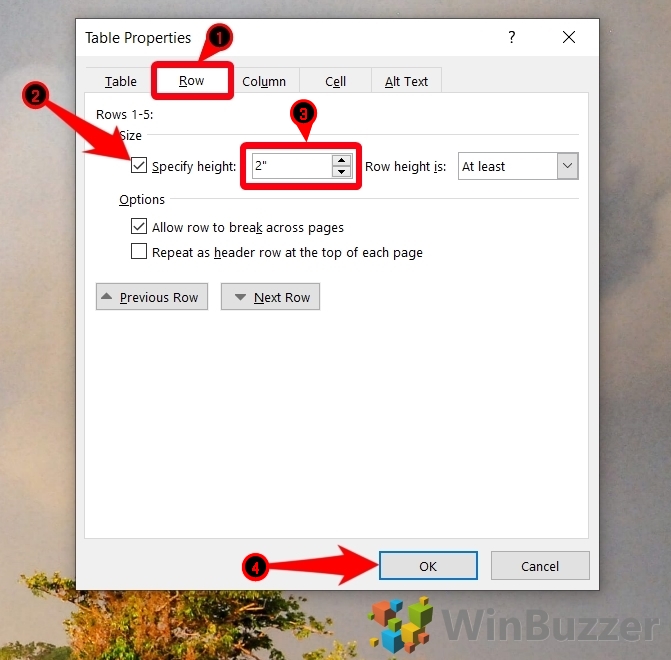
- Open the the “Row” tab, tick “Specify height”, and type 2″
Press “OK” when you’re done adjusting the table’s formatting.

- Insert a picture to your first table cell
To do so, open the “Insert” tab in your ribbon, then click “Pictures > This Device..”

- Navigate to your logo image and press “Insert”

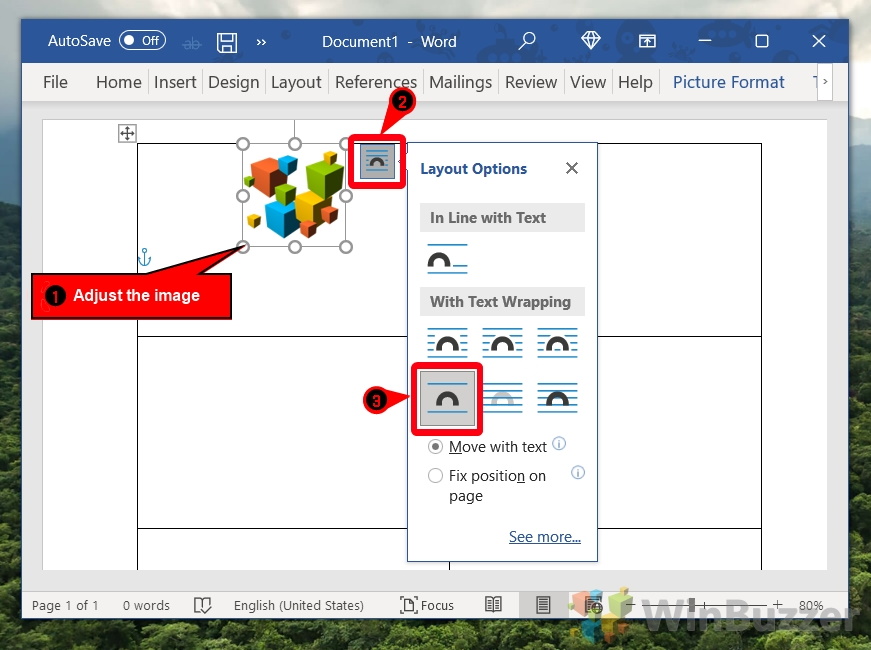
- Click the image, then press the layout icon in its top right and select “Top and bottom”

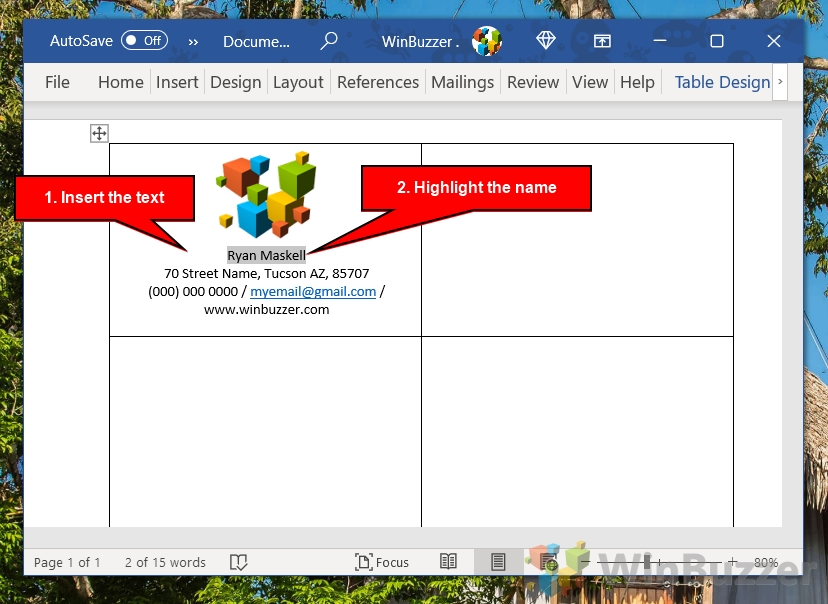
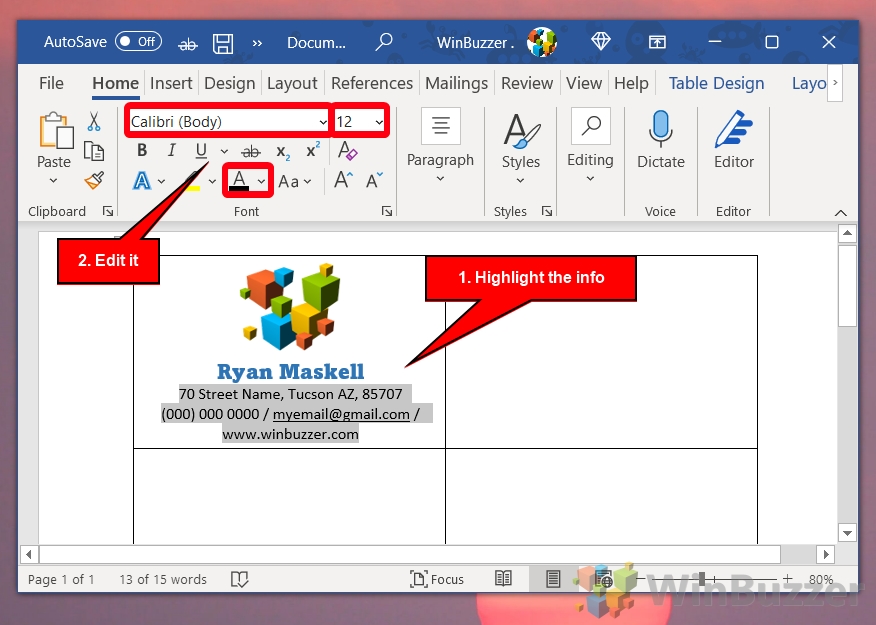
- Type your name, address, and other details underneath the logo and highlight your name

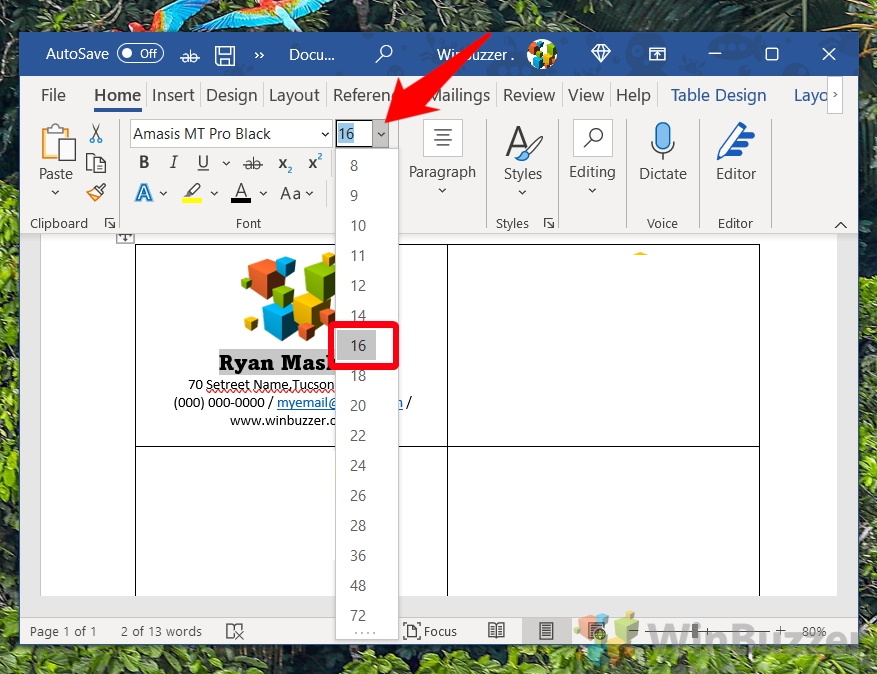
- In the “Home” ribbon tab, click the font dropdown and choose a font for your name

- Adjust the font size to 16 points

- Optional: change your font color

- Highlight and edit the information under the name

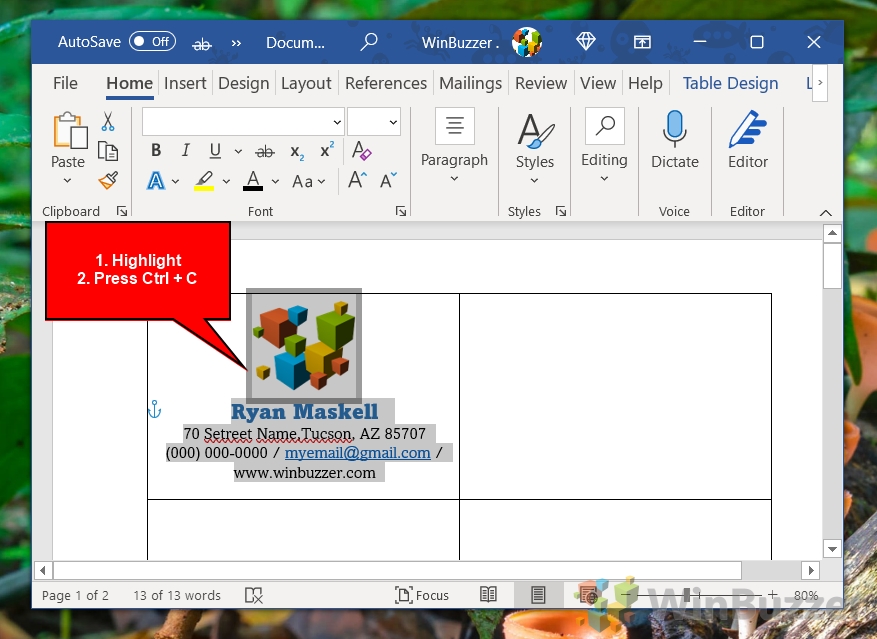
- Select everything in the cell and press “Ctrl + C” on your keyboard

- Replicate Across Cells
Copy and paste the design into the remaining cells to create a full page of business cards.

- Print and Cut
Print the business cards on high-quality card stock and cut them out along the table borders.


FAQ – Frequently Asked Questions About Printing Business Cards With Word
Can I use custom fonts in my business cards created in Word?
Yes, you can enhance the uniqueness of your business cards by using custom fonts. First, ensure the font is installed on your system. After installation, reopen Word, and the new font will appear in the dropdown font list under the “Home” tab. Remember, if you share the Word file, the recipient must also have the font installed to see the design as intended.
How do I share my Word business card design with someone who doesn’t have Microsoft Word?
To ensure your design is viewable by anyone, save it as a PDF. In Word, go to “File” > “Save As” and select “PDF” from the “Save as type” menu. This format preserves your layout and font choices, ensuring others see the design exactly as you intended, regardless of their software.
What is the best card stock thickness for business cards printed from Word?
For a professional look and feel, choose card stock between 80 and 110 lb (pounds). This range is thick enough to provide durability and a premium feel but is still typically compatible with most home and office printers. Check your printer’s manual for maximum paper thickness to avoid jams.
Can I add QR codes to my Word business card?
Yes, adding a QR code is a great way to link directly to your professional website or portfolio. Generate your QR code using an online generator, then download the code as an image. Insert this image into your Word document by going to “Insert” > “Pictures” and selecting the QR code from your files. Adjust the size without distorting the code to ensure scanability.
How to create a border for my business card in Word?
To create a stylish border around your business card, select the table or cell containing your design, then navigate to the “Design” tab that appears under “Table Tools” when the table is selected. Here, you can choose from various border styles, colours, and thicknesses. Be mindful of the print margin limitations of your printer to ensure the border prints as expected.
Is it possible to print double-sided business cards in Word?
Yes, printing double-sided business cards can be achieved by adjusting your printer settings. Look for an option like “Print on Both Sides” or “Duplex Printing” in the printer dialogue box when you print from Word. Depending on your printer’s capabilities, you may need to manually reinsert the paper to print the second side.
How can I make sure the colors on my printed business cards match my design?
Color discrepancies between screens and printouts are common due to differences in color reproduction technologies. To achieve colors that are as close as possible to your design, use a calibrated monitor and select “Color Management” options within your printer’s properties. It’s also wise to print a test card on the same card stock you plan to use for the final print to see how the colors actually appear.
Can I save my business card design as a template for future use in Word?
After perfecting your business card design, you can save it as a template for future projects. Go to “File” > “Save As” and choose “Word Template (*.dotx)” from the “Save as type” dropdown menu. This saves your layout, font, and design choices, making it simple to create new business cards with the same branding.
How can I align text vertically in my business card’s cell in Word?
For vertical text alignment within a table cell, right-click the cell and select “Table Properties.” Navigate to the “Cell” tab, and under “Vertical alignment,” choose either “Top,” “Center,” or “Bottom.” This feature is particularly useful for achieving a balanced look in your design.
Can business cards created in Word be considered professional?
Absolutely. With careful attention to layout, font choices, and print quality, business cards designed in Word can rival those made with specialized design software. The key to professionalism is in the details: ensure your information is accurate, your branding is consistent, and your printing materials are of high quality.
What if I want to use a non-standard size for my business cards?
To design a business card with non-standard dimensions in Word, adjust your table or document size to reflect your desired dimensions. Use the “Layout” tab to modify the size of rows and columns within a table, or use the “Page Setup” dialog (accessible under the “Layout” tab) for overall document dimensions. Always verify that your printer can accommodate your chosen size before finalizing your design.
How do I ensure my printed business cards have accurate dimensions?
For accurate dimensions, pay close attention when setting up your document and printing. Use the “Layout” tab to set exact margins and table dimensions, and always print a test page on regular printer paper before using your final card stock. This practice ensures any adjustments needed for margins or alignment can be made before the final print.
How to duplicate a business card design to fill a page in Word?
After designing your card, you can easily replicate the design across a page. If you’re using a table, copy the contents of the designed cell, then paste into the other cells of the table. For a design created on the whole page, copy the entire page content and paste it into a new blank page in the same document. Ensure uniformity in your document setup across pages for consistent results.
Can I import designs from other software into Word for my business card?
While importing a complete design from another software can be limited, you can bring in aspects like logos or background images. Save these elements as images in a format like JPEG or PNG, then use Word’s “Insert” > “Pictures” option to add them to your business card design. This method allows for some level of design portability, though recreating text and other elements directly in Word ensures the best editability and print quality.
How can I print my business cards from Word without a border appearing around them?
To achieve borderless printing, ensure your design extends to the very edge of the Word document. In your printer settings, select “borderless printing” if available. Not all printers support borderless printing, especially for thicker card stock, so check your printer’s capabilities and perhaps consider professional printing services for borderless business cards.
Related: How to Add an Email Signature in Outlook
Though simply writing your name does the job, an email signature adds a degree of professionalism to your email while promoting your social media and other platforms. In our other guide, we show you how to create a signature in Outlook using a set of Microsoft-provided templates. We also cover how to change signatures in Outlook if you have one already.

Related: How to Remove or Clear Formatting in Microsoft Word
If you pasted text into your document from the internet or another document, you may find it necessary to learn how to clear formatting in Word. The in-built feature will remove any display issues you may have and return text to its default form. In our other guide, we show you how to clear formatting in Word via the Styles and Font windows so you can get your document back to a blank slate.
Related: How to Customize the Ribbon in Microsoft Word, PowerPoint, Excel, and Outlook
For many years now, Microsoft Office has used an intuitive ribbon system to help users easily find and organize the tools they require. Though many are familiar with the interface, fewer realize that you can actually customize the ribbon in MS Word, PowerPoint, Excel, and Outlook. In our other guide, we show you how to customize the ribbon in Microsoft Word, PowerPoint, Excel, or Outlook, including how to add, remove, and rename tabs and items.