

While Google Docs doesn’t have quite as much functionality as Microsoft Word, the free online tool has a surprising amount of flexibility. For example, though it has no specific border too, it’s entirely possible to create page borders in Google Docs. Indeed, today we’ll be showing you how to add a border in Google Docs using three separate methods: using a table, drawing it by hand, and with an image.
Page Borders in Google Docs: Why You Might Want Them
A border can give your page a more elegant look. They can also mark a space for a viewer to make notes in the margins. Finally, they can be used as a guide for cutting.
Of course, you can also use a page border to give your document a bit of flair and make it stand out. Our methods should help regardless of your purpose.
Create a Simple Page Border in Google Docs Using a 1×1 Table
This method uses the table tool for creating a customizable color page border. It’s a straightforward approach for those seeking a simple yet effective border.
- Add a 1×1 table
Click on the “Insert” button in the toolbar, select “Table,” and then click on the top left square to insert a 1×1 table into your document.

- Customize your table’s lines
Click inside the table and use the pencil and line customization tools on the right side of your toolbar to adjust the appearance of your table’s border.

- Access Table Properties
Click on “Format” in the toolbar, then navigate to “Table” and select “Table properties” from the dropdown menu.

- Adjust Border Thickness and Padding
In the “Table properties” window, customize your table’s border thickness, color, and padding. Click “OK” to apply your changes.

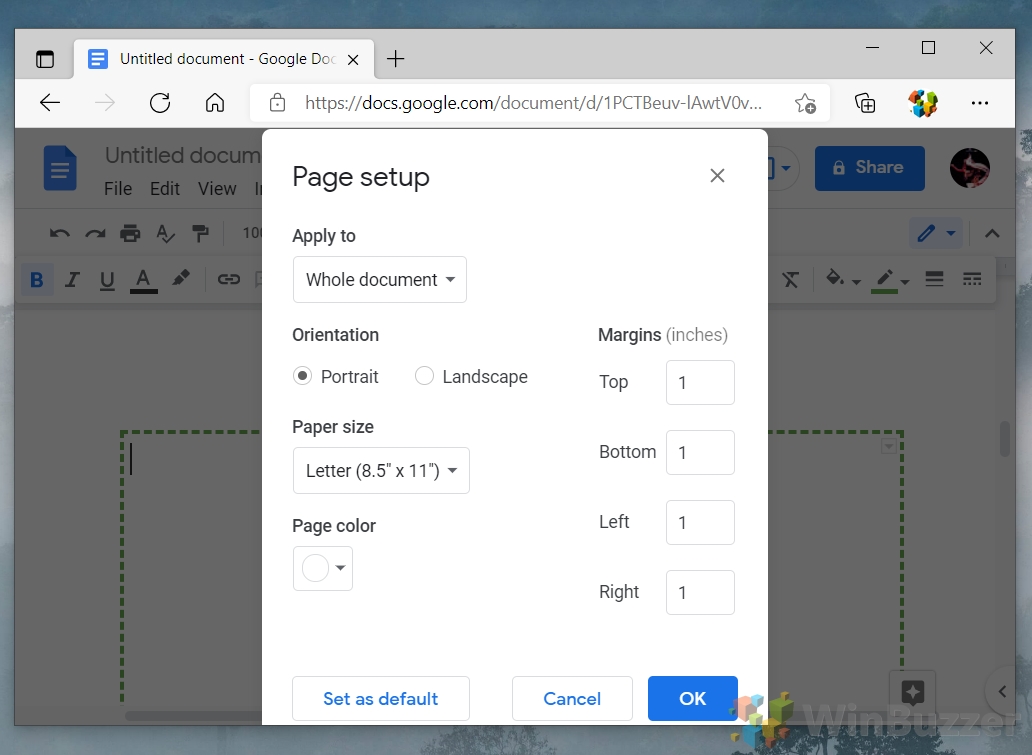
- Set Page Margins
Go to “File” > “Page setup” to adjust the margins between the border and the edge of the page.

- Adjust the margins between the border and the edge of the page
You’ll see the margin sizes on the right, in inches. Press “OK” when you’ve finished adjusting them.

- Enjoy Your Custom Page Border
Your Google Docs page now has a custom border, ready for content.

How to Add Page Borders in Google Docs via the Drawing Tool
This method provides more control over the design of your page borders, allowing for custom creation.
- Insert a New Drawing
Click “Insert” in the toolbar, then select “Drawing” and click “+ New” to begin.

- Choose a Shape
In the Drawing tool, click the shape icon, hover over “Shapes“, and select a shape for your border.

- Adjust the Shape
Resize and adjust the shape to fit your page, using the pencil and line tools for customization.

- Add Text Inside the Shape
Click the “T” button to add text inside your shape, if desired.

- Save and Close
Click “Save and Close” to insert the custom border into your document.

- Edit Your Page Border
Click on your shape and select “Edit” to modify your border as needed.

How to Use an Image for Your Google Docs Page Border
Using an image as a page border allows for the inclusion of custom patterns or designs, offering a unique look.
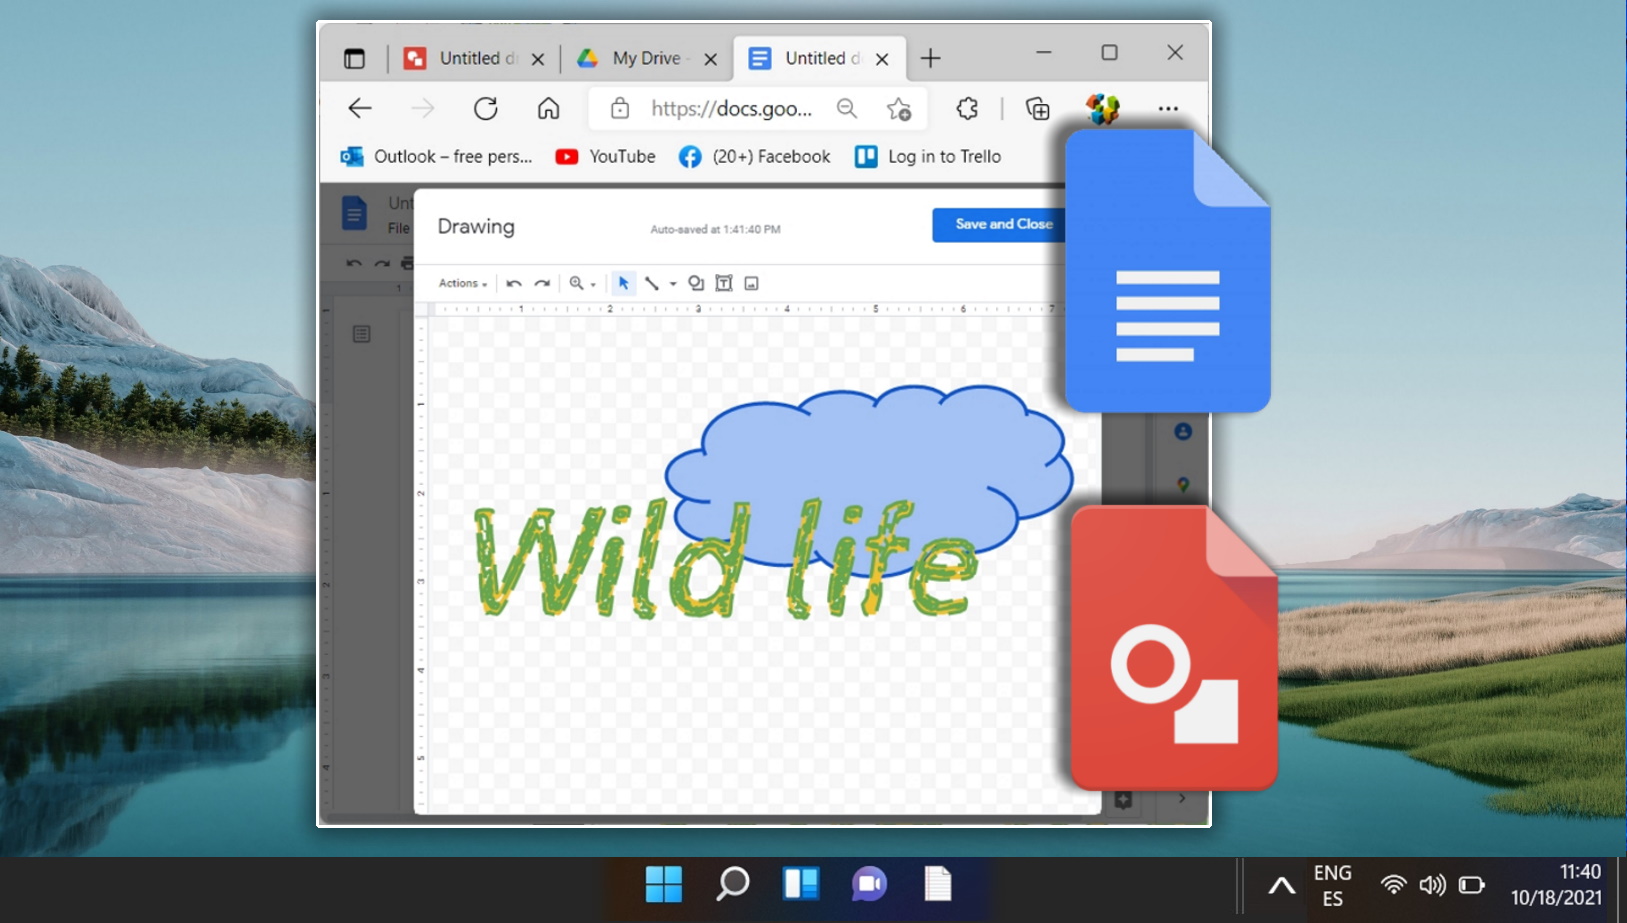
- Insert a New Drawing
Start by clicking “Insert” > “Drawing” > “+ New“.

- Add an Image
Click the image icon in the toolbar and choose your image upload method.

- Adjust the Image
Resize the image to fit your page, ensuring it aligns with your margins.

- Add Text to the Image
Optionally, click the “T” icon to add text over your image.

- Save and Close
Click “Save and Close” to apply the image border to your document.

- Modify Your Image Border
If needed, click on the image and select “Edit” for further adjustments.

How to Add a Border Around a Paragraph in Google Docs
You can focus the reader’s attention on a specific paragraph by adding a visual border around it. Google Docs allows you to easily add borders around selected paragraphs using its paragraph styles formatting options. Follow these steps to enhance your document’s visual appeal.
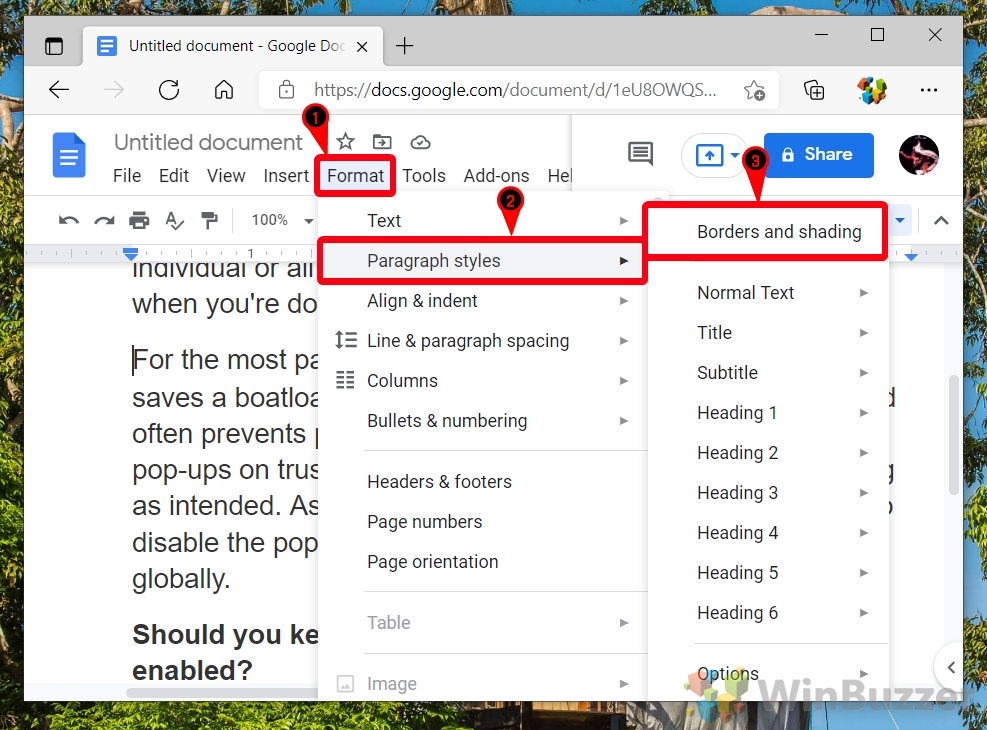
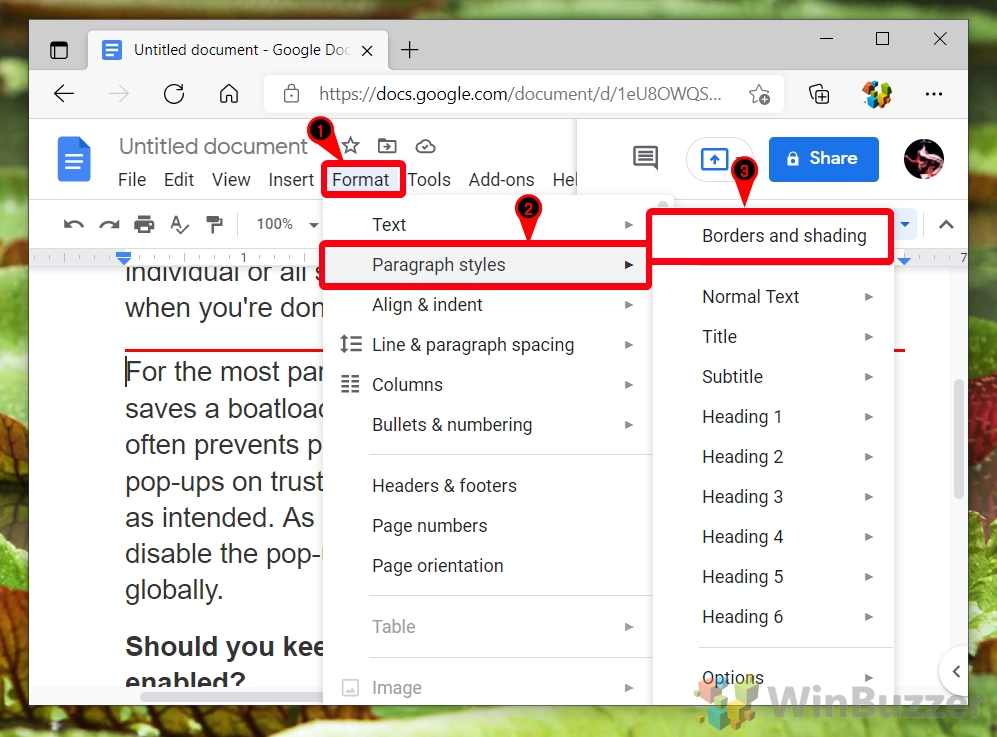
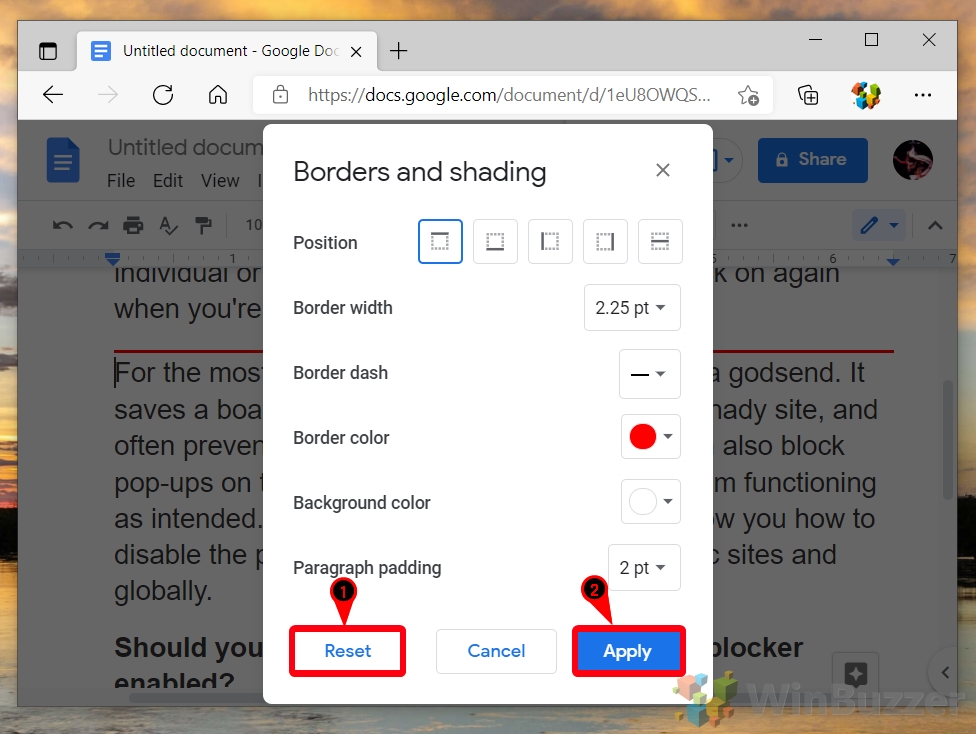
- Press “Format > Paragraph styles > Borders and shading”
Navigate to the top menu of Google Docs, click on “Format“, hover over “Paragraph styles“, and then select “Borders and shading“. This will open the Borders and Shading menu, where you can customize your paragraph’s border.
- Select the border sides you’d like and set the width, color, padding, and dash
In the Borders and Shading menu, you can select which sides of the paragraph you want the border to appear on. Additionally, you have the option to adjust the border’s width, color, padding, and dash style. Adjust these settings according to your preference.

- The border will display around your paragraph
Upon applying your settings, the border you’ve customized will now be visible around the selected paragraph. This can enhance the look of your document and make important sections standout.
- Optional: Remove the border again
If you decide that you want to remove the border around your paragraph, simply go back to “Format > Paragraph styles > Borders and shading” in the Google Docs menu to adjust the border settings.
- Press “Reset” and then “Apply”
To remove the border, select the “Reset” button which reverts any changes made to the border settings back to their default state. After that, click “Apply” to confirm and remove the border from your paragraph.
FAQ – Frequently Asked Questions About Borders in Google Docs
Can I add a border to only the top and bottom of my page in Google Docs?
Yes, to accomplish this, you have two main options: First, using the drawing tool, you can draw lines individually at the top and bottom of your page. Make sure to adjust the thickness and color of these lines to your liking. Second, you could insert a 1×1 table, then customize its border settings to only show the top and bottom borders, adjusting the color and thickness as well. This method gives a more structured alignment to your content.
How can I ensure my content is perfectly centered within the border in Google Docs?
For ensuring perfect alignment, after setting up your border, select your content and use the “Format” menu to choose “Align & indent,” then “Center.” For borders created with tables, click inside the table, go to “Table properties,” and adjust cell padding to ensure the content is centered within the cell. These steps help you center content both vertically and horizontally, giving your document a polished look.
Is it possible to share a Google Docs document with a custom border without granting editing permissions?
Absolutely, you can share your document while keeping control over editing rights. Click on the “Share” button in the top right corner, and in the sharing settings, input the email addresses of the people you want to share the document with. Then, select either ‘Viewer‘ or ‘Commenter‘ from the dropdown menu next to their email. This way, they can see or comment on your document and its custom border without being able to make any changes.
How can I create a rounded border in Google Docs?
For a rounded border, navigate to “Insert” > “Drawing” > “+ New.” Use the shape icon to select a rounded rectangle and draw it to fit your content dimension. Inside the drawing tool, handles on the corners of your shape allow you to control the curve of your rounded corners. Customize the line weight and color as needed before saving to your document. This process lets you add bespoke rounded borders that can enhance the aesthetics of your document.
Can I import borders from other programs into Google Docs?
Direct import of border styles is not an option in Google Docs. However, a workaround is to design your border in an external image editing program, save it as an image file, and then use the “Insert” > “Drawing” > “+ New” pathway to incorporate that image as your border. This method requires you to ensure the dimensions fit your document. It’s a flexible way to utilize custom designs, including intricate borders that Google Docs doesn’t natively support.
Is there a way to make the border automatically adjust to text changes?
Google Docs lacks an automatic adjustment feature for borders in response to text changes. If you’re using a table as a border, it may expand vertically with added content, but there is no horizontal auto-adjustment. For drawn or image borders, manual adjustment is necessary if the text overflows or changes the intended layout. Regularly review your document layout during editing to maintain proper alignment and appearance.
How do I add a border around a specific text block rather than the whole page?
To highlight a specific block of text with a border, create a 1×1 table around the text. Click “Insert” > “Table” and draw a single cell. Cut and paste your text into this cell. Through “Table properties,” you can adjust the cell borders’ color, thickness, and padding to craft the desired effect. This method effectively draws attention to key sections of your document without impacting the entire page layout.
Can I apply a gradient color to my border in Google Docs?
Directly applying gradient colors to borders is not supported in Google Docs. A viable alternative involves creating a gradient border in a graphic design software, then saving it as an image. Within Google Docs, use “Insert” > “Drawing” > “+ New” to include the gradient image as your document’s border. Adjust the image to fit the page, ensuring the gradient effect accentuates your document’s aesthetic appeal.
How can I copy a border setup from one Google Doc to another?
For copying a border setup, select the border element (if it’s a drawing, image, or table), then press Ctrl/Cmd+C, and in the new document, press Ctrl/Cmd+V to paste it. If it’s a drawn border or image, you might need to adjust it slightly to fit the new document’s layout. This method facilitates consistency across multiple documents, saving time and effort in re-creating border designs.
Can I use emojis or special characters in designing my border in Google Docs?
Yes, integrating emojis or special characters into your border design adds a unique flair. Use the Drawing tool by selecting “Insert” > “Drawing” > “+ New,” then click the “T” for the text box where you can include emojis or special characters. This not only personalizes your borders but can also communicate specific themes or emotions pertinent to your document’s content.
Is it possible to add a watermark within a border in Google Docs?
To add a watermark within a bordered document, start by creating your border using your preferred method. Then, for the watermark, “Insert” > “Drawing” > “+ New,” upload or create your watermark image ensuring it’s set to a lower opacity for a subtle effect. Position this drawing where you’d like within your document. This technique enables layered visual elements that enhance your document’s professionalism and design coherence.
How to rectify a border that looks uneven on one side in Google Docs?
Uneven borders can disrupt your document’s visual appeal. To correct them, carefully review the settings of your border. For tables, check the cell margin settings in “Table properties” to ensure uniformity. If using the Drawing tool, verify that the dimensions of your shapes or lines are consistent on all sides. Adjust accordingly to achieve a balanced look, paying close attention to alignment and dimensions for symmetry.
Can I set different border styles (e.g., dashed, dotted) in Google Docs?
For intricate border styles like dashed or dotted lines, the Drawing tool offers more flexibility. When creating a new drawing, select the line tool and choose from the available line styles to craft your custom border. This method is particularly useful for adding creative or thematic elements to your document, giving it a personalized touch that standard borders may not provide.
How can I create a shadow effect for my border in Google Docs?
To simulate a shadow effect, utilize the Drawing tool to create two borders: your main border and a slightly larger, fainter version behind it. Adjust the color and transparency of the shadow border to achieve the desired effect. This layering technique can add depth to your document, making the border more visually striking.
Is it possible to animate a border or parts of it in Google Docs for a presentation?
While Google Docs does not support animating document elements, you might consider using Google Slides for presentation purposes. In Slides, import your document’s content and create animated borders using shapes, lines, and images. This approach lets you add dynamic elements to your presentation, making it more engaging for your audience.
Related: How to Add a Table of Contents in Google Docs and Update It for Changes
Adding a table of contents to your Google Docs is important once they reach dozens of pages. While many overlook this feature in favor of the document outline, it’s a useful tool to tell readers what’s in the document and help them navigate it. In our other guide, we show you how to create a table of contents in Google Docs via the use of heading styles, and then update it to reflect any changes you make in the editing process.
Related: How to Draw on Google Docs
Google Docs isn’t just for typing up documents; it’s also equipped with features that allow you to unleash your creativity through drawing. Whether you’re looking to add a personal touch to your documents or need to create detailed diagrams. In our other guide, we show you how to draw on Google Docs using both its in-built tool and the separate Google Drawing service.
Related: How to Use Google Docs Offline on Windows, Mac, or Linux
Microsoft Word is naturally our word processor of choice. However, that doesn’t stop us from acknowledging that Google Docs is a strong, free alternative. The only real thing holding it back is that it requires an internet connection to use. Or, at least, it used to. Today we’re going to show you how to use Google Docs offline so that you can stay productive on the move. In our other guide, we show you how to use Google Docs offline to edit Documents when you’re away from a Wi-Fi network.
Related: How to Add a Table of Contents in Google Docs and Update It for Changes
Adding a table of contents to your Google Docs is important once they reach dozens of pages. While many overlook this feature in favor of the document outline, it’s a useful tool to tell readers what’s in the document and help them navigate it. In our other guide, we show you how to create a table of contents in Google Docs via the use of heading styles, and then update it to reflect any changes you make in the editing process.


