

There are a few ways to move pages in Word, but the most effective involve the use of the Word navigation pane or some simple copy and pasting. It’s these two methods that we’ll be covering here.
Before we start, we do recommend that you perform these changes on a separate version of your document. If you save your document out as “documentname-rearranged”, you can look at both versions and see which flows the best.
How to Rearrange Pages in Word via the Navigation Pane
Managing a large document in Word becomes significantly easier when you utilize the Navigation Pane, especially for documents organized with headings. This method doesn’t move pages per se but rearranges sections, which is often more efficient for large-scale edits.
- Add Headings to Your Document
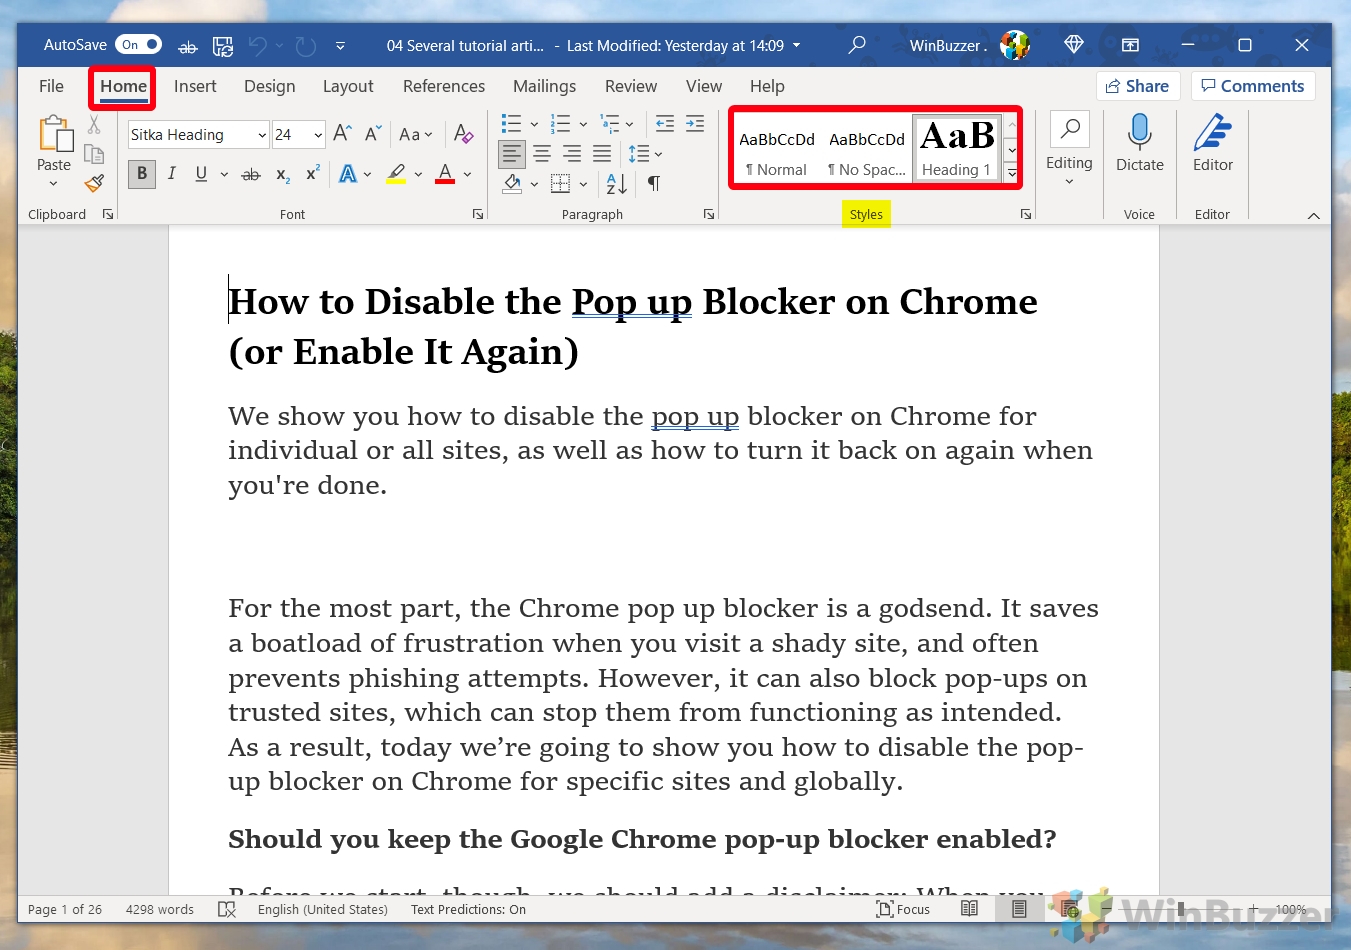
For effective navigation and organization, divide your document into sections using Heading 1 for main titles, Heading 2 for sub-sections, and Heading 3 for sub-sub-sections. This can be done from the “Home” tab under the styles section.

- Open the headings section of the Word navigation pane
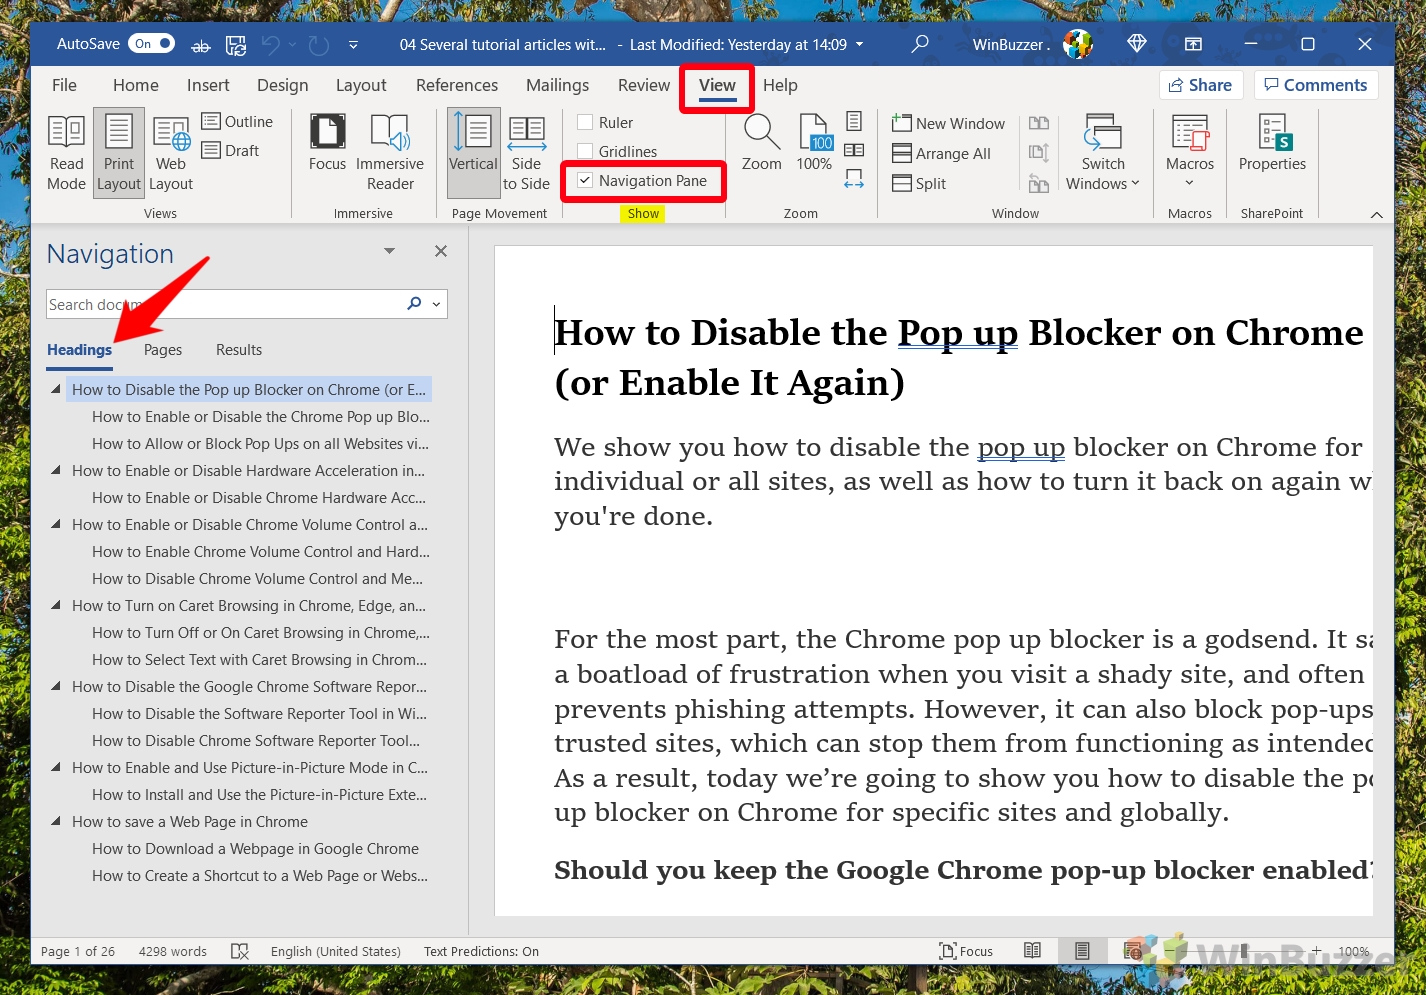
Activate the “Navigation Pane” by going to the “View” tab and checking the option in the “Show” section. Ensure you’re on the “Headings” tab to view your document’s structure.

- Click and drag your heading to rearrange pages in Word
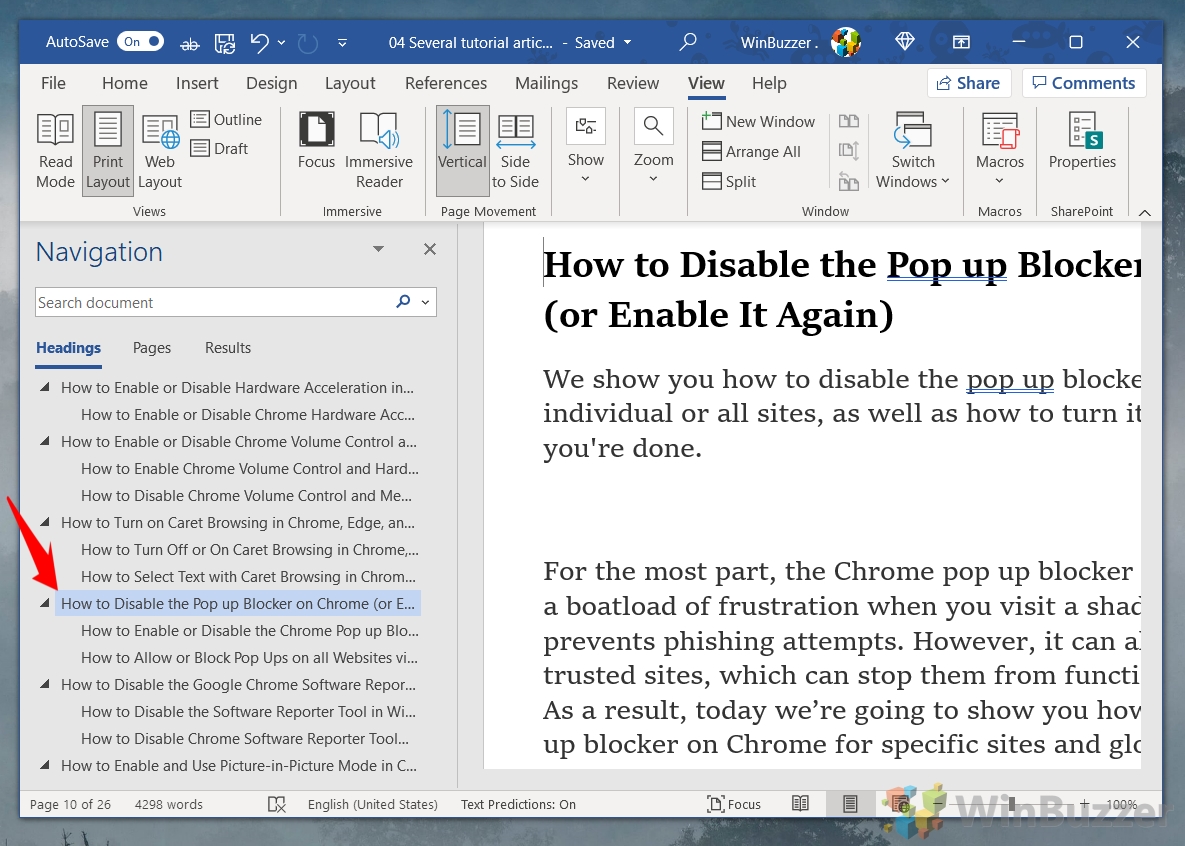
You can click and drag on any heading in the navigation pane to move it before or after another heading in your document. Once you let go of your mouse button, the heading all of its content will be moved to that section of your document.

- Click on your heading in the Word navigation pane to view the changes
After rearranging, click the heading in the Navigation Pane to jump to its new location and review the adjustment. You can now make further adjustments to content and order as required.


How to Move Pages in Word by Copy and Paste
For more granular control over your document’s layout, moving specific pages or text blocks via copy and paste is an effective strategy. This method allows for precise placement within your document.
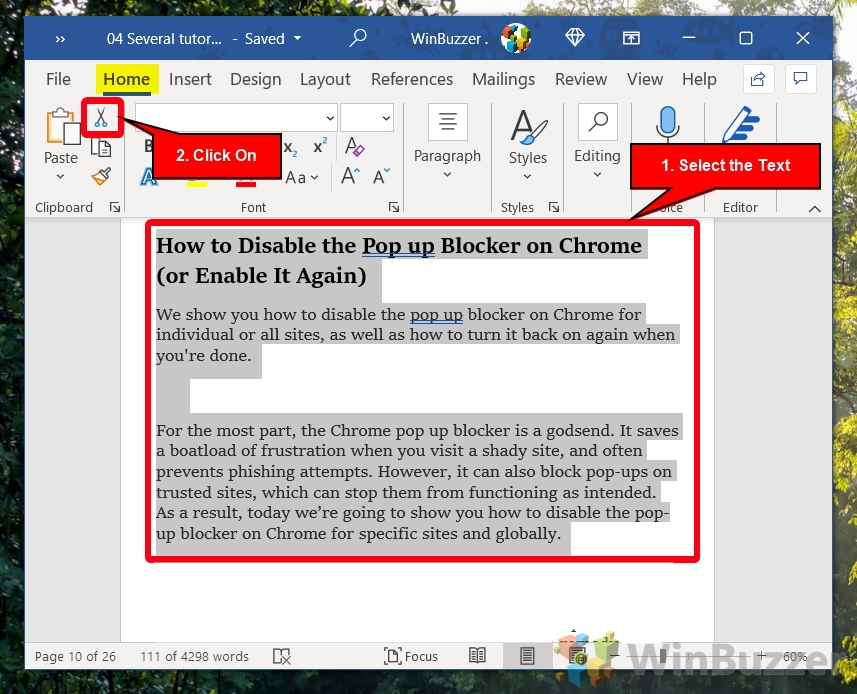
- Select your text and use the cut tool
Highlight the text you wish to move by clicking and dragging or using the Shift key for selection. Cut the text with the scissors icon in the “Home” tab or use Ctrl + X. This action temporarily removes the text, preparing it for relocation.

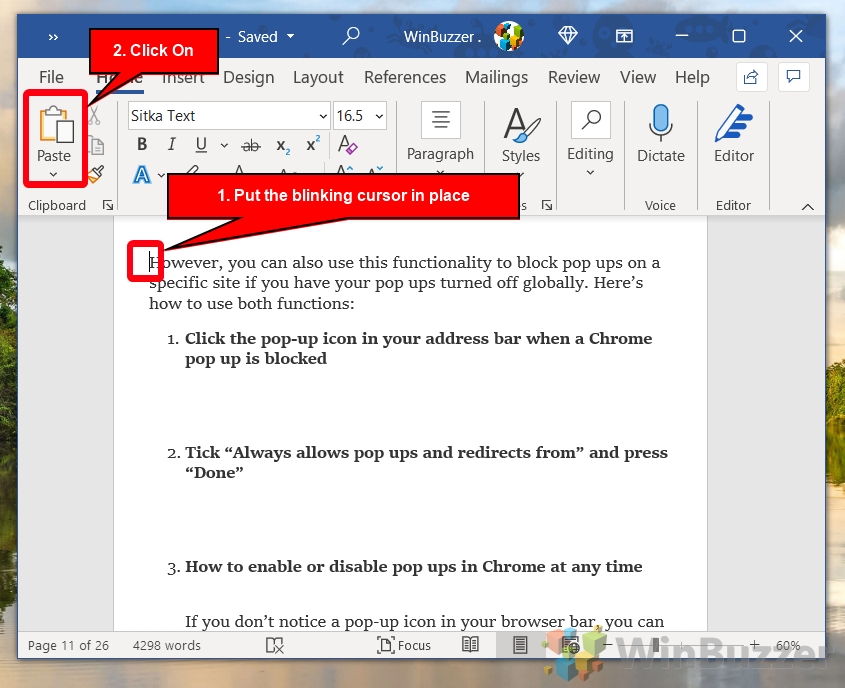
- Put your cursor at the start of your target page and paste your contents
Position your cursor at the desired location and paste the text using the clipboard icon in the “Home” tab or by pressing Ctrl + V. This completes the relocation of your selected text.

FAQ – Frequently Asked Questions About Arranging Sections in Word
How can I automatically update figures and table numbers after rearranging sections?
Whenever figures or tables are moved, their numbering might need adjusting to reflect their new positions in the document. To ensure consistency, right-click on each figure or table caption and choose “Update Field”, then select “Update entire table”. This action refreshes numbering throughout the document, ensuring all references in the text correspond correctly to the moved items. For broader changes, consider selecting the entire document (Ctrl+A) and pressing F9, which updates all fields, including references and captions.
Is there a shortcut to quickly switch between the “Navigation Pane” and my document?
Yes, pressing “F6” allows you to toggle between the Navigation Pane and the document editing area. This can significantly expedite the rearrangement process, especially in lengthy documents, by enabling you to swiftly adjust the structure without reverting to the mouse. If the “F6” key cycles through more areas than desired, “Shift+F6” can be used to navigate back in the opposite direction.
How do I ensure that moved sections maintain their heading level when using the Navigation Pane?
Word meticulously maintains the hierarchy of headings, even when moving sections using the Navigation Pane. If you need to adjust the heading level for better organization post-movement, right-click the heading in the Navigation Pane, choose the desired heading level under the “Styles” option. This method ensures that the logical structure of your document remains intact while enabling flexible adjustments to the document’s organization.
What is the most efficient way to consolidate several short paragraphs into a single section for easier rearrangement?
To streamline the process of managing and rearranging text, consider grouping several short paragraphs under a unifying heading. Start by selecting the text you wish to consolidate, then insert a heading at the beginning of this block by choosing the appropriate style (e.g., Heading 2) from the “Styles” section on the Home tab. This not only helps in organizing the content logically but also aids in navigating through the document using the Navigation Pane for subsequent rearrangements.
What’s the quickest method to split a long document into smaller sections for easier management and rearrangement?
Inserting strategic page breaks and applying headings at key points can transform a lengthy, unwieldy document into manageable sections. Use the “Insert > Page Break” option to define clear divisions and allocate relevant headings to these new sections. This segmentation facilitates easier navigation, organization, and subsequent rearrangement of the document through methods like the Navigation Pane, enhancing overall document structure and readability.
How do hyperlinks behave when text or sections are moved within the document?
Hyperlinks that refer to targets within the same document should adjust automatically when the referenced content is moved. However, it’s prudent to verify these links post-rearrangement. For external links, there’s no change as they refer to fixed URLs. If a hyperlink fails to update, manually edit it by right-clicking the link, selecting “Edit Hyperlink”, and then adjusting the target location to ensure it points to the correct section or figure.
Can I lock a section to prevent it from being accidentally moved or edited?
Microsoft Word doesn’t offer a straightforward feature to “lock” sections against relocation or editing in the same way that sheets can be protected in Excel. However, you can limit editing on specific parts of the document to prevent accidental changes by selecting “Review > Restrict Editing”. Under “Editing restrictions”, choose “No changes (Read only)” for sections you want to protect, making them immune to unintended modifications while leaving others freely editable.
Is it possible to rearrange text blocks or sections to a different document?
Transferring content between documents is as simple as cutting (Ctrl + X) and pasting (Ctrl + V) the desired sections or text blocks. To maintain the original formatting, ensure to use the “Keep Source Formatting” option upon pasting. This feature is especially useful for reorganizing content spread out over multiple documents or consolidating information into a single, coherent document.
How can I visually mark sections that I plan to move or have already moved?
Utilizing comments is an effective method to track which sections are earmarked for movement or have already been repositioned. Select the specific text or section, then go to “Review > New Comment” to add your notes, such as “Move to Chapter 3” or “Relocated to Section 2.1”. Comments serve as an excellent reminder, helping to streamline the rearrangement process and ensuring all intended changes are accounted for before finalizing the document layout.
How do I handle page numbering when sections get moved around?
After rearranging sections, check the continuity and logic of your page numbering by navigating to “Insert > Page Number”. Choose your preferred numbering style and position (e.g., top or bottom of the page). For documents where sections start anew with page 1, ensure to insert section breaks (“Layout > Breaks > Next Page”) and unlink the sections’ footers or headers by deselecting “Link to Previous” in the Header & Footer Tools. This allows for independent control over the numbering in each section.
What’s the best practice for rearranging content that includes a mix of text and images?
When dealing with content that includes both text and images, group (or ‘anchor’) the images to related paragraphs to ensure they move together. To do this, right-click the image, choose “Wrap Text”, and select “Tight” or any option other than “In Line with Text”. Then, when selecting the text for moving, ensure to include the image in the selection. This process helps maintain the text-image relationship intact, preserving the layout and flow of the document upon rearranging.
How do I deal with figures and charts when rearranging pages?
Before moving sections containing figures or charts, verify that these elements are correctly anchored to the relevant text. After rearrangement, double-check the figures and charts to ensure they’re positioned as intended and that their references in the text still point accurately. If necessary, adjust the anchor points or edit the textual references to align with the new layout of the document.
Can merging documents affect the arrangement of pages and sections?
Merging documents can significantly disarray the structured flow and organization. Employ the “Review > Compare” tool to systematically combine documents, allowing you to control how sections and content are integrated. This approach maintains a level of order in the document structure, preventing inadvertent duplication or misplaced sections, thereby facilitating a smoother merging process.
How can I use document templates to facilitate better page and section organization from the start?
Using templates with predefined styles and structures can substantially streamline initial document setup and later rearrangements. To create or use a template, start a new document and choose a template that closely matches your intended structure or design your own template by setting up headings, sections, and formatting as desired. Save this as a template for future use. This proactive step ensures consistency and organization from the outset, reducing the need for extensive restructuring later.
Can I use macros to automate some of the rearrangement processes?
For users frequently engaging in routine document editing tasks, creating macros can be a time-saver. To record a macro, go to “View > Macros > Record Macro”, perform the desired actions (such as moving specific sections or applying certain formatting), and stop the recording. Later, you can execute these macros to automate repetitive editing tasks, enhancing efficiency and consistency across documents. Remember, a basic understanding of Visual Basic for Applications (VBA) can help in tweaking macros for more complex needs.
Related: How to Duplicate a Page in Microsoft Word
The process to copy a page in Word is simple, but it varies slightly depending on the document you have and your intentions. There’s some variation between whether you have a single page or multi-page document, for example. In our other guide, we show you how to duplicate a page in Word for both single-page and multi-page documents, as well as how to insert a blank page.

Related: How to Delete a Blank Page in Word
A blank page may be useful if you’re planning to continue your document, but it can look very unprofessional when you’re sending off a finished document. As a result, it’s important that you know how to delete a blank page in Word when you have no need for it.

Related: How to Insert and Remove Page Breaks in Word
Microsoft Word offers users a plethora of tools to ensure that documents are both readable and professionally presented. One such tool is the ‘Page Break’. Whether you’re drafting a lengthy report, a novel, or a simple letter, understanding how to manipulate page breaks can significantly enhance the structure and appearance of your document.


