Though you should always be cautious about running untrusted apps as an administrator in Windows 11 or Windows 10, there are many legitimate ones that require an admin access token to perform as they should. As a result, if your application isn’t working correctly, it’s useful to know how to run a program as an administrator.
Examples of when an application may need a full administrator access key include during installation, when applying compatibility settings, and when writing to or modifying content in restricted folders.
When this happens, users typically receive a User Account Control (UAC) dialog asking them to provide their consent for administrator rights. However, not every application asks for admin rights when it needs it, making it useful to know how to make an app run as an administrator manually.
Here we show you several ways to achieve this, as well as how to make it so a specific app always runs as an administrator.
⚠️ Please note: The process described below is the same in Windows 11 as it is in Windows 10. However, bear in mind that we’ll be using screenshots from Windows 10, so your UI may look a little different. We’ll point out any changes you need to be aware of as they come up.
How to Run as Administrator in Windows using Keyboard Shortcuts
Utilizing a keyboard shortcut to run programs as an administrator in Windows 10 is a quick and efficient method. This approach is particularly useful for frequently used applications.
- Activate Admin Mode with Shortcut
Press “Ctrl + Shift + Enter” after clicking on your app. This keyboard shortcut is a convenient way to elevate your application’s privileges directly from the search or the Start Menu.

How to Run a Program as Administrator via the Context Menu
Accessing administrative privileges through the context menu is a straightforward and widely used method. It’s intuitive and ensures that the necessary permissions are granted for the application to function correctly.
- Select ‘Run as administrator’
Right-click the application icon and choose “Run as administrator“. When the UAC dialog appears, click “Yes” to proceed. In Windows 11 you have one additional click on “Show more options”, if you did not disable the extra menu there.

How to To Run as Administrator via the Run Dialog
For applications that are not frequently used or do not have desktop shortcuts, the Run dialog provides a quick method to execute them with administrative rights.
- Open Run Dialog and Execute as Admin
Press “Ctrl + R“, type your application’s name, then press “Ctrl + Shift + Enter“. Alternatively, you can click “OK” while holding “Ctrl + Shift“.

How To Run Programs as an Admin from the Start Menu
The Start Menu is a central hub for launching applications, and knowing how to execute them with admin rights from here can streamline your workflow.
- Use Advanced Options in the Start Menu
Right-click the app in your Start menu, select “More > Run as administrator“. Confirm any UAC prompts by clicking “Yes“.

How to Run a Program as Administrator in Windows 10 Explorer using the Ribbon
When you’ve already navigated to an application within File Explorer and wish to launch it with administrative privileges, there’s a convenient method available through the File Explorer interface. Here’s the procedure for both Windows 10 and Windows 11:
- Access ‘Application Tools’ in the Ribbon
Click on the app, switch to the “Application Tools” tab in the ribbon, and press “Run as administrator“.

- Alternative Ribbon Method
Click the bottom half of the “Run as administrator” icon in the ribbon for more options.

How to Run a Taskbar App as Administrator
Running an application as an administrator from the taskbar is a lesser-known but effective method, especially for frequently used apps.
- Access the Hidden Taskbar Menu
Right-click the taskbar icon, then right-click the application name and select “Run as administrator“. This reveals a secret menu with additional options.

How to Run as Administrator Through Task Manager
Task Manager is not just for monitoring system performance but also serves as a powerful tool for launching applications with administrative privileges.
- Open Task Manager
Use “Ctrl + Shift + Esc” or search for “Task Manager” and open it.

- Expand More Details
Click “More details” at the bottom if in compact mode.

- Run New Task as Admin
Navigate to “File > Run new task“, type the application’s name, check “Create this task with administrative privileges“, and click “OK“.

- Type the name of the app, tick “Create this task with administrative privileges” and press “OK”
This ensures the application runs with the necessary permissions for its operation.

How to Always Run as Administrator in Windows 10 with Advanced Shortcut Properties
If you have an application that requires administrative privileges every time it’s run, manually selecting “Run as administrator” can become tiresome. By setting the application to always request admin privileges upon launch, you alleviate the necessity for those extra clicks. Remember, the User Account Control (UAC) dialog will still appear, asking for your permission.
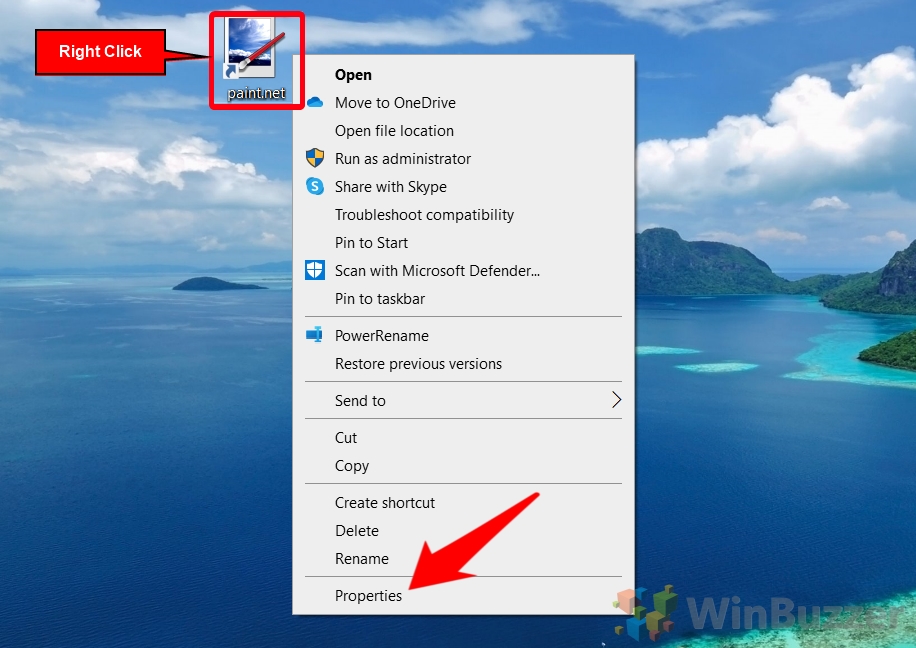
- Right-click your app shortcut and click “Properties”
Locate the shortcut for the application you want to always run as an administrator. Right-click on it and select “Properties” from the context menu to open the properties window.

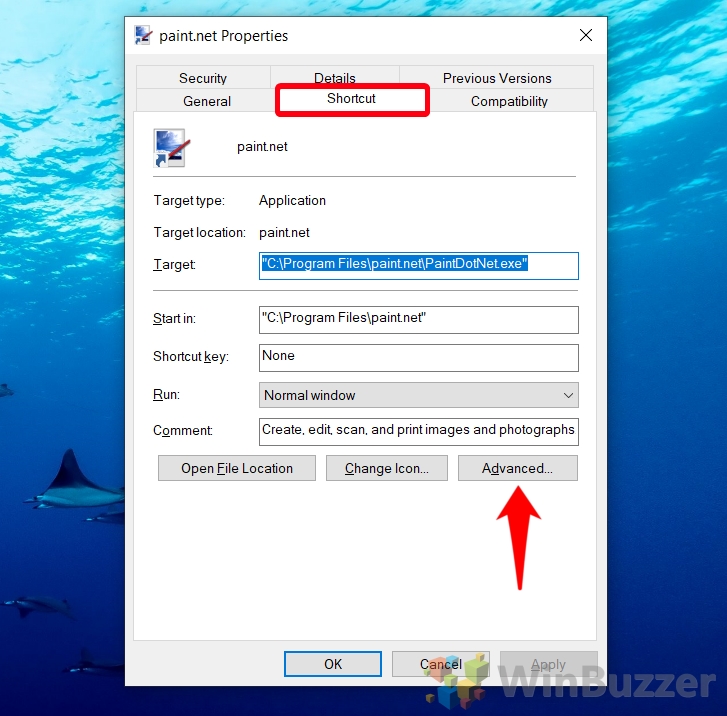
- Open the “Shortcut” tab and press the “Advanced…” button
In the application’s properties window, navigate to the “Shortcut” tab. Here, you will see an “Advanced…” button near the bottom-right. Click this button to proceed to the advanced settings.

- Tick “Run as administrator” and press “OK”
Within the Advanced Properties dialog, you’ll find the “Run as administrator” option. Check the box next to this option to ensure the application always requests administrative privileges upon launching. Click “OK” to save these settings and then “OK” again in the main properties window to apply these changes.

How to Always Run as Administrator via Compatibility Properties
If you don’t have a shortcut to the app, you can make it always run as an administrator through the compatibility tab in its properties:
- Right-Click Your App and Select “Properties”
Locate the application you wish to always run as administrator. Right-click on its shortcut and select “Properties“. This action opens the Properties window where you can adjust various settings for the app.

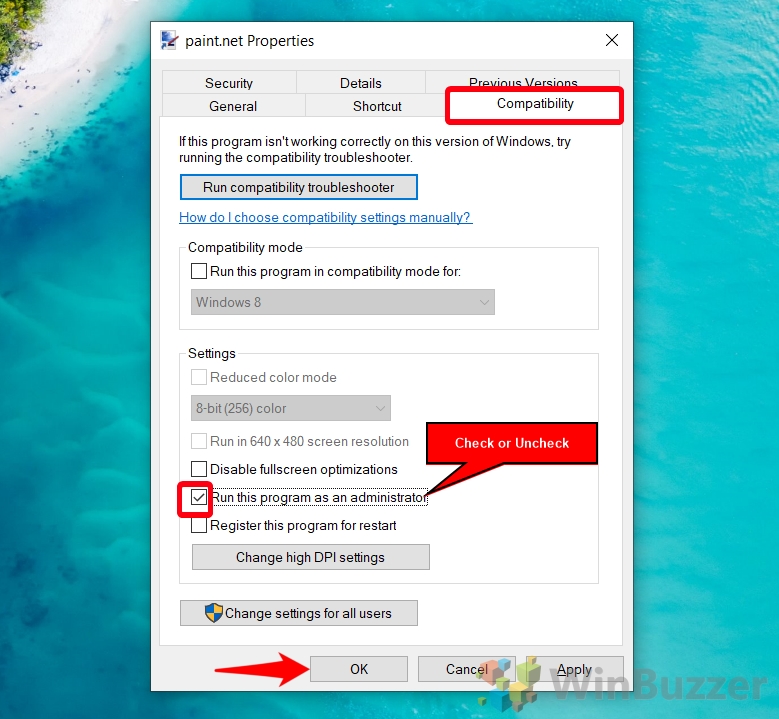
- Open the “Compatibility” Tab and Tick “Run this Program as an Administrator”
Within the Properties window, navigate to the “Compatibility” tab. Here, you will find the option “Run this program as an administrator”. Check this box to enable the application to always run with administrative privileges. Click “OK” to save and apply these changes.

- Optional: Choose Whether to Apply the Changes to All Users
If your computer is shared with multiple users and you would like to apply this setting for everyone, click the “Change settings for all users” button located at the bottom of the Compatibility tab. This opens a new window where you can specify settings that affect all users.

- Tick or Untick “Run this Program as an Administrator”
In the window for changing settings for all users, you have the option to either “Run this program as an administrator” for every user by ticking the box, or leave it unticked to let each user decide. After making your selection, click “OK” to apply the changes.


How to Always Run an App as Administrator in Registry Editor
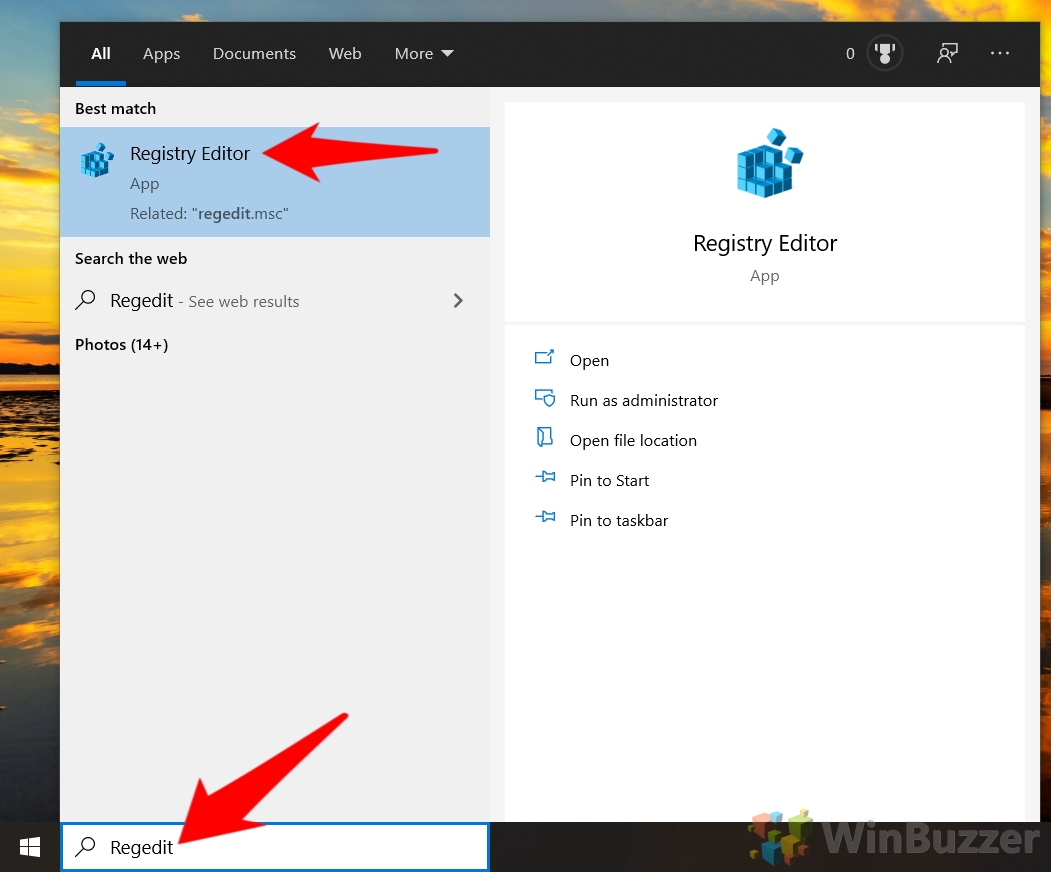
- Open the Registry Editor
Press the “Start” button and type “Regedit“. Select the top result to open the Registry Editor.
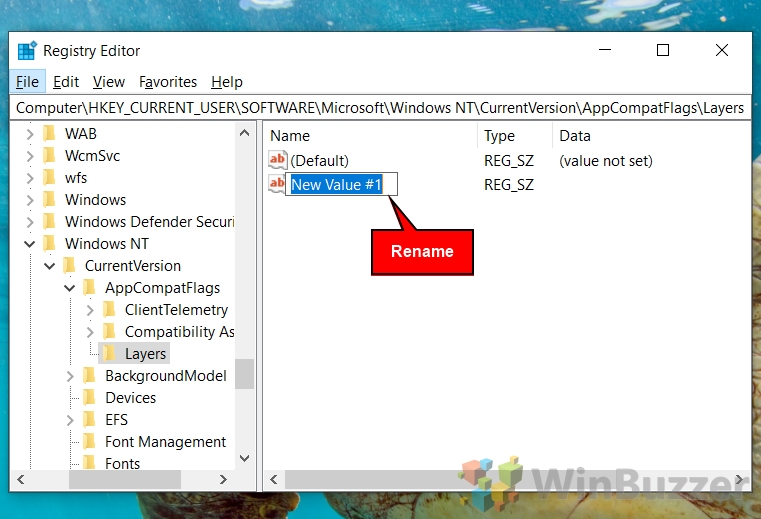
- Navigate to the app compatibility registry key and add a new string value
In the Registry Editor’s address bar, paste the following path and press Enter:
Computer\HKEY_CURRENT_USER\SOFTWARE\Microsoft\Windows NT\CurrentVersion\AppCompatFlags\Layers
Right-click in the main pane’s empty space and select “New > String Value“.

- Type the path to your program exe as the file name
As an example, use “C:/Program Files/Paint.net/UpdateMonitor.exe“.
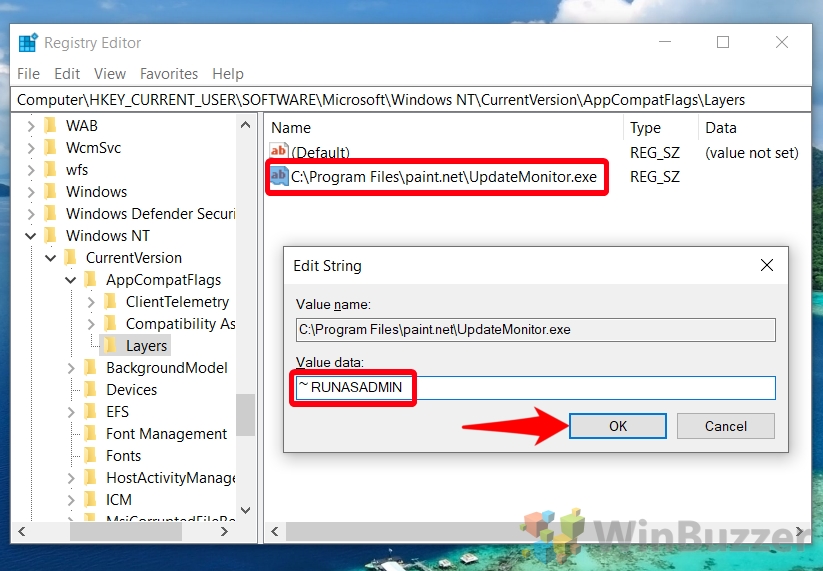
- Double-click the new string and enter “~RUNASADMIN” in the value data field
Hit “OK” to confirm the changes. The next time you start the application, it will run with administrator privileges.
FAQ – Frequently Asked Questions About Admin Privileges and User Account Control (UAC)
What is User Account Control (UAC) and why does it ask for permissions?
User Account Control (UAC) is a fundamental security component of Windows 10 designed to prevent unauthorized changes to the operating system. When a software or user initiates an action that requires administrative-level permission, UAC prompts the user to allow or deny the action. This mechanism helps protect your system against malicious software and accidental changes by ensuring that users consciously approve elevated access for apps that could potentially make significant modifications to the system settings or files.
How can I tell if an application requires administrator privileges?
Applications that perform operations affecting system-wide settings, such as software installation, changes to system files, and modifications to system settings, typically require administrator privileges to run properly. Signs that an application might need these privileges include receiving errors about insufficient permissions when attempting to perform tasks, or specific instructions within the app’s documentation or setup process directing you to run it as an administrator. Additionally, applications that interact with Windows system components or require access to restricted areas of the file system often require elevated permissions for full functionality.
Is it safe to always run a program as an administrator?
Running programs as an administrator can significantly compromise your system’s security, especially if the programs are compromised by malware or other malicious entities. Administrator privileges grant an application unrestricted access to your system, allowing it to make any changes, including those detrimental to your system’s integrity or your personal privacy. Therefore, it’s crucial to grant admin rights only when necessary and ensure the software you are running with elevated privileges is from a trusted source. Regularly using applications with standard permissions minimizes potential security risks and is a good practice for routine computer use.
Why might some applications not support the ‘Ctrl + Shift + Enter’ shortcut to run as an administrator?
The ‘Ctrl + Shift + Enter‘ shortcut is designed to work with applications integrated into the Windows operating environment, such as those accessible through the Start menu or the search function. However, applications with custom startup processes or those that do not interact directly with the standard Windows shell—such as third-party tools with bespoke launchers—may not recognize or support this shortcut. These applications often require alternative methods to achieve elevated privileges, such as modifying properties directly or using specific options provided within the application or its launcher.
Can I run Windows Store apps as an administrator?
Windows Store apps, also known as Universal Windows Platform (UWP) apps, are designed to operate within a confined environment, or sandbox, to enhance security and stability. This design restricts their ability to request or achieve the same level of access as traditional desktop applications, including running with administrator privileges. Consequently, the option to run these apps as an administrator is typically unavailable. The sandbox model ensures that the apps have limited access to the system’s resources, preventing them from making significant changes to the operating system or accessing sensitive areas outside their isolated environment.
What should I do if an application still doesn’t run correctly even after granting admin rights?
If granting administrative rights doesn’t resolve the issue, consider the following steps: Verify the software’s compatibility with your Windows version and look for any updates or patches from the developer. Ensure that all necessary dependencies, such as frameworks or libraries, are installed and up to date. Additionally, consult the software’s official documentation or support forums for any known issues and recommended solutions. In some cases, running the application in compatibility mode for an earlier version of Windows can resolve conflicts. If problems persist, reach out to the application’s customer support for more targeted troubleshooting.
Can changing compatibility settings affect how an application runs besides enabling admin rights?
Yes, changing compatibility settings can significantly impact how an application functions on your system, beyond merely enabling administrative rights. These settings can adjust the application’s behavior to simulate the operating conditions of previous Windows versions, addressing compatibility issues that may prevent the app from running correctly on newer systems. Options include running the application in a specific Windows version mode, changing display settings (reducing color mode, running in 640×480 resolution), disabling full-screen optimizations, and adjusting DPI settings. While these changes can improve application performance or functionality, it’s essential to understand their effects and revert any adjustments that do not resolve the issue or adversely affect the app’s operation.
Is there a way to temporarily grant admin rights to an app without changing its permanent settings?
Yes, you can temporarily grant administrator rights without altering an application’s permanent settings by using context menus or keyboard shortcuts. For instance, right-clicking an application’s executable file or shortcut and selecting “Run as administrator” from the context menu allows for a single instance of elevated privileges without changing the app’s default behavior. Similarly, using the ‘Ctrl + Shift + Enter‘ keyboard shortcut when launching applications from the Start menu or search function prompts for administrative privileges for that session. These methods are ideal for applications that only occasionally require elevated privileges, enabling you to maintain default security settings while bypassing them as needed for specific tasks.
Why would I need to run an application as an administrator if I’m already logged in as an admin user?
Even when logged in with an administrator account, Windows enforces a security principle known as “least privilege“, which operates applications under standard user permissions by default. This strategy minimizes the risk posed by malicious software and limits the potential impact of unauthorized changes to the system. Running an application as an administrator elevates its access to perform tasks or make changes that would otherwise be restricted. Therefore, explicit permission through User Account Control (UAC) prompts or selecting “Run as administrator” is necessary to grant an application full administrative privileges, ensuring conscious user approval for elevated access.
What are the risks of making changes in the Registry to set permanent admin rights?
Altering the Windows Registry to set permanent administrative rights can introduce significant risks, including system instability, security vulnerabilities, and operational errors. The Registry contains critical settings that dictate the behavior of the operating system and installed applications. Incorrect modifications can lead to application failures, system crashes, and compromised security. Always ensure that you have a complete backup of the Registry and the system before making any changes. It’s advisable to proceed with Registry edits only if you are familiar with its structure and impacts and to follow detailed instructions carefully to minimize potential issues.
How can I ensure that a program doesn’t run as administrator by default?
To prevent a program from running as an administrator by default, you need to access its properties. Right-click the application’s shortcut or executable file, choose “Properties“, navigate to the “Compatibility” tab, and ensure the “Run this program as an administrator” option is unchecked. If you’ve modified the properties of the program’s shortcut to always run as an administrator, removing this setting from the shortcut’s properties will revert it to standard user privileges. Additionally, if changes were made in the Registry or application compatibility settings to always run the program with elevated rights, you must reverse those changes following the appropriate methods for each setting.
Can administrator rights affect network permissions and access?
Yes, administrator rights can extend to network-related activities, enabling actions that require elevated privileges, such as modifying network settings, installing network drivers, or accessing certain network resources that are restricted to standard users. For example, tasks that alter the system’s firewall settings, configure network interfaces, or grant/deny network access to other applications may necessitate administrator permissions. Having administrative privileges ensures that only authorized users can make significant changes to network configurations, enhancing security within a managed network environment.
How can I identify which applications are running with administrator privileges?
To identify applications running with administrator privileges, you can use the Task Manager. Open Task Manager (Ctrl + Shift + Esc), navigate to the “Details” tab, and right-click on the column header to choose “Select columns“. From the list, add the “Elevated” column, which will then display a “Yes” for processes running with elevated (administrator) permissions. This feature allows you to monitor and identify which applications are using elevated privileges, assisting in managing and securing your operating environment.
Is it possible to run batch files as an administrator without using a shortcut?
To run batch files as an administrator without creating a shortcut, you can use the Command Prompt or PowerShell with elevated rights. Begin by opening Command Prompt or PowerShell as an administrator (search for it in the Start menu, then right-click and select “Run as administrator“). Navigate to the directory containing your batch file using the cd command, and then run the batch file by typing its name and pressing Enter. Running the command line interface with elevated privileges ensures that any scripts executed inherit these administrative rights, allowing them to perform tasks that require such permissions.
What should I do if the ‘Run as administrator’ option is missing or grayed out?
If the “Run as administrator” option is missing or grayed out, several factors could be at play. This issue may arise due to the application’s compatibility, system policies, or file corruption. Begin by checking if the application is compatible with your Windows version and consider reinstalling the app if necessary. Additionally, explore system policies that may restrict running programs as an administrator by using the Group Policy Editor (gpedit.msc) of Windows, or checking your account permissions to ensure it has administrative rights. To address potential file corruption, utilize the System File Checker tool by opening Command Prompt as an administrator and running the command sfc /scannow. This process scans and repairs corrupted system files, which may resolve the issue.
Related: How to Allow or Stop Apps from Running in the Background
In Windows, many apps don’t stop functioning as soon as you aren’t using them. We typically refer to these apps, which perform actions behind the scenes, as background apps. In our other guide, we show you how to stop apps from running in the background in Windows for individual users, individual apps, and for all users.

Related: How to Create a Windows 11 Shutdown Shortcut (or Sleep, Hibernate, Lock)
It typically takes just a few clicks to activate sleep mode in Windows 11, but why wait? In our other tutorial we show you how to create a Windows 11 shutdown shortcut that can do it in a double-click instead, which you can use from the desktop or pinned to the taskbar.
Related: How to Create a Desktop Shortcut to Apps, Websites, or Commands
Though these days many prefer to use Start pins rather than create a shortcut on the desktop, they have their place. Knowing how to create a desktop shortcut can open additional avenues for efficiency, allowing you to pin a website or run a command with a double-click. In our other guide, we show you how to create a desktop shortcut in Windows 11 or Windows 10 using fast, simple, and effective methods.