

Page borders are a useful tool. They make your document stand out without looking tacky, while providing a guide should somebody want to staple or hole punch. Today we’re going to show you how to add a border in Word, which has various pre-built design options to spice up your document.
Setting Page Borders in Word Differs by Version
The process to create Microsoft Word borders will vary slightly depending on your version. We’re going to assume you have an Office 365 subscription or Office 2019. If you have an older version, look to the layout or page layout tab instead.
In newer versions of Word, there are three in-built page border variants: box, shadow, and 3-D. You can also set custom borders if you wish. The first is the most suitable for an enterprise setting, but the others can be a bit of fun. We’ll show you how to choose between them to suit your preference. Let’s get started:
How to Add a Basic Border in Word
If you came here for a plain, black border, this section is for you. You can get from blank page to professional-looking border for Word in just a few clicks:
- Open the “Design” Tab and Click “Page Borders”

- Select “Box” and Click “OK”
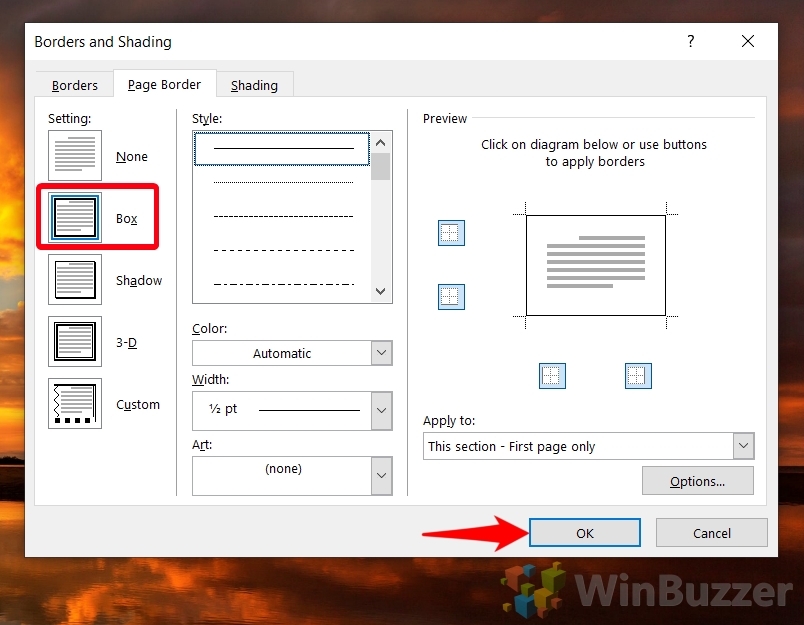
- Check Your New Page Borders in Word Page View
You should see that the border neatly hugs the edge of your text and images without overlapping.

How to Set Alternate Microsoft Word Border Styles and Formatting
If a plain black line is a little too boring for you, you can make use of the Word page border options to customize the shadow, thickness, line style, and more.
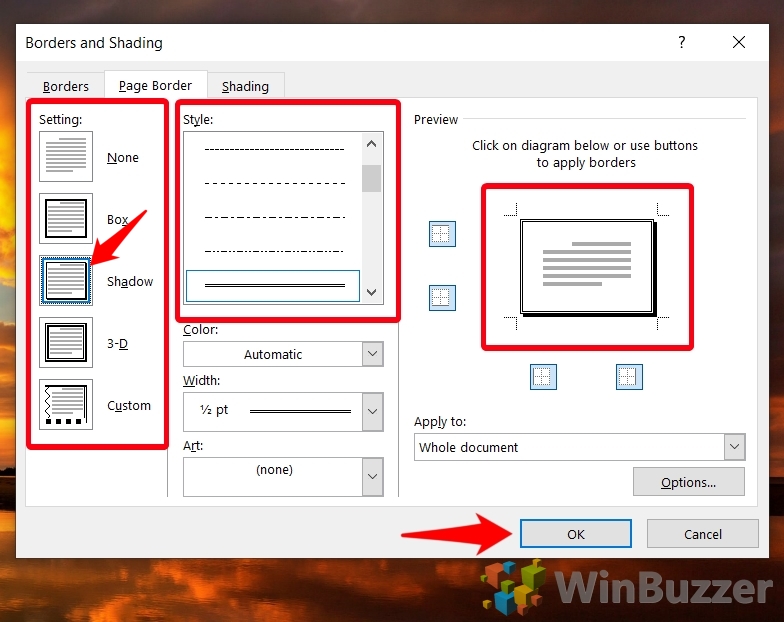
- Switch to Another Border Setting and Change Line Style
Instead of choosing a lined “Box” as borders for pages, you can use “None” for the standard invisible border design, or choose “Shadow” or “3-D” for a 3-D effect. “Custom” allows defining your own page border design. Border line style, color and thickness can also be changed. Press “OK” to apply the changes.
- Preview Your Page Borders in Your Main Document Window

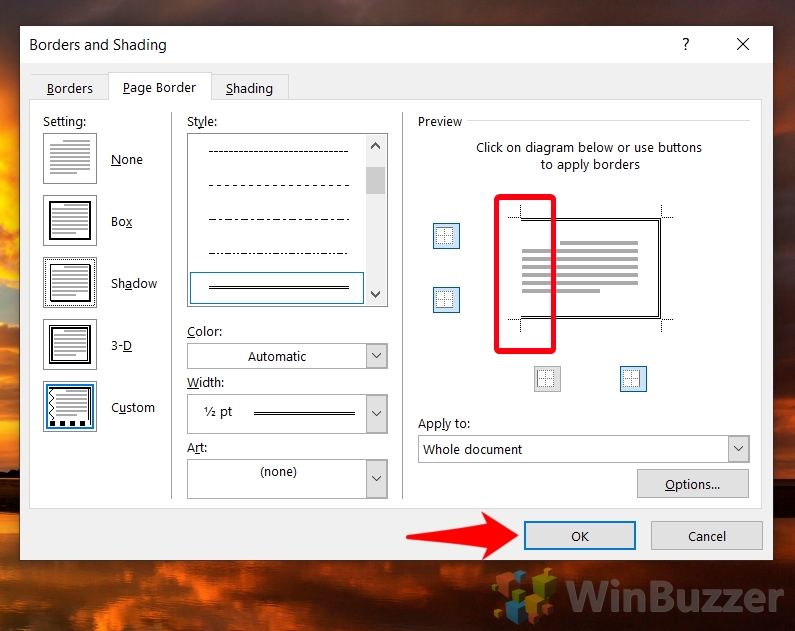
- Remove an Individual Border Line
If you’d like to remove a specific border line, you can do so by clicking it in the preview on the right-hand side and then pressing “OK”.
- Check Your Page Borders in Word Page View
You should see that border you selected is completely gone and the line instead reaches right to the edge of the page.
- Modify the Style of a Specific Word Border Line
If you want a single border to be in a different style, you can instead click “Custom“, select a line style, and then click on the border you want to change in the preview window. Press “OK” to apply the changes to your document.
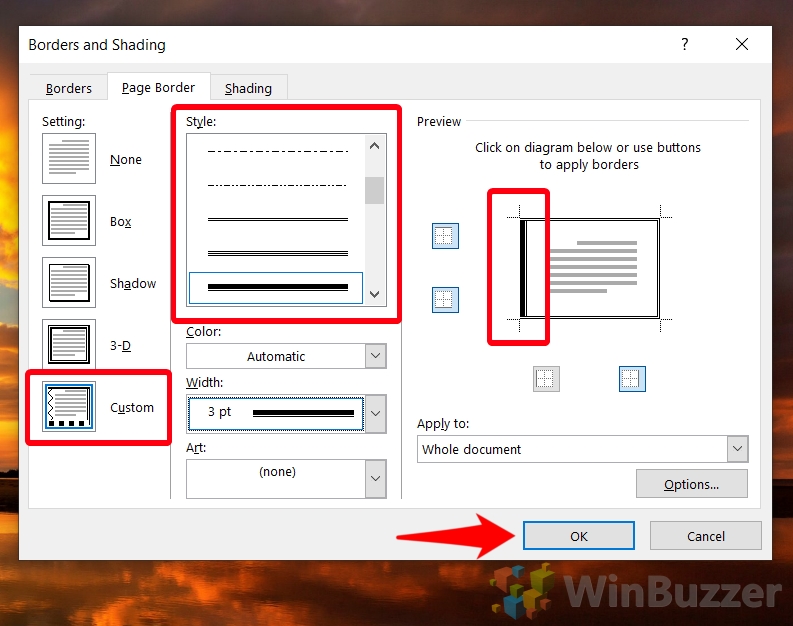
- Check Your Border Line’s New Style
- How to Change the Colour and Width of Page Borders in Word
If you have a dark document background or black is too boring, you can change your border color and width in the same menu.
Click on the “Color” and “Width” dropdown to do so, then click “OK” to apply the changes. This works for both your border as a whole and a specific border line.
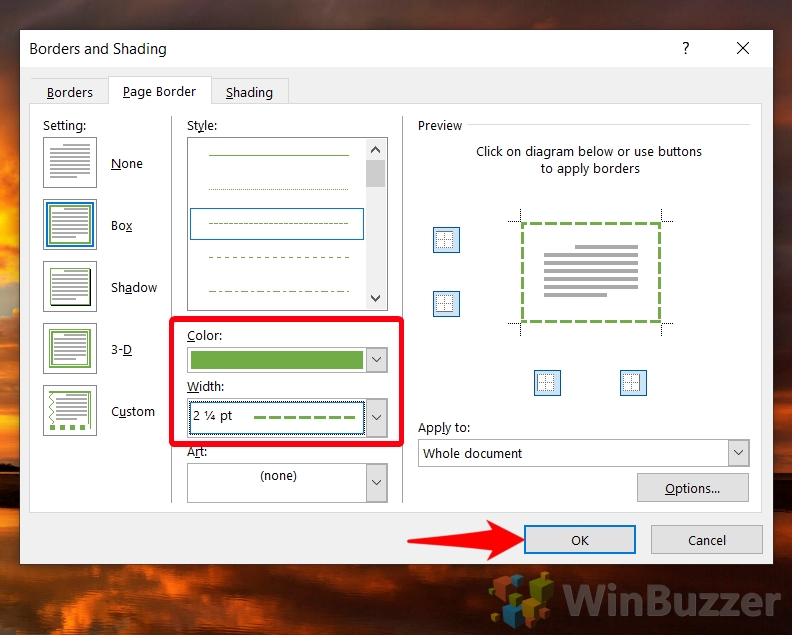
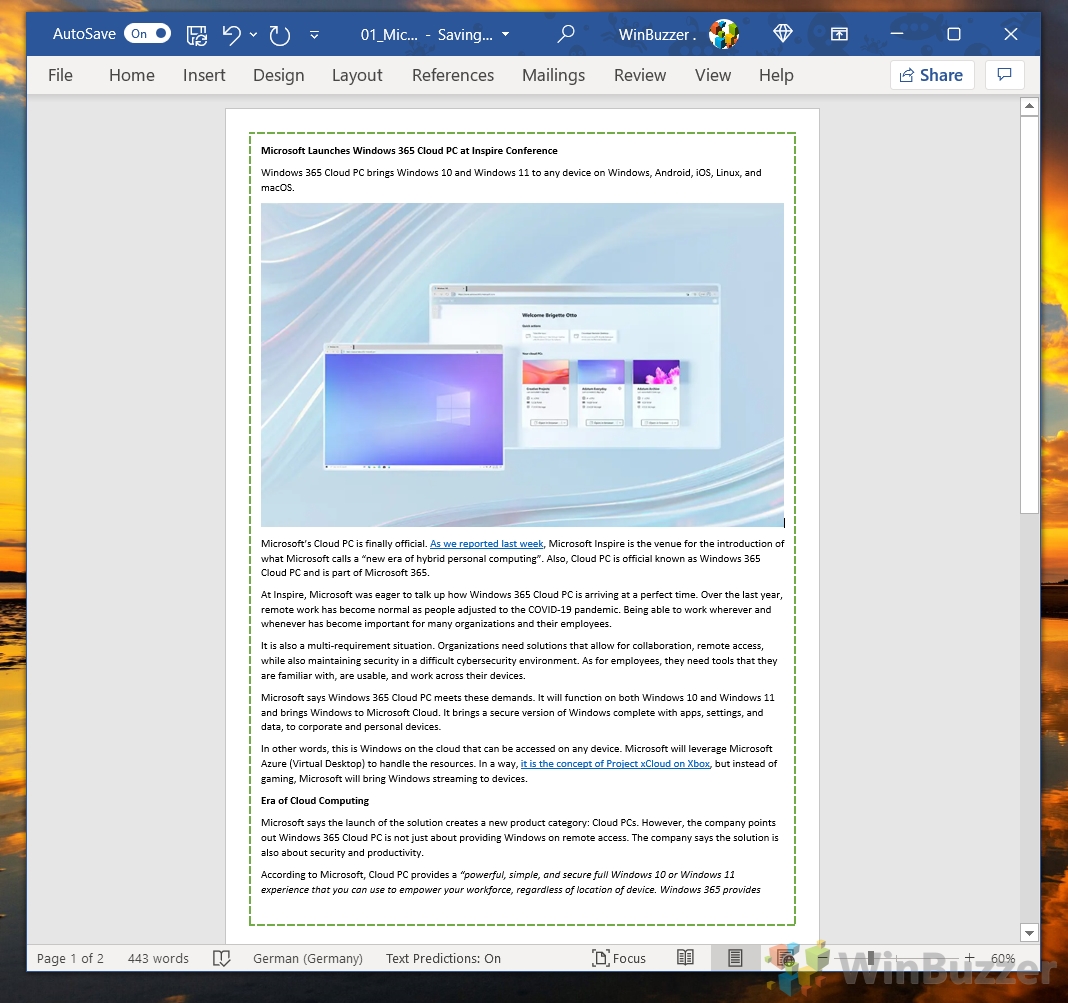
- View Your New Border Colour and Width and Adjust as Necessary
How to Insert a Border in Word for a Single Page
Quite often it makes sense to only have a border on the first page – for use on a cover page for example. Here’s how you can do that:
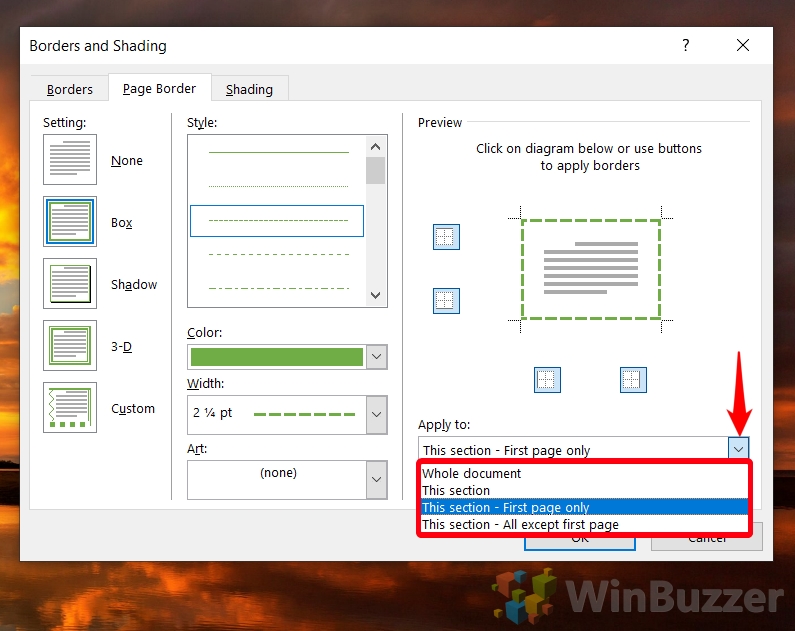
- Click the Dropdown Underneath “Apply to” and Choose “This Section – First Page Only”
Selecting this option will apply the border to your first page only. If you want to apply it to a different page, you can click on the page in your document and choose “This section” instead. Alternatively, if you want a border everywhere but the first page, choose “This section – All except first page“. Press “OK” to apply the changes.
- Make Sure the Page Border in Word Applied Correctly
FAQ – Frequently Asked Questions About
Can I apply a border to only certain pages, not just the first one?
To apply borders to specific pages, you must first divide your document into sections by inserting section breaks where you want the borders to change. Then, go to the “Page Borders” dialog box, choose your desired border settings, and in the “Apply to” dropdown, select “This section.” Repeat this process for each section where you want different borders.
Is it possible to use custom images or patterns as page borders?
While Word offers a variety of built-in Art patterns for borders, for truly custom images, you would need to use a workaround by inserting the image into the header or footer. Adjust its size and repeat it along the page edges. This method requires manual adjustment to achieve the appearance of a continuous border.
How do I adjust the margin between the border and the text?
In the “Page Borders” dialog box, click on “Options” beside the “Apply to” dropdown. Here, you can adjust the margin measurements in the “Margin” fields, controlling the space between your borders and the document’s text. This allows for precise control over the placement of your borders relative to the document content.
Can I set different borders for odd and even pages?
Word does not directly support alternating borders for odd and even pages through a simple setting. To achieve this, you would need to manually assign different sections to odd and even pages and configure their borders separately. This requires planning your document layout beforehand to accommodate the different sections.
How do I copy border settings from one document to another?
Although Word does not offer a function to directly copy and paste border settings, you can open both documents side by side, replicate the exact settings found under “Page Borders” in one document, and manually apply them to the other. Another approach is to save the document with the desired borders as a template, which can then be used to create new documents with the same settings.
What’s the easiest way to remove all borders from a document?
To remove all borders from your document, go to the “Design” tab, click on “Page Borders“, and in the dialog box that appears, select “None.” This action will remove any existing page borders from your document. Remember to apply this change to the entire document or specific sections, depending on your requirements.
Can page borders be added to documents in Word Online?
As of the latest update, Word Online has limited design capabilities compared to the desktop version, and detailed border customization such as adding custom styles or patterns is not supported. However, basic document formatting and simple borders may still be possible. Check the latest version of Word Online for any new features.
Can you add borders to only the top and bottom of a page?
Yes, you can customize which sides of the page have borders. In the “Page Borders” dialog box, select “Custom” under the “Setting” section, then click on the border icons for the top and bottom sides to activate them while leaving the left and right side icons deselected. This method lets you apply borders selectively to any combination of sides.
Are there any limitations on the color palette for borders?
Word’s built-in color palette for borders offers a wide range of colors, but if you require a specific shade, click on “More Colors” for a more extensive selection, including RGB (Red, Green, Blue) sliders that allow you to customize colors precisely. This feature is useful for matching borders to specific branding or design schemes.
What should I do if my border is not printing correctly?
First, ensure your printer settings are configured to print “Background colors and images” found under Word’s “Options” menu in the “Display” section. If the border is close to the edge and not printing, check the page size and margin settings in Word and adjust them according to your printer’s capabilities. Also, consider the printer’s non-printable area, which varies by model, and ensure your border is within the printable margins.
How do I make a border appear only on certain sides of the text on a page?
To customize which sides of the page display a border, open the “Page Borders” dialog box, select “Custom” in the settings, then click directly on the icons representing the four sides of the page to toggle borders on or off individually. This feature allows for detailed customization, enabling borders on any combination of page sides.
Can I save my border settings for future use?
Directly saving border settings for use in other documents isn’t inherently supported. However, a practical workaround is saving the document that contains your desired border settings as a Word Template (.dotx). When you want to use the same settings again, create a new document based on the template, which will inherit the border settings.
How to apply a gradient effect to page borders?
Direct application of gradients to page borders within Word is not supported. However, you can create a gradient effect using a graphic design software, save it as an image, and then insert it into your Word document as a text watermark or in the header/footer, scaling it to fit the page margins. This requires creative manipulation for a full border effect.
How do I apply borders to table cells instead of whole pages?
To apply borders to table cells, first select the cells or table where you want to apply the borders. Then, under the “Table Design” tab, which appears when a table is selected, use the “Borders” option to choose from various styles, colors, and widths for your cell borders. This option allows for granified control over the appearance of table cells within your document.
How can I ensure my custom border doesn’t overlap with text?
To prevent borders from overlapping with text, adjust the page margins and paragraph spacing settings under the “Layout” or “Page Layout” tab. Additionally, when setting up your border in the “Page Borders” options, click “Options” and modify the margins there to specify the distance from the text to the border. This double check ensures that your content and borders are clearly separated and visually appealing.
Related: How to Clear Formatting in Microsoft Word
If you pasted text into your document from the internet or another document, you may find it necessary to learn how to clear formatting in Word. The in-built feature will remove any display issues you may have and return text to its default form. In our other guide, we show you how to clear formatting in Word via the Styles and Font windows so you can get your document back to a blank slate.
Related: How to Delete a Blank Page in Word
A blank page may be useful if you’re planning to continue your document, but it can look very unprofessional when you’re sending off a finished document. As a result, it’s important that you know how to delete a blank page in Word when you have no need for it.

Related: How to Move and Rearrange Pages in Word
There are a few ways to move pages in Word, but the most effective involve the use of the Word navigation pane or some simple copy and pasting. In our other guide, we show you how to rearrange pages in Word using the navigation pane, as well as how to copy a whole page in Word and move it somewhere else in your document.

Related: How to Insert a Footnote or Endnote in Microsoft Word
The ability to insert footnotes and endnotes in Microsoft Word documents is indispensable. These elements serve not only to cite sources and provide additional context but also to enhance the readability and credibility of your document. Whether you’re drafting a scholarly article, a detailed report, or any comprehensive document, understanding the nuances of footnotes and endnotes is crucial. In our other guide, we show you how to add a footnote or endnote in Word using the software’s built-in tools, whilst also explaining the difference between the two.


