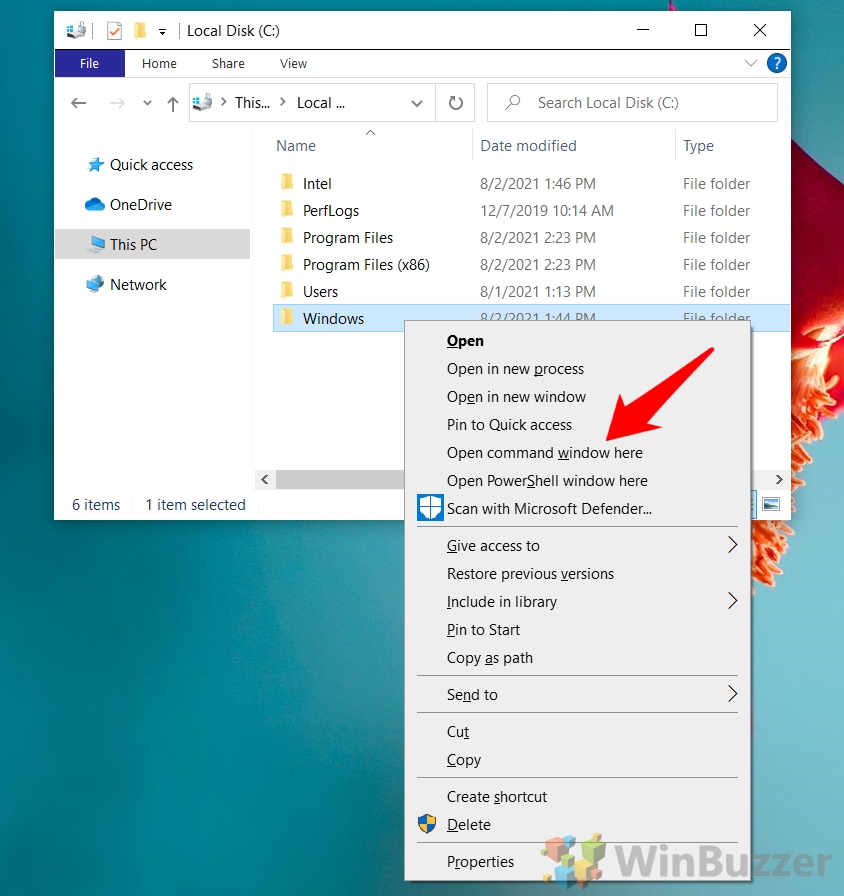
If you’re anything like me, you’ve always relied on Windows 10’s “Open command window here” context menu to access your favorite command-line tool. However, in recent versions of Windows 10 and in Windows 11, Microsoft has phased this option out in favor of PowerShell.
As a result, when you want to open CMD in a folder you have to navigate there manually via commands. If you’re a heavy CMD user, this gets frustrating pretty quickly. Instead, we’re going to show you how to open Command Prompt in a folder again, both when you right-click a folder and in empty space.
If you don’t use PowerShell at all, we’ll also show you how to remove the “Open PowerShell window here” context item for a cleaner UI.
How to Add “Open command window here” to the Folder Context Menu
For users who frequently utilize the Command Prompt, having quick access directly from the context menu can significantly streamline your workflow. This method will restore the “Open command window here” option that has been replaced by PowerShell.
- Open the Registry Editor
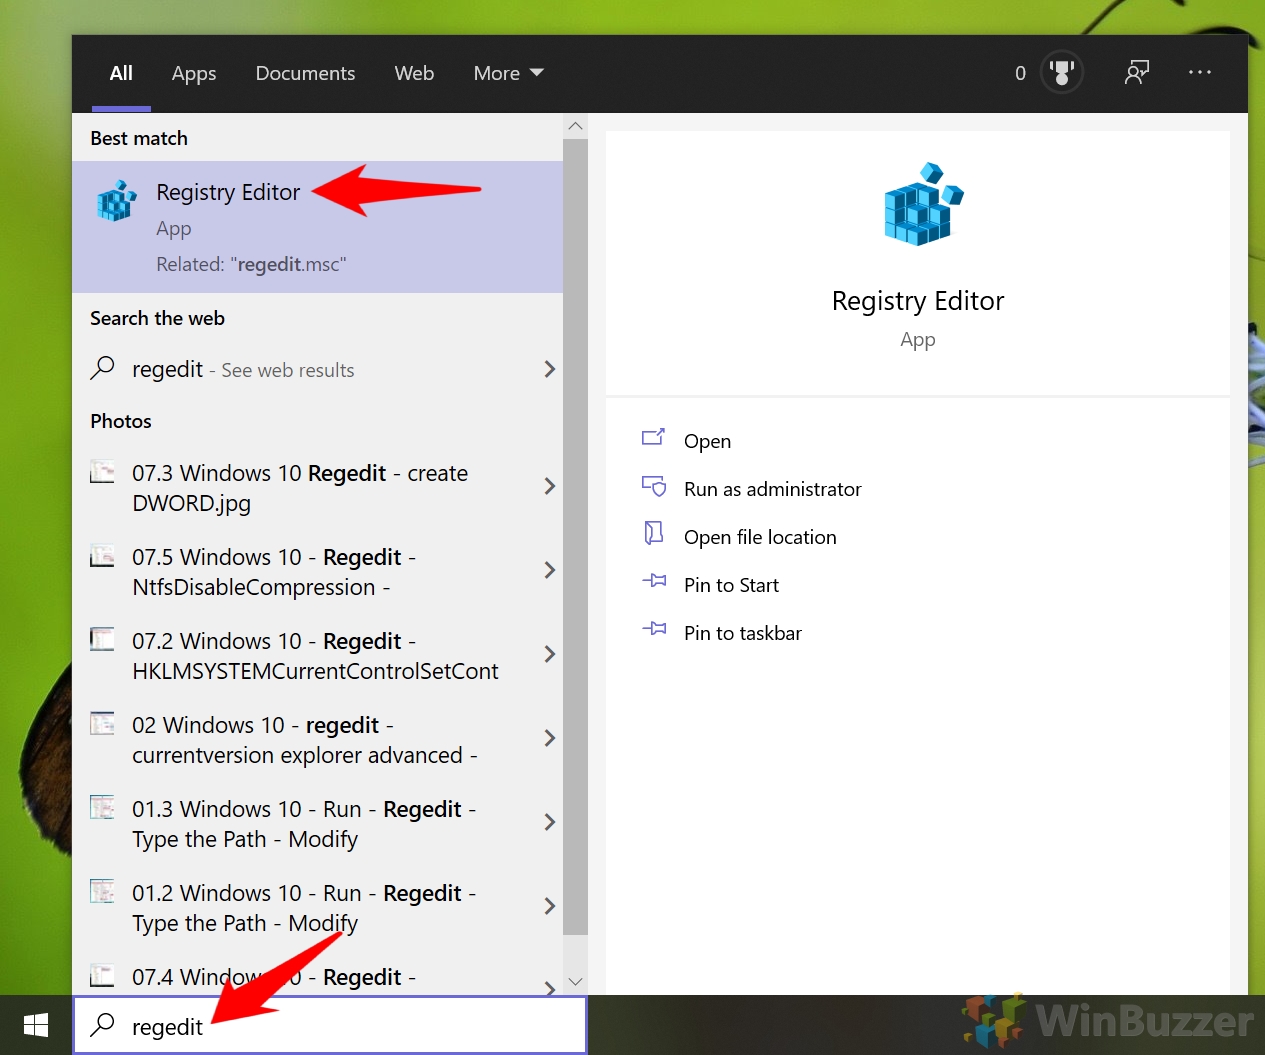
Press the Start button and type “Registry Editor”. Select the top result to launch the Registry Editor. This is your gateway to modifying deep system settings, so proceed with caution.
- Navigate to the CMD Key and Change Its Permissions
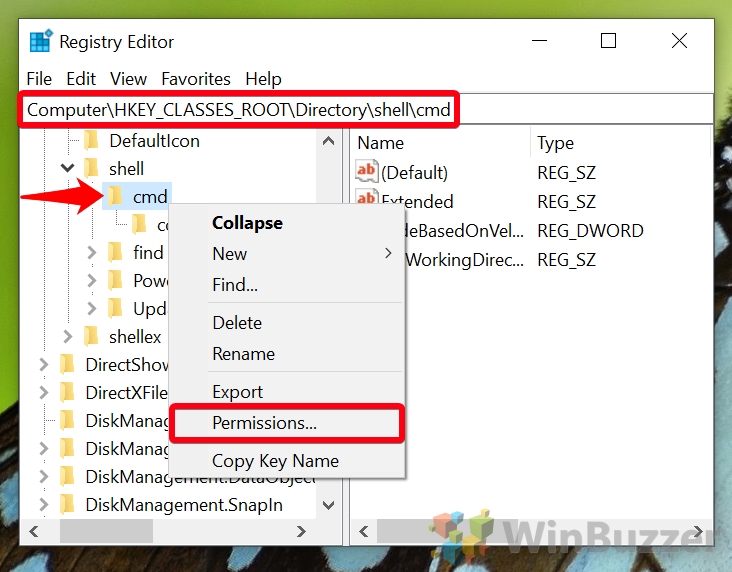
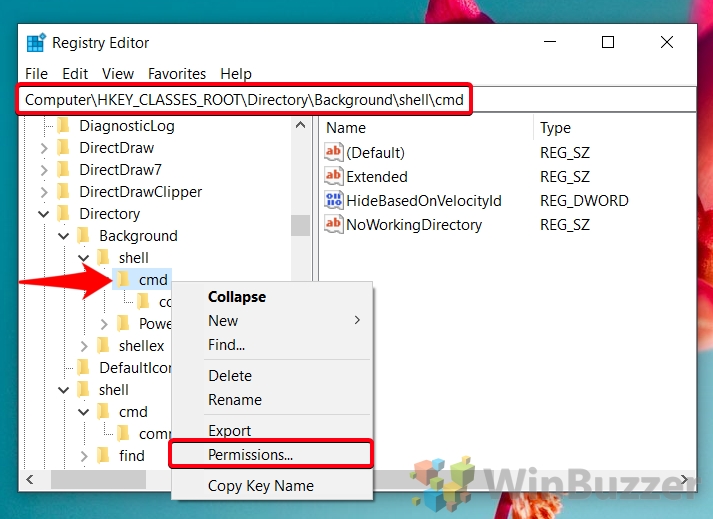
Copy and paste the following into the Registry Editor’s address bar to locate the cmd key.
Computer\HKEY_CLASSES_ROOT\Directory\shell\cmd
Right-click the cmd folder in the sidebar and select “Permissions…” from the context menu to adjust who can modify this registry key.
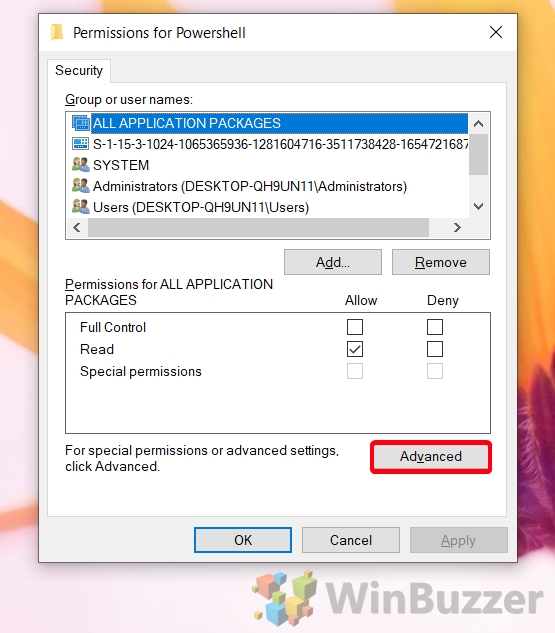
- Click “Advanced” at the Bottom of the Permissions Window
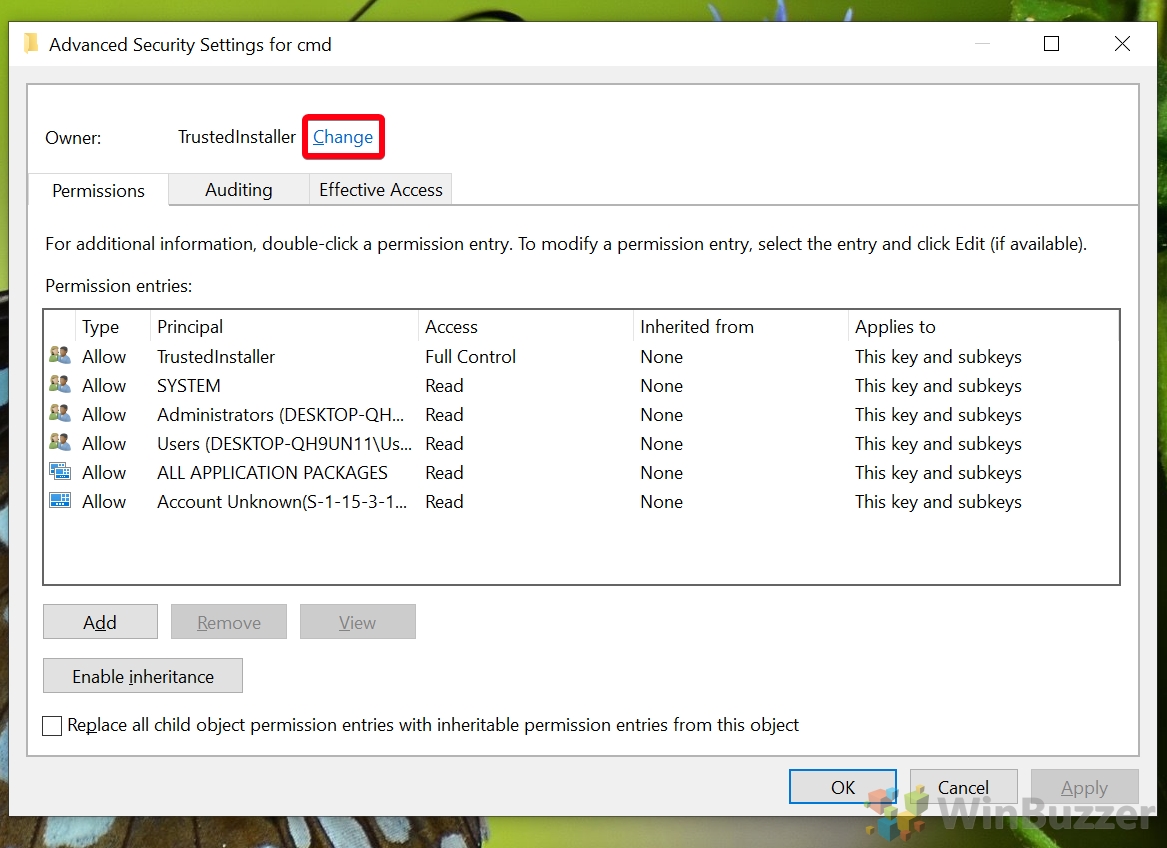
In the Permissions window, you’ll find an “Advanced” button at the bottom. Clicking this will take you to the advanced security settings for the cmd key.


- Open Owner Settings
To modify permissions, you’ll need to change the owner from “TrustedInstaller” to your user account. Click the “Change” link next to the owner’s name to proceed.
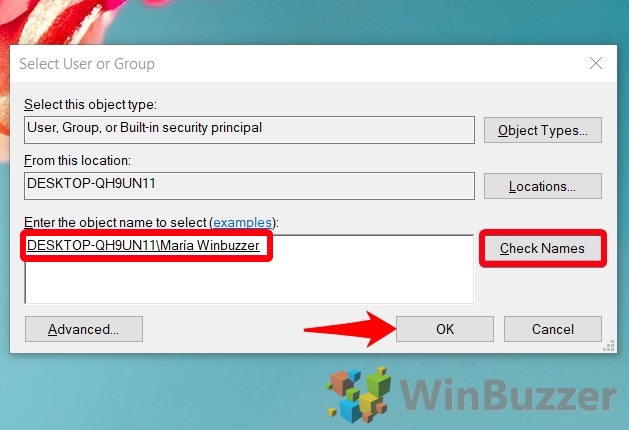
- Select Your Windows User as the Object Name
Type your username into the “Enter the object name to select” box and press “Check Names“. Your full username path should automatically populate. Click “OK” once confirmed.
- Replace the Owner on Subcontainers and Objects
Back in the Advanced Security Settings screen, select “Replace owner on subcontainers and objects“, then click “Apply” and “OK” to save your changes.

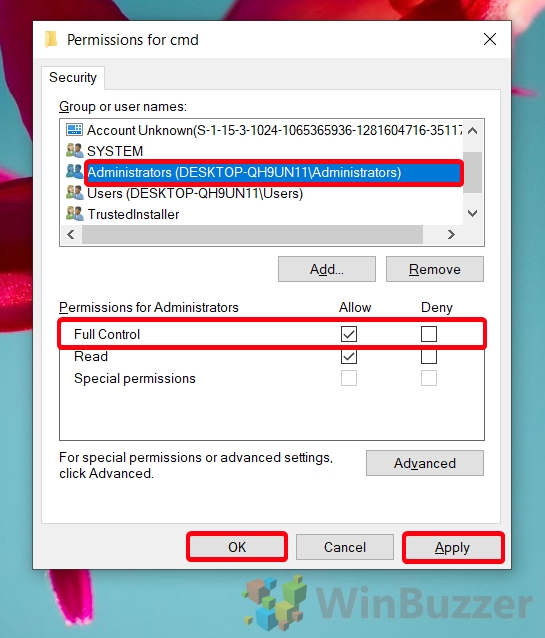
- Allow the Administrators Group Full Control Over the Registry Key
In the “Permissions for cmd” window, select “Administrators” under the “Group or user names” heading and check “Full Control“. Press “OK” and “Apply” to confirm.
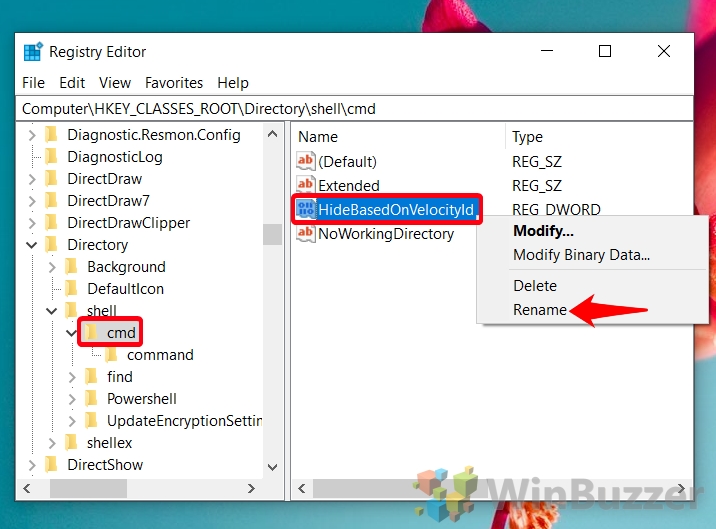
- Edit the “HideBasedOnVelocityId” Registry Entry
Find the “HideBasedOnVelocityId” entry in the main pane, right-click it, and choose “Rename” from the context menu.
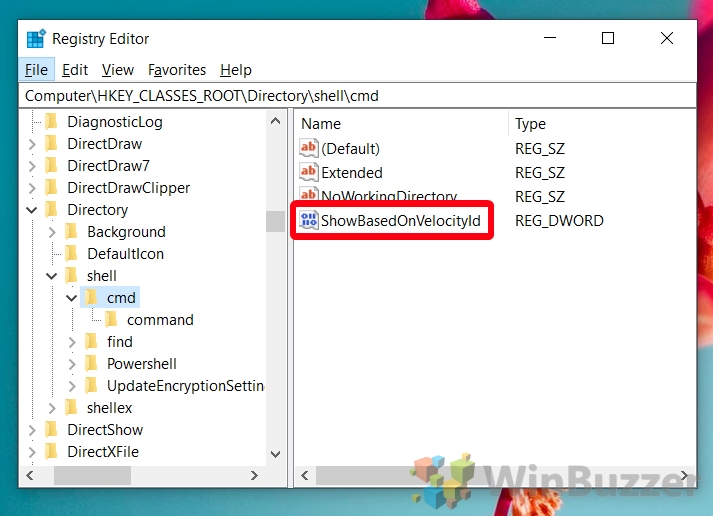
- Call it “ShowBasedOnVelocityId”
Rename it exactly as “ShowBasedOnVelocityId“, including capitalization, to ensure the change takes effect.
- Check Your “Open command windows here” Entry in Windows File Explorer
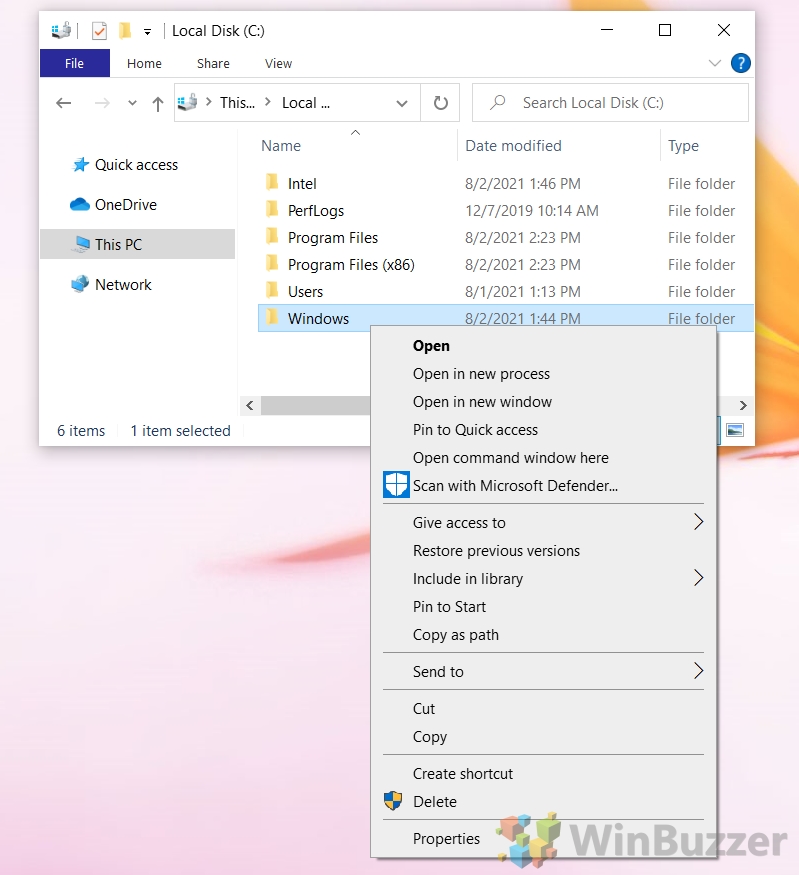
Right-click any folder to see if the “Open command window here” option is now available alongside the Open PowerShell option.
How to Enable “Open command window here” for the Background Context Menu
If you want to add the “Open command prompt” here entry when you right-click the blank space in a folder, you need to enable it for the background context menu. The process is very similar to above, with a one important change – the registry key you edit:
- Open the Registry Editor
Just like before, access the Registry Editor by pressing Start, typing “Registry Editor”, and selecting the top result.

- Navigate to the CMD Registry Key and Change Its Permissions
This time, navigate to a slightly different key by pasting the following into the Registry Editor’s address bar.
Computer\HKEY_CLASSES_ROOT\Directory\Background\shell\cmd
Right-click cmd in the sidebar and choose “Permissions…”.
- Click “Advanced” at the Bottom of the Permissions Window
In the Permissions window, you’ll find an “Advanced” button at the bottom. Clicking this will take you to the advanced security settings for the cmd key.
- Open Owner Settings
To modify permissions, you’ll need to change the owner from “TrustedInstaller” to your user account. Click the “Change” link next to the owner’s name to proceed.
- Select Your Windows User as the Object Name
Type your username into the “Enter the object name to select” box and press “Check Names“. Your full username path should automatically populate. Click “OK” once confirmed.
- Replace the Owner on Subcontainers and Objects
Back in the Advanced Security Settings screen, select “Replace owner on subcontainers and objects“, then click “Apply” and “OK” to save your changes.
- Allow the Administrators Group Full Control Over the Registry Key
In the “Permissions for cmd” window, select “Administrators” under the “Group or user names” heading and check “Full Control“. Press “OK” and “Apply” to confirm.
- Edit the “HideBasedOnVelocityId” Registry Entry
Find the “HideBasedOnVelocityId” entry in the main pane, right-click it, and choose “Rename” from the context menu.
- Call it “ShowBasedOnVelocityId”
Rename it exactly as “ShowBasedOnVelocityId“, including capitalization, to ensure the change takes effect.
- Check Your “Open command windows here” Entry in Windows File Explorer
Right-click any folder to see if the “Open command window here” option is now available alongside the Open PowerShell option.
How to Remove “Open PowerShell Window Here” from the Context Menu
As you’d probably expect, removing the “Open PowerShell window here” entry from the Windows context menu follows a similar process to adding the “Open CMD in folder” entry. However, there are a couple of important changes, so it’s worth paying attention:
- Open the Registry Editor
Press the “Start” button and then type “Registry Editor“. Click the top result.

- Search for the PowerShell registry key and change its permissions
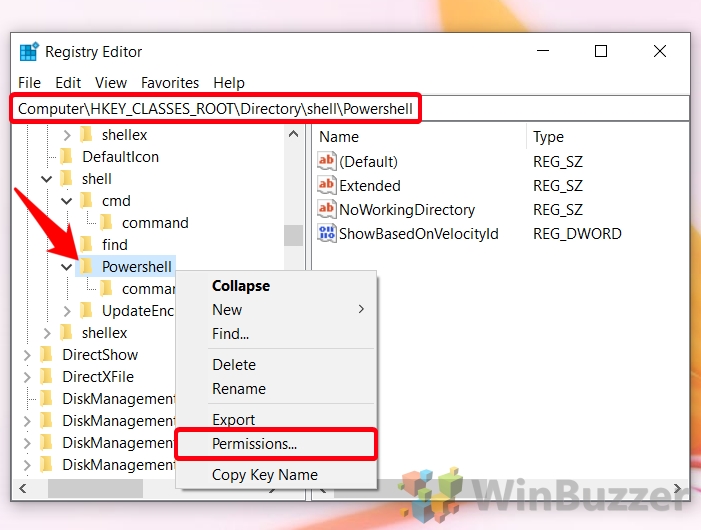
You can find it by pasting the following into your Registry Editor search bar:
Computer\HKEY_CLASSES_ROOT\Directory\shell\PowerShell
Right-click the “Powershell” folder in your sidebar and select “Permissions…” from the context menu.
- Click “Advanced” at the bottom of the permissions window
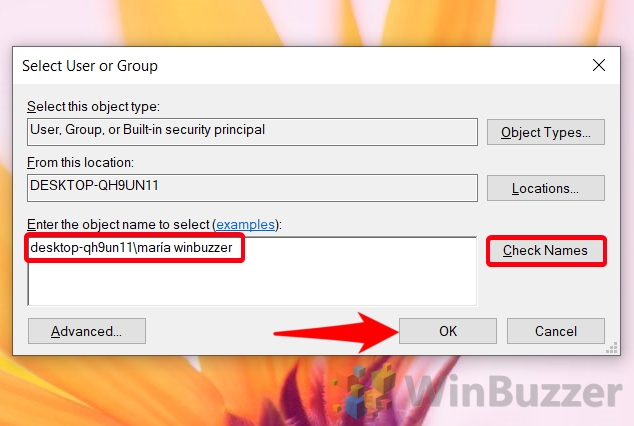
- Press the “Change” button next to the “TrustedInstaller” owner

- Press the “Change” button next to the “TrustedInstaller” owner
Type your username into the “Enter the object name to select” box and press check name. The full path to your user will automatically appear. Press “OK” once it has.
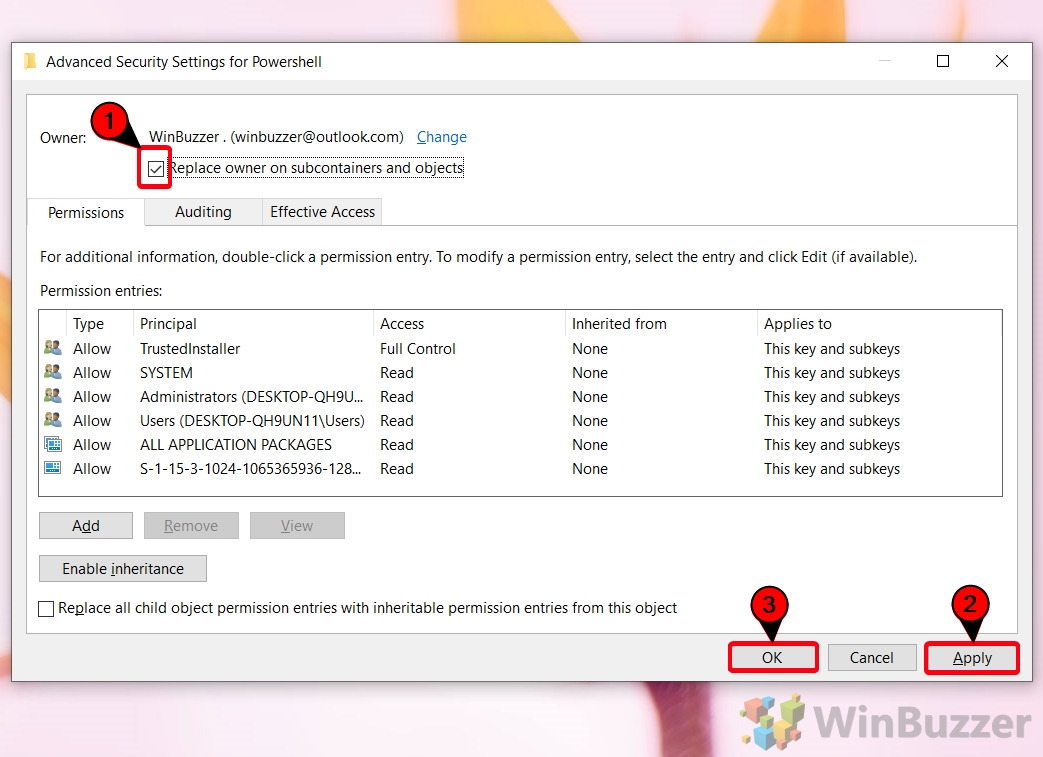
- Replace the owner on subcontainers and objects
Back in the main Advanced Security Settings screen, tick “Replace owner on subcontainers and objects“, then click “Apply” and “OK“.
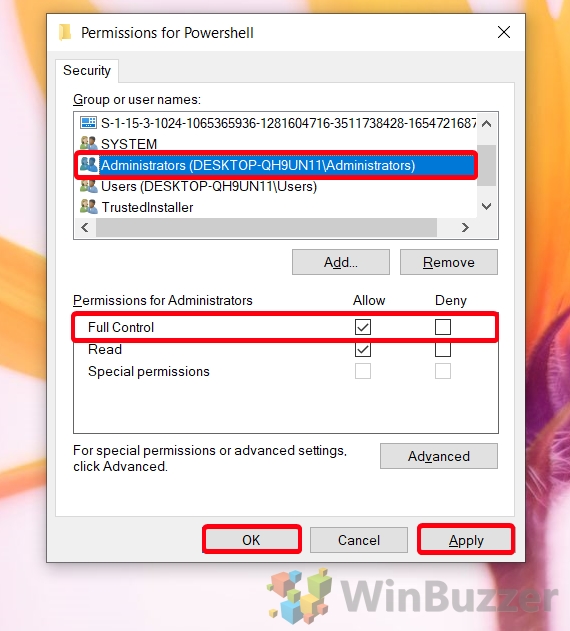
- Allow the administrators group full control over the registry key
In the “Permissions for cmd” window, click on “Administrators” under the “Group or user names” heading and tick “Full Control“. Then press “OK” and “Apply“.
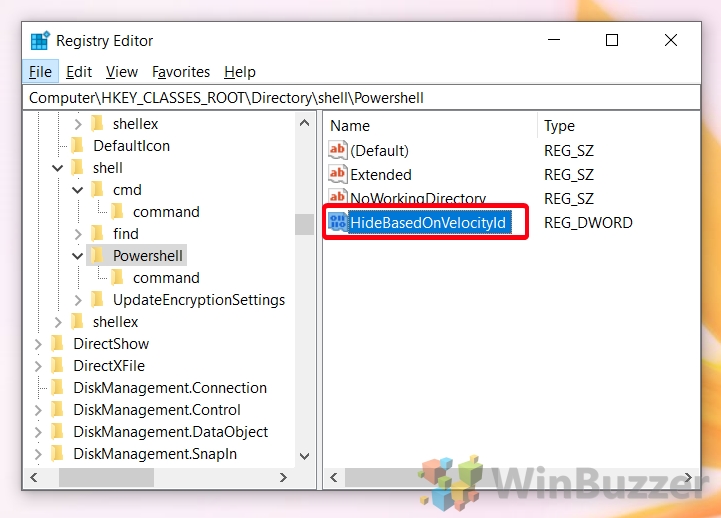
- Rename the “ShowBasedOnVelocityId” registry entry
To do so, right-click it in the main pane and select “Rename“.
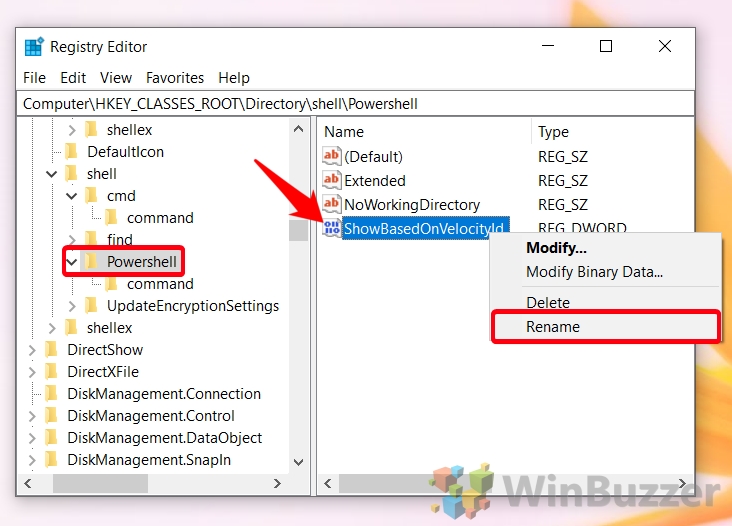
- Name it “HideBasedOnVelocityId”
Make sure you type it exactly, including any capital letters. The changes should apply immediately.
- Check your Windows context menu to see if the PowerShell entry is gone
If you’ve done everything correctly, you should only see the “Open command window here” text when you right-click a folder.
FAQ – Frequently Asked Questions About Customizing the Windows Context Menu
Can I add both Command Prompt and PowerShell options to the context menu simultaneously?
Absolutely. To achieve this, follow the tutorial to add the “Open command window here” option without removing any existing PowerShell entries from your context menu. This method ensures that you have the flexibility to access either utility directly from the context menu, catering to a wide range of user preferences and operational necessities in various situations.
What should I do if my context menu doesn’t update after making changes?
After following the steps in the tutorial, if the context menu does not reflect the changes, first ensure that all steps were followed correctly, focusing on the details of permissions adjustments and the precise renaming of registry entries. If errors persist, restarting the computer is crucial as it forces the system to reload the registry, potentially applying the changes. Additionally, verify that the registry keys and values you’ve modified exist and are named as expected, as typographical errors can prevent changes from taking effect.
How do I backup my registry before making any modifications?
Creating a registry backup is a vital precautionary step. Open the Registry Editor and navigate to “File” > “Export“. In the dialog box that appears, select a convenient location and provide a meaningful name for the backup file. Ensure “All” is selected under Export range. Click “Save” to create a complete backup of the registry. This backup can be restored by simply double-clicking the file, should it be necessary to undo the changes made.
Are there risks involved in editing the registry?
Yes, editing the registry carries inherent risks, as improper changes can lead to system instability, functionality issues, or even prevent Windows from booting correctly. To mitigate these risks, ensure you have a complete backup of the registry before making any changes, and carefully follow the provided instructions. If unsure, seek assistance or research further before proceeding with modifications.
How can I open the Registry Editor with administrative privileges?
Opening the Registry Editor with administrative privileges is essential for making changes that affect the entire system. To do so, right-click the Start button and select “Windows PowerShell (Admin)” or “Command Prompt (Admin)” from the menu. In the elevated terminal window, type regedit and press Enter. This action launches the Registry Editor with the necessary permissions to modify system-wide settings.
Can I modify the context menu for other applications or commands?
Yes, the context menu is highly customizable. The process for adding or removing items is similar to what’s outlined in the tutorial, with modifications specific to the application or command in question. Identify the appropriate registry key for the application, understanding that adding a new item usually requires creating a new key or modifying an existing one, setting permissions, and possibly creating or editing command strings. Use caution and back up your registry before proceeding.
Will these context menu customizations affect all user accounts on my computer?
Most changes made under HKEY_CLASSES_ROOT in the Registry Editor impact all user profiles on a machine. If you’re aiming to apply modifications that affect only a specific user, consider making changes under HKEY_CURRENT_USER. This targets the logged-in user’s profile, allowing for personalized customization without altering the experience for other users on the system.
Can I revert the changes if I decide to return to the default context menu settings?
To undo any changes, you need to reverse the changes made during the customization process. This involves using the Registry Editor to navigate to the modified keys, and either deleting entries you’ve added or renaming them back to their original names. For example, if you changed “HideBasedOnVelocityId” to “ShowBasedOnVelocityId,” renaming it back will revert the changes. Always ensure you have a registry backup before making any changes, as this provides a straightforward path to revert the system to its original state if needed.
What version of Windows 10 do these customization instructions apply to?
The provided steps are applicable to various incarnations of Windows 10, but be mindful that Microsoft’s updates can occasionally alter aspects of system behavior, including context menu management. Therefore, while these instructions are designed to be as universally applicable as possible, ensure your system is suitably backed up before proceeding, and double-check steps if you’re on a significantly newer or custom edition of Windows 10.
Is it feasible to use Group Policy Editor for these context menu changes?
The Group Policy Editor, while a powerful tool for configuring different aspects of Windows behavior, typically does not offer the granularity required for the specific context menu customizations detailed in this tutorial. Its availability is also restricted to professional and enterprise versions of Windows. Thus, direct registry editing remains the most versatile and comprehensive approach for the outlined modifications.
Can I execute these modifications on Windows 11?
While the tutorial specifically addresses Windows 10, the fundamental principles behind registry editing for context menu customization are applicable to Windows 11. However, given the differences in the user interface and possibly the organization of registry keys in Windows 11, you may need to adapt the steps slightly. It’s always advisable to research any differences in the process or seek updated guides explicitly geared towards Windows 11.
Is there a way to add “Open Command Window Here” without manual registry edits?
The need for manual registry edits to achieve specific context menu customizations highlights the depth of control these modifications provide. While certain third-party software solutions claim to enable similar adjustments without direct registry interaction, these applications essentially automate the registry editing process in the background. Users should exercise caution and due diligence when employing such tools, considering potential security and stability implications.
How do I ensure my user account has the administrative privileges necessary for these customizations?
To verify or acquire administrative privileges, navigate to “Settings” > “Accounts” > “Your info” on your Windows 10 computer. Your role is displayed under your account name; if it’s not “Administrator“, you may need to either log in with an administrator account or have the current administrator elevate your account’s status. Without these privileges, your ability to make system-wide changes like the ones outlined in the tutorial will be limited.
Why might someone prefer Command Prompt over PowerShell, or vice versa?
The choice between Command Prompt and PowerShell largely hinges on the specific tasks at hand and the user’s familiarity with each tool. Command Prompt provides a straightforward, legacy interface for executing batch files and simple commands. Meanwhile, PowerShell introduces a more powerful scripting environment built on .NET, enabling complex automation scripts and access to a wider range of system functions. Users who perform advanced administrative tasks or seek extensive automation capabilities typically lean towards PowerShell.
How can I confirm my modifications are successfully applied?
Confirmation of successful registry modifications typically involves visually verifying the presence or absence of the intended context menu items. After completing the changes and restarting your system, navigate to a folder or the desktop background and right-click to bring up the context menu. The modifications, such as the “Open command window here” or the removal of “Open PowerShell window here“, should be reflected accordingly, indicating the successful application of your changes. If the expected items are not present, retracing your steps to ensure accurate execution of the instructions is advisable.
Related: How to Disable “Show More Options” in Windows 11 to See the Full Context Menu
The “Show More Options” line in the Windows 11 context menu is a departure from the traditional, instantly accessible full menu that users have become accustomed to in previous versions of Windows. While visually appealing, this change can disrupt the workflow by adding an extra step to access commonly used functions. In our other guide, we show you how to restore the classic context menu in Windows 11, removing the need to click “Show More Options”.

Related: How to Disable Command Prompt (CMD)
The Windows Command Prompt aka CMD is an incredibly useful tool from which you can perform pretty much any task on your system. However, this power also makes it dangerous when it’s in the wrong hands. In our other guide, we show you how to disable Command Prompt in Windows via Gpedit and the Registry Editor. This is useful for keeping users from bypassing other blocks you have in place.

Related: How to Open a File or Folder in Terminal in Windows 11
Navigating the Windows Terminal to open files and folders is a skill that enhances productivity and efficiency, particularly for those who prefer command-line interfaces (CLI) over graphical user interfaces (GUI). Windows Terminal, a modern application in Windows 11, integrates traditional command-line environments like Command Prompt (CMD) and PowerShell, providing a robust platform for performing a variety of tasks. In our other guide, we show you how to open a file or folder in Command Prompt or PowerShell and how to change directory from there in Windows 11 using a series of commands.
Related: How to Reset and Rebuild the Search Index
The Windows indexing service tracks important drives and folders for changes by creating an up to date database of filenames, filetypes and even content keywords of specific files. The downside of this Windows index is that its results might be outdated, either showing files that have been removed already or not listing existing files you might be searching for. In our other guide, we show you how to reset Windows indexing with a rebuild of the Windows search index. This might help if you are getting search results that are missing, no longer valid, or incorrect.