

Whether it’s talking to your friends online or working from home, headsets are a vital tool for communication. However, many are surprised that they plug in their device only to find that their headset microphone is not working in Windows 10 or they have no sound in general. In this tutorial, we plan to remedy that by showing you how to set up a headset on your Windows 10 PC.
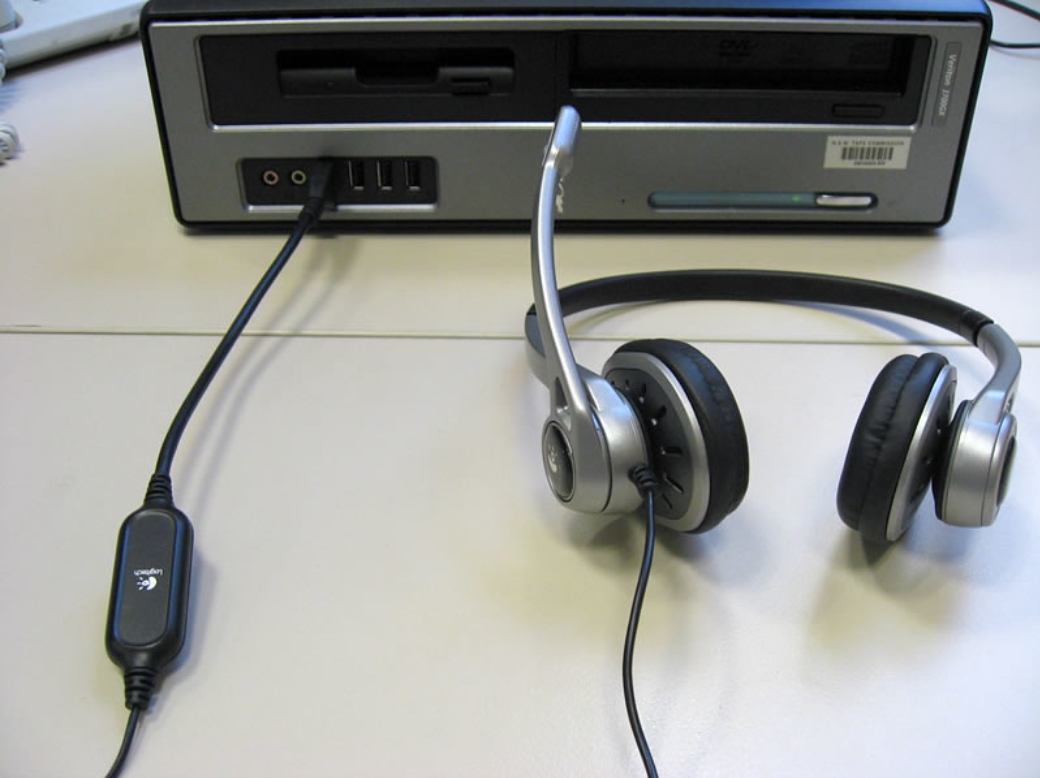
Before we start with the software side of things, however, it’s worth checking that the physical connection between your headset and PC is correct. This may sound simple, but there are a few different types of headsets with different input methods.
The most common type of headsets use 3.5mm jacks. They typically have two of them – one with a pink ending and one with a green. It’s important that you plug these into inputs in your PC that match their color. Some PCs have orange or blue ports as well as pink and green ones. If you’re colorblind or your PC is tucked in the dark under the desk, this can be easy to confuse.
USB headsets are also common, offering the advantage of an in-built amplifier. Naturally, you should make sure the USB port it’s plugged into is actually working before you troubleshoot further.
Wireless headsets, meanwhile, rely on Bluetooth. As a result, you should make sure your PC has a Bluetooth adapter and that Bluetooth is turned on in your settings.
How to set up a PC Headset for Input and Output in Windows 10
The most common that your headset mic may not be working in Windows 10 is pre-existing audio devices. When you plug an audio device into Windows 10, it doesn’t always switch to it automatically. Here’s how you can change that:
- Plug in your headset
If it’s 3.5mm, plug both inputs into the jacks, otherwise plug in your USB or connect via Bluetooth.
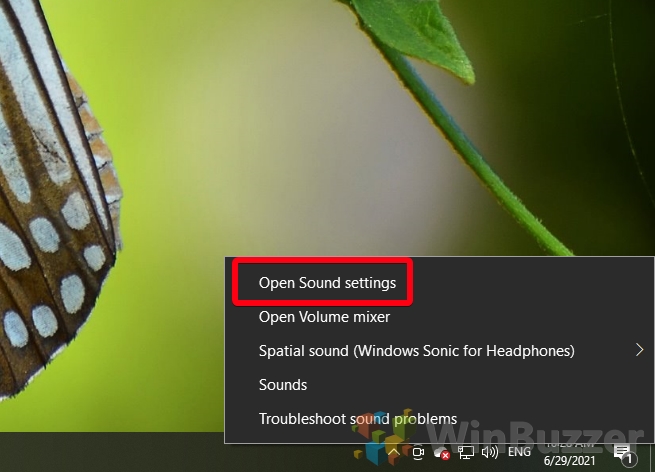
- Open Sound settings
To start our microphone setup, we need to right-click the sound icon on the taskbar and then click “Open Sound settings”.

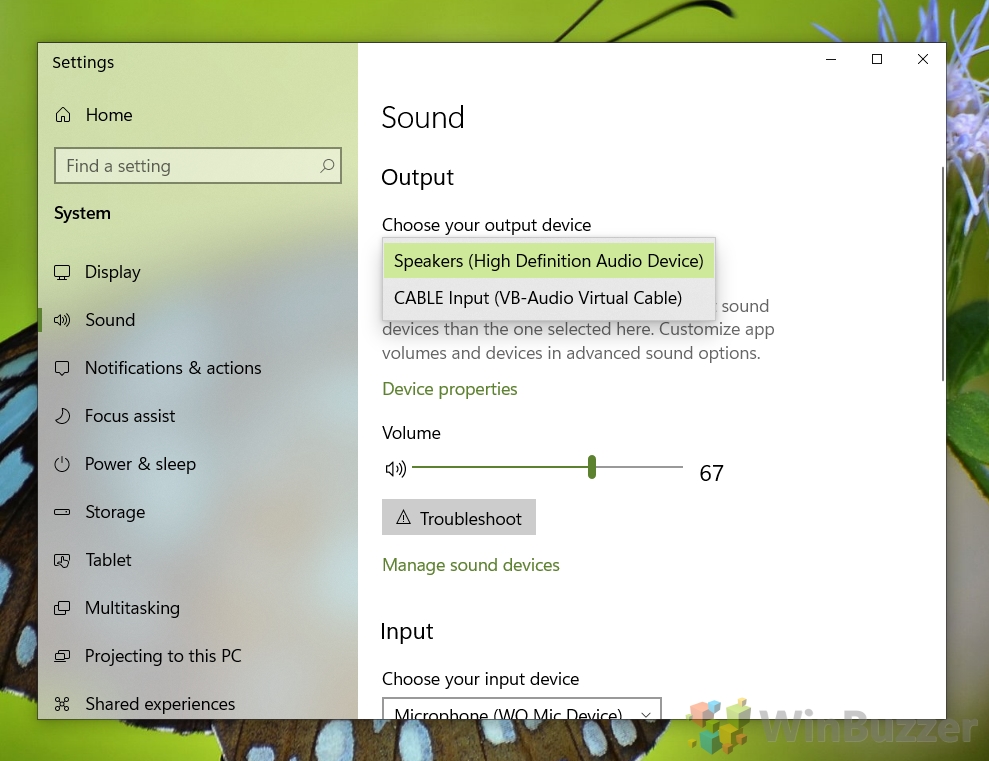
- How to set up audio output
Under the “Choose your output device” heading, click the drop-down list.

- Select your headset from the list
If Windows detected your headset correctly, it should be relatively easy to indentify.
- How to set up microphone input
If you find your headset mic is not working in Windows 10, scroll down to the input section and click the drop-down under “Choose your input device”.
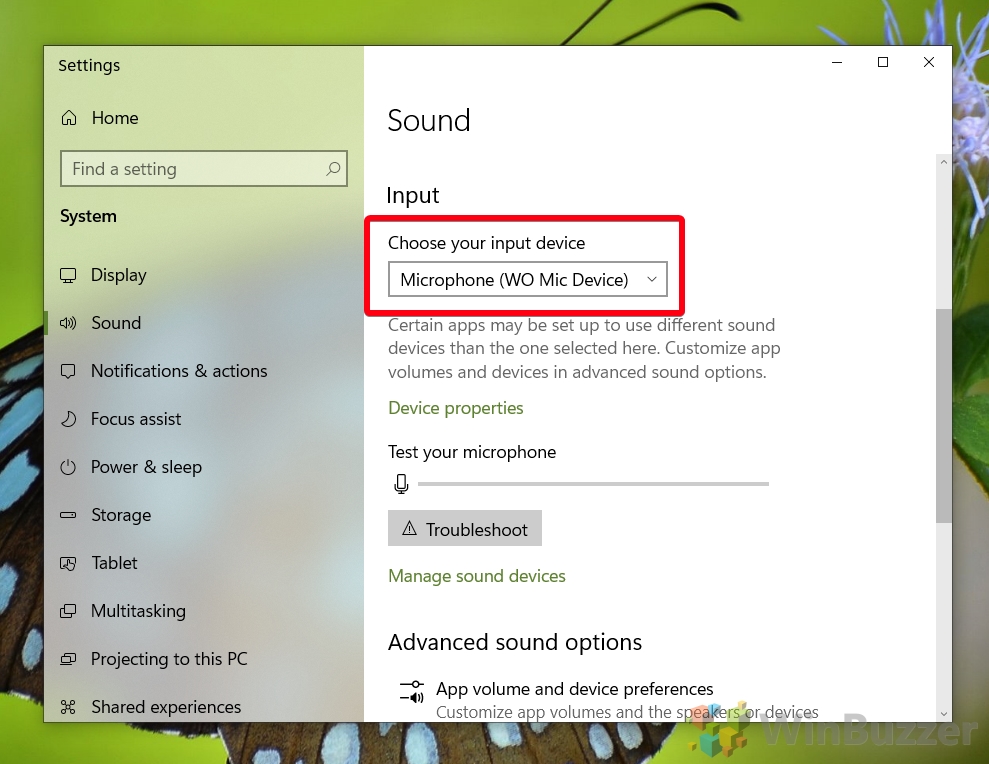
- Select your headset microphone from the list

How to Set Up a Headset for Specific Apps
If you followed the steps above but your headset mic is still not working in some Windows 10 apps, you may have to change their settings separately. Here’s how you can do that:
- Open sound settings
Right-click the sound icon on your taskbar, then press “Open Sound settings”.

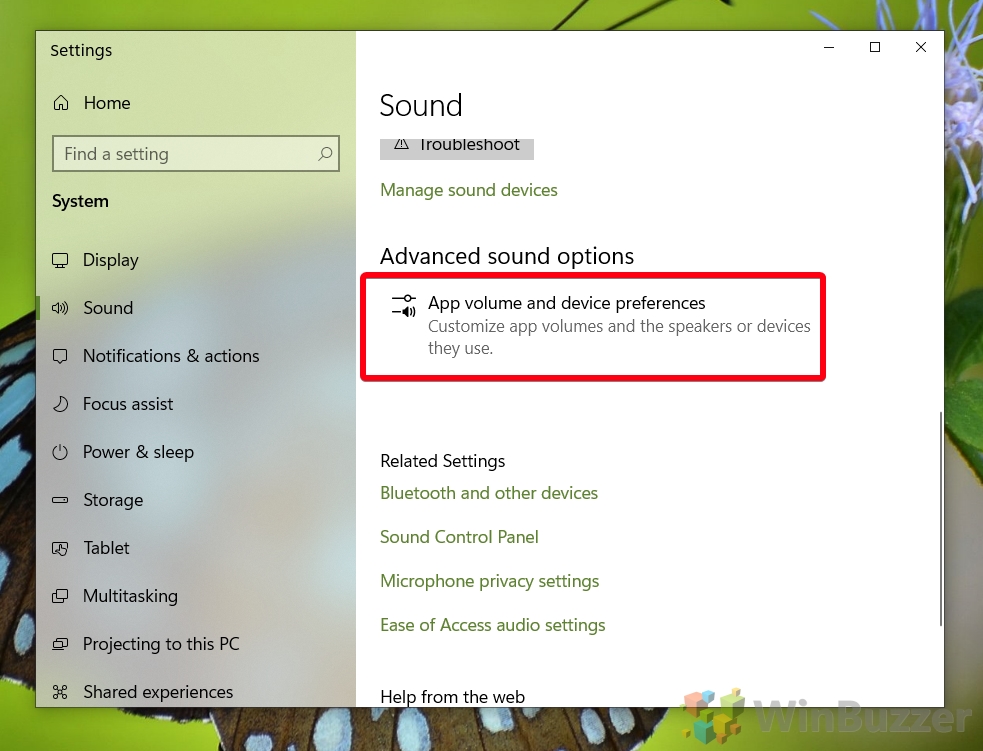
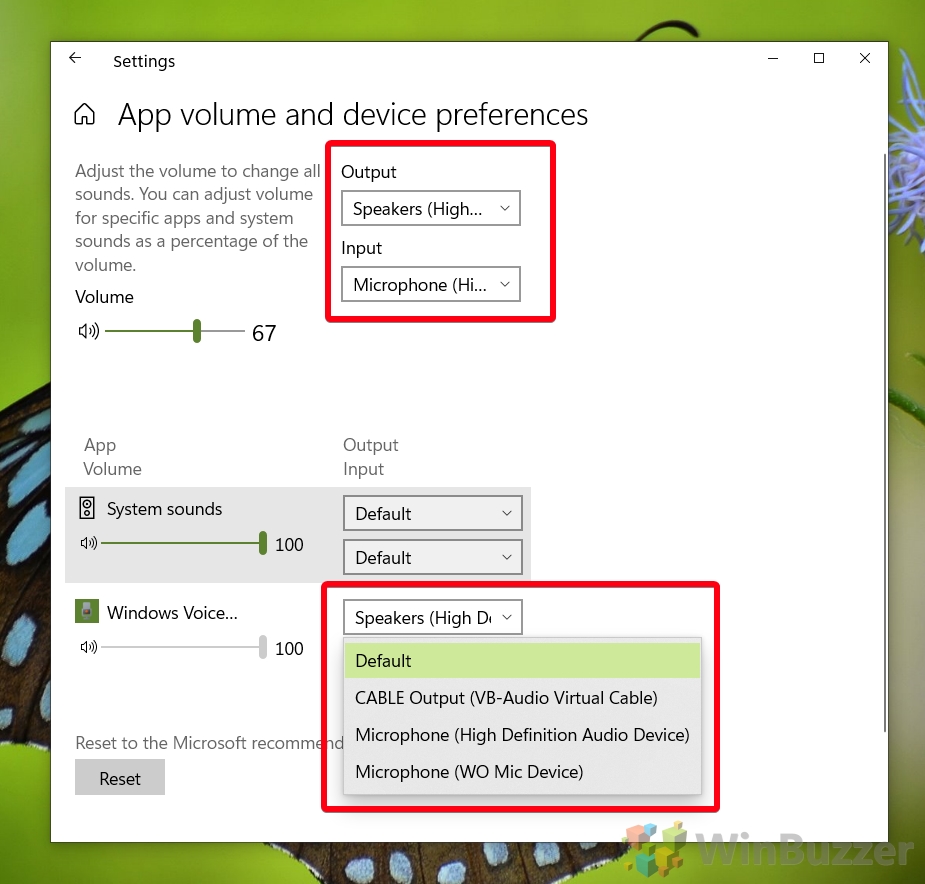
- Open the App volume and device preferences menu
You’ll find it by scrolling down the page and looking for “Advanced sound options”. You’ll find the button just underneath the heading.
- Set up your headset for specific apps
At the top app volume and device preferences section, choose the input and output you’d like apps to default to. Then, in the list below, perform output and microphone set up for each app. Bear in mind that you’ll have to have opened them at least once for them to show up on this list.
Headset Mic or Audio Not Working Still? Here’s How to Troubleshoot It
If your PC headset still isn’t working, you could have some kind of configuration, driver, or hardware issue. We won’t go into them all in detail here but instead rely on Windows 10’s in-built troubleshooter, which can fix the most common issues automatically. Here’s how to use it:
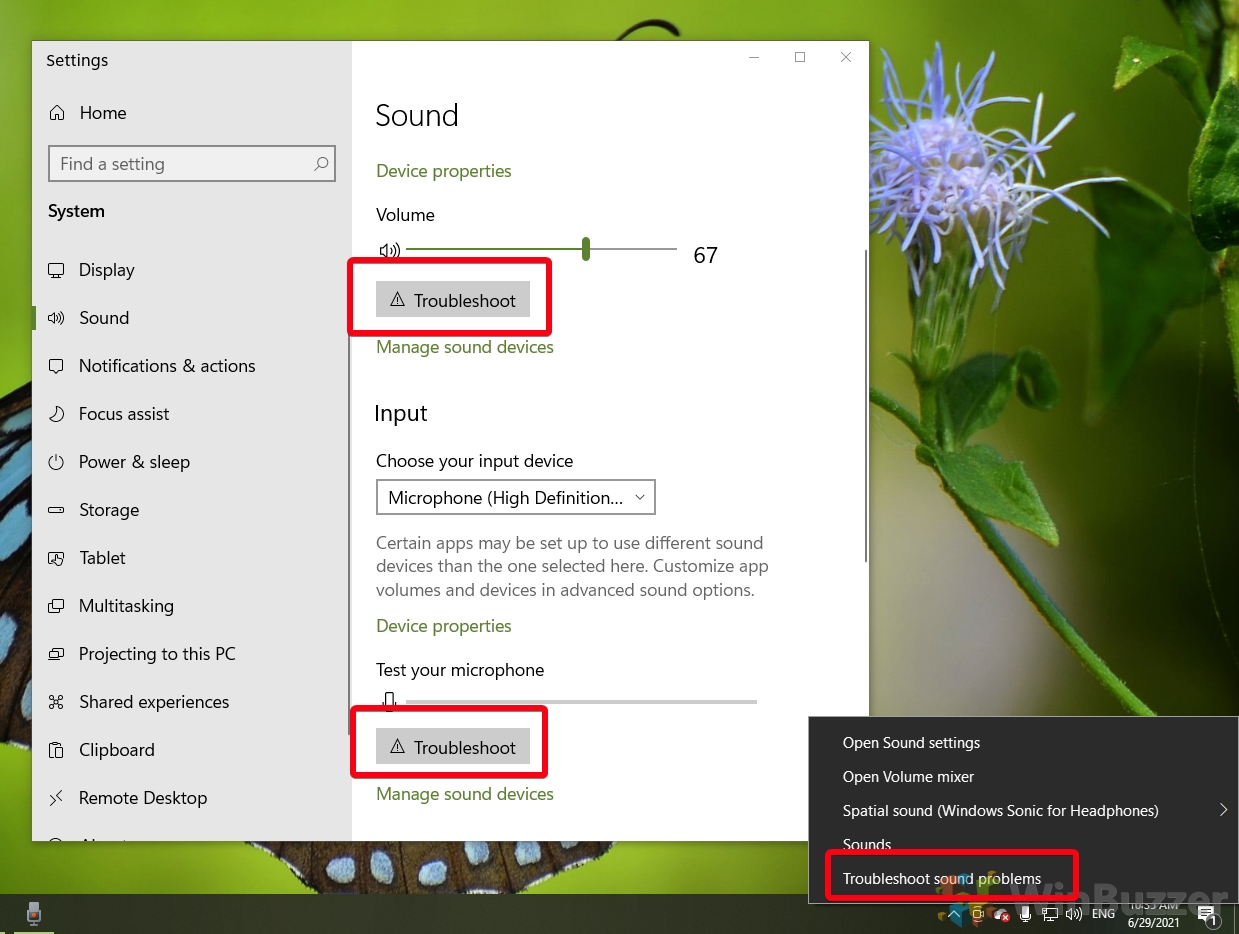
- Open Sound settings
Right-click the audio icon on your taskbar and click “Open Sound settings”.
- Troubleshoot your audio output and/or microphone
In your sound settings, look for the grey “Troubleshoot” button underneath your input and output devices. Click it to have Windows automatically check for problems. In most cases, it’ll restart your headphone driver for you to see if that fixes things.
If you need to troubleshoot your sound again in the future, know that you can right-click the icon on your taskbar and select “Troubleshoot sound problems” from there.
That wraps up this guide on how to set up a headset on a PC in Windows 10. If you’re having issues still, leave a comment below and we’ll try to help you as best as we can.
If you’re still not sure if your microphone is working, you can follow our guide on how to hear yourself on mic or how to record audio.
Last Updated on February 14, 2022 7:44 pm CET by Markus Kasanmascheff


