Whether you want to joke around with a friend or have a genuine reason, knowing how to rotate text is a useful skill. We’re going to show you how to do just that today in Microsoft Word.
We’ll also be showing you how to flip text, mirror text, and add effects to it to make it stand out more. Before we start, though, it’s worth noting that if you just want to flip text upside down, an online upside down text generator may be the fastest choice. You can simply type your message and have the changes carry over to any application.
That said, creating rotated text in Word provides some additional options and is usually the best choice if you don’t plan to take the text elsewhere.
Reasons to Flip Text, Rotate Text or Mirror Text in Word
Design aesthetics: Flipping text can be used to create an interesting visual effect in a design.
Translation: Text can be flipped to change its orientation in order to support languages that are written from right-to-left.
Technical limitations: In some cases, text might need to be flipped in order to accommodate technical limitations, such as limitations in printing or display capabilities.
Accessibility: Flipping text can be used to make documents more accessible to individuals with visual impairments by reversing the orientation of the text.
How to Rotate or Flip Text in Word Quickly
Creating and rotating text in Microsoft Word involves using a text box for additional formatting options. This section will guide you through creating a text box, rotating text quickly, manually adjusting the rotation, and finalizing your rotated text.
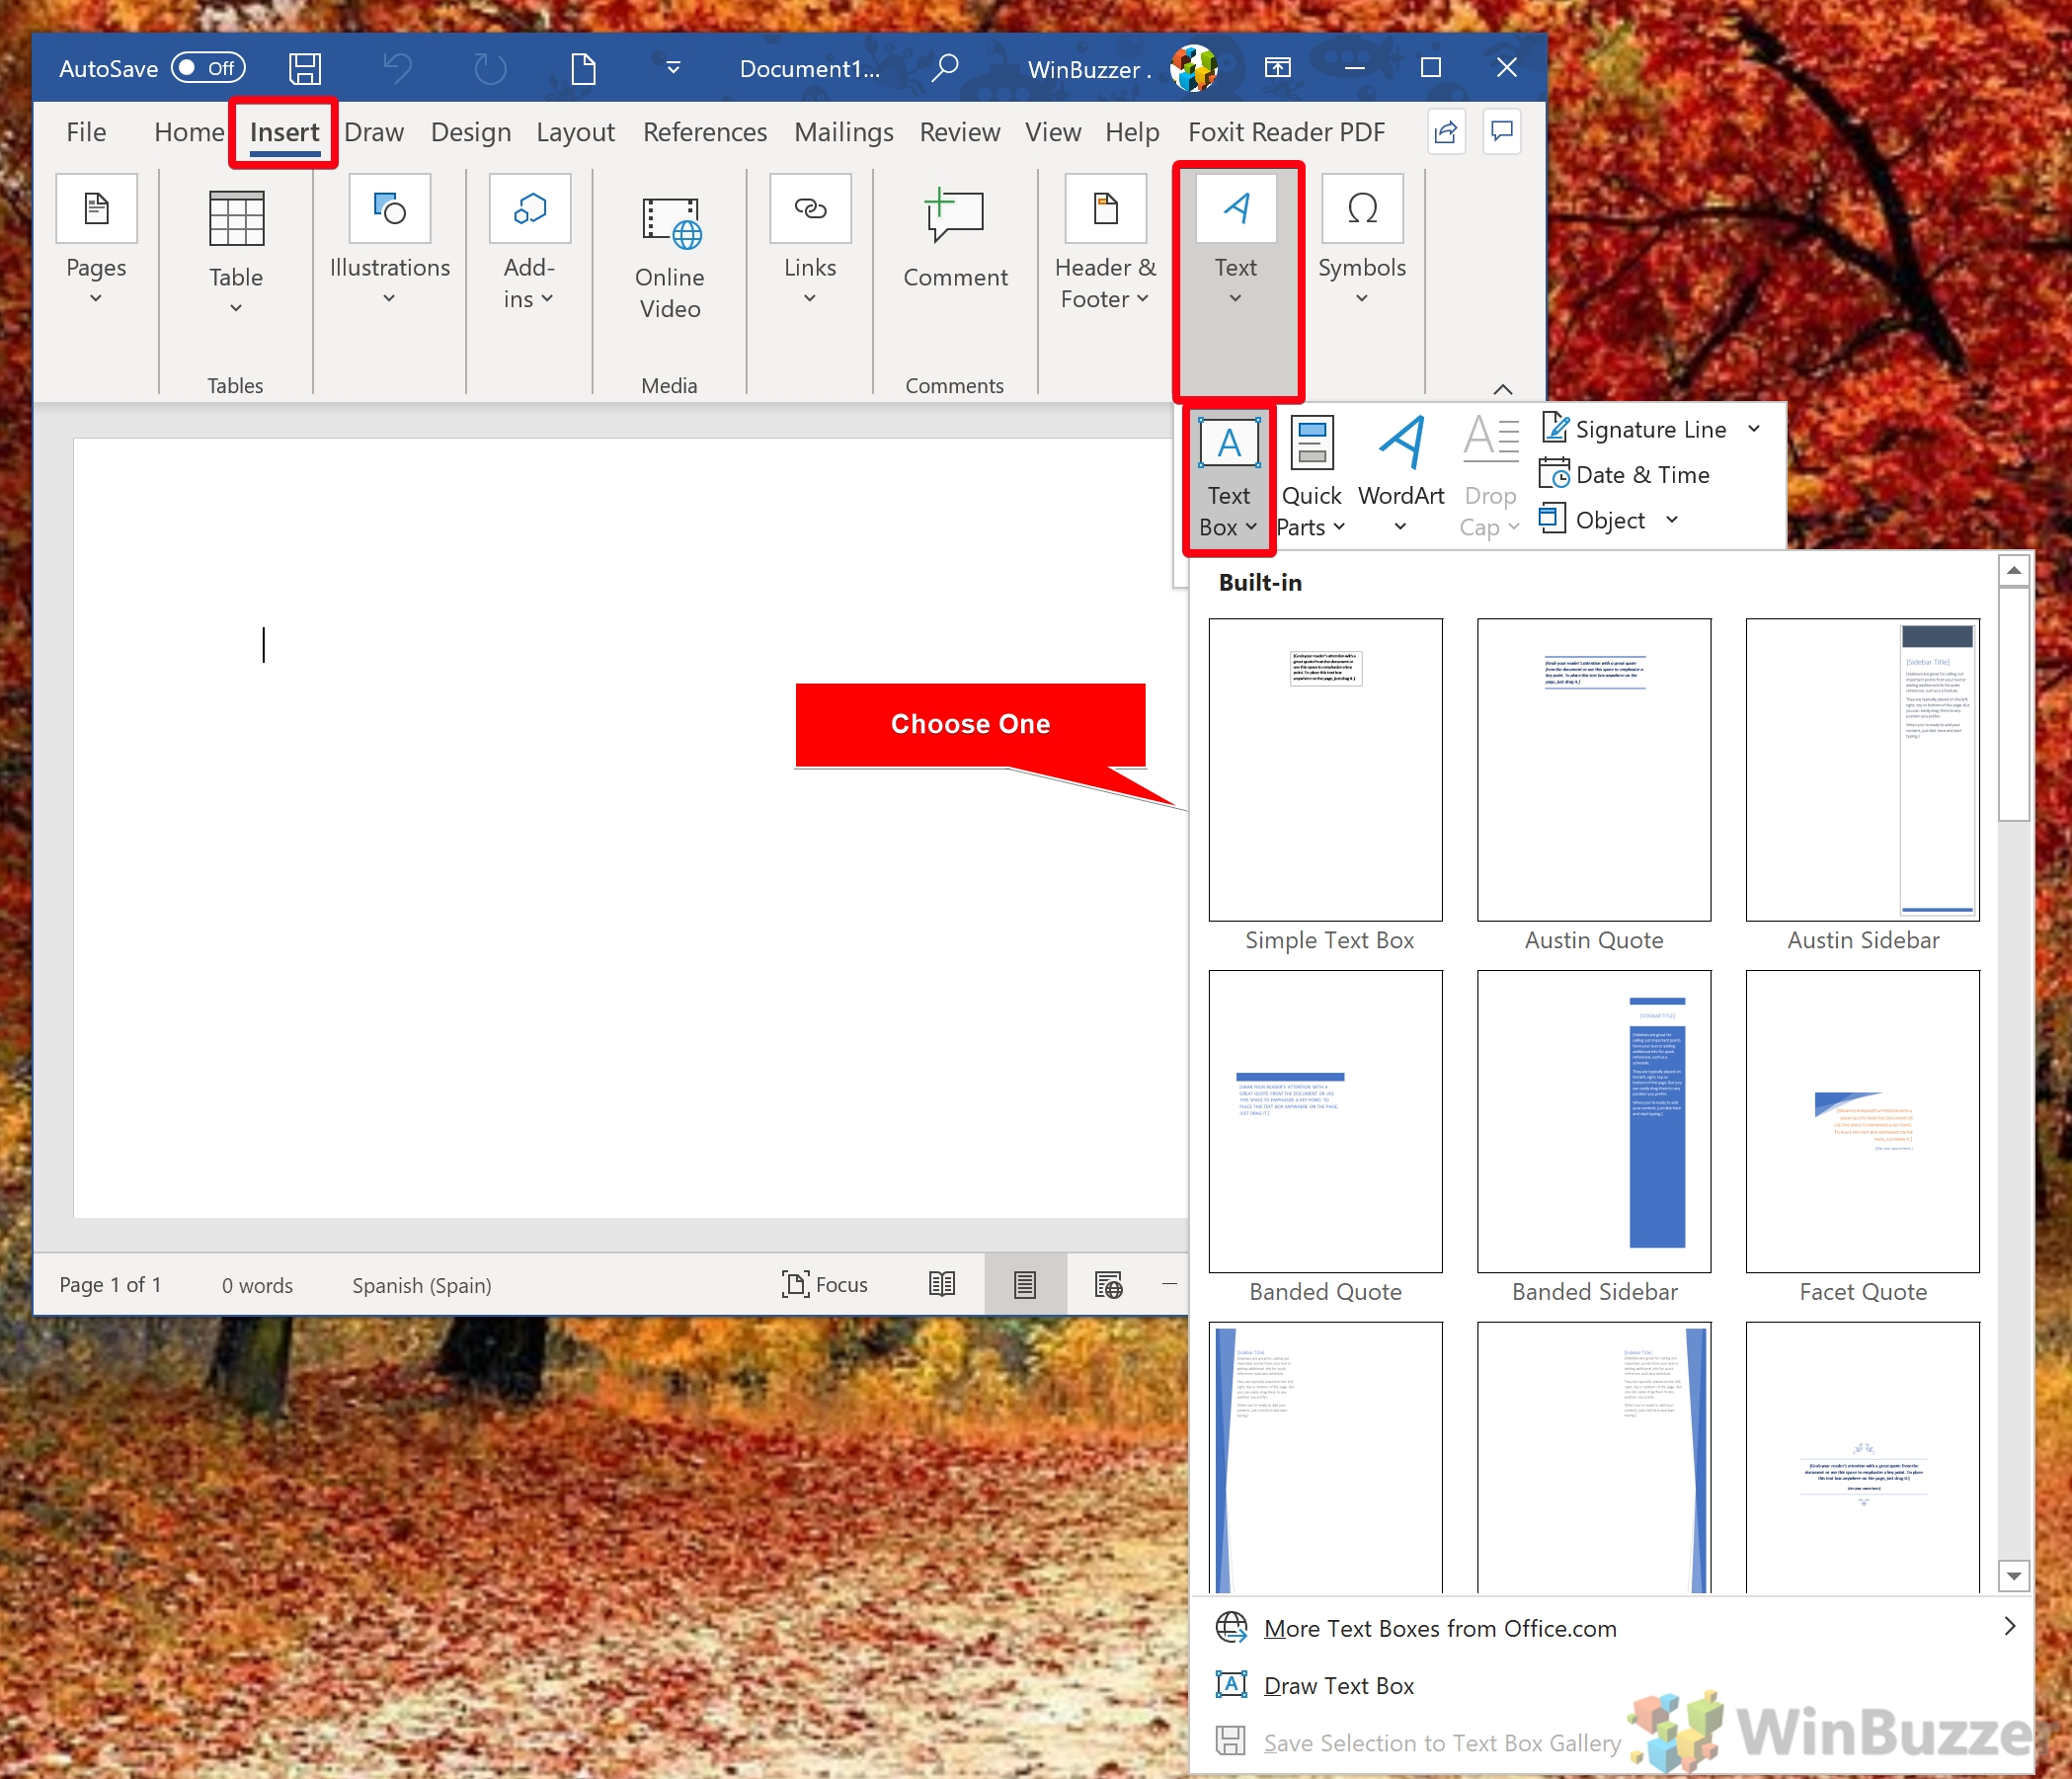
- Create a Text Box
To begin, go to the “Insert” tab and select “Text > Text Box”. Choose the “Simple Text Box” for ease of use. If needed, fill the text box with random text using Word’s generation tools.
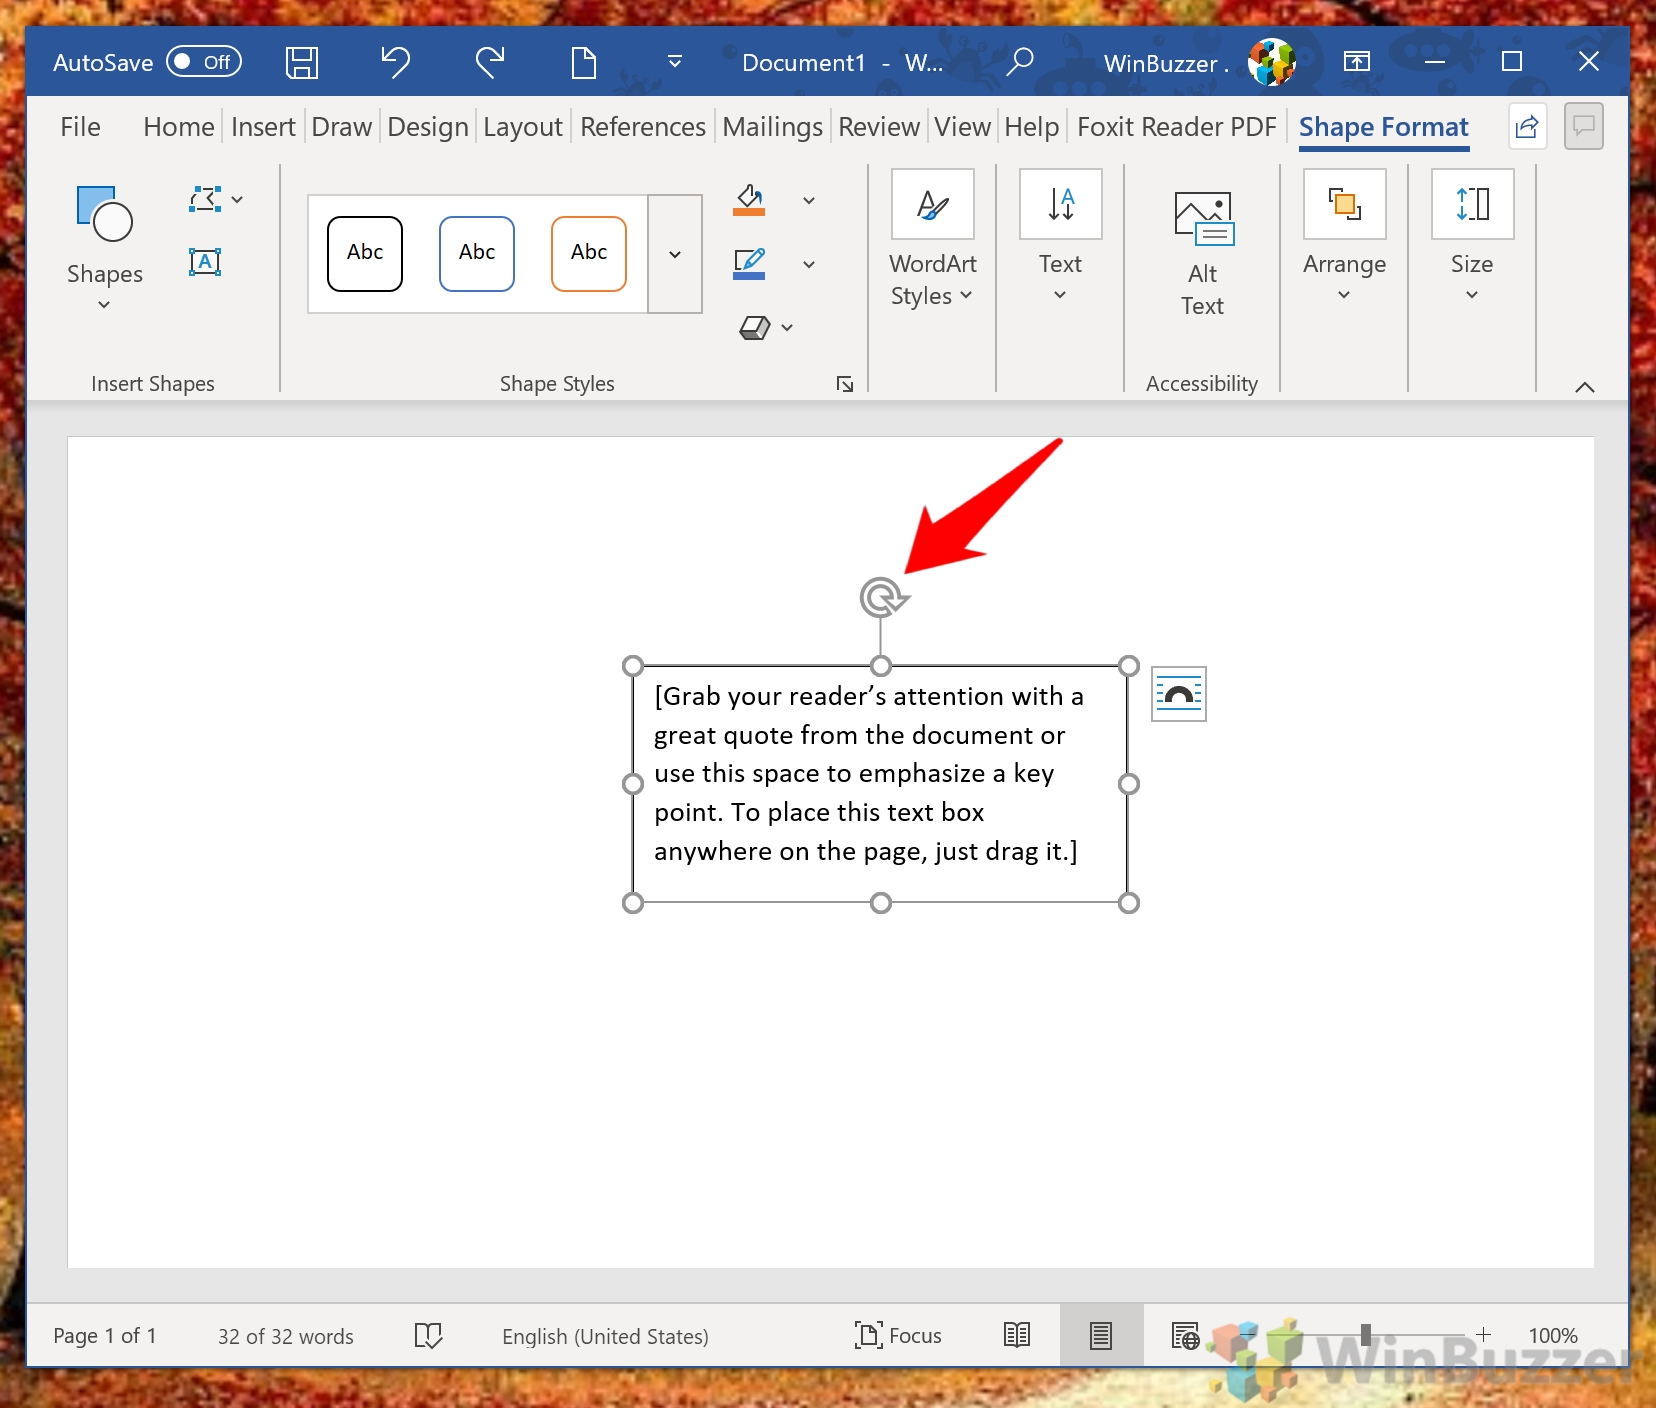
- Quickly Flip or Rotate Text
Select the text box and activate the “Shape Format” tab. Use the rotation option to rotate your text in 90-degree increments, allowing for quick adjustments to the text orientation. You can also choose “Flip Vertical” or “Flip Horizontal” to mirror your text vertically or horizontally.

- Manually Rotate a Text Box
For precise control, use the rotation handle above the text box to adjust its angle freely, enabling custom text orientation. You can also use this to rotate text that you have flipped previously.
- Enjoy your rotated text
After rotation, you may notice a border around the text box. The following methods explain how to remove this border and add effects like shadows for a more polished look.

How to Mirror and Rotate Text in Word Manually
Mirroring text in Word can add a creative touch to your documents. This section covers accessing 3-D rotation options and applying mirror effects to your text.
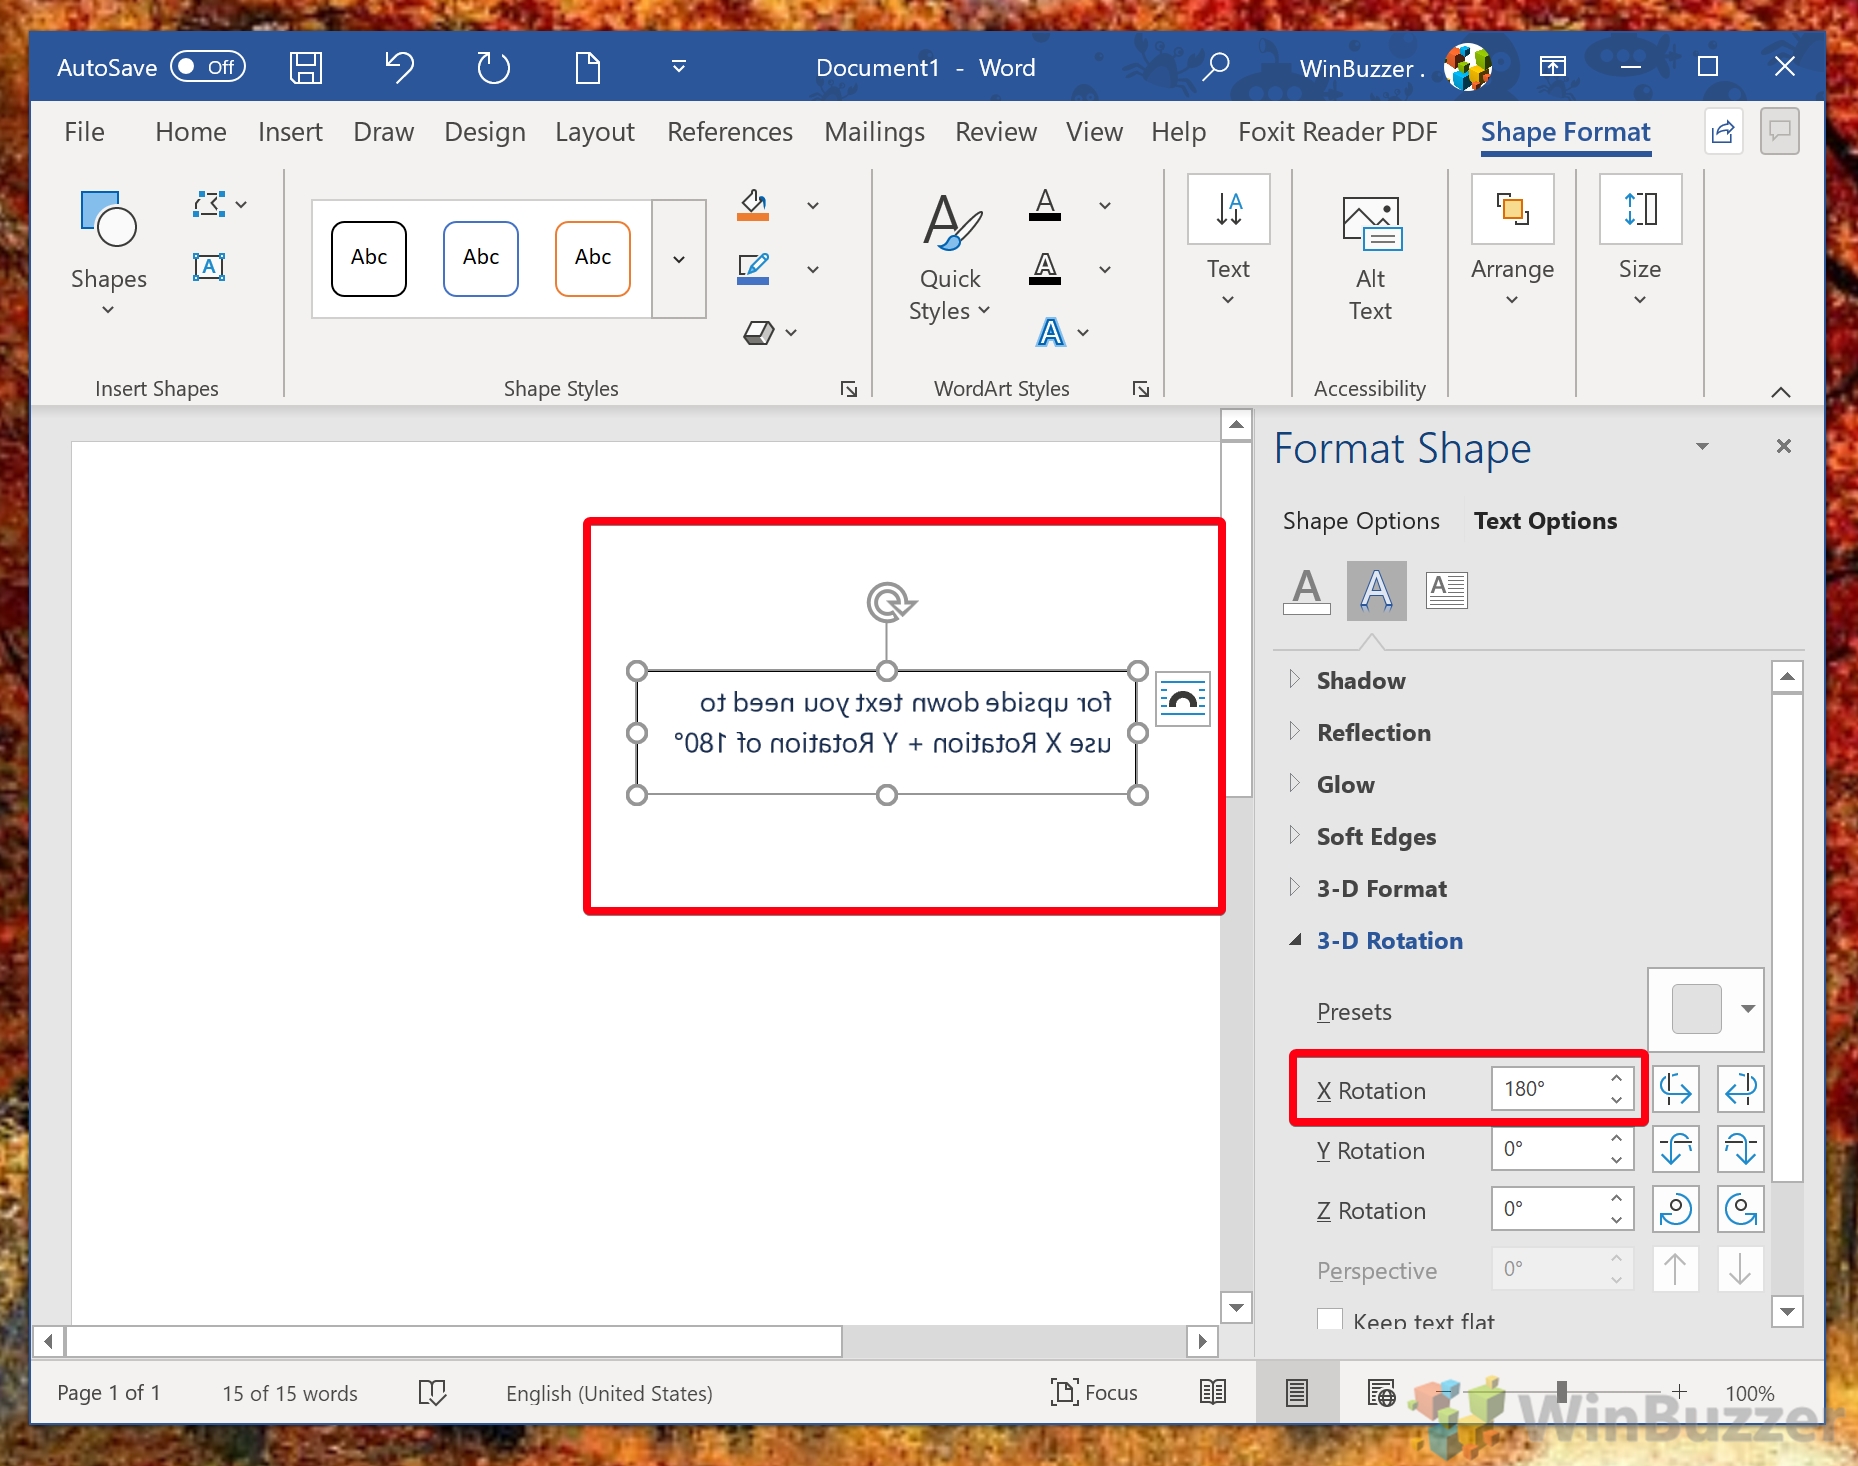
- Open 3-D rotation options
Select your text box and go to the “Shape Format” tab. Click the text effects icon and then “3-D Rotation > 3-D Rotation Options…” to access additional settings.
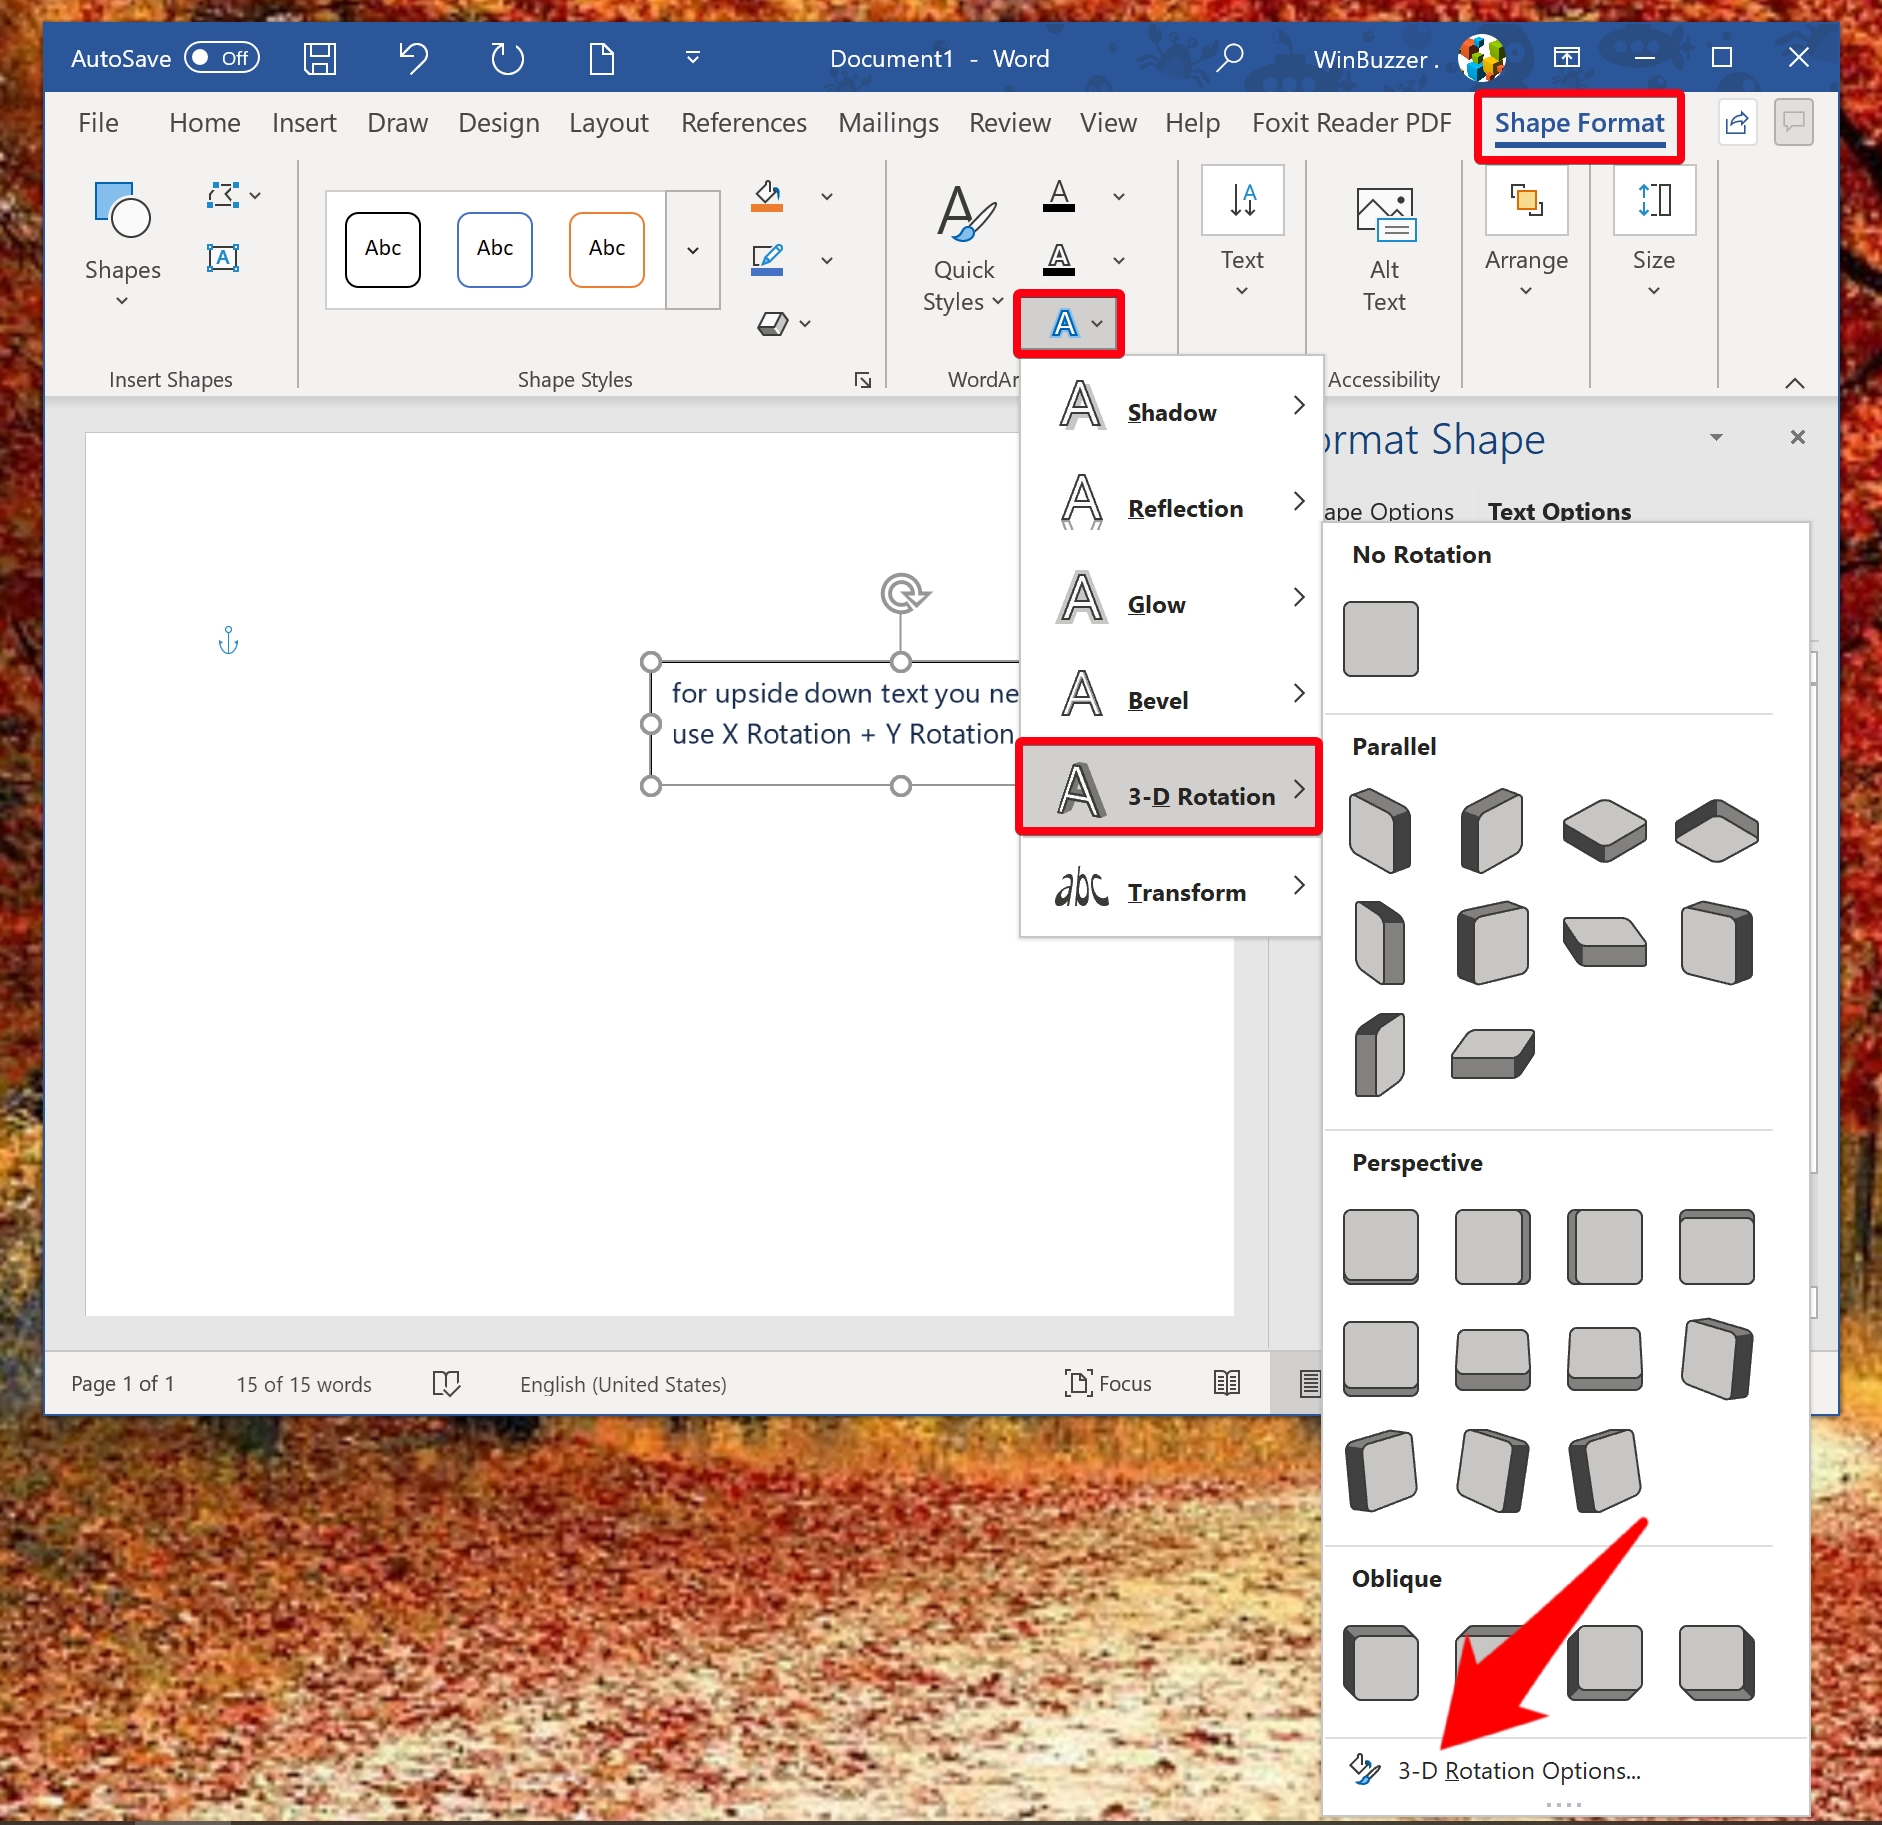
- Mirror text by X, Y, or Z rotation
In the “3-D Rotation” window, adjust the X, Y, or Z rotation fields to mirror your text horizontally, upside down, or flip it, creating various visual effects.
How to Change Text Box Border and Shadow
Enhancing your text box with borders and shadows can make your text stand out. This section will show you how to customize the text box border and add effects.
- How to remove a text box border in Microsoft Word
To remove the text box border, select the box, open the “Shape Format” tab, click the pen icon, and choose “No Outline” in the Theme Colors menu for a cleaner look. There you can also change the color and styling options if you wish.

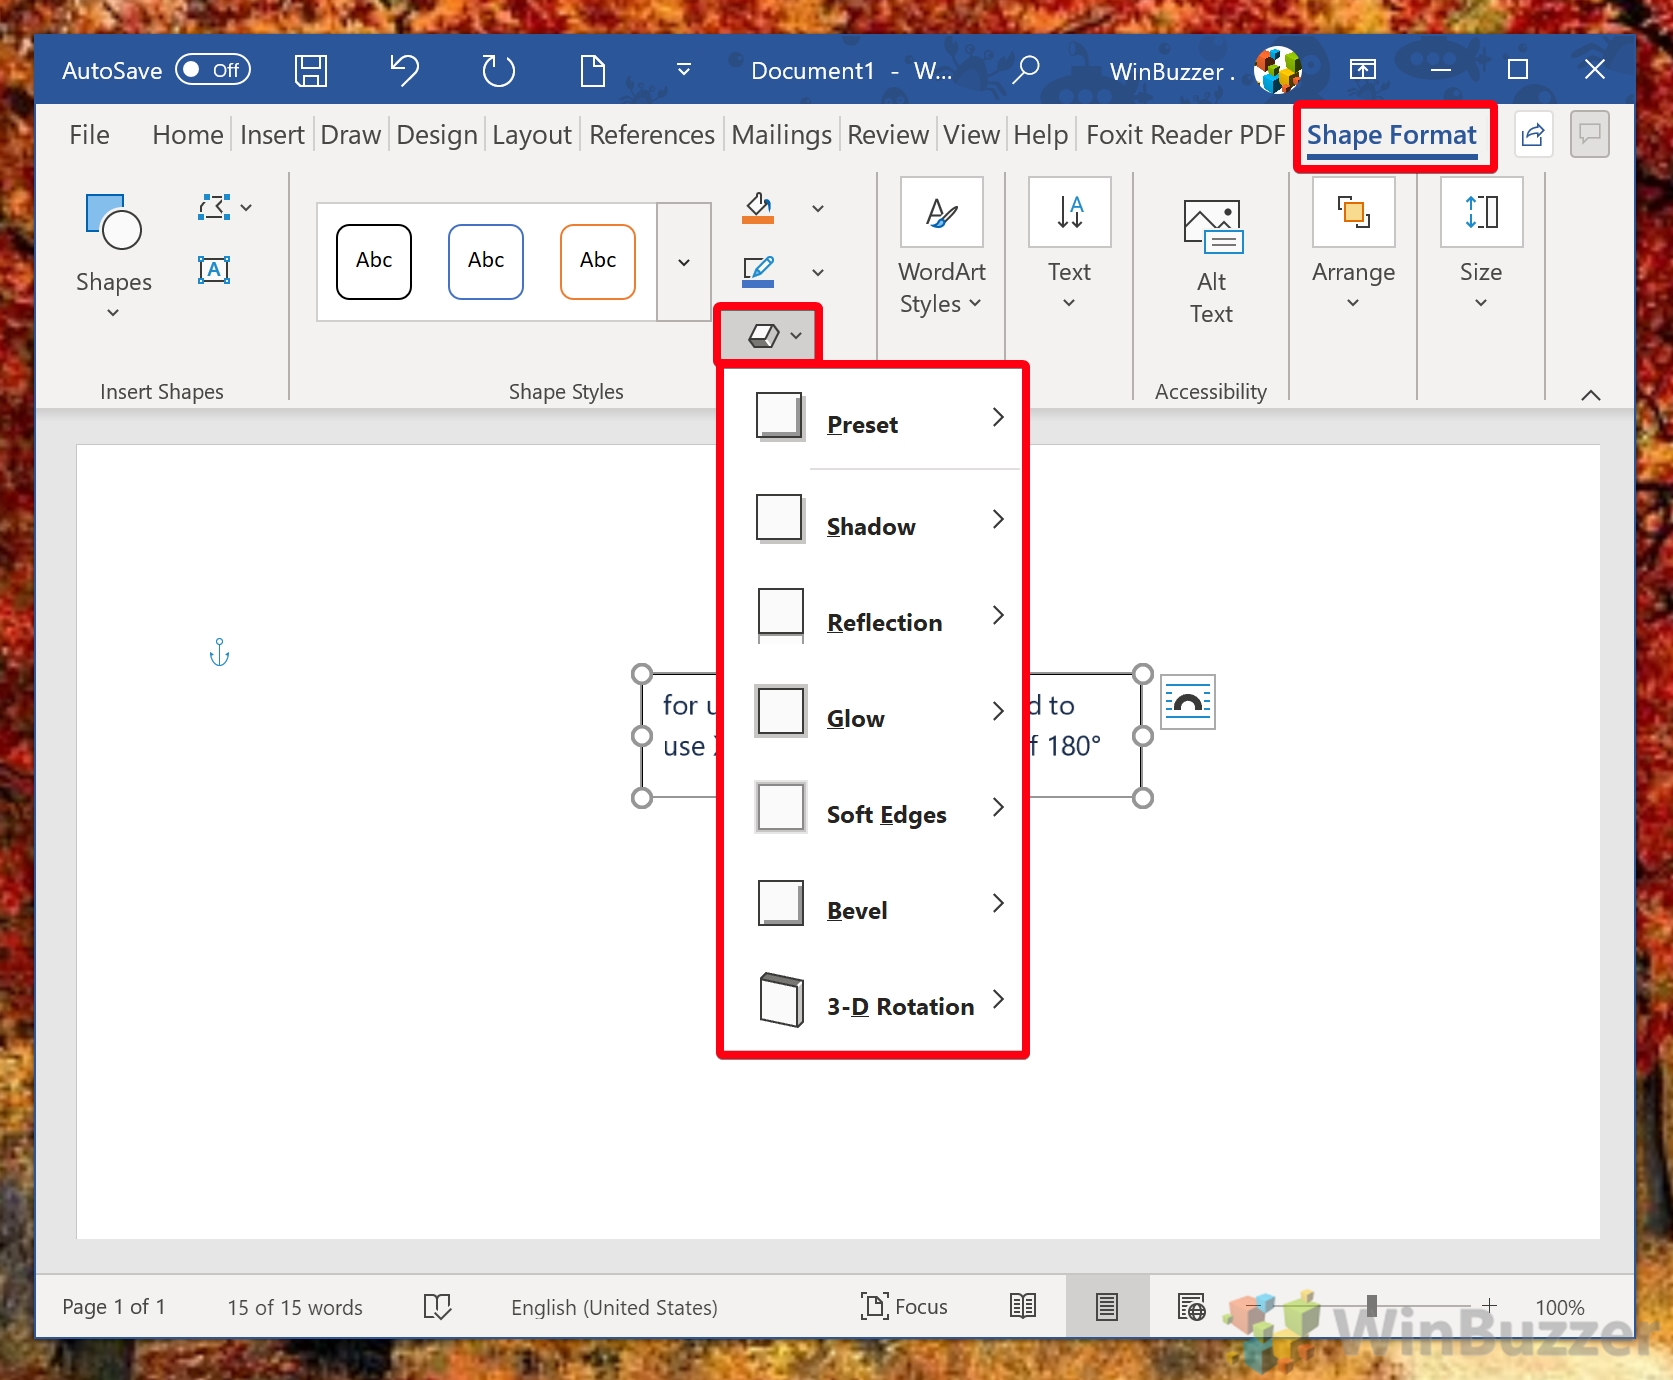
- How to add shadow and other effects to a text box in Word
Access the “Shape Format” tab and click the cuboid icon to apply effects like shadow, reflection, glow, and more, enhancing your text box’s visual appeal.
- Select your effects and enjoy
Customizing your text box with these effects can create a unique and visually appealing document element.

FAQ – Frequently Asked Questions About
How can I create a text box that automatically adjusts its size to fit the text in Word?
After inserting a text box through the “Insert” tab and selecting “Text Box“, right-click on its border and select “Format Shape“. Navigate to the “Text Box” tab within the Format Shape pane. Ensure the “Resize shape to fit text” option is checked. This setting allows the text box to expand automatically, ensuring all text is visible without manual adjustments.
Is it possible to group text boxes together in Word for easier manipulation?
Indeed, grouping multiple text boxes simplifies their manipulation as a single object. To group, hold down the Ctrl key and click each text box you wish to include in the group. Once all desired text boxes are selected, right-click on one of them and choose “Group” > “Group” from the context menu. This allows you to move, resize, or format them collectively.
Can I save a customized text box as a reusable style for future documents?
While Word does not directly support saving text box styles, a workaround involves saving a document template with your customized text boxes. Create and customize your text box, then save this document as a Word Template (*.dotx). When you need a new document with these text boxes, create it by opening your saved template, preserving your customizations.
How do I ensure my rotated text remains readable after printing?
Prior to printing, preview your document in “Print Layout” view to ensure that the rotated text appears as intended and is positioned correctly for readability. Adjust the text box’s rotation using its rotation handle for the best orientation, and use the “Print Preview” feature to verify its appearance on the printed page, making adjustments as necessary.
What’s the best way to align rotated text boxes with images in Word?
After inserting and rotating your text boxes and images, select both by holding Ctrl and clicking each object. Then, navigate to the “Format” tab and use the “Align” tools. You can select alignment options such as “Align to Center” or “Align to Left” to ensure perfect alignment. For precise control, use the “Grid Settings” under the “View” tab to enable gridlines for manual alignment.
Can I lock the position of a text box in Word to prevent accidental movement?
To lock a text box’s position, select it, right-click, and choose “Format Shape“. In the “Layout & Properties” tab, under the “Position” section, you can specify the horizontal and vertical positioning relative to the page or margin. Then, activate the “Lock anchor” option to secure its position. However, this does not fully prevent editing, so consider restrictions under “Review” > “Restrict Editing” for more control.
How to evenly distribute multiple text boxes horizontally or vertically in Word?
Select all text boxes intended for distribution by holding down Ctrl and clicking on each. Under the “Format” tab, find the “Align” dropdown in the arranging group. Choose either “Distribute Horizontally” or “Distribute Vertically” based on your needs. This action evenly spaces the text boxes, ensuring consistent distribution either across their centers (horizontally) or middles (vertically).
Is there a way to quickly copy formatting from one text box to another in Word?
The Format Painter tool is designed for this purpose. First, click on the text box containing the formatting you wish to replicate. Then, on the “Home” tab, click the “Format Painter” (paintbrush icon). With the painter active, click or drag over the target text box. This transposes the formatting, replicating styles such as border thickness, text alignment, and fill color.
How can I apply a gradient fill to my text box background in Word?
After selecting your text box, click “Shape Format” > “Shape Fill” > “Gradient” > “More Gradients.” In the “Format Shape” pane that appears, you can choose from preset gradients or customize your gradient by selecting “Gradient Fill.” Adjust the direction, colors, and gradient stops to achieve the desired effect, creating a visually striking background for your text.
Can I link text boxes so the text flows from one to another as it overflows?
To link text boxes for text flow, first create and position your text boxes. Select the first text box and on the “Format” tab, choose “Create Link”. The cursor changes to a pitcher; click on the second text box to establish the link. Now, text will flow from the first to the second box as it exceeds the capacity of the first.
How to use Word’s Quick Styles to apply pre-defined styles to text boxes quickly?
To utilize Quick Styles for text boxes, first select the text box. Go to the “Format” tab, where you’ll find “Quick Styles” in the styles group. Clicking “Quick Styles” displays a gallery of style thumbnails. Choose any of these to quickly apply a cohesive set of visual styles to your text box, including colors, borders, and text effects.
How can I rotate a group of objects, including text boxes and images, together in Word?
To rotate multiple objects collectively, select them by holding Ctrl and clicking each object. Once selected, right-click and choose “Group” > “Group” to combine them into a single entity. A single rotation handle appears above the grouped objects, allowing you to rotate them together. This maintains their relative positions and orientations.
Is it possible to convert a rotated text box into an image within Word?
Yes, you can transform a rotated text box into an image. First, select the text box, then right-click and choose “Copy”. Go to the “Home” tab, click the dropdown under “Paste“, and select “Paste Special“. In the dialog box, choose “Picture (Enhanced Metafile)” and click “OK“. The text box is now an image, preserving the rotation and format.
Can I create a custom outline style for my text boxes in Word for a unique design?
Yes, to create a custom outline for a text box, select the text box and go to the “Shape Format” tab. Select “Shape Outline” to choose a color, then “Weight” to adjust the thickness of the outline. For a distinctive look, select “Dashes” and choose from various dash styles. This customization enables unique border designs that enhance the visual appeal of your document.
How do I add a hyperlink to a text within a text box in Word?
To insert a hyperlink into text within a text box, highlight the text you wish to link. Right-click the selection and choose “Link” or go to the “Insert” tab and select “Link“. In the “Insert Hyperlink” dialog box, you can link to existing files, web pages, or create an email address link. Fill in the necessary details and click “OK” to create the hyperlink, enabling direct access to web resources from your document.
Related: How to Use Word Templates and Change the Template File “Normal.dotm”
The Microsoft Word Normal.dotm template is the default template that dictates the basic structure of any new document you create, such as margins, font style, and size. There might be times when you need to alter this template to suit your specific needs, or reset it if it becomes corrupted. In our other guide, we show you how to use templates in Microsoft Word, using the default Word template file “Normal.dotm“, individual templates created by yourself, or from the Free Microsoft Office Templates Catalog.
Related: How to Enable Autosave in Word to Never Lose Your Edits
Whether it’s due to an unstable power supply, a computer hiccup, or just human error, losing unsaved work is a problem that can strike at any time, leaving a trail of lost time and effort. This is where Microsoft Word’s Autosave feature becomes a true lifesaver

Related: How to Change Background Color or Set a Picture Background in Word
The default white background color for Microsoft Word documents provides the best level of contrast for most people. Unfortunately, it also has the tendency to blind you if you’re doing some late-night text editing. If you work in marketing or are creating a brochure, a Word background image can do a lot of the heavy lifting visually. Though they can risk looking tacky, a well-thought-out, subtle background image texture can bring a document to the next level. In our other guide, we show you how to change background color in Word, set a Word background image, or apply a background image texture.
Related: How to Add a Vertical or Horizontal Line in Word and Word Online
Creating a document that is not only informative but also visually appealing can significantly enhance readability and viewer engagement. In Microsoft Word, one simple yet effective way to achieve this is by incorporating vertical and horizontal lines. These lines serve various purposes, from dividing sections to emphasizing key points or simply adding an aesthetic element to your document. In our other guide, we show you how to make a horizontal or vertical line in Word and Word Online using a variety of simple methods.