If you’re a fan of minimalism, one of the surefire ways to may your OS cleaner is to hide folders and folders in Windows 10. Though Microsoft hides several folders by default, you may find that your drives fill up with rarely accessed content over time.
This particularly true of the documents folder, which over time will accumulate configuration files, game saves, and other clutter that can make it difficult to remain productive.
Hidden Folders in Windows 10
We are going to show you how to hide folders or files on Windows 10 so you can keep them private or just get them out of the way. We’ll also show you how to show hidden files and unhide hidden files if you need to get them back.
How to Hide Folders or Files in Windows 10 with File Explorer
The most intuitive way to hide a folder in Windows 10 is through File Explorer. An easily accessible toggle makes it trivial for anyone to de-clutter their drives. Here’s how you can make use of it:
- Open the folder or file properties
Before you can hide folders or files, you need to right-click the item in question and select “Properties”.

- Tick the file or folder hide box
In the “General” tab of your file or folder properties, look for the “Hidden” check box and tick it. If you hide a file, that’s all you need to do. When you hide folders, however, you must follow the additional step before.
Meanwhile, if you’re wondering how to unhide files and folders in Windows 10, that’s simple – just untick the Hidden box.
Press “OK” when you’re done.

- Apply the folder hide to subfolders and files
A hidden folder in Windows 10 has two options: you can hide just the root directory, or also hide its subfolders and files.
You may be wondering what the point of this is if the base folder will be gone from File Explorer anyway. The answer is that if you don’t hide subfolders and files, they may still show in search results even if they’re not easily accessible through File Explorer.
In most cases, you’ll want to tick “Apply changes to this folder, subfolders and files” and press “OK”.

- How to show hidden files on Windows 10
If you accidentally hide the wrong folder or need to access one again, you can view hidden files in Windows Explorer with this easy toggle:
In your File Explorer ribbon, click the “View” tab, then look for the “Show/hide” section. Untick the option that reads “Hidden items”. Your hidden folders and files will then display with a slightly greyed-out icon.

How to Hide a Folder or File in Windows 10 with Command Prompt and PowerShell
If you’re on a GUI-less install or need to automate the process, you can also hide folders and files in Windows 10 with a command. We’ll show you how below. The commands work both on the Command Prompt and in PowerShell:
- Open Command Prompt
Press Start and type “CMD”, then click the top result, “Command Prompt”.

- Find the folder you want to hide and run the ‘attrib +h’ command
Before we can perform our folder hide or file hide, we need to navigate to its parent folder.
For example, we want to hide the “Personal Files” folder. This is in our OneDrive documents folder, so we’ll navigate to Documents in CMD with thecdcommand:cd C:\Users\yourusername\OneDrive\Documents
Now that we’re here, we can hide a directory or file by adding the
+hattribute to it:attrib +h "Personal Files"
Switch
Personal Filesout for the name of your folder or file.
- Hide files and subfolders
If you’re hiding a file, that’s all you need to do. If you want to hide a folder, you’ll want to run one more command.
Though we’ve hidden the root folder, we still need to hide all of the files and folders inside of it. To do that, you can navigate inside the folder withcd "Your Folder"and run the following command:attrib +h /s /d
All of the items with the hidden attribute will now be invisible.

How to Unhide Folders and Files with Command Prompt
Tou can unhide folders or files with Command Prompt with a very similar command to hiding them. This time, however, we have to remove the hidden attribute rather than adding it. Here’s how:
- Open Command Prompt
Press Start and type “CMD”, then click the top result, “Command Prompt”.

- Unhide a folder of file with the ‘attrib’ command
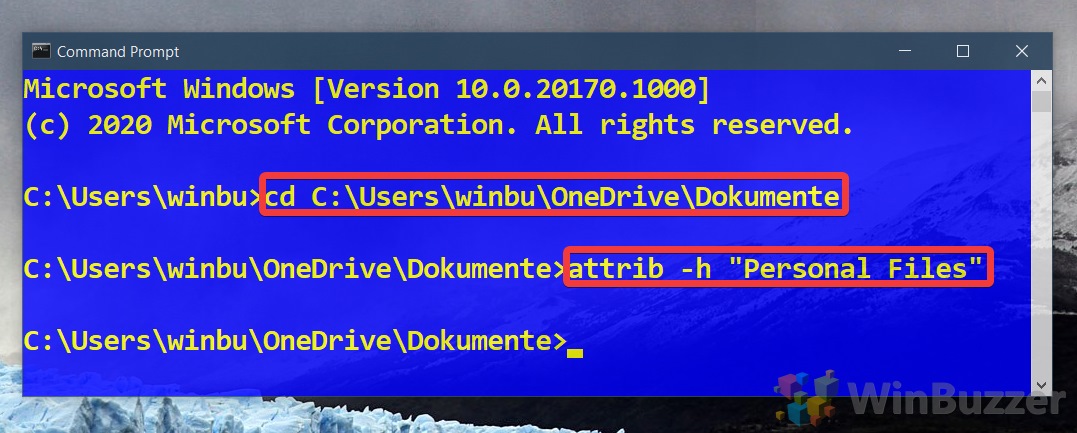
In your Command Prompt Window, navigate the parent directory of the file or folder you’d like to unhide. In our case, we want to unhide a folder called “Personal Files”, which is in our OneDrive Documents folder:cd C:\Users\username\OneDrive\Documents
Switch the above command with the path to your parent folder and press Enter. Then run the attrib -h command to unhide the file or folder of your choice:
attrib -h "Folder or File name"

- Unhide subfolders and files
If you unhide a folder with the above method, you’ll notice that its sub-folders and files will still be hidden. You can remedy this by navigating to the folder withcd "Folder Name"and running:
attrib -h /s /d

There you have it. You now know how to hide or unhide folders and files in Windows 10. If you’d like to declutter further, you can follow our tutorials to remove built-in Windows apps and customize the Start Menu.
Last Updated on February 14, 2022 7:44 pm CET by Markus Kasanmascheff


