

Most of the time, Windows 10 does a respectable job of making sure cameras work out of the box. Unfortunately, though, there’s no guarantee your webcam will keep working indefinitely. To make things worse, if your Windows 10 camera is not working, it could be due to any number of things – from software to hardware.
In this guide, we’re going to focus on the software side of things. As a result, you should make sure to check the physical connection first if you can. If you’re using an external webcam, this should be simple. Look for any breaks in the wire, try a different USB port, and try it on another device.
If your webcam is built into your laptop or PC, physical troubleshooting will be harder, so we recommend following the steps below before you go to a technician or send it for repair.
Why is my camera not working?
There are several reasons a camera might stop working or fail to work out of the box. The most likely reason your camera is not working in Windows 10 is a driver issue. While the OS always tries to find compatible drivers for your device, it may fail, particularly if you have an old or uncommon device. Drivers can also cause issues if you perform a system update, but your webcam manufacturer hasn’t updated their drivers to support it yet.
Finally, it’s possible your camera is disabled due to a software or settings conflict. This could be your Windows 10 privacy settings.
Let’s go over the fixes for these problems below, starting with drivers:
How to fix your camera not being detected in Windows 10
The first step to troubleshoot camera issues in Windows 10 is to look for the webcam in Device Manager. This way, you can confirm whether or not the operating system is detecting it as it should.
Before we start, make your device is plugged in (if it’s external).
- Open Device Manager
Press the Start or Search button and type “Device Manager”. Click the top result.
- Expand Sound, video, and game controllers and/or Imaging devices
You can do so by scrolling down the list, finding the relevant category, and pressing the down arrow next to it.
- Check if your camera is in the list
If it shows up, we know that Windows has identified your device and the problem lies in another area. If it doesn’t, continue to the next steps.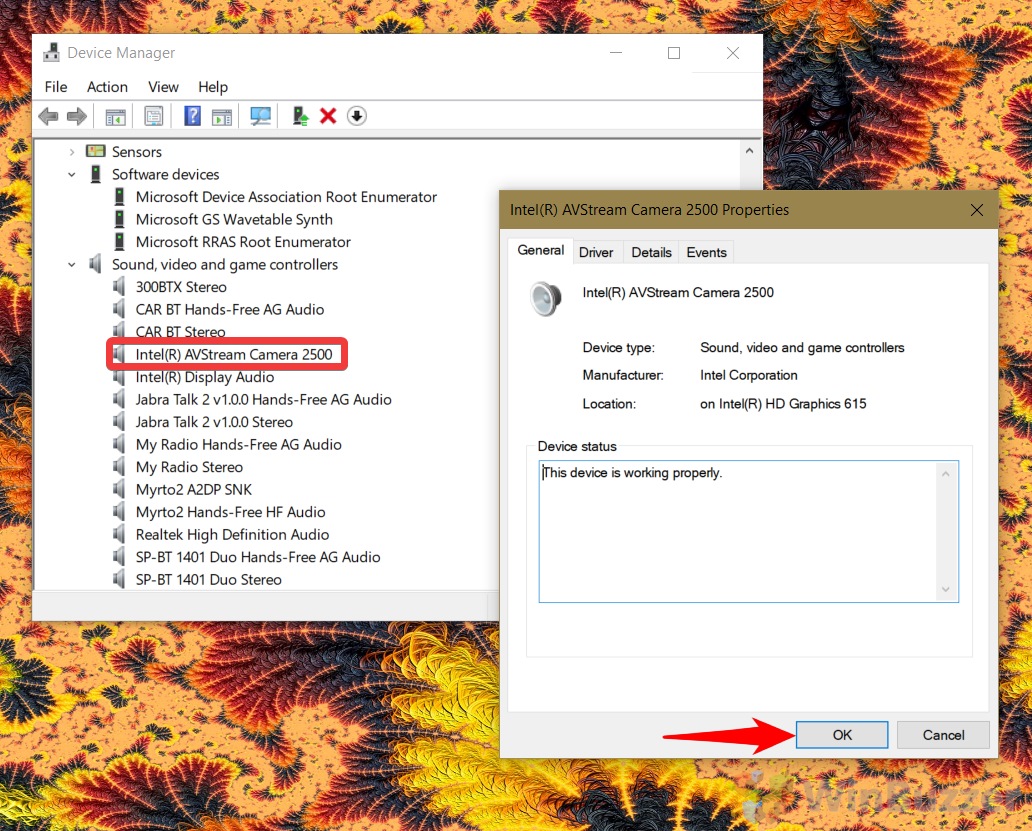
- Scan for hardware changes
If your camera does not show up, press “Action” in the top bar, then click “Scan for hardware changes”. Check again to see if the camera is listed and then test the camera using the Windows 10 camera app. If it doesn’t show up, disconnect it, restart your PC, log in, and connect it again.
If your webcam still doesn’t show up, try a different USB port and check the “Other devices” section to see if there’s an undetectable device in your list. If it’s the latter, try the driver update section further down.
How to Allow apps Camera Access via Privacy settings
Sometimes the problem isn’t that the camera isn’t working but that the camera is disabled for certain apps due to your Windows 10 privacy settings. This is particularly true if you chose privacy-sensitive options when you set up your PC.
Thankfully, this is very easy to remedy:
- Open Settings
Press Start, then click the settings cog, above the power button.
- Click ‘Privacy’

- Allow access to the camera on your device
Click “Camera” on the sidebar, then press “Change” in the main pane and switch “Camera access for this device” to “On”.
- Give apps access to your camera
Still in the main pane, scroll until you see “Allow apps to access your camera” and toggle it to “On”.
- Grant specific apps access to your camera
In the “Choose which Microsoft Store apps can access your camera” section, switch the toggle to “On” for the app you’d like to enable. In our case, we’re using Microsoft Camera, but you may want to turn it on for Skype, Microsoft Teams, or another software.
How to Update / Install a Camera Driver with Device Manager
If your Windows 10 webcam still is not working, it’s possible that you don’t have the most recent drivers for it. Windows typically updates drivers like this automatically, but sometimes it misses them. You must have the latest drivers for long-term compatibility and to fix any security flaws.
- Open Device Manager
Press Start and type “Device Manager”. Click the top result.
- Open the ‘Sound, video and game controllers’ and ‘Imaging’ sections
Your webcam will likely be under one of these but also make sure to check “Other devices”.
- Right-click your webcam and select ‘Update driver’

- Click ‘Search automatically for drivers’
If there isn’t a new Windows camera driver available, this doesn’t necessarily mean it’s up to date. Check the support section of your webcam on its manufacturer’s page to see if there are any drivers there. Avoid third-party driver sites as they often contain malware.
After installing the driver, test your camera using the Microsoft Camera app.
How to Remove an Update in Windows 10
As mentioned earlier, Cameras can sometimes stop working after a Windows 10 cumulative or quality update. If this is the case for you, first try uninstalling your most recent update by following the steps below:
- Open Settings
Press Start and click the settings cog above the power button.
- Click ‘Update & Security’

- Click ‘Windows Update’ and then ‘View update history’

- Press ‘Uninstall updates’

- Uninstall the problematic update
Tick the relevant update and press “Uninstall”, clicking “Yes” to the prompt. Restart your computer if it doesn’t automatically and then perform a camera test in Windows 10.
In the Installed Updates window, search down the list for the update you installed immediately before your problem started to occur. Only uninstall updates marked “Feature Update” or “Update”. Do not install security updates as they may leave your computer vulnerable and are unlikely to affect your webcam functionality.
How to Roll Back to a Previous Version of Windows 10
If your camera is not working after a recent Windows 10 feature update, you can also roll back via the settings menu. This process is simple and automatic.
- Open settings
Press Start and then click the settings cog above the power button.
- Click ‘Update & Security’

- Go back to a previous version of Windows 10
In the sidebar, press “Recovery”, then look for “Go back to the previous version of Windows 10” in the main pane. Click “Get started”.
- Tick ‘Earlier builds seemed for reliable’ and press ‘Next’

- Click ‘No, thanks’

- Read the ‘Need to know’ section and press ‘Next’
Take note that you may need to reinstall some apps and programs and you’ll lose any settings changes you made after installing the latest build. It’s also a good idea to back up your files before you continue.
- Press ‘Next’ on the “Don’t get locked out” screen
Make sure you remember your password before you do so.

- Press ‘Go back to earlier build’
The roll-back process may take a little time and your computer may automatically restart. Test your camera afterward to verify the issue is resolved.
How to Rollback a Camera Driver using Device Manager
Occasionally, updating your camera drivers for Windows 10 may cause issues. This is usually if you’re on a later version than is meant for your operating system version or if there is a bug in the manufacturer’s driver. You can fix this by rolling the driver back using Device Manager.
- Open Device Manager
Press Start and type “Device Manager“. Click the top result.
- Look for your webcam in Device manager
It could be under the “Sound, video and game controllers”, “Imaging devices”, or “Other devices” sections. Click the arrow to the left of them to expand the categories.
- Open your webcam’s properties
Right-click your webcam in the list and then hit “Properties”.
- ln the “Driver” tab, select “Roll Back Driver”
If this option isn’t available, then Windows doesn’t have the old version stored or it hasn’t been updated recently.
- Tick ‘My apps don’t work with this driver’ and press ‘Yes’

How to Reinstall a Camera Driver with Device Manager
If the source of your problem is an incorrect or damaged driver, you may be able to fix it by using Device Manager to find the Windows camera driver and reinstall it.
- Open Device Manager
Press Start and type Device Manager. Click the top result.
- Find your webcam in Device Manager
It could be under the “Sound, video and game controllers”, “Imaging devices”, or “Other devices” sections. Click the arrow to the left of them to expand the categories.
- Uninstall the camera driver in Windows 10
Right-click your webcam or USB camera driver and press “Uninstall device”.
- Tick ‘Delete the driver software for this device’ and press ‘Uninstall’
Don’t worry, we’ll be getting your driver back in the next step.
- Scan for hardware changes in Device Manager
In the Device Manager top bar, click “Action”, then “Scan for hardware changes”. Windows will automatically detect your device and install the webcam driver. If it doesn’t, unplug your camera, restart your pc, then plug it in. Then, scan for hardware changes again if it still doesn’t show up.
By following the steps in this tutorial, you should have been able to fix your camera. However, it’s possible your Windows 10 camera is still not working if you have an uncommon problem. If you suspect you have a software conflict, do a clean boot and troubleshoot camera issues there.
If you’d like more help, check what your webcam is by following this guide and post your issue in as much detail as possible in the comments section below.


