

Though it isn’t intuitive to access, Windows 10 has a video editor built-in that serves as a handy replacement to the classic Windows Movie Maker. With it, you can trim, cut, draw on, add text to, and draw on videos.
You can also use it to edit together various clips, add slow-mo, and apply 3D text or music. Confusingly, though, you’ll find it not as a standalone program, but as part of the Photos app.
Today, we’re going to show you how to use this Windows video editor, walking you through each of its features so you can apply them to your movie or clip. I think you’ll find it much more intuitive than its classic counterpart, with a couple of new features to boot.
How to use Windows Video Editor to Trim, Take Photos of, Draw On, or Slow a Video
Before we start this tutorial, you’ll want a video clip to play around with. If you don’t have one, this free short film made by Blender animation studios should do the trick.
- Open your video clip with the Windows media editor
Right-click your file and select “Open with > Photos” to get started.
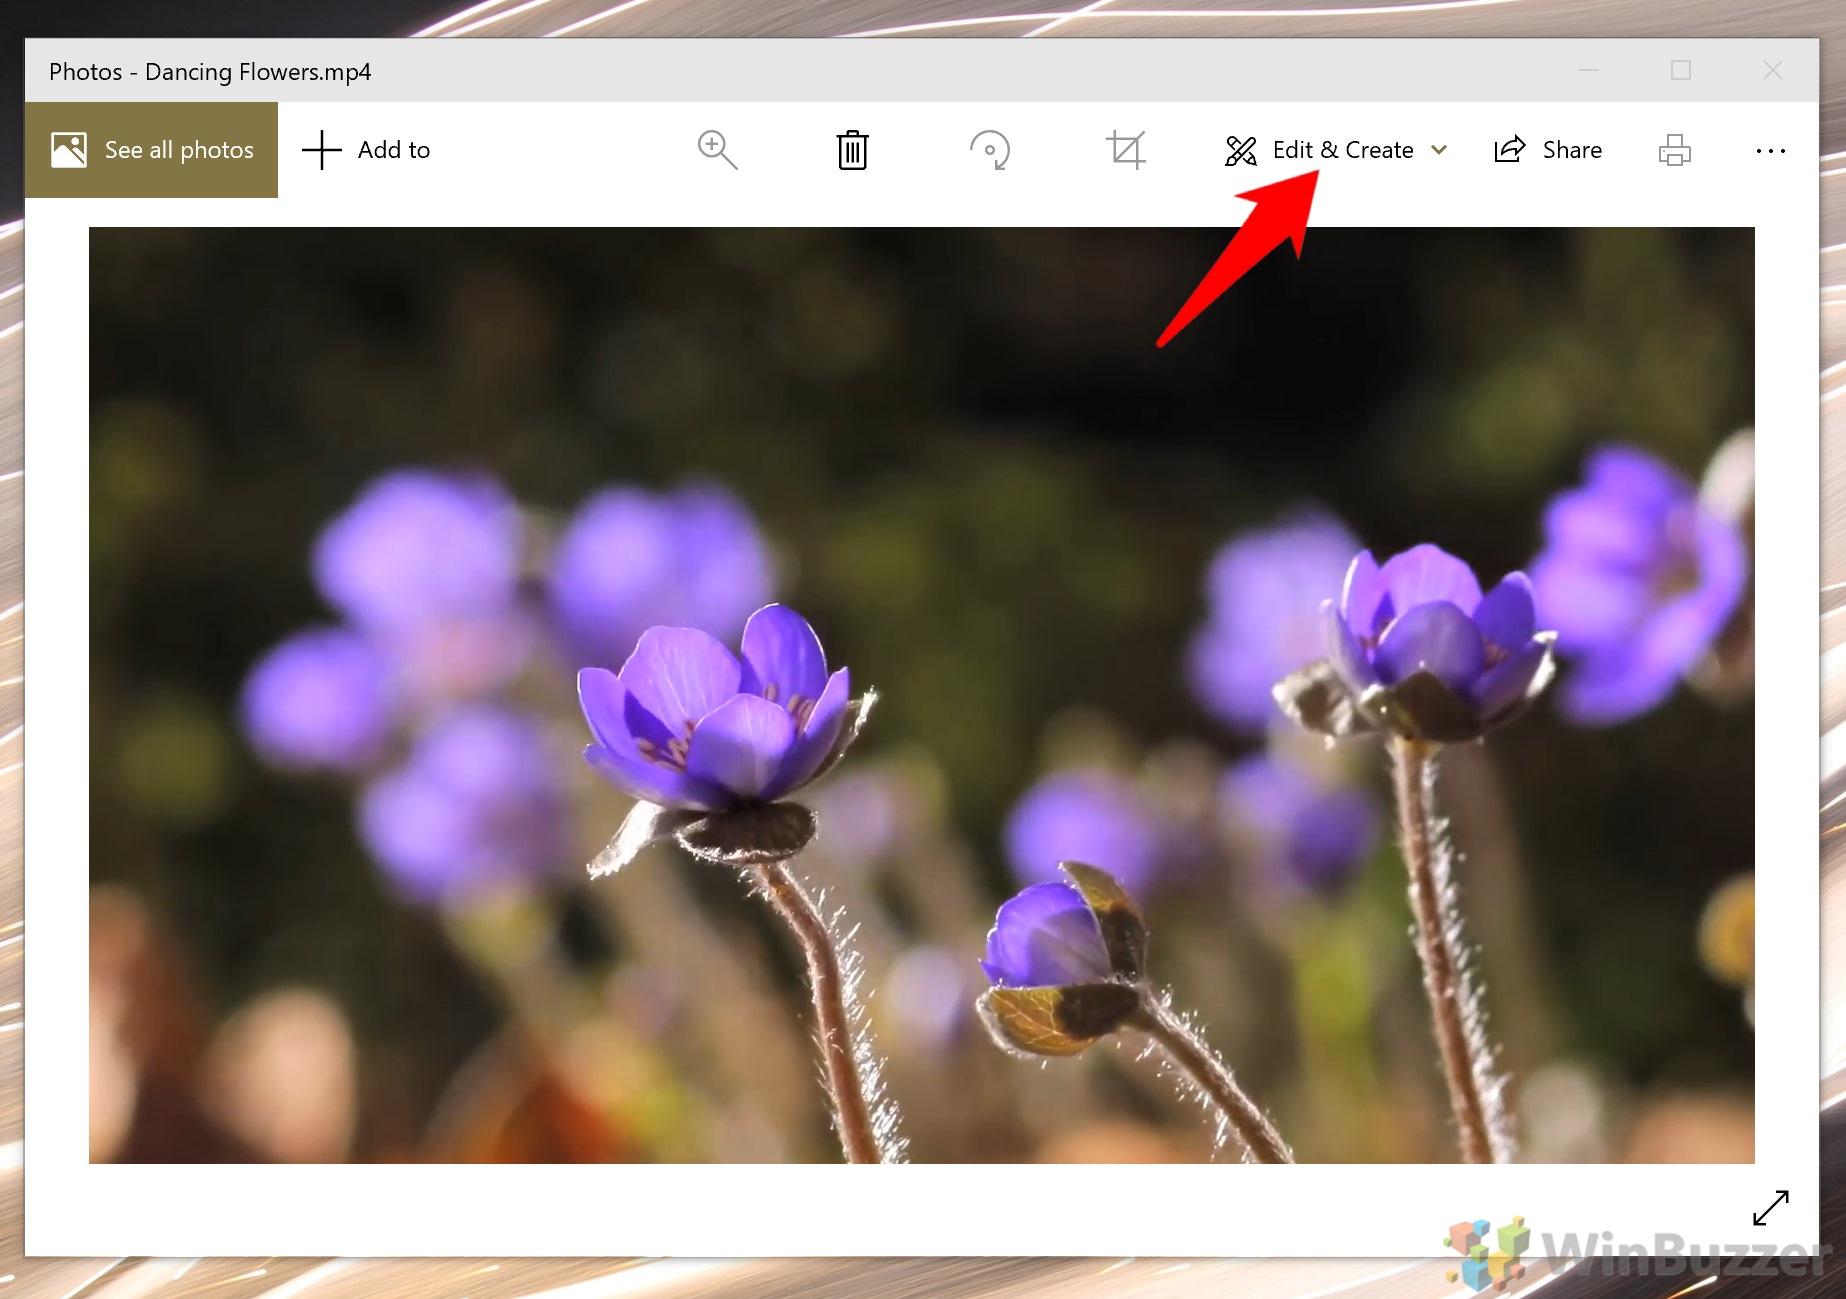
- Click “Edit & Create”
- How to trim a video on Windows 10
Most commonly video editors are used to simply make an existing video shorter. You can trim a video in Windows 10’s build-in editor by simply pressing the “Trim” button in the fly-out menu.
- Trim your video and save a copy
To use the trim function, just click and drag the white dots at either side of the video to select the portion you want to keep. You can grab the little pin icon to see what’s happening at a certain point of the video and adjust it accordingly.
Once you’re done, play your trimmed clip a few times to make sure you’re not missing anything. Click “Save a copy” once you’re happy. This way, you’ll keep your original video file and can even cut out a different portion to use later.
- Find and play your saved video
Your new clip should be saved under “Video title_trim” and be placed in the same folder as your original file. Give it a play just to make sure everything came out correctly.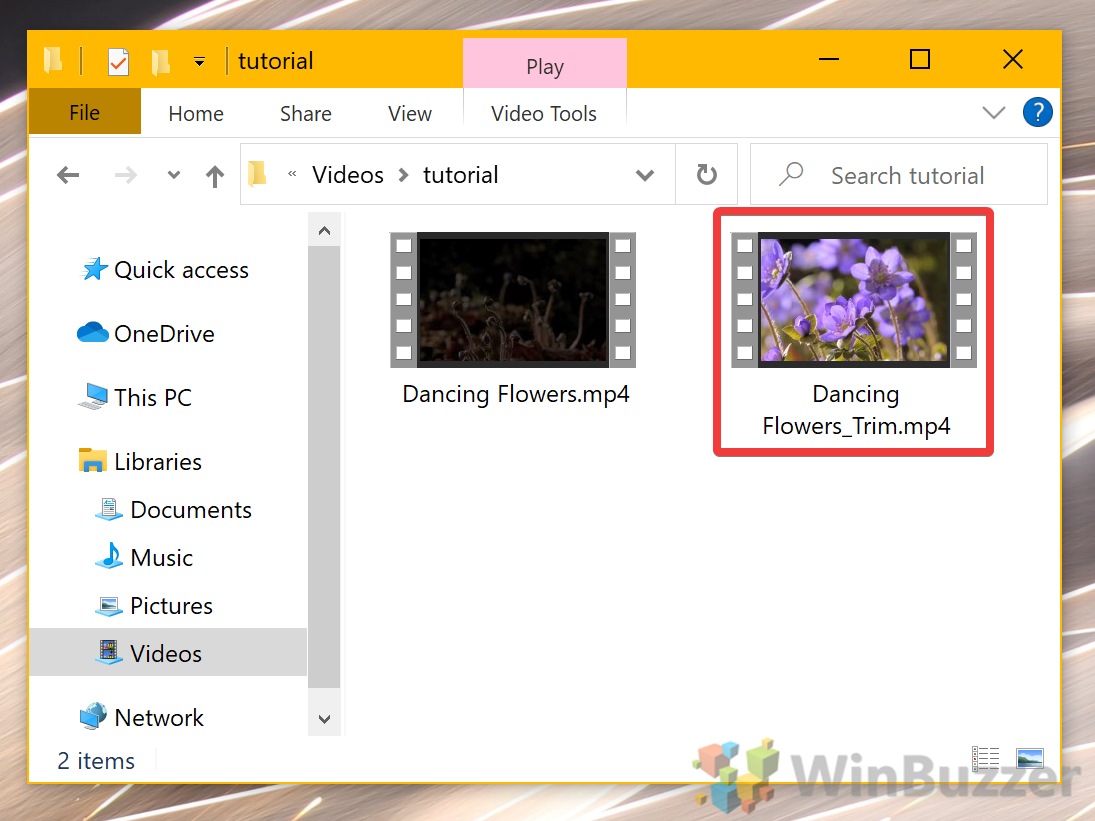
- How to add slow-mo in the Windows 10 video editor
If you want to get fancy, you can also use the Windows 10 editor to slow down video. This is useful if you have a clip with a high framerate and want to highlight a certain part of the action. Just bear in mind that if you have a clip that was recorded at 30fps or lower, it will look quite choppy.
To get started, click “Add slow-mo” from the edit menu.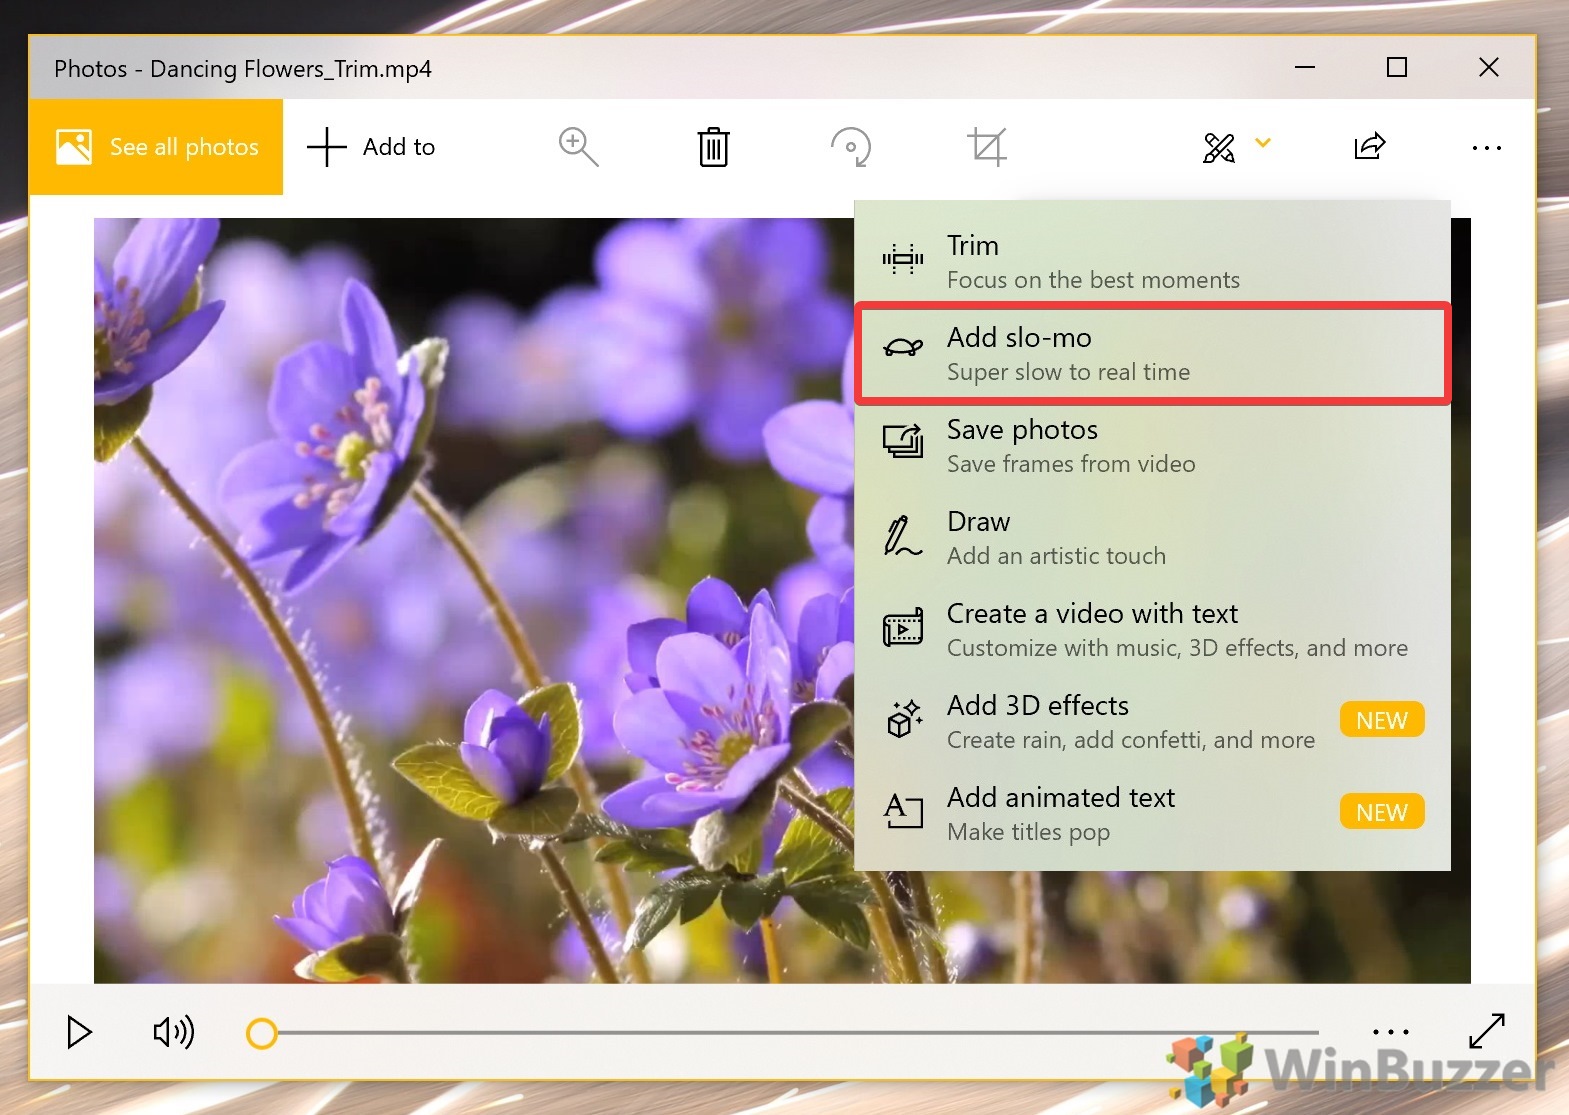
- Speed or slow your video
Slow-mo works similarly to the trim tool, but with an additional slider. Move the yellow pins to select the video you’d like to slow down, then adjust the slider towards the tortoise to slow it down. Once you’re done, you can save a copy again.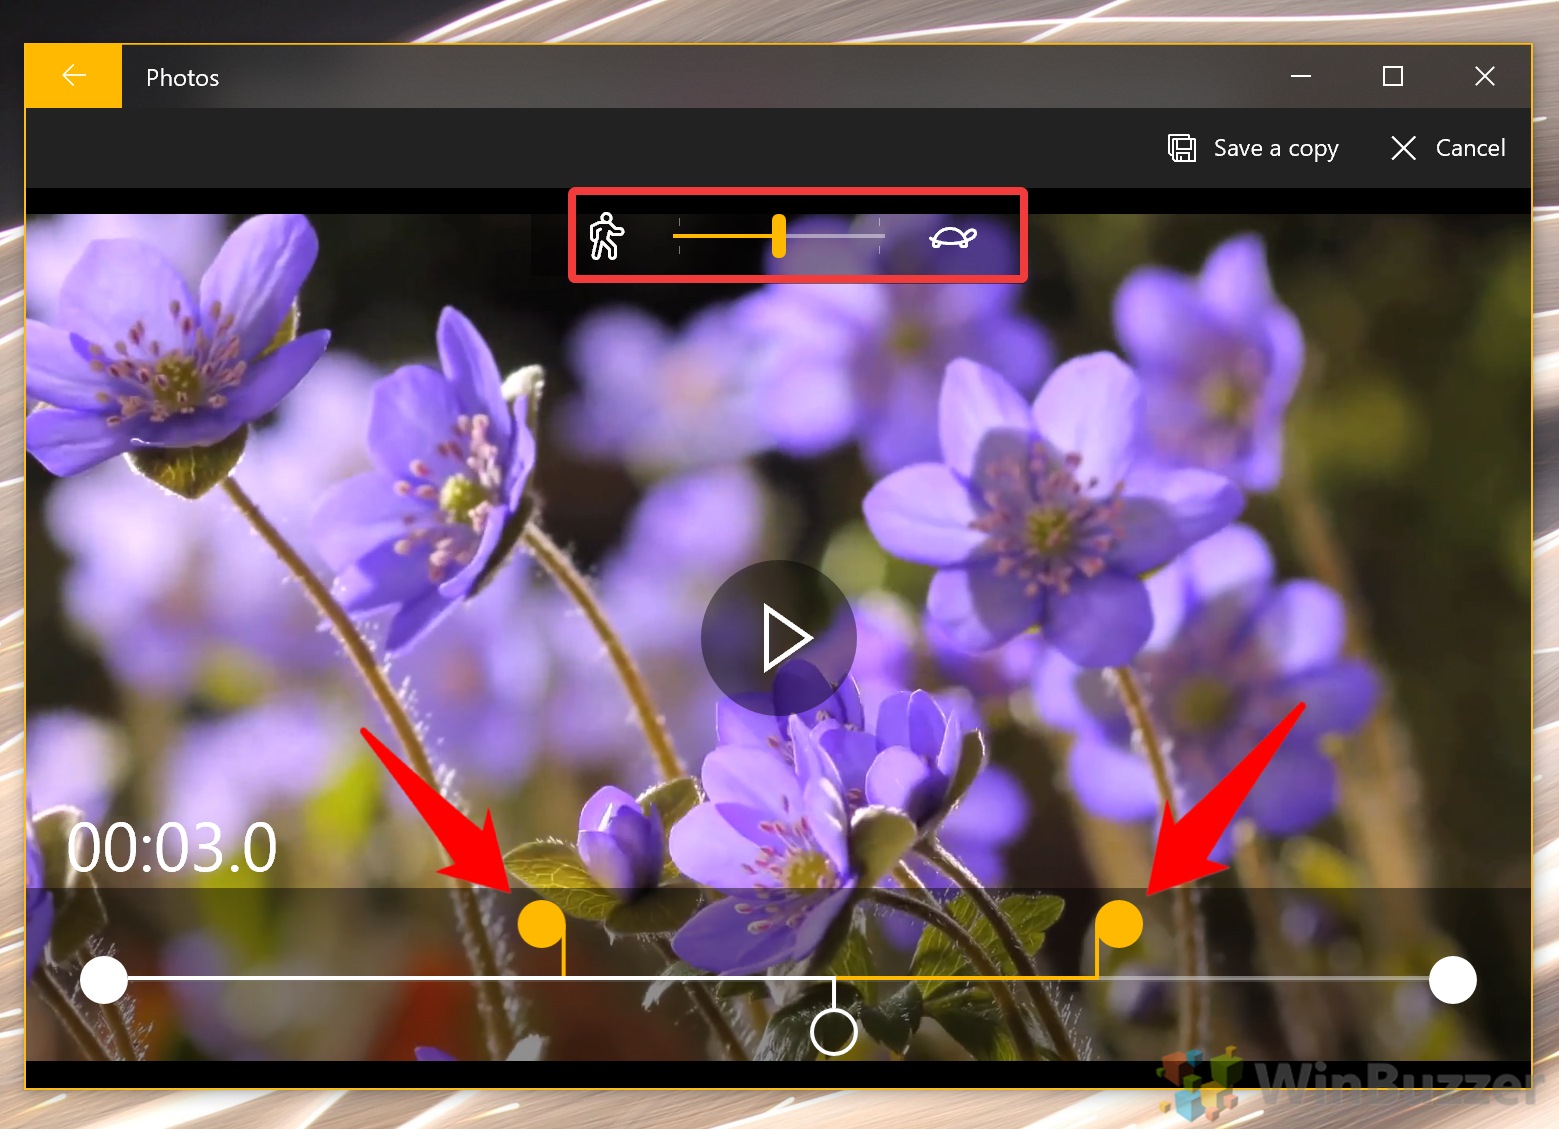
- How to save a photo from a video
They say a picture tells a thousand words, but a video holds thousands of pictures. If you want to keep the focus on one still image, you can easily save it out separately.
As with all the features here, it starts by pressing the edit button and pressing “Save photos”.
- Find the photo you want to save
Use the slider at the bottom to find the section of the video that’s of interest to you. Once you have an idea, press the arrow buttons at the bottom of the screen to move frame-by-frame. This allows you to get to the perfect moment in time – perhaps when someone has stopped blinking and has a smile on their face, or when an object is no longer blurry.
Once you’re happy, click “Save a photo” to keep it for the picture book.
- How to draw on a video in Windows 10
Press the edit button and then “Draw” to get started.
Sometimes, your video editing may take a more analytical or creative turn. With the “Draw” tool, you can circle important parts of a video or draw cartoons on top of your footage. Unfortunately, these are static images, not animated ones, but it’s still good fun.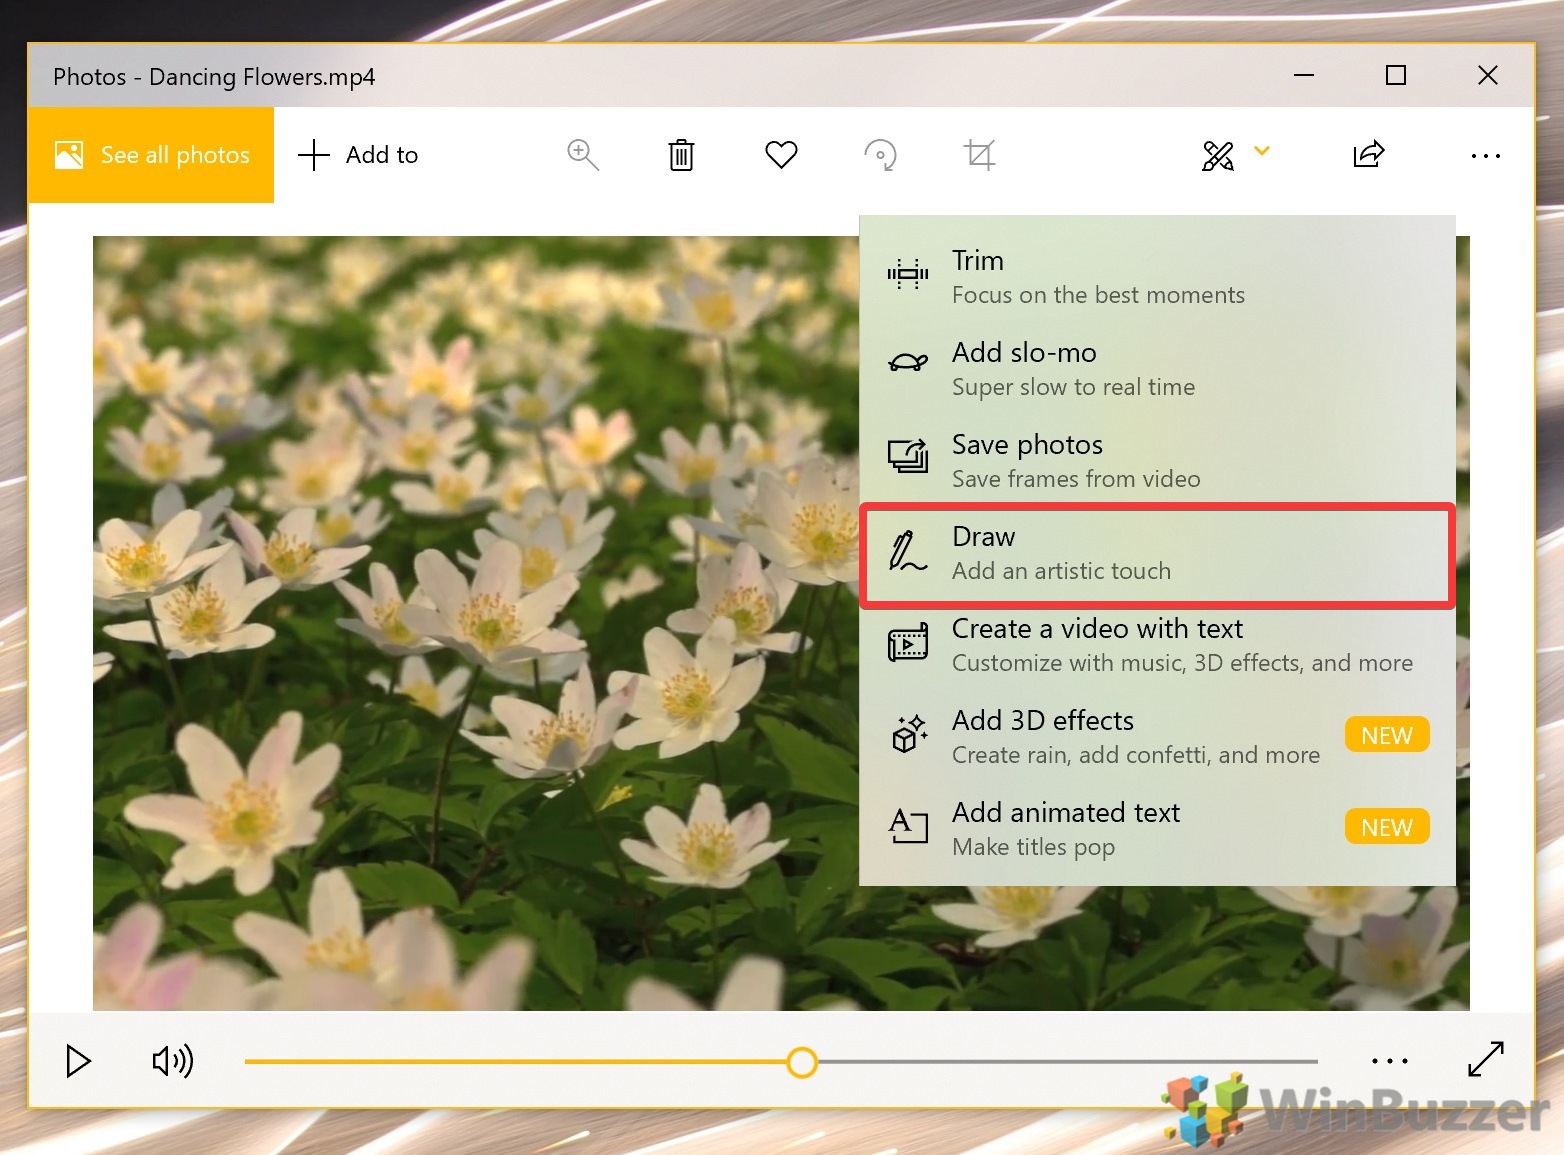
- Doodle on your video
Our flower footage is nice, but it’s also very…boring. Thankfully, we can use the drawing tools presented at the top of our video to draw a lovely bumblebee. Once you’re done, press the save icon to save a copy of the video with the drawing on it.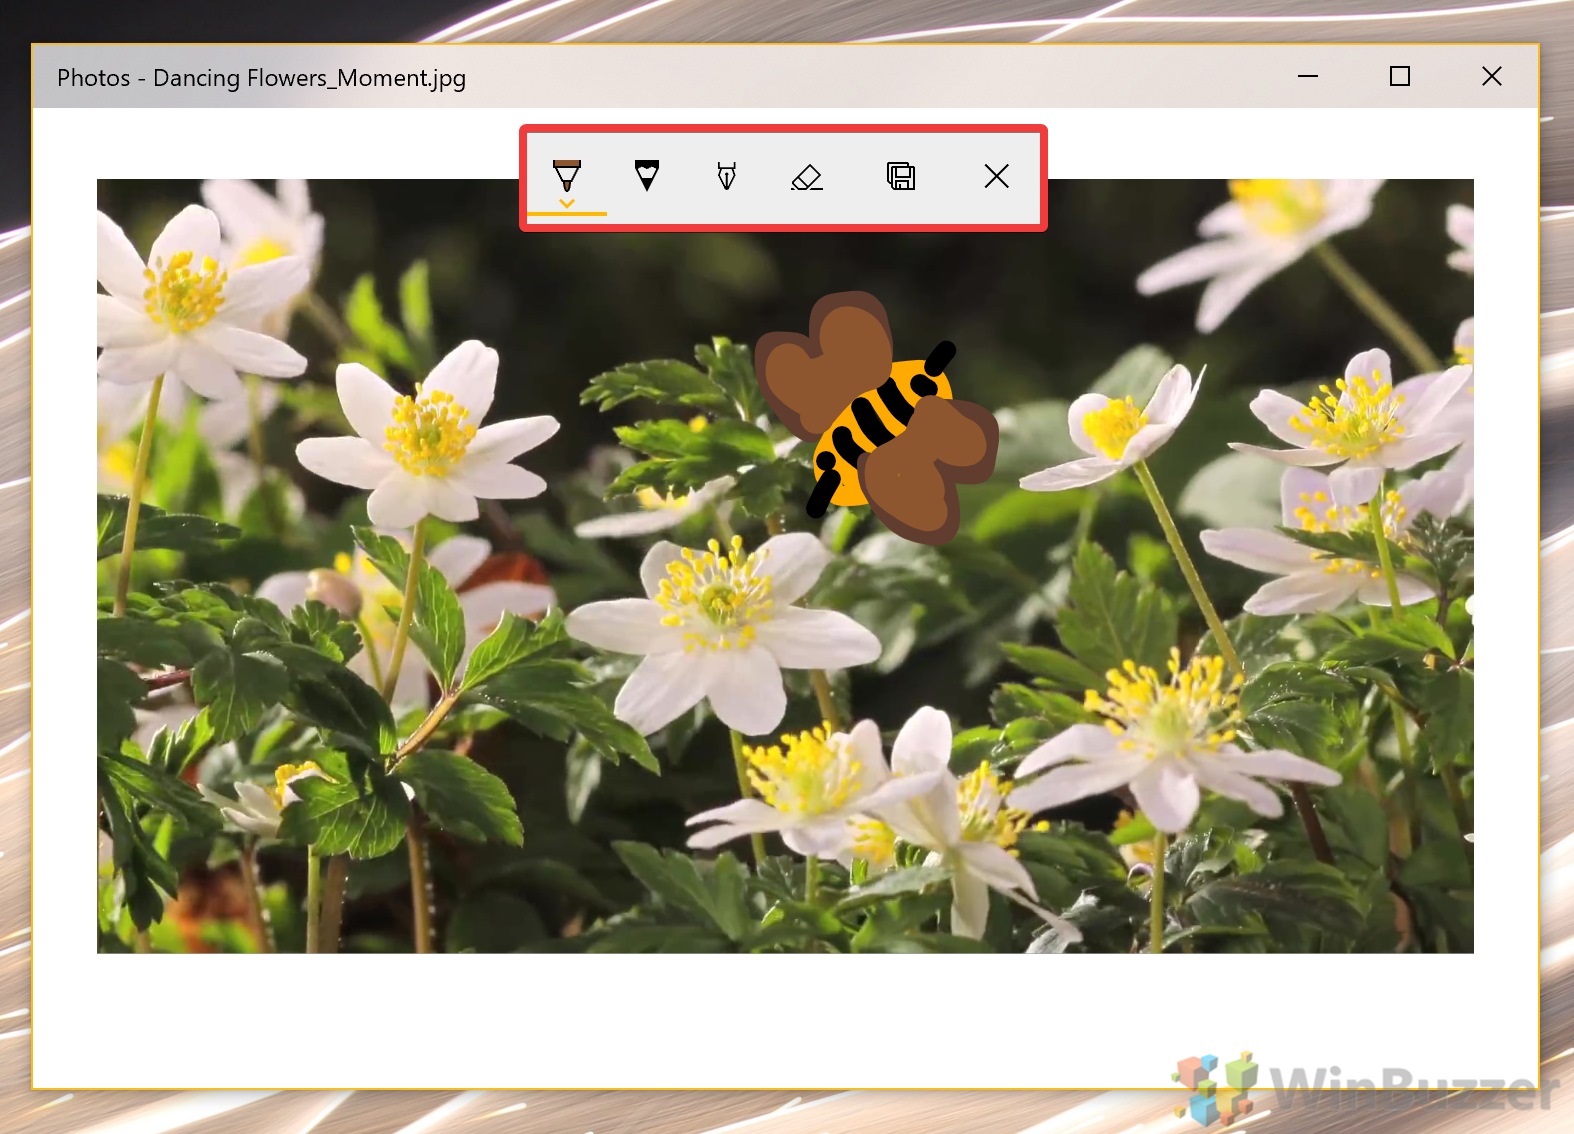
- Perform more advanced edits
For more advanced editing, press one of the bottom three options in the edit menu and move on to the next section.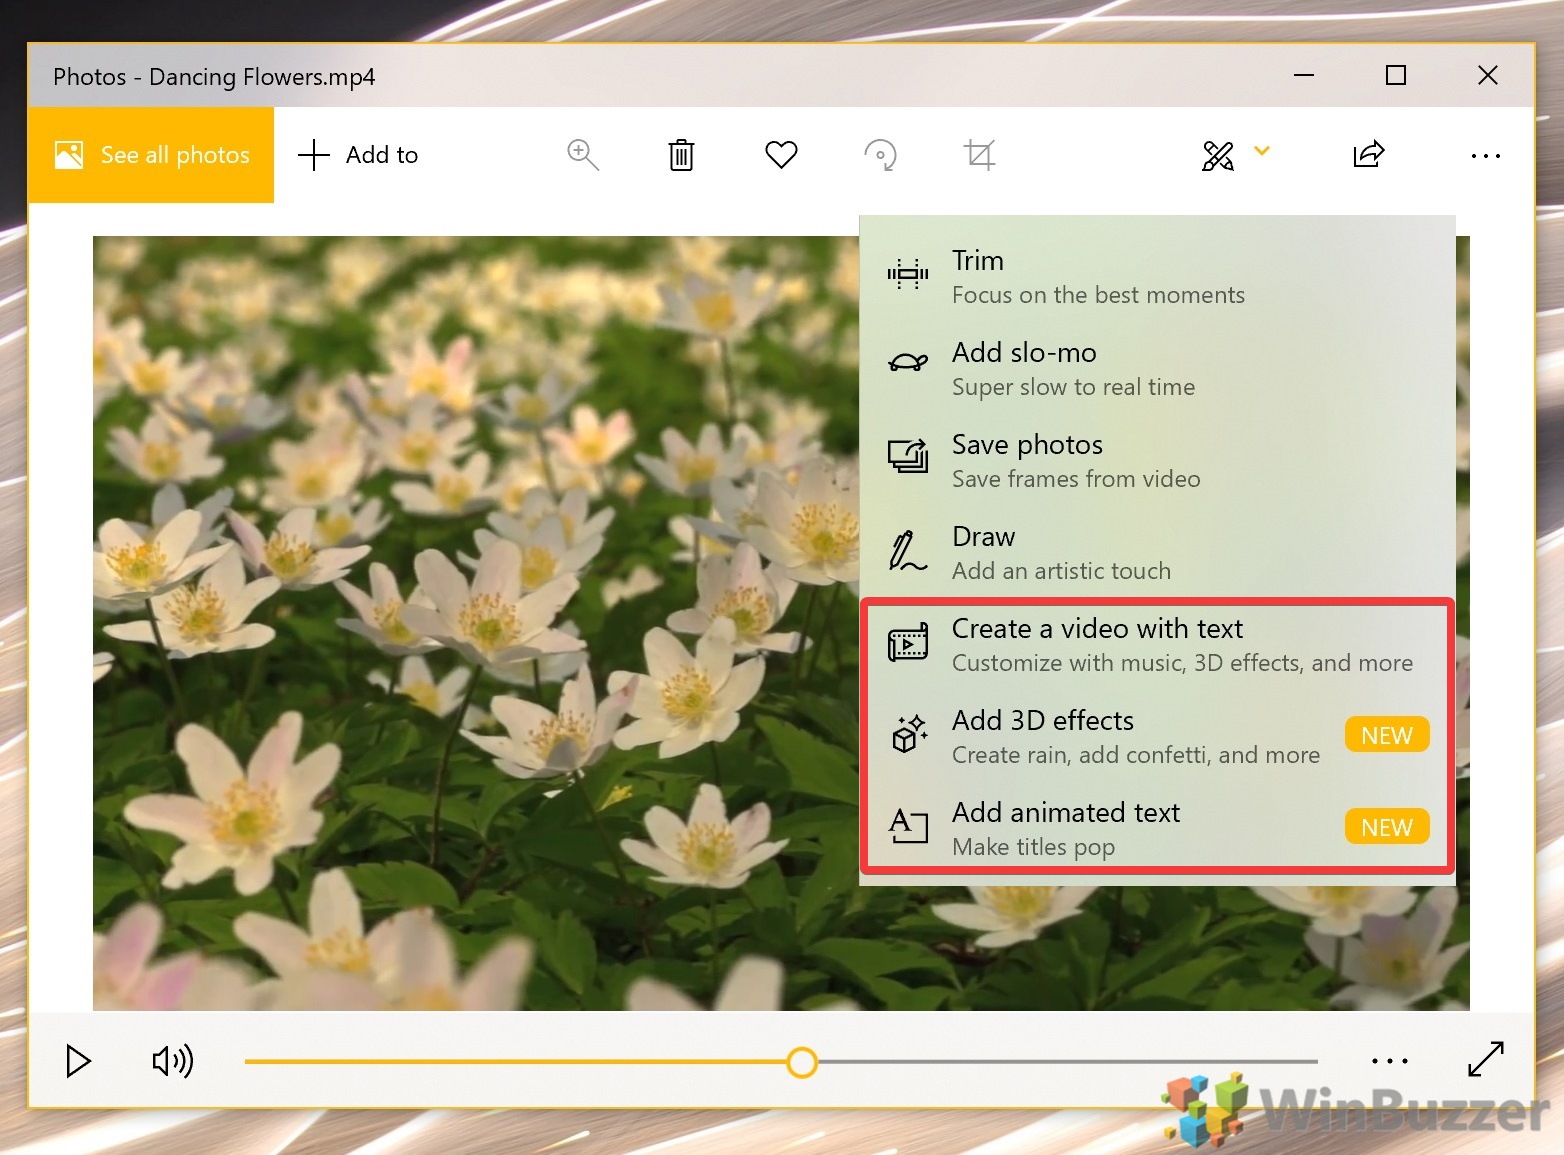
How to Add Text to a Video in Windows 10, Add 3D Effects, or Combine Videos
The advanced Microsoft Photos video editor will be more what you’re used to if you’re a fan of Windows Movie Maker, Adobe Premiere, or other video editing software. It’s essentially what remains of the “Story Remix” application Microsoft created a few years back.
- Create a new video project via ‘Add to’
To get working with your video, open it with Photos and then click “+ Add to” and “New video with music”.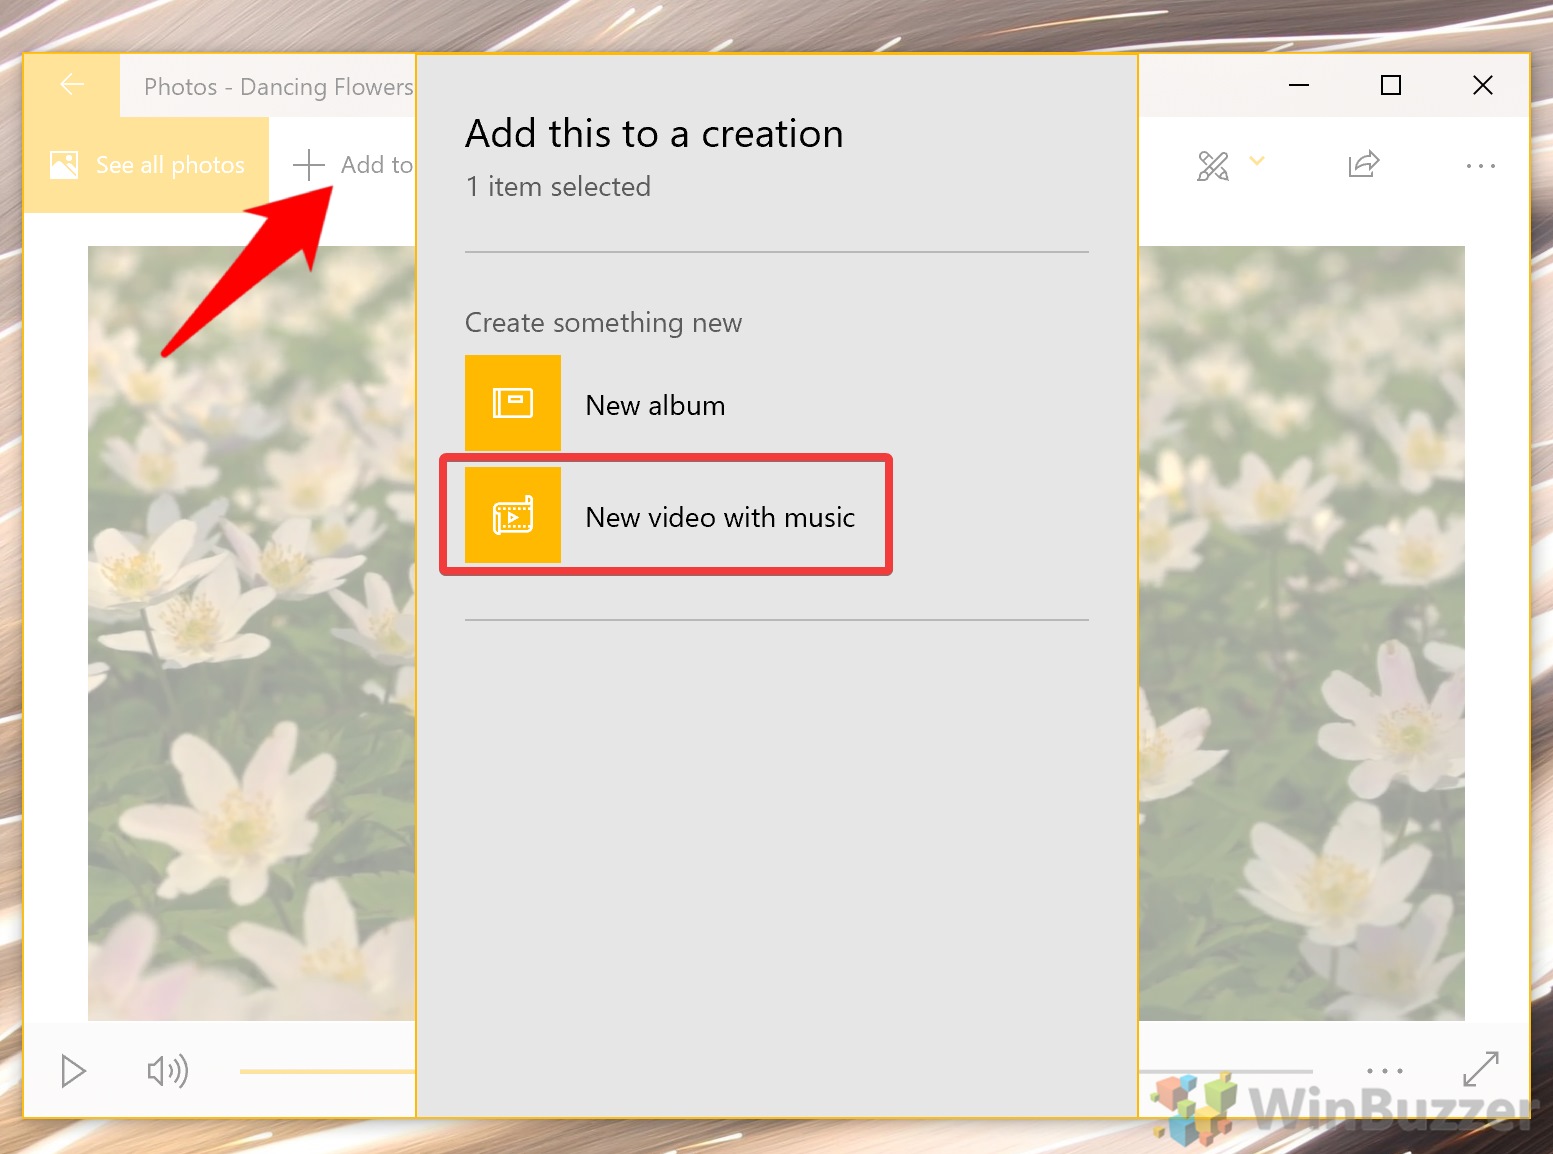
- OR: create a new video project via the Photos menu
If you don’t know which clip you want to start with, you can instead open your Start menu, search for “Photos”, and click the top result.
- Start a new video project
Next to the Photos search bar, click “New video > New video project”.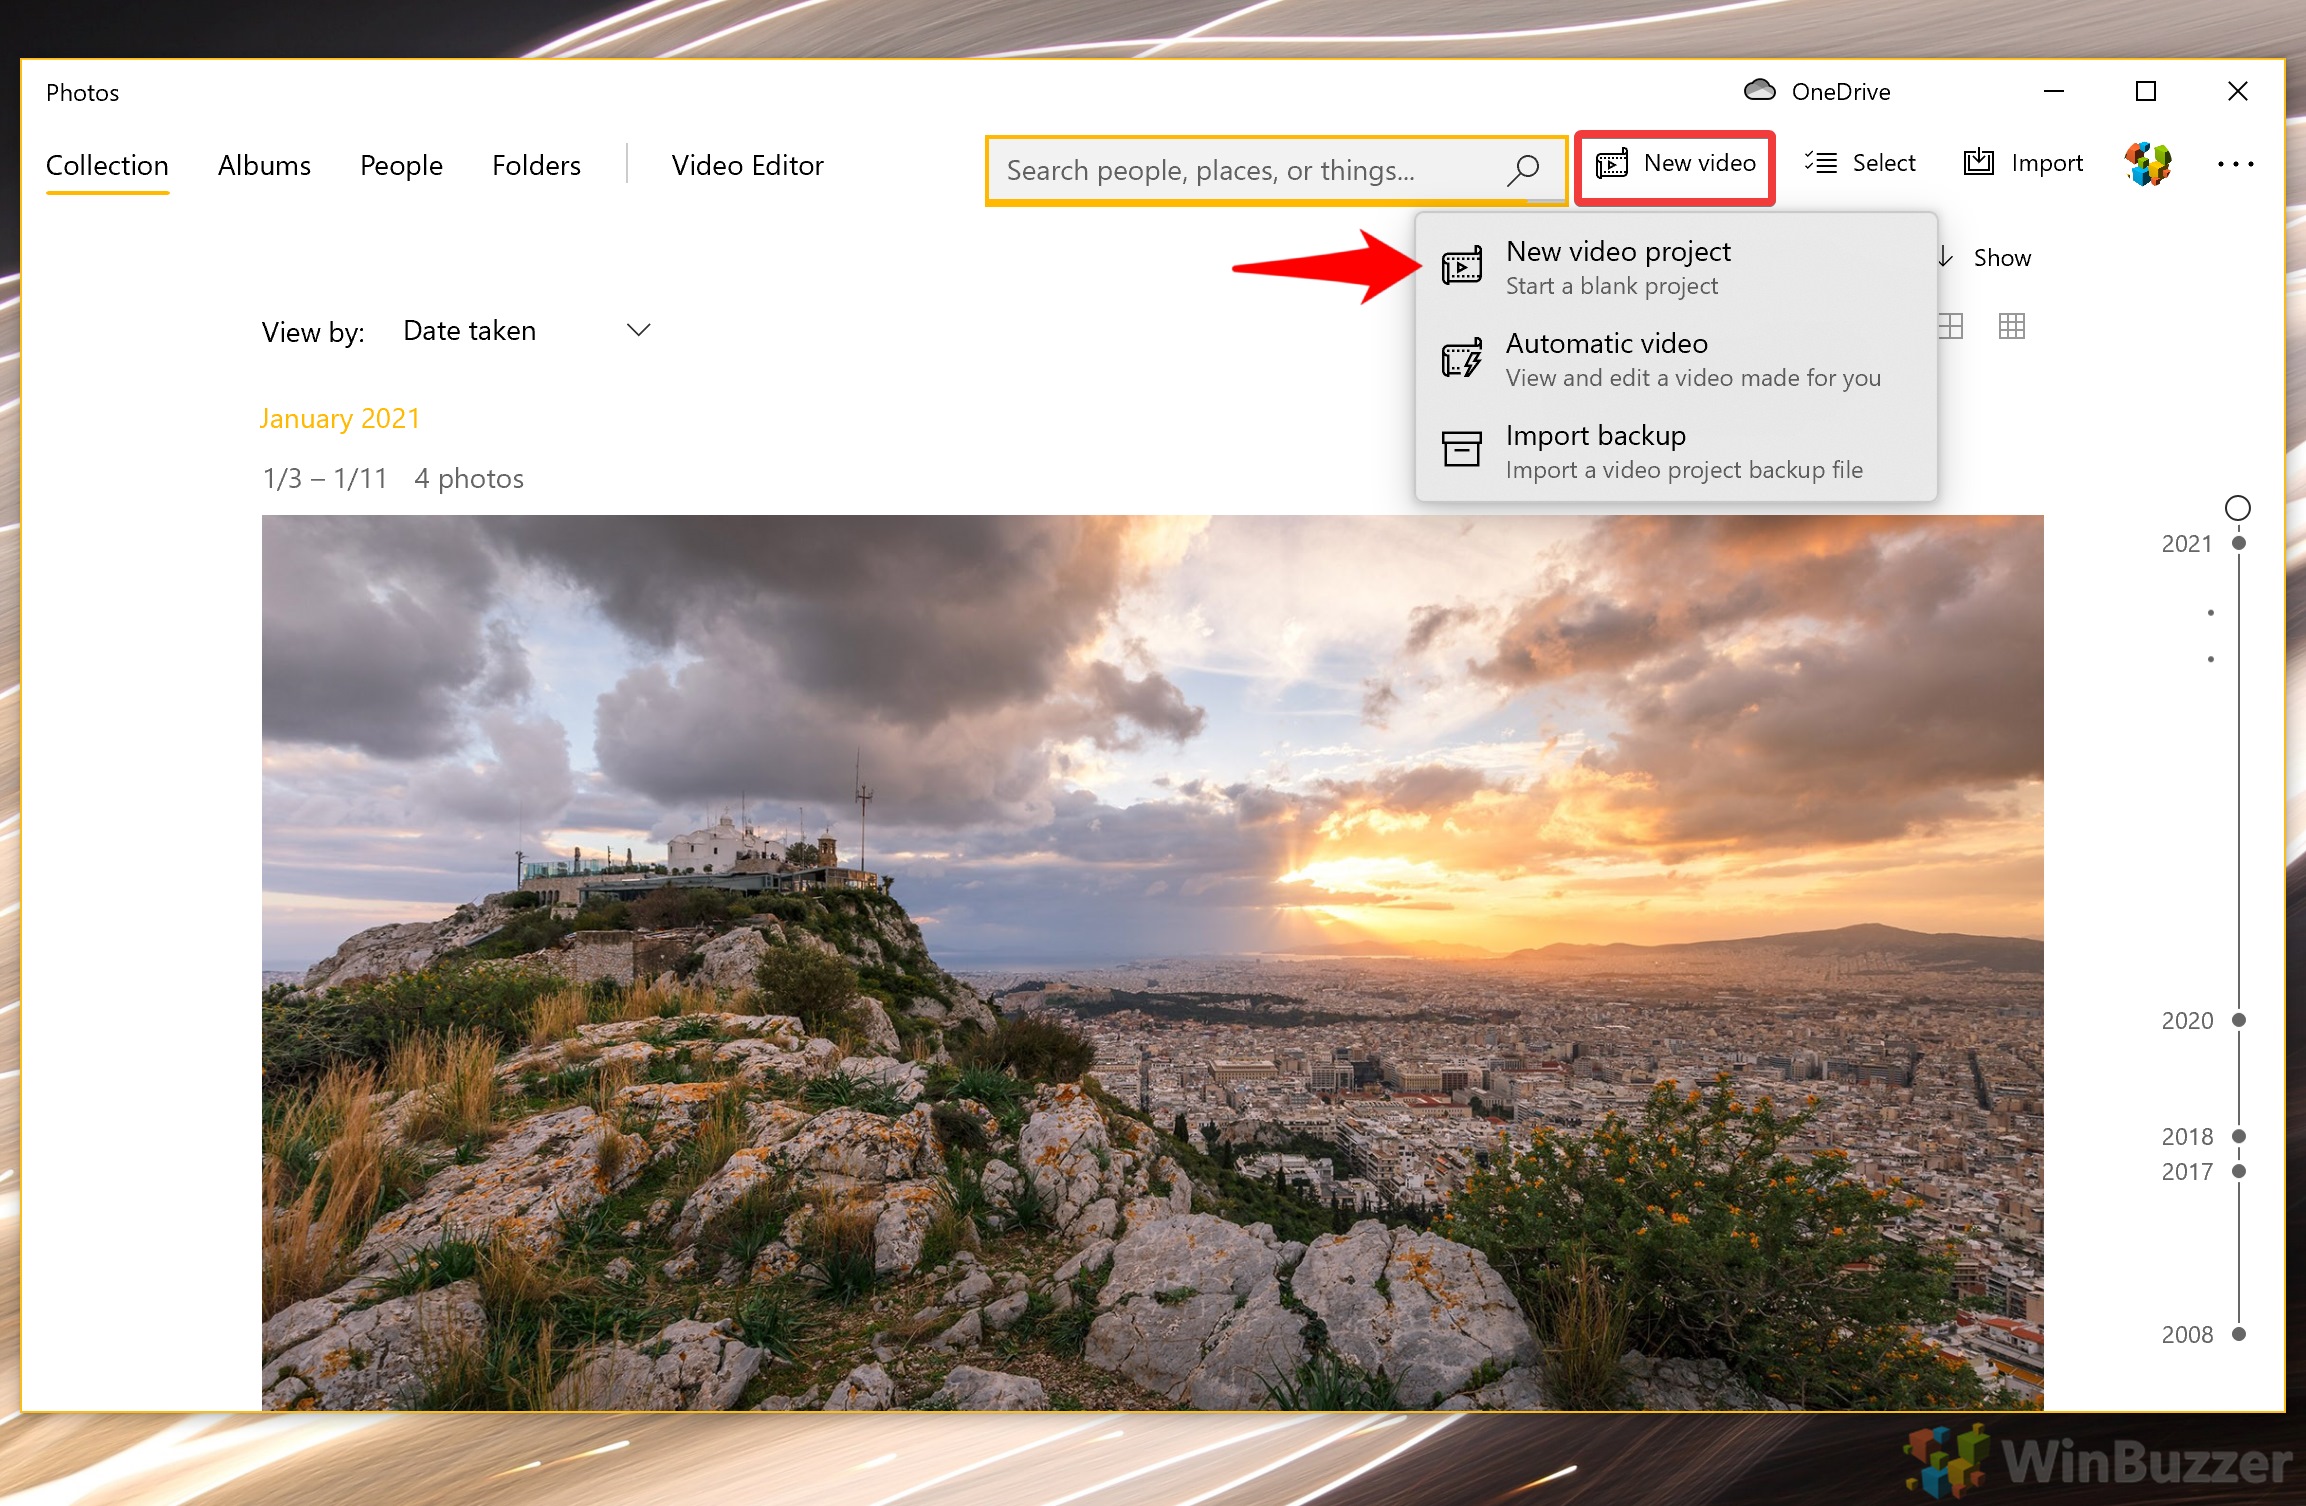
- Give your project a name
It’s tempting to type a random string of letters, but we encourage you to be descriptive, so you don’t get confused later.
Once you’ve typed a name in the box, click “OK”.
- Add media to the Windows 10 editor
Press “+ Add” to add media. This can a photo or video, and you can also click “From the web” to look for creative commons’ pictures online.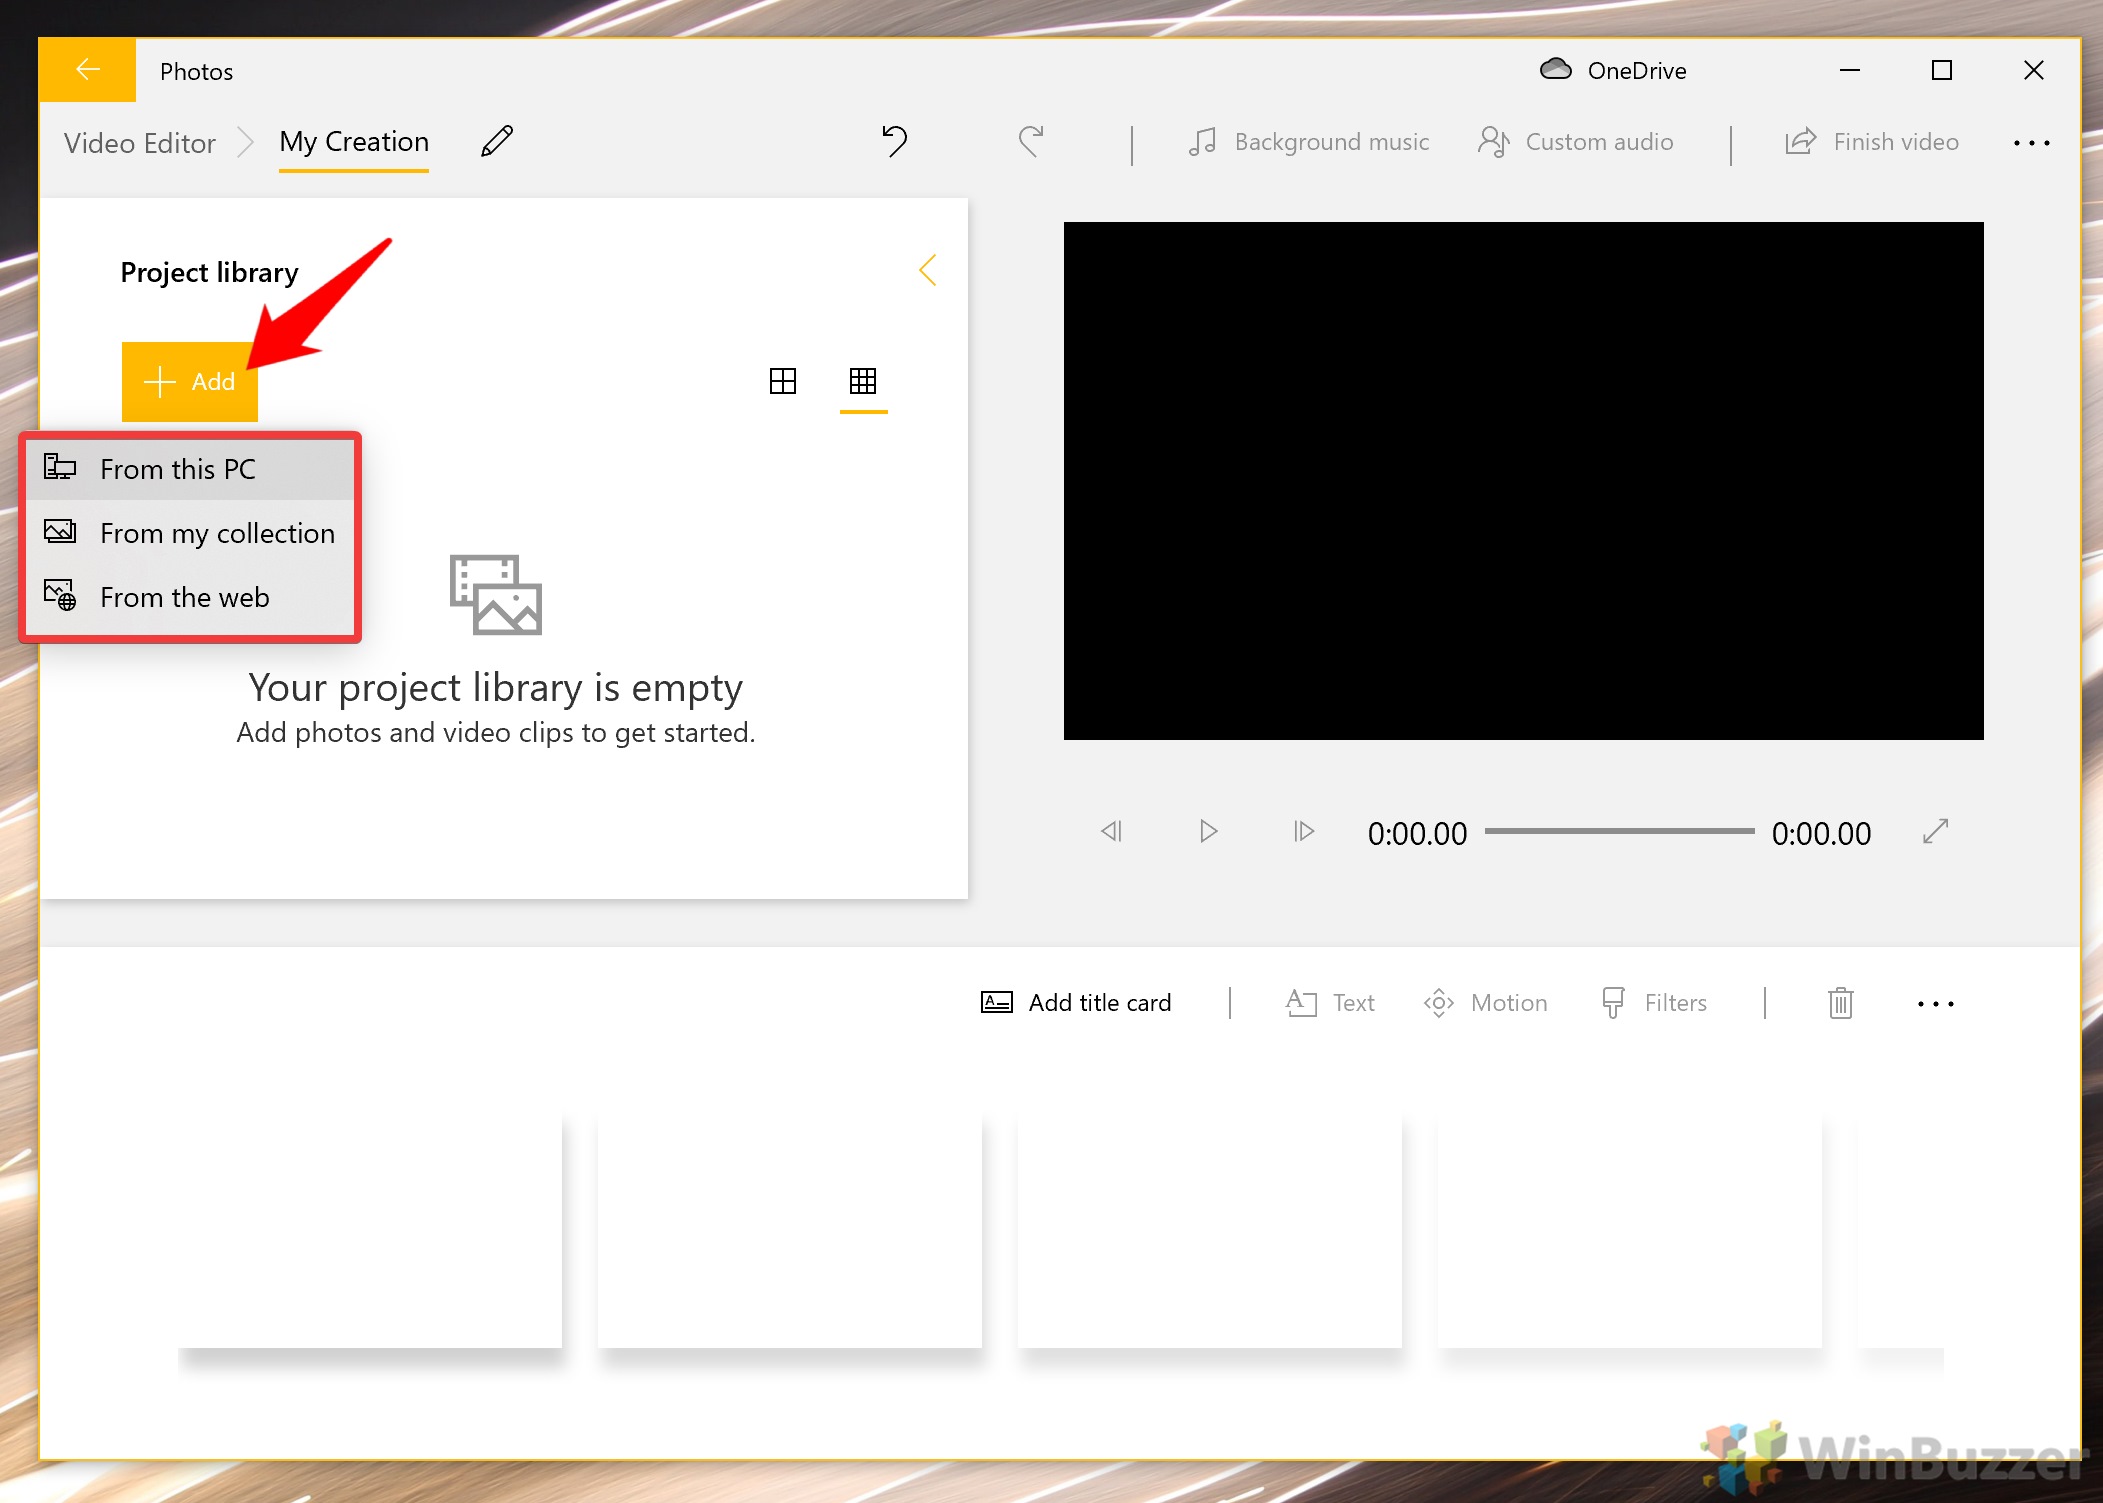
- Drag the video clip or picture to your timeline
The timeline is the blank white section at the bottom of the screen that reads “Drag items from the project library here”.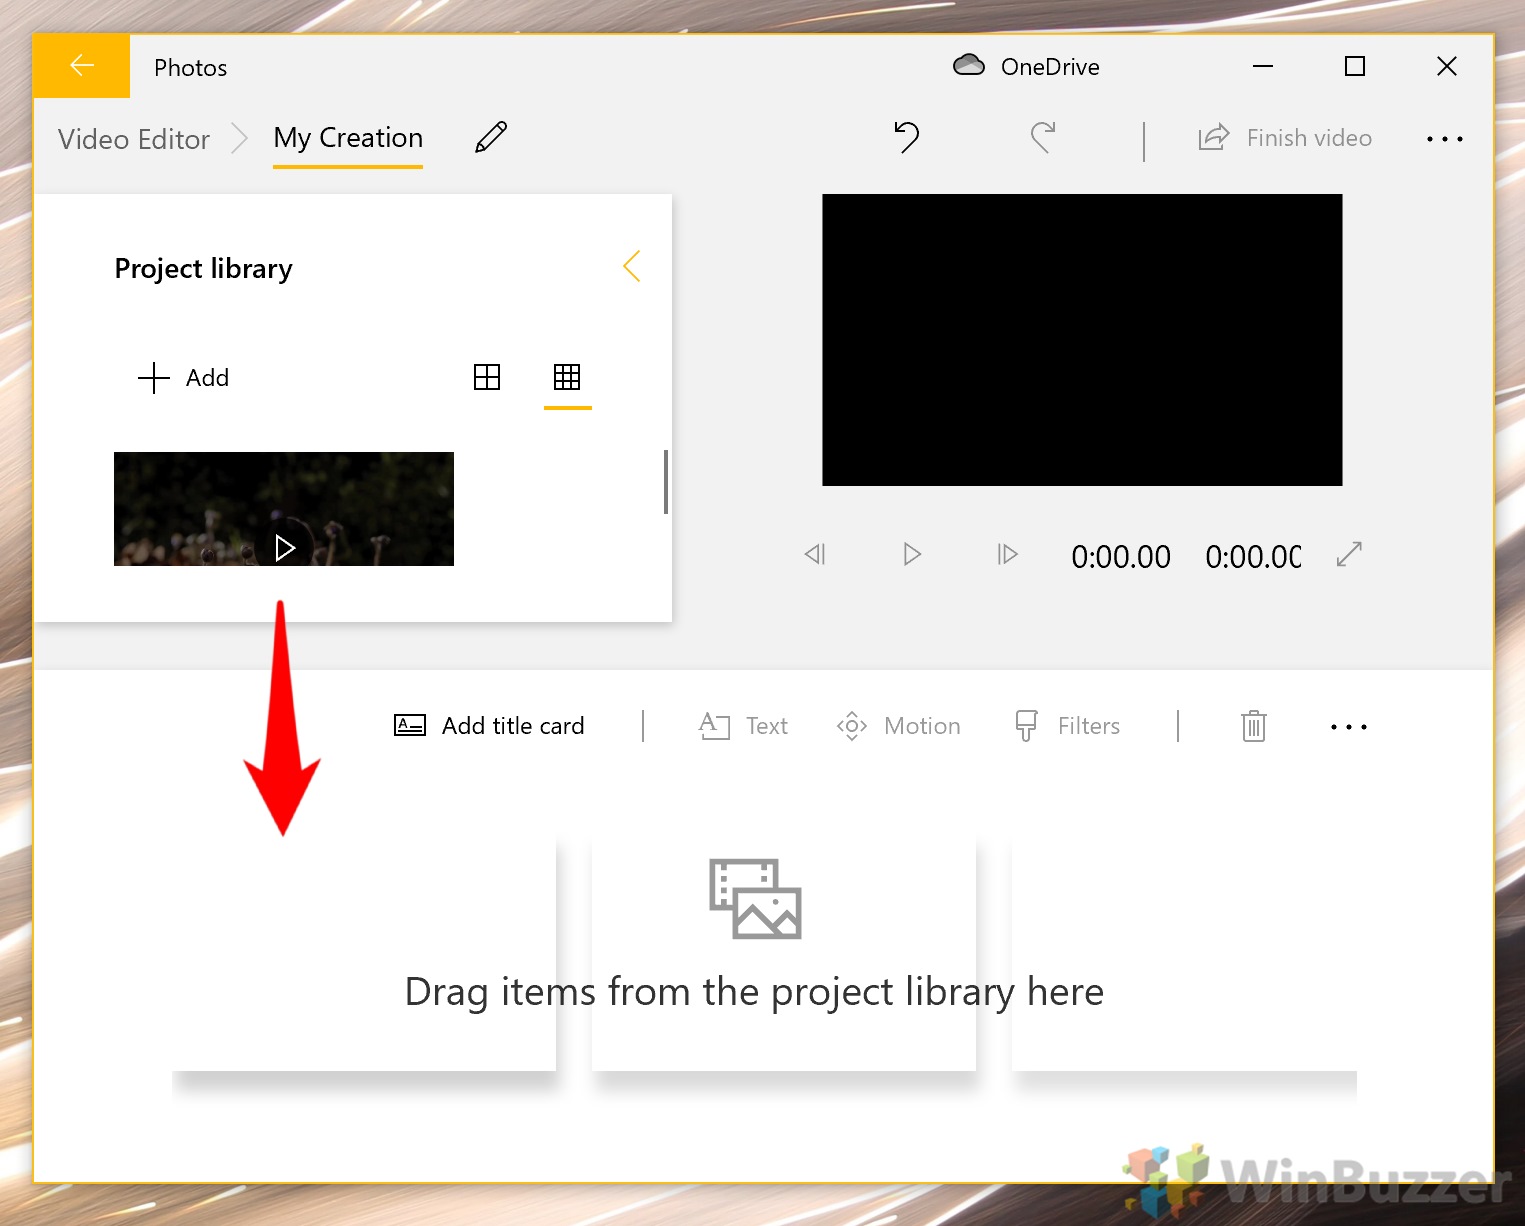
- Use Windows 10 to cut or split a video
With the image selected in your timeline, press “Split”.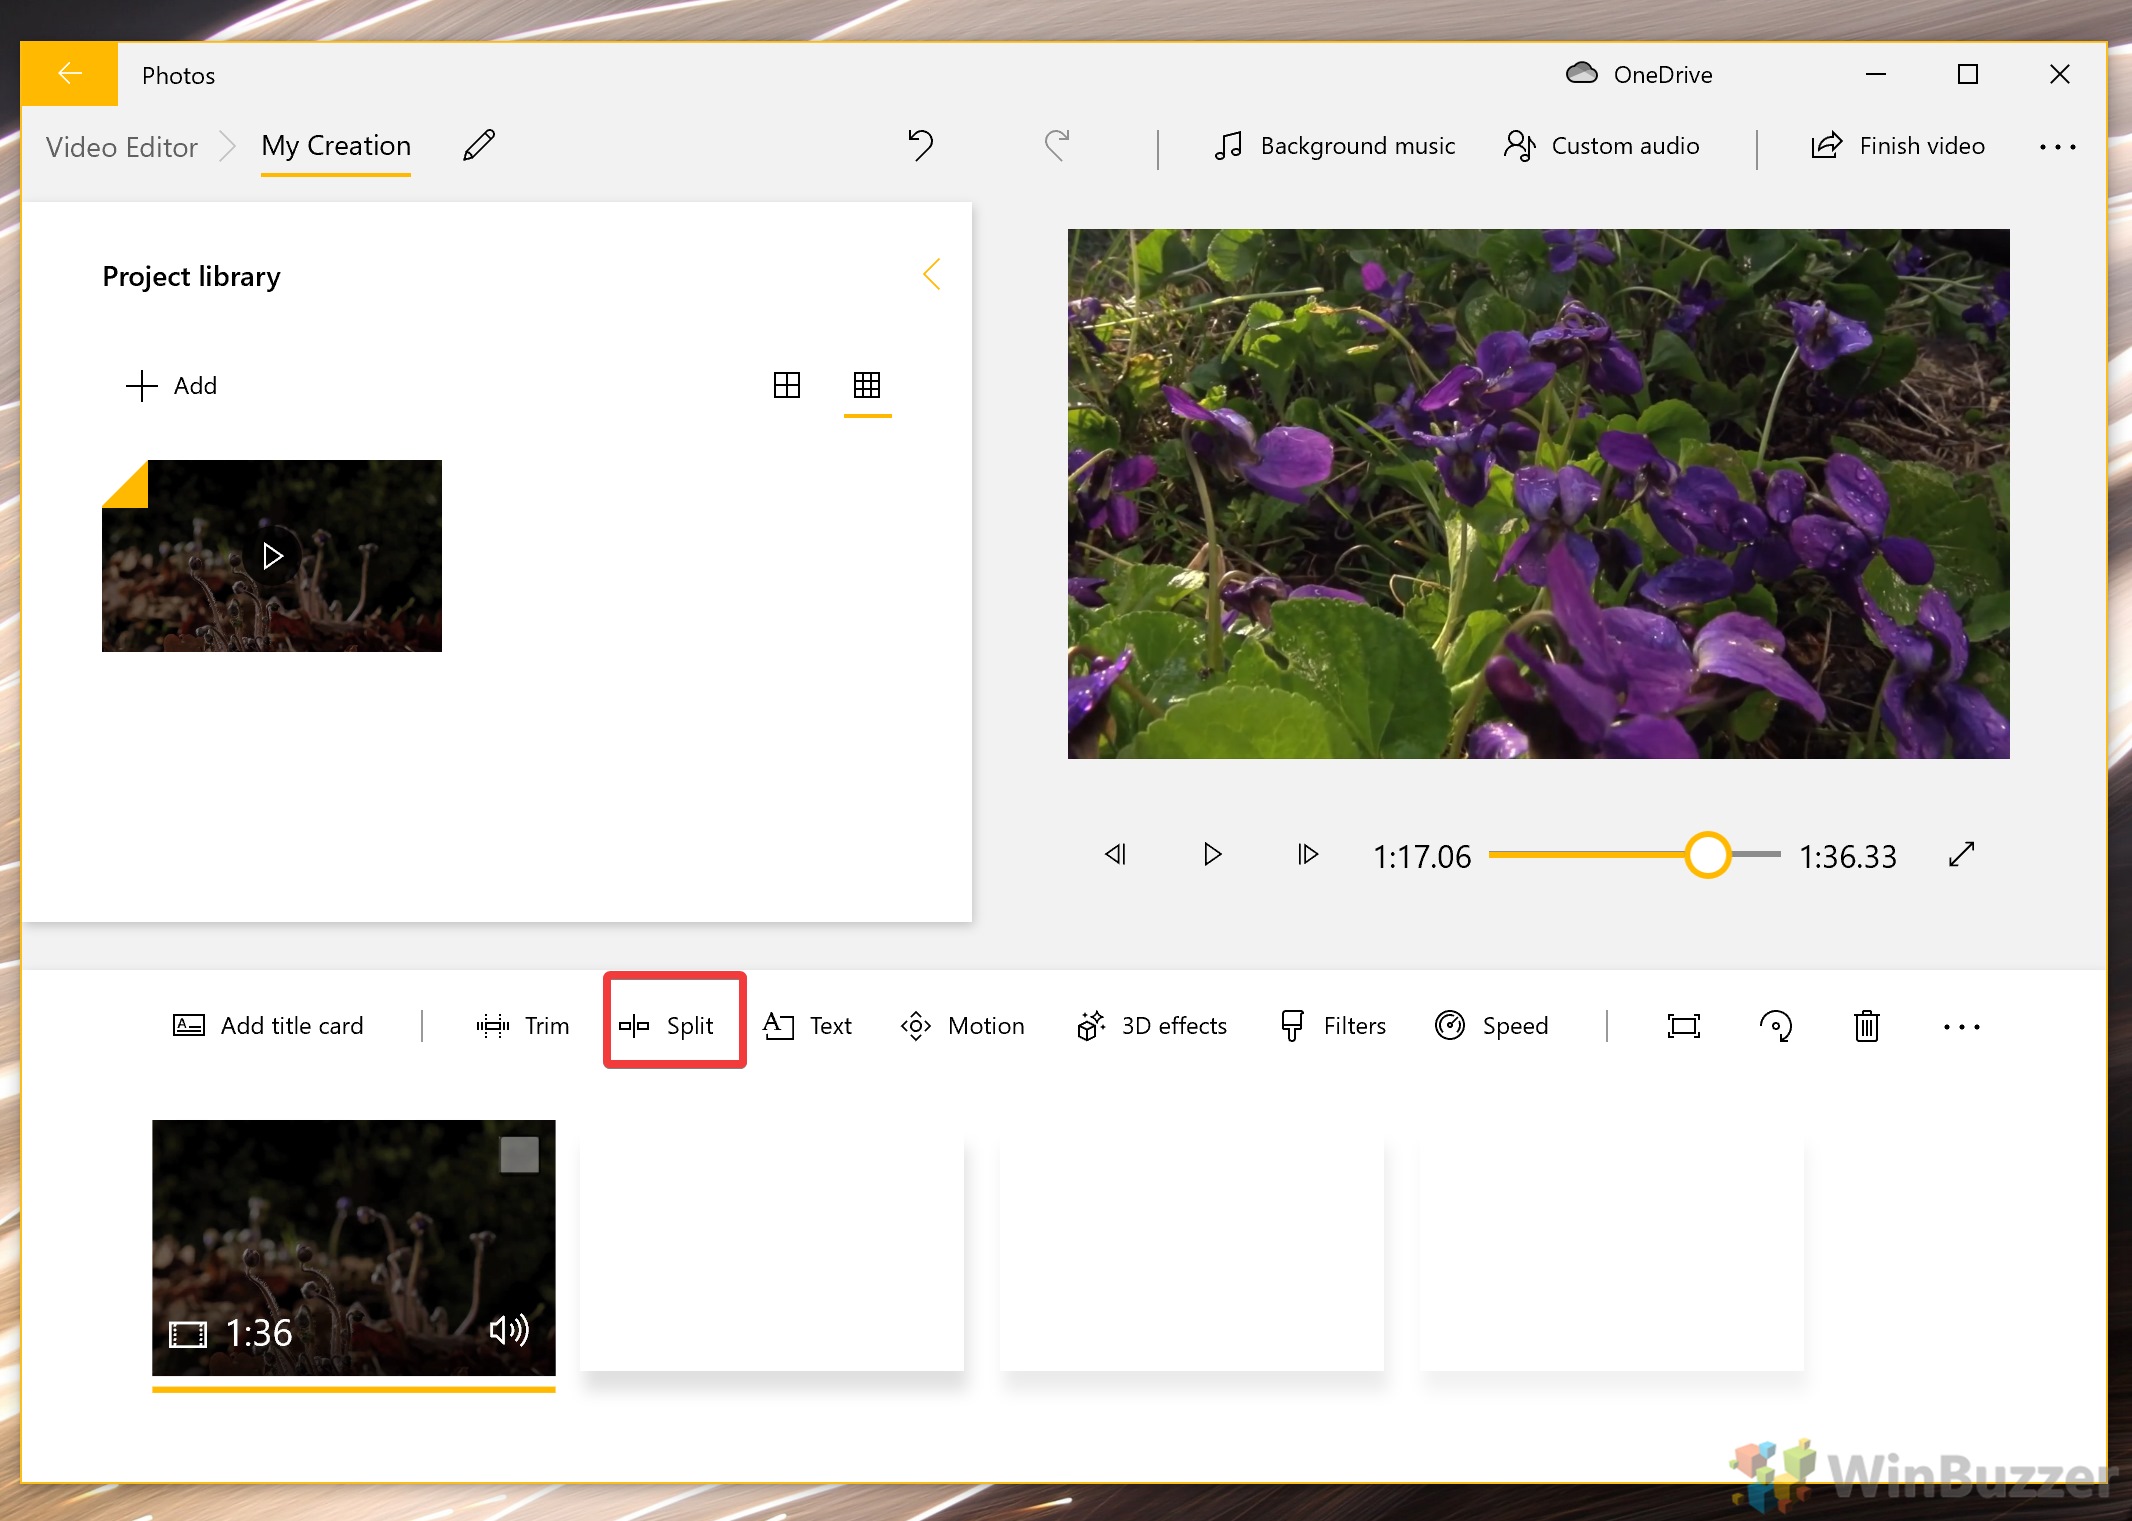
- Move the cursor to the section you want to split
Everything past the pin will become a separate video. This will allow you to apply different effects to that portion or re-order it.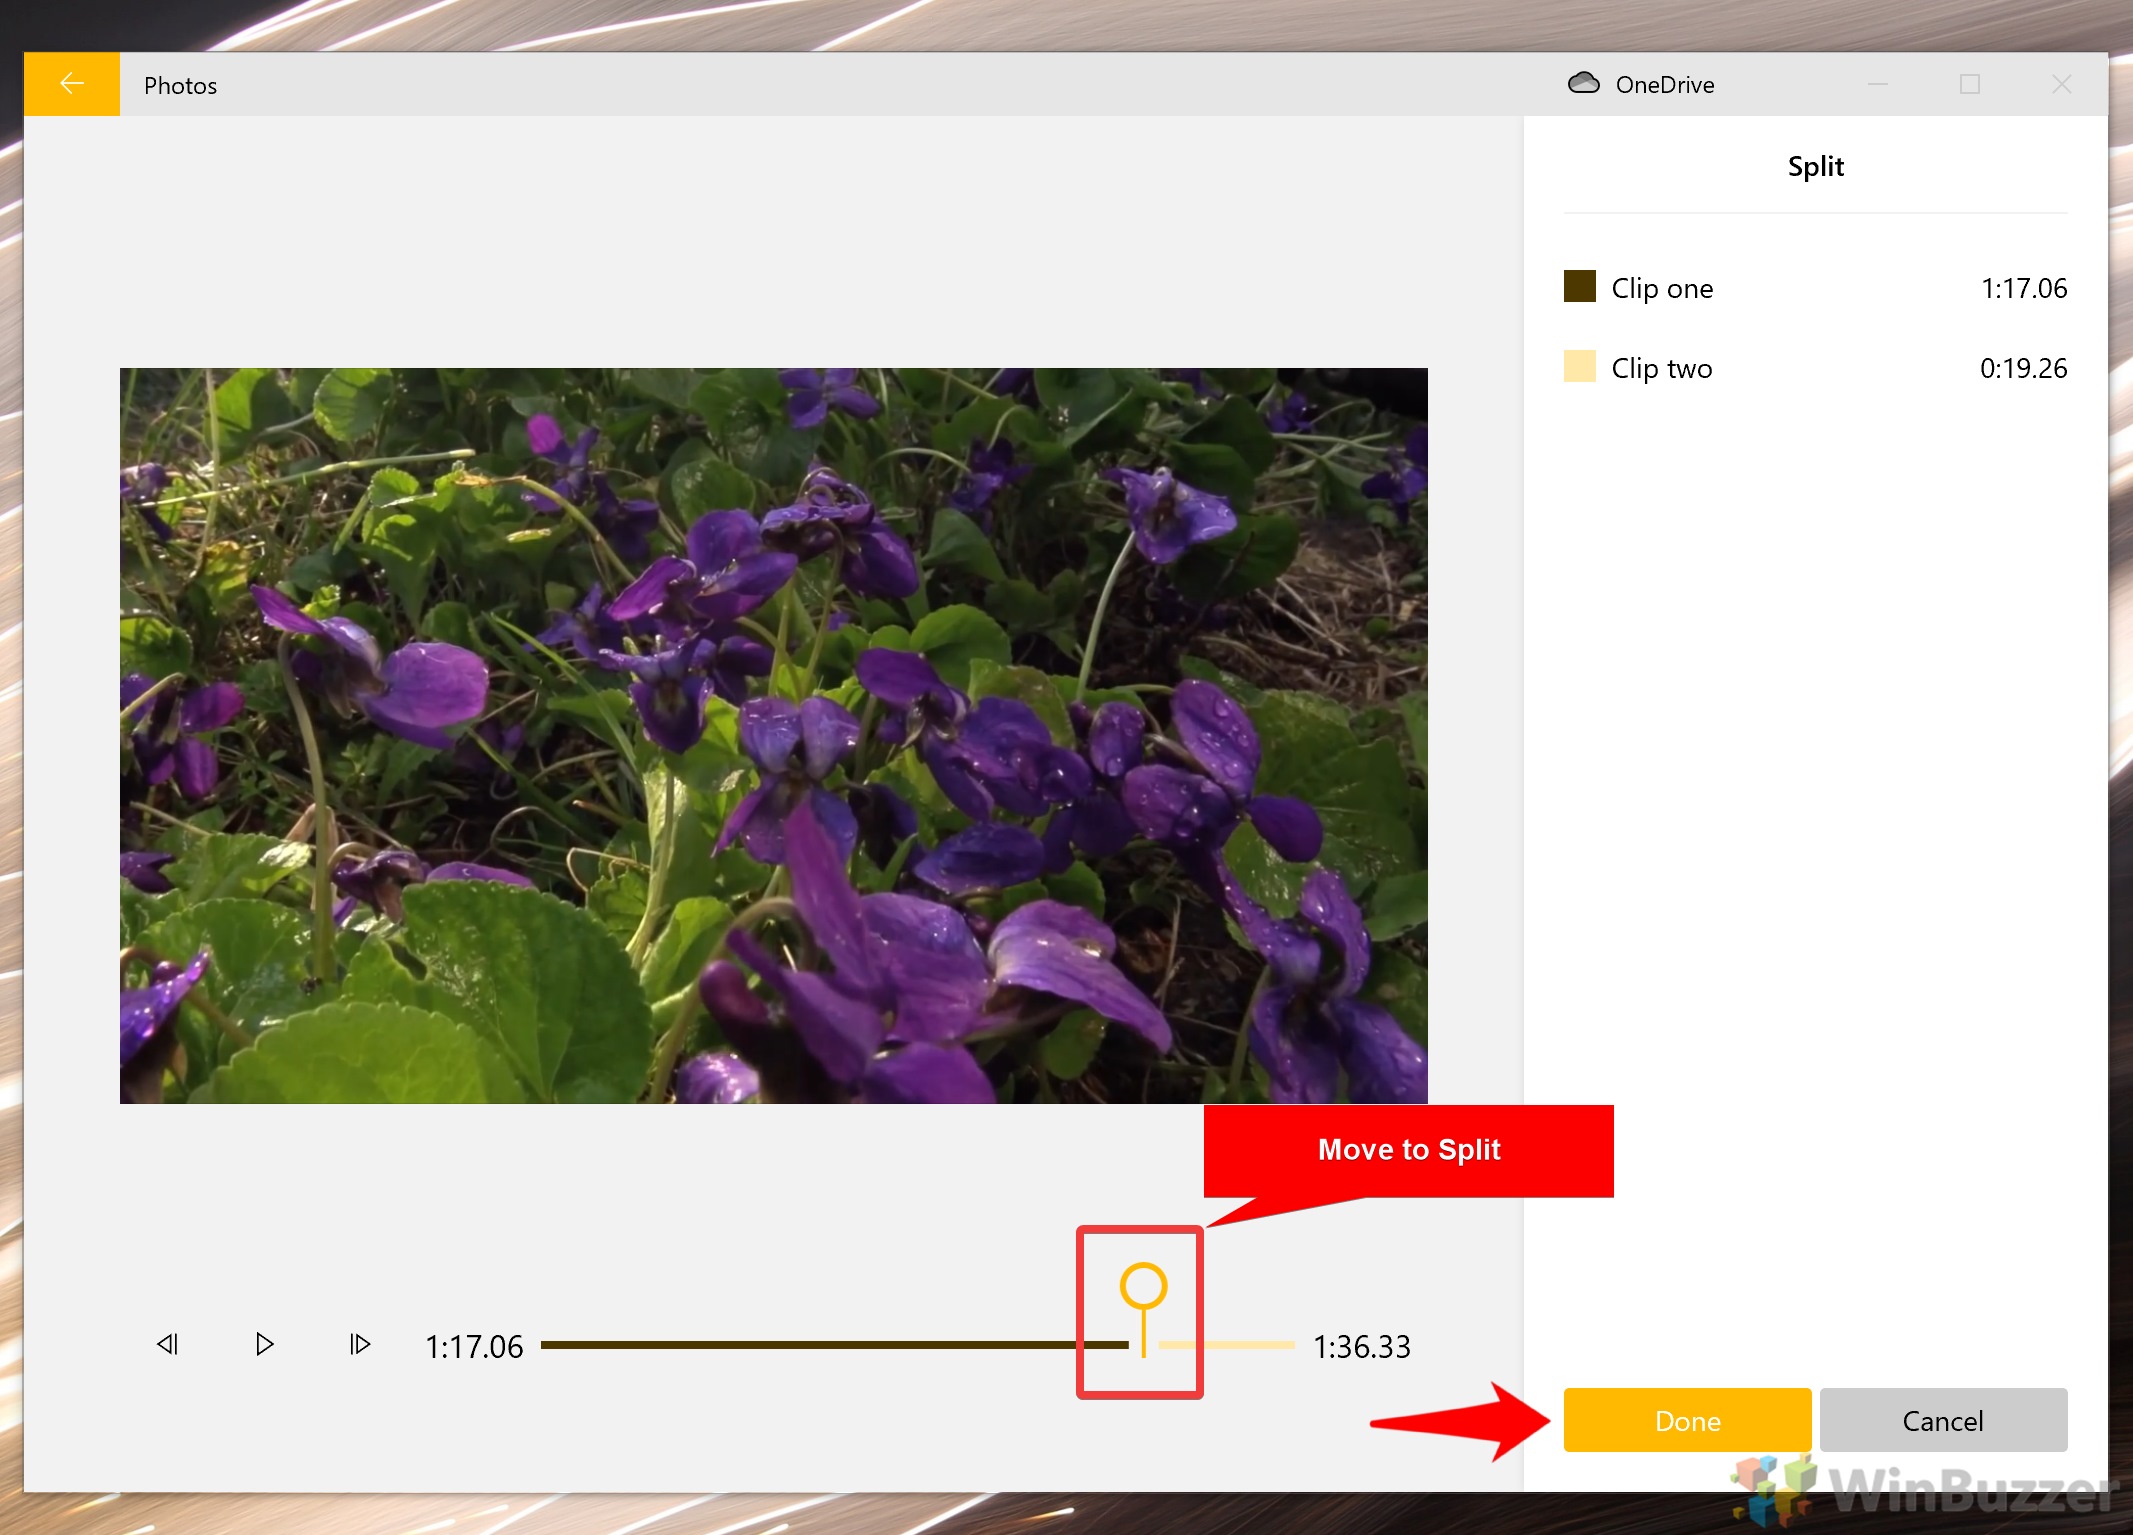
- How to add text to a video in Windows 10
We can also add text to our video. Start this process by selecting the clip in your timeline and pressing the “Text” button, which should be just above it.
- Select a font and type your message
At the bottom of your screen, move the yellow labels to the portion of your video you’d like to add text to. Then, in the right-side panel, type your text. Look through the “Animated text style” list until you find one you like and click on it.
Finally, select where on the video you’d like the text to appear via the “Layout” menu and press “Done”.
- How to add motion (camera movement) to your video
There are no Windows 10 video editor transitions, but you can combine these motion effects for a dynamic look. Press the “Motion” button above your timeline to open the editing menu.
- Choose your motion effect
Under the “Motion” side panel, click an effect that looks interesting and press the play button on your video to preview it. If you’re happy with the results, click “Done”.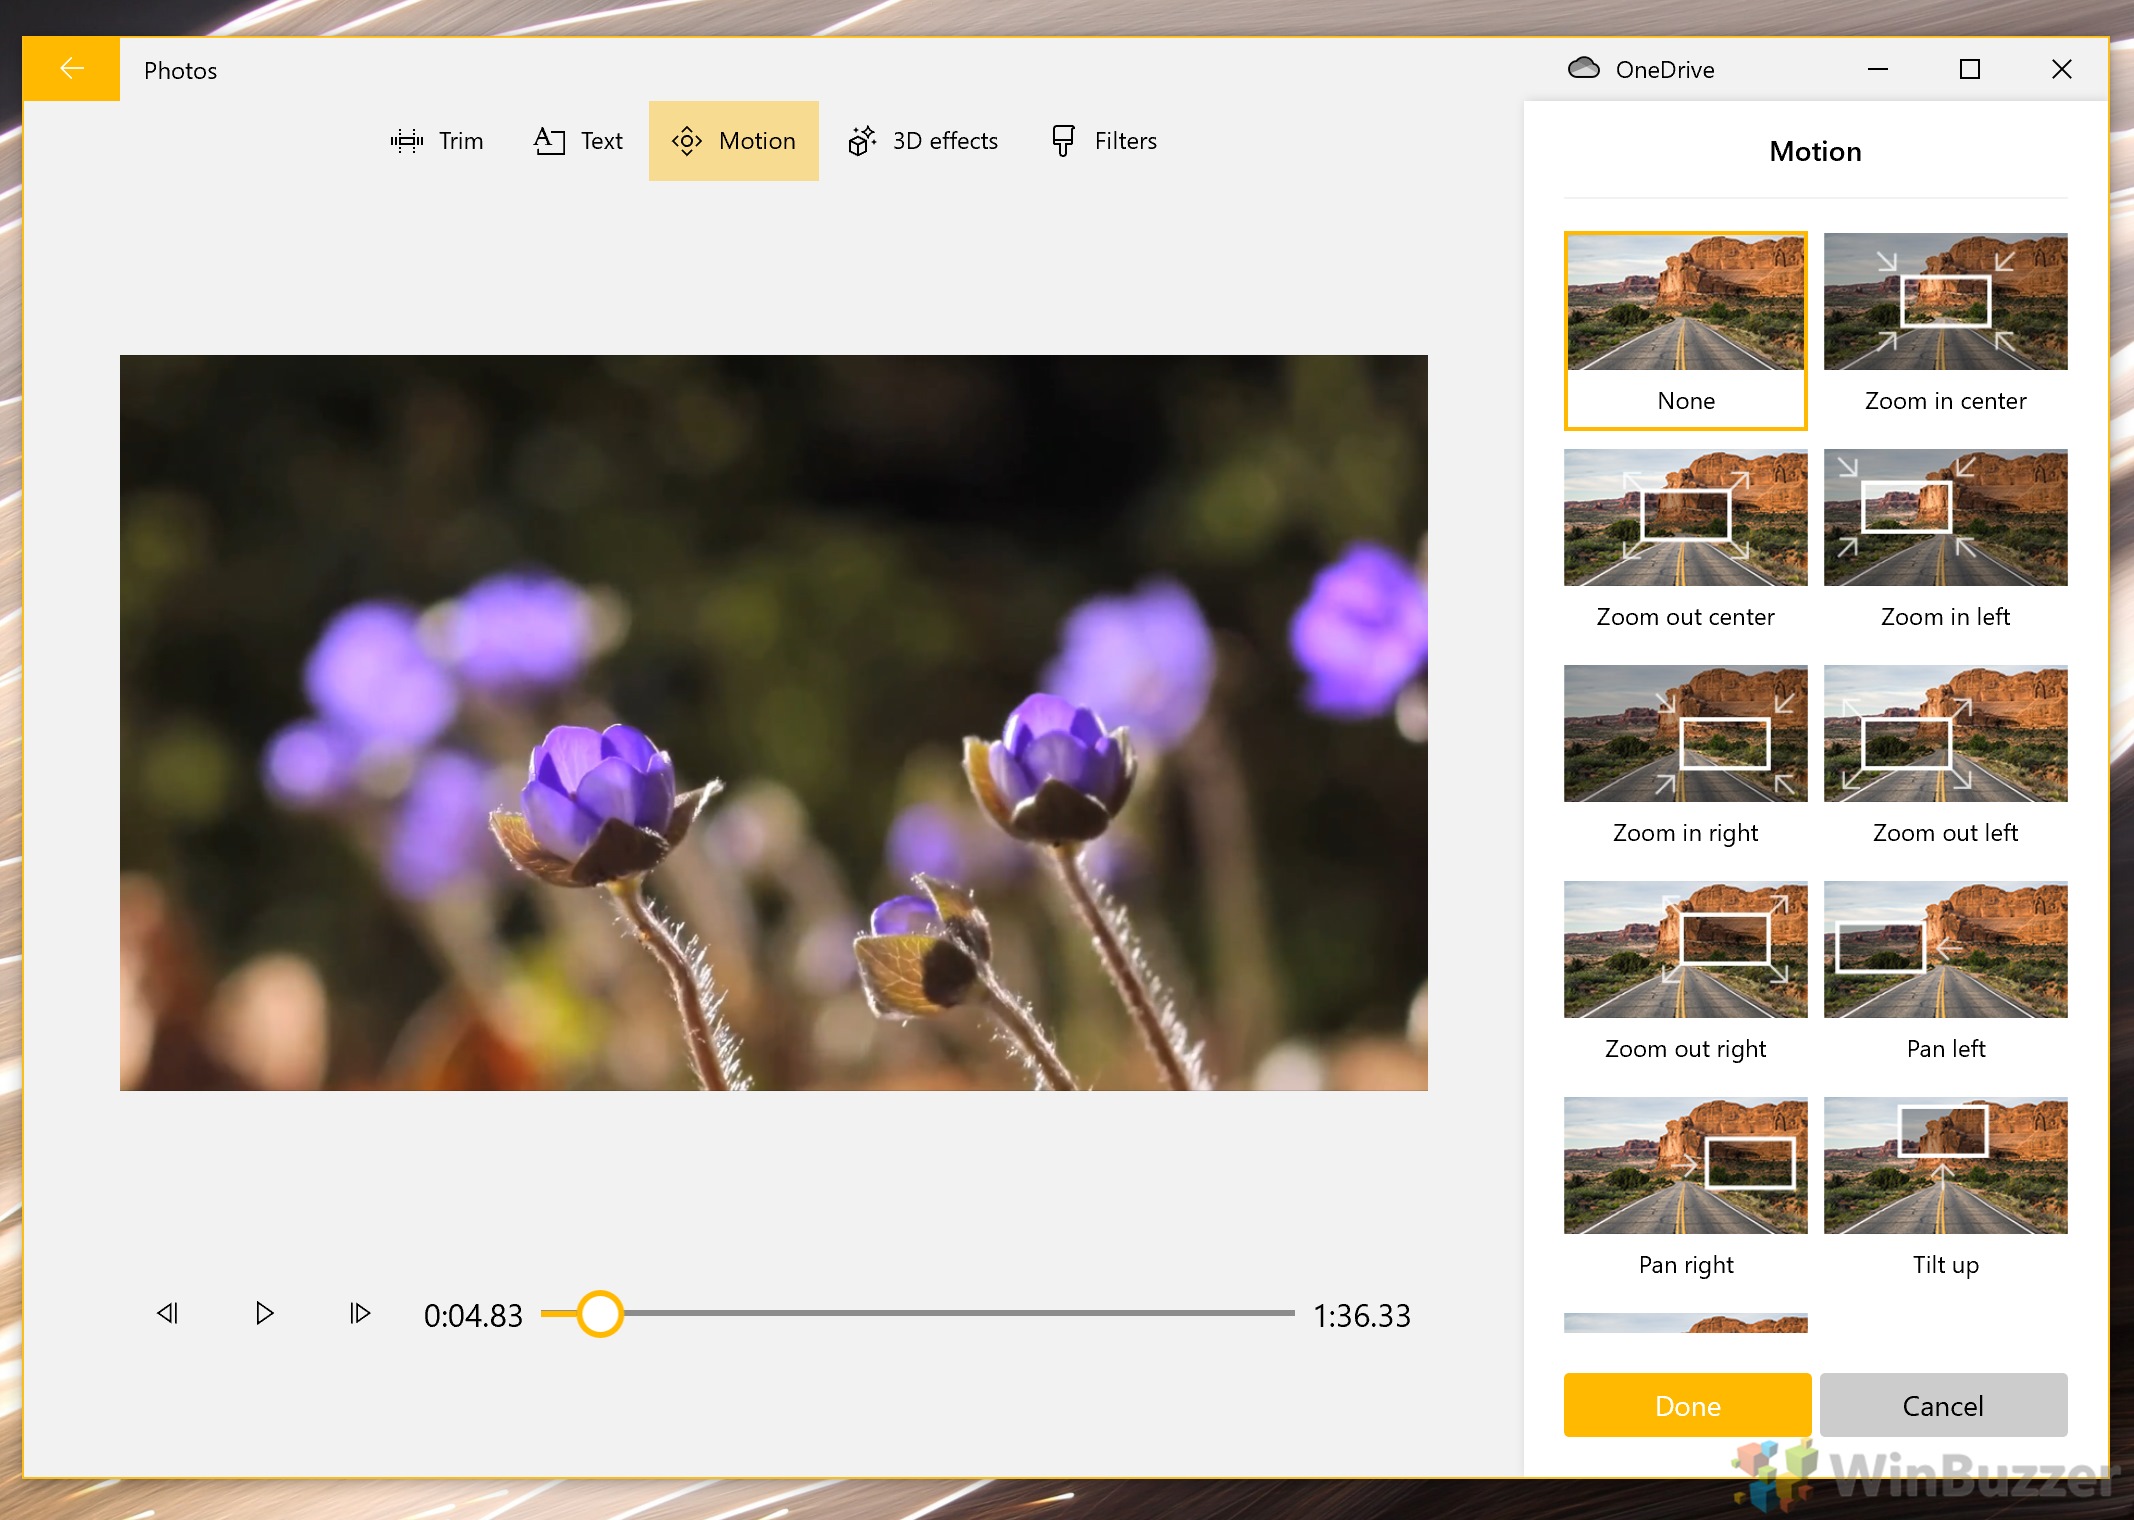
- How to add 3D effects in the Windows Media Editor
3D effects and items add a bit of fun to your video and can even look okay professionally if you use them in moderation. You have the choice of the aurora, leaves, balloons, snow, and much more. Some of the effects apply to the entire video, while others let you choose where to place them.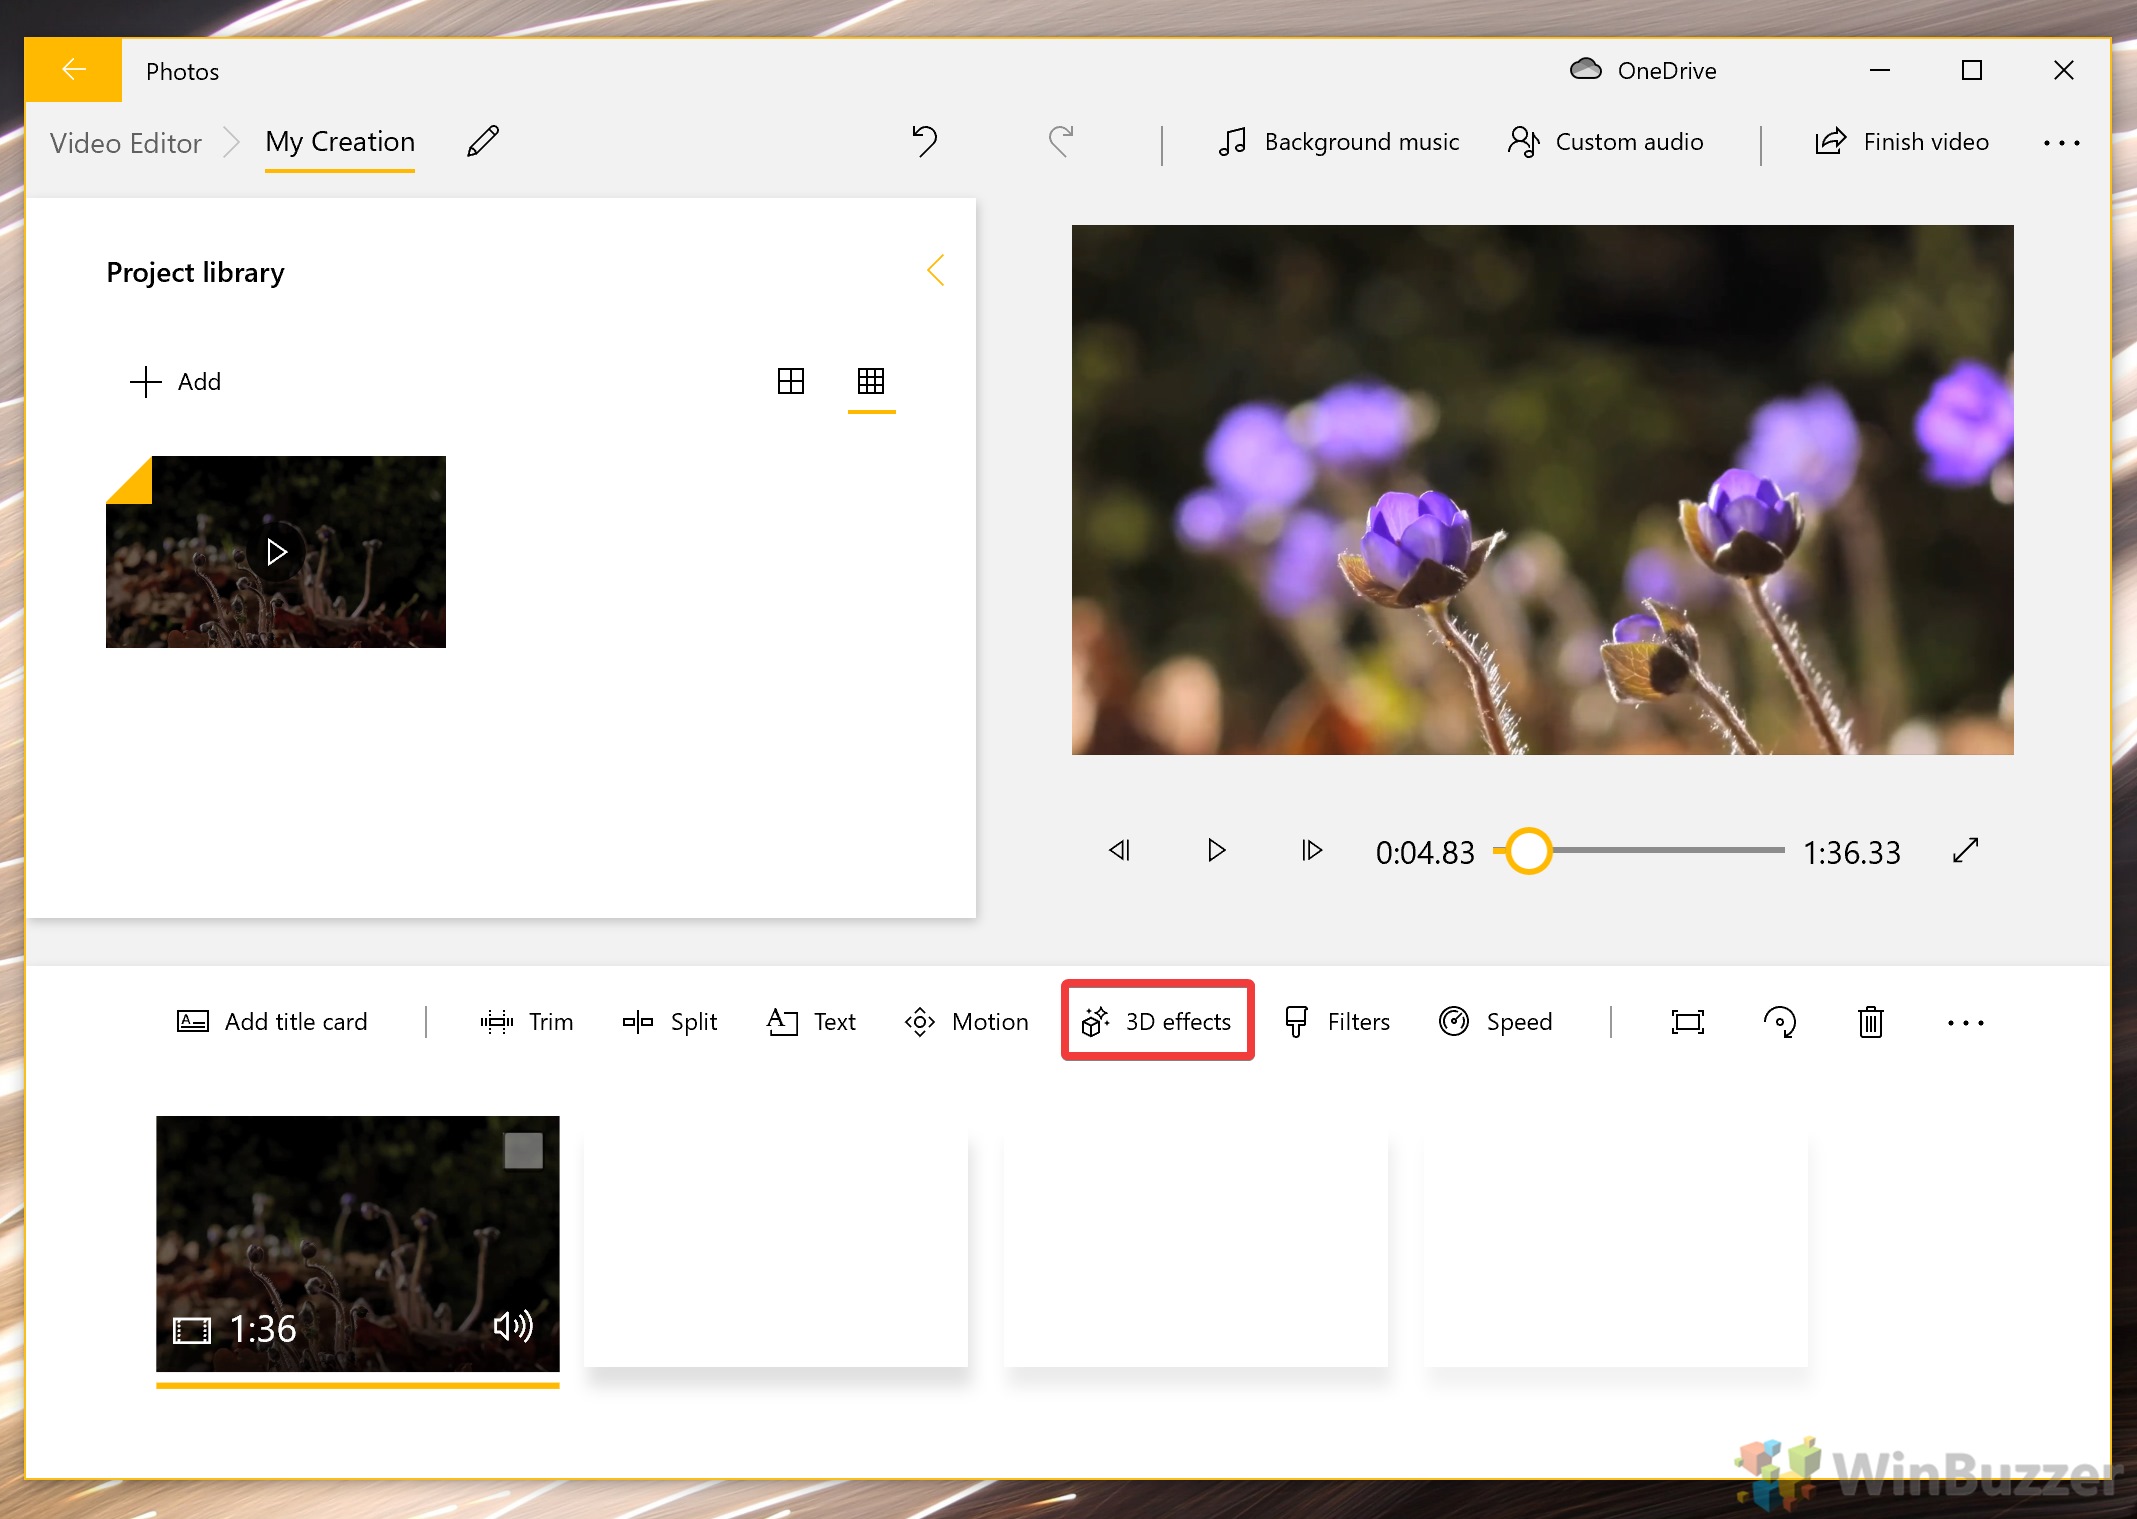
- Select your effect
In the “Effects” sidebar, scroll down the list or search until you find one you like the look of and click it. You can also click the “3D library” button to add models from Paint 3D if you wish.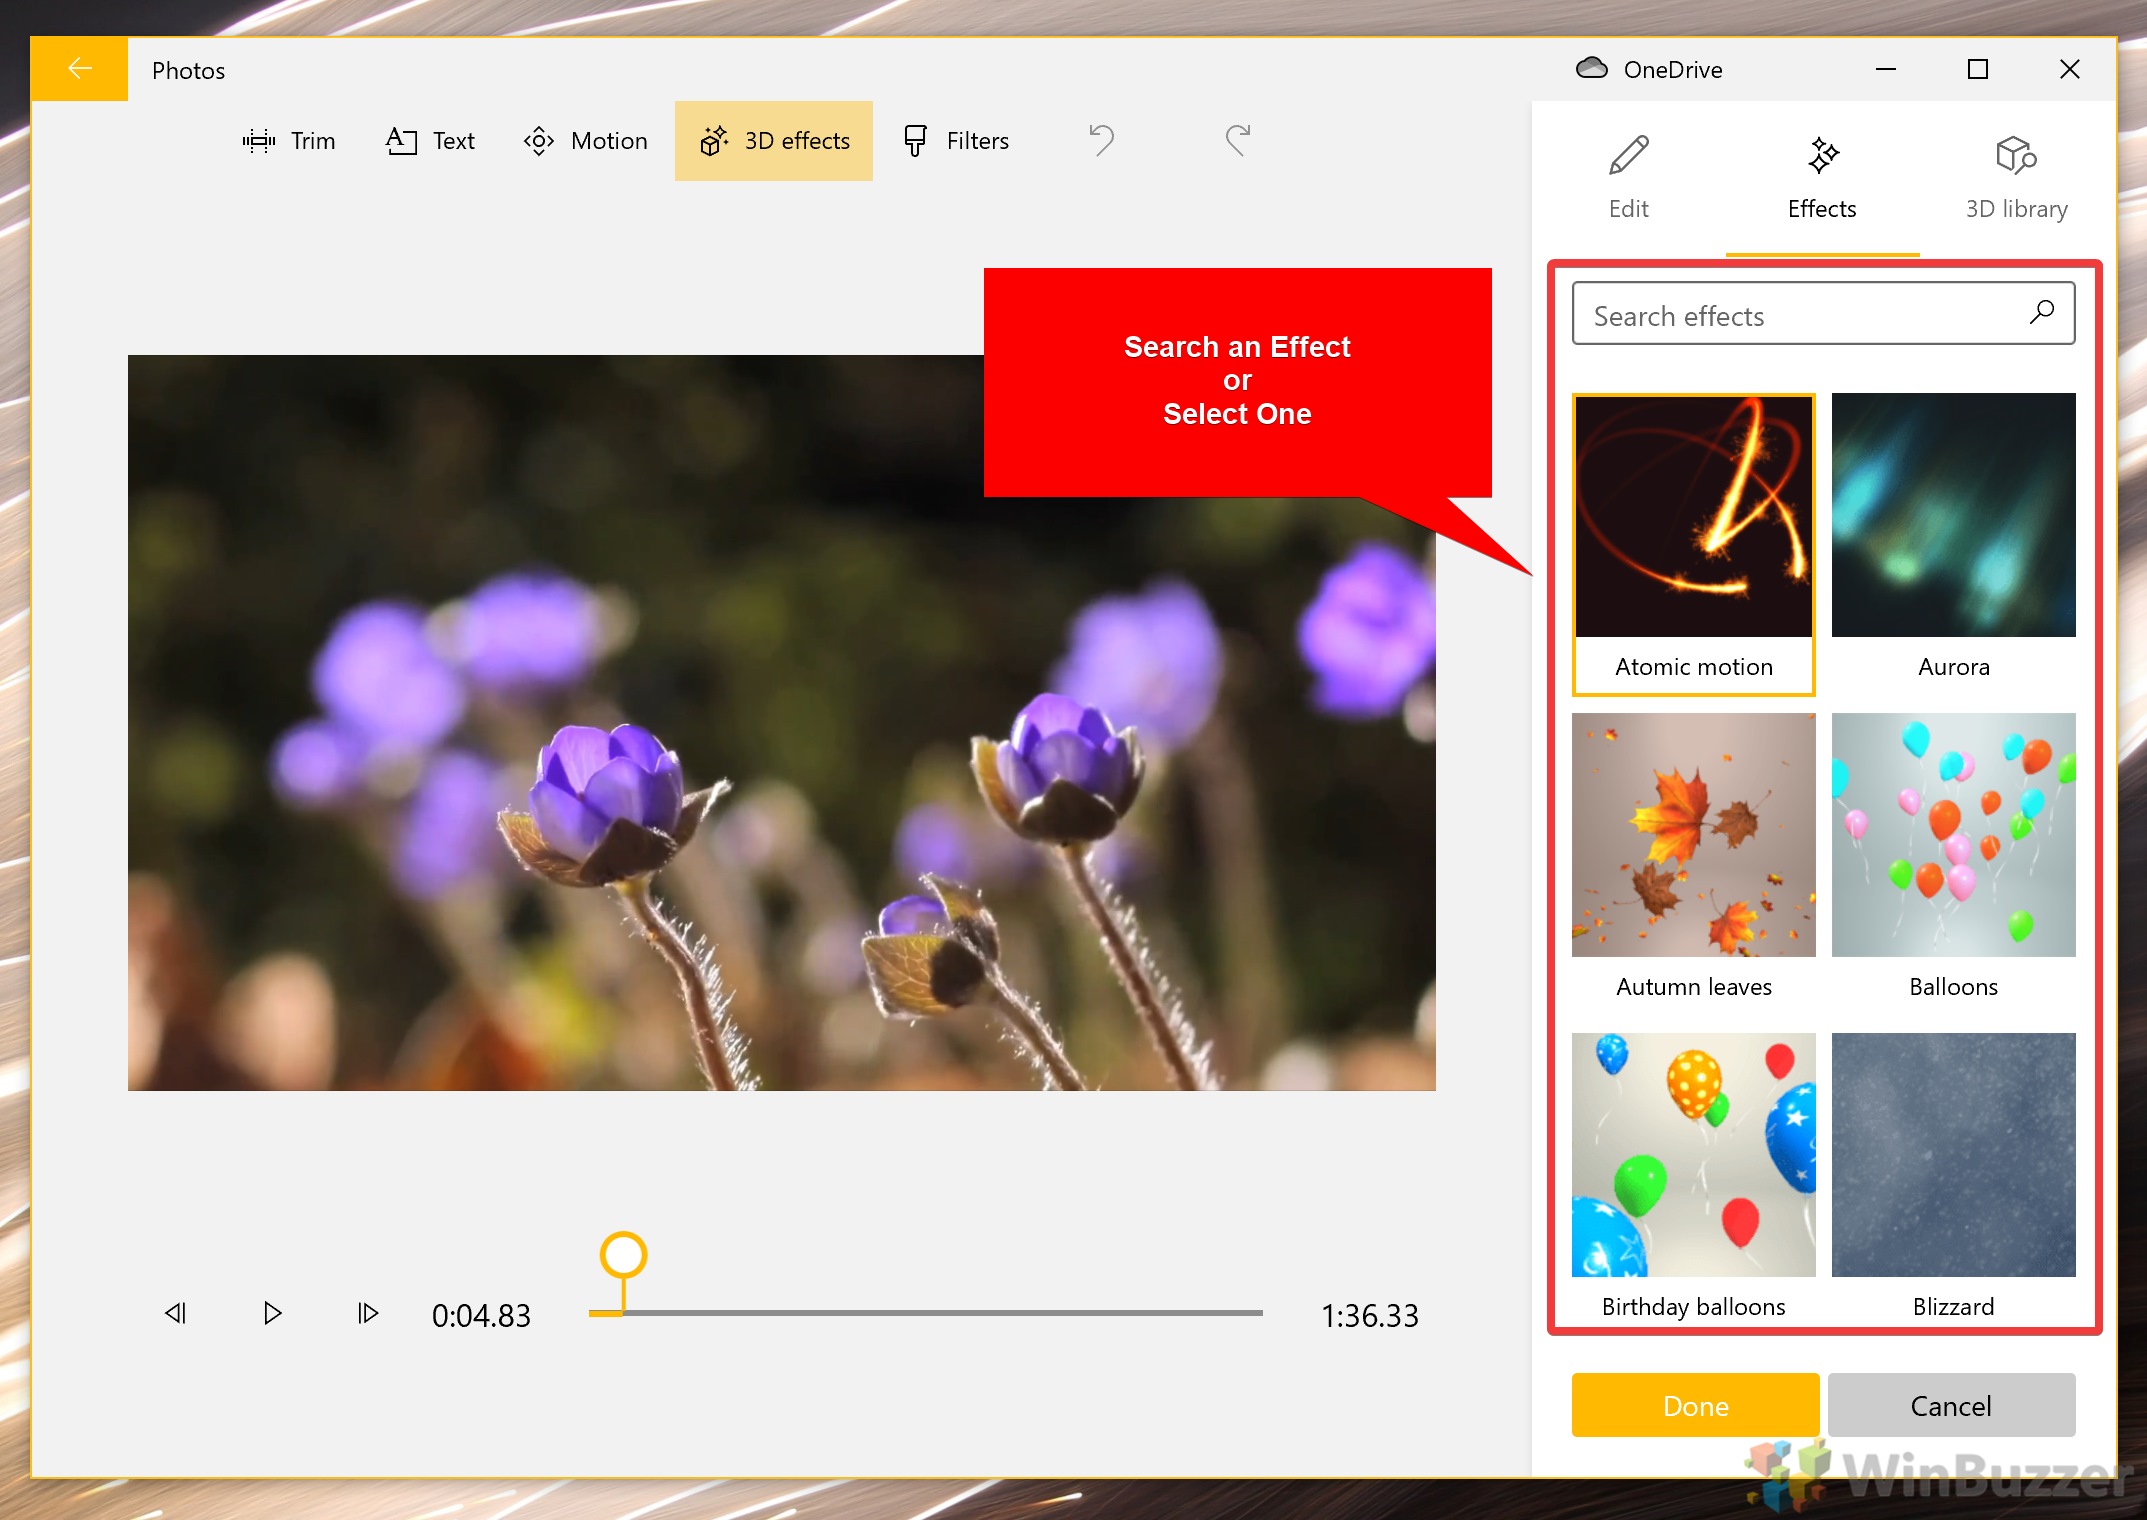
- Adjust the 3D effect volume and duration
Drag the slider in the playback bar to choose how long the effect should last and change the volume slider to enhance or remove any audio effects that come with it. You can layer multiple effects on top of each other if you wish. Press “Done” when you’re finished to save the video.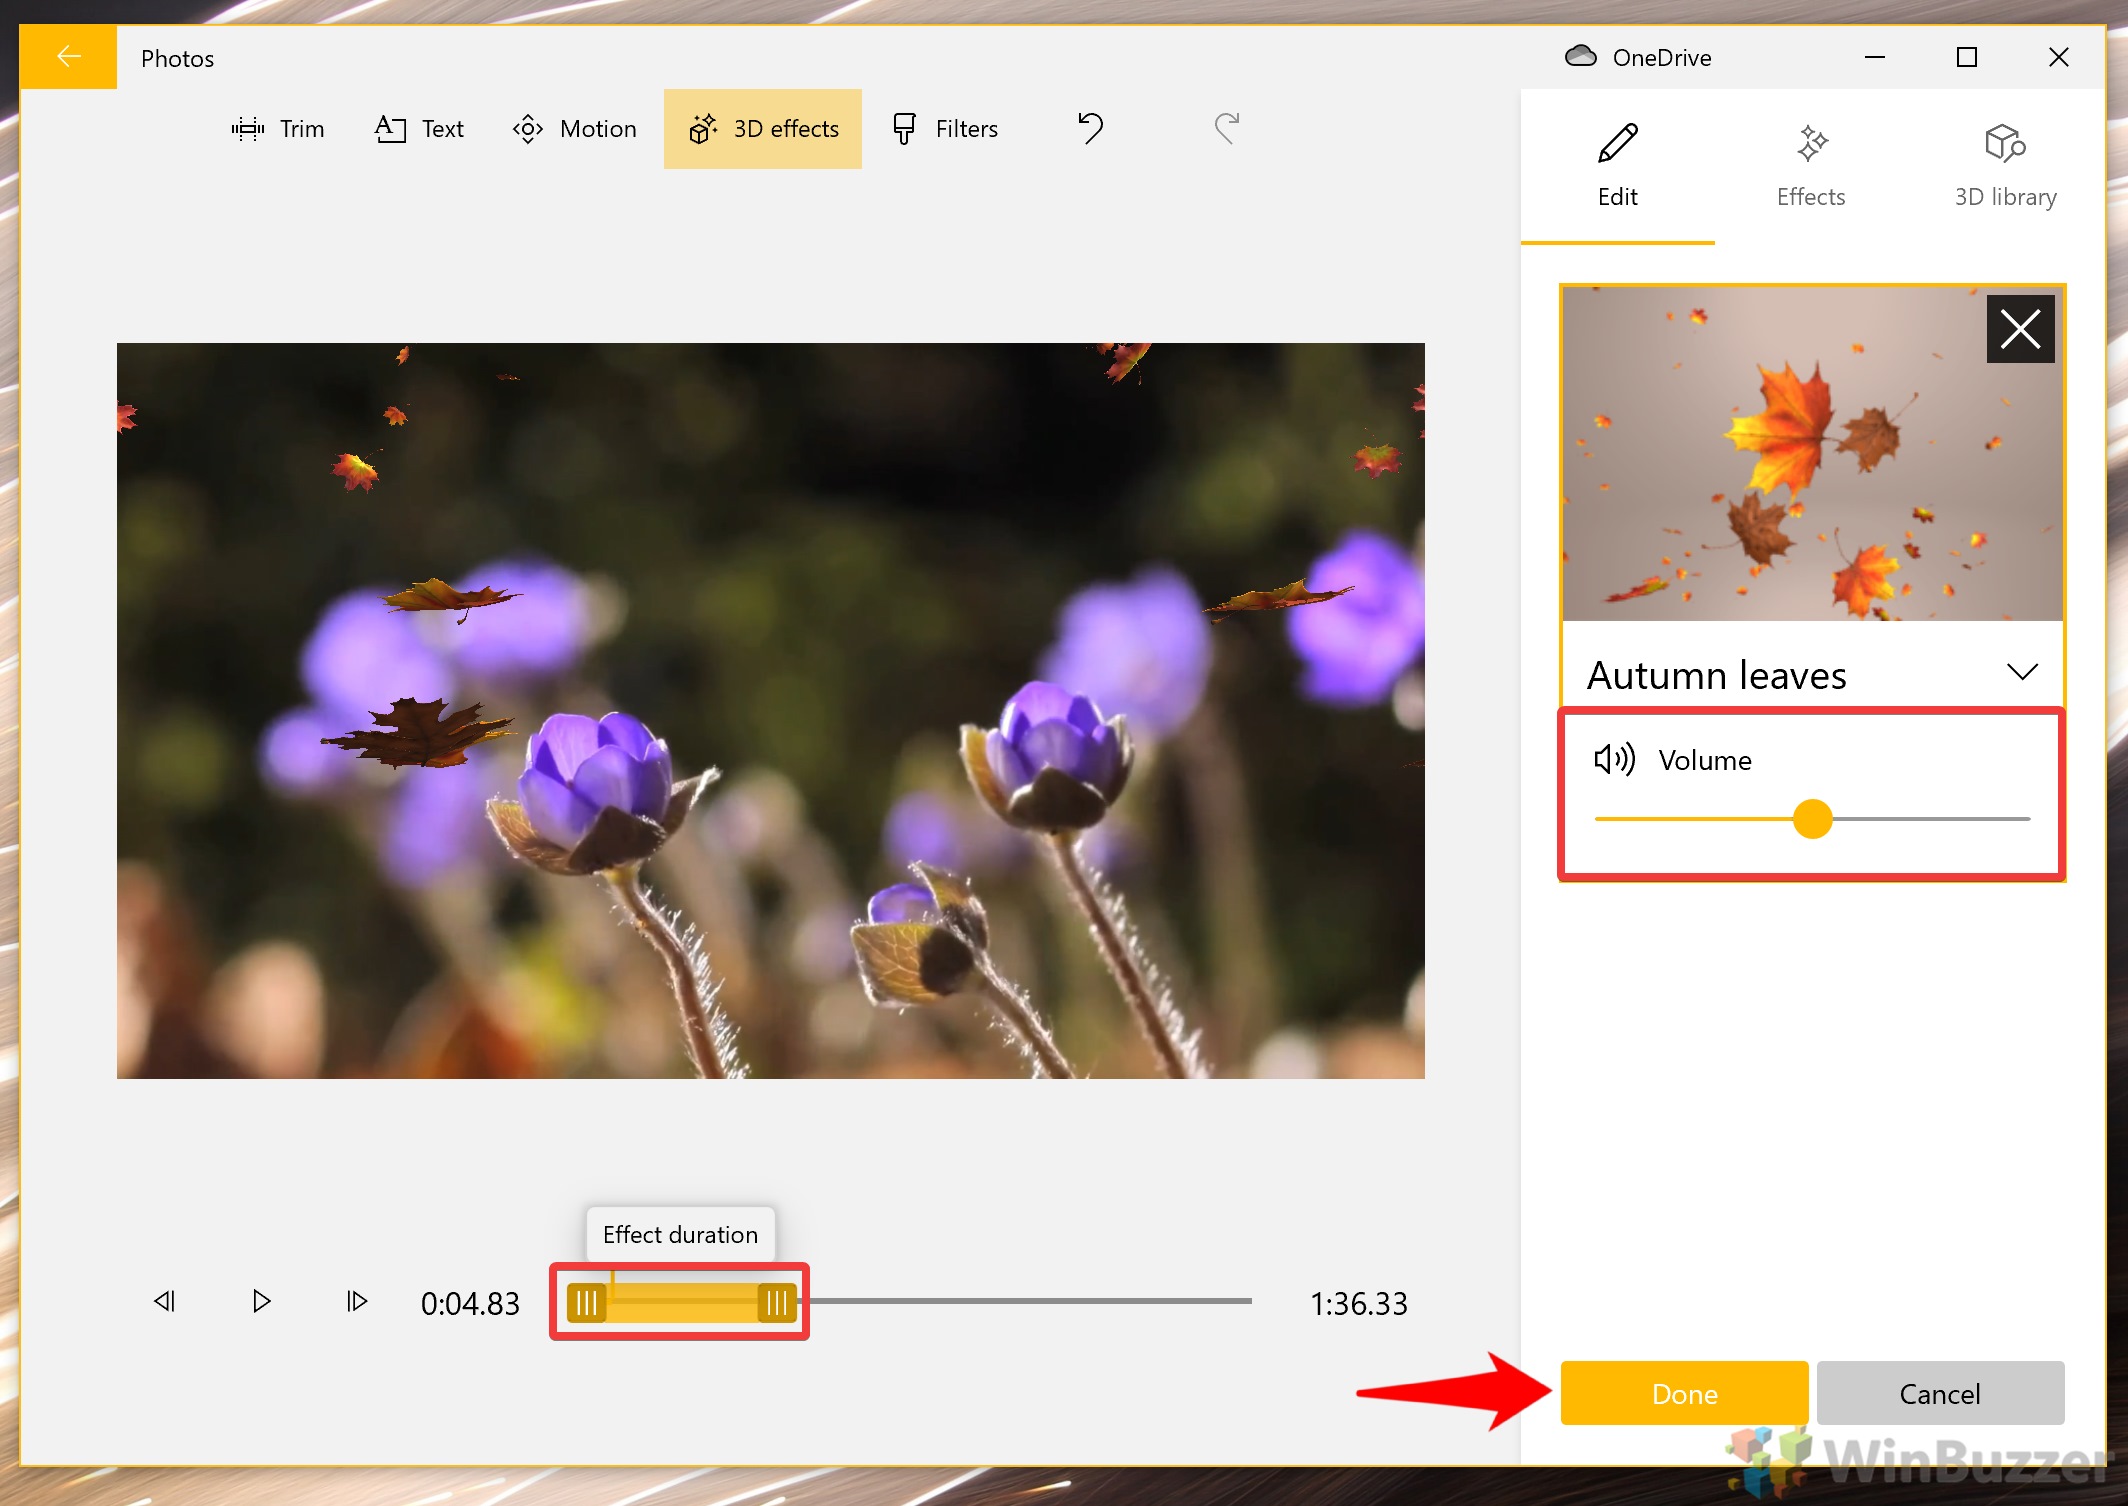
- How to add a filter to your video in Windows 10
Though Windows 10 doesn’t have dedicated color correction tools (you’ll have to download professional software for that), it does have quick fixes via its filters. You can find the bottom above your video timeline, in the left middle.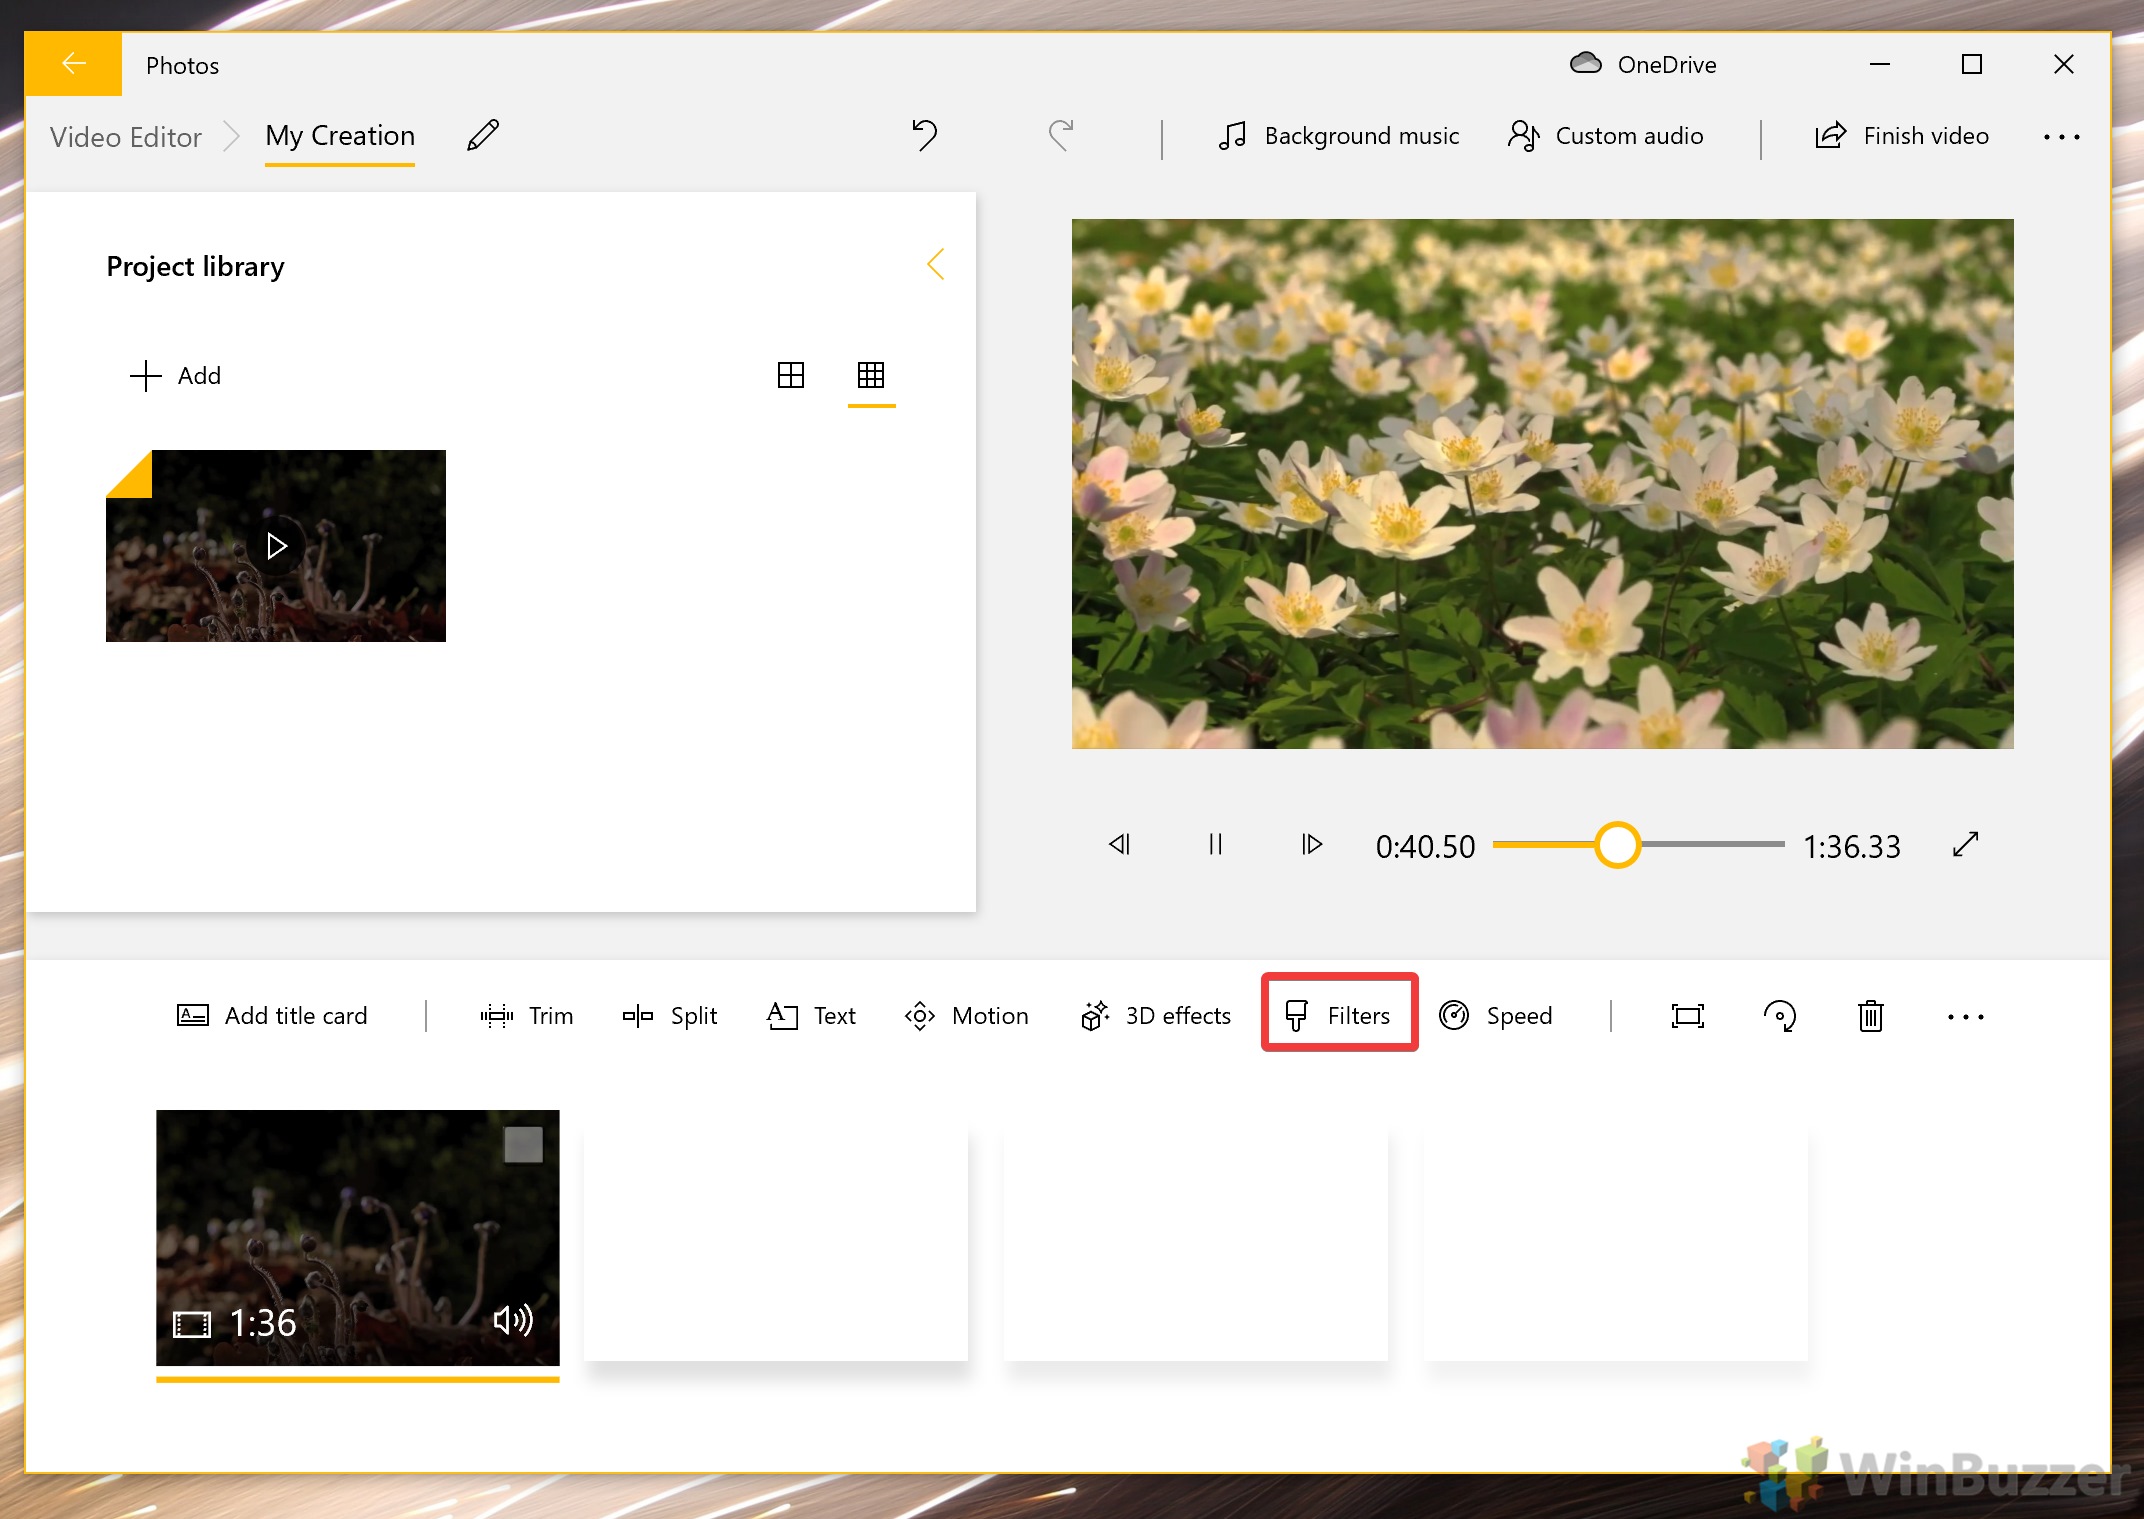
- Choose a video filter
Select a filter from the right sidebar to preview it. I quite like the Classic filter for some added contrast without being over-zealous. Click “Done” when you’re happy.
- How to speed up or slow down a video with the Microsoft Photos video editor
We already covered slow motion, but what if you want to change the speed of a clip that’s part of a larger project. For that, you can press the “Speed” button above the timeline. Then, just drag the slider towards “Slow” or “Fast” to suit your preference.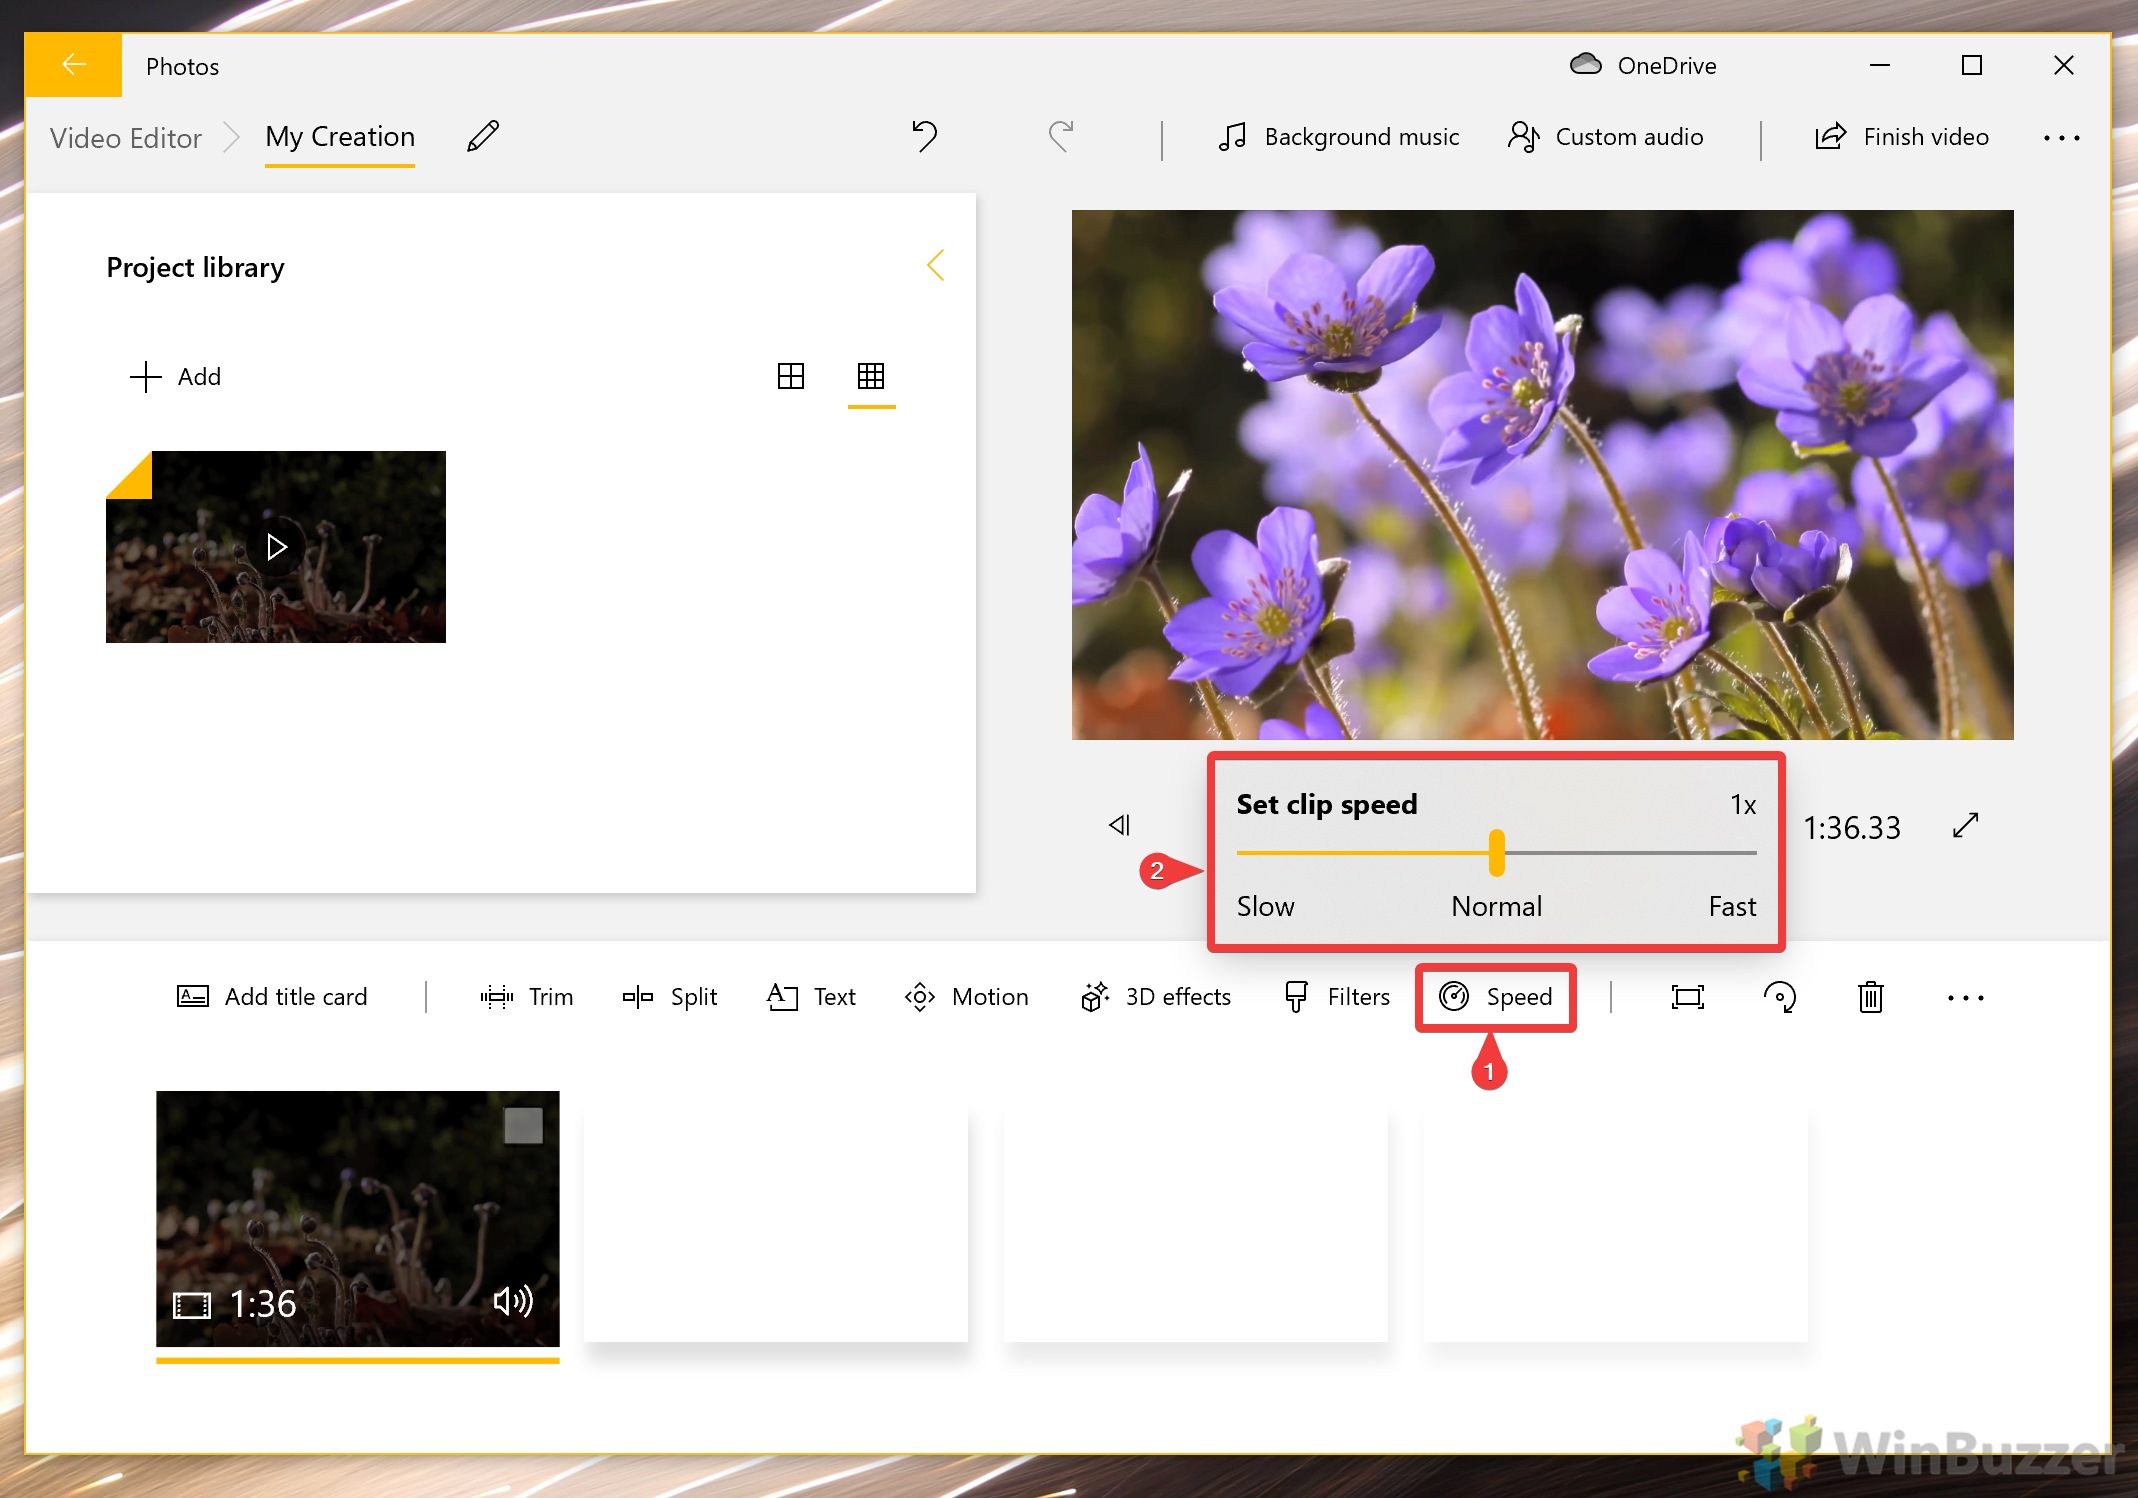
- How to resize a video in Windows 10
Click the full screen button next to Speed and select “Remove black bars” or “Shrink to fit” to get a nice, uninterrupted video.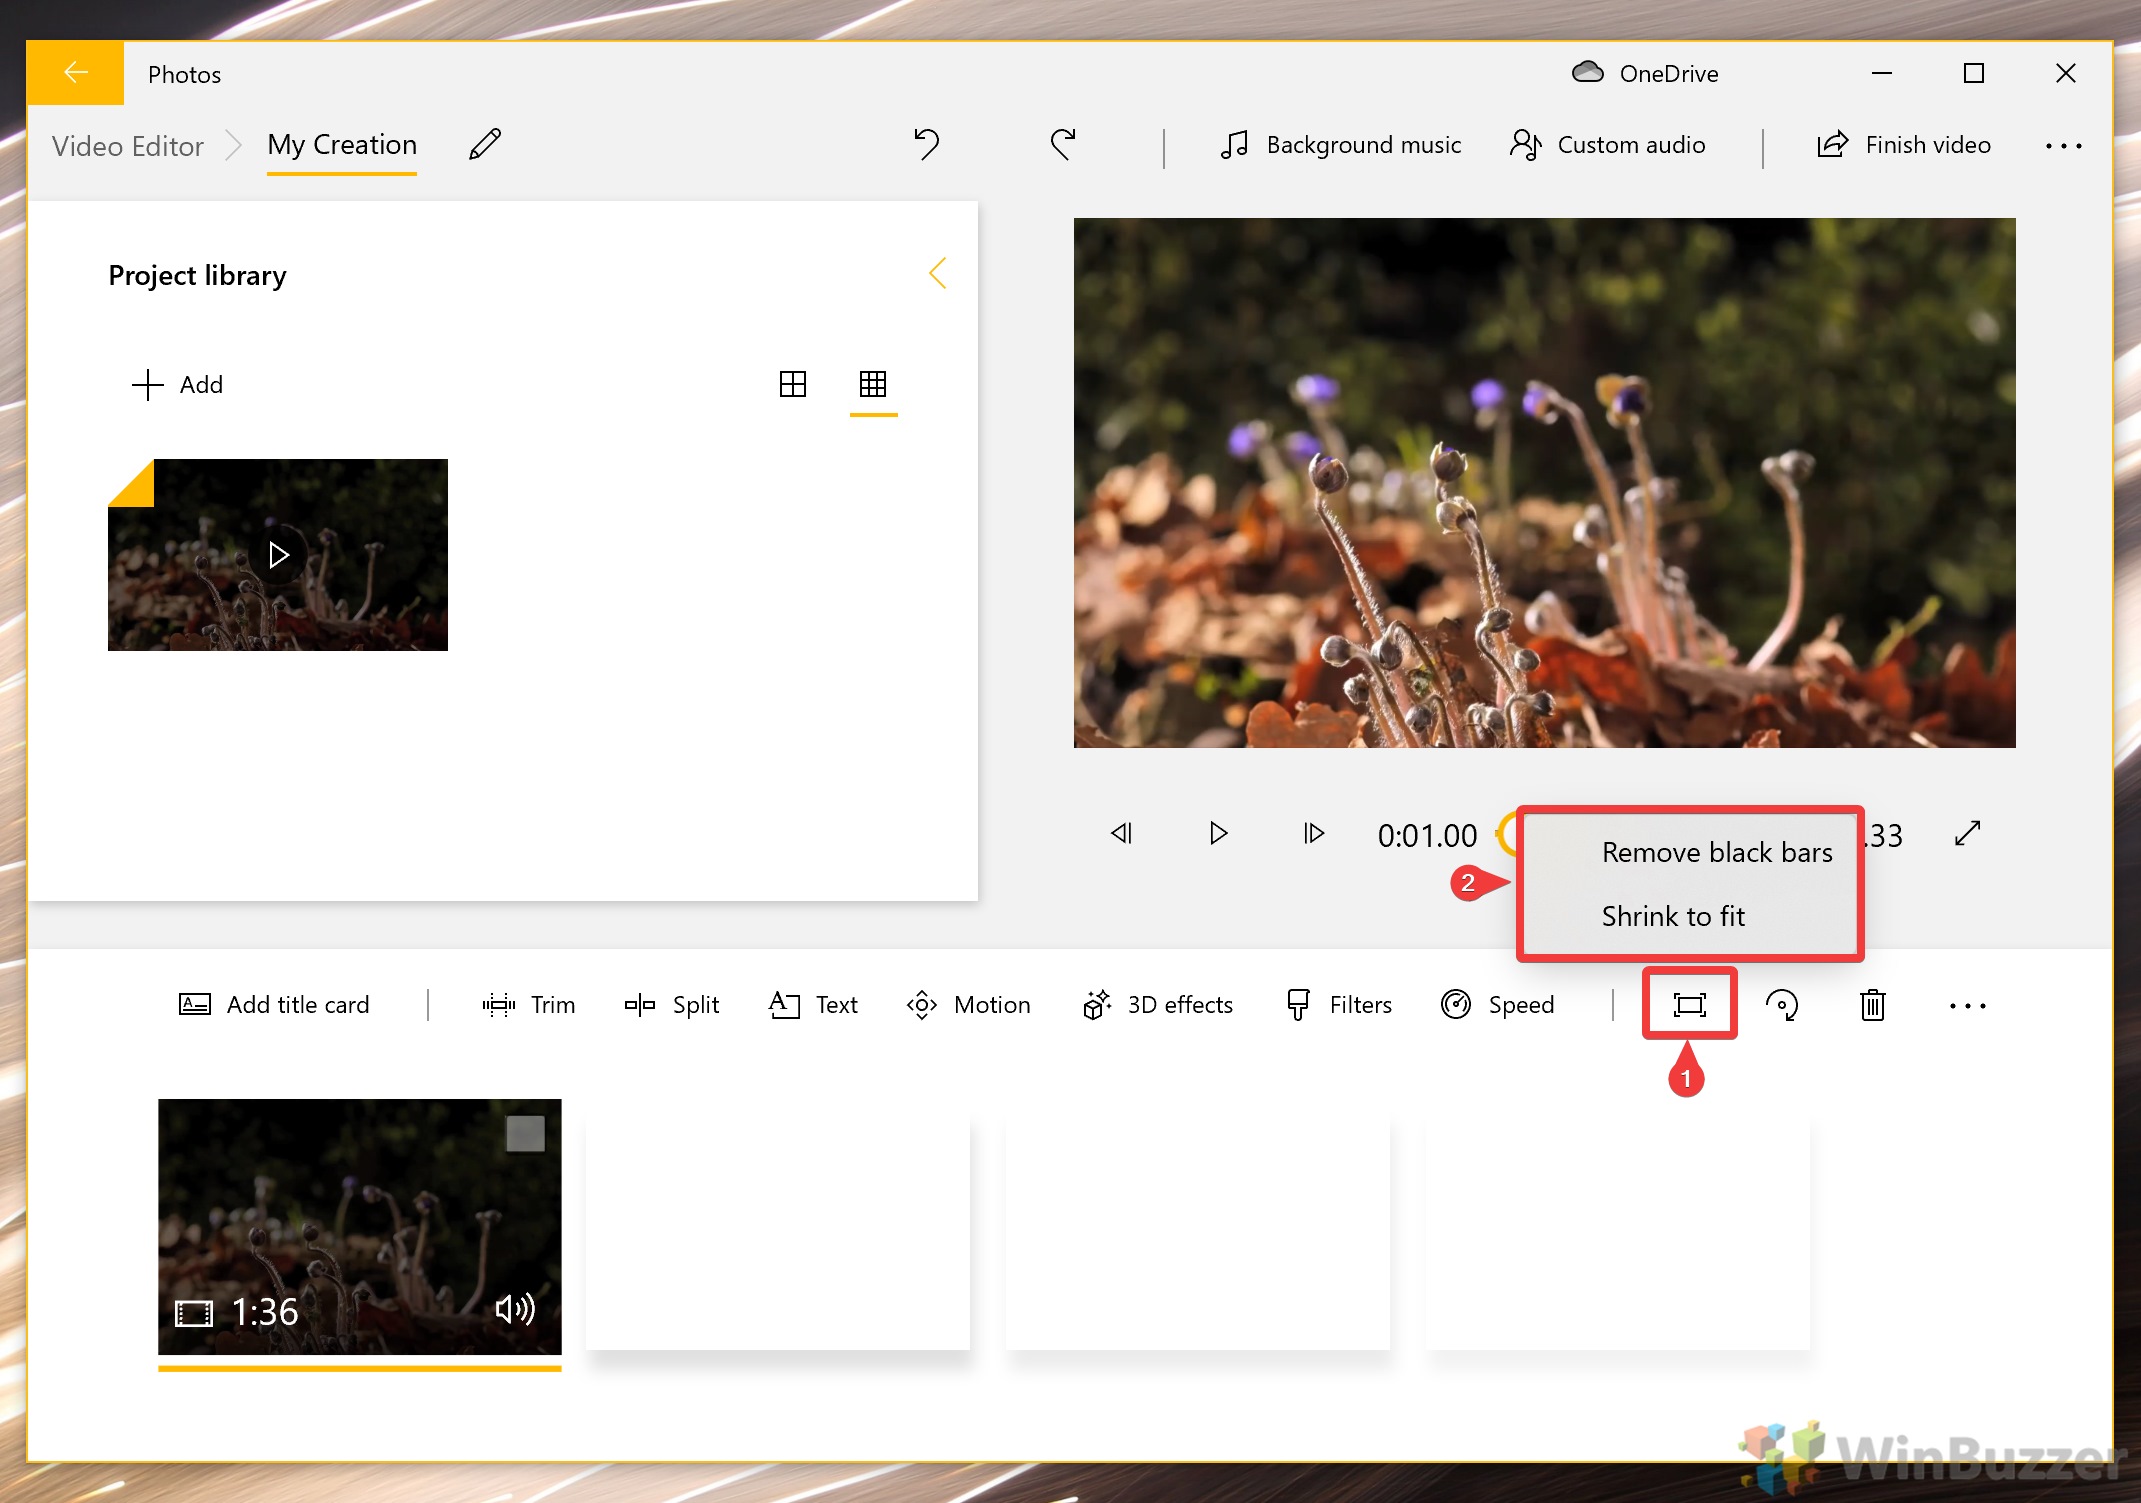
- How to rotate a video in the Windows 10 Photos app
To change the orientation of your video, add it to your timeline and press the rotate icon or Ctrl + R to turn it 90-degrees at a time.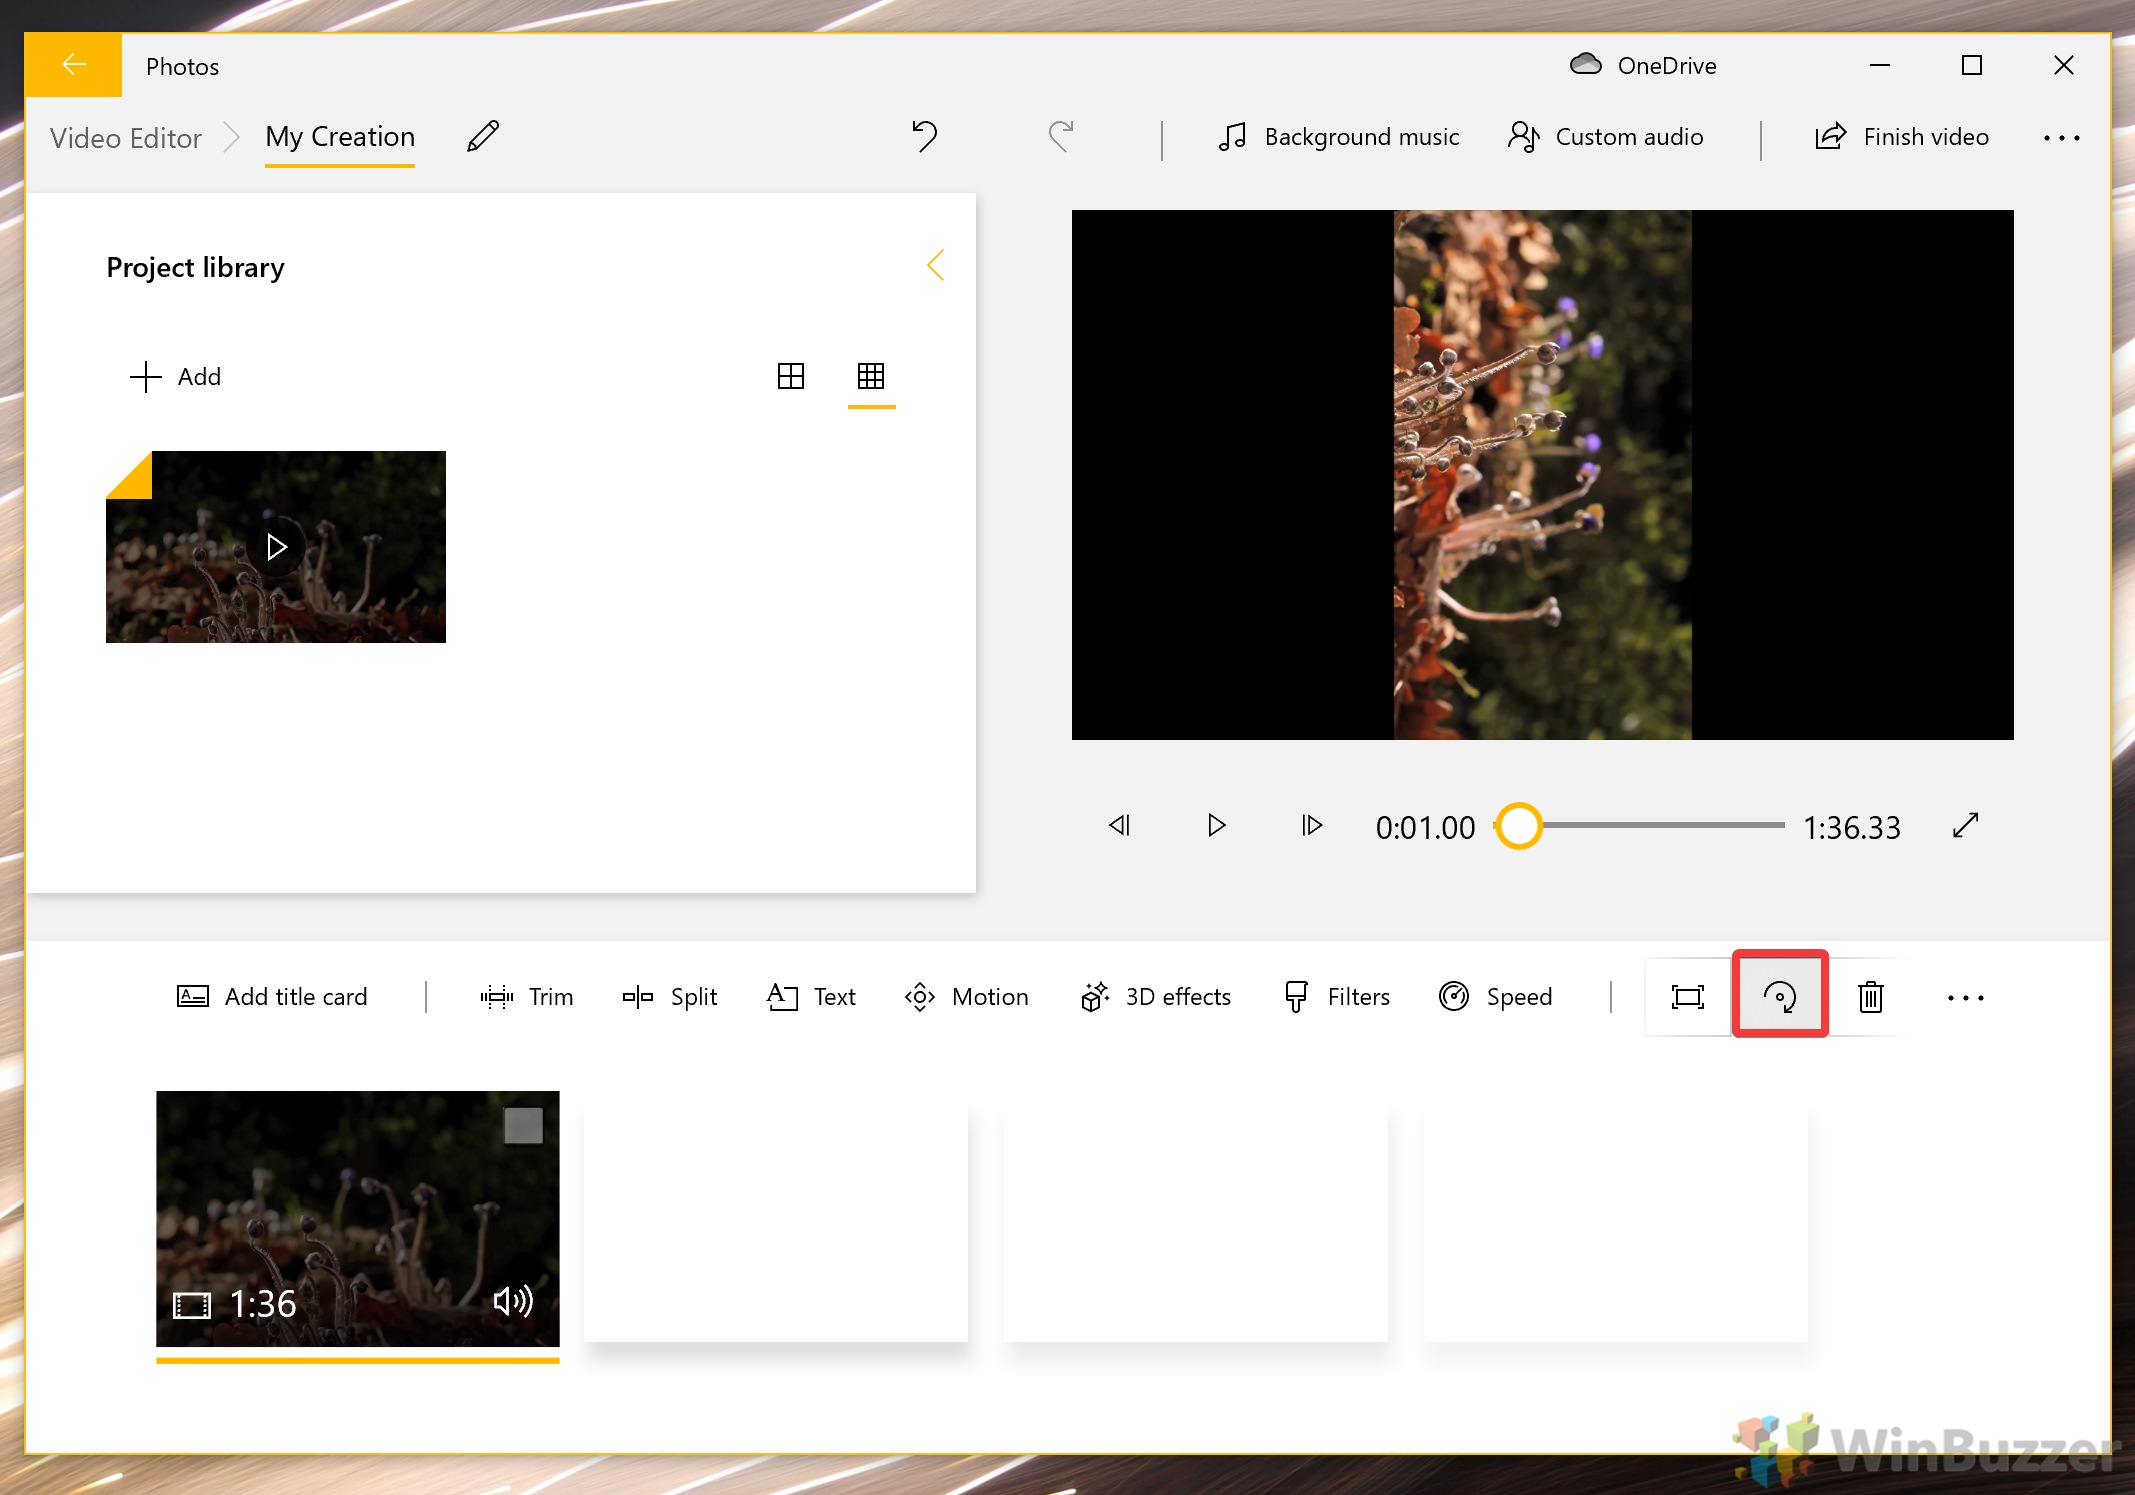
- How to remove a single clip from your timeline
You can delete a single clip from your timeline by clicking it and pressing the bin icon on the toolbar.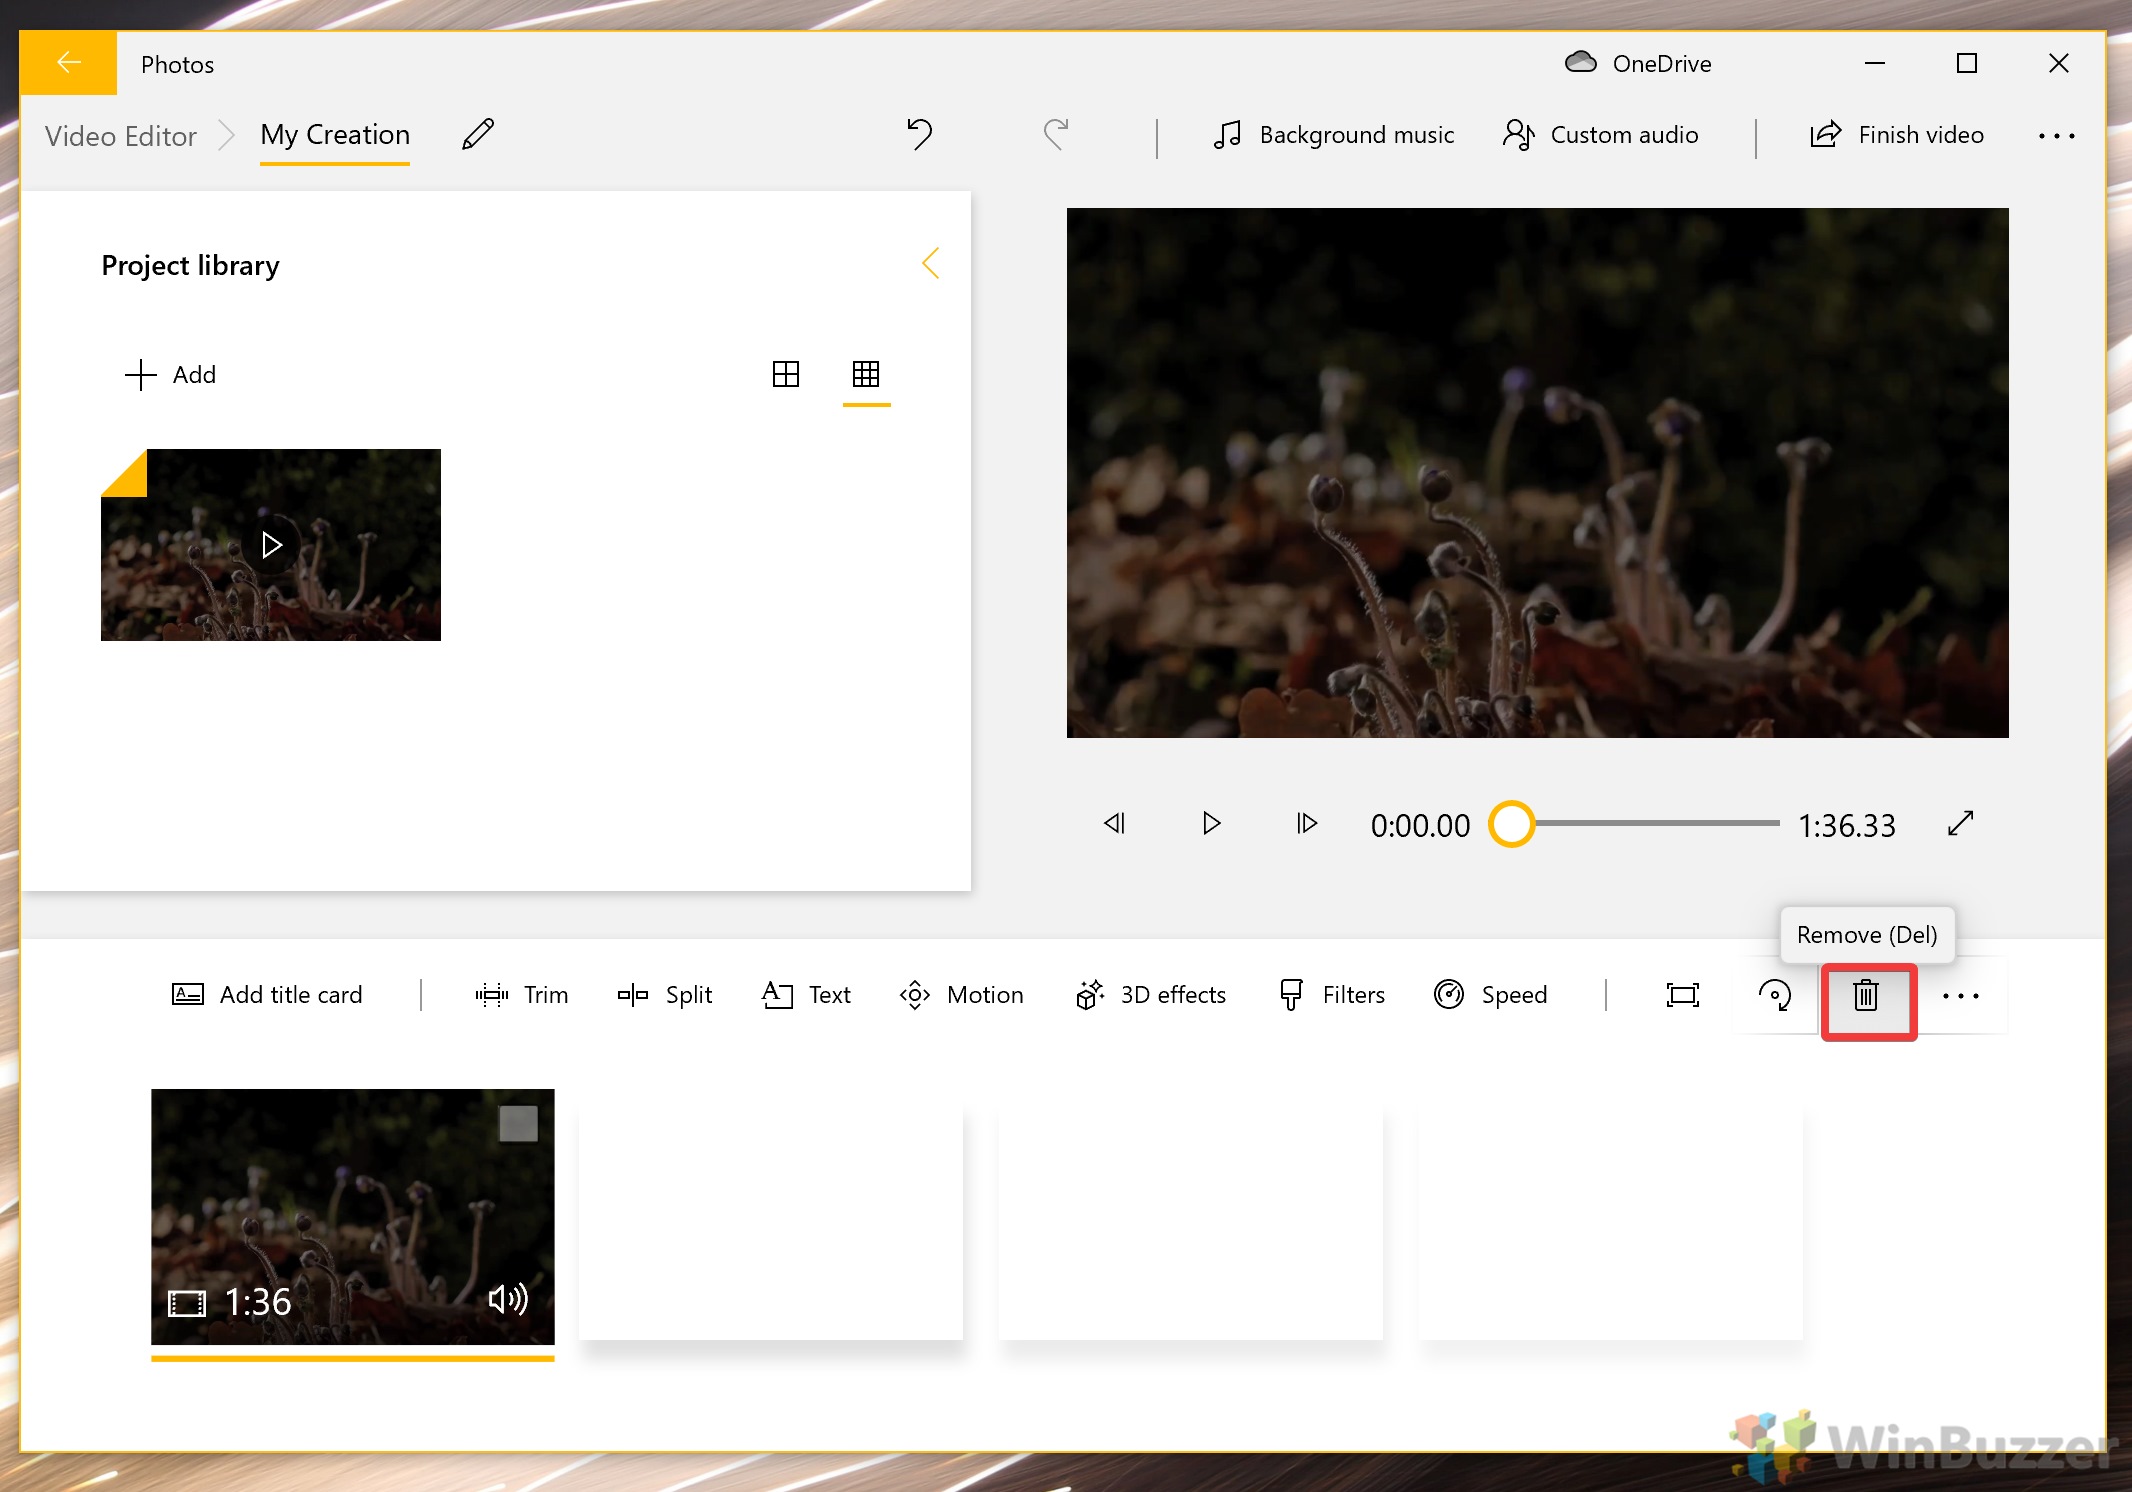
- How to remove all clips from the timeline
If you need to wipe the timeline entirely, instead press the three dots on the far-right of the toolbar and click “Remove all”.
- How to adjust audio volume in the Windows 10 editor
If you have a clips from various sources, there’s a good chance they’ll have different volumes. This can be jarring for the viewer, but thankfully you can easily remedy this by clicking the clip and moving the volume slider that appears on the right-hand side of its icon.
- How to add a theme to your video project
For a unified look you can make use of the Microsoft photos video editor’s in-built theme selection. To access them, click the three dots in the top-right corner of your window and click “Themes”.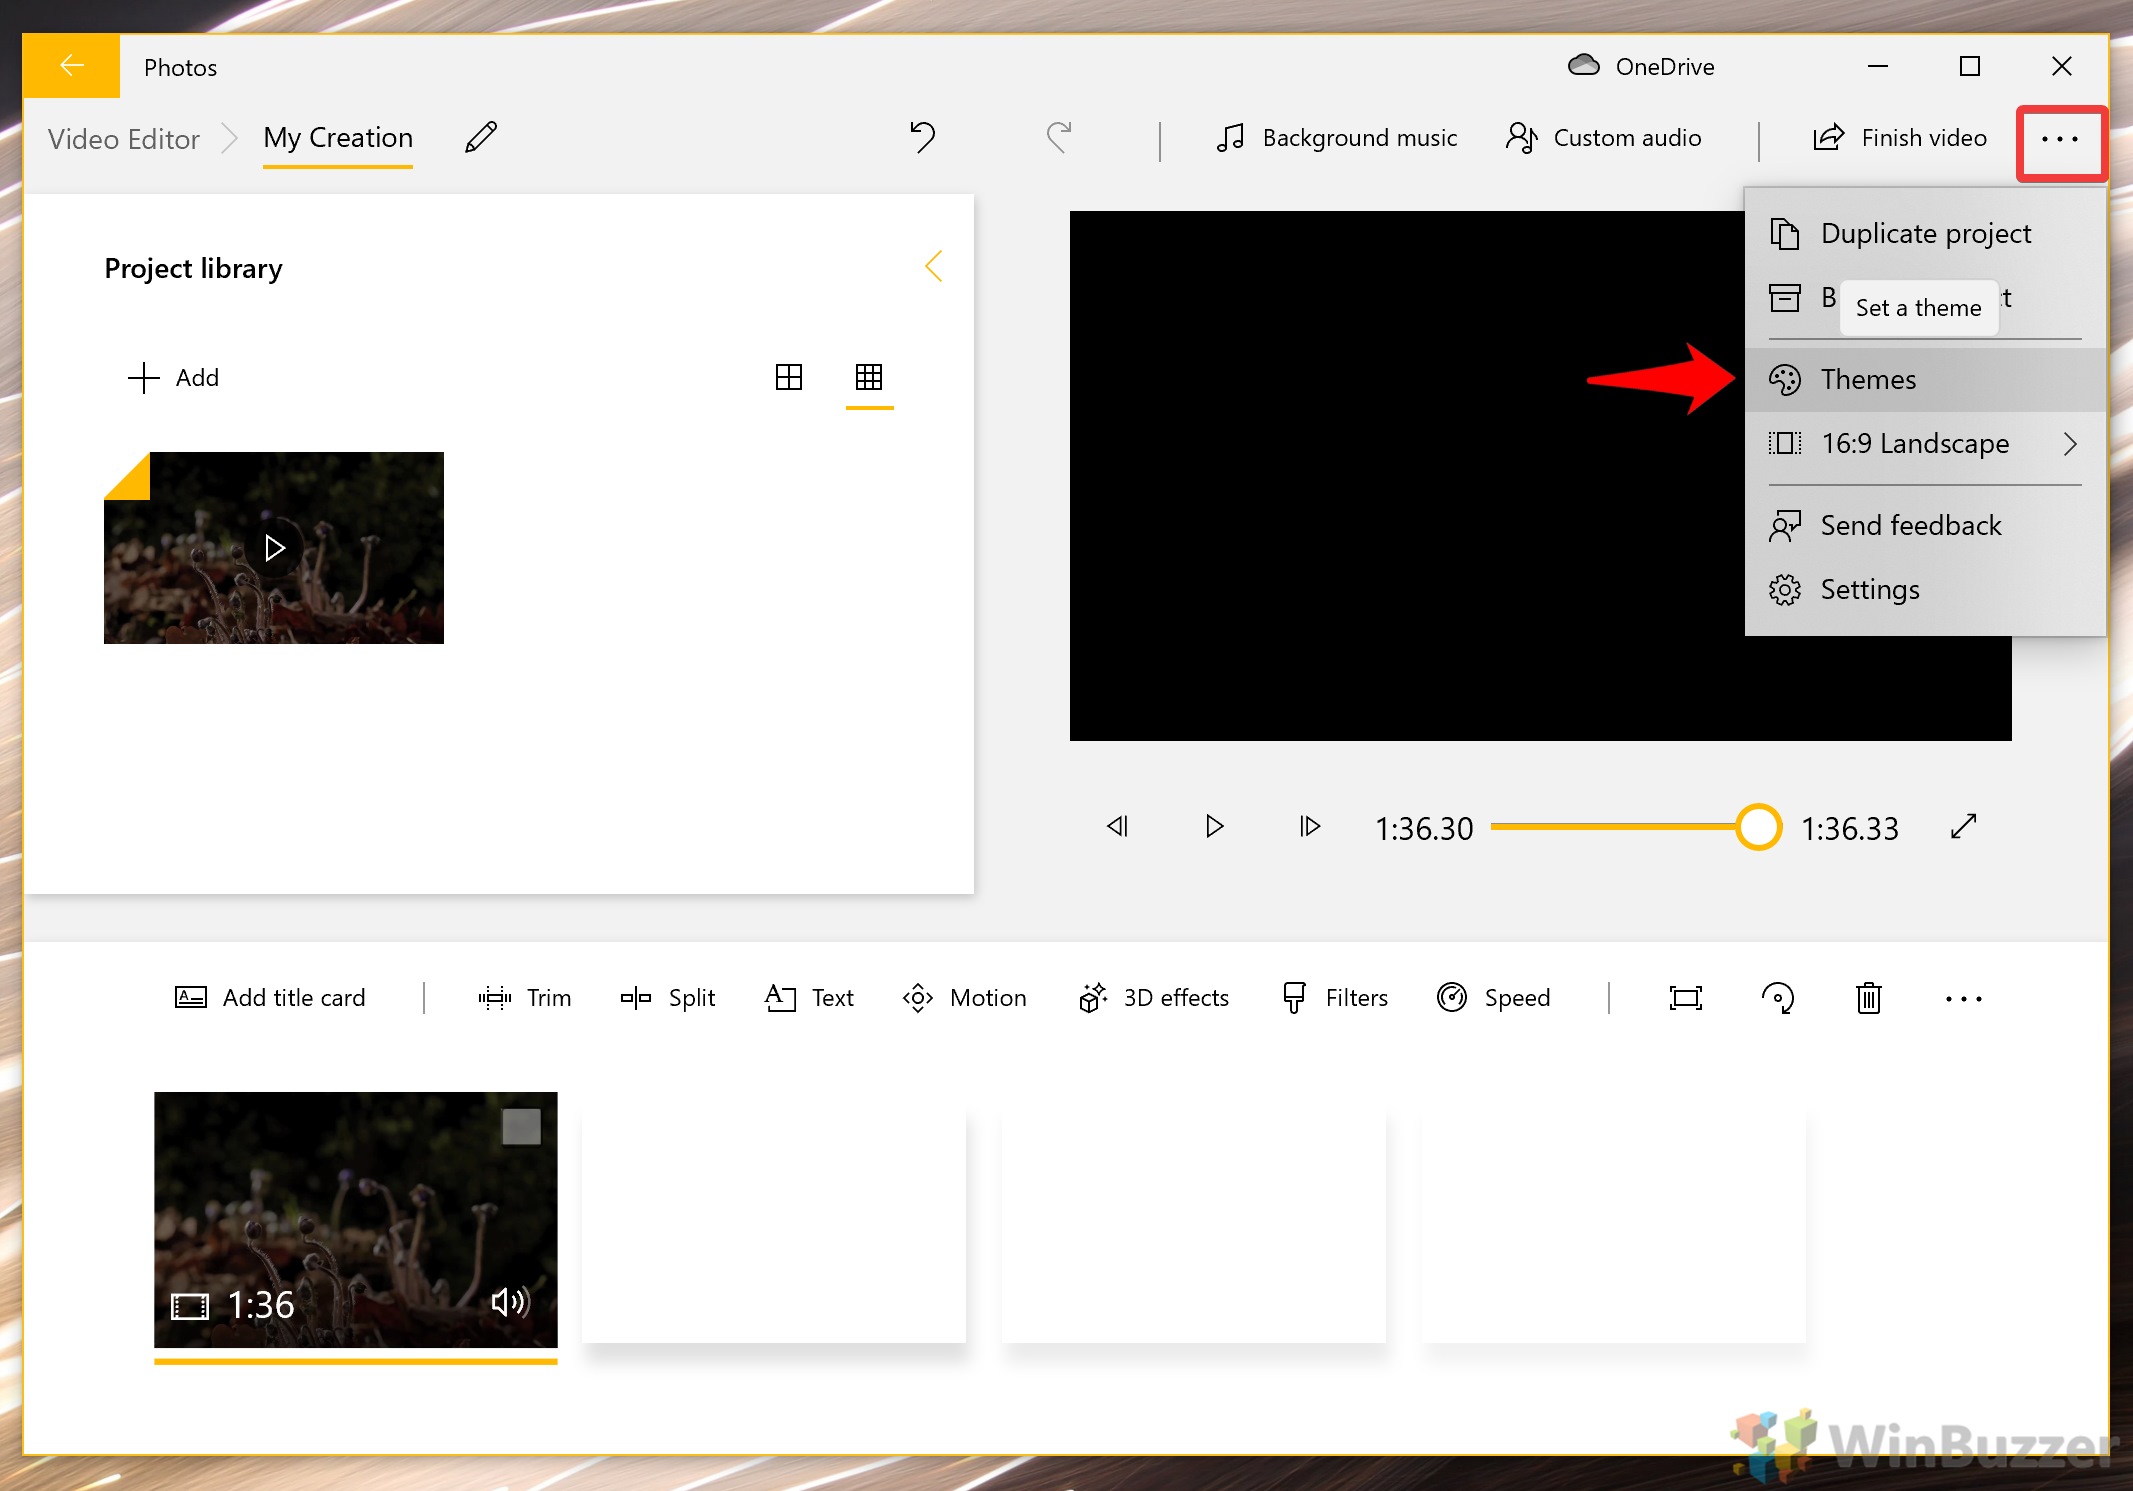
- Choose a theme and press ‘Done’

- How to change your video’s aspect ratio
Landscape videos can be frustrating to view on a phone. To crop videos in Windows 10 to another aspect ratio, you can click the three dots and then press “16:9 Landscape > Make portrait”. You can also switch from 16:9 to 4:3 or from one of those to 16:9.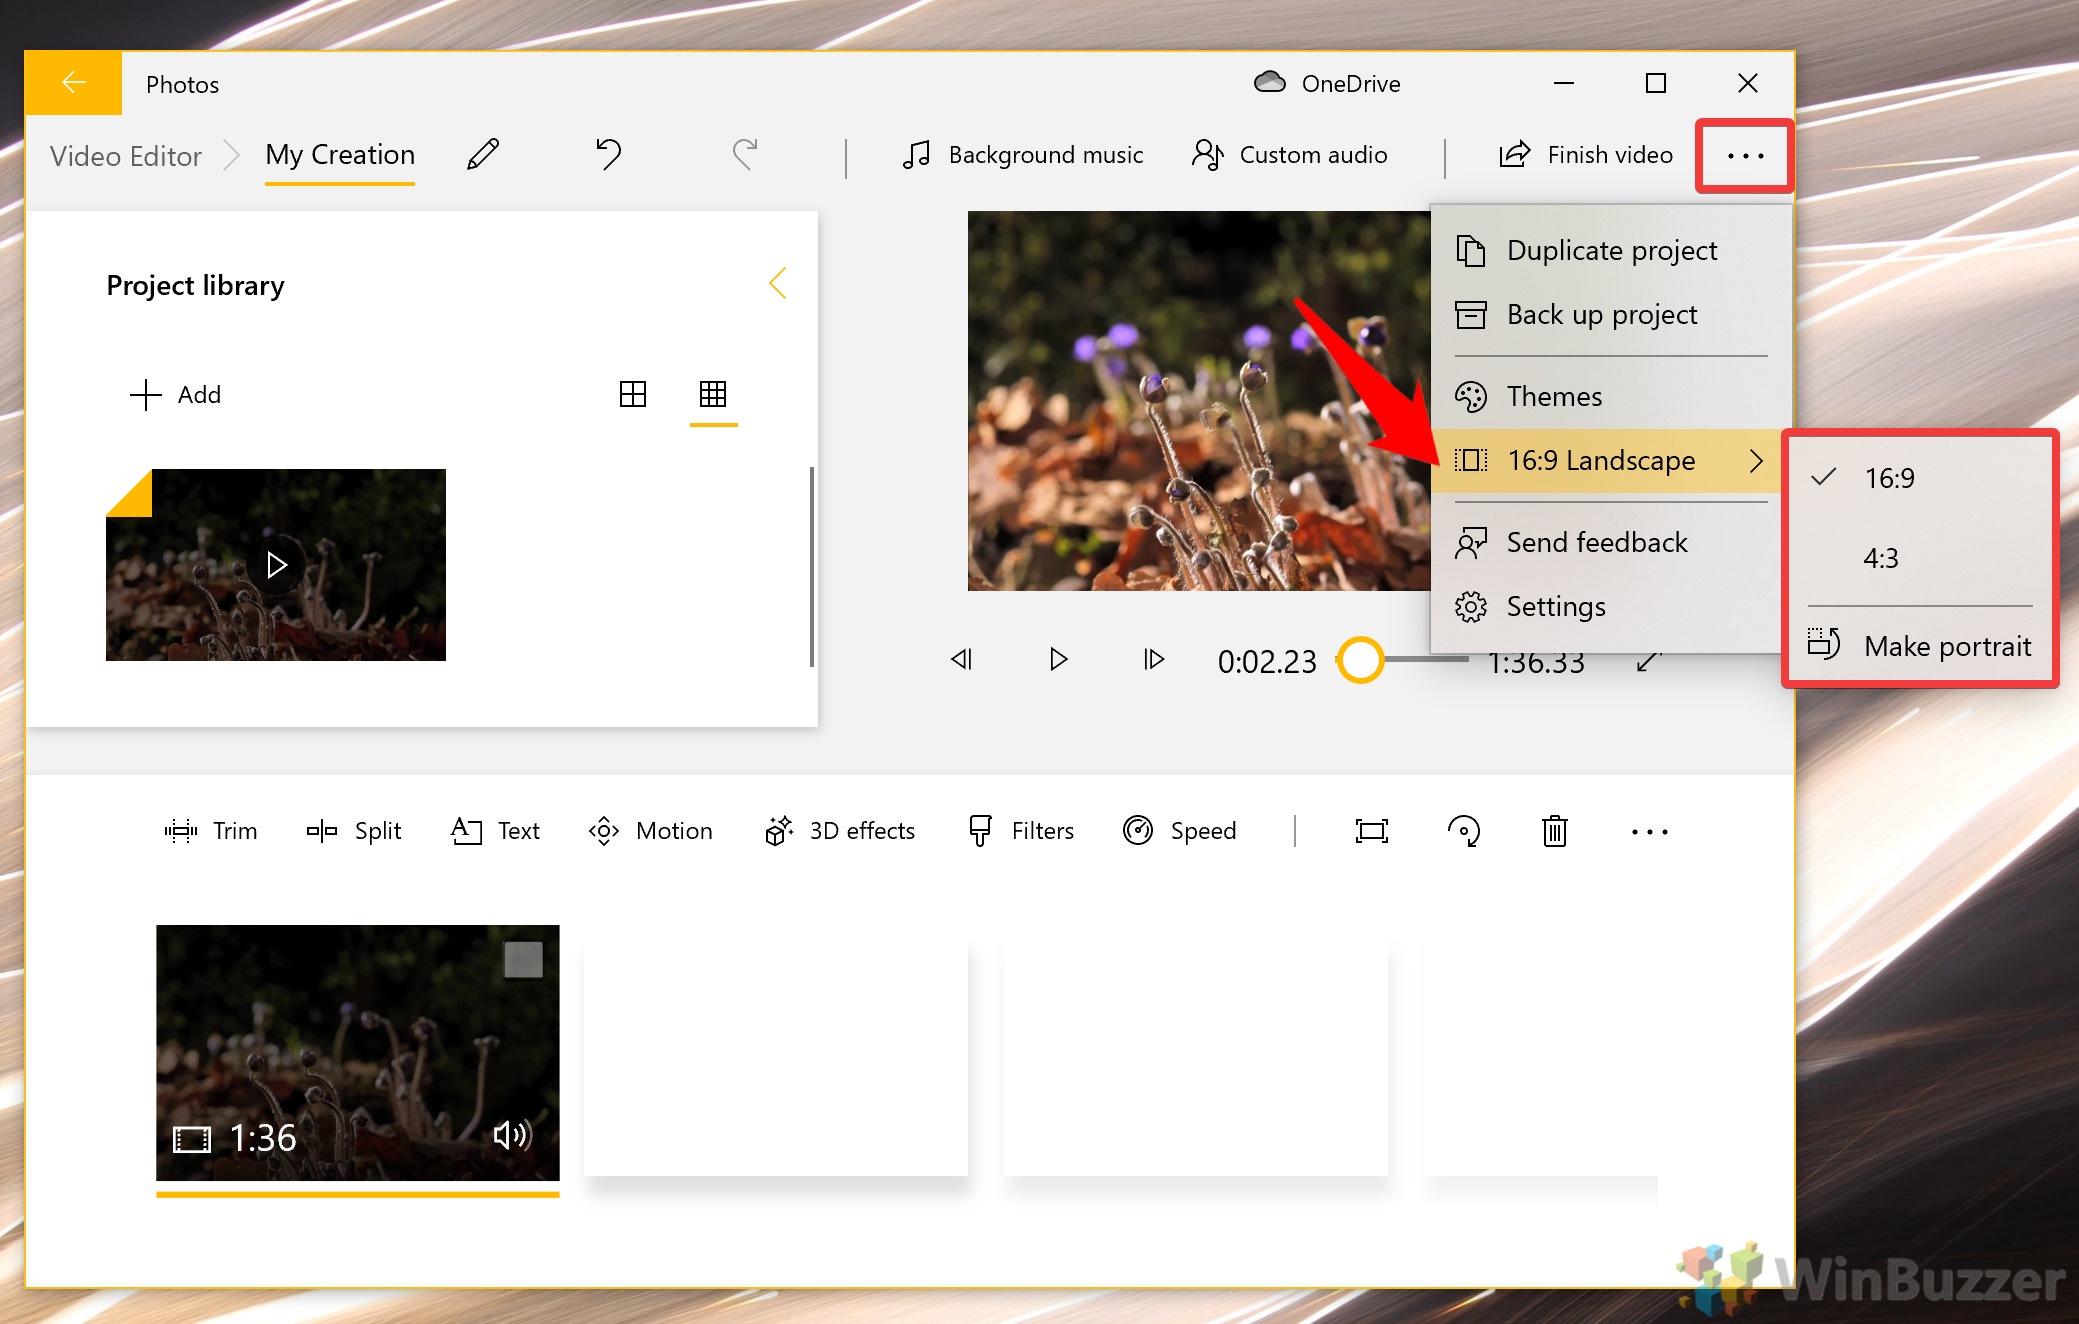
- How to add music (or custom audio) to a video in Windows 10
Click the “Custom audio” button above the video preview to open the audio menu. You can also press “Background music” to choose from Microsoft’s preset selection.
- Add your audio or music file
Click “Add audio file”, browse to its location, and press “Done” to add it to your video.
- How to save and export your final video
Now that you’ve made all the adjustments you require, you can press the “Finish video” button to start the export process.
- Choose your video quality and press ‘Export’

- Name and save your creation
Make sure it’s in a safe location and press “Export”. Depending on the length of your video, your hardware, and how good your hardware is, this could take some time.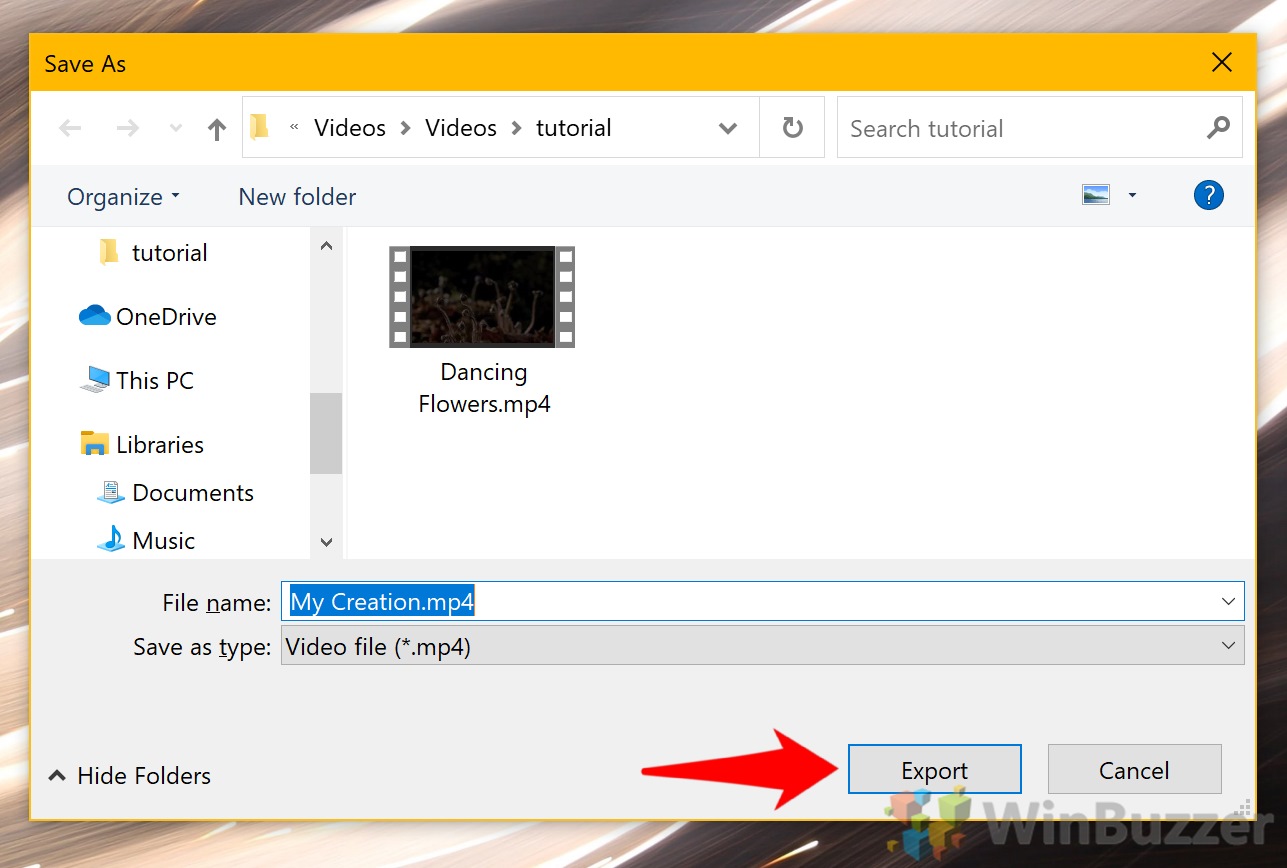
- View your created video
Once your export is complete, Windows 10 will automatically open your completed video file to review. If it didn’t come out as you intended, click the “Show in video export issues? Let’s fix it.” text.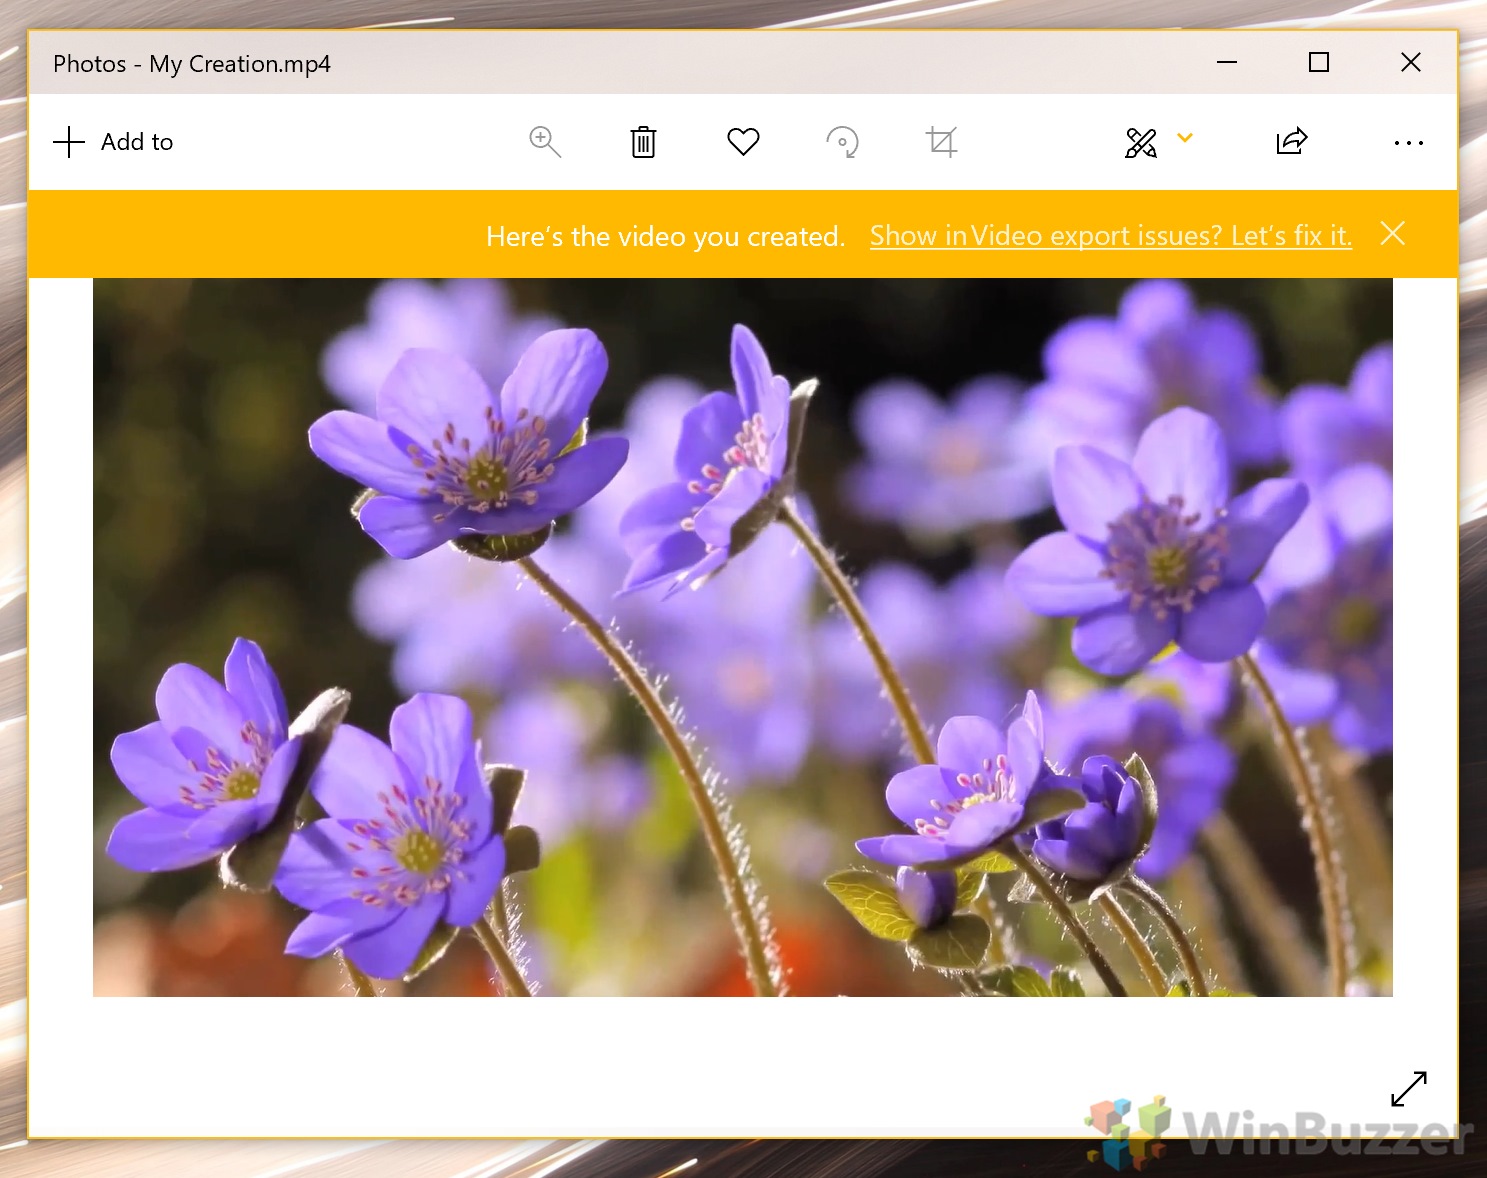
If you made it all the way through this tutorial, you should have a fairly good idea of how to use the Window video editor to manipulate your clips. However, if you just want to quickly rotate your video, you can check our dedicated tutorial instead. You may also want to learn how to set your freshly created video as a desktop background.


