Maybe you’ve heard of a shiny new update for .NET Framework, seen a vulnerability disclosure, or hit a frustrating error. In all of these cases, you’ll want to check your .NET Framework version and ensure you’re on the latest release.
The process to do so isn’t particularly intuitive. There’s no “version” button to click, as .NET isn’t an application, and it won’t show up in your Apps & Features menu.
Instead, you’ll have to use the command-line (CMD), PowerShell or registry to check what version of .NET you have. While this can be intimidating for those who aren’t familiar with those tools, the upside is that it only takes a few seconds once you know. In this guide we show you how to check your .NET framework version with Command Prompt, PowerShell, and the Registry Editor.
How to Check .NET Framework Versions with Command Prompt
This method involves using the Command Prompt to query the registry for installed .NET Framework versions. It’s a quick and straightforward approach for those comfortable with command-line interfaces.
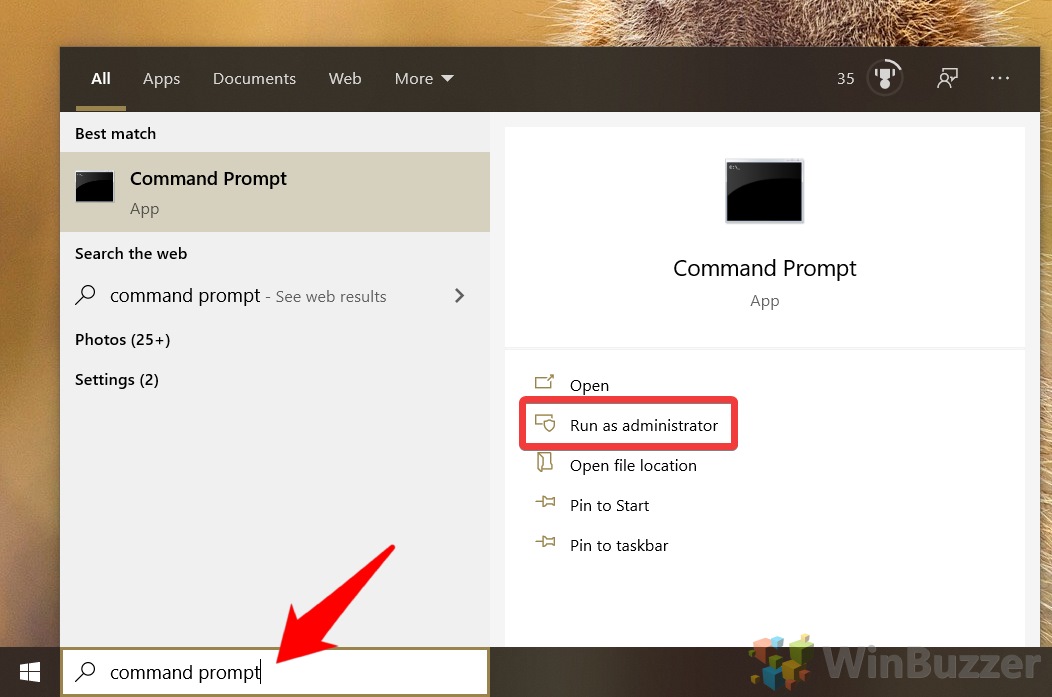
- Open Command Prompt as Administrator
Press the Start button, type “Command Prompt”, right-click on it, and select “Run as administrator”.
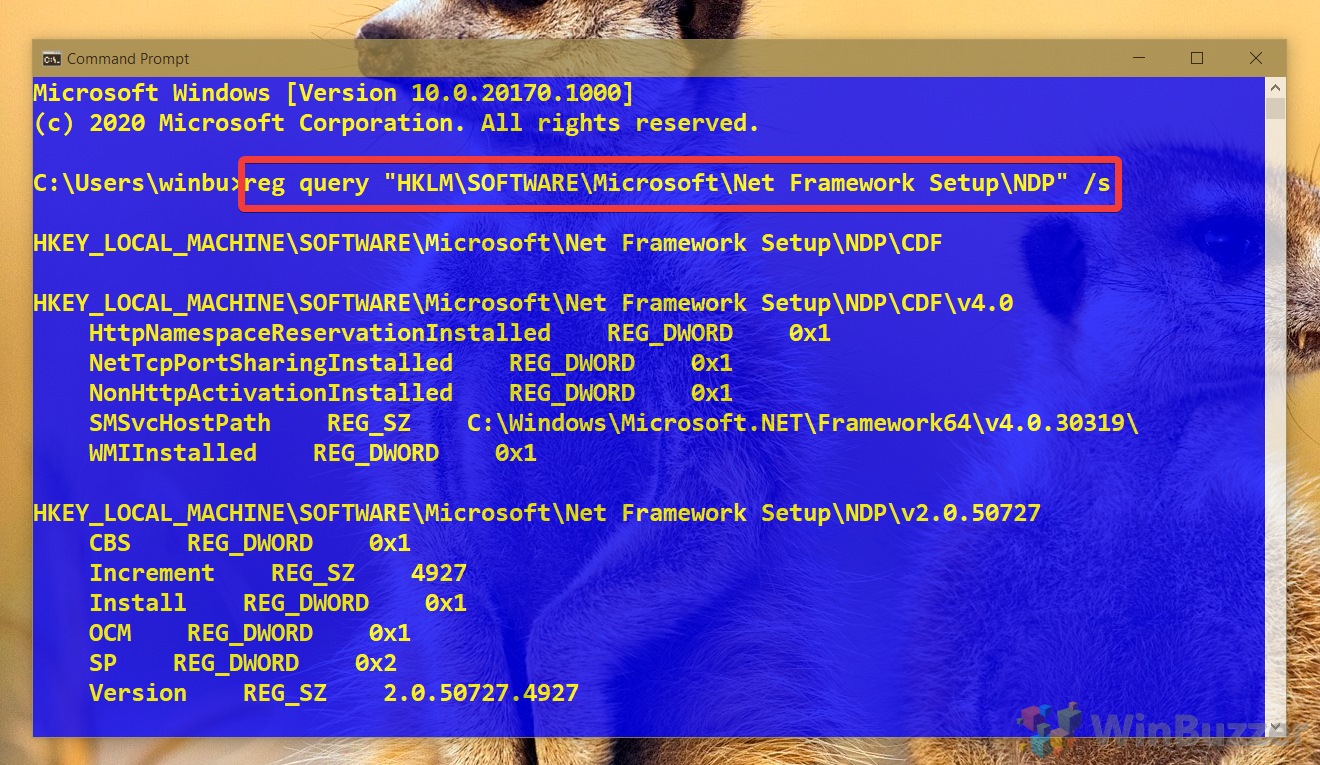
- Run the Registry Query Command
Type the following command and press Enter:
reg query "HKLM\SOFTWARE\Microsoft\Net Framework Setup\NDP" /s
This will list all the .NET Framework versions installed on your system.
- Check the Exact .NET Version
For detailed information about .NET Framework 4.x versions, use the following command:
reg query "HKLM\SOFTWARE\Microsoft\Net Framework Setup\NDP\v4" /s
This provides the full version number for comparison against the latest version available.

How to Find .NET Framework Version in the Registry Editor
For those who prefer a graphical user interface, the Registry Editor allows you to visually find our the installed .NET Framework versions. This takes a little longer, but still won’t be more than a minute.
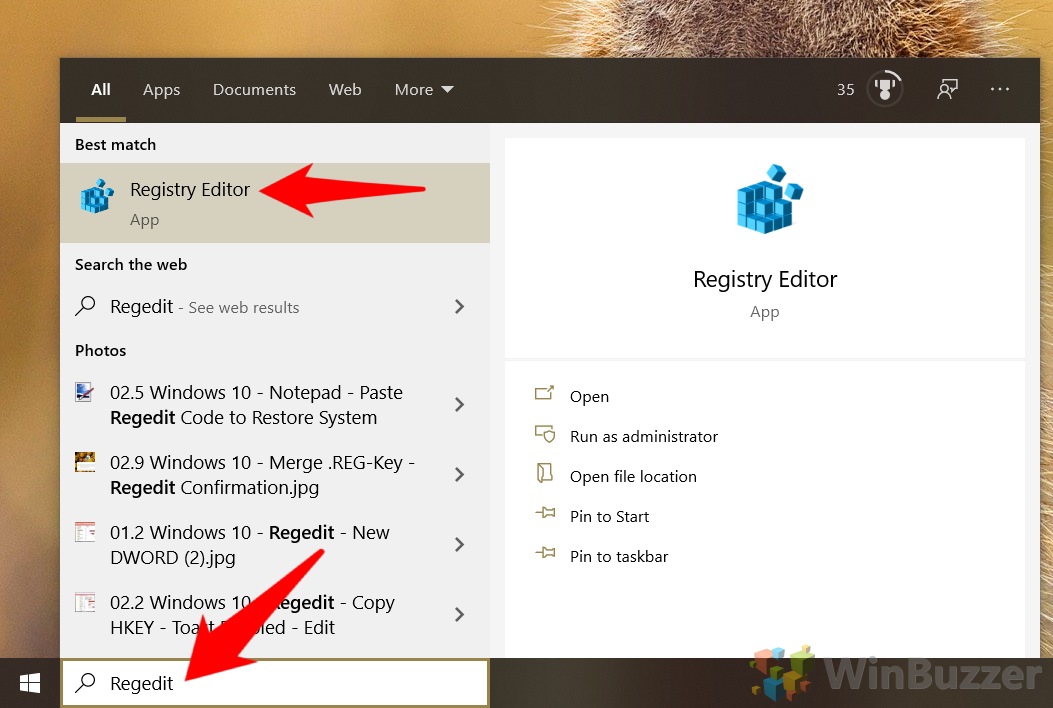
- Open the Registry Editor
Press Start and type “Regedit”, then press Enter or click on the top result.
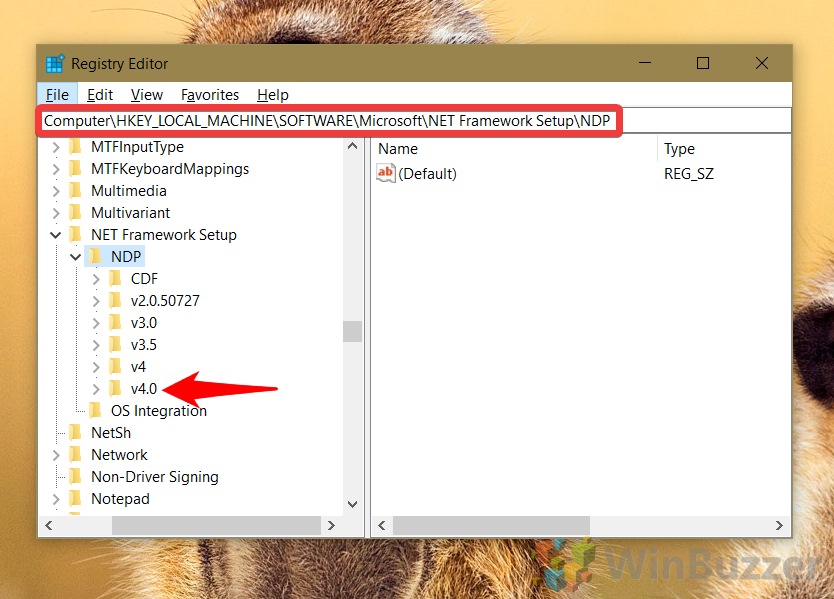
- Navigate to the .NET Registry Key
In the Registry Editor, navigate to:
HKEY_LOCAL_MACHINE\SOFTWARE\Microsoft\NET Framework Setup\NDP
In the sidebar under the “NDP” key, you’ll see the various versions you have installed. Click the main version key, in our case v4 or v4.0.
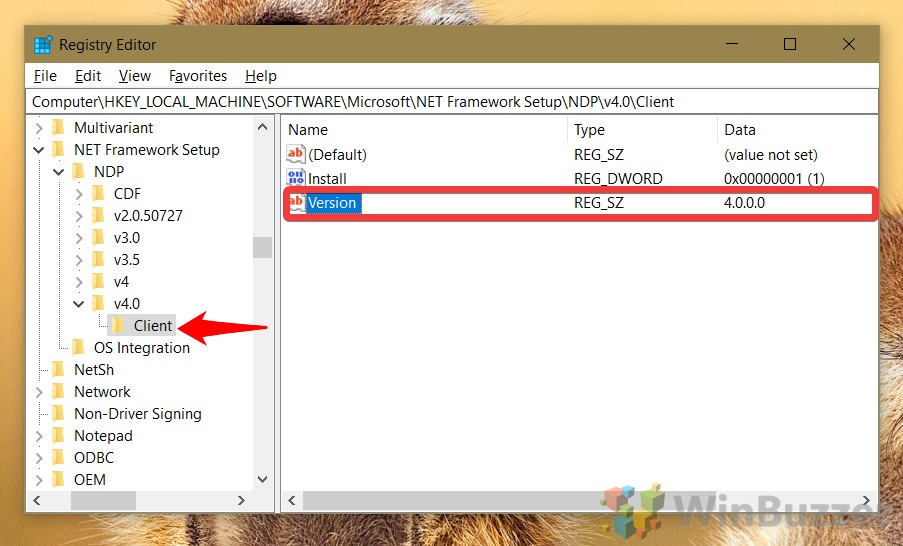
- Check Your .NET Version
Select the “Client” key in your sidebar, then check the data field of your “Version” entry for the version number. If you need a more specific number, check the “v4” key rather than “v4.0“.
How to Check .NET Framework Version with PowerShell
If you prefer the syntax of PowerShell, you can also use that to determine which version you have. We’ll be doing so via a registry query and a community GitHub tool which you can read about here. This will give you a nice, clear readout of which versions you have installed and which are missing.
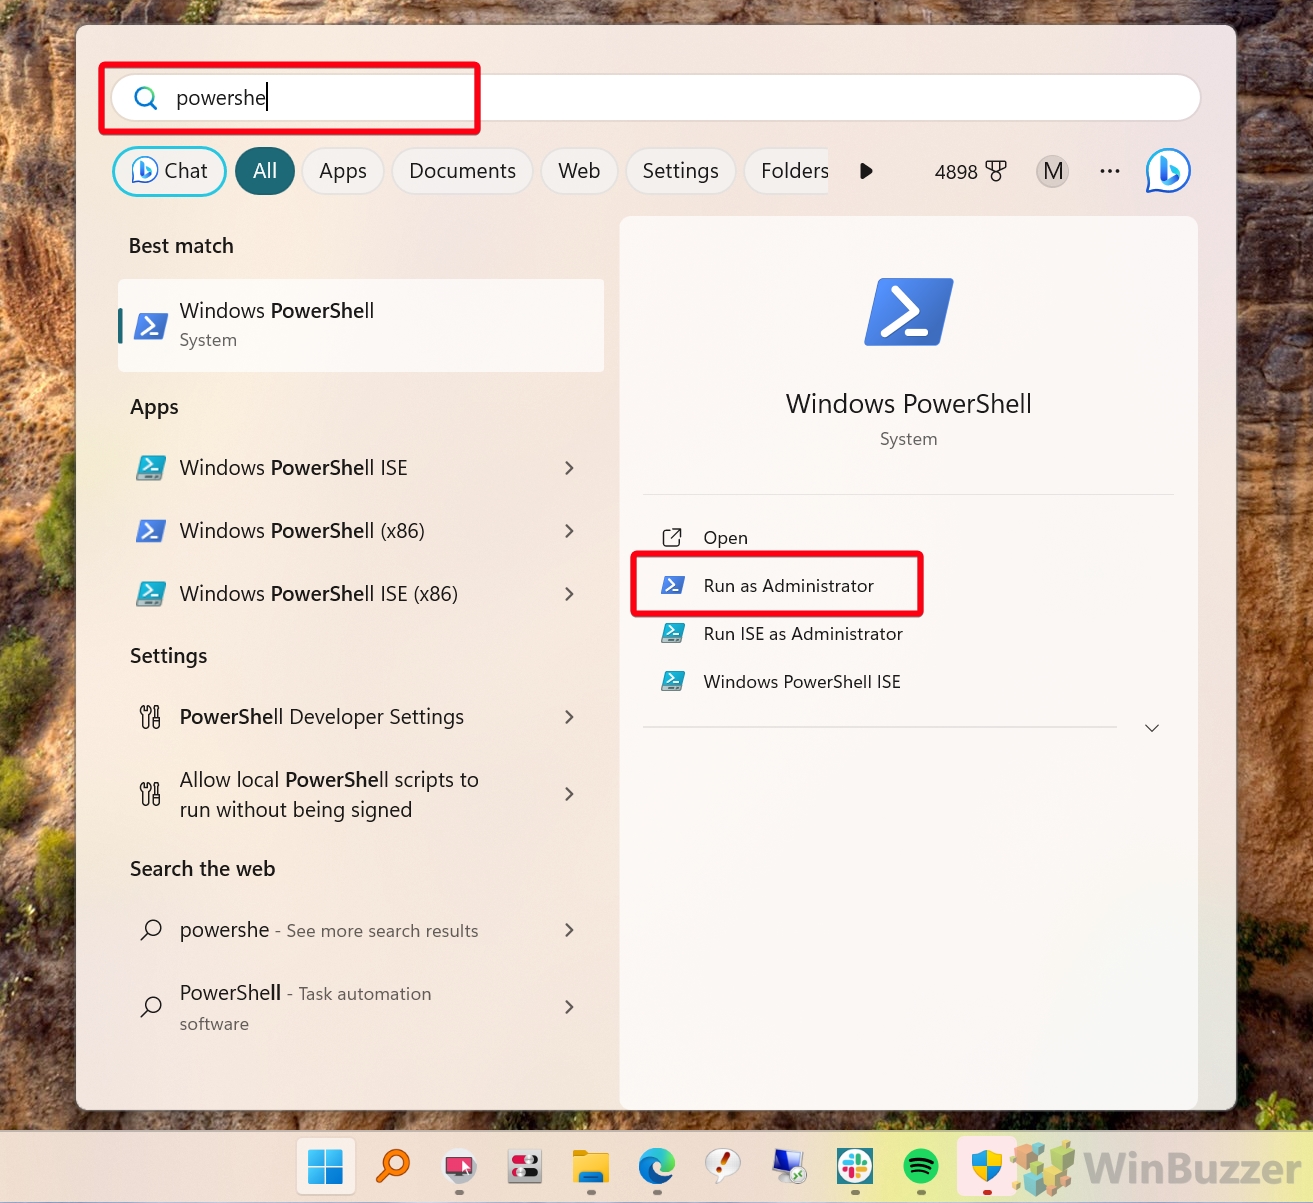
- Open PowerShell as Administrator
Press the Windows key, write “PowerShell“, and select “Windows PowerShell (Admin)“.
- Get the .NET Version via Registry Query
Use the following command to list the available .NET Framework versions:
Get-ChildItem 'HKLM:\SOFTWARE\Microsoft\NET Framework Setup\NDP ' -Recurse | Get-ItemProperty -Name version -EA 0 | Where { $_.PSChildName -Match '^(?!S)\p{L}'} | Select PSChildName, version
PowerShell will return a list of .NET versions. It gets the job done, but as you can see the readout is a bit confusing and the command very complex and unmemorable. You can continue to the next steps for a more intuitive method.

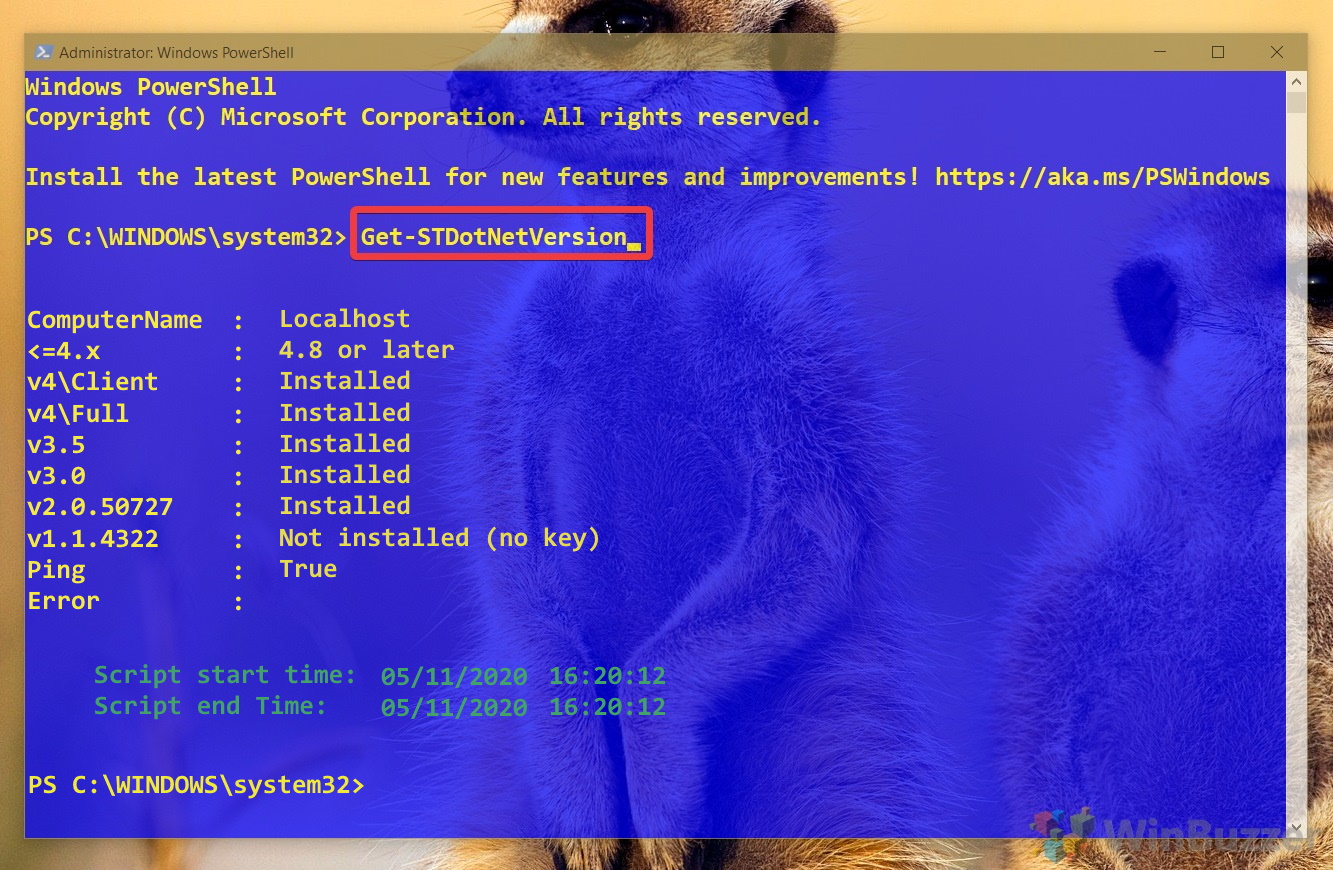
- Install the DotNetVersionLister Module
RunInstall-Module -Name DotNetVersionLister -Scope CurrentUserto install the DotNetVersionLister tool.
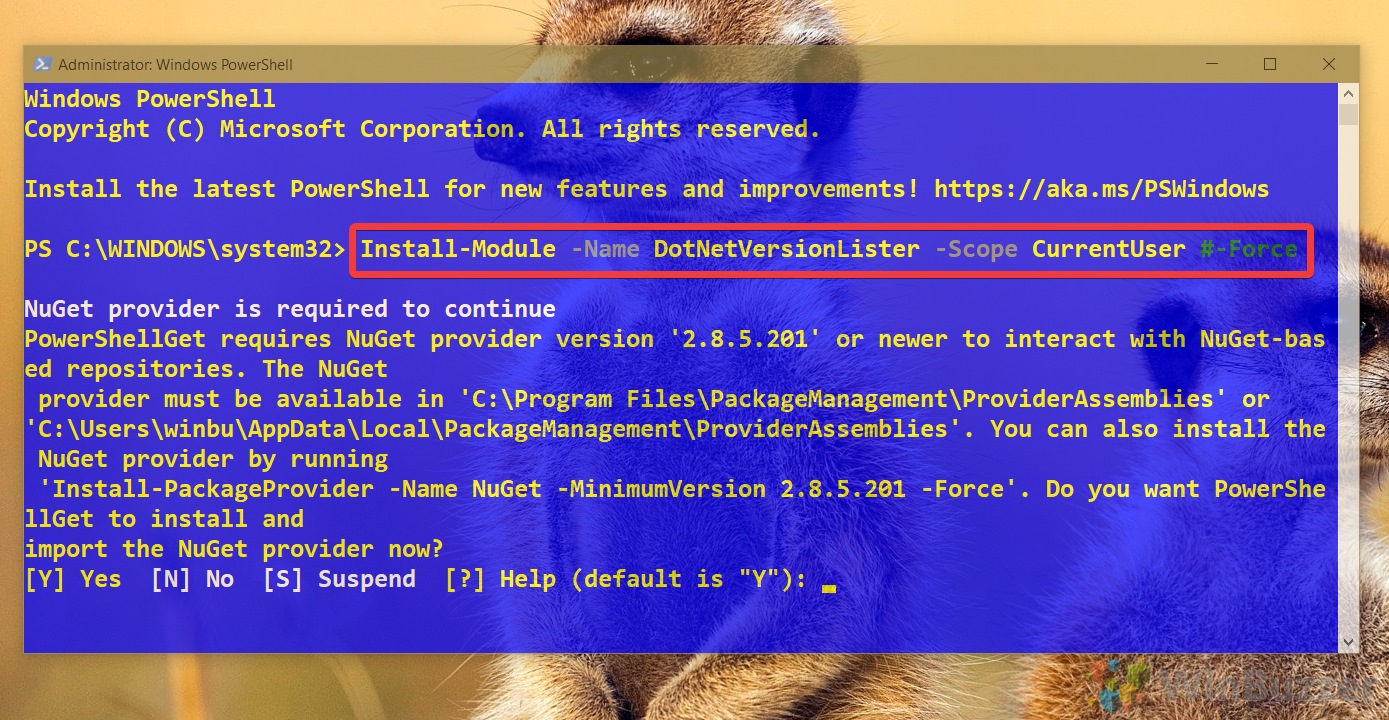 Press Y and then Enter to install it.
 - Find the .NET Framework Version
With DotNetVersionLister installed, useGet-STDotNetVersionto check your .NET Framework version. This command provides a clear list of installed and missing versions.
FAQ – Frequently Asked Questions About .NET Framework
How can I find out the latest .NET Framework version available?
The most reliable way to find out the latest .NET Framework version is to visit the official Microsoft .NET download page at https://dotnet.microsoft.com/download/dotnet-framework. This website lists all versions of the .NET Framework, including release notes and download links. Keeping abreast of the latest version ensures that you can take full advantage of new features and security improvements.
Does installing a new .NET Framework version remove older versions?
Generally, when you install a new .NET Framework version, it doesn’t replace or remove older versions. Each version of the .NET Framework is designed to coexist alongside others, allowing different applications to rely on specific versions they need. However, there are exceptions, such as .NET Framework 4.5 and its point releases (4.5.1, 4.5.2, etc.), which replace earlier versions of .NET 4.
Can PowerShell be used to install missing .NET Framework versions?
Yes, PowerShell can be instrumental in managing .NET Framework versions, including installation. While PowerShell itself does not directly install the .NET Framework, it can invoke the installer and manage its execution. For example, you can use PowerShell to download the installer package via a script and then execute the installer in silent mode. This approach is particularly useful for automating the setup process across multiple systems or ensuring that the necessary .NET Framework versions are installed for specific applications.
What is the difference between .NET Framework and .NET Core?
The .NET Framework is Microsoft’s traditional platform for building desktop and web applications on Windows. It is a comprehensive, feature-rich development framework that includes everything from an extensive class library to development tools. On the other hand, .NET Core is a cross-platform, open-source framework designed for creating modern applications that can run on Windows, Linux, and macOS. .NET Core is built to handle cloud-based, server-side applications and provides a more modular, lightweight platform for building high-performance apps.
How can developers ensure their application is compatible with multiple .NET versions?
Developers can ensure application compatibility across multiple .NET versions through multi-targeting. This technique involves configuring their application project file to specify different target frameworks, thus enabling the application to be built against multiple .NET Framework versions. It also involves rigorous testing against each targeted .NET Framework version. Tools like the .NET Portability Analyzer can also help assess compatibility issues and identify necessary changes for cross-version compatibility.
What if the Command Prompt or PowerShell method doesn’t show all installed .NET Framework versions?
If the Command Prompt or PowerShell doesn’t list all installed .NET Framework versions, it could be due to incorrect command syntax or insufficient privileges. Ensure you are running these tools as an administrator. Additionally, cross-referencing with other methods, such as examining the Registry Editor or checking installed updates in the Control Panel, can provide a more comprehensive view. It’s also worth noting that some versions of .NET Framework may not be listed if they are part of the operating system and considered integral components, such as .NET 3.5 on Windows 10.
Can I check for .NET Framework updates without using Windows Update?
Yes, you can manually check for and download .NET Framework updates without relying on Windows Update. This can be done by visiting the Microsoft Update Catalog website at https://www.catalog.update.microsoft.com/Home.aspx, where you can search for specific updates related to the .NET Framework. This method is particularly useful for obtaining updates to deploy in an offline environment or when facing issues with Windows Update.
Is there a way to check the .NET Framework version on a macOS or Linux machine?
Since the traditional .NET Framework is Windows-only, checking its version is not applicable to macOS or Linux machines. For cross-platform development, Microsoft offers .NET Core (now part of the unified .NET 5 and onwards). The version of .NET Core or .NET 5 (and later) can be checked on macOS and Linux by opening the terminal and typing dotnet --info. This command provides detailed information about the SDKs and runtimes installed, including their versions.
Can I use these methods to check the .NET version on a Windows Server?
Yes, the methods described for checking the .NET Framework version on Windows client operating systems also apply to Windows Server. Whether you’re using the Command Prompt, Registry Editor, or PowerShell, these tools and the commands provided function the same way on both Windows Server and Windows client systems. It’s essential for system administrators to verify the .NET Framework versions on servers to ensure compatibility and security compliance for hosted applications.
Can I check the .NET Framework version on a remote computer?
Checking the .NET Framework version on a remote computer can be achieved through PowerShell remoting. By using the Invoke-Command cmdlet, you can execute the version checking scripts or commands on the remote machine, provided you have the necessary permissions. This method is efficient for system administrators who need to check versions across multiple machines in a network.
How can I uninstall a specific .NET Framework version?
Uninstalling specific .NET Framework versions can be carefully done through the “Programs and Features” section in the Control Panel for versions that appear as standalone installations. For integral versions tied to the operating system, such as .NET Framework 3.5 in newer versions of Windows, you can enable or disable them via the “Turn Windows features on or off” option. However, exercise caution as removing essential .NET Framework versions can lead to application instability or system issues.
What does ‘EA 0’ mean in the PowerShell command used in the tutorial?
In the PowerShell command mentioned in the tutorial, -EA 0 stands for -ErrorAction SilentlyContinue. This parameter instructs PowerShell to proceed with the command execution without halting or displaying errors encountered during the process. Utilizing -EA 0 is particularly useful when running scripts that may trigger non-critical errors you wish to ignore for the script’s smooth execution.
Is it necessary to restart the computer after installing or updating the .NET Framework?
Following the installation or update of the .NET Framework, a system restart is often recommended and sometimes required. Restarting ensures that all components of the .NET Framework are correctly initialized and that any applications depending on it can recognize the changes. In some cases, the installer will prompt for a restart, which is a clear indicator that a restart is necessary to complete the installation process fully.
Can I check the .NET Framework version without administrative privileges?
While the methods detailed in the tutorial require administrative privileges to access certain system information or modify settings, users without administrative rights have alternatives. One approach is to check the list of installed programs through the Control Panel or Settings app, where some .NET Framework versions may be listed. However, this method might not reveal all installed .NET Framework versions and typically offers less detail.
How can I automate the process of checking .NET Framework versions on multiple machines?
To automate the checking of .NET Framework versions across multiple machines, you can utilize PowerShell scripting combined with remote execution capabilities. Scripts can be written to query the registry, process the information, and output .NET Framework versions installed on each machine. These scripts can then be run remotely via PowerShell remoting or deployed through Group Policy, providing a scalable solution for managing and auditing .NET Framework versions within an organization.
Related: How to Check Powershell Version in Windows 11 or Windows 10
PowerShell, a critical component of the Windows ecosystem, undergoes regular updates to introduce new features, fix bugs, and enhance security. Keeping your PowerShell version current is pivotal for leveraging the latest capabilities and ensuring scripts run smoothly. In our other guide, we show you how to get your PowerShell version using two different commands.

Related: How to Check Your Windows Version, Edition and Build Number
Understanding the version of your Windows operating system is crucial for a variety of reasons, such as installing new programs, troubleshooting, and ensuring you have the latest security updates. In our other guide, we show you how to find your Windows version, edition and exact build number with various internal tools.
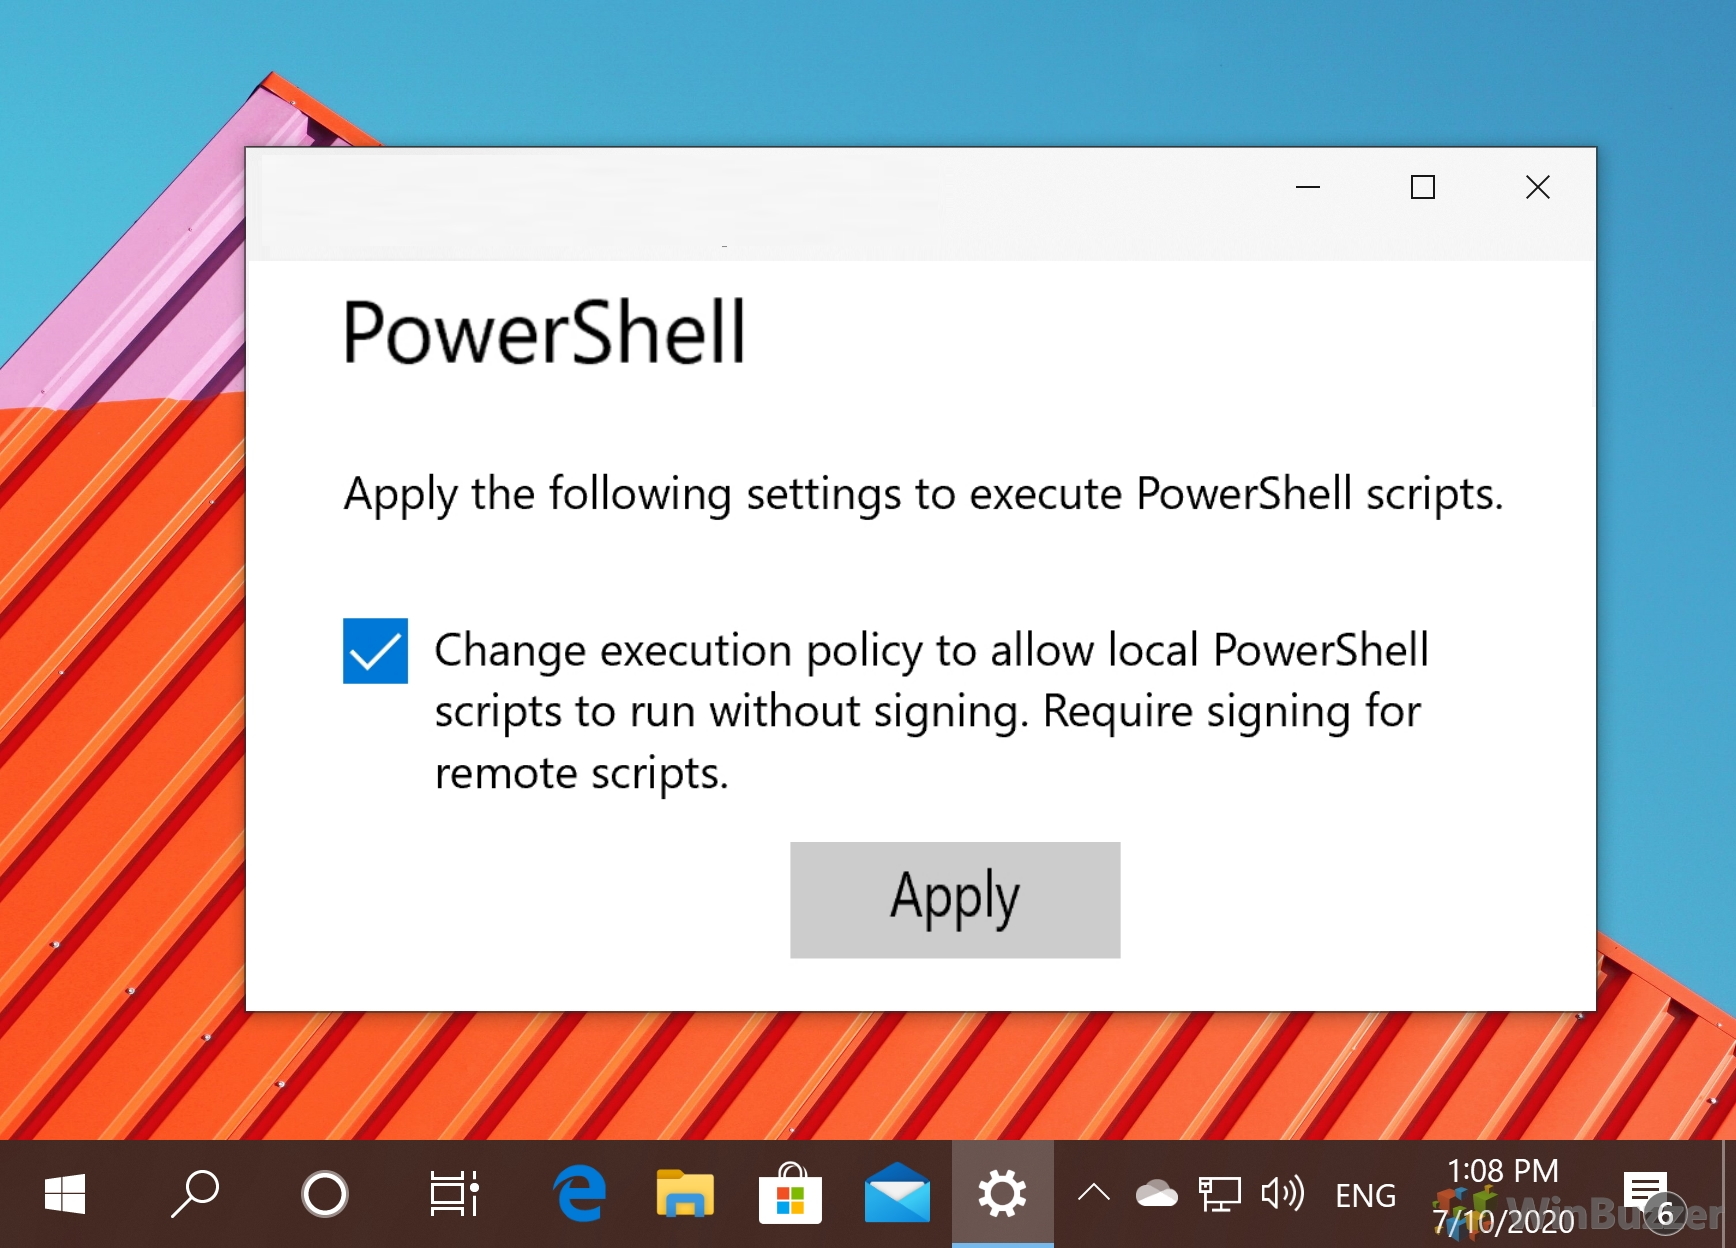
Related: How to Enable PowerShell Scripts via PowerShell Execution Policy
PowerShell is a powerful tool that many, including myself, don’t use to its full potential. That’s why most of us rely on PowerShell scripts crafted by others, but this can have its own hurdles. Often, you’ll see errors like “PowerShell: running scripts is disabled on this system”. To Enable PowerShell scripts in Windows, you must first set the execution policy. In our other guide, we show you how to enable PowerShell scripts in Windows by setting your execution policy via the command-line.
Related: How to Open a File or Folder in Terminal in Windows 11
Navigating the Windows Terminal to open files and folders is a skill that enhances productivity and efficiency, particularly for those who prefer command-line interfaces (CLI) over graphical user interfaces (GUI). Windows Terminal, a modern application in Windows 11, integrates traditional command-line environments like Command Prompt (CMD) and PowerShell, providing a robust platform for performing a variety of tasks. In our other guide, we show you how to open a file or folder in Command Prompt or PowerShell and how to change directory from there in Windows 11 using a series of commands.