Windows Spotlight brings a dynamic and visually stunning experience to your Windows lock screen. It showcases an array of beautiful images from around the globe, changing regularly.
In fact, they’re so nice you may be wondering how to save Windows Spotlight images for use as a desktop background. However, these images are not straightforward to save for personal use due to their hidden and encrypted storage location.
The Windows spotlight images location can be found in “AppData“, and the file names are unintuitive. Additionally, searching for a Windows spotlight image download instead can yield out-of-date results.
In this guide we walk you through the process so you don’t need to figure it out yourself. We’ll cover how to find the Windows spotlight images location manual backup, or how to save them automatically via an app.
⚠️ Please note: The process described below is the same in Windows 11 as it is in Windows 10. However, bear in mind that we’ll be using screenshots from Windows 10, so your UI may look a little different. We’ll point out any changes you need to be aware of as they come up.
How to Find the Windows 10 Spotlight Images Location and Save Them Manually
This method involves locating the hidden folder where Windows stores these images, copying them, and converting them to a viewable format. It’s a bit technical but quite rewarding.
- Navigate to the Spotlight Images Folder
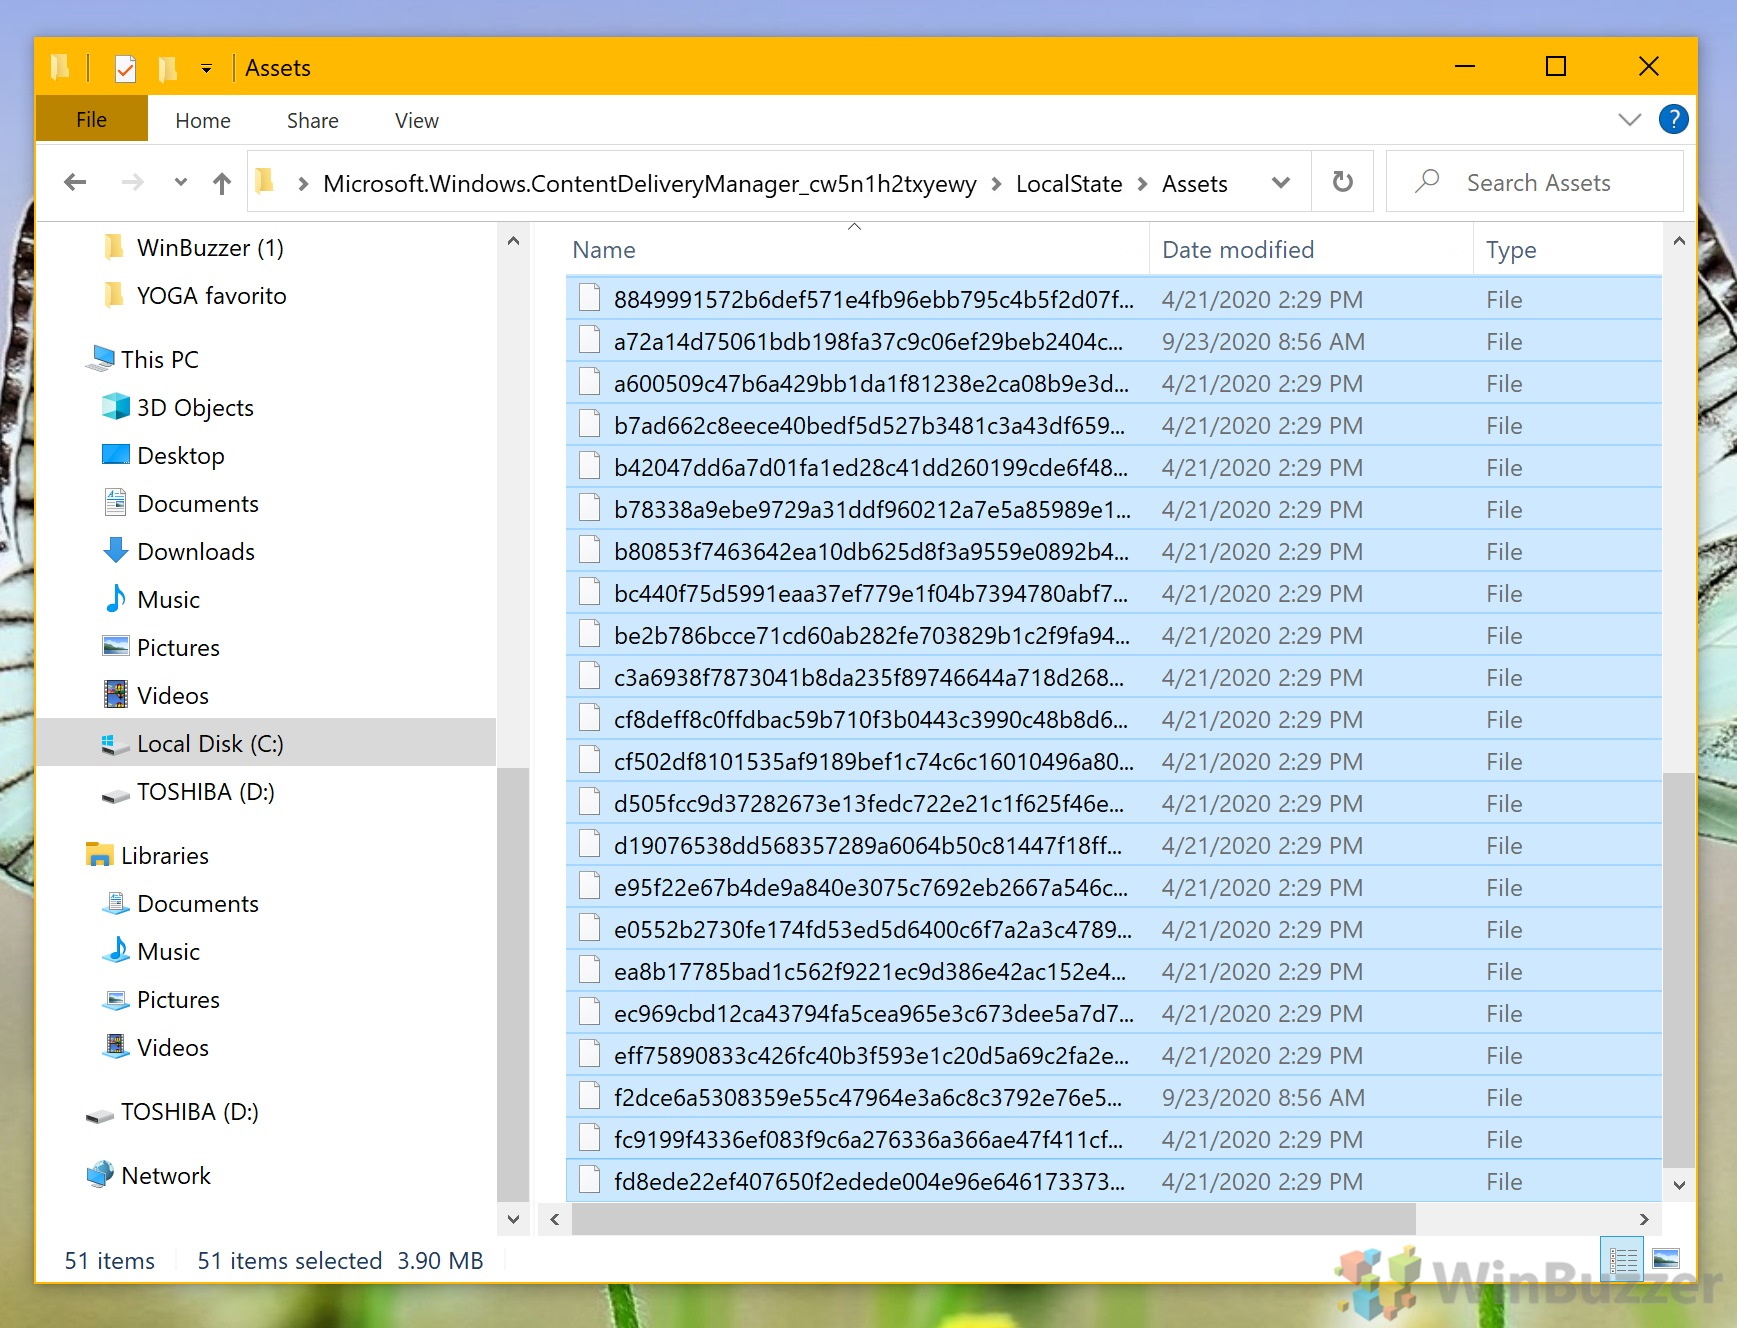
First, you need to access the folder where Windows stores the Spotlight images. This is located in a hidden directory. To view it, you might need to enable the viewing of hidden items in File Explorer. The path to this folder is%LocalAppData%\Packages\Microsoft.Windows.ContentDeliveryManager_cw5n1h2txyewy\LocalState\Assets. Copy this path, open File Explorer, paste it into the address bar, and press Enter.
- Open PowerShell at your Windows spotlight images location
Windows 10: Still in File Explorer, press the “File” button in the top-left, then click “Open Windows PowerShell > Open Windows PowerShell“.
Windows 11: Click the “See more” (ellipsis) button located near the top-right corner. From the context menu that appears, hover over “Show more options” to expand further options. Click on “Open in Windows Terminal“. (Note: In Windows 11, the default terminal is now Windows Terminal, which can also open PowerShell).

- Open PowerShell in the Folder
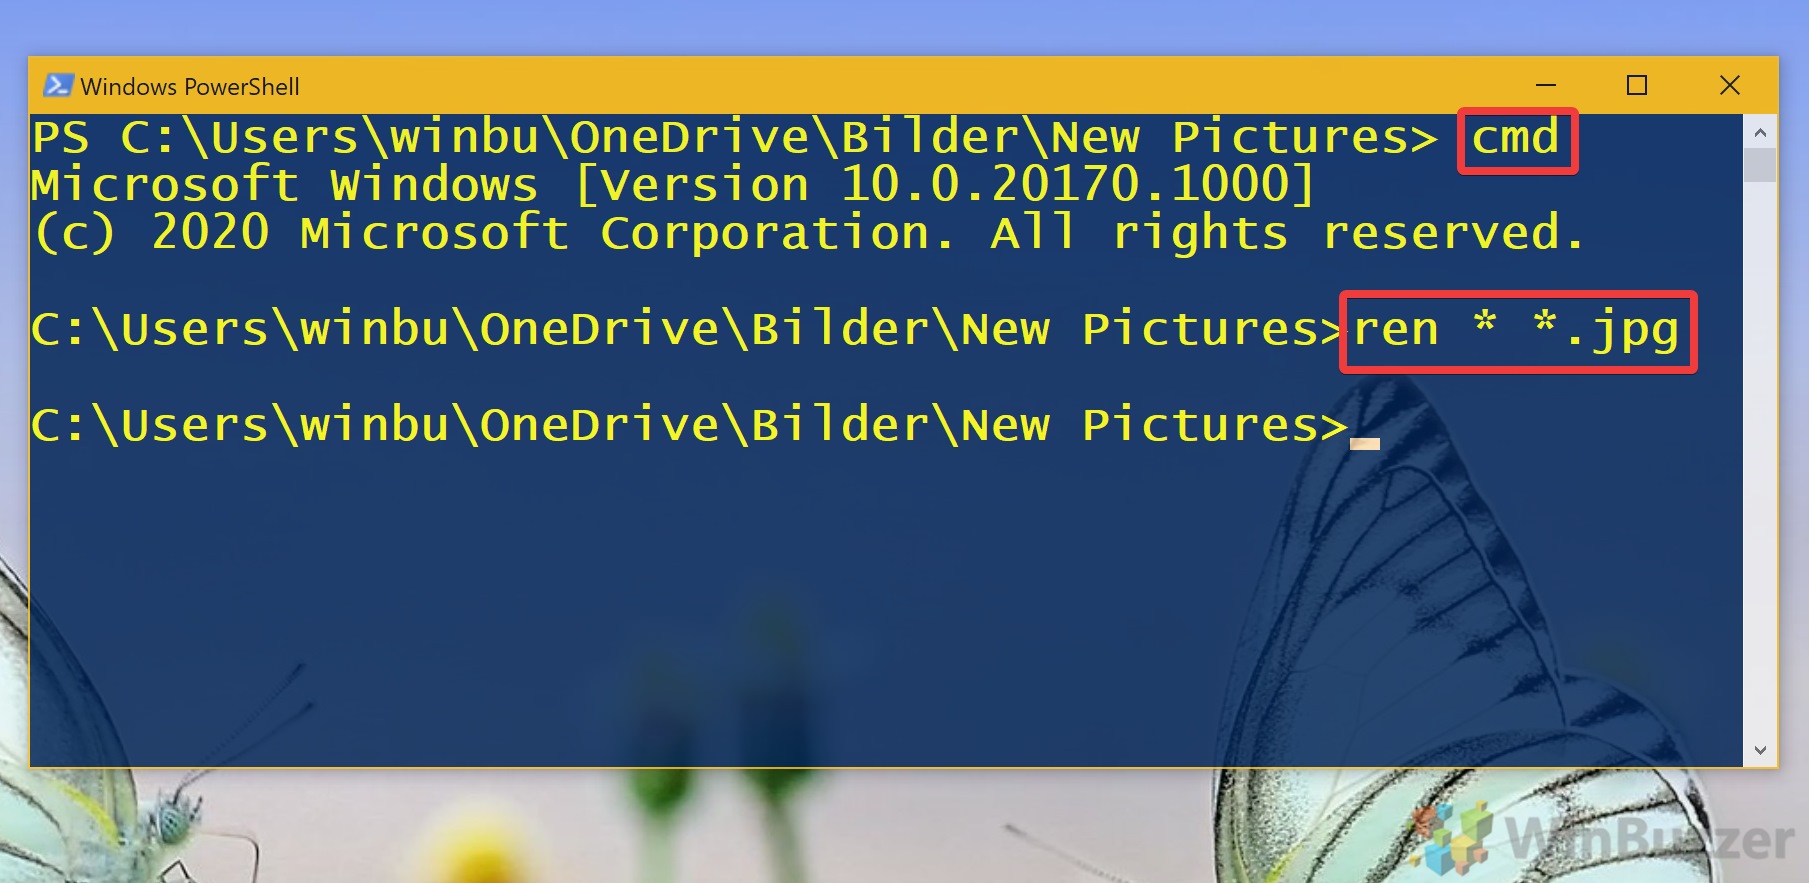
You may have noticed at this point that though you have saved your Windows Spotlight images, you can’t open them. This is because they don’t have the jpg file type. To remedy this, we can run a simple command in PowerShell to add “.jpg” to the end of each file.
In PowerShell, typeren **.jpgand press Enter. This set all windows spotlight pictures to the JPEG image format.
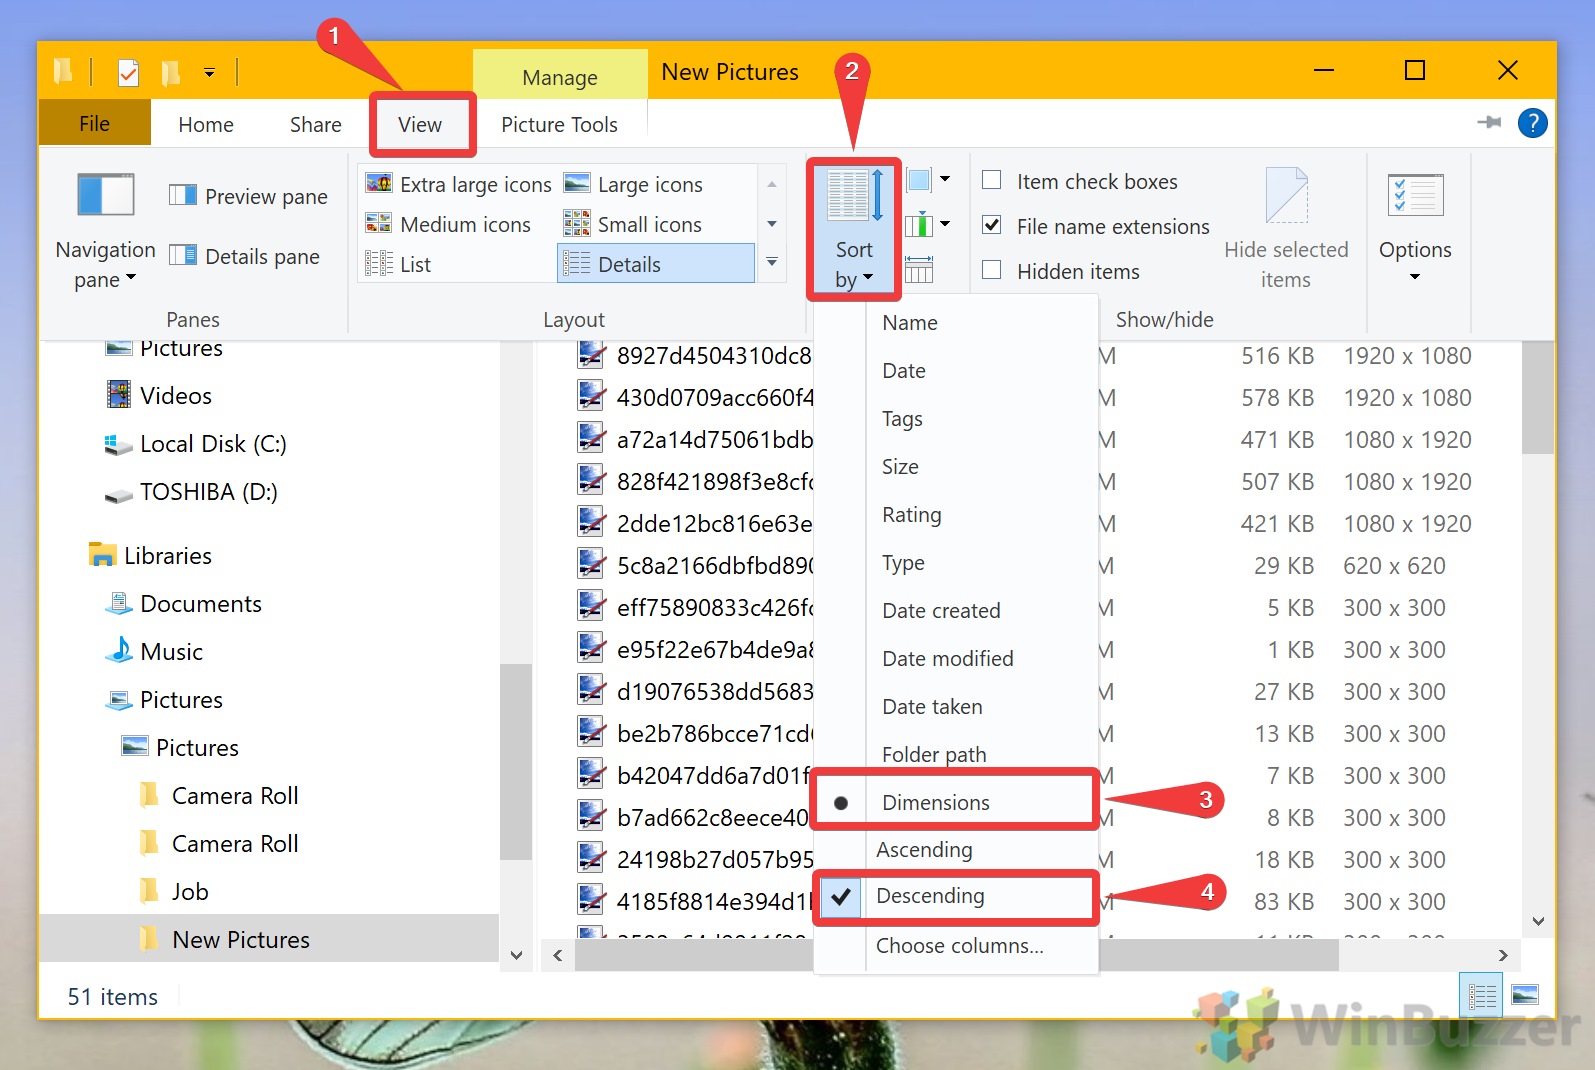
- Enable the Dimensions Column
Back in the File Explorer window where your images are now saved as .jpg, you’ll want to filter out the actual Spotlight images from other system files. Right-click on the column header, select “More…“, and then check “Dimensions” to add this column to your view.
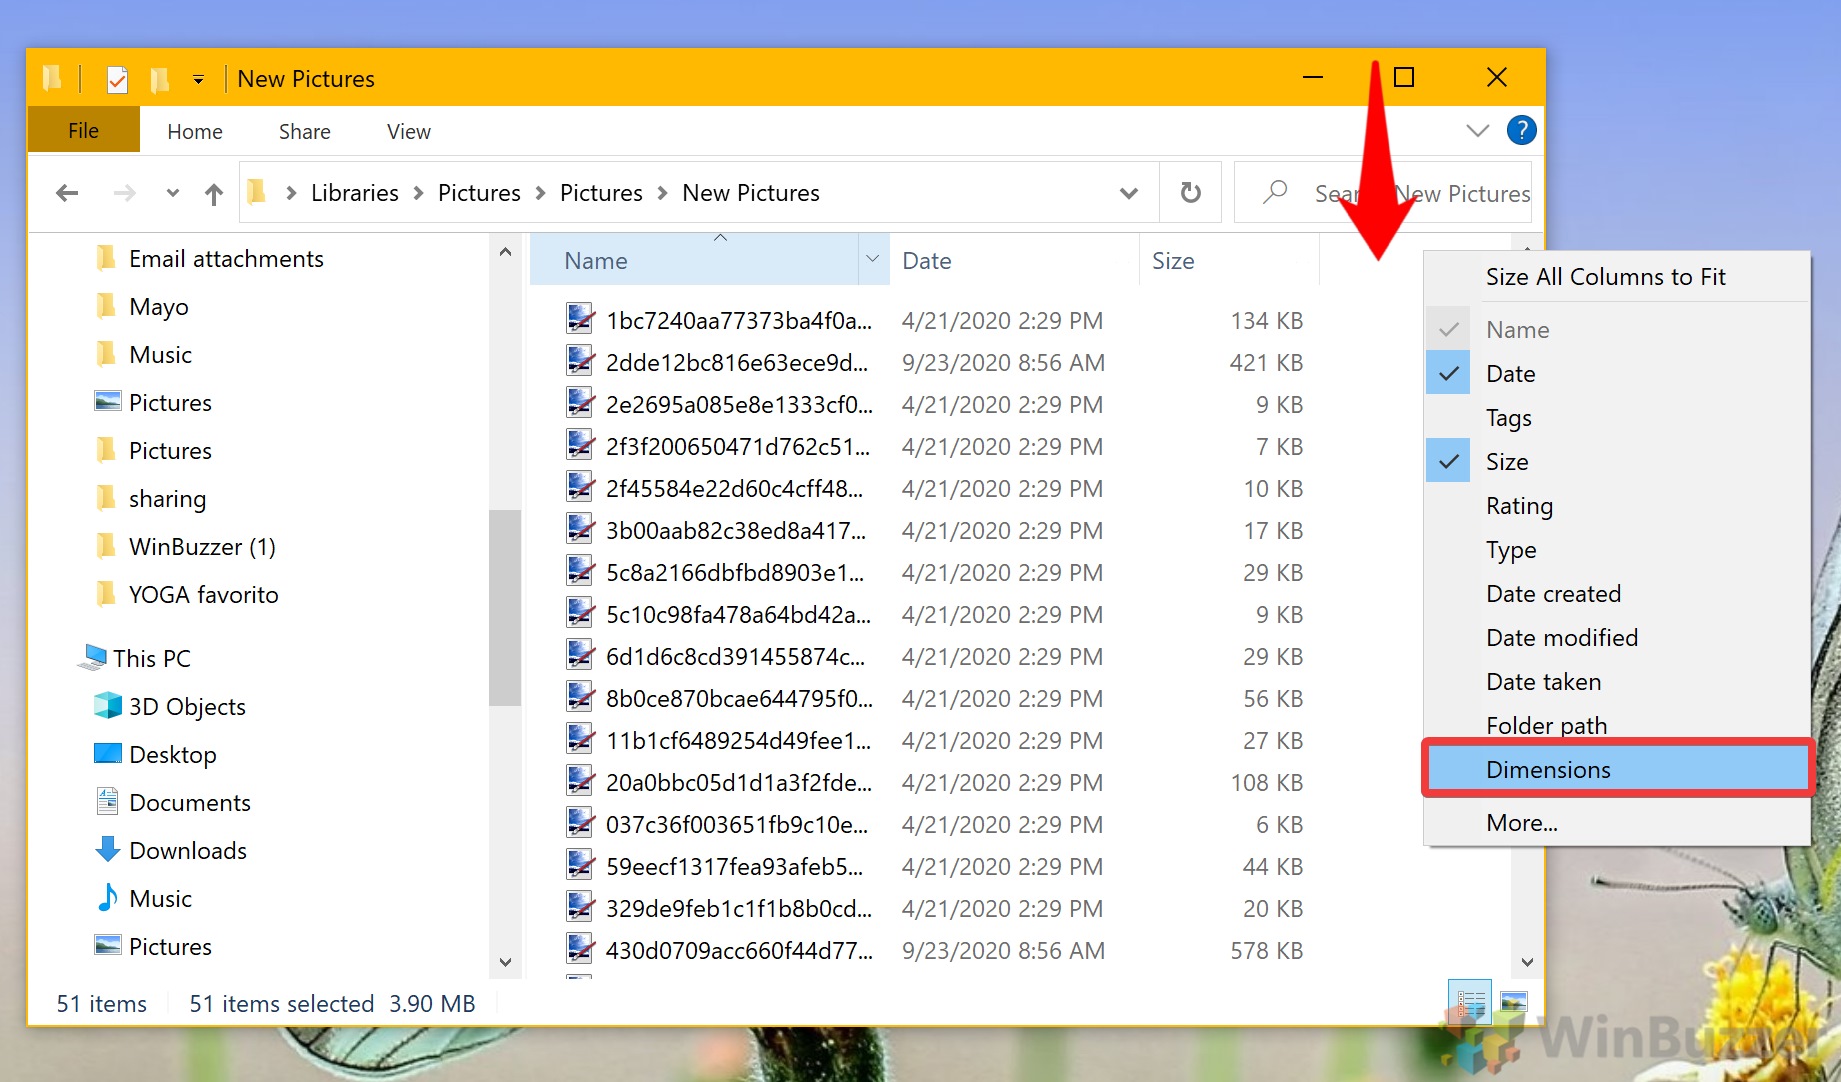
- Sort by Image Dimensions
Spotlight images are typically high resolution. Click on the “View” tab, select “Sort by“, choose “Dimensions“, and then “Descending” to bring the largest images to the top. These are likely to be your Spotlight images.
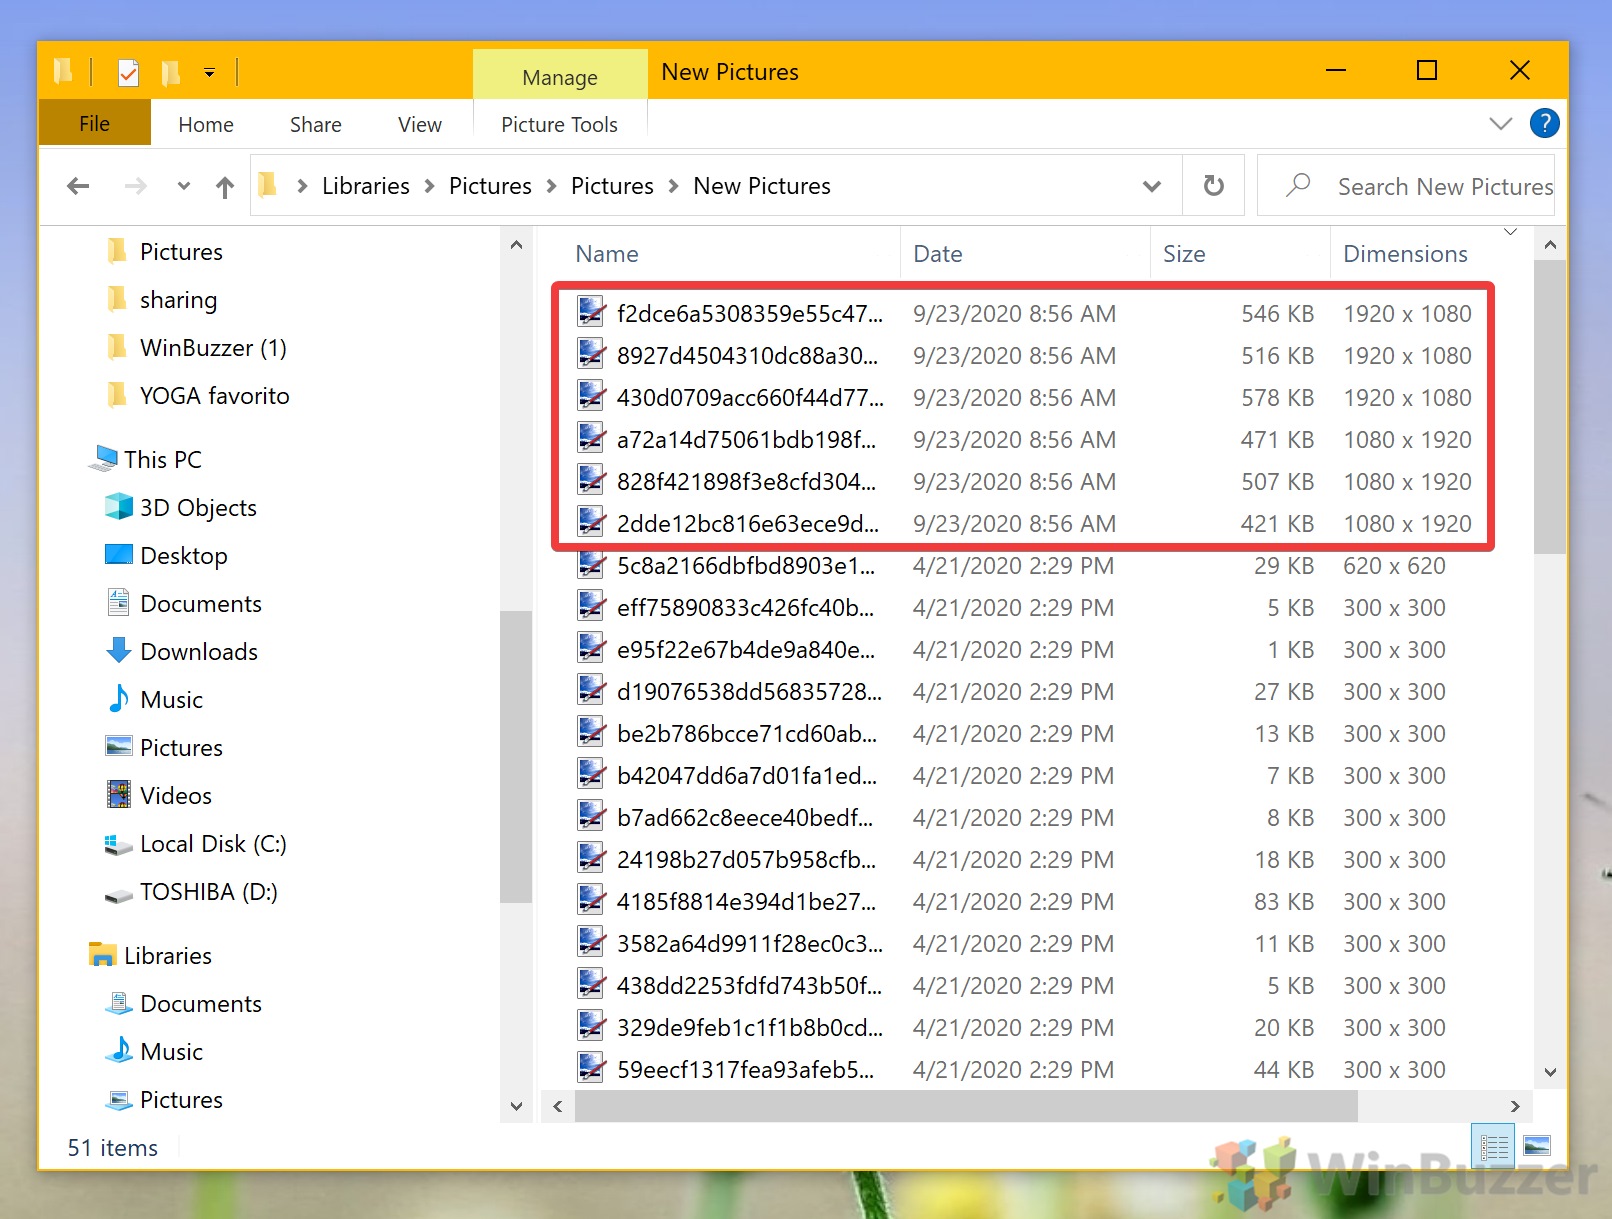
- Delete the other images
Look for all images with a resolution of 1920×1080 and above either select them and copy them to a new folder, or delete all of the other images with a low resolution.
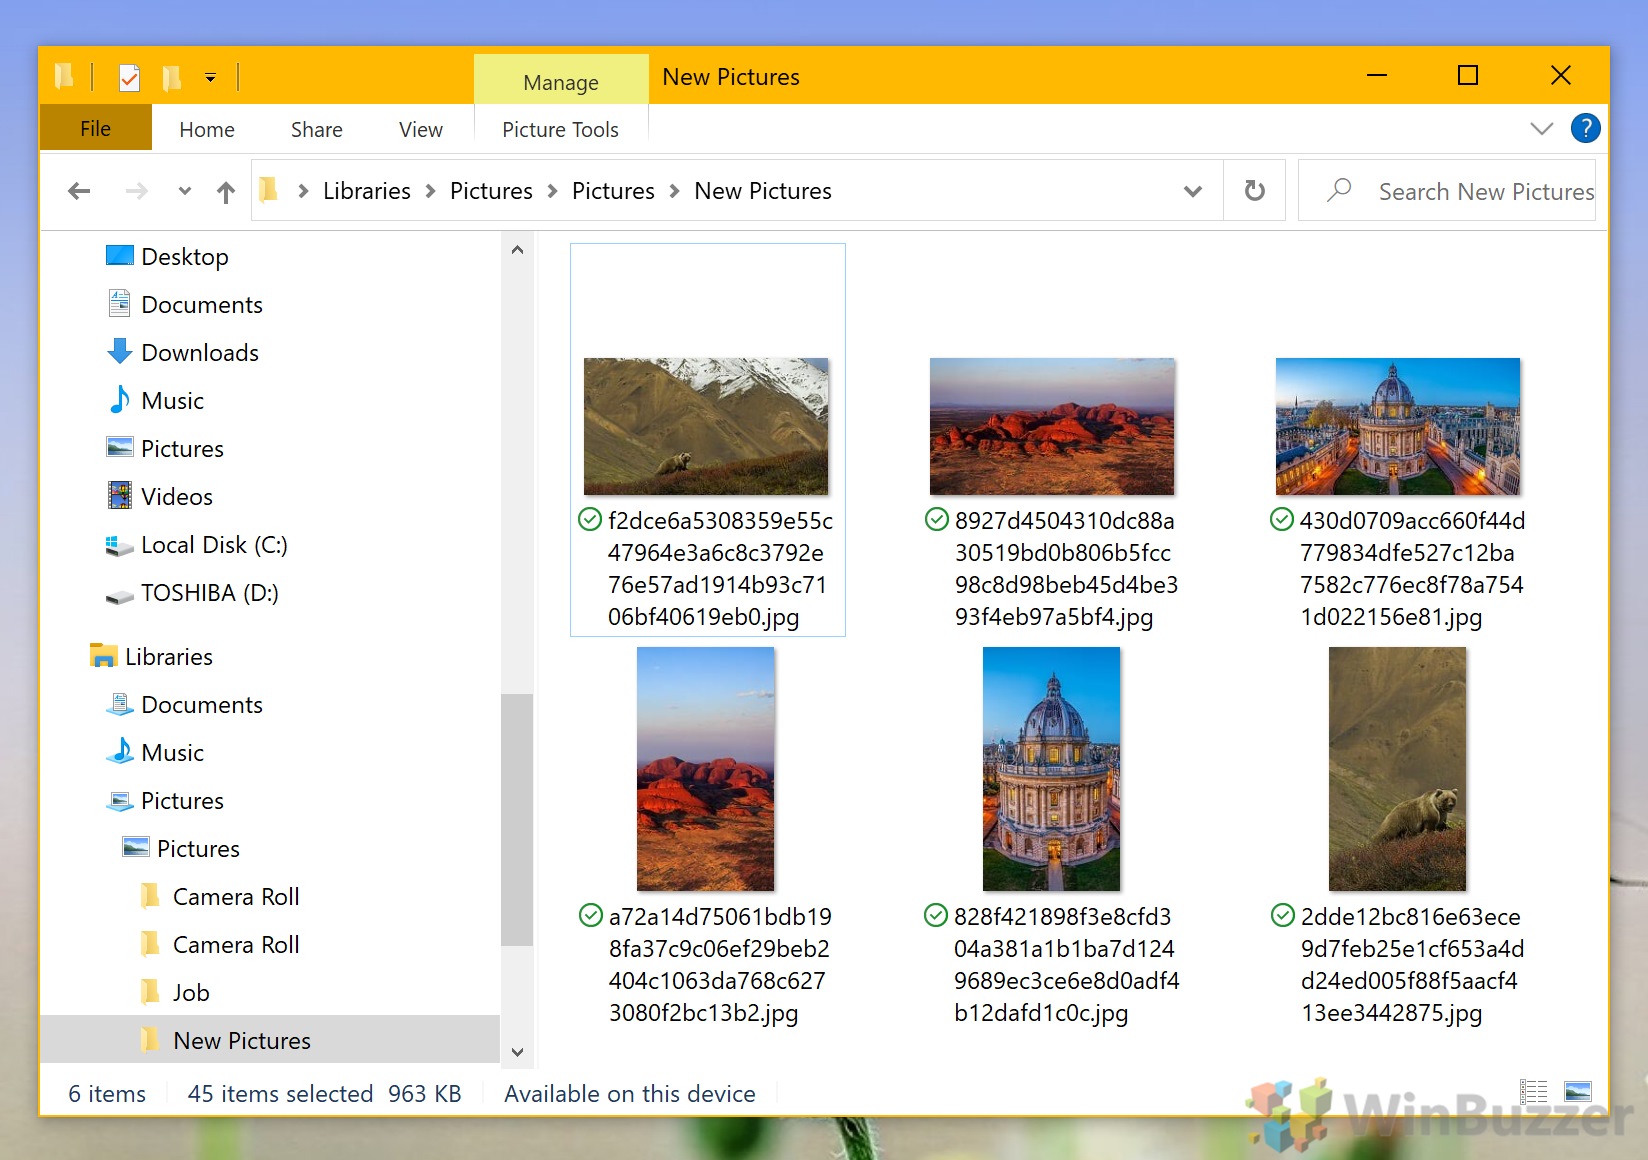
- Select and Save Your Favorite Images
Now that you’ve filtered the images, browse through them and save the ones you want to keep. You can copy or move them to other folders, set them as your desktop background, print them, or use them in projects.
How to save Windows Spotlight Images Automatically
For those who prefer a more hands-off approach, using an application to automatically save these images is the way to go. The Dynamic Theme app from the Microsoft Store automates this process.
Once installed, Dynamic Theme will start to automatically download your Windows Spotlight image each day. First, though, you have to enable this option.
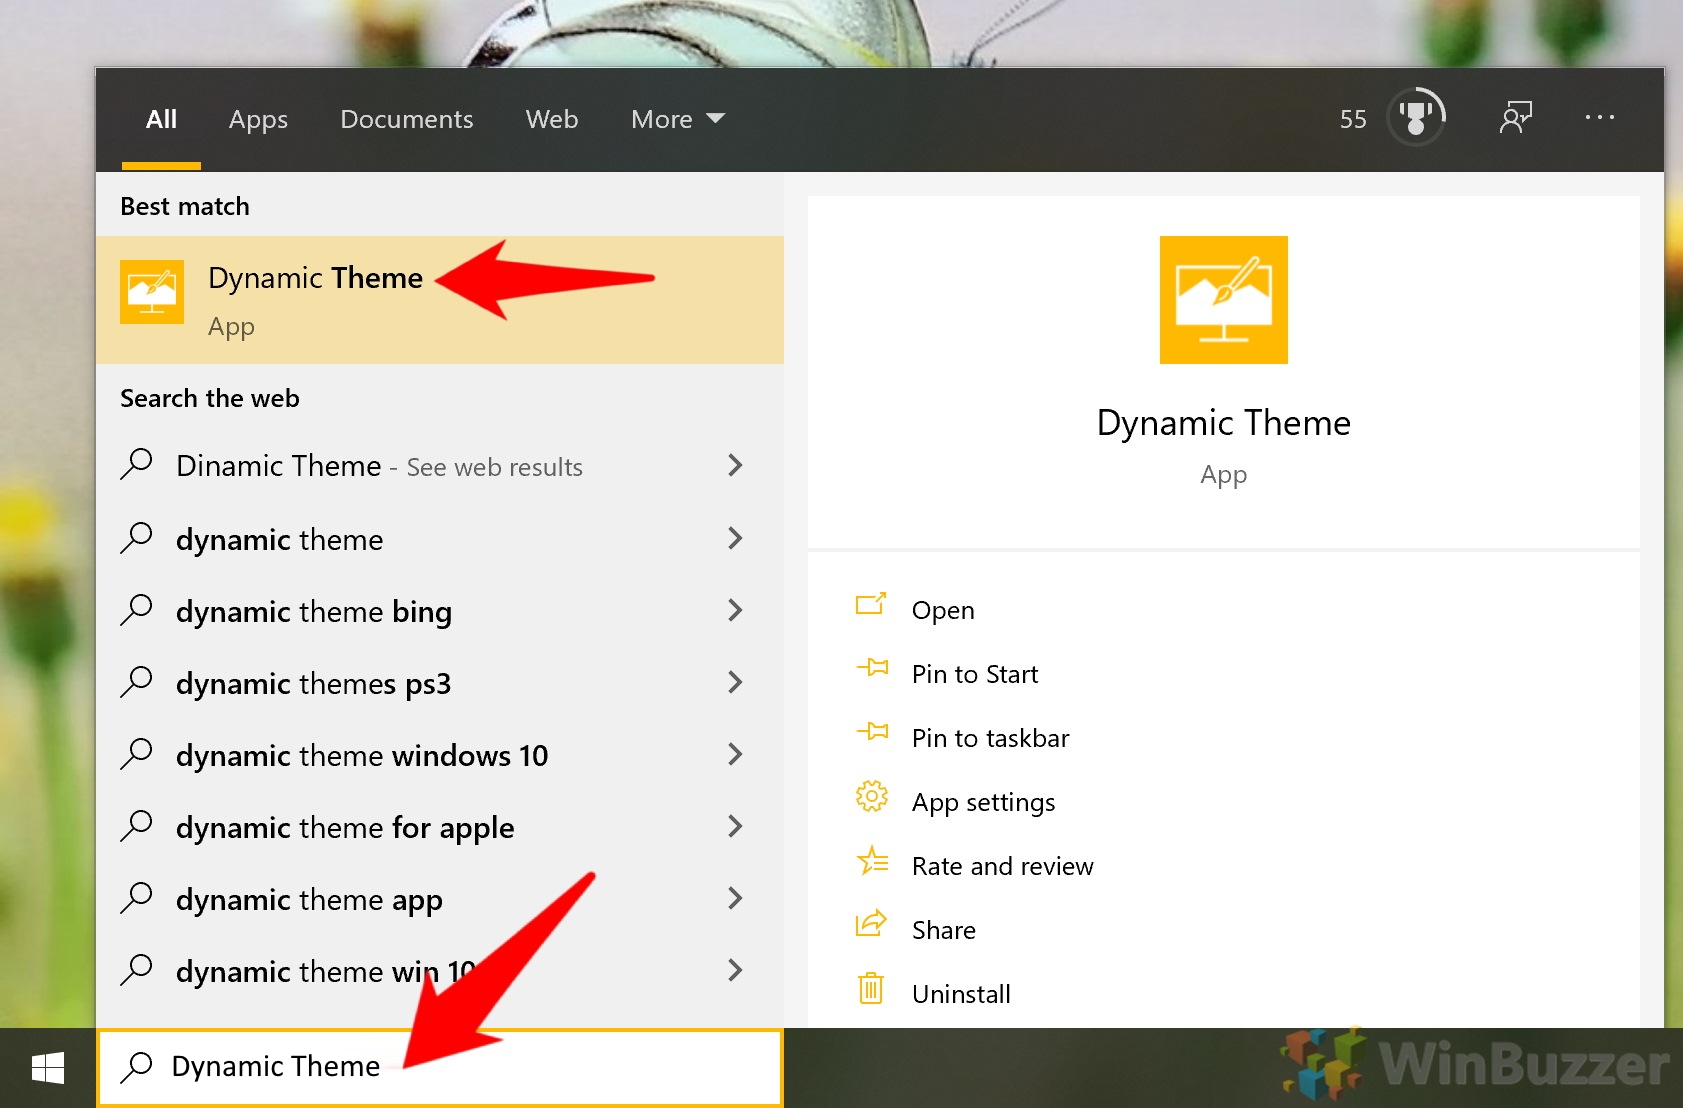
- Install and Open Dynamic Theme
Download and install the Dynamic Theme app from the Microsoft Store. Once installed, launch the app by pressing the “Start” button, typing “Dynamic Theme“, and selecting the app from the results.
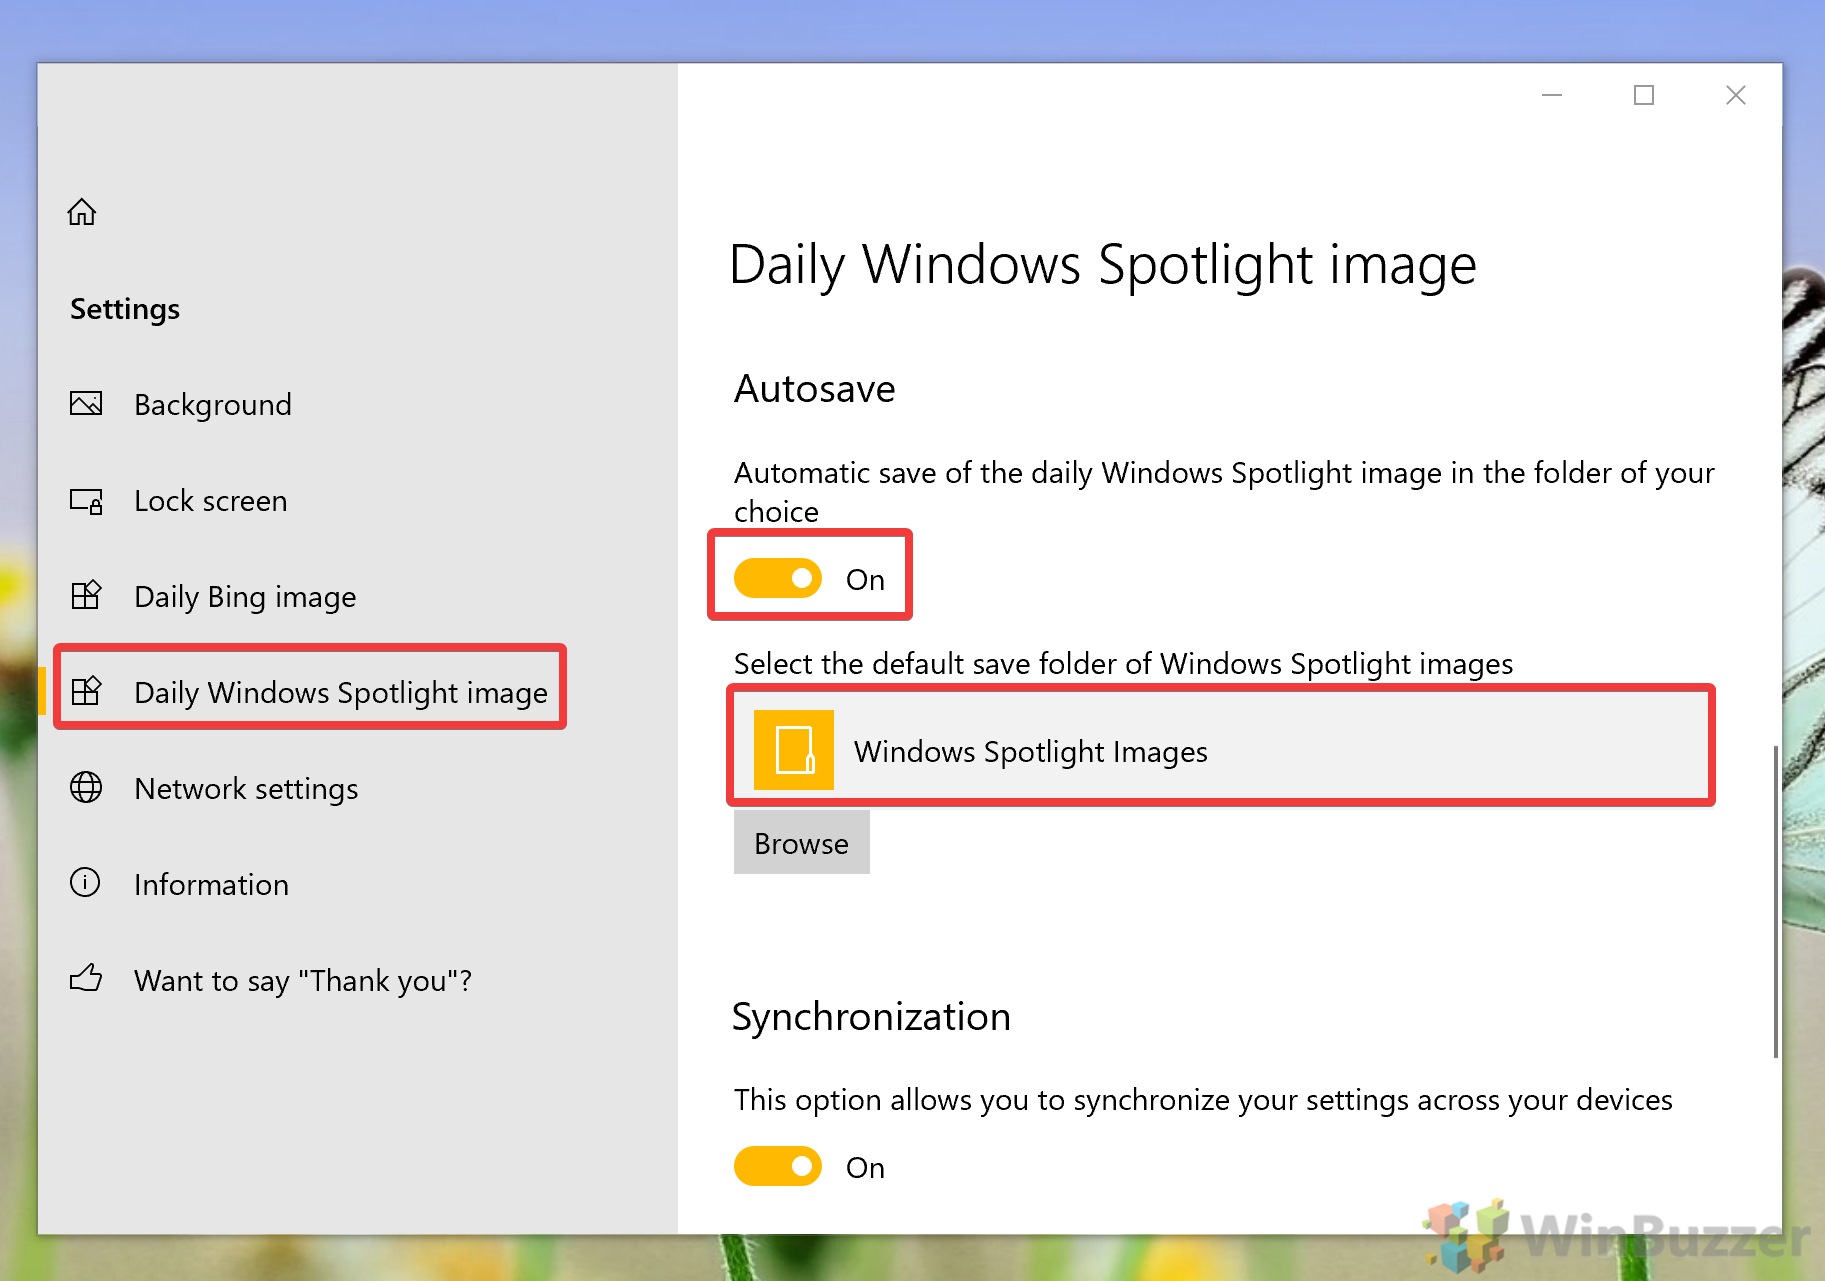
- Enable the Autosave Feature
In the Dynamic Theme app, navigate to the “Daily Spotlight image” section. Here, enable the option for “Automatic save of daily Windows Spotlight image in the folder of your choice“. Select a folder where you’d like these images to be saved.
- Configure Lock Screen Settings
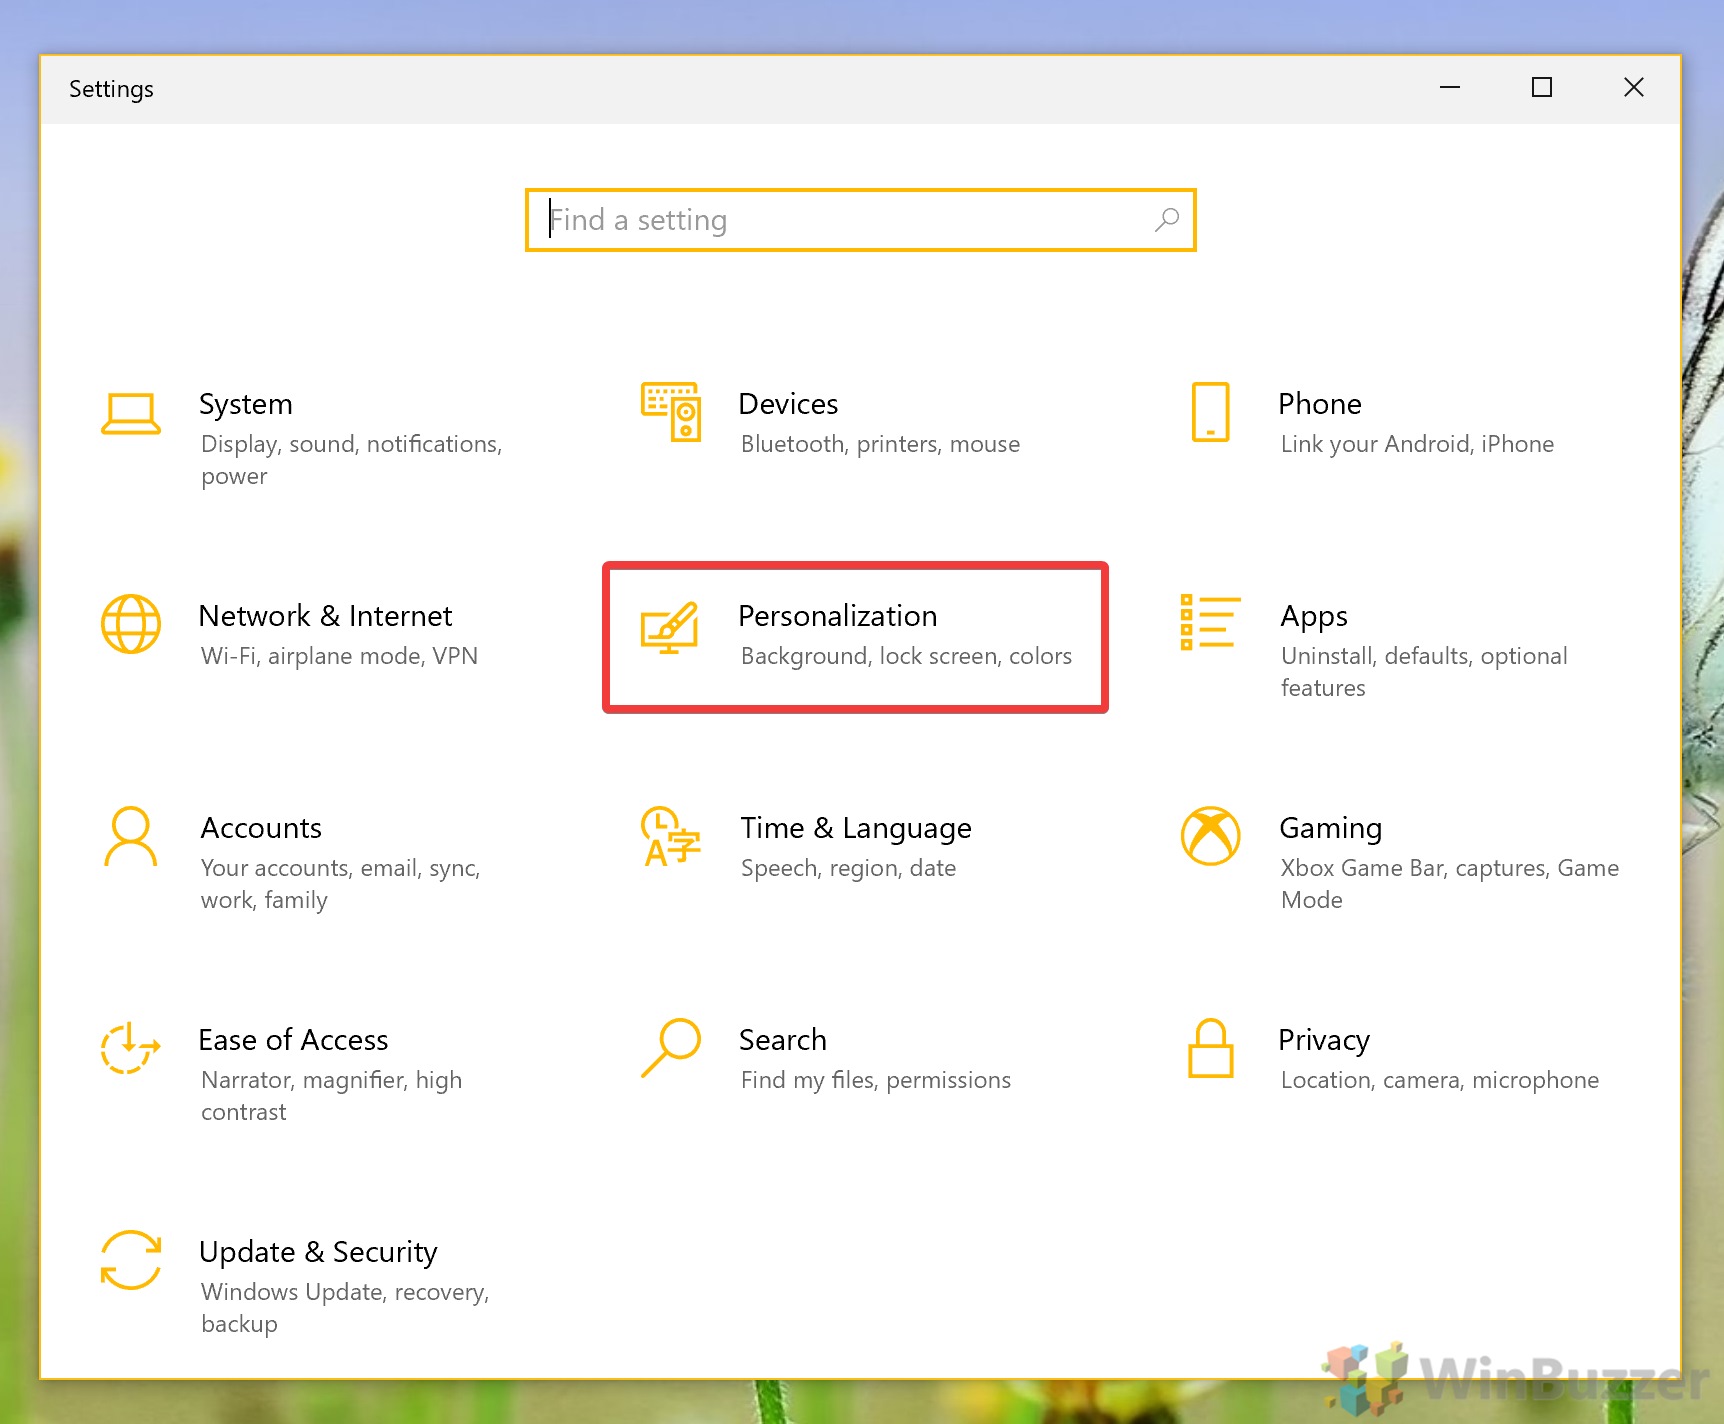
For Dynamic Theme to function correctly, it needs to be set as the source for your lock screen images. Press the “Start” button, click the settings cog to open Settings.

- Navigate to “Personalization”
- Add your Windows Spotlight Images
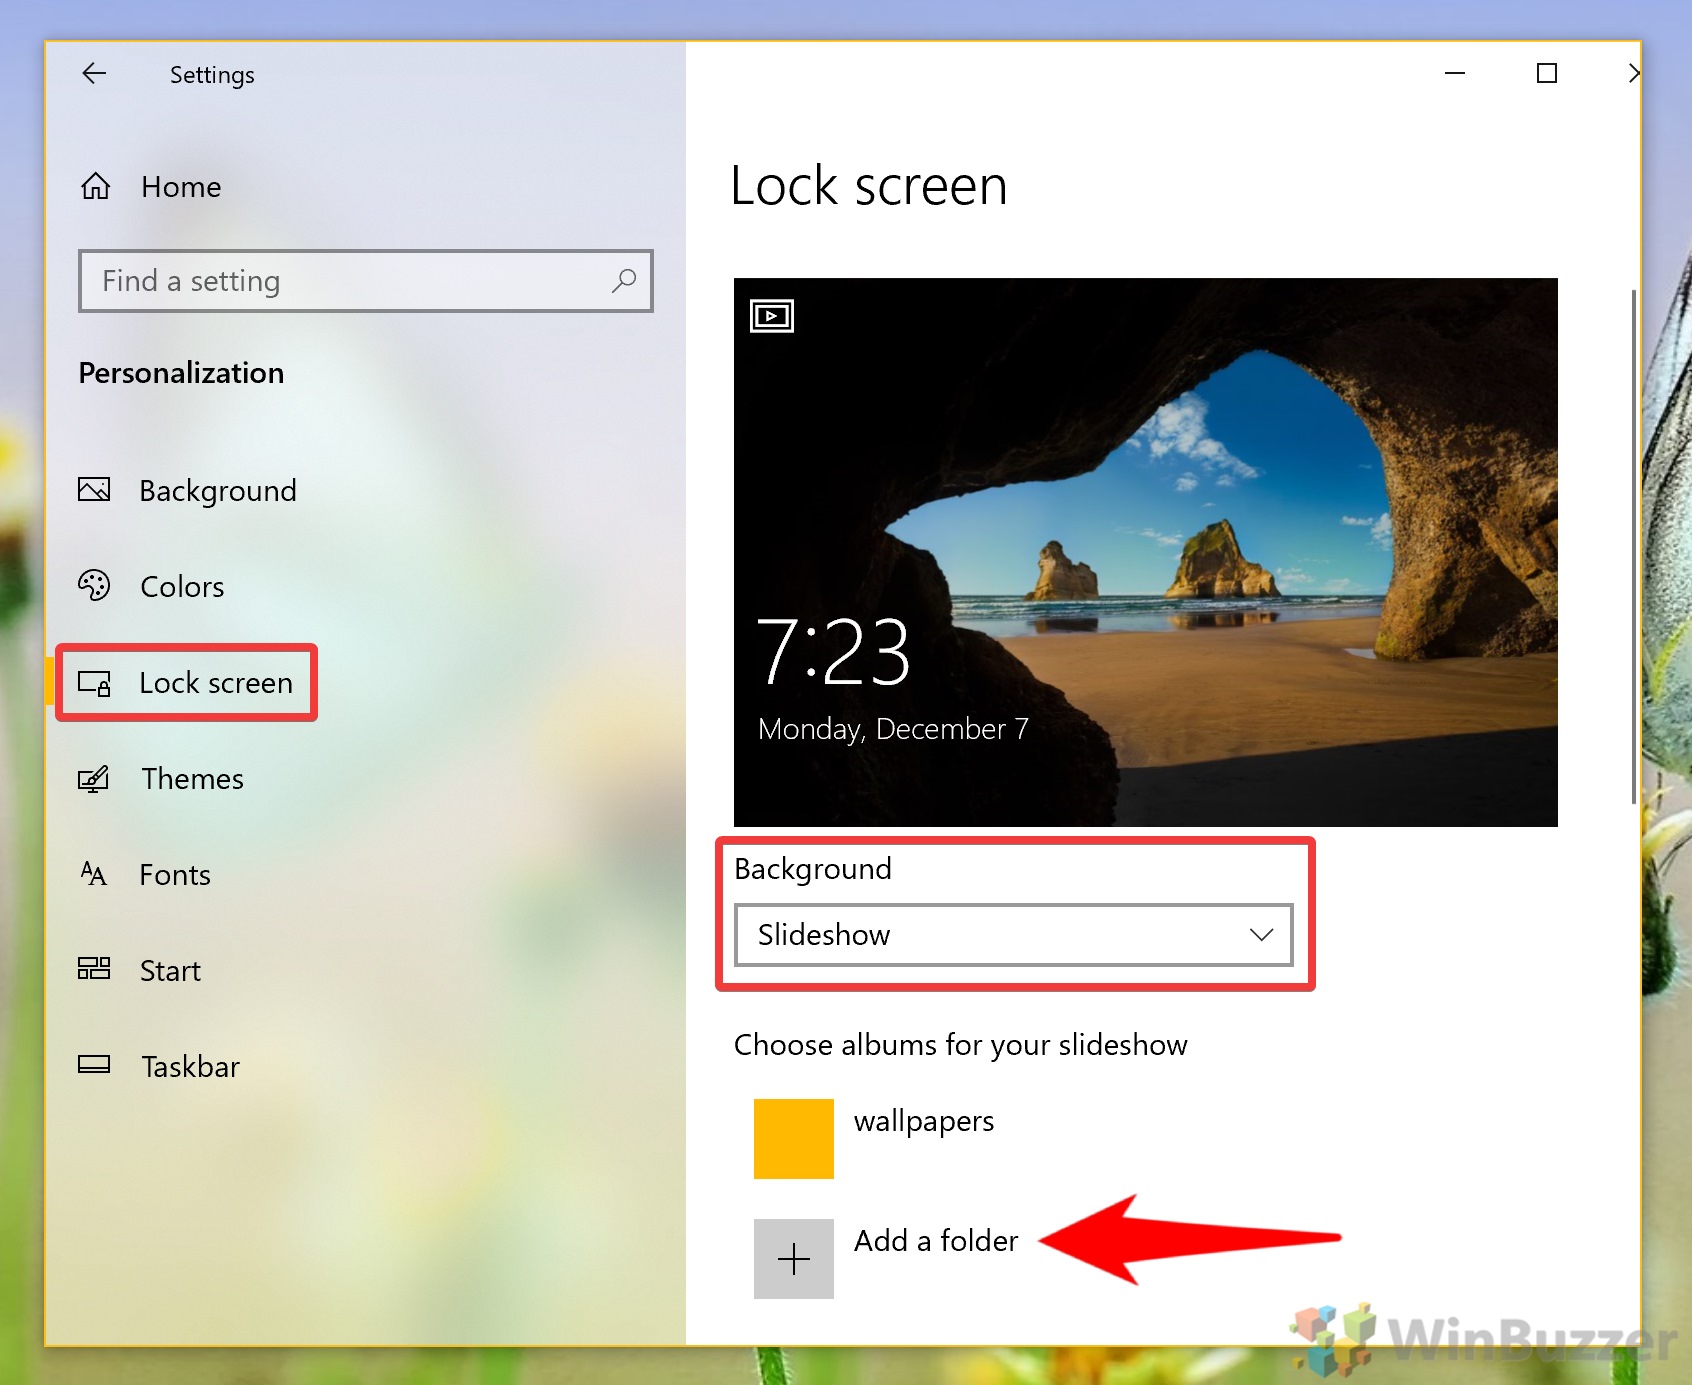
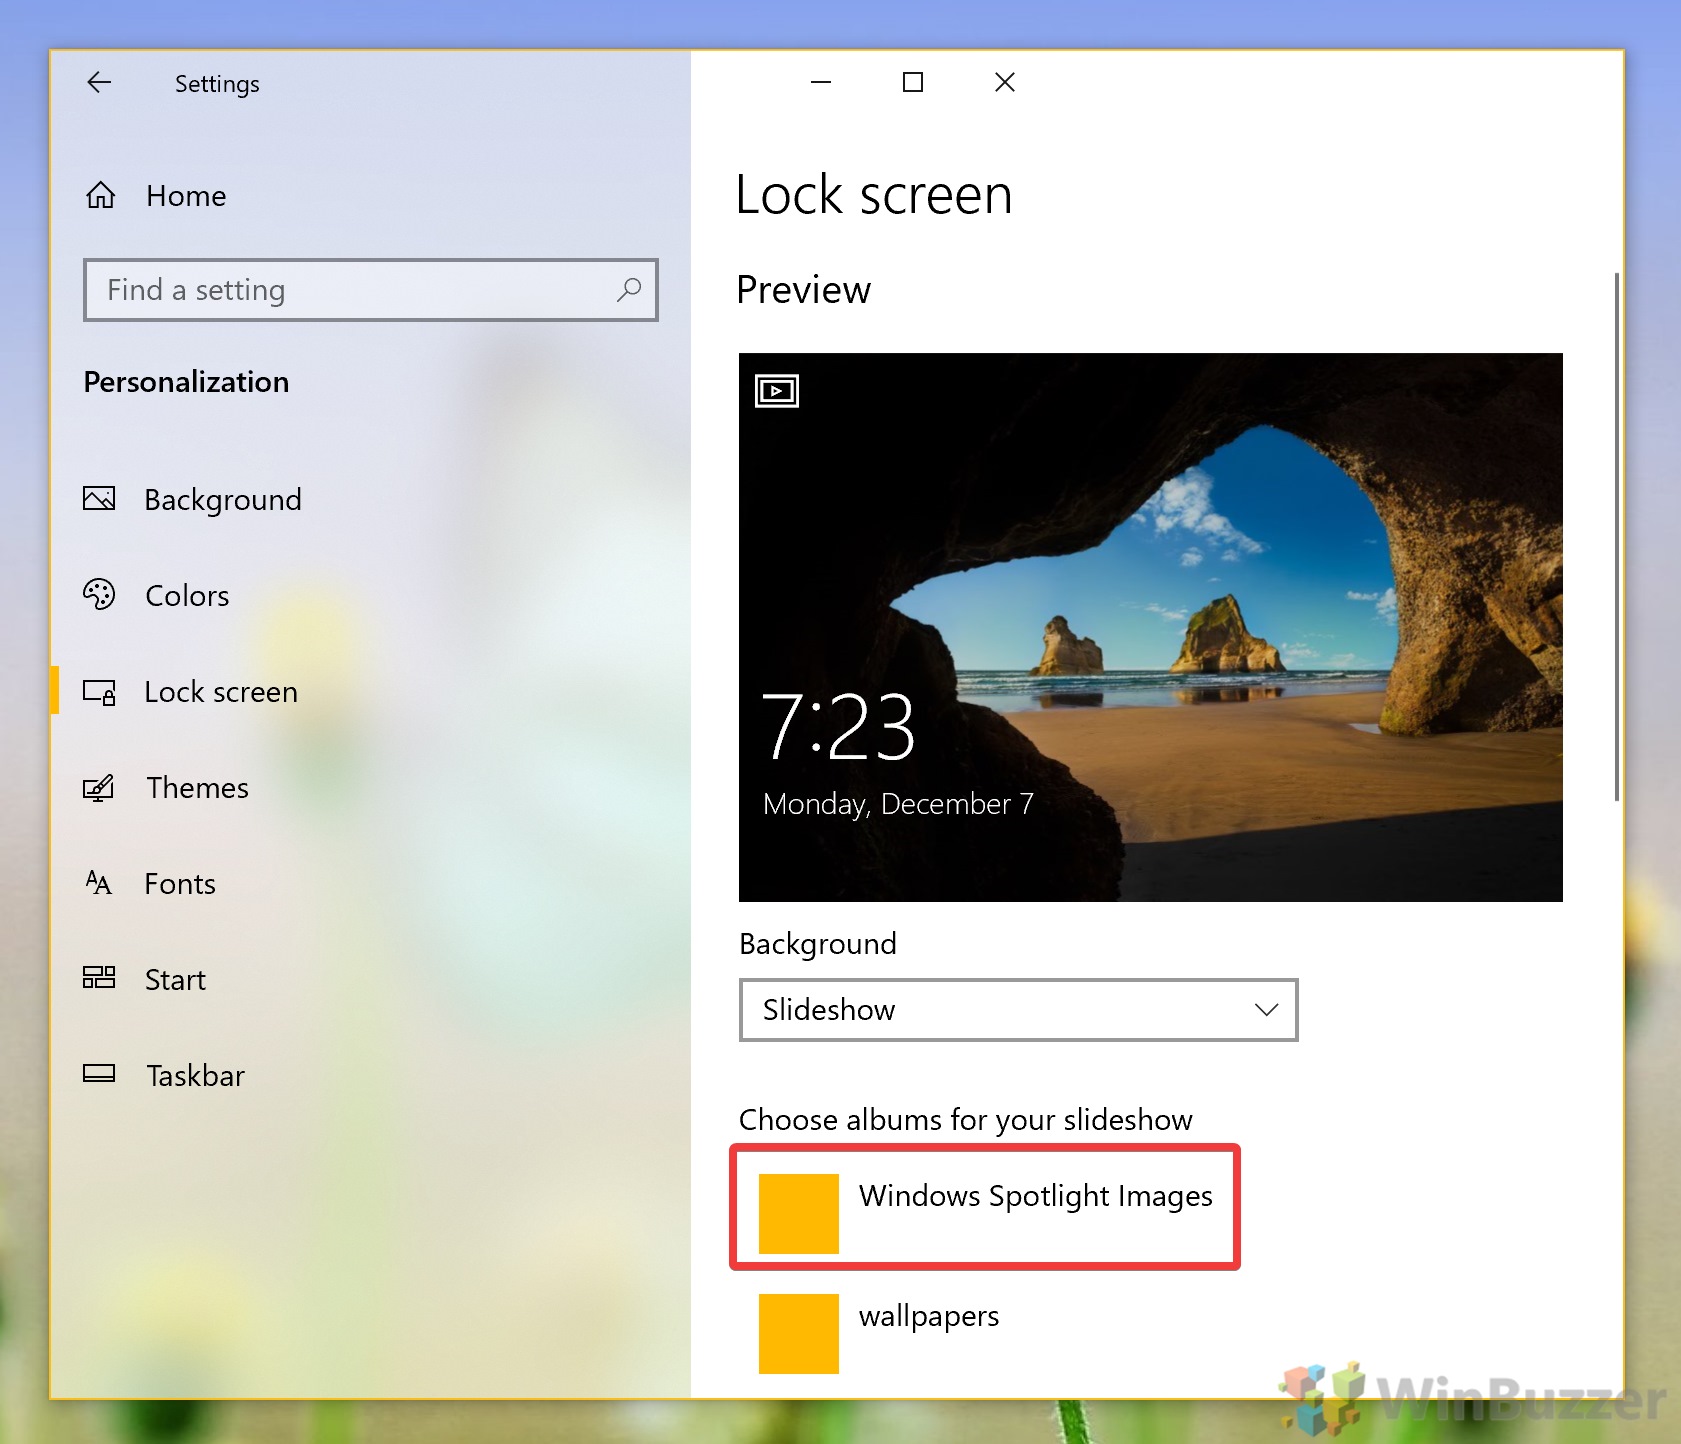
Click “Lock screen” in the sidebar, set your background to “Slideshow“, and then press “Add a folder“.
- Select your Spotlight images folder
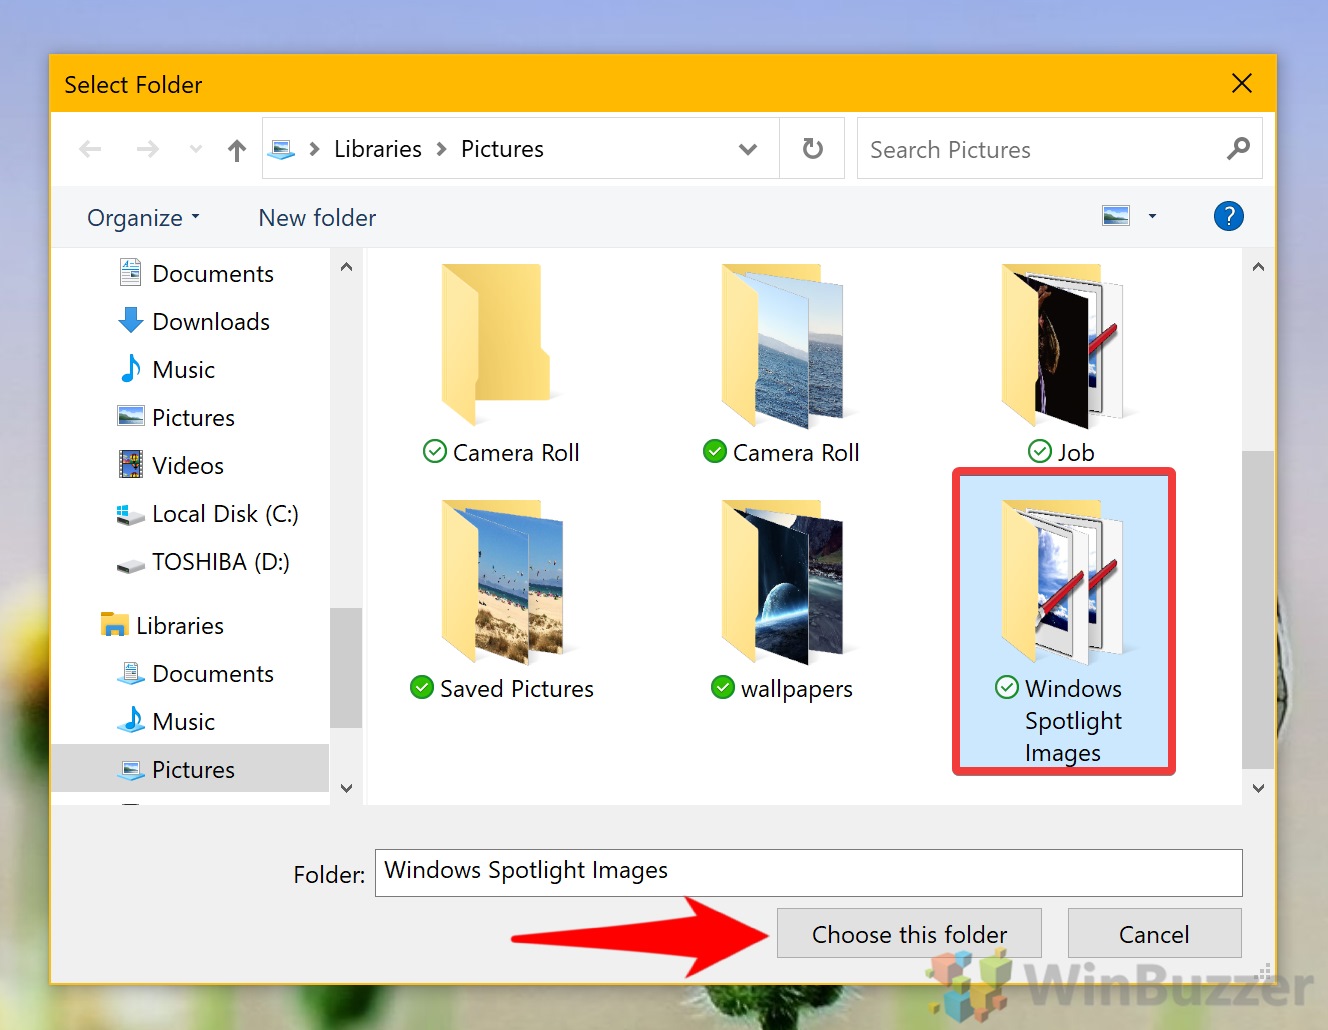
Navigate to your Windows Spotlight Images location, click the folder, and press “Choose this folder“.
- Enjoy Your New Backgrounds
Under the “Choose albums for your slideshow” heading, it should now read “Windows Spotlight Images“.
With Dynamic Theme set up, it will now automatically save new Windows Spotlight images to your selected folder. You can enjoy these beautiful images on your lock screen without manually saving them.
FAQ – Frequently Asked Questions About Windows Spotlight Images
Can I use saved Windows Spotlight images for commercial purposes?
No, the saved Windows Spotlight images are meant for personal use only due to copyright restrictions. Utilizing these images for any commercial purposes without obtaining explicit permission from the copyright owner could lead to legal consequences. It’s essential to respect copyright laws and only use these images within the limits allowed for personal use, such as personal desktop backgrounds or screensavers.
Why do some saved images appear blank or corrupted after converting them?
When converting files from the Spotlight Images folder, some may appear blank or corrupted because not all files are actual images. This folder contains various system files, including temporary data and thumbnails, which may not convert properly into an image format. To mitigate this, use the sorting by dimensions technique mentioned in the tutorial to prioritize and separate larger (likely true images) from these non-image files. This way, you only attempt to convert files that are large enough to be actual Spotlight images.
How can I automate the process of converting and filtering Spotlight images without using PowerShell?
To automate the process beyond using PowerShell for a one-time conversion, you could write a more complex script using PowerShell or another scripting language that periodically checks the Spotlight images folder, copies new files, converts them to a viewable format (e.g., JPEG), and filters them based on dimensions or other criteria. However, this requires an intermediate understanding of scripting and task scheduling on Windows. Tools like Task Scheduler can run your script at regular intervals, automating the process of maintaining a current collection of Spotlight images.
Is it possible to choose a specific image to be my permanent lock screen image?
Yes, by saving the desired Windows Spotlight image using the methods mentioned in the tutorial, you can set that specific image as your lock screen background. To do this, go to Settings > Personalization > Lock screen, choose “Picture” under “Background“, and then select the saved image you wish to use. This way, your lock screen will display your preferred image permanently, or until you decide to change it.
How do I revert back to using Windows Spotlight images on my lock screen after changing it?
To revert to Windows Spotlight for dynamic lock screen images, navigate to Settings > Personalization > Lock screen on your Windows 10 device. Under the “Background” dropdown menu, select “Windows Spotlight” instead of “Picture” or “Slideshow“. This action will restore the dynamic and regularly changing Spotlight images to your lock screen, discontinuing any static image previously set and resuming the automatic updates of new and stunning imagery.
Can Spotlight images be used on multiple devices, or do I need to save them separately for each device?
Once you have saved Spotlight images to a common accessible location, such as a cloud storage folder or a network shared drive, you can use them on multiple devices without needing to save them separately on each device. Ensure the device has access to the folder where the images are stored, and then manually set them as backgrounds or lock screen images through the device’s personalization settings. This approach provides flexibility and convenience, especially for users who want to maintain a consistent aesthetic across multiple devices.
What’s the easiest way to find the most recent Windows Spotlight image that I really liked?
If you’re manually saving Spotlight images frequently, keeping them organized by “Date modified” can help you identify the most recent ones quickly. By periodically performing the manual saving process outlined in the tutorial and then reviewing the images in your designated “Spotlight images” folder sorted by the date, you can swiftly locate the recent images that caught your eye. Regular housekeeping and organization of this folder, perhaps by creating subfolders for specific months or themes, can further simplify finding specific images later on.
How can I ensure that I don’t lose my saved Spotlight images?
To protect your collection of saved Spotlight images against data loss or system malfunctions, consider setting up a backup routine. This could involve regularly copying the images to an external hard drive, a USB flash drive, or a cloud storage service like Dropbox, Google Drive, or OneDrive. Most cloud services offer automated backup solutions that can sync your chosen folders (such as your Spotlight images folder) to the cloud continuously or at scheduled intervals. This way, even if your primary device encounters issues, your images remain secure and retrievable from the backup location.
Why can’t I find the Spotlight images folder using the search function in File Explorer?
The Spotlight images folder is located in a system directory that is hidden by default and may not be indexed by Windows search, making it virtually invisible to simple search queries in File Explorer. Direct navigation using the folder’s explicit file path is required to access it. To open this directory, you must enable the viewing of hidden items in the File Explorer’s “View” tab and then paste the given path into the File Explorer’s address bar. This method bypasses the need for the search function and takes you directly to the Spotlight images storage location.
After enabling hidden items, can other system files or folders be affected by accident?
Viewing hidden items and system files in File Explorer makes them visible but does not inherently modify or affect them. However, care should be taken not to accidentally delete or change these files, as they could be critical for the proper functioning of Windows or certain applications. Always ensure you know the significance of a hidden file or folder before making any changes, and consider hiding items again after you’ve finished your task to reduce the risk of accidental modifications.
Are there any third-party tools that provide similar images to Windows Spotlight but with easier access?
Yes, several third-party applications and websites offer collections of dynamic, high-quality images similar to those found in Windows Spotlight. Examples include Wallpaper Engine, John’s Background Switcher, and Unsplash, each providing a wide range of stunning visuals with various customization options and easier access to images. Some of these tools allow you to set the images as wallpapers directly from the application and may offer features like automated updates or the ability to curate personal collections of favorite images.
Can the Dynamic Theme app also change my desktop background automatically?
The Dynamic Theme app, besides managing and saving new Spotlight images, also offers the capability to automatically update your desktop wallpaper with images from the same collection. This feature ensures that your desktop background can stay fresh and inspiring, similar to your lock screen, without manual changes. To enable this, delve into the app’s settings and configure the desktop background options to match your preferences for how and when you’d like the app to update your wallpaper.
How can I resolve errors when the PowerShell command doesn’t convert files to JPEG?
If you encounter errors with the PowerShell command for converting files, first ensure you’ve navigated to the correct folder where the images are stored. If the command syntax is correct but issues persist, running PowerShell as an administrator might resolve permission-related errors. Right-click on PowerShell from the Start menu and select “Run as administrator” before repeating the command. For more complex issues, consult PowerShell documentation or community forums for specific error messages or alternative methods to batch convert files.
Is it normal for the saved Spotlight images folder to get very large over time?
Yes, as you continue to save new Spotlight images, the folder containing these files will grow in size. Regularly reviewing and deleting images you no longer want or need can help manage the folder’s size. Additionally, consider compressing older images into archive files (e.g., ZIP) to save space while keeping them accessible for future use. This approach allows for efficient storage management without sacrificing the collection of images you’ve accumulated.
Can I share saved Windows Spotlight images with friends for their personal use?
Sharing saved Windows Spotlight images with friends for non-commercial, personal use generally aligns with fair use, as long as you do not claim ownership of the images or profit from their distribution. It’s courteous to remind friends that these images are copyright-protected and should be used within the same personal use constraints. However, always consider the copyright status of any digital content before sharing it, and when in doubt, err on the side of caution and refrain from distributing copyrighted material.
Related: Windows Spotlight Not Working? Fix It with a Reset or Re-Register
If Windows spotlight images are not changing on your PC you can be stuck with the same lock screen image for eternity unless you take action. Others run into more serious issues like a Windows spotlight blue screen or a “Windows spotlight is not available” error. In our other guide, we show you how to reset and re-register Windows Spotlight so that images continue to change.

Related: How to Make a Slideshow on Windows 11 and Windows 10
Creating a slideshow on Windows 11 and Windows 10 can be a fun and creative way to compile memories, present information, or share a story through images and music. Both operating systems provide users with intuitive tools that simplify the process, making it accessible even for those without any technical background. In our other guide, we show you how to make a slideshow from photos in Windows, covering various pieces of in-built software and how to use them.

Related: How to Set a Video as a Live Desktop Wallpaper in Windows
If you prefer using a video as a live desktop wallpaper instead of a slideshow, there are various ways to achieve this in Windows 11 and Windows 10. In our other guide we show you two different methods that should work well on most systems.