If you have more than one user on your PC or share it with a family member, you likely have to log out and in a lot. Microsoft has kept this in mind, adding a switch user in Windows 11 / 10 that’s known as fast user switching.
The interface can be accessed on most PC’s by clicking the profile icon, via the “ALT + F4” hotkey or via the Windows 10 / 11 lock screen. Some users find that the Windows 10 switch user option is missing. This often happens because someone has disabled the feature, and there are some good reasons for doing so.
While fast user switching is useful, you can run into problems when trying to shut your PC down or run software that is already active on the other account. Fast user switching performance is also a topic of hot debate, with signed-in accounts sometimes still using CPU and RAM.
As a result, we’re going to show you how to disable fast user switching, but we’ll also cover enabling it if the Windows 11 / 10 switch user option is missing on your system and you want to use it.
⚠️ Please note: The process described below is the same in Windows 11 as it is in Windows 10. However, bear in mind that we’ll be using screenshots from Windows 11, so your UI may look a little different. We’ll point out any changes you need to be aware of as they come up.
How to Disable Fast User Switching or Enable it with the Local Group Policy Editor
If you have Windows 11 / 10 Pro or Enterprise and are wondering how to disable fast user switching, look no further than the local group policy editor. This is by far the easiest method but Windows 10 Home users will need to look elsewhere.
- Open the Local Group Policy Editor
Press the “Windows” key and type “gpedit”, then click “Edit Group Policy”.

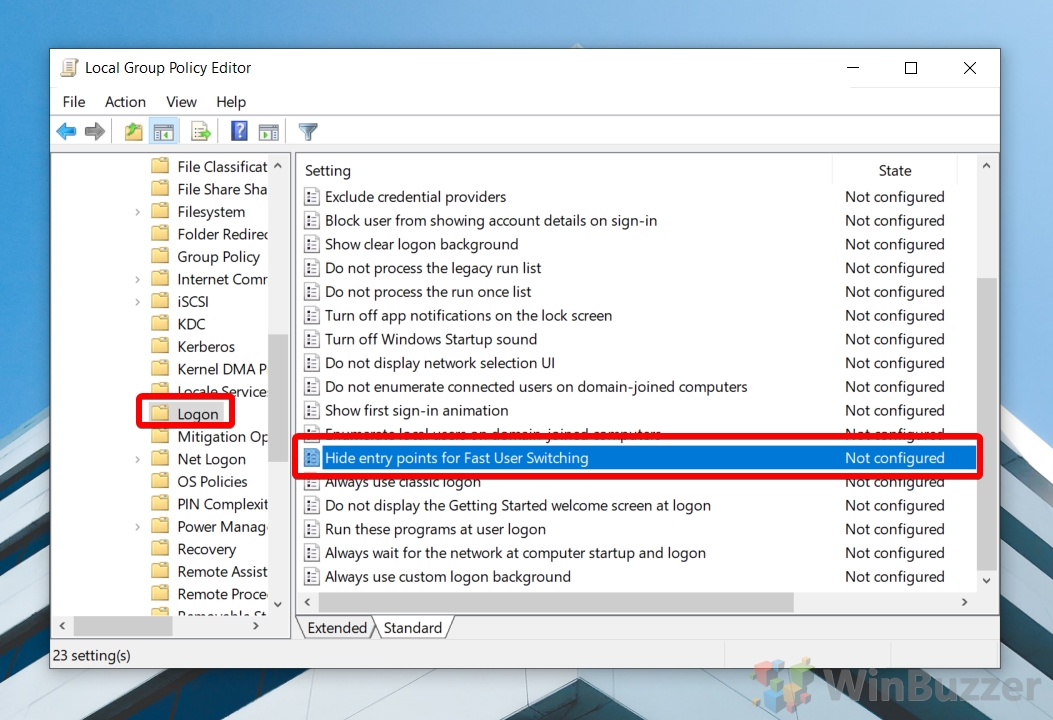
- Find the Windows 10 fast user switching policy
In the Local Group Policy Editor sidebar, navigate toComputer Configuration\Administrative Templates\System\Logon. Double-click the policy in the main pane named “Hide entry points for Fast User Switching”.
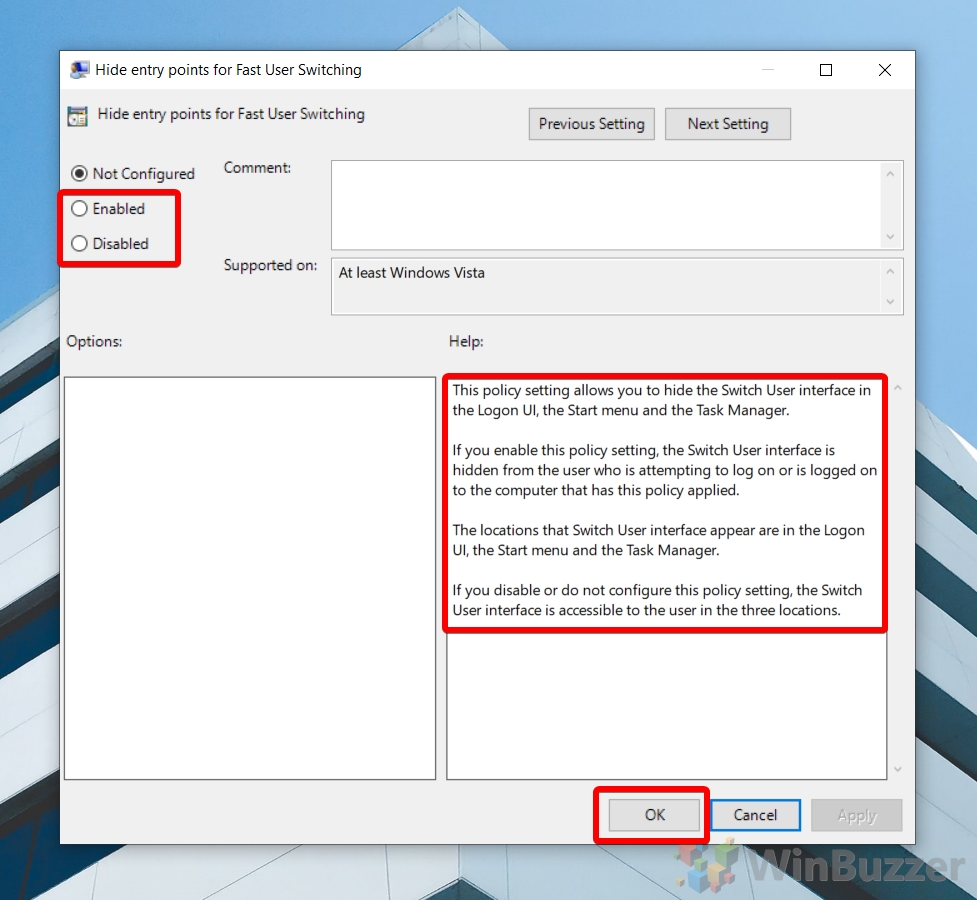
- Disable fast user switching or turn it on
In the group policy editing window, set “Hide Entry Points for Fast User Switching” to one of the following:
Enabled = to disable the switch user
Disabled = to enable the menu if Windows 10 switch user is missing
Not Configured = to follow the system defaults
Make sure you read the help section before making a decision, then click “OK”. Restart your PC or the Explorer process.
How to Enable or Disable Fast User Switching with Regedit
Unfortunately, Windows 10 / 11 Home users have no option other than making changes to the registry if they want to disable or enable switch user in Windows 10. It’s up to you if you do this via the manual method below or the faster command prompt method further down.
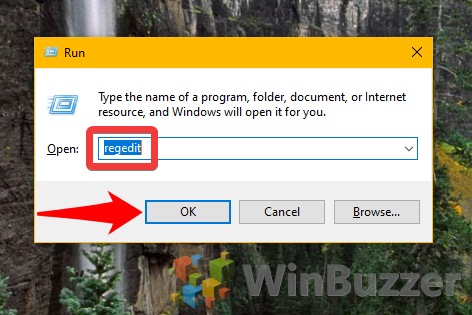
- Open the Registry Editor
Press “Windows +R” and type “regedit” in the dialog box, then press “OK”.
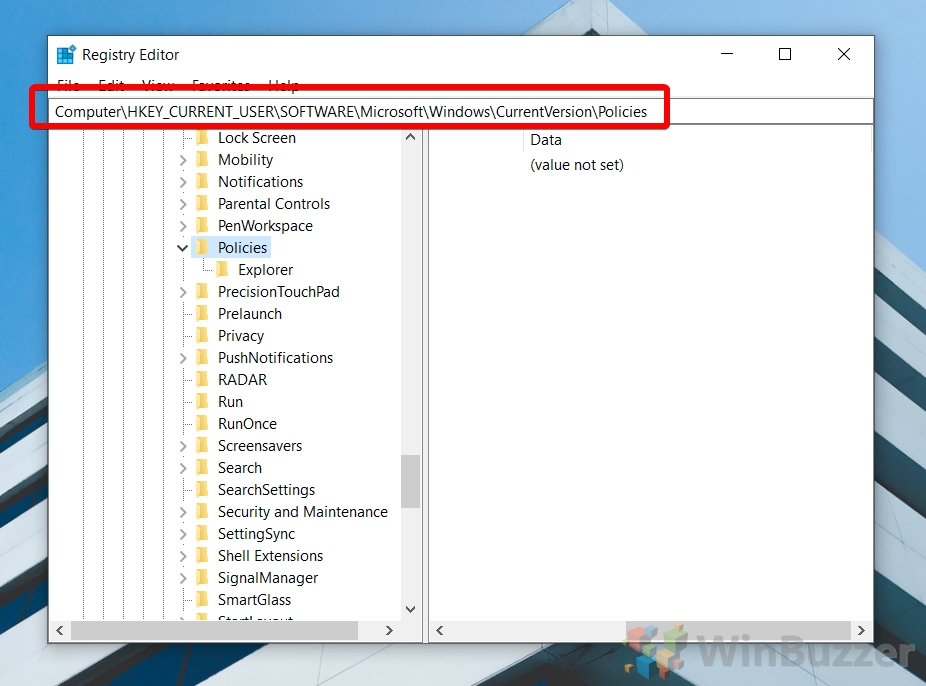
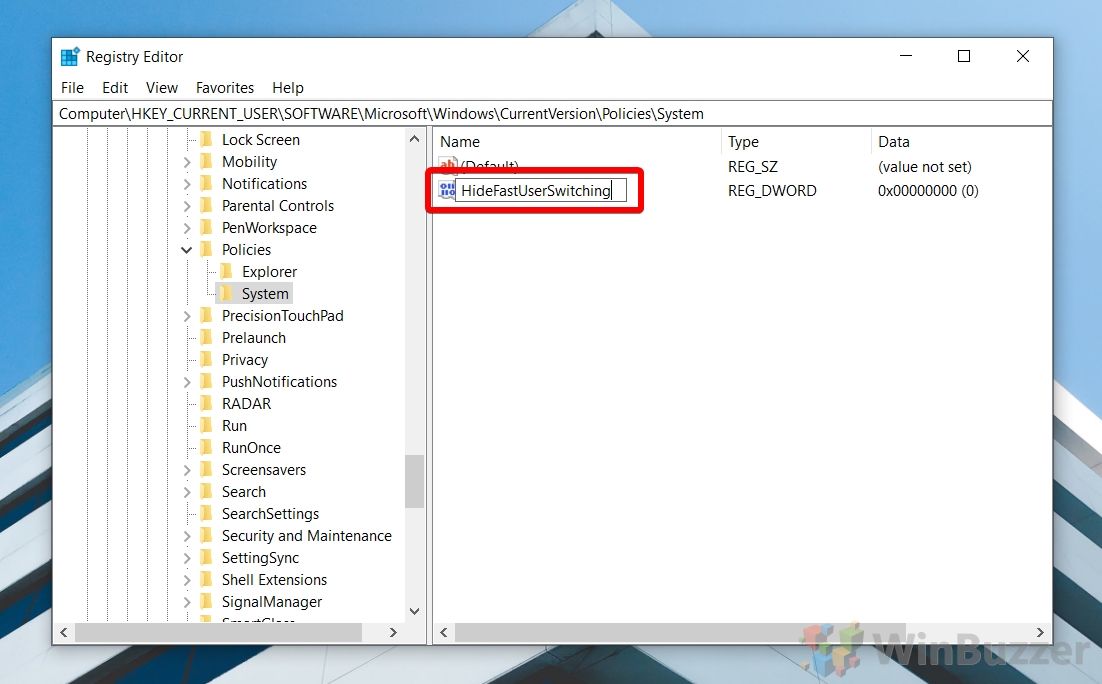
- Navigate to the Policies key to disable fast switching for the current user
PasteComputer\HKEY_CURRENT_USER\Software\Microsoft\Windows\CurrentVersion\Policies\Systeminto your address bar and press “Enter”.
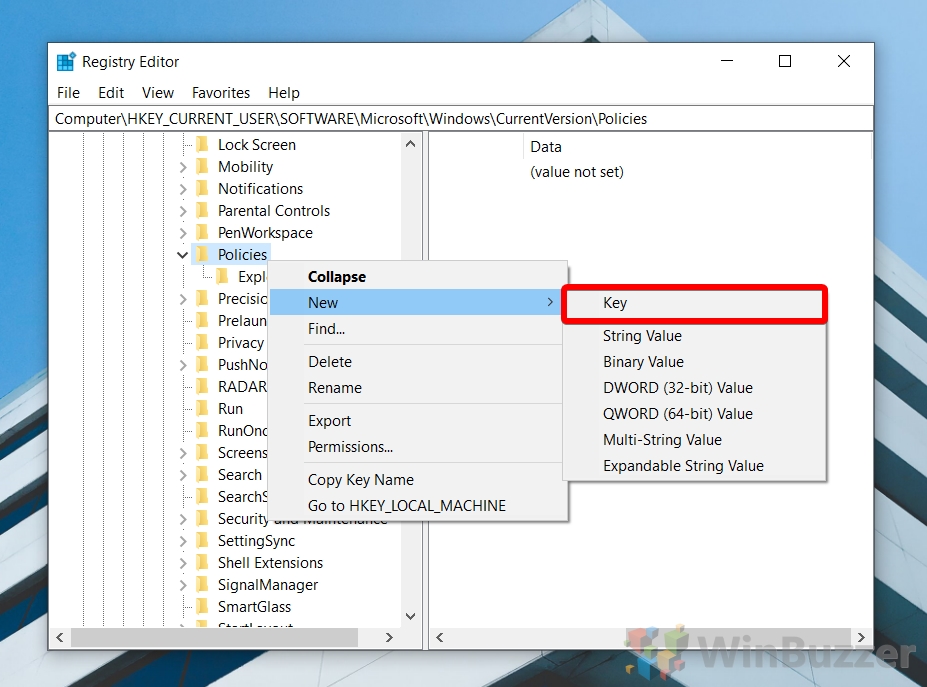
- Create a new registry key
Right-click the empty space and choose “New > Key”.
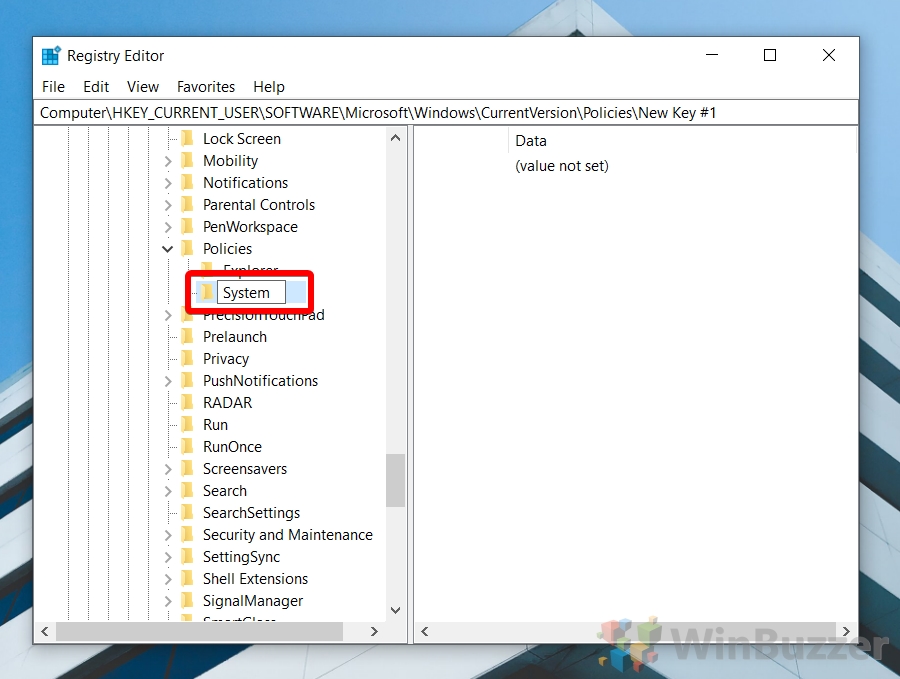
- Name the folder “System”
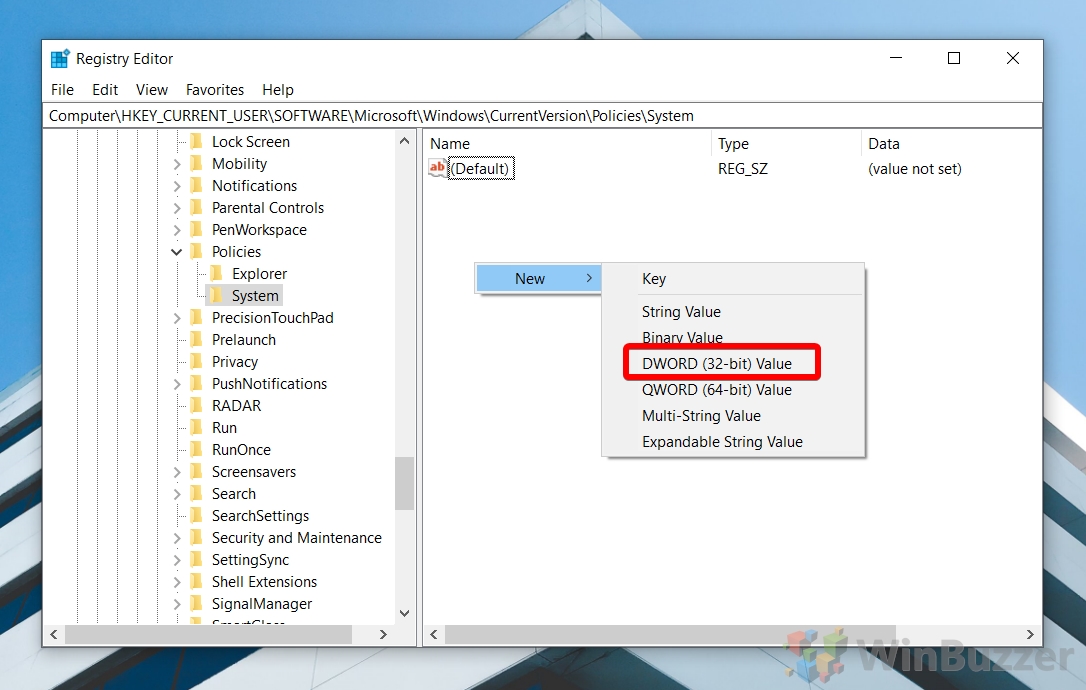
- Create a new DWORD (32-bit) Value in the System key
To do so, right-click the empty space in the empty pane and choose “New > DWORD (32-bit) value”.
- Name the DWORD “HideFastUserSwitching”
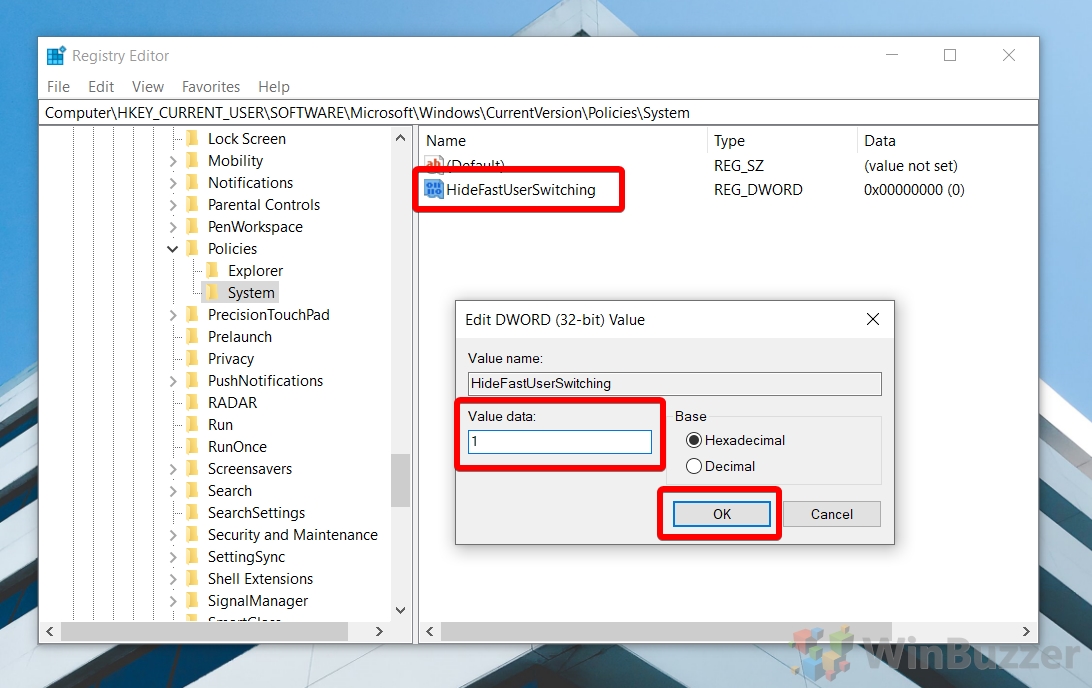
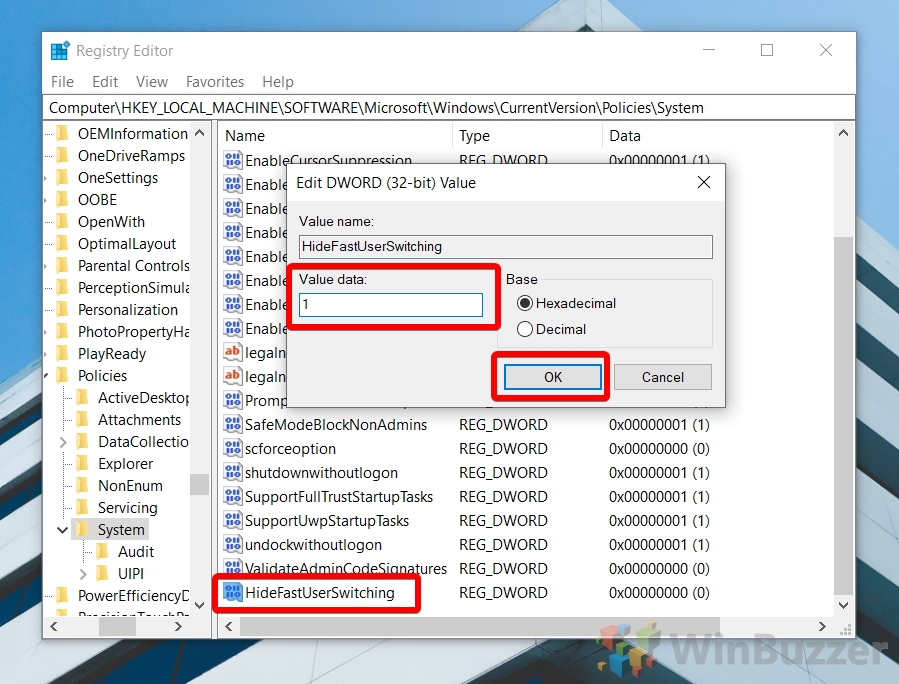
- Enable or disable fast user switching for the current user
Double-click your new DWORD and change the value data to “1” to hide the switch user option, or “0” to force it to display. Restart your PC or the Explorer process.
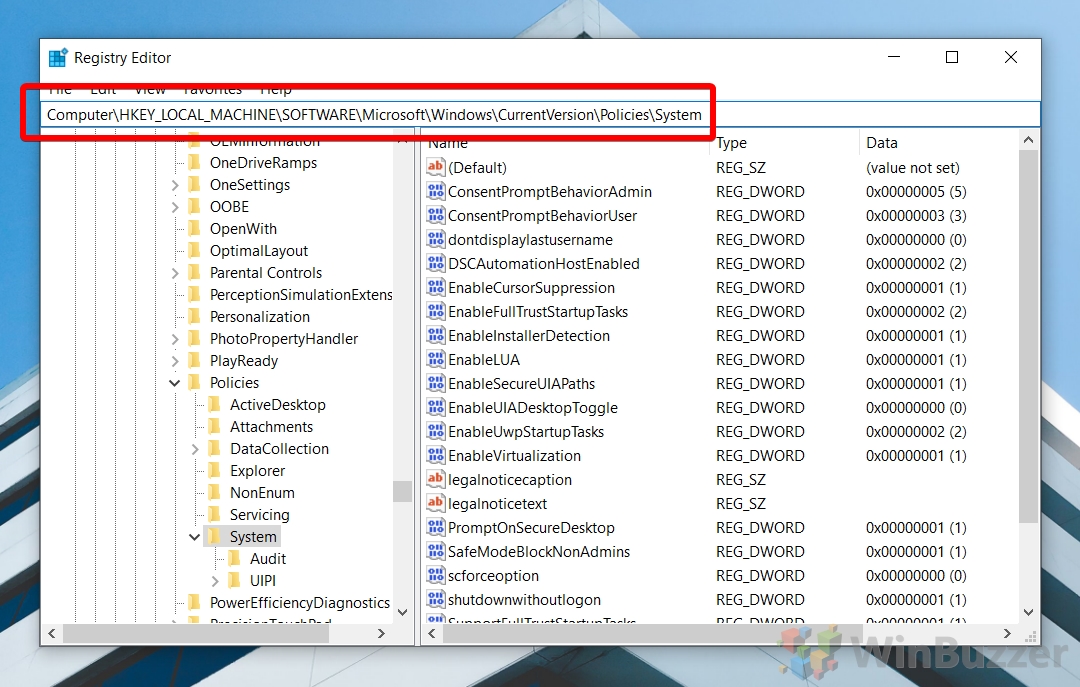
- Navigate to the policy key for the entire machine
You’ll find it atComputer\HKEY_LOCAL_MACHINE\SOFTWARE\Microsoft\Windows\CurrentVersion\Policies\System.
- Create a new DWORD
Right-click the empty space in the empty pane and choose “New > DWORD (32-bit) value”.
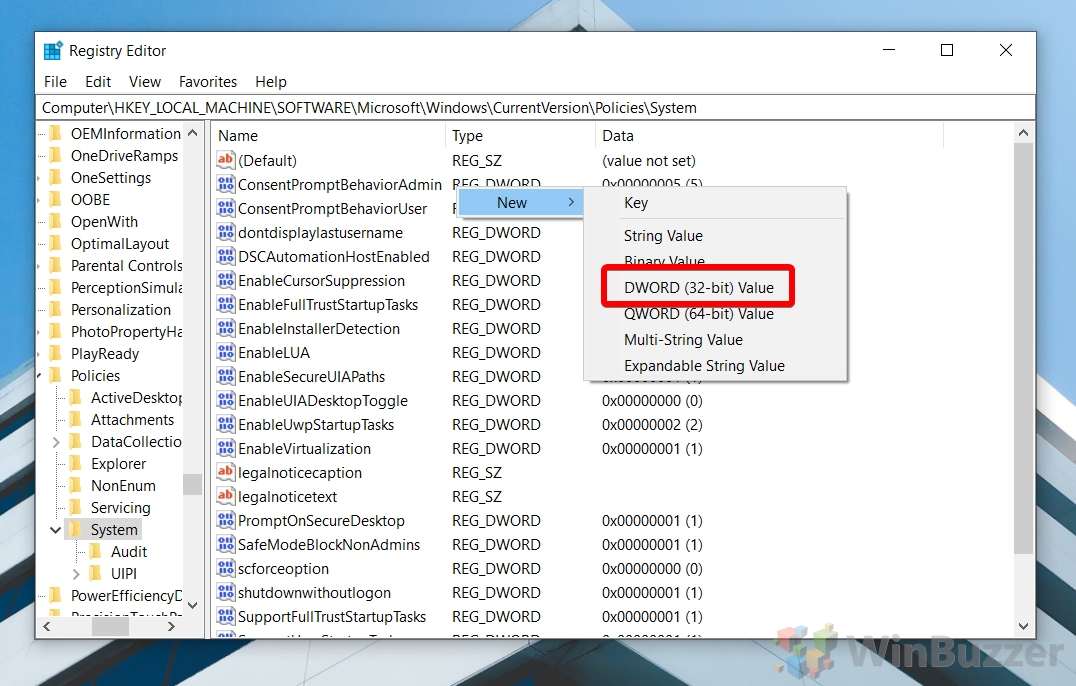
- Name the DWORD “HideFastUserSwitching”
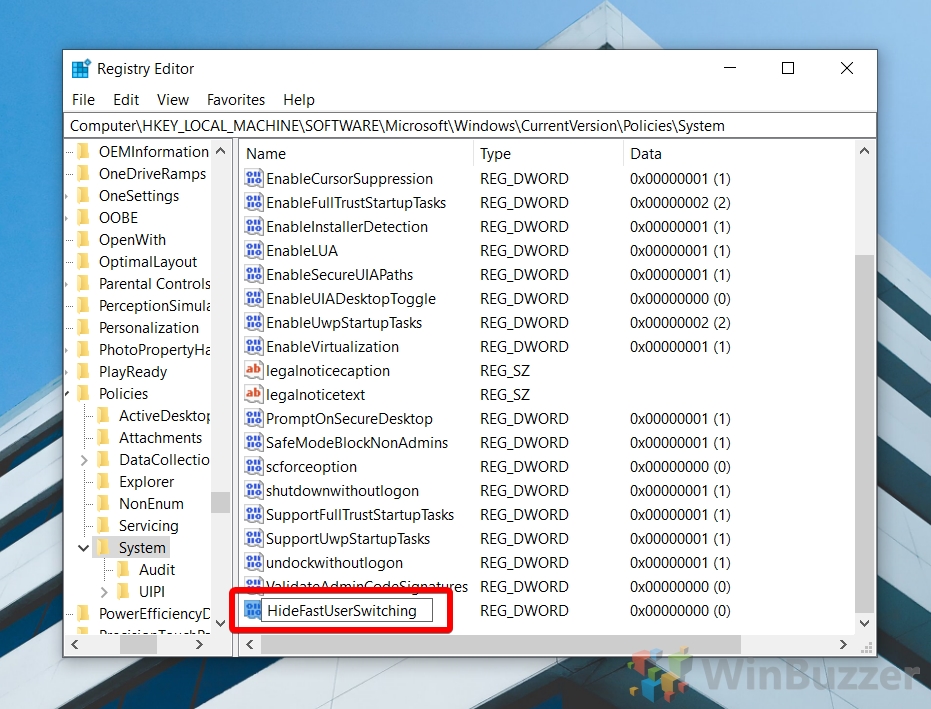
- Enable or disable fast user switching for all users
Double-click your new DWORD and change the value data to “1” to hide the switch user option, or “0” to force it to display. Restart your PC or the Explorer process.
How to Enable or Disable Switch User in Windows 10 via CMD
Alternatively, you can use a series of combined commands in Command Prompt to delete or add the relevant registry keys, then restart Explorer.exe so you can apply the changes without a restart.
- Open Command Prompt
Press the “Windows” key, type cmd, and then click “Run as Admin” next to the Command Prompt entry.

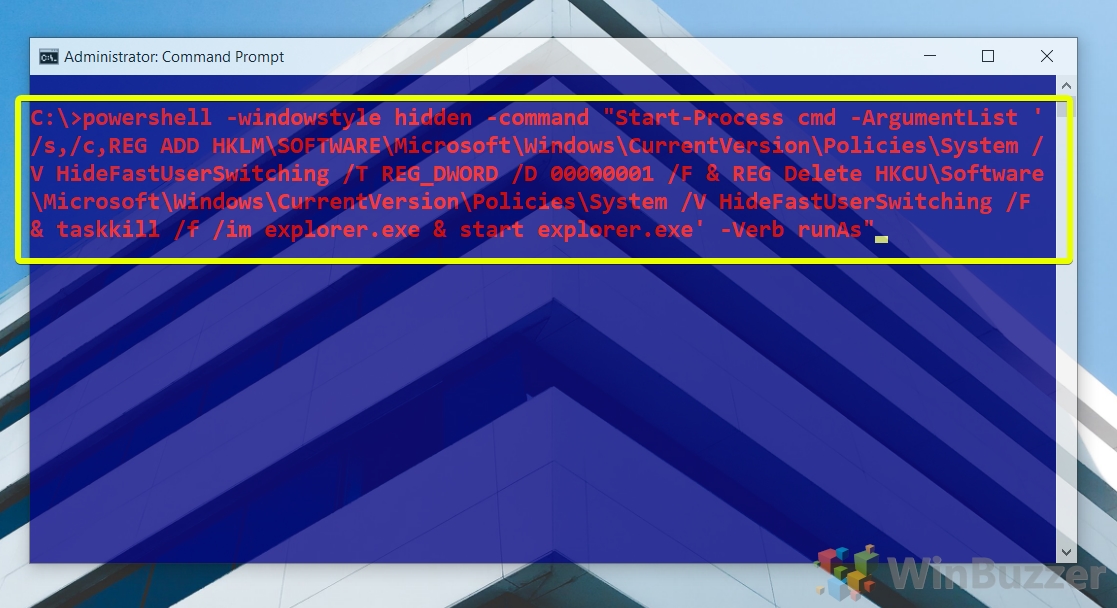
- Enter the enable or disable switch user menu command
To disable the fast user switching interface, paste the following command by copying it and then right-clicking in CMD. Then, press “Enter”.
powershell -windowstyle hidden -command "Start-Process cmd -ArgumentList '/s,/c,REG ADD HKLM\SOFTWARE\Microsoft\Windows\CurrentVersion\Policies\System /V HideFastUserSwitching /T REG_DWORD /D 00000001 /F & REG Delete HKCU\Software\Microsoft\Windows\CurrentVersion\Policies\System /V HideFastUserSwitching /F & taskkill /f /im explorer.exe & start explorer.exe' -Verb runAs"
To enable it, copy the following command, right-click to paste into CMD, then press “Enter”.powershell -windowstyle hidden -command "Start-Process cmd -ArgumentList '/s,/c,REG Delete HKLM\SOFTWARE\Microsoft\Windows\CurrentVersion\Policies\System /V HideFastUserSwitching /F & REG Delete HKCU\Software\Microsoft\Windows\CurrentVersion\Policies\System /V HideFastUserSwitching /F & taskkill /f /im explorer.exe & start explorer.exe' -Verb runAs"
FAQ – Frequently Asked Questions About Fast User Switching
Can I use Fast User Switching with both Microsoft and local user accounts?
Fast User Switching is compatible with both Microsoft and local user accounts in Windows 10 and Windows 11. This feature allows any user logged into the computer to switch to another account without logging off, preserving the state of their open applications and files. This seamless transition facilitates multiple users to share a single device while maintaining their individual workspaces and settings.
How does Fast User Switching affect running applications on other user profiles?
When Fast User Switching is utilized, applications and processes initiated by a user continue to run in the background even after switching to another account. This means that any program, file, or task that was left open or running will remain active, consuming CPU, RAM, and other system resources. While this allows for a quick switch back to the original session without losing progress, it can lead to increased memory usage and potentially slow down the system, especially if resource-intensive applications are left running.
Is Fast User Switching available on all versions of Windows 10 and 11?
Fast User Switching is a feature available across various editions of Windows 10 and Windows 11, including Home, Pro, and Enterprise. However, the methods to enable or disable this feature can differ based on the edition. For instance, the Group Policy Editor, a tool used to disable or enable Fast User Switching, is not available in the Home edition of Windows 10. Users of the Home edition need to resort to Registry modifications to manage this feature or use this workaround to access Group Policies.
What’s the difference between logging off and switching users with Fast User Switching?
Logging off a user account closes all open applications and files, effectively ending the session and freeing up system resources. In contrast, Fast User Switching allows users to leave their applications open and switch to another user account without logging off. This maintains the session in the background, keeping all programs and tasks active. While Fast User Switching offers convenience for multiple users sharing a computer, it can lead to increased resource consumption compared to logging off, which resets the session’s resource usage.
Can Fast User Switching be enabled or disabled from the Windows Control Panel?
Direct management of Fast User Switching settings through the Windows Control Panel is not typically available. Instead, these settings are adjusted through the Local Group Policy Editor or the Windows Registry Editor. The Control Panel primarily offers user account management functionalities, such as creating or modifying user accounts, but does not provide options to manage Fast User Switching directly.
Does enabling or disabling Fast User Switching require administrative privileges?
Modifying the settings for Fast User Switching, whether through the Local Group Policy Editor or the Windows Registry, requires administrative privileges. This is because such changes affect the system’s operation and can impact all users on the computer. Users without administrative rights will not be able to make these changes to ensure system security and integrity.
How can I troubleshoot issues with Fast User Switching not working as expected?
Troubleshooting Fast User Switching issues involves several steps: First, ensure your system is up to date with the latest Windows updates, as patches and fixes are regularly released. Check for any applied Group Policies or Registry settings that might be interfering with Fast User Switching. Running a system file checker scan (sfc /scannow in the Command Prompt) can help identify and fix corrupted system files. Additionally, consider scanning for malware or software conflicts that might affect user account functionalities. If the issue persists, creating a new user account and transferring data might be a last resort to circumvent the problem.
Can Fast User Switching be configured to automatically log off inactive users?
Windows does not natively support automatically logging off users based on inactivity within the Fast User Switching context. However, third-party software solutions or custom scripts can be developed to monitor user activity and log off users after a defined period of inactivity. These solutions would need to be carefully tested to ensure they do not inadvertently disrupt user work.
Will disabling Fast User Switching improve my system’s security?
Disabling Fast User Switching can enhance system security by reducing the attack surface for potential unauthorized access and ensuring that sessions are fully terminated when a user finishes their work. It compels users to log off, thereby closing all applications and clearing temporary data from the system’s memory. This can be particularly beneficial in environments where sensitive information is accessed, ensuring that data is not inadvertently left accessible in a background session.
How do I know if Fast User Switching is causing performance issues on my PC?
To determine if Fast User Switching is impacting system performance, monitor the system’s resource usage through the Task Manager. If you notice significant CPU, memory, or disk usage attributed to applications or processes from other user profiles, Fast User Switching might be contributing to the slowdown. Performance issues might be more noticeable on systems with limited resources or when multiple users have resource-intensive applications running simultaneously.
Is there a way to limit the number of users that can use Fast User Switching?
Windows does not provide a built-in feature to directly limit the number of users that can utilize Fast User Switching. However, administrators can indirectly control this by managing user account permissions, ensuring only authorized users have active accounts or the ability to log in. For tighter control, especially in organizational environments, administrators might implement custom scripts or use third-party management tools to enforce specific user access policies.
Does Fast User Switching work if I’m connected to a domain?
Fast User Switching is generally supported in domain-connected environments, allowing users to switch between domain and local accounts. However, domain administrators can enforce policies that restrict or disable this feature for security or resource management reasons. It’s essential to consult with your IT department or domain administrator to understand how Fast User Switching is managed in your specific environment.
Can changes to Fast User Switching settings be reverted?
Any modifications made to enable or disable Fast User Switching through the Group Policy Editor or Registry Editor can be reverted by following the same procedures and selecting the opposite settings. It’s crucial to document changes and understand the implications before making adjustments, as reverting settings can sometimes require specific steps, especially if changes were made through the Registry.
How does Fast User Switching interact with screen savers or lock screens?
Screen savers and lock screens operate on a per-session basis in a Fast User Switching environment. This means that initiating a screen saver or lock screen in one user session does not affect other active sessions. Each user can configure their screen saver or lock screen settings independently, and these settings are preserved when switching between users.
If Fast User Switching is disabled, how can another user access the PC without logging off the current user?
If Fast User Switching is disabled, the current user must either log off or lock their session to allow another user to log in. Locking the session keeps the current user’s applications and files open in the background, while presenting the login screen for another user to sign in. This approach maintains some level of convenience for multiple users sharing a computer, though it does not offer the same seamless experience as Fast User Switching.
Extra: How to Enable or Disable Secure Sign-in with Ctrl+Alt+Del
Hackers are getting more and more creative, but one method of compromising a Windows account has been around for many years. Attackers with physical or remote access to your PC can replace the sign-in screen with a fake one, capturing your password and potentially compromising your entire Microsoft account. A feature called Secure Sign-in is designed to stop this, typically accessed with the hotkey Ctrl + Alt + Del. In our other guide, we show you how to turn Windows Secure Sign-in via Ctrl+Alt+Del on or off to save you some keystrokes or protect against fake login screens.

Extra: How to Add a User Account on Windows 11
Creating a new user account on Windows 11, whether it’s a local account or a Microsoft account, can enhance your computing experience by offering a more personalized, secure, and organized usage. In our other guide, we show you how to create user accounts in Windows 11, both local or linked to a Microsoft account, how to convert normal users into administrators, how to change user names, and more.

Extra: How to Change a Normal User to Administrator in Windows
Windows has two general account types, the “Standard” user, who gains access to a selected number of features and functions, and the “Administrator”, who can perform more advanced tasks such as app installation, global settings changes, and command execution. In our other guide, we show you how to make an existing user administrator in Windows 11 or Windows 10 via Settings, netplwiz, Command Prompt, and more.