
Windows 10 has various backup methods in place, including saving an image of your entire system and making your own custom recovery partition. However, many of these methods are storage-intensive tasks and aren’t much good for smaller changes to files. For that, there’s Windows 10 file history, a useful tool if you’ve accidentally overwritten a document or damaged it in some other way, or have broken an OS.
What is Windows 10 File History? Windows file history vs backup and restore
File History is a Windows 10 back up feature that saves each version of files in the Documents, Pictures, Videos, Desktop, and Offline OneDrive folders. Though its name implies a primary focus on version control, you can actually use it as a fully-fledged backup tool for your important documents.
Unlike Windows 10 Backup and Restore, file history is not designed to create full system backups. This is by design.
Windows 10 File History automatically saves the latest version of all your documents, and it can do so to an external or network-connected drive. This means that if anything were to happen to your PC, you would still have a safe version of your photos, videos, and more.
However, it’s worth noting that the feature only keeps five editions, or versions, of each file. If you change a file more than five times, the original version will be gone forever. As a result, if you want to save the state of your files at a certain point in time, you’re better off taking a system image.
To make a File History backup on Windows, you need an external drive or network drive. Today, we’re going to show you how to restore previous versions of a file in Windows 10 with File History, and how to turn it on if it isn’t enabled already. We’ll also cover how to exclude folders from File History and how to change how often Windows saves copies of files.
How to Restore a File with Windows File History
- After selecting your file, press the “History” button in the File Explorer ribbon
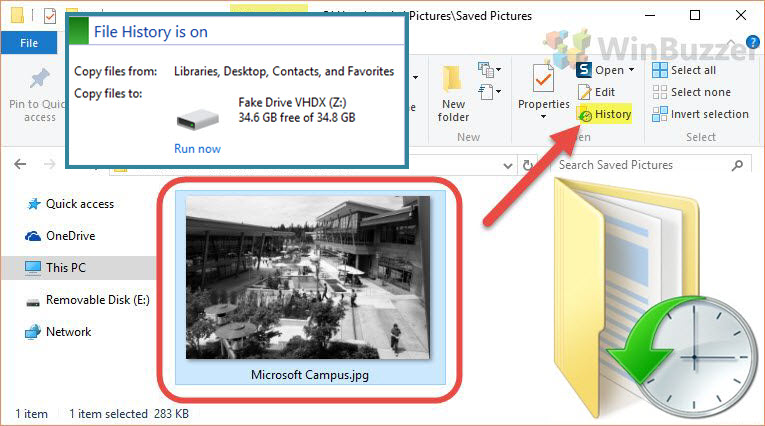
- Select the version of the file you wish to keep
Windows will show the versions of a file it has saved and ask you which files you want to keep. You can also choose to keep both versions, in which case a file will be restored with a (1) next to its name. Click “Continue” once you’re done.
How to Enable Windows 10 File History
Windows File History is not running automatically in Windows 10 and Microsoft unfortunately prefers to point users towards OneDrive for backing up Windows-Documents. Thankfully, it isn’t too hard to how to turn on file history in Windows 10.
.
- Open Windows 10 File History from the start menu
Press the “Start” button or click on the search bar on your taskbar and type “File History”. Click the first result, which should say “Control panel” beneath it.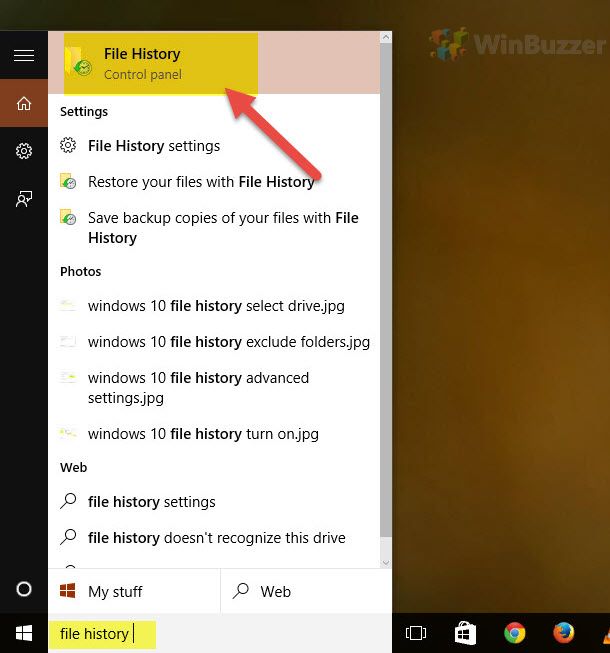
- Turn on Windows 10 File History
If you have a single extra hard drive with plenty of free space, all you’ll need to do is click “Turn on” underneath the file history dialog. If you’re using a virtual hard disk on your OS drive (not recommended), you can choose it via the “Select drive” dialog. If you prefer the new Windows settings interface, you can also enable it there, under the “Backup” sub-heading. You can get all the same choices by clicking “More options”.
How to Exclude Folders from Windows 10 File History
Though File History only performs a Windows 10 backup of your user folder by default, it’s likely there are some places you won’t want to save. The downloads folder, for example, is often filled with junk like old installers that you’d be happy to be rid of. The OS lets you exclude non-critical folders to save on backup space.
- Open the “Exclude folders” sub-menu

- Add the folders to Windows 10 File History’s exclusion list
In the next window, press the “Add” button and navigate to the folder you don’t want to include. Once you’re done, select “Save changes”.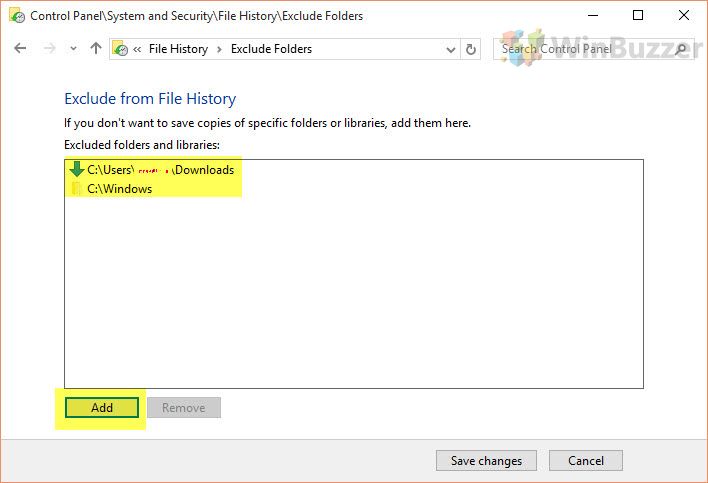
How to Change How Often Windows 10 File History Makes Backups
You can also determine how often File History makes a backup on Windows. Setting it to check less frequently can save a minor amount of resources, while making it check more often can save your skin.
- Open the “Advanced settings” interface
Back in File History’s left sidebar, click “Advanced Settings”. - Change Windows 10 File History’s backup frequency
Under the “Versions” subheading, look for the drop-down next to “Save copies of files:” and switch it to suit your preference. For full security in your data, we recommend “Every 10 minutes”. Under “Keep saved versions”, you can also determine how long the backups will be kept for, with “Forever” being the most secure setting.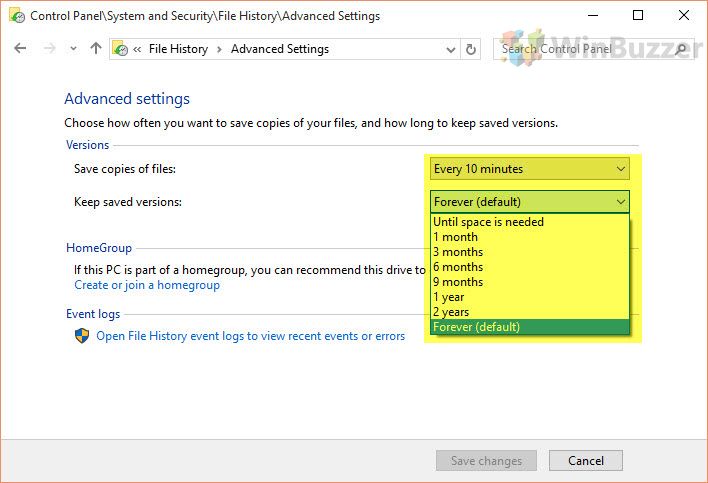
Last Updated on January 29, 2021 11:58 am CET by Markus Kasanmascheff


