Though you may not realize it, Windows does a lot in the background to ensure that your PC continues to run smoothly. One of these components is the Windows 10 automatic maintenance tool, which periodically runs scans on your PC and makes changes to keep it healthy.
How does Windows maintenance work?
As well as checking security settings and for malware, Windows 10 maintenance tools make sure Windows and its applications are up to date. However, some users find this scan isn’t completing often enough.
By default, Windows 10 tries to schedule maintenance when it predicts you won’t be using the PC (2 am), but postpones it for a later date if it detects user activity. As a result, Windows 10 system maintenance could fail to complete if you’re a night owl or have your time zone set to a different location.
If Windows maintenance is in progress and you interrupt it before a task can complete, it will set a deadline for its completion. If it misses the deadline, it will try to finish it during the next window, in which cast the Windows 10 maintenance tools may run for longer than an hour. Miss it again, and the user will be prompted to initiate the task manually.
If you’re running into such notification a lot, it may be smart to change your Windows maintenance schedule. This tutorial will cover how to use the Windows 10 maintenance software, including changing the Windows maintenance schedule via the Control Panel or Regedit. If you don’t like the idea of Windows automatically waking up your PC, we’ll also show you how to disable that feature.
How to Change the Windows 10 Automatic Maintenance Schedule via Control Panel
Windows maintenance is still hidden away in the legacy security and maintenance control panel, as it’s one of the few features that hasn’t been ported to the new settings apps. Even so, this is the simplest way to adjust it.
- Open Control Panel via the Start Menu
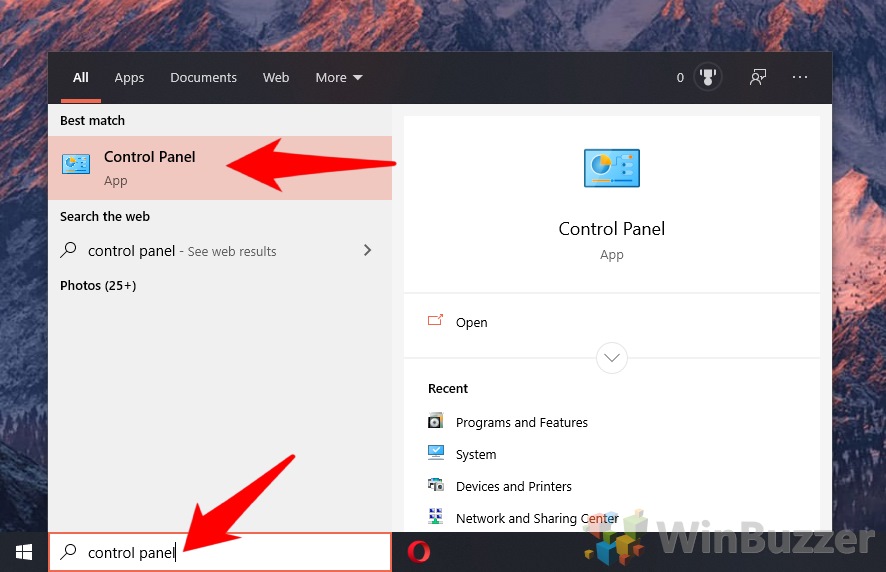
Press “Start” and type “Control Panel”, clicking the first result.
- Switch to small Control Panel icons
In the Windows 10 Control Panel, find the ‘View by:’ heading and change “Category” to “Small icons”.
- Open the Security and Maintenance control panel
- Change your Windows maintenance settings
In the security and maintenance control panel, click on “Change maintenance settings” to begin the process to adjust your schedule. If a session is currently running, you’ll see a ‘maintenance in progress’ heading instead. Stop the maintenance and continue as usual.
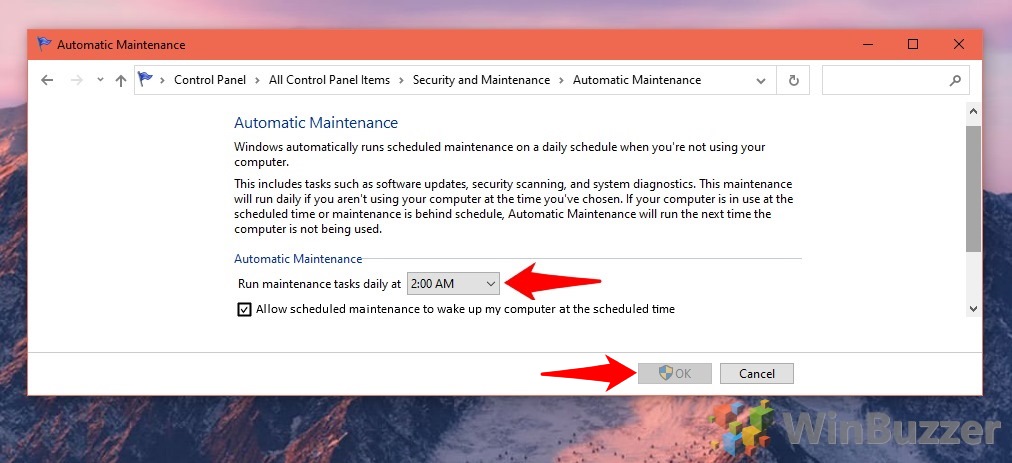
- Use the Windows 10 maintenance tools to change your Automatic Maintenance Schedule
Under the subheading “Automatic Maintenance”, look for “Run maintenance tasks daily at” Change the drop-down from 3:00 AM to the time of your choice and click “OK”. Accept the UAC prompt if required.
How to Change Windows 10 Maintenance Settings with Regedit
Though the Control Panel is the most user-friendly method, you can adjust Windows 10 automatic maintenance times faster via the Registry Editor. Just be sure to follow our best practices.
- Open Regedit
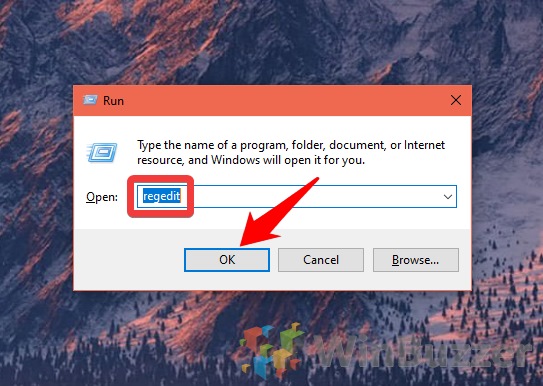
Press “Windows + R” and type “regedit” Press “OK” to open it.
- Go to the Maintenance Schedule Registry key and Add a New String Value
Navigate toComputer\HKEY_LOCAL_MACHINESOFTWARE\Microsoft\Windows NT\CurrentVersion\Schedule\Maintenanceand right-click the empty white space in the right-hand window. Select “New > String Value”.
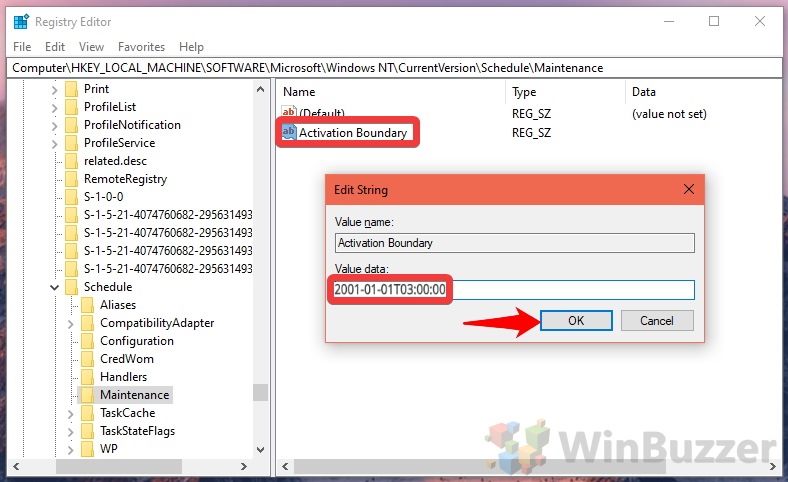
- Name the Windows maintenance DWORD “Activation Boundary” and add value data
In the “Value name:” filed, enter “Activation Boundary” and set the “Value data” as the time of your choice:Time Date Value 12:00 AM 2001-01-01T00:00:00 1:00 AM 2001-01-01T01:00:00 2:00 AM – default 2001-01-01T02:00:00 3:00 AM 2001-01-01T03:00:00 4:00 AM 2001-01-01T04:00:00 5:00 AM 2001-01-01T05:00:00 6:00 AM 2001-01-01T06:00:00 7:00 AM 2001-01-01T07:00:00 8:00 AM 2001-01-01T08:00:00 9:00 AM 2001-01-01T09:00:00 10:00 AM 2001-01-01T10:00:00 11:00 AM 2001-01-01T11:00:00 12:00 PM 2001-01-01T12:00:00 1:00 PM 2001-01-01T13:00:00 2:00 PM 2001-01-01T14:00:00 3:00 PM 2001-01-01T15:00:00 4:00 PM 2001-01-01T16:00:00 5:00 PM 2001-01-01T17:00:00 6:00 PM 2001-01-01T18:00:00 7:00 PM 2001-01-01T19:00:00 8:00 PM 2001-01-01T20:00:00 9:00 PM 2001-01-01T21:00:00 10:00 PM 2001-01-01T22:00:00 11:00 PM 2001-01-01T23:00:00
How to Turn off Automatic Maintenance Wakeup with Regedit
By default, the Windows 10 maintenance tools automatically wake your PC to perform your tasks, even if you’re sleeping. If you find that a bit creepy, it’s possible to turn it off.
- Open Regedit
- Add a New DWORD to the Schedule Maintenance key
Navigate toComputer\HKEY_LOCAL_MACHINE\SOFTWARE\Microsoft\Windows NT\CurrentVersion\Schedule\Maintenanceand right-click the blank space in the main panel. Choose “New > DWORD (32-bit)”.
- Name the maintenance Registry DWORD “WakeUp” and modify value data
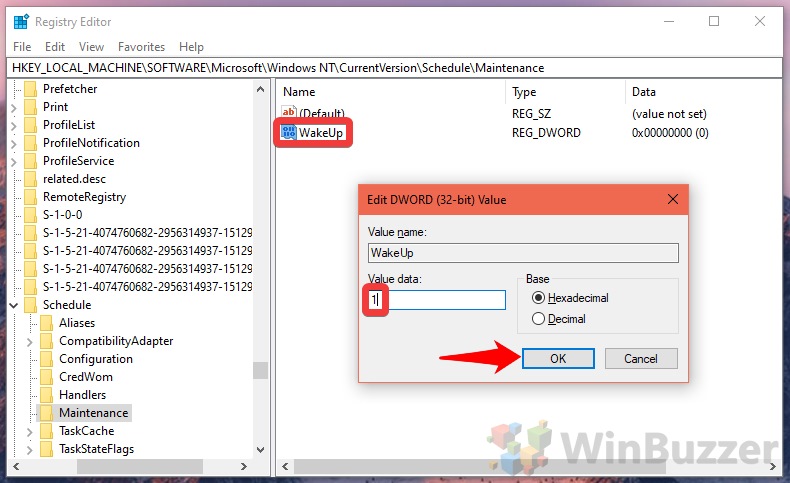
Under “Value name”, enter exactly “WakeUp”, and type “1” in the “Value data:” field. Click “OK”.

